The feeling is a common one: setting a passphrase on an SSH key is the right thing to do for security, but it feels inconvenient. Forgetting the passphrase is a real risk, and an unencrypted key file feels like leaving a door unlocked. The good news is that for anyone using a Mac, there is a perfect solution built right into the operating system that offers strong security without the daily inconvenience.
This solution is the macOS Keychain. By integrating SSH with Keychain Access, it is possible to have a key that is encrypted on the disk with a strong passphrase, but which does not require typing that passphrase for every single use. Let's explore how this works.

The Problem: Security vs. Convenience
First, let's be clear: an SSH key should always have a passphrase. A private key file is just that---a file. If a computer is compromised and an attacker copies the ~/.ssh directory, an unencrypted private key gives them immediate access to every server that trusts that key.
A passphrase encrypts the private key file itself. Even if an attacker steals the file, they cannot use it without first cracking the passphrase. This is a critical layer of security.
However, this security comes at the cost of convenience. Typing a long, complex passphrase every time a connection is made to a server or a git push is performed can be very tedious. This is the exact problem that the macOS Keychain integration is designed to solve.
The Solution: macOS Keychain Integration
Keychain Access is the built-in password management system in macOS. It securely stores all kinds of secrets, from Wi-Fi passwords to application credentials. Modern versions of OpenSSH, the standard SSH tool included with macOS, can communicate directly with the Keychain.
The workflow is simple:
- A user creates an SSH key with a strong passphrase.
- The user tells the SSH client to store this passphrase in the Keychain.
- The first time the key is used, macOS will ask for the passphrase and offer to save it.
- On all future uses, the SSH agent will automatically and securely retrieve the passphrase from the Keychain to unlock the key.
The user only needs to unlock their Keychain, which happens automatically when they log into their Mac. For extra security, the Keychain can even be configured to require Touch ID or an Apple Watch for access.
How to Set It Up
Setting this up is surprisingly simple and involves just two steps.
First, ensure there is an SSH key with a passphrase. If a new one is needed, it can be created with this command. It is important to enter a secure passphrase when prompted.
ssh-keygen -t ed25519 -C "your_email@example.com"
ssh-add --apple-use-keychain ~/.ssh/id_ed25519
Second, create or edit the SSH configuration file at ~/.ssh/config. This file controls the behavior of the SSH client. Add the following lines to it:
Host *
  AddKeysToAgent yes
  UseKeychain yes
  IdentityFile ~/.ssh/id_ed25519
Let's break down what these lines do:
Host *: This means the settings will apply to all hosts that are connected to.AddKeysToAgent yes: This tells the SSH client to automatically add the key to the runningssh-agent.UseKeychain yes: This is the key instruction. It tells SSH on macOS to store and retrieve the key's passphrase from the Keychain.IdentityFile ~/.ssh/id_ed25519: This specifies the default key to use.
That's it. The next time a connection is made using this key (e.g., ssh user@server), a dialog box will appear asking for the passphrase. After entering it, there will be an option to save it to the Keychain. Once saved, it will never be asked for again in that login session.
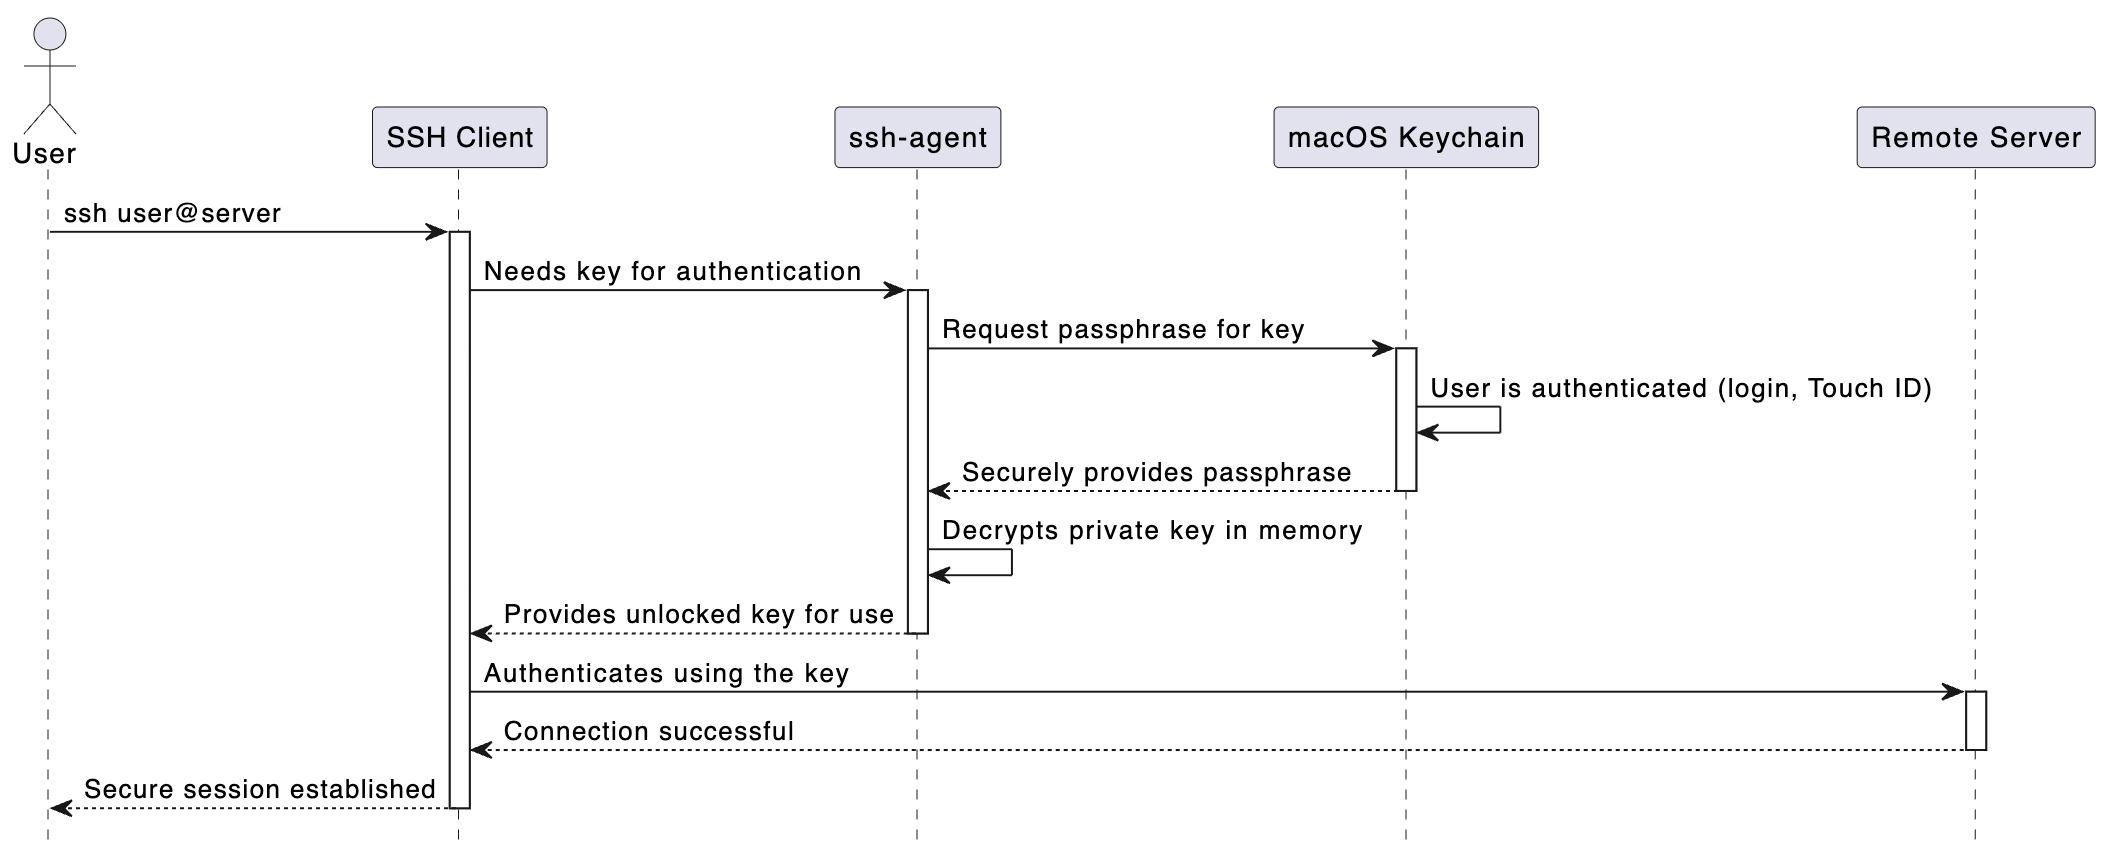
The Secure Workflow in Action
Here is a diagram that shows what happens behind the scenes when a user connects to a server with this setup.
Conclusion
It is not necessary to choose between security and convenience when it comes to SSH keys on a Mac. By using a passphrase-protected key and enabling Keychain integration, everyone can have the best of both worlds. The key remains safely encrypted on the disk, protected from theft, while daily use becomes seamless and free of password prompts. This simple configuration is one of the most effective ways to improve both security and quality of life for any developer or system administrator working on macOS.