Web服务
Web服务和HTTP协议
Internet 因特网
因特网是"Internet"的中文译名,它起源于美国的五角大楼,它的前身是美国国防部高级研究计划局(ARPA)主持研制的ARPAnet。20世纪50年代末,正处于冷战时期。当时美国军方为了自己的计算机网络在受到袭击时,即使部分网络被摧毁,其余部分仍然能保持通信联系,便由美国国防部的高级研究计划局(ARPA)建设了一个军用网,叫做"阿帕网(ARPAnet)"。
因特网始于1969年的美国,首先用于军事连接,后将美国西南部的加利福尼亚大学洛杉矶分校、斯坦福大学研究学院、UCSB(加利福尼亚大学)和犹他州大学的四台主要的计算机连接起来。这个协定由马萨诸塞州剑桥的BBN科技参与执行,BBN构建了IMP(接口信息处理机),那是一种定制的霍尼韦尔小型机(Honeywell DDP-516 Minicomputer)。在经过BBN对软件设计,路由,流量控制及网络控制的设计和构建后,它们被分配到各个站点充当接入ARPANET的网关。BBN在1969年8月30号到年底间陆续制造了4台IMP,并开始联机。
另一个推动 Internet 发展的广域网是NSF网,它最初是由美国国家科学基金会资助建设的,目的是连接全美的5个超级计算机中心,供100多所美国大学共享它们的资源。NSF网也采用 TCP/IP协议,且与Internet 相连。
ARPA网和NSF网最初都是为科研服务的,其主要目的为用户提供共享大型主机的宝贵资源。随着接入主机数量的增加,越来越多的人把Internet作为通信和交流的工具。一些公司还陆续在Internet上开展了商业活动。随着Internet的商业化,其在通信、信息检索、客户服务等方面的巨大潜力被挖掘出来,使Internet有了质的飞跃,并最终走向全球。
Internet 和中国
北京时间 1987 年 9 月 14 日,物理研究员钱天白 建立起一个网络节点,通过电话拨号连接到国际互联网,向他的德国朋友发出来自中国的第一封电子邮件:Across the Great Wall we can reach everycorner in the world,自此,中国与国际计算机网络开始连接在一起。
1990 年 10 月,钱天白教授代表中国正式在国际互联网络信息中心的前身 DDN-NIC 注册登记了我国的顶级域名 CN,并且从此开通了使用中国顶级域名 CN 的国际电子邮件服务。由于当时中国尚未正式连入Internet,所以委托德国卡尔斯鲁厄大学运行 CN 域名服务器。
1993 年 3 月 2 日,中国科学院高能物理研究所租用 AT&T(美国电话电报)公司的国际卫星信道接入美国斯坦福线性加速器中心(SLAC)的 64K 专线正式开通,专线开通后,美国政府以 Internet 上有许多科技信息和其他各种资源,不能让社会主义国家接入为由,只允许这条专线进入美国能源网而不能连接到其他地方。尽管如此,这条专线仍是我国部分接入 Internet 的第一根专线。
1994 年 4 月 20 日,中国通过一条 64K 的国际专线全功能接入国际互联网,成为国际互联网大家庭中的第 77 个成员,正式开启了互联网时代。随后,中科院高能物理研究所推出第一个 WWW 网站和第一套网页。
1994 年 5 月 21 日,在钱天白教授和德国卡尔斯鲁厄大学的协助下,中国科学院计算机网络信息中心完成了中国国家顶级域名 CN 服务器的设置,改变了中国 CN 顶级域名服务器一直放在国外的历史。1995 年 5 月 17 日,第 27 个世界电信日,邮电部正式宣布,向国内社会开放计算机互联网接入服务。
HTTP超文本传输协议
HTTP相关概念
互联网 :是网络的网络,是所有类型网络的母集。
因特网 :世界上最大的互联网网络。即因特网概念从属于互联网概念。习惯上大家连接在因特网的计算机都称为主机。
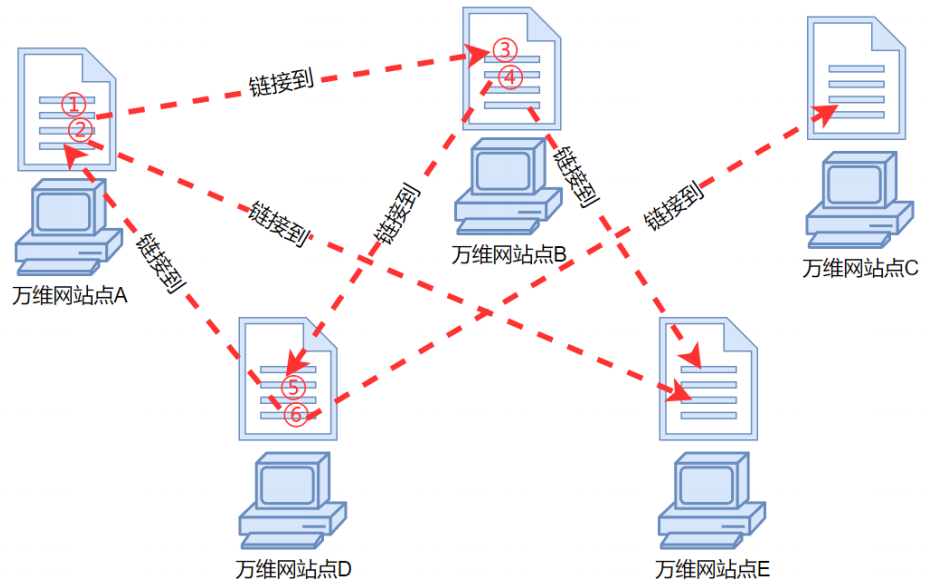
万维网 :WWW(world wide web)。万维网并非某种特殊的计算机网络,是一个大规模的、联机式的信息贮藏库,使用链接的方法能非常方便地从因特网上的一个站点访问另一个站点(超链接技术),具有提供分布式服务 的特点。万维网是一个分布式的超媒体系统 ,是超文本系统的扩充,基于 B/S 架构 实现。
URL(Uniform Resource Locator)万维网使用统一资源定位符来标志万维网上的各种文档,并使每个文档在整个因特网的范围内具有唯一的标识符 URL。
HTTP(HyperText Transfer Protocol)即超文本传送协议。HTTP是处于应用层的协议,使用 TCP 传输层协议进行可靠的传送。因此,需要特别提醒的是,万维网是基于因特网的一种广泛因特网应用系统,且万维网采用的是 HTTP(80/TCP)和 HTTPS(443/TCP)的传输协议,但因特网还有其他的网络应用系统(如:FTP、SMTP等)。
HTML(HyperText Markup Language)万维网使用超文本标记语言,使得万维网页面的设计者可以很方便地使用链接从页面的某处链接到因特网的任何一个万维网页面,并且能够在自己的主机屏幕上将这些页面显示出来。HTML 与 TXT 一样,仅仅是一种文档,不同之处在于:这种文档传供于浏览器上为浏览器用户提供统一的界面呈现的统一规约。且具备结构化的特征,这是 TXT 所不具备的强制规定。
HTTP通信协议
HTTP(HyperText Transfer Protocol,超文本传输协议)是一种用于分布式、协作式的超媒体信息系统的应用层协议。HTTP 是万维网的数据通信的基础设计,最初的目的是为了提供一种远距离共享知识的方式,借助多文档进行关联从而实现超文本,连成相互参阅的 WWW(world wide web,万维网)。HTTP 的发展是由蒂姆▪伯纳斯▪李(Tim Berners-Lee)于1989 年在欧洲核子研究组织(CERN)所发起。HTTP 的标准制定由万维网协会(World Wide Web Consortium,W3C)和互联网工程任务组(Internet Enginering Task Force,IETF)进行协调,最终发布了一系列的 RFC,其中最著名的是 1999年 6 月公布的 RFC 2616,定义了 HTTP 协议中现今广泛使用的一个版本------HTTP1.1 版本。
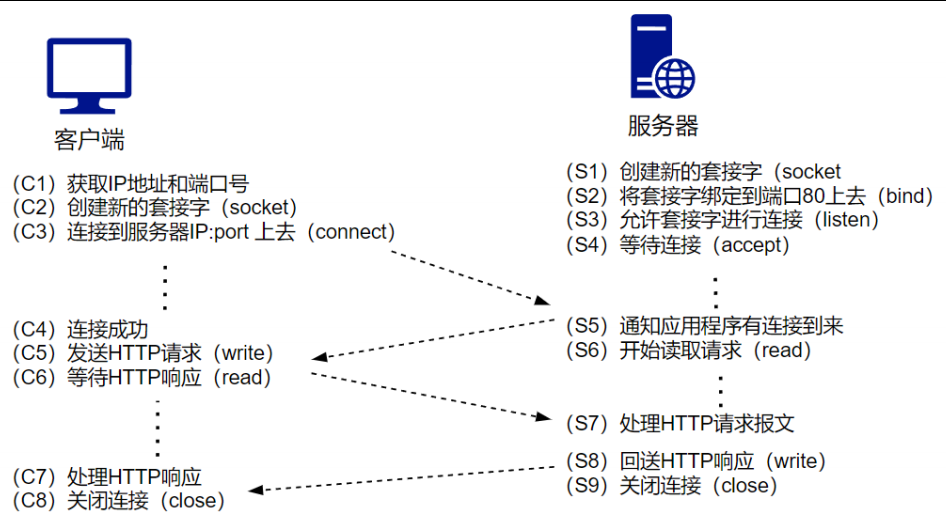
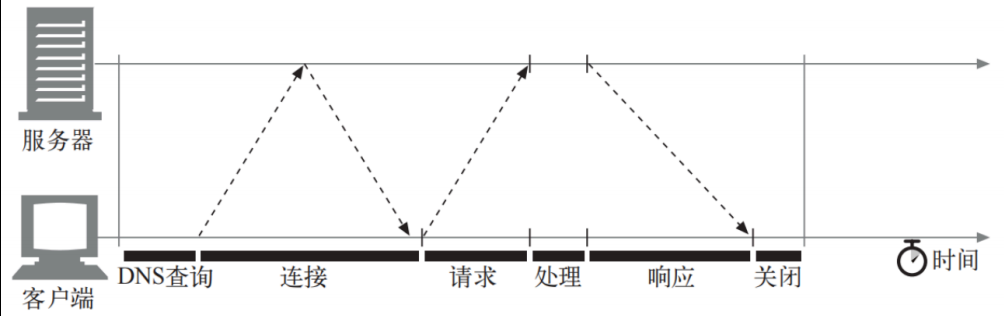
HTTP 服务通信过程:
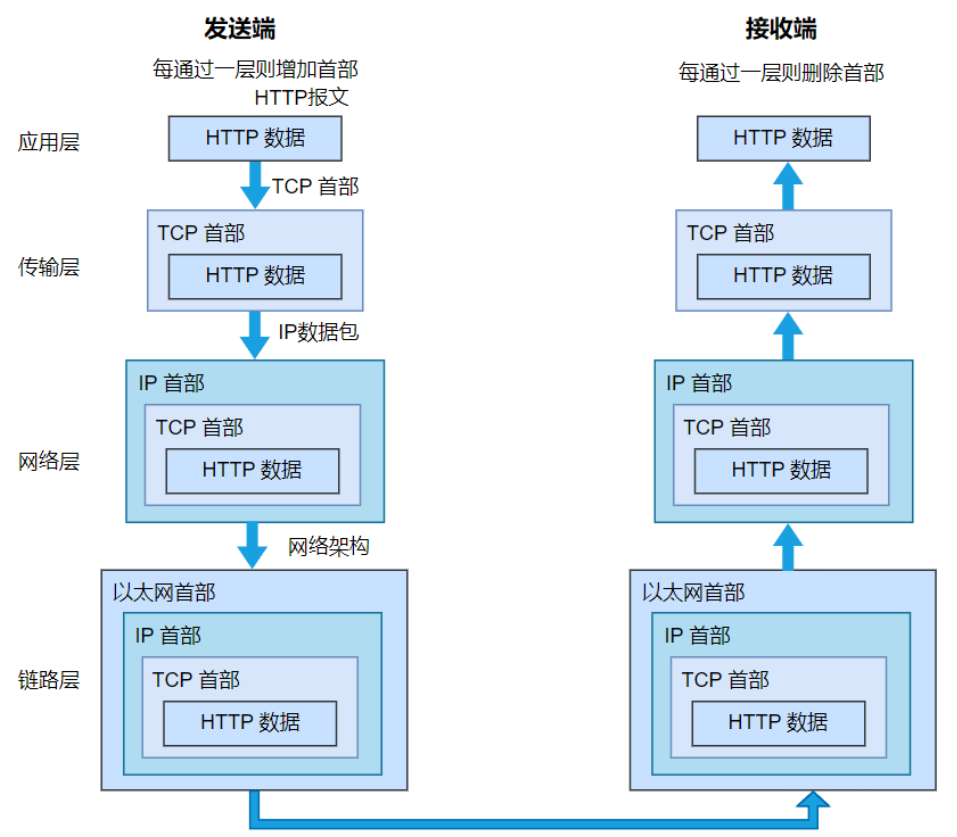
HTTP协议分层:
HTTP相关技术
1.3.3.1 Web开发语言
http:Hyper Text Transfer Protocol ,应用层协议,默认端口:80/tcp
web前端开发语言:
- html
- css
- javascript
1.3.3.2 MIME
MIME :Multipurpose Internet Mail Extensions,多用途因特网邮件扩展。
文件:/etc/mime.types,来自于 mailcap 包
MIME格式:type/subtype txt html jpg bmp,如:
cmd
text/plain txt asc text pm el conf log
text/html html htm
text/css
image/jpeg jpg jpeg
image/png
video/mp4
application/javascrip
1.3.3.3 URI和URL
URI:Uniform Resource Identifier,统一资源标识,分为 URL 和 URN。
URN:Uniform Resource Naming,统一资源命名。如 P2P 下载使用的磁力链接就是 URN 的一种实
现:
cmd
magnet:?xt=urn:btih:2d2a66e12ec4f61a5a8f5e8fdfed89d2f70859fbURL:Uniform Resource Locator,统一资源定位符,用于描述某服务特定资源位置。
两者区别:URN 如同一个人的名称,而 URL 代表一个人的住址。换言之,URN 定义某事物的身份,而
URL 提供查询该事物的方法。
URL组成:

html
<scheme>://<user>:<password>@<host>:<port>/<path>;<params>?<query>#<frag>
css
scheme:方案,访问服务器以获取资源时要使用哪种协议
user:用户,某些方案访问资源时需要的用户名
password:密码,用户对应的密码,中间用冒号(:)分隔
Host:主机,资源宿主服务器的主机名或IP地址
Port:端口,资源宿主服务器正在监听的端口号,很多方案有默认端口号
path:路径,服务器资源的本地名,由一个/将其与前面的URL组件分隔
params:参数,指定输入的参数,参数为名/值对,多个参数用逗号(,)分隔
query:查询,传递参数给程序,如数据库,用?分隔,多个查询用&分隔
frag:片段,一小片或一部分资源的名字,此组件在客户端使用,用#分隔URL示例:

1.3.3.4 网站访问量
网站访问量统计的重要指标
- IP:即 Internet Protocol,指独立IP数,一天内来自相同客户机 IP 地址只计算一次,记录远程客户机 IP 地址的计算机访问网络的次数,是衡量网站流量的重要指标。
- PV:即 Page View,页面浏览量或点击量,用户每次刷新被计算一次,PV 反映的是浏览某网站的页面数, PV 与来访者的数量成正比,PV 并不是页面的来访者数量,而是网站被访问的页面数量。
- UV:即 Unique Visitor,访问网站的一台电脑为一个访客。一天内相同的客户端只被计算一次。可以理解成访问某网站的电脑的数量。网站判断来访电脑的身份是通过 coolies 实现的。如果更换了IP 后但不清楚 Cookies,再访问相同的网站,该网站的统计中 UV 数不变。
HTTP工作机制
一次http事务包括:
- http请求:http request
- http响应:http response
Web资源:web resource,一个网页由多个资源(文件)构成,打开一个页面,通常会有多个资源展示出来,但是每个资源都要单独请求。因此,一个 Web 页面通常并不是单个资源,而是一组资源的集合。
资源类型:
静态文件:无需服务端做出额外处理,服务器端和客户端的文件内容相同。
常见文件后缀:.html、.txt、.jpg、.js、.css、.mp3、.avi 等
动态文件:服务端执行程序,返回执行的结果,服务端和客户端的文件内容不相同。
常见文件后缀:.php、.jsp、.asp、.py、.go 等
HTTP连接请求:
HTTP协议版本
1.3.5.1 HTTP 1.x协议
http/0.9
1991,原型版本,功能简陋,只有一个命令 GET。GET /index.html,服务器只能回应 HTML 格式字符串,不能回应别的格式。
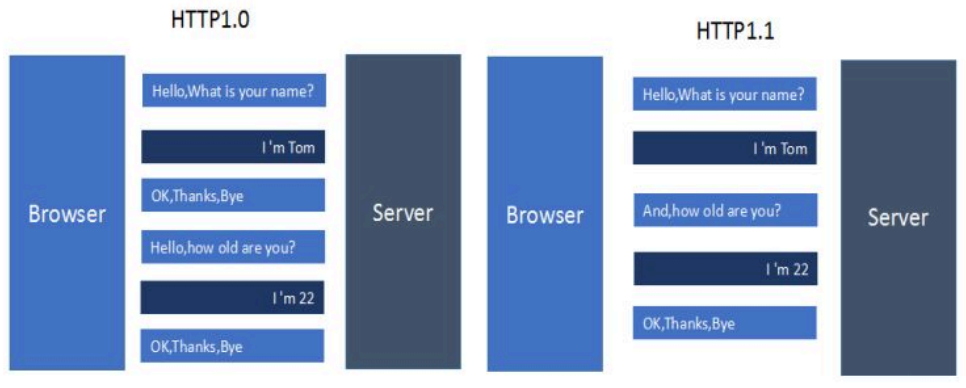
http/1.0
1996 年 5 月,支持 cache,MIME,method
每个 TCP 连接只能发送一个请求,发送数据完毕,连接就关闭,如果还要请求其他资源,就必须再新建一个连接。引入 POST 命令和 HEAD 命令,头信息是 ASCII 码,后面数据可为任何格式。服务器回应时会告诉客户端,数据是什么格式,即 Content-Type 字段的作用。这些数据类型总称为 MIME(多用途互联网邮件扩展),每个值包括一级类型和二级类型,预定义的类型,也可以自定义类型。常见 ContentType 值有:text/html、image/jpge、audio/mp3 等。
http/1.1
1997 年 1 月,引入持久连接(persistent connection),即 TCP 连接默认不关闭,可以被多个请求复用,不用声明 Connection: keep-alive。对于同一个域名,大多数浏览器允许同时建立 6 个持久连接。同时还引入了管道机制,即在同一个 TCP 连接中,客户端可以同时发送多个请求,进一步改进了 HTTP协议的效率。
新增方法:PUT、PATCH、OPTIONS、DELETE
同一个 TCP 连接里,所有的数据通信是按次序进行的。服务器只能顺序处理回应,前面的回应慢,会有许多请求排队,造成"队头堵塞(Head-of-line Blocking)"。为避免上述问题,有两种方法:一是减少请求数;二是同时多开持久连接。
网页优化技巧,如合并脚本和样式表、将图片嵌入 CSS 代码、域名分片(domain sharding)等。
HTTP 协议不带有状态,每次请求都必须附上所有信息。请求的很多字段都是重复的,浪费带宽,影响速
度。
1.3.5.2 HTTP 2.0协议
SPDY协议
SPDY:2009 年谷歌研发,综合 HTTPS 和 HTTP 两者优点于一体的传输协议,主要特点:
- 降低延迟:针对 HTTP 高延迟的问题,SPDY 优雅的采用了多路复用(Multiplexing)。多路复用通过多个请求 stream 共享一个 tcp 连接的方式,解决了 Head-of-line blocking 的问题,降低了延迟同时提高了带宽的利用率。
- 请求优先级(Request Prioritization):多路复用带来一个新的问题是:在连接共享的基础上有可能会导致关键请求被阻塞。SPDY 允许给每个 request 设置优先级,重要的请求会优先得到响应。比如浏览器加载首页。
- Header压缩:HTTP 1.x 的 header 很多时候都是重复多余的,选择合适的压缩算法可以减少包的大小和数量。
- 基于HTTPS的加密协议传输,大大提高了传输数据的可靠性。
- 服务端推送(Server push),采用了 SPDY 的网页,如网页有一个 style.css 的请求,在客户端收到 style.css 数据的同时,服务端会将 style.js 的文件推送给客户端,当客户端再次尝试获取 style.js时就可以直接从缓存中获取到,不用再发请求了。
HTTP2协议
http/2.0:2015年发布,HTTP2.0是 SPDY 的升级版
- 头信息和数据体都是二进制,称为头信息帧和数据帧
- 复用TCP连接,在一个连接里,客户端和浏览器都可以同时发送多个请求和响应,且不用按顺序响应,避免了"队头堵塞",此双向的实时通信称为多工(Multiplexing)
- 引入头信息压缩机制(Header Compression),头信息使用 gzip 或 compress 压缩后再发送;客户端和服务器同时维护一张头信息表,所有字段都会存入这个表,生成一个索引号,不发送同样字段,只发送索引号,提高速度。
- HTTP/2 允许服务器有新数据时未经请求,主动向客户端发送资源,而无需客户端拉取,即服务器推送。
HTTP2.0和SPDY区别
- HTTP2.0 支持明文 HTTP 传输,而 SPDY 强制使用 HTTPS
- HTTP2.0 消息头的压缩算法采用 HPACK,而 SPDY 采用 DEFLATE
HTTP请求访问的完整过程
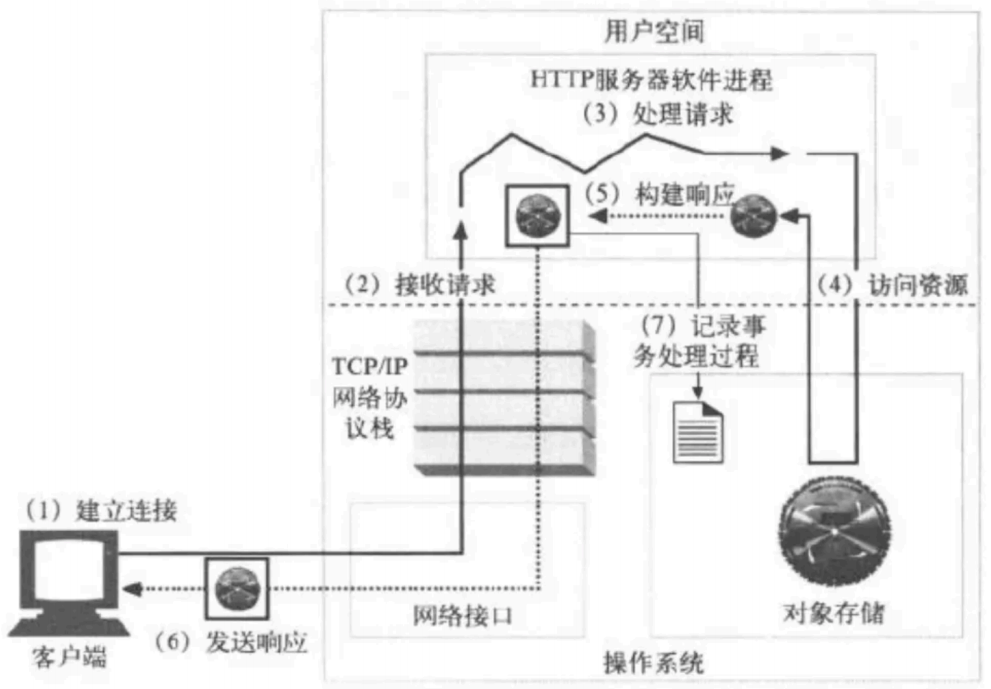
一次完整的 http 请求处理过程:
-
建立连接:接收或拒绝连接请求
-
接收请求:接收客户端请求报文中对某资源的一次请求的过程
-
处理请求:服务器对请求报文进行解析,并获取请求的资源及请求方法等相关信息,根据方法、资源、首部和可选的主体部分对请求进行处理。常用请求Method:GET、POST、HEAD、PUT、DELETE、TRACE、OPTIONS
-
访问资源:服务器获取请求报文中请求的资源web服务器,即存放了web资源的服务器,负责向请求者提供对方请求的静态资源,或动态运行后生成的资源
-
构建响应报文:
一旦Web服务器识别除了资源,就执行请求方法中描述的动作,并返回响应报文。响应报文中 包含有响应状态码、响应首部,如果生成了响应主体的话,还包括响应主体
1)响应实体:如果事务处理产生了响应主体,就将内容放在响应报文中回送过去。响应报文中通常包括:
- 描述了响应主体MIME类型的Content-Type首部
- 描述了响应主体长度的Content-Length
- 实际报文的主体内容
2)URL重定向:web服务构建的响应并非客户端请求的资源,而是资源另外一个访问路径。
3)MIME类型:Web服务器要负责确定响应主体的MIME类型。多种配置服务器的方法可将MIME类型与资源管理起来。
- 魔法分类:Apache web服务器可以扫描每个资源的内容,并将其与一个已知模式表(被称为魔法文件)进行匹配,以决定每个文件的MIME类型。这样做可能比较慢,但很方便,尤其是文件没有标准扩展名时。
- 显式分类:可以对Web服务器进行配置,使其不考虑文件的扩展名或内容,强制特定文件或目录内容拥有某个MIME类型。
- 类型协商:有些Web服务器经过配置,可以以多种文档格式来存储资源。在这种情况下,可以配置Web服务器,使其可以通过与用户的协商来决定使用哪种格式(及相关的MIME类型)最好"。
-
发送响应报文:
Web服务器通过连接发送数据时也会面临与接收数据一样的问题。服务器可能有很多条到各个客户端的连接,有些是空闲的,有些在向服务器发送数据,还有一些在向客户端回送响应数据。服务器要记录连接的状态,还要特别注意对持久连接的处理。对非持久连接而言,服务器应该在发送了整条报文之后,关闭自己这一端的连接。对持久连接来说,连接可能仍保持打开状态,在这种情况下,服务器要正确地计算Content-Length首部,不然客户端就无法知道响应什么时候结束。
-
记录日志:
最后,当事务结束时,Web服务器会在日志文件中添加一个条目,来描述已执行的事务。
HTTP协议报文头部结构
http协议:http/0.9,http/1.0,http/1.1,http/2.0
http协议:stateless 无状态,服务器无法持续追踪访问者来源。
解决http协议无状态方法:
- cookie 客户端存放
- session 服务端存放
http事务:一次访问的过程
- 请求:request
- 响应:response
http报文结构:
协议查看或分析的工具:tcpdump,wireshark,tshark。
HTTP请求报文
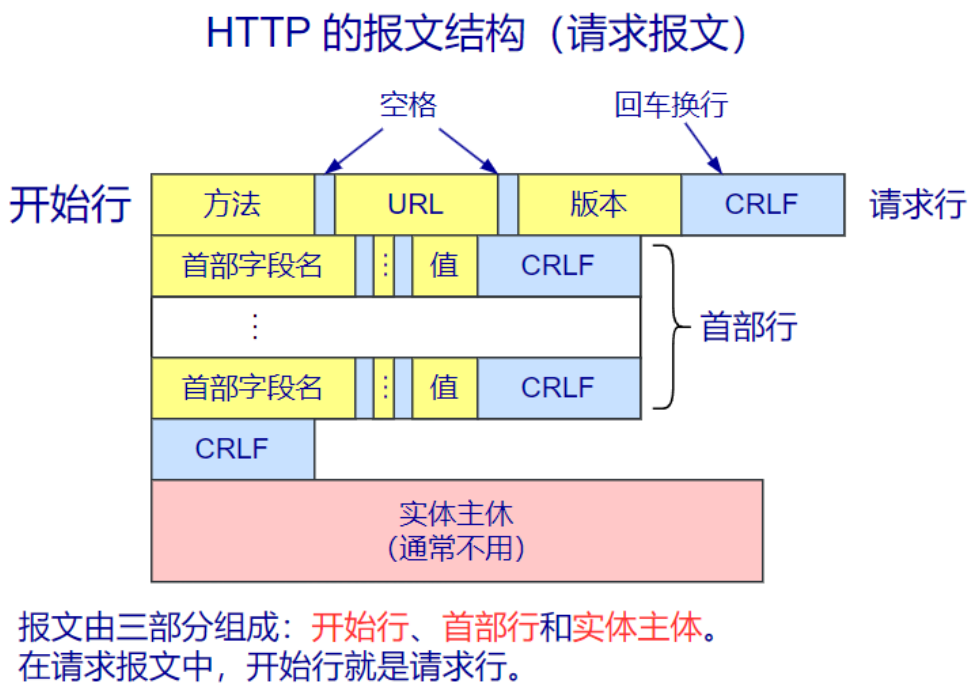
request 报文格式:
html
<method> <request-URL> <version>
<headers>
<entity-body>
示例:
css
GET / HTTP/1.1
Accept: */*
Accept-Encoding: gzip, deflate
Connection: keep-alive
Host: www.baidu.com
User-Agent: Httpie/0.94
请求字段说明:
- Host :客户端端请求的域名。
- Connection :告诉服务端,处理完本请求后,是否关闭连接。
- User-Agent :客户端使用的浏览器或APP 类型/版本。
- Accept :客户端支持哪些类型的文档。
- Accept-Encoding :客户端支持的编码类型。
- Accept-Language :客户端支持的语言类型。
- Referer :客户端从哪个网页过来的。
- Cache-Control :指定缓存机制。
在 linux 中可以通过如下命令来查看:
cmd
curl -v http://www.baidu.comHTTP响应报文
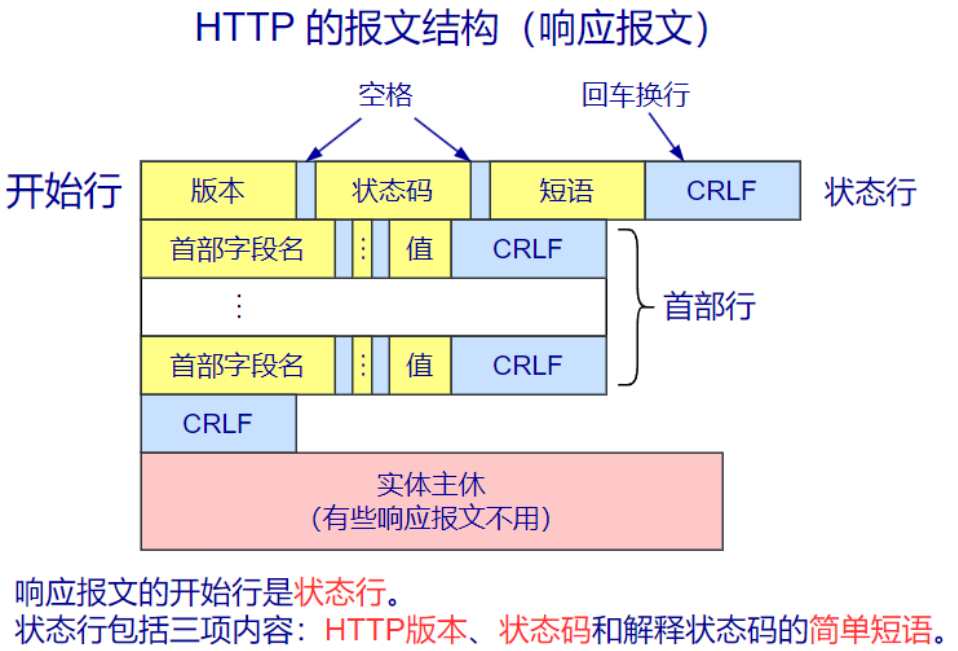
response 报文格式:
css
<version> <status> <reason-phrase>
<headers>
<entity-body>
示例:
css
HTTP/1.1 200 OK
Cache-Control: max-age=3, must-revalidate
Connection: keep-alive
Content-Encoding: gzip
Content-Type: text/html; charset=UTF-8
Date: Thu, 07 Nov 2023 03:44:14 GMT
Server: Tengine
Transfer-Encoding: chunked
Vary: Accept-Encoding, Cookie
响应字段说明:
- Allow :表明服务器支持哪些请求方法,如GET,POST 等。
- Content-Encoding :响应内容编码方法。
- Content-Type :响应内容属于什么MIME 类型。
- Content-Length :响应内容的长度。
- Date :当前GMT 时间。
- Expiress :响应内容过期时间,过期后将不再缓存内容。
- Last-Modified :文档的最后改动时间。
- Location :告诉客户端到哪里获取文档,一般用于重定向。
- Refresh :浏览器在多少秒后刷新文档。
- Server :服务器名字。
- Set-Cookie :设置和页面关联的Cookie。
- Date :表示消息发送时间。
Tip
在 Linux 中可以使用 curl -I 域名 的方式来查看。
HTTP报文格式详解
1.4.3.1 Method方法
请求方法,标明客户端希望服务器对资源执行的动作,包括如下:
- GET:从服务器获取一个资源
- HEAD:只从服务器获取文件的响应首部
- POST:向服务器输入数据,通常会再由网关程序继续处理
- PUT:将请求的主体部分存储在服务器中,如上传文件
- DELETE:请求删除服务器上指定的文档
- TRACE:追踪请求到达服务器中间经过的代理服务器
- OPTIONS:请求服务器返回对指定资源支持使用的请求方法
- CONNECT:建立一个到由目标资源标识的服务器的隧道
- PATCH:用于对资源应用部分修改
1.4.3.2 version版本
http
HTTP/<major>-<minor>范例:
http
HTTP/1.11.4.3.3 status状态码
服务器在向客户端返回内容时,会带有一个 HTTP Status Code (状态码),用于告诉客户端的返回状态。
HTTP 状态码分为 5 种类型,由三个十进制数字组成。第一个数字( 1-5 )代表状态码的分类,后两位是其含义。
| 状态码类型 | 含义 |
|---|---|
| 1xx | 表明服务器已经收到请求 |
| 2xx | 表明服务器已经成功接收并处理请求 |
| 3xx | 表明请求的资源已重定向到其它地方 |
| 4xx | 表明客户端的请求有错误 |
| 5xx | 表明服务端出现错误 |
常见状态码:
| 状态码 | 描述 | 含义 |
|---|---|---|
| 100 | Continue | 客户端应继续其请求 |
| 200 | OK | 请求成功,一般用于 GET 与 POST 请求 |
| 301 | Moved Permanently | 请求的资源已被永久重定向到新地址 |
| 302 | Found | 请求的资源已被临时重定向到新地址 |
| 304 | Not Modified | 客户端访问的内容未修改,应从缓存中获取内容 |
| 400 | Bad Request | 客户端的请求有误 |
| 401 | Unauthorized | 请求要求客户端进行身份认证 |
| 403 | Forbidden | 服务端拒绝客户端访问 |
| 404 | Not Found | 客户端请求的资源服务端不存在 |
| 405 | Method Not Allowed | 客户端请求的方法被禁止 |
| 500 | Internal Server Error | 服务器内部错误 |
| 501 | Not Implemented | 服务器不支持该请求 |
| 502 | Bad Gateway | 服务器宕机 |
| 503 | Service Unavailable | 服务器过载,暂时不可用 |
| 505 | Http Version not suppored | 客户端使用的 HTTP 版本,服务端不支持 |
1.4.3.4 reason-phrase原因短语
状态码所标记的状态的简要描述
1.4.3.5 headers首部字段头
首部字段包含的信息最为丰富,首部字段同时存在于请求和响应报文内,并涵盖 HTTP 报文相关的内容信息。使用首部字段是为了给客户端和服务器提供报文主体大小、所使用的语言、认证信息等内容。
首部字段是由首部字段名 和字段值构成的,中间用冒号(:)分隔的字段值对应,即 key/value 键/值对。
单个 HTTP 首部字段可以有多个值。
1.4.3.6 entity-body实体
请求时附加的数据或响应时附加的数据。例如,登录网站时的用户名和密码,博客的上传文章,论坛上的发言等。
Web相关工具
links
格式:
css
links [options]... [URL]...
常用选项:
-dump:非交互模式,显示输出结果
-source:打印源码
wget
格式:
bash
wget [OPTION]... [URL]...
常用选项:
# 启动
-V,-version:显示wget版本后退出
-h,-help:打印语法帮助
-b,-background:启动后转入后台执行
-e,-execute=COMMAND:执行`.wgetc '格式的命令,wgetrc格式参见 /etc/wgetc或
~/.wgetrc'`
#记录和输入文件
-o,-output-file=FILE:把记录写入到 File文件中
-a,-append-output=FILE:把记录追加到 FILE 文件中
-d,-debug:打印调试输出
-q,-quit:安静模式(没有输出)
-v,-verbose:冗长模式(缺省设置)
-nv,-non-verbose:关掉冗长模式,但不是安静模式
-i,-input-file=FILE:下载在FILE文件中出现的URLS
-F,-force-html:把输入文件当作 HTML 格式文件对待
-B,-base=URL:将URL作为在 -F,-i参数指定的文件中出现的相对链接的前缀
-sslcertfile=FILE:可选客户端证书
-sslcertkey=KEYFILE:可行客户端证书KEYFILE
-egd-file=FILE:指定EGD socket的文件名
# 下载
-bind-address=ADDRESS:指定本地使用地址
-t,-tries=NUMBER:设定最大尝试链接次数(0 表示无限制)
-O,-output-document=FILE:把文档写入到 FILE 文件中
-nc,-no-clobber:不要覆盖存在的文件或使用.
#前缀
-c,-continue:接着下载没下载完的文件
-progress=TYPE:设置进程标记
-N,-timestamping:不要重新下载文件除非比本地文件新
-S,-server-response:打印服务器的回应
-spider:不下载任何东西
-T,-timeout=SECONDS:设定响应时的秒数
-w,-wait=SECONDS:两次尝试之间间隔SECONDS秒
-waitretry=SECONDS:在重新链接之间等待1..SECONDS秒
-random-wait:在下载之间等待0..2*WAIT秒
-Y,-proxy=on/off:打开或关闭代理
-Q,-quota=NUMBER:设置下载的容量限制
-limit-rate=RATE:限定下载输率
# 目录
-nd,-no-director-ies:不创建目录
-x,-force-directories:强制创建目录
-nH,-no-host-directories:不创建主机目录
-P,-directory-prefix=PREFIX:将文件保存目录 PREFIX/...
-cut-dirs=NUMBER:忽略 NUMBER 层远程目录
# HTTP选项
-http-user=USER:设置HTTP用户名为USER
-http-passwd=PASS:设置HTTP密码为PASS
-C,-cache=on/off:允许/不允许服务端的数据缓存(一般情况下允许)
-E,-html-extension:将所有text/html 文件以 .html 扩展名保存
-ignore-length:忽悠`Content-Type头域`
-headers=STRING:在 headers中插入字符串STRING
-proxy-user=USER:设置代理用户名为USER
-proxy-passwd=PASS:设置代理密码为 PASS
-referer=URL:在 HTTP 请求中包含 `Referer: URL 头`
-s,-save-headers:保存HTTP头到文件
-u,-user-agent=AGENT:设定代理的名称为AGENT而不是WGET/VERSION
-no-http-keep-alive:关闭HTTP活动链接
-cookies=off:不使用cookies
-load-cookies=FILE:在开始会话前从文件 FILE 中加载cookie
-save-cookie=FILE:在会话结束后将cookies保存到 FILE
# FTP 选项
-nr,-dont-remove-listing:不移走.listing 文件
-g,-glob=on/off:打开或关闭文件名为globbing机制
-passive-ftp:使用被动传输模式(缺省值)
-active-ftp:使用主动模式
-retr-symlinks:在递归时将链接指向文件而不是目录
# 递归下载
-r,-recursive:递归下载
-l,-level=NUMBER:最大递归深度(inf或0代表无穷)
-delete-after:在现在完毕后局部删除文件
-k,convert-links:转换非相对链接为相对链接
-R,-backup-converted:在转换文件X之前,将之备份为x.orig
-m,-mirror:等价于 -r -N -l inf -nr
-p,-page-requisties:下载显示HTML文件的所有图片
# 递归下载中包含和不包含
-A,-accept=LIST:分号分隔的被接受扩展名的列表
-R,-reject=LIST:分号分隔的被拒绝扩展名的列表
-D,-domains=LIST:分号分隔的被接受域的列表
-exclude-domains=LIST:分号分隔的不被接受域的列表
-follow-ftp:跟踪HTML文档中的FTP链接
-follow-tags=LIST:分号分隔的被跟踪的HTML标签列表
-G,-ignore-tags=LIST:分号分隔的被忽略的HTML标签列表
-H,-span-hosts:当递归时转到外部主机
-L,-relative:仅仅跟踪相对链接
-I,-include-directories=LIST:允许目录的列表
-X,-exclude-directories=LIST:不被包含目录的列表
-np,-no-parent:不要追溯到父目录
curl
curl是基于 URL 语法在命令行方式下工作的传输工具,它支持 FTP、FTPS、HTTP、HTTPS、GOPHER、TELNET、DICT、FILE及LDAP等协议。curl 支持 HTTPS 认证,并且支持 HTTP 的 POST、PUT 等方法,FTP 上传,kerberos 认证,HTTP 上传,代理服务器,cookies,用户名密码认证,下载文件断点续传,上载文件断点续传,http代理服务器管道,还支持 ipv6,socks5代理服务器,通过 http 代理服务器上传文件到 FTP 服务器等,功能十分强大。
格式:
css
curl [options] [URL]...
常见选项:
-A/--user-agent <string>:设置用户代理发送给服务器
-e/--referer <URL>:来源网址
--cacert <file>:CA证书(SSL)
-k/--insecure:允许忽略证书进行 SSL 连接
--compressed:要求返回是压缩的格式
-H/--header "key:value":自定义首部字段传递给服务器
-i:显示页面内容,包括报文首部信息
-I/--head:只显示响应报文首部信息
-D/--dump-header <file>:将 url 的header信息存放在指定文件中
--basic:使用HTTP基本认证
-u/--user <user [:password]>:设置服务器的用户和密码
-L:如果有3xx响应码,重新发请求到新位置
-O:使用URL中默认的文件名保存文件到本地
-o <file>:将网络文件保存为指定的文件中
--limit-rate <rate>:设置传输速度
-0/--http1.0:数字0,使用 HTTP 1.0
-v/--verbose:更详细
-C:选项可对文件使用断点续传功能
-c/--cookie-jar <file name>:将url中cookie存放在指定文件中
-x/--proxy <proxyhost [:port]>:指定代理服务器地址
-U/--proxy-user <user:password>:代理服务器用户和密码
-T:选项可将指定的本地文件上传到 FTP 服务器上
-d/--data:方式指定使用POST方式传递数据
-s --silent:静默模式
-b name=data:从服务器响应set-cookie得到值,返回给服务器
-w <format>:显示相应的指定的报文信息,如:%{http_code},%{remote_ip}等
范例:
bash
curl -I http://www.163.com
curl -Iv -A ie10 http://www.163.com
curl -H "user-agent: firefox" 192.168.100.8
# 判断网站是否正常
if [ "$(curl -sL -w '%{http_code}' http://www.baidu.com -o /dev/null)" =
"200" ]; then
echo "Success"
else
echo "Fail"
fi
# 或者
if curl -sL --fail http://www.baidu.com -o /dev/null; then
echo Success
else
echo Fail
fi
# 利用curl获取响应码和远程主机IP
curl -s -I -m10 -o /dev/null -w %{http_code} http://www.baidu.com
200
curl -s -I -m10 -o /dev/null -w %{remote_ip} http://www.baidu.com
58.87.87.99
curl -s -I -m10 -o /dev/null -w %{local_ip} http://www.baidu.com
curl -s -I -m10 -o /dev/null -w %{local_port} http://www.baidu.com
curl -s -I -m10 -o /dev/null -w %{remote_port} http://www.baidu.com
Web服务介绍
Netcraft 公司于 1994 年底在英国成立,多年来一直致力于互联网市场以及在线安全方面的咨询服务,
其中在国际上最具影响力的当属其针对网站服务器、域名解析/主机提供商,以及SSL市场所做的客观严
谨的分析研究。
https://www.netcraft.com/blog/february-2024-web-server-survey/
Apache 经典的Web服务端
Apache起初由美国的伊利诺大学香槟分校的国家超级计算机应用中心开发,目前经历了两大版本,分别是1.x和2.x,其可以通过编译安装实现特定的功能。官方网站:http://www.apache.org
MPM(multi-processing module)三种工作模式。
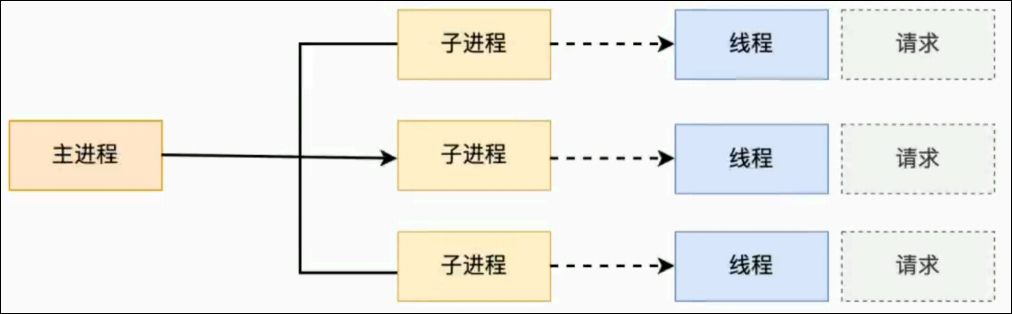
Apache prefork模型
预派生模式,有一个主控制进程,然后生成多个子进程,每个子进程有一个独立的线程响应用户请求,相对比较占用内存,但是比较稳定,可以设置最大和最小进程数,是最古老的一种模式,也是最稳定的模式,适用于访问量不是很大的场景。
优点:稳定。
缺点:每个用户请求需要对应开启一个进程,占用资源较多,并发性差,不适用于高并发场景。
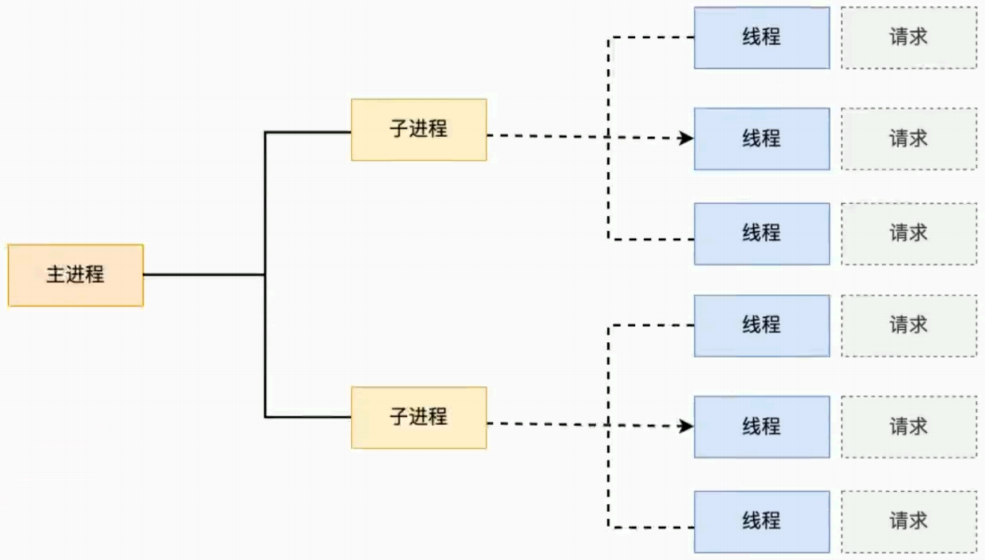
Apache worker模型
一种多进程和多线程混合的模型,有一个控制进程,启动多个子进程,每个子进程里面包含固定的线程,使用线程来处理请求,当线程不够使用时会再启动一个新的子进程,然后在进程里面再启动线程处理请求,由于其使用了线程处理请求,因此可以承受更高的并发。
优点:相对prefork占用内存较少,可以同时处理更多请求。
缺点:敷衍keepalive的长连接方式,某个线程会一直被占据,即使没有传输数据,也需要一直等待到超时才会被释放。如果过多线程被这样占据,也会导致在高并发场景下的无服务线程可用。
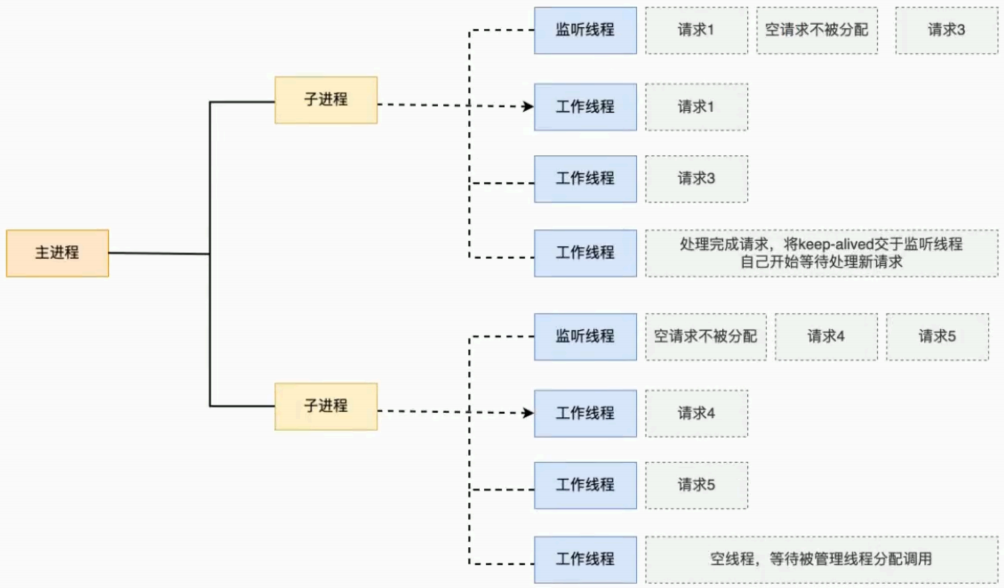
Apache event模型
Apache 中最新的模式,2012 年发布的 apache 2.4.x 系列正式支持 event 模型,属于事件驱动模型(epoll),每个进程响应多个请求,在现在版本里已经是稳定可用的模式。它和 worker 模式很像,最大的区别在于,它解决了 keepalive 场景下,长期被占用的线程的资源浪费问题。event MPM 中,会有一个专门的线程来管理这些 keepalive 类型的线程,当有真实请求过来时,将请求传递给服务线程,执行完毕后,又允许它释放。这样增强了高并发场景下的请求处理能力。
优点:单线程响应多请求,占据更少的内存,高并发下表现更优秀。
缺点:没有线程安全控制。
Nginx 高性能的 Web 服务端
Nginx 是由俄罗斯国立莫斯科鲍曼科技大学在 1994 年毕业的学生为俄罗斯 rambler.ru 公司开发的,开发工作最早从 2002 年开始,第一次公开发布时间是 2004 年 10 月 4 日,版本号是 0.1.0。
2019 年 3 月 11 日 F5 与 Nginx 达成协议,F5 将收购 Nginx 的所有已发行股票,总价值约为 6.7 亿美元,约合人民币 44.97 亿,而 Nginx 核心模块代码长度 198430(包括空格和注释),所以一行代码约为 2.2 万人民币。
官网地址:https://nginx.org/
Nginx 历练十几年的迭代更新,目前功能已经非常完善且运行稳定,分为社区版和商业版。另外 Nginx的社区版分为开发版(奇数)、最新稳定版(偶数)和过期版。Nginx 以功能丰富 著称,它即可以作为 http 服务器 ,也可以作为反向代理服务器 或者邮件服务器 。能够快速的响应静态网页的请求 ,支持FastCGI/SSL/Virtual Host/URL Rwrite/Gzip/HTTP Basic Auth/http 或者 TCP 的负载均衡等功能,并且支持第三方的功能扩展。
天猫、淘宝、京东、小米、163、新浪等一线互联网公司都在用 Nginx 或者进行二次开发。
基于 Nginx 的工作场景:
Nginx架构和安装
Nginx概述
Nginx介绍
Nginx(engine x),2002 年开发,分为社区版和商业版(nginx plus)。
2019 年3 月 15 日 F5 Networks 6.7 亿美元的价格收购。
nginx是免费的、开源的、高性能的 HTTP 和反向代理服务器、邮件代理服务器、以及 TCP/UDP 代理服务器。
nginx其他二次发行版:
- Tengine:由淘宝网发起的 Web 服务器项目,它在 Nginx 的基础上,针对大访问量的需求,添加了很多高级功能和特性。Tenginx 的性能和稳定性已经在大型的网站如淘宝网、天猫商城等得到了很好的检验。它的最终目标是打造一个高效、稳定、安全、易用的 Web 平台。从 2011 年 12 月开始,Tengine 成为一个开源项目。官网:http://tengine.taobao.org/
- OpenResty:基于Nginx与Lua语言的高性能Web平台,章亦春团队开发。官网:http://openresy.org/cn/
Nginx功能介绍
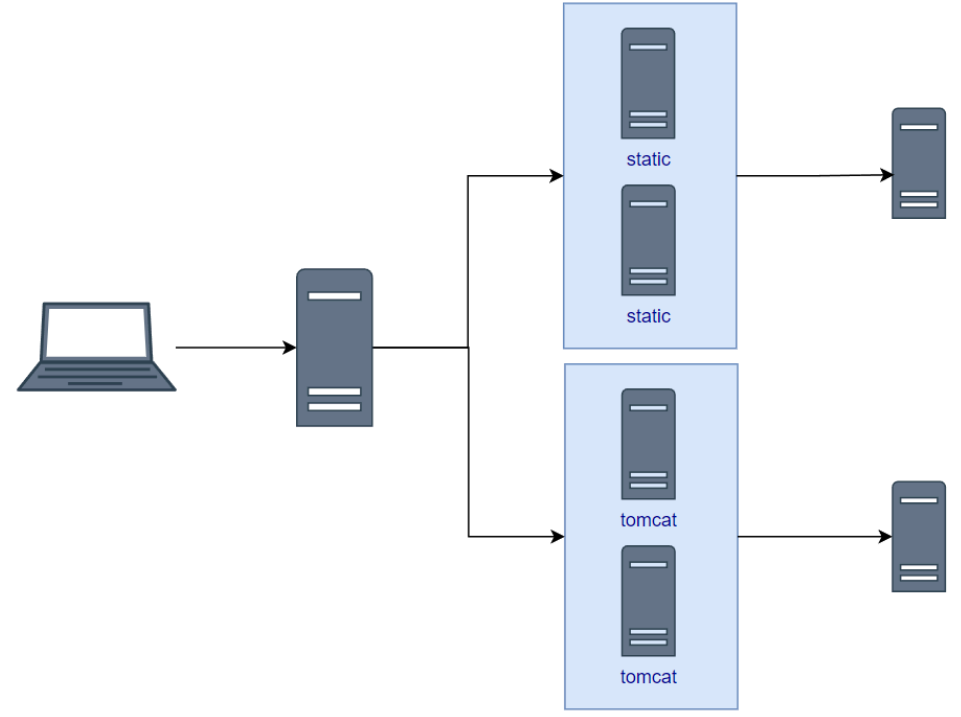
- 静态的web资源服务器 html、图片、js、css、txt 等静态资源
- http/https协议的反向代理
- 结合FastCGI/uWSGI/SCGI等协议反向代理动态资源请求
- tcp/udp协议的请求转发(反向代理)
- imap4/pop4协议的反向代理
Nginx架构和进程
nginx架构
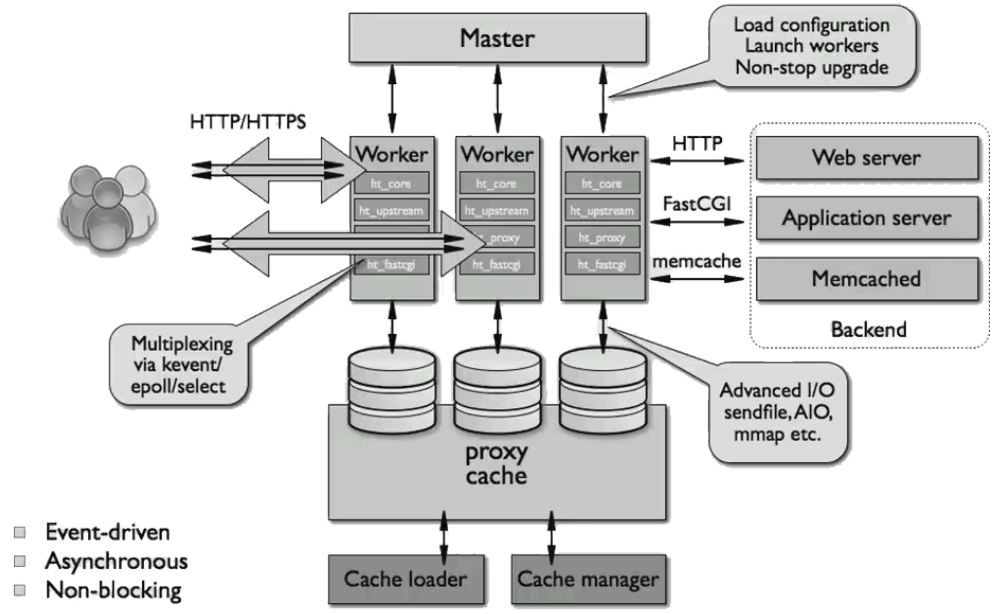
nginx进程
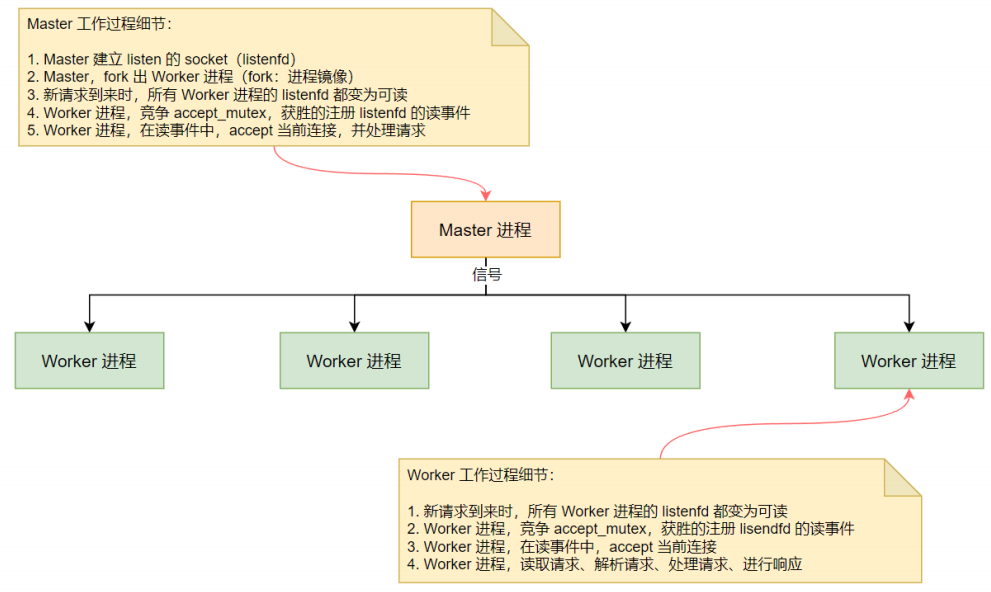
nginx是多进程组织模式,而且是一个由 Master 主进程和 Worker 工作进程组成。

主进程(master process)的功能:
对外接口:接收外部的操作(信号)
对内转发:根据外部的操作的不同,通过信号管理 Worker
监控:监控 worker 进程的运行状态,worker 进程异常终止后,自动重启 worker 进程
读取nginx配置文件并验证其有效性和正确性
建立、绑定和关闭socket连接
按照配置生成、管理和结束工作进程
接受外界指令,比如重启、升级及退出服务器等指令
不中断服务,实现平滑升级,重启服务并应用新的配置
开启日志文件,获取文件描述符
不中断服务,实现平滑升级,升级失败进行回滚处理
编译和处理perl脚本
工作进程(Worker Process)的功能:
所有 worker 进程都是平等的
实际处理:网络请求,由 worker 进程处理
worker 进程数量:一般设置为核心数,充分利用 CPU 资源,同时避免进程数量过多,导致进程竞争
CPU 资源,增加上下文切换的损耗
接受处理客户的请求
将请求依次送入各个功能模块进行处理
I/O调用,获取响应数据
与后端服务器通信,接收后端服务的处理结果
缓存数据,访问缓存索引,查询和调用缓存数据
发送请求结果,响应客户的请求
接收主程序指令,比如重启、升级和退出等
nginx启动和HTTP连接建立

- nginx启动时,Master进程,加载配置文件
- Master进程,初始化监听的socket
- Master进程,fork出多个Worker进程
- Worker进程,竞争新的连接,获取方通过三次握手,建立Socket连接,并处理请求
HTTP处理过程
nginx是一种高性能的Web服务器,可以处理大量的并发HTTP请求。nginx在处理HTTP请求时采用了高效的事件驱动模型,使用异步IO等技术实现了高性能、低延迟的请求处理。
在处理HTTP请求时,nginx会通过以下步骤进行处理:
- 读取请求:当客户端发送HTTP请求时,Nginx会使用socket接口读取请求,包括请求头和请求体。
- 解析请求:Nginx会对请求进行解析,包括解析请求方法、请求路径、查询参数等信息。Nginx还会对请求头进行解析,包括解析Host、User-Agent、Content-Type等字段,这些信息可以在后续处理中使用。
- 处理请求:根据解析得到的请求信息,Nginx会进行请求处理。比如,如果请求路径对应的是一个静态文件,Nginx会直接返回文件内容;如果请求路径对应的是一个动态页面,Nginx会将请求转发给对应的后端服务器。
- 处理请求体:如果请求包含请求体,Nginx会将请求体读取到内存中,以供后续处理使用。
- 处理响应:当请求处理完成后,Nginx会根据处理结果生成响应,并发送给客户端。Nginx会将响应头和响应体一起发送给客户端,响应头中包含响应状态码、响应头字段等信息。
- 关闭连接:当请求处理完成后,Nginx会关闭连接,释放资源,等待下一个请求。
Nginx模块介绍
nginx有多种模块
- 核心模块:是Nginx服务器正常运行必不可少的模块,提供错误日志记录、配置文件解析、事件驱动机制、进程管理等核心功能。
- 标准HTTP模块:提供HTTP协议解析相关的功能,比如:端口配置、网页编码设置、HTTP响应头设置等。
- 可行HTTP模块:主要用于扩展标准的HTTP功能,让Nginx能处理一些特殊的服务,比如:Flash多媒体传输、解析 GeoIP 请求、网络传输压缩、安全协议 SSL 支持等邮件服务模块:主要用于支持Nginx的邮件服务,包括对 POP3 协议、IMAP 协议和 SMTP 协议的支持。
- Stream服务模块:实现反向代理功能,包括 TCP 协议代理。
- 第三方模块:是为了扩展 Nginx 服务器应用,完成开发者自定义功能,比如:json 支持、Lua 支持等。
Nginx 高度模块化,但其模块早期不支持 DSO 机制;1.9.11 版本支持动态装载和卸载。
安装Nginx
Nginx分为社区版和商业版本,一般是社区版。
本地仓库安装
bash
[root@kittod ~]# dnf install nginx -y
Updating Subscription Management repositories.
Unable to read consumer identity
This system is not registered with an entitlement server. You can use
subscription-manager to register.
BaseOS 90
MB/s | 2.0 MB 00:00
AppStream 103
MB/s | 6.5 MB 00:00
Dependencies resolved.
============================================================================
============================
Package Architecture Version
Repository Size
============================================================================
============================
Installing:
nginx x86_64 1:1.20.1-14.el9_2.1
baseos2 40 k
Installing dependencies:
nginx-core x86_64 1:1.20.1-14.el9_2.1
baseos2 574 k
nginx-filesystem noarch 1:1.20.1-14.el9_2.1
baseos2 11 k
redhat-logos-httpd noarch 90.4-2.el9
baseos2 18 k
Transaction Summary
============================================================================
============================
Install 4 Packages
Total size: 643 k
Installed size: 1.8 M
Downloading Packages:
Running transaction check
Transaction check succeeded.
Running transaction test
Transaction test succeeded.
Running transaction
Preparing :
1/1
Running scriptlet: nginx-filesystem-1:1.20.1-14.el9_2.1.noarch
1/4
Installing : nginx-filesystem-1:1.20.1-14.el9_2.1.noarch
1/4
Installing : nginx-core-1:1.20.1-14.el9_2.1.x86_64
2/4
Installing : redhat-logos-httpd-90.4-2.el9.noarch
3/4
Installing : nginx-1:1.20.1-14.el9_2.1.x86_64
4/4
Running scriptlet: nginx-1:1.20.1-14.el9_2.1.x86_64
4/4
Verifying : nginx-1:1.20.1-14.el9_2.1.x86_64
1/4
Verifying : nginx-core-1:1.20.1-14.el9_2.1.x86_64
2/4
Verifying : nginx-filesystem-1:1.20.1-14.el9_2.1.noarch
3/4
Verifying : redhat-logos-httpd-90.4-2.el9.noarch
4/4
Installed products updated.
Installed:
nginx-1:1.20.1-14.el9_2.1.x86_64 nginx-core-1:1.20.1-
14.el9_2.1.x86_64
nginx-filesystem-1:1.20.1-14.el9_2.1.noarch redhat-logos-httpd-
90.4-2.el9.noarch
Complete!
删除本地安装
bash
[root@kittod ~]# dnf remove nginx -y
Updating Subscription Management repositories.
Unable to read consumer identity
This system is not registered with an entitlement server. You can use
subscription-manager to register.
Dependencies resolved.
============================================================================
============================
Package Architecture Version
Repository Size
============================================================================
============================
Removing:
nginx x86_64 1:1.20.1-14.el9_2.1
@baseos2 148 k
Removing unused dependencies:
nginx-core x86_64 1:1.20.1-14.el9_2.1
@baseos2 1.6 M
nginx-filesystem noarch 1:1.20.1-14.el9_2.1
@baseos2 0
redhat-logos-httpd noarch 90.4-2.el9
@baseos2 12 k
Transaction Summary
============================================================================
============================
Remove 4 Packages
Freed space: 1.8 M
Running transaction check
Transaction check succeeded.
Running transaction test
Transaction test succeeded.
Running transaction
Preparing :
1/1
Running scriptlet: nginx-1:1.20.1-14.el9_2.1.x86_64
1/4
Erasing : nginx-1:1.20.1-14.el9_2.1.x86_64
1/4
Running scriptlet: nginx-1:1.20.1-14.el9_2.1.x86_64
1/4
Erasing : redhat-logos-httpd-90.4-2.el9.noarch
2/4
Erasing : nginx-core-1:1.20.1-14.el9_2.1.x86_64
3/4
Erasing : nginx-filesystem-1:1.20.1-14.el9_2.1.noarch
4/4
Running scriptlet: nginx-filesystem-1:1.20.1-14.el9_2.1.noarch
4/4
Verifying : nginx-1:1.20.1-14.el9_2.1.x86_64
1/4
Verifying : nginx-core-1:1.20.1-14.el9_2.1.x86_64
2/4
Verifying : nginx-filesystem-1:1.20.1-14.el9_2.1.noarch
3/4
Verifying : redhat-logos-httpd-90.4-2.el9.noarch
4/4
Installed products updated.
Removed:
nginx-1:1.20.1-14.el9_2.1.x86_64 nginx-core-1:1.20.1-
14.el9_2.1.x86_64
nginx-filesystem-1:1.20.1-14.el9_2.1.noarch redhat-logos-httpd-
90.4-2.el9.noarch
Complete!
官方安装
首先打开官方网址:
单击 Install 链接。
单击 packages 链接。
单击 RHEL and derivatives 链接。
按照页面提示配置仓库
配置仓库
bash
[root@kittod ~]# vim /etc/yum.repos.d/nginx.repo
[root@kittod ~]# cat /etc/yum.repos.d/nginx.repo
# 仓库配置
[nginx-stable]
name=nginx stable repo
baseurl=http://nginx.org/packages/centos/$releasever/$basearch/
gpgcheck=1
enabled=1
gpgkey=https://nginx.org/keys/nginx_signing.key
module_hotfixes=true

[nginx-mainline]
name=nginx mainline repo
baseurl=http://nginx.org/packages/mainline/centos/$releasever/$basearch/
gpgcheck=1
enabled=0
gpgkey=https://nginx.org/keys/nginx_signing.key
module_hotfixes=tru
安装nginx
bash
[root@kittod ~]# dnf install nginx
Updating Subscription Management repositories.
Unable to read consumer identity
This system is not registered with an entitlement server. You can use
subscription-manager to register.
nginx stable repo 40 kB/s | 38 kB
00:00
Dependencies resolved.
============================================================================
============
Package Architecture Version Repository
Size
============================================================================
============
Installing:
nginx x86_64 1:1.26.2-1.el9.ngx nginx-stable
996 k
Transaction Summary
============================================================================
============
Install 1 Package
Total download size: 996 k
Installed size: 3.3 M
Is this ok [y/N]: y
Downloading Packages:
nginx-1.26.2-1.el9.ngx.x86_64.rpm 586
kB/s | 996 kB 00:01
----------------------------------------------------------------------------
----------------------------
Total 585
kB/s | 996 kB 00:01
nginx stable repo 14
kB/s | 12 kB 00:00
Importing GPG key 0xB49F6B46:
Userid : "nginx signing key <signing-key-2@nginx.com>"
Fingerprint: 8540 A6F1 8833 A80E 9C16 53A4 2FD2 1310 B49F 6B46
From : https://nginx.org/keys/nginx_signing.key
Is this ok [y/N]: y
Key imported successfully
Importing GPG key 0x7BD9BF62:
Userid : "nginx signing key <signing-key@nginx.com>"
Fingerprint: 573B FD6B 3D8F BC64 1079 A6AB ABF5 BD82 7BD9 BF62
From : https://nginx.org/keys/nginx_signing.key
Is this ok [y/N]: y
Key imported successfully
Importing GPG key 0x8D88A2B3:
Userid : "nginx signing key <signing-key-3@nginx.com>"
Fingerprint: 9E9B E90E ACBC DE69 FE9B 204C BCDC D8A3 8D88 A2B3
From : https://nginx.org/keys/nginx_signing.key
Is this ok [y/N]: y
Key imported successfully
Running transaction check
Transaction check succeeded.
Running transaction test
Transaction test succeeded.
Running transaction
Preparing :
1/1
Running scriptlet: nginx-1:1.26.2-1.el9.ngx.x86_64
1/1
Installing : nginx-1:1.26.2-1.el9.ngx.x86_64
1/1
Running scriptlet: nginx-1:1.26.2-1.el9.ngx.x86_64
1/1
----------------------------------------------------------------------
Thanks for using nginx!
Please find the official documentation for nginx here:
* https://nginx.org/en/docs/
Please subscribe to nginx-announce mailing list to get
the most important news about nginx:
* https://nginx.org/en/support.html
Commercial subscriptions for nginx are available on:
* https://nginx.com/products/
----------------------------------------------------------------------
Verifying : nginx-1:1.26.2-1.el9.ngx.x86_64
1/1
Installed products updated.
Installed:
nginx-1:1.26.2-1.el9.ngx.x86_64
Complete!
[root@kittod ~]# rpm -qa | grep nginx
nginx-1.26.2-1.el9.ngx.x86_64
默认安装的是 stable 版本,接下来是安装 mainline版本,先删除之前安装的 stable版本。
删除版本
bash
[root@kittod ~]# dnf remove nginx -y
Updating Subscription Management repositories.
Unable to read consumer identity
This system is not registered with an entitlement server. You can use
subscription-manager to register.
Dependencies resolved.
============================================================================
Package Architecture Version
Repository Size
============================================================================
Removing:
nginx x86_64 1:1.26.2-1.el9.ngx
@nginx-stable 3.3 M
Transaction Summary
============================================================================
Remove 1 Package
Freed space: 3.3 M
Running transaction check
Transaction check succeeded.
Running transaction test
Transaction test succeeded.
Running transaction
Preparing :
1/1
Running scriptlet: nginx-1:1.26.2-1.el9.ngx.x86_64
1/1
Erasing : nginx-1:1.26.2-1.el9.ngx.x86_64
1/1
Running scriptlet: nginx-1:1.26.2-1.el9.ngx.x86_64
1/1
Verifying : nginx-1:1.26.2-1.el9.ngx.x86_64
1/1
Installed products updated.
Removed:
nginx-1:1.26.2-1.el9.ngx.x86_64
Complete!
mainline版本
bash
# 启动 mainline 版本
[root@kittod ~]# dnf config-manager --enable nginx-mainline
Updating Subscription Management repositories.
Unable to read consumer identity
This system is not registered with an entitlement server. You can use
subscription-manager to register.
# 安装 mainline 版本
[root@kittod ~]# dnf install nginx
Updating Subscription Management repositories.
Unable to read consumer identity
This system is not registered with an entitlement server. You can use
subscription-manager to register.
nginx stable repo 6.5 kB/s | 2.9 kB
00:00
nginx mainline repo 64 kB/s | 59 kB
00:00
Dependencies resolved.
============================================================================
============
Package Architecture Version Repository
Size
============================================================================
============
Installing:
nginx x86_64 1:1.27.2-1.el9.ngx nginx-mainline
1.0 M
Transaction Summary
============================================================================
============
Install 1 Package
Total download size: 1.0 M
Installed size: 3.4 M
Is this ok [y/N]: y
Downloading Packages:
nginx-1.27.2-1.el9.ngx.x86_64.rpm 630
kB/s | 1.0 MB 00:01
----------------------------------------------------------------------------
----------------------------
Total 630
kB/s | 1.0 MB 00:01
Running transaction check
Transaction check succeeded.
Running transaction test
Transaction test succeeded.
Running transaction
Preparing :
1/1
Running scriptlet: nginx-1:1.27.2-1.el9.ngx.x86_64
1/1
Installing : nginx-1:1.27.2-1.el9.ngx.x86_64
1/1
Running scriptlet: nginx-1:1.27.2-1.el9.ngx.x86_64
1/1
----------------------------------------------------------------------
Thanks for using nginx!
Please find the official documentation for nginx here:
* https://nginx.org/en/docs/
Please subscribe to nginx-announce mailing list to get
the most important news about nginx:
* https://nginx.org/en/support.html
Commercial subscriptions for nginx are available on:
* https://nginx.com/products/
----------------------------------------------------------------------
Verifying : nginx-1:1.27.2-1.el9.ngx.x86_64
1/1
Installed products updated.
Installed:
nginx-1:1.27.2-1.el9.ngx.x86_64
Complete!
# 查看安装包
[root@kittod ~]# rpm -qa | grep nginx
nginx-1.27.2-1.el9.ngx.x86_64
删除安装
bash
[root@kittod ~]# dnf remove nginx
Updating Subscription Management repositories.
Unable to read consumer identity
This system is not registered with an entitlement server. You can use
subscription-manager to register.
Dependencies resolved.
============================================================================
============================
Package Architecture Version
Repository Size
============================================================================
============================
Removing:
nginx x86_64 1:1.27.2-1.el9.ngx
@nginx-mainline 3.4 M
Transaction Summary
============================================================================
============================
Remove 1 Package
Freed space: 3.4 M
Is this ok [y/N]: y
Running transaction check
Transaction check succeeded.
Running transaction test
Transaction test succeeded.
Running transaction
Preparing :
1/1
Running scriptlet: nginx-1:1.27.2-1.el9.ngx.x86_64
1/1
Erasing : nginx-1:1.27.2-1.el9.ngx.x86_64
1/1
Running scriptlet: nginx-1:1.27.2-1.el9.ngx.x86_64
1/1
Verifying : nginx-1:1.27.2-1.el9.ngx.x86_64
1/1
Installed products updated.
Removed:
nginx-1:1.27.2-1.el9.ngx.x86_64
Complete!
# 删除残留的日志文件
[root@kittod ~]# rm -rf /var/lib/nginx/
[root@kittod ~]# rm -rf /var/log/nginx/
源码安装
bash
# 克隆 git 源码仓库
[root@kittod ~]# git clone https://github.com/nginx/nginx.git
Cloning into 'nginx'...
remote: Enumerating objects: 69702, done.
remote: Counting objects: 100% (237/237), done.
remote: Compressing objects: 100% (141/141), done.
remote: Total 69702 (delta 126), reused 130 (delta 91), pack-reused 69465
(from 1)
Receiving objects: 100% (69702/69702), 71.56 MiB | 1.95 MiB/s, done.
Resolving deltas: 100% (53456/53456), done.
[root@kittod ~]# cd nginx/
[root@kittod nginx]# ll
total 40
drwxr-xr-x. 6 root root 4096 Oct 9 17:23 auto
-rw-r--r--. 1 root root 5215 Oct 9 17:23 CODE_OF_CONDUCT.md
drwxr-xr-x. 2 root root 168 Oct 9 17:23 conf
drwxr-xr-x. 4 root root 72 Oct 9 17:23 contrib
-rw-r--r--. 1 root root 4049 Oct 9 17:23 CONTRIBUTING.md
drwxr-xr-x. 8 root root 94 Oct 9 17:23 docs
-rw-r--r--. 1 root root 1319 Oct 9 17:23 LICENSE
drwxr-xr-x. 2 root root 39 Oct 9 17:23 misc
-rw-r--r--. 1 root root 14220 Oct 9 17:23 README.md
-rw-r--r--. 1 root root 787 Oct 9 17:23 SECURITY.md
drwxr-xr-x. 9 root root 91 Oct 9 17:23 src

# 如果提示如下错误,请先安装 gcc 软件
[root@kittod nginx]# auto/configure
checking for OS
+ Linux 5.14.0-362.8.1.el9_3.x86_64 x86_64
checking for C compiler ... not found
auto/configure: error: C compiler cc is not found

[root@kittod nginx]# dnf install gcc
Updating Subscription Management repositories.
Unable to read consumer identity
This system is not registered with an entitlement server. You can use
subscription-manager to register.
Last metadata expiration check: 0:18:58 ago on Wed 09 Oct 2024 05:11:09 PM
CST.
Dependencies resolved.
===========================================================================
=============================
Package Architecture Version
Repository Size
===========================================================================
=============================
Installing:
gcc x86_64 11.4.1-2.1.el9
baseos2 32 M
Installing dependencies:
glibc-devel x86_64 2.34-83.el9_3.7
baseos2 56 k
glibc-headers x86_64 2.34-83.el9_3.7
baseos2 558 k
kernel-headers x86_64 5.14.0-362.8.1.el9_3
baseos2 6.7 M
libxcrypt-devel x86_64 4.4.18-3.el9
baseos2 32 k
make x86_64 1:4.3-7.el9
baseos 542 k
Transaction Summary
===========================================================================
=============================
Install 6 Packages
Total size: 40 M
Installed size: 95 M
Is this ok [y/N]: y
Downloading Packages:
Running transaction check
Transaction check succeeded.
Running transaction test
Transaction test succeeded.
Running transaction
Preparing :
1/1
Installing : kernel-headers-5.14.0-362.8.1.el9_3.x86_64
1/6
Installing : glibc-headers-2.34-83.el9_3.7.x86_64
2/6
Installing : libxcrypt-devel-4.4.18-3.el9.x86_64
3/6
Installing : glibc-devel-2.34-83.el9_3.7.x86_64
4/6
Installing : make-1:4.3-7.el9.x86_64
5/6
Installing : gcc-11.4.1-2.1.el9.x86_64
6/6
Running scriptlet: gcc-11.4.1-2.1.el9.x86_64
6/6
Verifying : make-1:4.3-7.el9.x86_64
1/6
Verifying : gcc-11.4.1-2.1.el9.x86_64
2/6
Verifying : glibc-devel-2.34-83.el9_3.7.x86_64
3/6
Verifying : glibc-headers-2.34-83.el9_3.7.x86_64
4/6
Verifying : kernel-headers-5.14.0-362.8.1.el9_3.x86_64
5/6
Verifying : libxcrypt-devel-4.4.18-3.el9.x86_64
6/6
Installed products updated.
Installed:
gcc-11.4.1-2.1.el9.x86_64 glibc-devel-2.34-
83.el9_3.7.x86_64
glibc-headers-2.34-83.el9_3.7.x86_64 kernel-headers-5.14.0-
362.8.1.el9_3.x86_64
libxcrypt-devel-4.4.18-3.el9.x86_64 make-1:4.3-7.el9.x86_64
Complete!

# 如果出现以下提示:
auto/configure: error: the HTTP rewrite module requires the PCRE library.
You can either disable the module by using --without-http_rewrite_module
option, or install the PCRE library into the system, or build the PCRE
library
statically from the source with nginx by using --with-pcre=<path> option.
# 安装:
[root@kittod nginx]# dnf install pcre-devel
Updating Subscription Management repositories.
Unable to read consumer identity
This system is not registered with an entitlement server. You can use
subscription-manager to register.
Last metadata expiration check: 0:26:49 ago on Wed 09 Oct 2024 05:11:09 PM
CST.
Dependencies resolved.
===========================================================================
=============================
Package Architecture Version
Repository Size
===========================================================================
=============================
Installing:
pcre-devel x86_64 8.44-3.el9.3
baseos2 511 k
Installing dependencies:
pcre-cpp x86_64 8.44-3.el9.3
baseos2 28 k
pcre-utf16 x86_64 8.44-3.el9.3
baseos2 188 k
pcre-utf32 x86_64 8.44-3.el9.3
baseos2 178 k
Transaction Summary
===========================================================================
=============================
Install 4 Packages
Total size: 905 k
Installed size: 2.6 M
Is this ok [y/N]: y
Downloading Packages:
Running transaction check
Transaction check succeeded.
Running transaction test
Transaction test succeeded.
Running transaction
Preparing :
1/1
Installing : pcre-utf32-8.44-3.el9.3.x86_64
1/4
Installing : pcre-utf16-8.44-3.el9.3.x86_64
2/4
Installing : pcre-cpp-8.44-3.el9.3.x86_64
3/4
Installing : pcre-devel-8.44-3.el9.3.x86_64
4/4
Running scriptlet: pcre-devel-8.44-3.el9.3.x86_64
4/4
Verifying : pcre-cpp-8.44-3.el9.3.x86_64
1/4
Verifying : pcre-devel-8.44-3.el9.3.x86_64
2/4
Verifying : pcre-utf16-8.44-3.el9.3.x86_64
3/4
Verifying : pcre-utf32-8.44-3.el9.3.x86_64
4/4
Installed products updated.
Installed:
pcre-cpp-8.44-3.el9.3.x86_64 pcre-devel-8.44-3.el9.3.x86_64 pcreutf16-8.44-3.el9.3.x86_64
pcre-utf32-8.44-3.el9.3.x86_64
Complete!
# 如果出现以下提示:
auto/configure: error: the HTTP gzip module requires the zlib library.
You can either disable the module by using --without-http_gzip_module
option, or install the zlib library into the system, or build the zlib
library
statically from the source with nginx by using --with-zlib=<path> option.
# 安装:
[root@kittod nginx]# dnf install zlib-devel
Updating Subscription Management repositories.
Unable to read consumer identity
This system is not registered with an entitlement server. You can use
subscription-manager to register.
Last metadata expiration check: 0:29:09 ago on Wed 09 Oct 2024 05:11:09 PM
CST.
Dependencies resolved.
===========================================================================
=============================
Package Architecture Version
Repository Size
===========================================================================
=============================
Installing:
zlib-devel x86_64 1.2.11-40.el9
baseos2 47 k
Transaction Summary
===========================================================================
=============================
Install 1 Package
Total size: 47 k
Installed size: 138 k
Is this ok [y/N]: y
Downloading Packages:
Running transaction check
Transaction check succeeded.
Running transaction test
Transaction test succeeded.
Running transaction
Preparing :
1/1
Installing : zlib-devel-1.2.11-40.el9.x86_64
1/1
Running scriptlet: zlib-devel-1.2.11-40.el9.x86_64
1/1
Verifying : zlib-devel-1.2.11-40.el9.x86_64
1/1
Installed products updated.
Installed:
zlib-devel-1.2.11-40.el9.x86_64
Complete!
出现以下提示,表示 configure 成功
creating objs/Makefile
Configuration summary
+ using system PCRE library
+ OpenSSL library is not used
+ using system zlib library
nginx path prefix: "/usr/local/nginx"
nginx binary file: "/usr/local/nginx/sbin/nginx"
nginx modules path: "/usr/local/nginx/modules"
nginx configuration prefix: "/usr/local/nginx/conf"
nginx configuration file: "/usr/local/nginx/conf/nginx.conf"
nginx pid file: "/usr/local/nginx/logs/nginx.pid"
nginx error log file: "/usr/local/nginx/logs/error.log"
nginx http access log file: "/usr/local/nginx/logs/access.log"
nginx http client request body temporary files: "client_body_temp"
nginx http proxy temporary files: "proxy_temp"
nginx http fastcgi temporary files: "fastcgi_temp"
nginx http uwsgi temporary files: "uwsgi_temp"
nginx http scgi temporary files: "scgi_temp"

# 执行 make 指令检测文件完整性
[root@kittod nginx]# make
# 出现以下提示,表示 make 完成
objs/src/http/modules/ngx_http_upstream_zone_module.o \
objs/ngx_modules.o \
-lcrypt -lpcre -lz \
-Wl,-E
sed -e "s|%%PREFIX%%|/usr/local/nginx|" \
-e "s|%%PID_PATH%%|/usr/local/nginx/logs/nginx.pid|" \
-e "s|%%CONF_PATH%%|/usr/local/nginx/conf/nginx.conf|" \
-e "s|%%ERROR_LOG_PATH%%|/usr/local/nginx/logs/error.log|" \
< docs/man/nginx.8 > objs/nginx.8
make[1]: Leaving directory '/root/nginx'

# 开始进行安装
[root@kittod nginx]# make install
# 出现以下提示,说明安装成功
test -d '/usr/local/nginx/logs' \
|| mkdir -p '/usr/local/nginx/logs'
test -d '/usr/local/nginx/html' \
|| cp -R docs/html '/usr/local/nginx'
test -d '/usr/local/nginx/logs' \
|| mkdir -p '/usr/local/nginx/logs'
make[1]: Leaving directory '/root/nginx'

# 启动服务
[root@kittod nginx]# /usr/local/nginx/sbin/nginx
# 查看服务
[root@kittod nginx]# netstat -lntup
Active Internet connections (only servers)
Proto Recv-Q Send-Q Local Address Foreign Address State
PID/Program name
tcp 0 0 127.0.0.1:631 0.0.0.0:* LISTEN
1196/cupsd
tcp 0 0 0.0.0.0:22 0.0.0.0:* LISTEN
1207/sshd: /usr/sbi
tcp 0 0 0.0.0.0:80 0.0.0.0:* LISTEN
42424/nginx: master
tcp 0 0 0.0.0.0:111 0.0.0.0:* LISTEN
1/systemd
tcp 0 0 127.0.0.1:6010 0.0.0.0:* LISTEN
2241/sshd: root@pts
tcp6 0 0 ::1:6010 :::* LISTEN
2241/sshd: root@pts
tcp6 0 0 :::22 :::* LISTEN
1207/sshd: /usr/sbi
tcp6 0 0 ::1:631 :::* LISTEN
1196/cupsd
tcp6 0 0 :::111 :::* LISTEN
1/systemd
udp 0 0 0.0.0.0:5353 0.0.0.0:*
986/avahi-daemon: r
udp 0 0 0.0.0.0:111 0.0.0.0:*
1/systemd
udp 0 0 127.0.0.1:323 0.0.0.0:*
1011/chronyd
udp 0 0 0.0.0.0:41410 0.0.0.0:*
986/avahi-daemon: r
udp6 0 0 :::5353 :::*
986/avahi-daemon: r
udp6 0 0 :::111 :::*
1/systemd
udp6 0 0 ::1:323 :::*
1011/chronyd
udp6 0 0 :::33739 :::*
986/avahi-daemon: r
# 查看 nginx 进程
[root@kittod nginx]# ps -ef | grep nginx
root 42401 1 0 17:47 ? 00:00:00 gpg-agent --homedir
/var/cache/PackageKit/9.3/metadata/nginx-stable-9-x86_64.tmp/gpgdir --usestandard-socket --daemon
root 42403 42401 0 17:47 ? 00:00:00 scdaemon --multi-server
--homedir /var/cache/PackageKit/9.3/metadata/nginx-stable-9-
x86_64.tmp/gpgdir
root 42415 1 0 17:47 ? 00:00:00 gpg-agent --homedir
/var/cache/PackageKit/9.3/metadata/nginx-mainline-9-x86_64.tmp/gpgdir --
use-standard-socket --daemon
root 42417 42415 0 17:47 ? 00:00:00 scdaemon --multi-server
--homedir /var/cache/PackageKit/9.3/metadata/nginx-mainline-9-
x86_64.tmp/gpgdir
root 42424 1 0 17:47 ? 00:00:00 nginx: master process
/usr/local/nginx/sbin/nginx
nobody 42425 42424 0 17:47 ? 00:00:00 nginx: worker process
root 42429 2252 0 17:47 pts/0 00:00:00 grep --color=auto nginx
# 查看页面:
[root@kittod nginx]# curl localhost
<!DOCTYPE html>
<html>
<head>
<title>Welcome to nginx!</title>
<style>
html { color-scheme: light dark; }
body { width: 35em; margin: 0 auto;
font-family: Tahoma, Verdana, Arial, sans-serif; }
</style>
</head>
<body>
<h1>Welcome to nginx!</h1>
<p>If you see this page, the nginx web server is successfully installed and
working. Further configuration is required.</p>
<p>For online documentation and support please refer to
<a href="http://nginx.org/">nginx.org</a>.<br/>
Commercial support is available at
<a href="http://nginx.com/">nginx.com</a>.</p>
<p><em>Thank you for using nginx.</em></p>
</body>
</html>

# 停止服务:
[root@kittod nginx]# /usr/local/nginx/sbin/nginx -s stop
[root@kittod nginx]# ps -ef | grep nginx
root 42401 1 0 17:47 ? 00:00:00 gpg-agent --homedir
/var/cache/PackageKit/9.3/metadata/nginx-stable-9-x86_64.tmp/gpgdir --usestandard-socket --daemon
root 42403 42401 0 17:47 ? 00:00:00 scdaemon --multi-server
--homedir /var/cache/PackageKit/9.3/metadata/nginx-stable-9-
x86_64.tmp/gpgdir
root 42415 1 0 17:47 ? 00:00:00 gpg-agent --homedir
/var/cache/PackageKit/9.3/metadata/nginx-mainline-9-x86_64.tmp/gpgdir --
use-standard-socket --daemon
root 42417 42415 0 17:47 ? 00:00:00 scdaemon --multi-server
--homedir /var/cache/PackageKit/9.3/metadata/nginx-mainline-9-
x86_64.tmp/gpgdir
root 42445 2252 0 17:49 pts/0 00:00:00 grep --color=auto nginx
# 查看网络状态
[root@kittod nginx]# netstat -lntup
Active Internet connections (only servers)
Proto Recv-Q Send-Q Local Address Foreign Address State
PID/Program name
tcp 0 0 127.0.0.1:631 0.0.0.0:* LISTEN
1196/cupsd
tcp 0 0 0.0.0.0:22 0.0.0.0:* LISTEN
1207/sshd: /usr/sbi
tcp 0 0 0.0.0.0:111 0.0.0.0:* LISTEN
1/systemd
tcp 0 0 127.0.0.1:6010 0.0.0.0:* LISTEN
2241/sshd: root@pts
tcp6 0 0 ::1:6010 :::* LISTEN
2241/sshd: root@pts
tcp6 0 0 :::22 :::* LISTEN
1207/sshd: /usr/sbi
tcp6 0 0 ::1:631 :::* LISTEN
1196/cupsd
tcp6 0 0 :::111 :::* LISTEN
1/systemd
udp 0 0 0.0.0.0:5353 0.0.0.0:*
986/avahi-daemon: r
udp 0 0 0.0.0.0:111 0.0.0.0:*
1/systemd
udp 0 0 127.0.0.1:323 0.0.0.0:*
1011/chronyd
udp 0 0 0.0.0.0:41410 0.0.0.0:*
986/avahi-daemon: r
udp6 0 0 :::5353 :::*
986/avahi-daemon: r
udp6 0 0 :::111 :::*
1/systemd
udp6 0 0 ::1:323 :::*
1011/chronyd
udp6 0 0 :::33739 :::*
986/avahi-daemon: r

# 查看 nginx 网络状态
[root@kittod nginx]# netstat -lntup | grep nginx

# 清理编译结果:
[root@kittod nginx]# make clean
rm -rf Makefile objs
# 清理安装结果:
[root@kittod nginx]# rm -rf /usr/local/nginx/
控制服务
指定信号可以使用以下指令:
css
nginx -s signal
signal 有以下几种:
stop 快速关闭
quit 优雅关闭
reload 重新加载配置文件
reopen 重新打开日志文件
启动服务:
bash
[root@kittod ~]# nginx
[root@kittod ~]# netstat -lntup | grep nginx
tcp 0 0 0.0.0.0:80 0.0.0.0:* LISTEN
2929/nginx: master
tcp6 0 0 :::80 :::* LISTEN
2929/nginx: master
停止服务:
bash
[root@kittod ~]# nginx -s stop
# 查看网络状态,检测是否成功关闭
[root@kittod ~]# netstat -lntup | grep nginx
页面自定义
bash
[root@kittod ~]# netstat -lntup | grep nginx
tcp 0 0 0.0.0.0:80 0.0.0.0:* LISTEN
2946/nginx: master
tcp6 0 0 :::80 :::* LISTEN
2946/nginx: master
[root@kittod ~]# curl localhost
...
<a href="https://apache.org">Apache™
</a> is a registered trademark of <a href="https://apache.org">the Apache Software Foundation</a>
in the United States and/or other countries.
<br />
<a href="https://nginx.com">NGINX™
</a> is a registered trademark of <a href="https://www.f5.com">F5 Networks, Inc.</a>.
</div>
</body>
</html>
[root@kittod ~]# ll /usr/share/nginx/html/
total 12
-rw-r--r--. 1 root root 3971 Oct 11 2023 404.html
-rw-r--r--. 1 root root 4020 Oct 11 2023 50x.html
drwxr-xr-x. 2 root root 27 Oct 10 14:04 icons
lrwxrwxrwx. 1 root root 25 Oct 11 2023 index.html ->
../../testpage/index.html
-rw-r--r--. 1 root root 368 Oct 11 2023 nginx-logo.png
lrwxrwxrwx. 1 root root 14 Oct 11 2023 poweredby.png -> nginx-logo.png
lrwxrwxrwx. 1 root root 37 Oct 11 2023 system_noindex_logo.png ->
../../pixmaps/system-noindex-logo.png
其中,index.html -> ../../testpage/index.html 文件为默认页面
[root@kittod html]# cd ../../
[root@kittod share]# pwd
/usr/share
[root@kittod share]# ll testpage/
total 8
-rw-r--r--. 1 root root 5909 Aug 9 2021 index.html
[root@kittod testpage]# curl localhost
<html>
<head><title>403 Forbidden</title></head>
<body>
<center><h1>403 Forbidden</h1></center>
<hr><center>nginx/1.20.1</center>
</body>
</html>
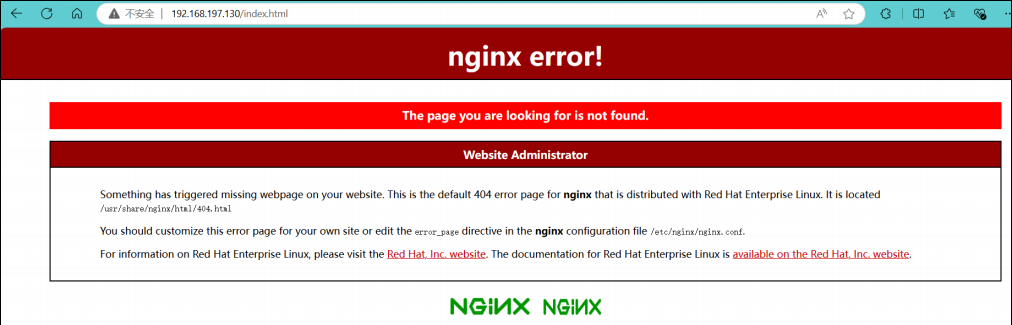
[root@kittod testpage]# curl localhost/index.html
...
</div>
</div>
<div class="logos">
<a href="http://nginx.net/"><img src="nginx-logo.png" alt="[ Powered by nginx ]" width="121" height="32" /></a>
<a href="http://www.redhat.com/"><img src="poweredby.png" alt="[ Powered by Red Hat Enterprise Linux ]" width="88" height="31" /></a>
</div>
</div>
</body>
</html>
### 可以看到,当移动index.html页面之后,再次访问时,已经显示的是 404.index.html 文件的内容。错误页面如图:
Nginx 配置服务
配置文件说明
Nginx的配置文件的组成部分:
- 主配置文件:nginx.conf
- 子配置文件:include conf.d/*.conf
- fastcgi,uwsgi,scgi 等协议相关的配置文件
- mime.types:支持的 mime 类型,MIME(Multipurpose Internet Mail Extensions)多用途互联网邮件扩展类型,MIME 消息能包含文本、图像、音频、视频以及其他应用程序专用的数据,是设定某种扩展名的文件用一种应用程序来打开的方式类型,当该扩展名文件被访问的时候,浏览器会自动使用指定应用程序来打开。多用于指定一些客户端自定义的文件名,以及一些媒体文件打开方式。
nginx配置文件格式说明:
!note
配置文件由指令与指令块构成
每条指令以分号结尾,指令与值之间以空格符号分隔
可以将多条指令放在同一行,用分号分隔即可,但可读性差,不推荐
指令块以{ }大括号将多条指令组织在一起,且可以嵌套指令块
include语句允许组合多个配置文件以提升可维护性
使用#符号添加注释,提高可读性
使用$符号使用变量
部分指令的参数支持正则表达式
配置结构
Nginx 主配置文件的配置指令方式:
!note
directive value [value2 ...];注意:
(1)指令必须以分号结尾
(2)支持使用配置变量
内建变量:由 Nginx 模块引入,可直接引用
自定义变量:由用户使用
set 命令定义,格式:set variable_name value;引用变量:
$varialbe_name
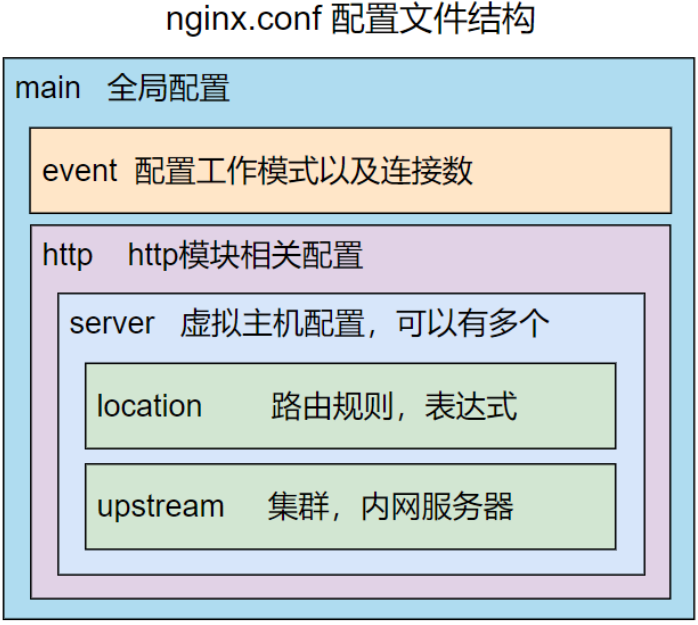
主配置文件结构:四部分
bash
main block:主配置段,即全局配置段,对 http,mail 都有效
# 事件驱动相关的配置
event {
...
}
# http/https 协议相关配置段
http {
...
}
# 默认配置文件不包括下面两个块
# mail 协议相关配置段
mail {
...
}
# stream 服务器相关配置段
stream {
...
}
默认主配置文件结构
bash
[root@kittod html]# nginx -t
nginx: the configuration file /etc/nginx/nginx.conf syntax is ok
nginx: configuration file /etc/nginx/nginx.conf test is successful

### 查看配置文件
[root@kittod ~]# cat /etc/nginx/nginx.conf
# For more information on configuration, see:
# * Official English Documentation: http://nginx.org/en/docs/
# * Official Russian Documentation: http://nginx.org/ru/docs/
	user nginx; ## 指定用户
	worker_processes auto; ## 开启工作进程数量,auto可以自动检测,通常为CPU核心数量
	error_log /var/log/nginx/error.log; ## 错误日志文件
  pid /run/nginx.pid; ## pid文件
	# Load dynamic modules. See /usr/share/doc/nginx/README.dynamic.
	include /usr/share/nginx/modules/*.conf; ## 包含模块的配置文件
	events { ## 定义配置上下文,提供连接处理相关指令
	worker_connections 1024; ## 可接受最大连接数,不能超过worker_rlimit_nofile参数。
}
http { ## 提供http服务
log_format main '$remote_addr - $remote_user [$time_local] "$request"
'
'$status $body_bytes_sent "$http_referer" '
'"$http_user_agent" "$http_x_forwarded_for"'; ## 日志格式定义
access_log /var/log/nginx/access.log main; ## 访问日志
sendfile on; ## Nginx服务器是否使用sendfile函数(zero copy)输出文件,磁盘重负载可设置为off
tcp_nopush on; ## 当包累计到一定大小后就发送,默认0.2s一次
tcp_nodelay on; ## 不等待
keepalive_timeout 65; ## 指定超时时间
types_hash_max_size 4096; ## 为了快速处理静态数据集,例如服务器名称, 映射指令的值,MIME类型,请求头字符串的名 称,nginx使用哈希表
include /etc/nginx/mime.types; ## 可解析的静态资源类型
default_type application/octet-stream; ## 用来配置Nginx响应前端请求默认的MIME类型
# Load modular configuration files from the /etc/nginx/conf.d directory.
# See http://nginx.org/en/docs/ngx_core_module.html#include
# for more information.
include /etc/nginx/conf.d/*.conf; ## 包含的服务配置文件

server {
	listen 80; ## 监听端口
	listen [::]:80; ## 监听端口
	server_name _; ## 指定servername
	root /usr/share/nginx/html; ## 内容根目录
	# Load configuration files for the default server block.
	include /etc/nginx/default.d/*.conf; ## 包含默认配置文件
	error_page 404 /404.html; ## 指定错误页面文件
	location = /404.html { ## 指定错误页面位置
}
	error_page 500 502 503 504 /50x.html; ## 指定错误页面
	location = /50x.html { ## 指定错误页面位置
	}
}
# Settings for a TLS enabled server.
#
# server {
# listen 443 ssl http2;
# listen [::]:443 ssl http2;
# server_name _;
# root /usr/share/nginx/html;
#
# ssl_certificate "/etc/pki/nginx/server.crt";
# ssl_certificate_key "/etc/pki/nginx/private/server.key";
# ssl_session_cache shared:SSL:1m;
# ssl_session_timeout 10m;
# ssl_ciphers PROFILE=SYSTEM;
# ssl_prefer_server_ciphers on;
#
# # Load configuration files for the default server block.
# include /etc/nginx/default.d/*.conf;
#
# error_page 404 /404.html;
# location = /40x.html {
# }
#
# error_page 500 502 503 504 /50x.html;
# location = /50x.html {
# }
# }
}

### 以下为配置目录,需要根据自己需求创建配置
[root@kittod html]# ll /etc/nginx/conf.d/
total 0
[root@kittod html]# ll /etc/nginx/default.d/
total 0
[root@kittod html]# ll /usr/share/nginx/modules/
total 0
配置基于主机名的 Web 服务器
bash
### 允许通过防火墙接收 HTTP 流量,通常这是通过 TCP 端口 80 传输的。
# --permanent:这个选项表示将更改应用为永久性的,即修改将在系统重启后依然生效。如果不加,则改变只会在当前运行的会话中生效(重启后会消失)。
[root@kittod ~]# firewall-cmd --permanent --add-service=http
success
[root@kittod ~]# firewall-cmd --reload
success
### 将 SELinux 的运行模式从启用(enforcing)切换到宽松(permissive)模式。
[root@kittod ~]# setenforce 0

## /etc/hosts 文件用于将主机名映射到 IP 地址。主要用于在没有 DNS(域名系统)服务器的情况下,提供主机名解析。
[root@kittod conf.d]# cat /etc/hosts
127.0.0.1 localhost localhost.localdomain localhost4
localhost4.localdomain4
::1 localhost localhost.localdomain localhost6
localhost6.localdomain6
192.168.197.130 www.example.com
192.168.197.130 www.example.net
[root@kittod conf.d]# pwd
/etc/nginx/conf.d

# 创建配置文件
[root@kittod conf.d]# cat com.conf
server {
	server_name www.example.com;
	root /var/www/example.com/;
	access_log /var/log/nginx/example.com/access.log;
	error_log /var/log/nginx/example.com/error.log;
}

[root@kittod conf.d]# cat net.conf
server {
	server_name www.example.net;
	root /var/www/example.net/;
	access_log /var/log/nginx/example.net/access.log;
	error_log /var/log/nginx/example.net/error.log;
}

[root@kittod conf.d]# mkdir -p /var/www/example.com/
[root@kittod conf.d]# echo example.com > /var/www/example.com/index.html
[root@kittod conf.d]# mkdir /var/log/nginx/example.com
[root@kittod conf.d]# mkdir /var/www/example.net/
[root@kittod conf.d]# echo example.net > /var/www/example.net/index.html
[root@kittod conf.d]# mkdir /var/log/nginx/example.net

[root@kittod conf.d]# curl www.example.com
example.com
[root@kittod conf.d]# curl www.example.net
example.net
配置基于端口的 Web 服务器
bash
# 创建端口配置
[root@kittod conf.d]# cat 9091.conf
server {
	listen 				  9091;
	server_name 		 _;
	root 					  /var/www/9091/;
	access_log 			/var/log/nginx/9091/access.log;
	error_log 			/var/log/nginx/9091/error.log;
}

[root@kittod conf.d]# cat 9092.conf
server {
listen 9092;
server_name _;
root /var/www/9092/;
access_log /var/log/nginx/9092/access.log;
error_log /var/log/nginx/9092/error.log;
}

[root@kittod conf.d]# mkdir /var/www/9091/
[root@kittod conf.d]# echo 9091 > /var/www/9091/index.html
[root@kittod conf.d]# mkdir /var/log/nginx/9091/

[root@kittod conf.d]# mkdir /var/www/9092
[root@kittod conf.d]# echo 9092 > /var/www/9092/index.html
[root@kittod conf.d]# mkdir /var/log/nginx/9092/

# 重启 nginx 服务
[root@kittod conf.d]# systemctl restart nginx
[root@kittod conf.d]# curl 192.168.197.130:9091
9091
[root@kittod conf.d]# curl 192.168.197.130:9092
9092
配置基于 IP 地址的 Web 服务器
bash
### 显示所有网络连接
[root@kittod conf.d]# nmcli connection show
NAME UUID TYPE DEVICE
ens160 bd7cb598-85e1-3c25-b696-f00bbdae9539 ethernet ens160
lo 101a95ef-e487-41bd-85ea-904739ff3241 loopback lo

# 添加一个或多个 IPv4 地址到指定的连接中
[root@kittod conf.d]# nmcli connection modify ens160 +ipv4.addresses
192.168.197.131/24
[root@kittod conf.d]# nmcli connection modify ens160 +ipv4.addresses
192.168.197.132/24
# 启动网卡
[root@kittod conf.d]# nmcli connection up ens160
Connection successfully activated (D-Bus active path:
/org/freedesktop/NetworkManager/ActiveConnection/3)
[root@kittod conf.d]# ip ad
1: lo: <LOOPBACK,UP,LOWER_UP> mtu 65536 qdisc noqueue state UNKNOWN group
default qlen 1000
link/loopback 00:00:00:00:00:00 brd 00:00:00:00:00:00
inet 127.0.0.1/8 scope host lo
valid_lft forever preferred_lft forever
inet6 ::1/128 scope host
valid_lft forever preferred_lft forever
2: ens160: <BROADCAST,MULTICAST,UP,LOWER_UP> mtu 1500 qdisc mq state UP
group default qlen 1000
link/ether 00:0c:29:fa:d7:6f brd ff:ff:ff:ff:ff:ff altname enp3s0
inet 192.168.197.131/24 brd 192.168.197.255 scope global noprefixroute ens160
valid_lft forever preferred_lft forever
inet 192.168.197.132/24 brd 192.168.197.255 scope global secondary
noprefixroute ens160
valid_lft forever preferred_lft forever
inet 192.168.197.130/24 brd 192.168.197.255 scope global secondary dynamic noprefixroute ens160
valid_lft 1799sec preferred_lft 1799sec
inet6 fe80::20c:29ff:fefa:d76f/64 scope link tentative noprefixroute
valid_lft forever preferred_lft forever

# 创建IP配置
[root@kittod conf.d]# cat 131.conf
server {
	server_name 192.168.197.131;
	root /var/www/131/;
	access_log /var/log/nginx/131/access.log;
	error_log /var/log/nginx/131/error.log;
}

[root@kittod conf.d]# cat 132.conf
server {
	server_name 192.168.197.132;
	root /var/www/132/;
	access_log /var/log/nginx/132/access.log;
	error_log /var/log/nginx/132/error.log;
}

[root@kittod conf.d]# mkdir /var/www/131
[root@kittod conf.d]# echo 131 > /var/www/131/index.html
[root@kittod conf.d]# mkdir /var/log/nginx/131

[root@kittod conf.d]# mkdir /var/www/132
[root@kittod conf.d]# echo 132 > /var/www/132/index.html
[root@kittod conf.d]# mkdir /var/log/nginx/132

[root@kittod conf.d]# systemctl restart nginx
[root@kittod conf.d]# curl 192.168.197.131
131
[root@kittod conf.d]# curl 192.168.197.132
132
配置账号验证访问
bash
# 安装 http 相关工具
[root@kittod conf.d]# dnf install httpd-tools -y

### 创建和管理用户密码文件。
# -c: 这个选项表示创建一个新文件。如果文件已存在,使用此选项将清除原有文件内容。如果只是添加用户,不应该使用此选项。
# -b: 该选项表示可以在命令行中使用明文密码,而不是在提示下输入(这在某些情况下可能会带来安全隐患,尽量避免在共享环境中使用)。
# 这里我们设置密码为 redhat
[root@kittod conf.d]# htpasswd -cb password zhangsan redhat
Adding password for user zhangsan
[root@kittod conf.d]# htpasswd -b password lisi redhat
Adding password for user lisi
[root@kittod conf.d]# cat password
zhangsan:$apr1$.8Df3FMX$MKNwPQsDhZJ1JuzWgJYjP1
lisi:$apr1$bRekxawz$ZANSRE1l.DLYUHzfkq82g0
# 修改密码文件权限
[root@kittod conf.d]# chmod 600 password
[root@kittod conf.d]# chown nginx password
[root@kittod conf.d]# ll password
-rw-------. 1 nginx root 90 Oct 25 15:15 password

### 要记住添加IP和对应网址到hosts文件中
[root@kittod conf.d]# cat /etc/hosts
...
192.168.197.130 www.account.com

# 创建账号验证配置
[root@kittod conf.d]# cat account.conf
server {
	server_name 		www.account.com;
	root 						/var/www/account;
	location /admin {
		index 							index.html;
		auth_basic 					"login password";
		auth_basic_user_file /etc/nginx/conf.d/password;
	}
	error_log 			/var/log/nginx/account.log;
}

[root@kittod conf.d]# mkdir /var/www/account/
[root@kittod conf.d]# echo account content > /var/www/account/index.html
[root@kittod conf.d]# mkdir /var/www/account/admin
[root@kittod conf.d]# echo account admin > /var/www/account/admin/index.html
[root@kittod conf.d]# systemctl restart nginx
[root@kittod conf.d]# curl www.account.com
account content

# 通过密码来访问网址,格式为: http://[用户名]:[密码]@[网址]/私人目录/网页
[root@kittod conf.d]# curl http://zhangsan:redhat@www.account.com/admin/index.html
account admin
[root@kittod conf.d]# curl http://lisi:redhat@www.account.com/admin/index.html
account admin
# 如果出现以下错误提示:
[root@kittod conf.d]# curl http://zhangsan:redhat@www.account.com/admin/index.html
<html>
<head><title>500 Internal Server Error</title></head>
<body>
<center><h1>500 Internal Server Error</h1></center>
<hr><center>nginx/1.20.1</center>
</body>
</html>

# 查看站点日志,需要注意 password 文件的权限
[root@kittod conf.d]# tail -f /var/log/nginx/account.log
2024/10/25 15:48:17 [crit] 5870#5870: *1 open() "/etc/nginx/conf.d/password"
failed (13: Permission denied), client: 192.168.197.131, server:
www.account.com, request: "GET /admin/index.html HTTP/1.1", host:
"www.account.com"
配置 https 加密服务
HTTPS 加密介绍
超文本传输协议 HTTP协议 被用于在Web浏览器和网站服务器之间传递信息。HTTP协议以明文方式 发送内容,不提供任何方式的数据加密,如果攻击者截取了Web浏览器和网站服务器之间的传输报文,就可以直接读懂其中的信息,因此HTTP协议不适合传输一些敏感信息,比如信用卡号、密码等。为了解决HTTP协议的这一缺陷,需要使用另一种协议:安全套接字层超文本传输协议HTTPS。
HTTPS(全称:Hyper Text Transfer Protocol over Secure Socket Layer 或 Hypertext Transfer Protocol Secure,超文本传输安全协议 ),是以安全为目标的HTTP通道 。HTTPS并不是一个新协议,而是HTTP+SSL(TLS)。原本HTTP先和TCP(假定传输层是TCP协议)直接通信,而加了SSL后,就变成HTTP先和SSL通信,再由SSL和TCP通信,相当于SSL被嵌在了HTTP和TCP之间。
SSL 是"Secure Sockets Layer"的缩写,中文叫做"安全套接层 "。它是在上世纪90年代中期,由网景公司设计的。到了1999年,SSL 应用广泛,已经成为互联网上的事实标准。IETF 就把 SSL 标准化。标准化之后SSL被改为 TLS(Transport Layer Security传输层安全协议)。
SSL协议分为两层:
- SSL记录协议 (SSL Record Protocol):它建立在可靠的传输协议(如TCP)之上,为高层协议提供数据封装、压缩、加密等基本功能。
- SSL握手协议(SSL Handshake Protocol):它建立在SSL记录协议之上,用于在实际的数据传输开始前,通讯双方进行身份认证、协商加密算法、交换加密密钥等。
SSL协议提供的服务:
- 认证用户和服务器,确保数据发送到正确的客户机和服务器。
- 加密数据以防止数据中途被窃取。
- 维护数据的完整性,确保数据在传输过程中不被改变。
Web网站的登录页面 通常都会使用 HTTPS 加密传输 的,加密数据以保障数据的安全,HTTPS能够加密信息 ,以免敏感信息被第三方获取,所以很多银行网站或电子邮箱等安全级别较高的服务都会采用 HTTPS协议,HTTPS 协议其实是有两部分组成:HTTP + SSL/TLS,也就是在 HTTP 上又加了一层处理加密信息的模块。服务器和客户端的信息传输都会通过 TLS 进行加密,所以传输的数据都是加密后的数据。
!note
Https实现过程如下:
客户端发起https请求:客户端访问某个web端的https地址,一般都是443端口
服务端的配置:
采用https协议的服务器必须要有一套证书,可以通过一些组织申请,也可以自己制作。目前国内很多网站都自己做的,当你访问一个网站的时候,提示证书不可信任就是表示证书是自己做的。证书就是一个公钥和私钥,就像一把锁和钥匙,正常情况下只有你的钥匙可以打开你的锁,你可以把这个送给另人,让他锁住一个箱子,里面放满了钱或秘密,别人不知道里面放了什么,而且别人了打不开,只有你的钥匙可以打开。
传送证书:
服务端给客户端传递证书,其实就是公钥,里面包含了很多信息,例如证书得到颁发机构、过期时间等。
客户端解析证书
这部分工作是由客户端完成。首先回验证公钥的有效性,如颁发机构、过期时间等。如果发现异常则会弹出一个警告框,提示证书可能存在问题,如果证书没有问题,就生成一个随机值,然后用证书对该随机值进行加密,就像2步骤所说,把随机值锁起来,不让别个看到。
传送4步骤的加密数据
就是将证书加密后的随机值传递给服务器,目的就是为了让服务器得到这个随机值,以后客户端和服务端的通信就可以通过这个随机值进行加密解密了。
服务端解密信息
服务端用私钥解密5步骤加密后的随机值之后,得到了客户端传过来的随机值(私钥),然后把内容通过该值进行对称加密,对称加密就是将信息和私钥通过算法混合在一起,这样除非你知道私钥,不然是无法获取其内部的内容,而正好 客户端和服务端都知道这个私钥,所以只要加密算法就可以保证数据的安全性。
传输加密后的信息
服务端将用私钥加密后的数据传递给客户端,在客户端可以被还原出原数据内容。
客户端解密信息
客户端用之前生成的私钥解密服务端传递过来的数据,由于 数据一直是加密的,因此即使第三方获取到数据也无法知道其详细内容。
服务配置
bash
# 添加网址IP
[root@kittod conf.d]# cat /etc/hosts
...
192.168.197.130 www.https.com

[root@kittod conf.d]# mkdir /var/www/https/
[root@kittod conf.d]# echo https > /var/www/https/index.html
[root@kittod conf.d]# mkdir /var/log/nginx/https
# 创建服务配置
[root@kittod conf.d]# cat https.conf
server {
	listen 443 ssl;
	server_name 					www.https.com;
	root 									/var/www/https/;
	ssl_certificate 			/etc/pki/tls/certs/https.com.crt;
	ssl_certificate_key 		/etc/pki/tls/private/https.com.key;
	access_log 						/var/log/nginx/https/access.log;
	error_log 						/var/log/nginx/https/error.log;
}

# 切换路径
[root@kittod certs]# pwd
/etc/pki/tls/certs

### 生成一个 RSA 私钥并将其保存到文件 https.com.key 中
[root@kittod certs]# openssl genrsa > https.com.key

### 生成自签名证书。
# req:这是 OpenSSL 的一个子命令,通常用于生成证书请求或自签名证书。
# -new:该选项表示生成一个新的证书签名请求(CSR)。
# -key https.com.key:指定使用 https.com.key 作为生成证书的私钥。这个私钥应当是之前生成并妥善保管的 RSA 私钥。
# -x509:该选项表示生成自签名证书,而不是生成一个证书请求。自签名证书可以用于测试和内部的应用。
# -days 100:指定生成的证书的有效期为 100 天。在这个有效期内,该证书可以用于 SSL/TLS 加密连接。
# -out https.com.crt:指定输出文件为 https.com.crt,这是生成的自签名证书的文件名。

[root@kittod certs]# openssl req -new -key https.com.key -x509 -days 100 -out https.com.crt
You are about to be asked to enter information that will be incorporated
into your certificate request.
What you are about to enter is what is called a Distinguished Name or a DN.
There are quite a few fields but you can leave some blank
For some fields there will be a default value,
If you enter '.', the field will be left blank.
-----
# 输入相关信息
Country Name (2 letter code) [XX]:86
State or Province Name (full name) []:chongqing
Locality Name (eg, city) [Default City]:banan
Organization Name (eg, company) [Default Company Ltd]:chengke
Organizational Unit Name (eg, section) []:rhce
Common Name (eg, your name or your server's hostname) []:www.https.com
Email Address []:admin@https.com

# 修改所有https开头的文件权限
[root@kittod certs]# chmod 600 https*
[root@kittod certs]# ll https*
-rw-------. 1 root root 1436 Oct 25 16:10 https.com.crt
-rw-------. 1 root root 1704 Oct 25 16:08 https.com.key
[root@kittod certs]# mv https.com.key ../private/
[root@kittod conf.d]# systemctl restart nginx
[root@kittod conf.d]# curl https://www.https.com
curl: (60) SSL certificate problem: self-signed certificate
More details here: https://curl.se/docs/sslcerts.html
curl failed to verify the legitimacy of the server and therefore could not
establish a secure connection to it. To learn more about this situation and
how to fix it, please visit the web page mentioned above.

# -k:表示在进行 HTTPS 请求时,忽略 SSL 证书验证(无视风险)。可以允许 curl 接受自签名证书或证书验证失败的情况下继续进行请求。
[root@kittod conf.d]# curl https://www.https.com -k
https
常见问题
bash
### 如果在重启服务时报错,则需要根据错误信息来解决错误
## 通常错误有:配置文件编写错误(缺少分号,路径配置错误),路径文件未创建等等

### 查看 nginx 系统状态
[root@kittod conf.d]# systemctl status nginx

### 重启虚拟机后,若没有设置自动挂载,则需要重新进行挂载。

### 如果出现 nginx 启动/重启失败,大概率是端口被某个进程占用了
# 通过杀死 nginx 的全部进程即可
[root@kittod conf.d]# killall nginx
nssl genrsa > https.com.key
生成自签名证书。
req:这是 OpenSSL 的一个子命令,通常用于生成证书请求或自签名证书。
-new:该选项表示生成一个新的证书签名请求(CSR)。
-key https.com.key:指定使用 https.com.key 作为生成证书的私钥。这个私钥应当是之前生成并妥善保管的 RSA 私钥。
-x509:该选项表示生成自签名证书,而不是生成一个证书请求。自签名证书可以用于测试和内部的应用。
-days 100:指定生成的证书的有效期为 100 天。在这个有效期内,该证书可以用于 SSL/TLS 加密连接。
-out https.com.crt:指定输出文件为 https.com.crt,这是生成的自签名证书的文件名。
root@kittod certs# openssl req -new -key https.com.key -x509 -days 100 -out https.com.crt
You are about to be asked to enter information that will be incorporated
into your certificate request.
What you are about to enter is what is called a Distinguished Name or a DN.
There are quite a few fields but you can leave some blank
For some fields there will be a default value,
If you enter '.', the field will be left blank.
输入相关信息
Country Name (2 letter code) XX:86
State or Province Name (full name) \[\]:chongqing
Locality Name (eg, city) Default City:banan
Organization Name (eg, company) Default Company Ltd:chengke
Organizational Unit Name (eg, section) \[\]:rhce
Common Name (eg, your name or your server's hostname) \[\]:www.https.com
Email Address \[\]:admin@https.com
修改所有https开头的文件权限
root@kittod certs# chmod 600 https*
root@kittod certs# ll https*
-rw-------. 1 root root 1436 Oct 25 16:10 https.com.crt
-rw-------. 1 root root 1704 Oct 25 16:08 https.com.key
root@kittod certs# mv https.com.key .../private/
root@kittod conf.d# systemctl restart nginx
root@kittod conf.d# curl https://www.https.com
curl: (60) SSL certificate problem: self-signed certificate
More details here: https://curl.se/docs/sslcerts.html
curl failed to verify the legitimacy of the server and therefore could not
establish a secure connection to it. To learn more about this situation and
how to fix it, please visit the web page mentioned above.
-k:表示在进行 HTTPS 请求时,忽略 SSL 证书验证(无视风险)。可以允许 curl 接受自签名证书或证书验证失败的情况下继续进行请求。
root@kittod conf.d# curl https://www.https.com -k
https
### 常见问题

```bash
### 如果在重启服务时报错,则需要根据错误信息来解决错误
## 通常错误有:配置文件编写错误(缺少分号,路径配置错误),路径文件未创建等等

### 查看 nginx 系统状态
[root@kittod conf.d]# systemctl status nginx

### 重启虚拟机后,若没有设置自动挂载,则需要重新进行挂载。

### 如果出现 nginx 启动/重启失败,大概率是端口被某个进程占用了
# 通过杀死 nginx 的全部进程即可
[root@kittod conf.d]# killall nginx