前言:什么是生命周期?
想象一下一个人的一生:出生 → 成长 → 工作 → 退休 → 离世。Vue 组件也有类似的生命周期,从创建到销毁的整个过程就是生命周期。
生命周期钩子就是 Vue 在组件生命周期的不同阶段自动调用的函数,让我们有机会在特定时刻执行自己的代码。
第一章:生命周期全景图
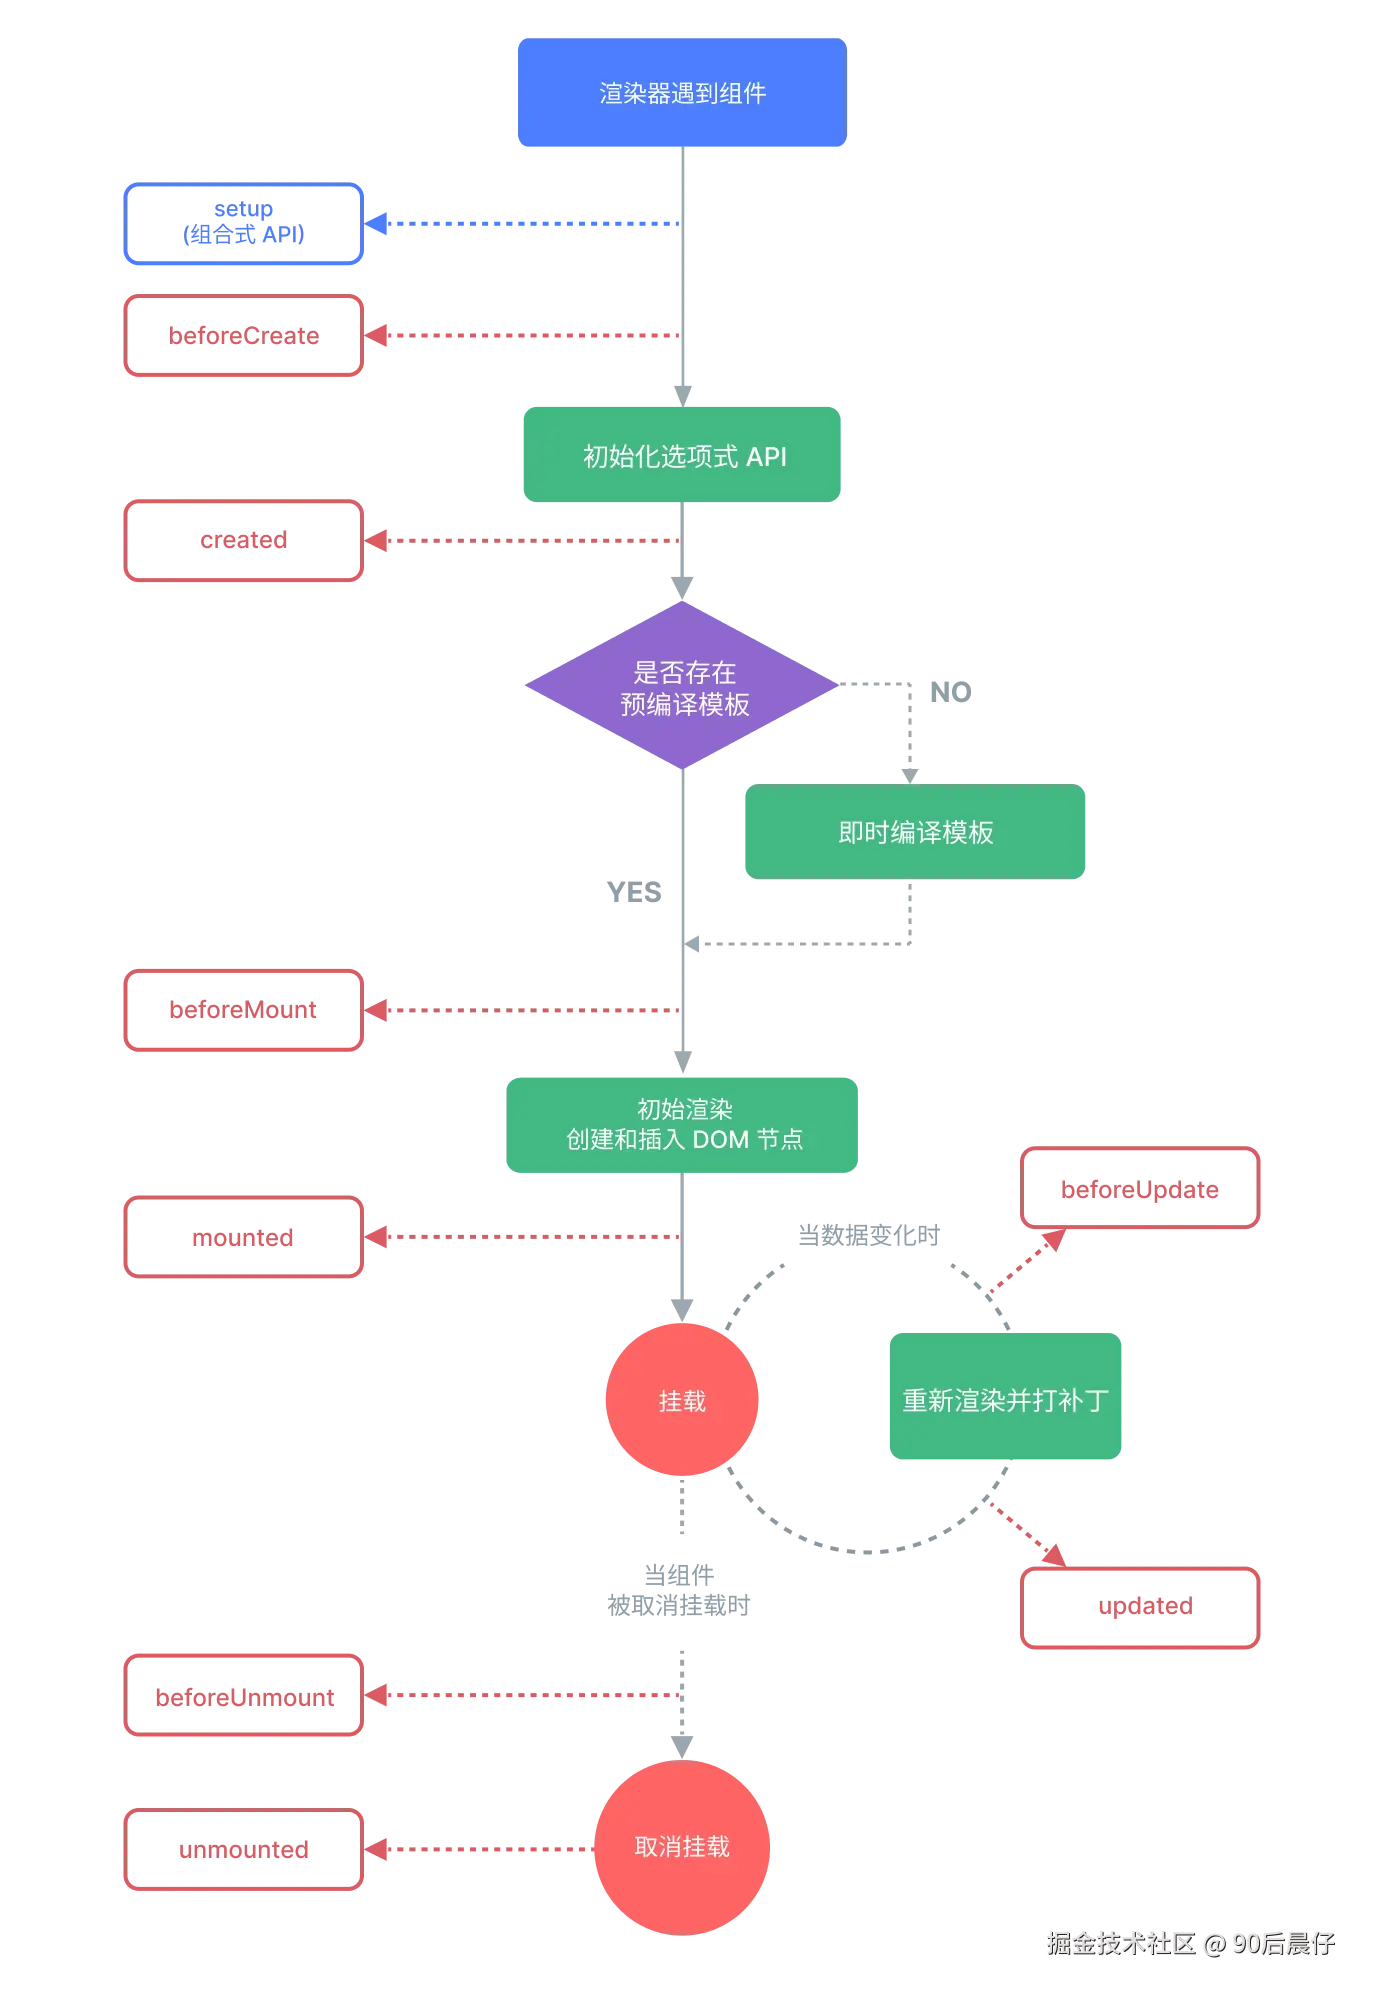
概括来总结一下生命周期:
markdown
组件诞生
    ↓
beforeCreate    → 组件刚初始化,什么都还没有
    ↓
created         → 数据已初始化,但DOM还未创建
    ↓
beforeMount     → 模板编译完成,但还未挂载到页面
    ↓
mounted         → 组件已显示在页面中 ✅
    ↓
    ┌─→ beforeUpdate  → 数据变化,DOM更新前
    │     ↓
    │   updated      → DOM已更新完成
    │     ↓
    └─────┘
    ↓
beforeUnmount   → 组件即将被销毁
    ↓
unmounted       → 组件已销毁 🏁
在这个过程中,Vue 会在不同阶段自动触发一些"钩子函数"(生命周期钩子),我们就可以在这些关键节点里插入自己的逻辑。
📌 打个比方:
-
beforeCreate 就像刚出生的婴儿,什么都还没有;
-
created 就像长大拥有了思想,但还看不见世界;
-
mounted 就像登上舞台,终于亮相;
-
updated 就像换上新衣,焕然一新;
-
unmounted 就是彻底谢幕,离开舞台。
第二章:详细解析每个生命周期阶段
2.1 创建阶段(组件诞生)
js
<template>
  <div class="lifecycle-demo">
    <h3>{{ title }}</h3>
    <p>计数: {{ count }}</p>
    <button @click="count++">增加</button>
    <div ref="messageElement">我是DOM元素</div>
  </div>
</template>

<script>
export default {
  data() {
    return {
      title: '生命周期演示',
      count: 0
    }
  },

  // 1. beforeCreate - 组件刚初始化
  beforeCreate() {
    console.log('🚀 beforeCreate 阶段')
    console.log('数据:', this.title)        // undefined - 数据还未初始化
    console.log('DOM:', this.$refs.messageElement) // undefined - DOM不存在
    console.log('-------------------')
  },

  // 2. created - 数据已准备好
  created() {
    console.log('✅ created 阶段')
    console.log('数据:', this.title)        // '生命周期演示' - 数据已初始化
    console.log('DOM:', this.$refs.messageElement) // undefined - DOM还未创建
    console.log('可以在这里调用API获取数据')
    console.log('-------------------')

    // 常用场景:初始化数据、调用API
    this.fetchData()
  },

  methods: {
    fetchData() {
      // 模拟API调用
      console.log('正在从服务器获取数据...')
    }
  }
}
</script>
2.2 挂载阶段(显示到页面)
js
<script>
export default {
  // ... 之前的代码

  // 3. beforeMount - 模板编译完成,即将显示
  beforeMount() {
    console.log('📝 beforeMount 阶段')
    console.log('DOM:', this.$refs.messageElement) // undefined - 还未插入页面
    console.log('模板已编译,但还未挂载到DOM中')
    console.log('-------------------')
  },

  // 4. mounted - 组件已显示在页面
  mounted() {
    console.log('🎉 mounted 阶段')
    console.log('DOM:', this.$refs.messageElement) // 真实的DOM元素
    console.log('组件已显示在页面中,可以操作DOM了')
    console.log('-------------------')

    // 常用场景:操作DOM、初始化第三方库、添加事件监听
    this.initThirdPartyLibrary()
    this.startTimer()
  },

  methods: {
    initThirdPartyLibrary() {
      // 比如初始化图表库、地图等
      console.log('初始化ECharts图表...')
    },

    startTimer() {
      // 启动定时器
      this.timer = setInterval(() => {
        console.log('定时器运行中...')
      }, 1000)
    }
  }
}
</script>
2.3 更新阶段(数据变化时)
js
<script>
export default {
  // ... 之前的代码

  // 5. beforeUpdate - 数据变化,但DOM还未更新
  beforeUpdate() {
    console.log('🔄 beforeUpdate 阶段')
    console.log('数据已变化,新count:', this.count)
    console.log('但DOM还未更新,页面显示的还是旧值')
    console.log('-------------------')
  },

  // 6. updated - DOM已更新完成
  updated() {
    console.log('✨ updated 阶段')
    console.log('DOM已更新完成,页面显示新值')
    console.log('可以在这里获取更新后的DOM状态')
    console.log('-------------------')

    // 注意:不要在这里修改数据,可能导致无限循环!
    // this.count++  // ❌ 危险操作!
  }
}
</script>
2.4 销毁阶段(组件消亡)
js
<script>
export default {
  // ... 之前的代码

  // 7. beforeUnmount - 组件即将被销毁
  beforeUnmount() {
    console.log('🛑 beforeUnmount 阶段')
    console.log('组件即将被销毁,但还可以访问数据和方法')
    console.log('这是清理工作的最后机会')
    console.log('-------------------')

    // 常用场景:清除定时器、取消网络请求、移除事件监听
    this.cleanup()
  },

  // 8. unmounted - 组件已销毁
  unmounted() {
    console.log('💀 unmounted 阶段')
    console.log('组件已完全销毁,所有东西都被清理了')
    console.log('-------------------')
  },

  methods: {
    cleanup() {
      // 清除定时器
      if (this.timer) {
        clearInterval(this.timer)
        console.log('定时器已清除')
      }

      // 取消网络请求
      console.log('取消未完成的网络请求...')
    }
  }
}
</script>
第三章:组合式API中的生命周期
在 Vue3 的 <script setup> 中,生命周期用法有所不同:
js
<template>
  <div class="composition-api-demo">
    <h3>{{ title }}</h3>
    <p>计数: {{ count }}</p>
    <button @click="increment">增加</button>
    <button @click="destroyComponent">销毁组件</button>
  </div>
</template>

<script setup>
import { ref, onBeforeMount, onMounted, onBeforeUpdate, onUpdated, onBeforeUnmount, onUnmounted } from 'vue'

const title = ref('组合式API生命周期')
const count = ref(0)
const showComponent = ref(true)

// 对应 beforeMount
onBeforeMount(() => {
  console.log('🔹 onBeforeMount - 模板编译完成,即将挂载')
})

// 对应 mounted
onMounted(() => {
  console.log('🔹 onMounted - 组件已挂载到DOM')
  console.log('可以在这里操作DOM或初始化第三方库')
})

// 对应 beforeUpdate
onBeforeUpdate(() => {
  console.log('🔹 onBeforeUpdate - 数据即将更新,DOM还未变化')
  console.log('当前count:', count.value)
})

// 对应 updated
onUpdated(() => {
  console.log('🔹 onUpdated - DOM已更新完成')
})

// 对应 beforeUnmount
onBeforeUnmount(() => {
  console.log('🔹 onBeforeUnmount - 组件即将销毁')
  console.log('清理定时器、事件监听等资源')
})

// 对应 unmounted
onUnmounted(() => {
  console.log('🔹 onUnmounted - 组件已销毁')
})

const increment = () => {
  count.value++
}

const destroyComponent = () => {
  showComponent.value = false
}
</script>
第四章:实际应用场景
4.1 数据获取场景
js
<template>
  <div class="user-profile">
    <div v-if="loading">加载中...</div>
    <div v-else-if="error">加载失败: {{ error }}</div>
    <div v-else>
      <h3>{{ user.name }}</h3>
      <p>邮箱: {{ user.email }}</p>
    </div>
  </div>
</template>

<script>
export default {
  data() {
    return {
      user: null,
      loading: false,
      error: null
    }
  },

  async created() {
    // 在created中获取数据,这样组件一创建就开始请求
    await this.fetchUserData()
  },

  methods: {
    async fetchUserData() {
      this.loading = true
      this.error = null

      try {
        // 模拟API调用
        const response = await this.$http.get('/api/user/1')
        this.user = response.data
      } catch (err) {
        this.error = err.message
      } finally {
        this.loading = false
      }
    }
  }
}
</script>
4.2 第三方库集成
js
<template>
  <div ref="chartContainer" style="width: 600px; height: 400px;"></div>
</template>

<script>
import * as echarts from 'echarts'

export default {
  data() {
    return {
      chart: null
    }
  },

  mounted() {
    // 在mounted中初始化图表,因为这时DOM已经存在
    this.initChart()
  },

  beforeUnmount() {
    // 组件销毁前清理图表实例,避免内存泄漏
    if (this.chart) {
      this.chart.dispose()
    }
  },

  methods: {
    initChart() {
      this.chart = echarts.init(this.$refs.chartContainer)

      const option = {
        title: { text: '销售图表' },
        xAxis: { data: ['1月', '2月', '3月'] },
        yAxis: {},
        series: [{ type: 'bar', data: [100, 200, 150] }]
      }

      this.chart.setOption(option)
    }
  }
}
</script>
4.3 事件监听管理
js
<template>
  <div class="resize-demo">
    <p>窗口宽度: {{ windowWidth }}px</p>
  </div>
</template>

<script>
export default {
  data() {
    return {
      windowWidth: 0
    }
  },

  mounted() {
    // 添加事件监听
    this.windowWidth = window.innerWidth
    window.addEventListener('resize', this.handleResize)
  },

  beforeUnmount() {
    // 移除事件监听,避免内存泄漏
    window.removeEventListener('resize', this.handleResize)
  },

  methods: {
    handleResize() {
      this.windowWidth = window.innerWidth
      console.log('窗口大小变化:', this.windowWidth)
    }
  }
}
</script>
第五章:常见问题和最佳实践
5.1 生命周期执行顺序
js
<!-- ParentComponent.vue -->
<template>
  <ChildComponent />
</template>

<script>
export default {
  beforeCreate() { console.log('父组件 beforeCreate') },
  created() { console.log('父组件 created') },
  beforeMount() { console.log('父组件 beforeMount') },
  mounted() { console.log('父组件 mounted') }
}
</script>

<!-- ChildComponent.vue -->
<script>
export default {
  beforeCreate() { console.log('子组件 beforeCreate') },
  created() { console.log('子组件 created') },
  beforeMount() { console.log('子组件 beforeMount') },
  mounted() { console.log('子组件 mounted') }
}
</script>
执行顺序:
js
父组件 beforeCreate
父组件 created
父组件 beforeMount
  子组件 beforeCreate
  子组件 created
  子组件 beforeMount
  子组件 mounted
父组件 mounted
5.2 避免的陷阱
js
<script>
export default {
  data() {
    return {
      items: []
    }
  },

  // ❌ 错误:在beforeCreate中访问数据
  beforeCreate() {
    console.log(this.items) // undefined
  },

  // ❌ 错误:在created中操作DOM
  created() {
    document.querySelector('.my-element') // null 或 错误的元素
  },

  // ❌ 错误:在updated中修改数据(可能导致无限循环)
  updated() {
    if (this.items.length > 10) {
      this.items.pop() // 危险!
    }
  },

  // ✅ 正确:在created中初始化数据
  created() {
    this.fetchData()
  },

  // ✅ 正确:在mounted中操作DOM
  mounted() {
    this.$refs.myElement.focus()
  },

  // ✅ 正确:使用计算属性或侦听器替代updated中的数据修改
  watch: {
    items: {
      handler(newItems) {
        if (newItems.length > 10) {
          this.items = newItems.slice(0, 10)
        }
      },
      deep: true
    }
  }
}
</script>
第六章:生命周期记忆口诀
为了方便记忆,可以记住这个口诀:
"创挂更销"四大阶段
js
创(创建阶段)
  beforeCreate - 初生婴儿,什么都没有
  created      - 有了思想,但看不见世界

挂(挂载阶段)
  beforeMount  - 准备好亮相,但还在后台
  mounted      - 登台表演,观众可见

更(更新阶段)
  beforeUpdate - 准备换装,旧装还在身
  updated      - 新装亮相,焕然一新

销(销毁阶段)
  beforeUnmount - 准备谢幕,还能说话
  unmounted     - 完全退场,清理舞台
总结
通过本文的学习,你应该已经掌握了:
- ✅ 生命周期概念 - 组件从创建到销毁的完整过程
- ✅ 8个生命周期钩子 - 每个阶段的作用和时机
- ✅ 组合式API用法 - 新的生命周期函数使用方式
- ✅ 实际应用场景 - 数据获取、第三方库集成等
- ✅ 最佳实践 - 避免常见陷阱,写出更好的代码
记住生命周期的重要性:合理使用生命周期钩子可以让你的组件更加健壮,避免内存泄漏,提升用户体验。