Nginx 反向代理与负载均衡核心内容总结
一、核心概念解析
1. 代理基础
代理是连接被代理角色与目标角色的渠道,类似专卖店作为厂家(被代理方)与用户(目标方)的中间枢纽,可分为正向代理与反向代理两种核心模式
2. 正向代理
- 场景:如客户端需访问境外网站,通过可访问该网站的代理服务器中转请求
- 特点:客户端明确目标服务器地址;目标服务器仅知晓请求来自代理服务器,隐藏真实客户端信息
3. 反向代理
- 场景:Nginx 接收客户端请求后,按规则分发至后端多台业务服务器处理
- 特点:客户端明确,但请求具体由哪台后端服务器处理未知;隐藏后端服务器信息,多用于服务器集群部署
- 实际应用:常与正向代理结合使用 ------ 正向代理客户端请求访问目标服务器,该目标服务器实为反向代理,连接多台真实业务服务器
二、Nginx 核心功能实现
1. 动静分离
- 原理:反向代理时,静态资源直接从 Nginx 发布路径读取,无需请求后端服务器,提升响应效率。
- 关键保障:需保证前后端程序一致性,可通过 Rsync 自动同步,或 NFS、MFS 分布式共享存储实现资源统一
- 依赖模块 :Http Proxy 模块为核心,常用
proxy_pass(转发请求)和proxy_cache(缓存资源)指令;使用proxy_cache需安装时集成第三方ngx_cache_purge模块,用于清除指定 URL 缓存,安装命令为./configure --add-module=.../ngx_cache_purge-1.0 ...
2. 负载均衡
- 实现基础 :通过
upstream模块定义后端服务器集群,该模块需配置在http段内 - 核心策略
- weight 轮询(默认) :请求按顺序分配至后端服务器,某服务器宕机时 Nginx 自动剔除,不影响服务。可通过
weight参数调整分配权重,值越大被分配请求的几率越高,适配不同硬件配置的服务器 - ip_hash :基于客户端 IP 的 hash 结果分配服务器,固定 IP 客户端始终访问同一服务器,可解决集群 session 共享问题。移除故障服务器时需标记为
down,不可直接删除配置,避免 hash 算法重算导致会话或缓存失效
- weight 轮询(默认) :请求按顺序分配至后端服务器,某服务器宕机时 Nginx 自动剔除,不影响服务。可通过
三、Nginx 实战案例
1. 负载均衡配置案例
-
环境准备
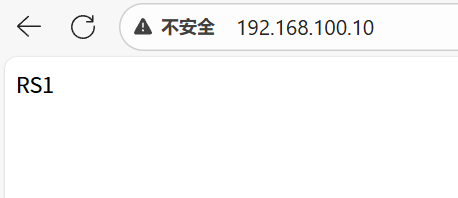
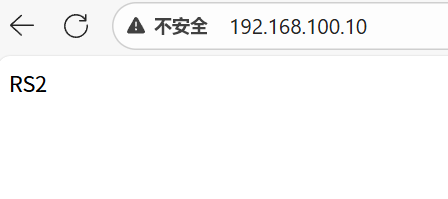
主机 IP 地址 安装软件 系统 Nginx 192.168.100.10 Nginx Centos7 Rs1 192.168.100.20 Httpd Centos7 Rs2 192.168.100.30 Httpd Centos7 - 所有主机关闭防火墙和 selinux,配置好 yum 仓库;Rs1、Rs2 安装 Httpd 并创建测试页面(分别输出 "this is rs1""this is rs2"),启动并设置开机自启
-
核心配置
-
基础轮询配置:在 Nginx 的
nginx.conf中定义
upstream集群,通过
proxy_pass转发请求
nginx
nginxhttp { upstream webserver { server 192.168.100.20; server 192.168.100.30; } server { listen 80; server_name localhost; location / { proxy_pass http://webserver; } } } -
权重配置:为 Rs1 设置权重 2,实现 2:1 的请求分配
nginx
nginxupstream webserver { server 192.168.100.20 weight=2; server 192.168.100.30; } -
非默认端口配置:若 Rs1 使用 8080 端口,需在配置中明确指定
nginx
nginxupstream webserver { server 192.168.100.20:8080 weight=2; server 192.168.100.30:80; } -
ip_hash 配置:添加
ip_hash指令实现基于 IP 的固定分配
nginx
nginxupstream webserver { ip_hash; server 192.168.100.20:8080 weight=2; server 192.168.100.30:80; }
-
-
测试与重载 :通过
nginx -t验证配置正确性,nginx -s reload重载配置,访问 Nginx 地址可看到请求按规则分配
2. 动静分离配置案例
-
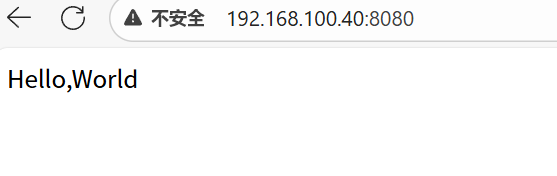
环境扩展:新增 Tomcat 主机(192.168.100.40),部署测试页面(输出 "Hello World")
-
核心配置 :定义静态资源集群(Rs1、Rs2)和 Tomcat 集群,通过不同
location分发请求nginx
nginxhttp { upstream static { server 192.168.100.20; server 192.168.100.30; } upstream tomcat { server 192.168.100.40:8080; } server { listen 80; server_name localhost; location / { proxy_pass http://static; # 静态资源请求转发至static集群 } location /test { proxy_pass http://tomcat; # 动态请求转发至Tomcat } } } -
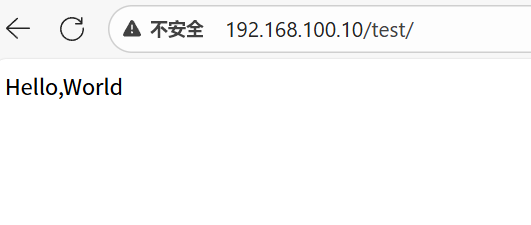
测试效果 :访问 Nginx 根路径获取静态页面,访问
/test路径获取 Tomcat 动态页面,实现动静分离
具体详细示例:
三台主机都关闭防火墙和selinux,还需要配置好yum仓库
nginx主机已部署nginx服务
rs1主机上,安装httpd,然后添加一个测试网页:
[root@rs1 ~]# cd /etc/yum.repos.d/
[root@rs1 yum.repos.d]# ls
sy.repo
[root@rs1 yum.repos.d]# cat sy.repo
[aa]
name=aa1
baseurl=file:///mnt
enabled=1
gpgcheck=0
[root@rs1 yum.repos.d]# mount /dev/cdrom /mnt/
mount: /dev/sr0 is write-protected, mounting read-only
[root@rs1 yum.repos.d]# yum -y install httpd
[root@rs1 yum.repos.d]# echo "RS1" > /var/www/html/index.html
[root@rs1 yum.repos.d]# systemctl restart httpd
[root@rs1 yum.repos.d]# systemctl enable httpdrs2主机上,安装httpd,然后添加一个测试网页:
[root@rs2 ~]# cd /etc/yum.repos.d/
[root@rs2 yum.repos.d]# ls
CentOS-Base.repo CentOS-Debuginfo.repo CentOS-Media.repo CentOS-Vault.repo
CentOS-CR.repo CentOS-fasttrack.repo CentOS-Sources.repo
[root@rs2 yum.repos.d]# rm -rf *
[root@rs2 yum.repos.d]# vim sy.repo
[aa]
name=aa1
baseurl=file:///mnt
enabled=1
gpgcheck=0
~
[root@rs2 yum.repos.d]# mount /dev/cdrom /mnt/
mount: /dev/sr0 is write-protected, mounting read-only
[root@rs2 yum.repos.d]# yum -y install httpd
[root@rs2 yum.repos.d]# echo "RS2" > /var/www/html/index.html
[root@rs2 yum.repos.d]# systemctl restart httpd
[root@rs2 yum.repos.d]# systemctl enable httpd
Created symlink from /etc/systemd/system/multi-user.target.wants/httpd.service to /usr/lib/systemd/system/httpd.service.在nginx主机上,修改配置文件,设置负载均衡
在http{}中配置upstream:
[root@nginx ~]# vim /usr/local/nginx/conf/nginx.conf
http {
include mime.types;
default_type application/octet-stream;
upstream webserver {
server 192.168.100.20;
server 192.168.100.30;
}
location / {
proxy_pass http://webserver;
}测试配置文件是否正确,然后重载nginx:
[root@nginx ~]# nginx -t
nginx: the configuration file /usr/local/nginx/conf/nginx.conf syntax is ok
nginx: configuration file /usr/local/nginx/conf/nginx.conf test is successful
[root@nginx ~]# nginx -s reload测试访问:


设置权重,如果想其中一台后端真实服务器,多承担一些访问量,可以去设置weight权重:
[root@nginx ~]# vim /usr/local/nginx/conf/nginx.conf
http {
include mime.types;
default_type application/octet-stream;
upstream webserver {
    server 192.168.100.20 weight=2;
    server 192.168.100.30;
}重载nginx并测试访问,此时会发现100.20主机(rs1),访问时,访问的2次后,才轮询到rs2中:
[root@nginx ~]# nginx -s reload

三台主机都是使用80端口,所以,在nginx配置文件中的upstream中,对应的真实后端服务器,我们并没有设置端口。如果其中某台后端服务器使用8080端口呢?我们如何进行设置,rs1为8080端口,rs2为80端口
首先修改rs1的httpd服务,侦听8080端口,并重启httpd服务:
[root@rs1 ~]# vim /etc/httpd/conf/httpd.conf
Listen 8080
[root@rs1 ~]# systemctl restart httpd
在nginx中:
[root@nginx ~]# vim /usr/local/nginx/conf/nginx.conf
http {
    include       mime.types;
    default_type  application/octet-stream;
    upstream webserver {
        server 192.168.100.20:8080;
        server 192.168.100.30;
    }
[root@nginx ~]# nginx -s reload
测试访问:

ip_hash配置:
[root@nginx ~]# vim /usr/local/nginx/conf/nginx.conf
http {
    include       mime.types;
    default_type  application/octet-stream;
    upstream webserver {
        ip_hash;
        server 192.168.100.20:8080;
        server 192.168.100.30;
    }
[root@nginx ~]# nginx -s reload

ip_hash这种负载均衡模式根据个人理解就是:例如多个用户通过nginx访问到了后端的httpd集群中,这个时候因为有不同用户,所以ip也不同,ip+hash算法计算的hash值都传到了httpd,nginx就记录了这个ip和hash值,那么下次同一个ip过来还是会分配到这个httpd的
如果在集群中的某台服务器出现故障,我们想要从nginx的集群配置中移除掉,我们不可以直接的将那一行删掉,比如server 192.168.100.10:8080 weight=2;删掉,如果直接删掉会导致nginx的hash算法重新计算,那么用户的会话或者说缓存都会失效掉,所以这里如果不用这台服务器,直接比较为down即可,也就是 server 192.168.100.10:8080 down 这么做就可以了
动静分离nginx+tomcat 还是基于上面的环境添加一台tomcat
Tomcat:192.168.100.40
部署tomcat:
上传压缩包并解压:
[root@client ~]# rz -E
rz waiting to receive.
[root@client ~]# ls
anaconda-ks.cfg               Documents             Music     Templates
apache-tomcat-10.0.23.tar.gz  Downloads             Pictures  Videos
Desktop                       initial-setup-ks.cfg  Public
[root@client ~]# tar -zxvf apache-tomcat-10.0.23.tar.gz -C /usr/local/

[root@client ~]# cd /usr/local/
[root@client local]# ls
apache-tomcat-10.0.23  bin  etc  games  include  lib  lib64  libexec  sbin  share  src
[root@client local]# ln -s apache-tomcat-10.0.23/ tomcat
[root@client local]# cd tomcat/
[root@client tomcat]# ls
bin           conf             lib      logs    README.md      RUNNING.txt  webapps
BUILDING.txt  CONTRIBUTING.md  LICENSE  NOTICE  RELEASE-NOTES  temp         work
[root@client tomcat]# cd webapps/
[root@client webapps]# ls
docs  examples  host-manager  manager  ROOT
[root@client webapps]# cd ROOT/
[root@client ROOT]# ls
asf-logo-wide.svg  bg-middle.png  bg-upper.png  index.jsp          tomcat.css  WEB-INF
bg-button.png      bg-nav.png     favicon.ico   RELEASE-NOTES.txt  tomcat.svg
[root@client ROOT]# ls
asf-logo-wide.svg  bg-middle.png  bg-upper.png  index.jsp          tomcat.css  WEB-INF
bg-button.png      bg-nav.png     favicon.ico   RELEASE-NOTES.txt  tomcat.svg
[root@client ROOT]# cp index.jsp index.jsp.bak
[root@client ROOT]# vim index.jsp

<html>
<head>
        <title>test page</title>
</head>
<body>
        <%
                out.println("Hello,World");
        %>
</body>
</html>
~
[root@client ROOT]# cd ..
[root@client webapps]# cd ..
[root@client tomcat]# ls
bin           conf             lib      logs    README.md      RUNNING.txt  webapps
BUILDING.txt  CONTRIBUTING.md  LICENSE  NOTICE  RELEASE-NOTES  temp         work
[root@client tomcat]# bin/catalina.sh start
Using CATALINA_BASE:   /usr/local/tomcat
Using CATALINA_HOME:   /usr/local/tomcat
Using CATALINA_TMPDIR: /usr/local/tomcat/temp
Using JRE_HOME:        /usr
Using CLASSPATH:       /usr/local/tomcat/bin/bootstrap.jar:/usr/local/tomcat/bin/tomcat-juli.jar
Using CATALINA_OPTS:
Tomcat started.
[root@client tomcat]# ss -anlt
State      Recv-Q Send-Q Local Address:Port               Peer Address:Port
LISTEN     0      128               *:111                           *:*
LISTEN     0      128               *:6000                          *:*
LISTEN     0      5      192.168.122.1:53                            *:*
LISTEN     0      128               *:22                            *:*
LISTEN     0      128       127.0.0.1:631                           *:*
LISTEN     0      100       127.0.0.1:25                            *:*
LISTEN     0      128       127.0.0.1:6010                          *:*
LISTEN     0      128              :::111                          :::*
LISTEN     0      100              :::8080                         :::*
LISTEN     0      128              :::6000                         :::*
LISTEN     0      128              :::22                           :::*
LISTEN     0      128             ::1:631                          :::*
LISTEN     0      100             ::1:25                           :::*
LISTEN     0      128             ::1:6010                         :::*
LISTEN     0      1      ::ffff:127.0.0.1:8005                         :::*             [root@client webapps]# mkdir test
[root@client webapps]# cp ROOT/index.jsp test/
部署完成后,测试访问以下tomcat的测试网页:
配置nginx,设置动静分离:
[root@nginx ~]# vim /usr/local/nginx/conf/nginx.conf
http {
    include       mime.types;
    default_type  application/octet-stream;
    upstream static {
        server 192.168.100.20;
        server 192.168.100.30;
    }
    upstream tomcat{
        server 192.168.100.40:8080;
    }

  server {
        listen       80;
        server_name  localhost;

        #charset koi8-r;

        #access_log  logs/host.access.log  main;

        location / {
                proxy_pass http://static;
        }
        location /test {
                proxy_pass http://tomcat;
        }
[root@nginx ~]# nginx -s reload