需求
我想要开发一个安卓小组件,uniapp没法实现,uts资料太少;只能借助原生安卓。
流程:用idea创建安卓项目------在项目里面创建一个安卓插件------然后安卓项目引入这个插件进行调试好------再放到uniapp项目里面------制作自定义基座------再使用自定义基座运行到手机上
创建安卓项目
我已经有了idea就没安装android studio了,直接用idea开发的;需要在idea中配置好gradle、android SDK、安卓插件
idea环境搭建
工具包:
idea:安装安卓插件
gradle:我用的是 https://mirrors.cloud.tencent.com/gradle/gradle-8.11.1-all.zip【这个版本很重要,如果出现不兼容就要换】
安卓SDK
安装和配置参考:https://blog.csdn.net/2301_80439638/article/details/148349900
创建安卓项目
环境搭建好后就可以创建android项目啦
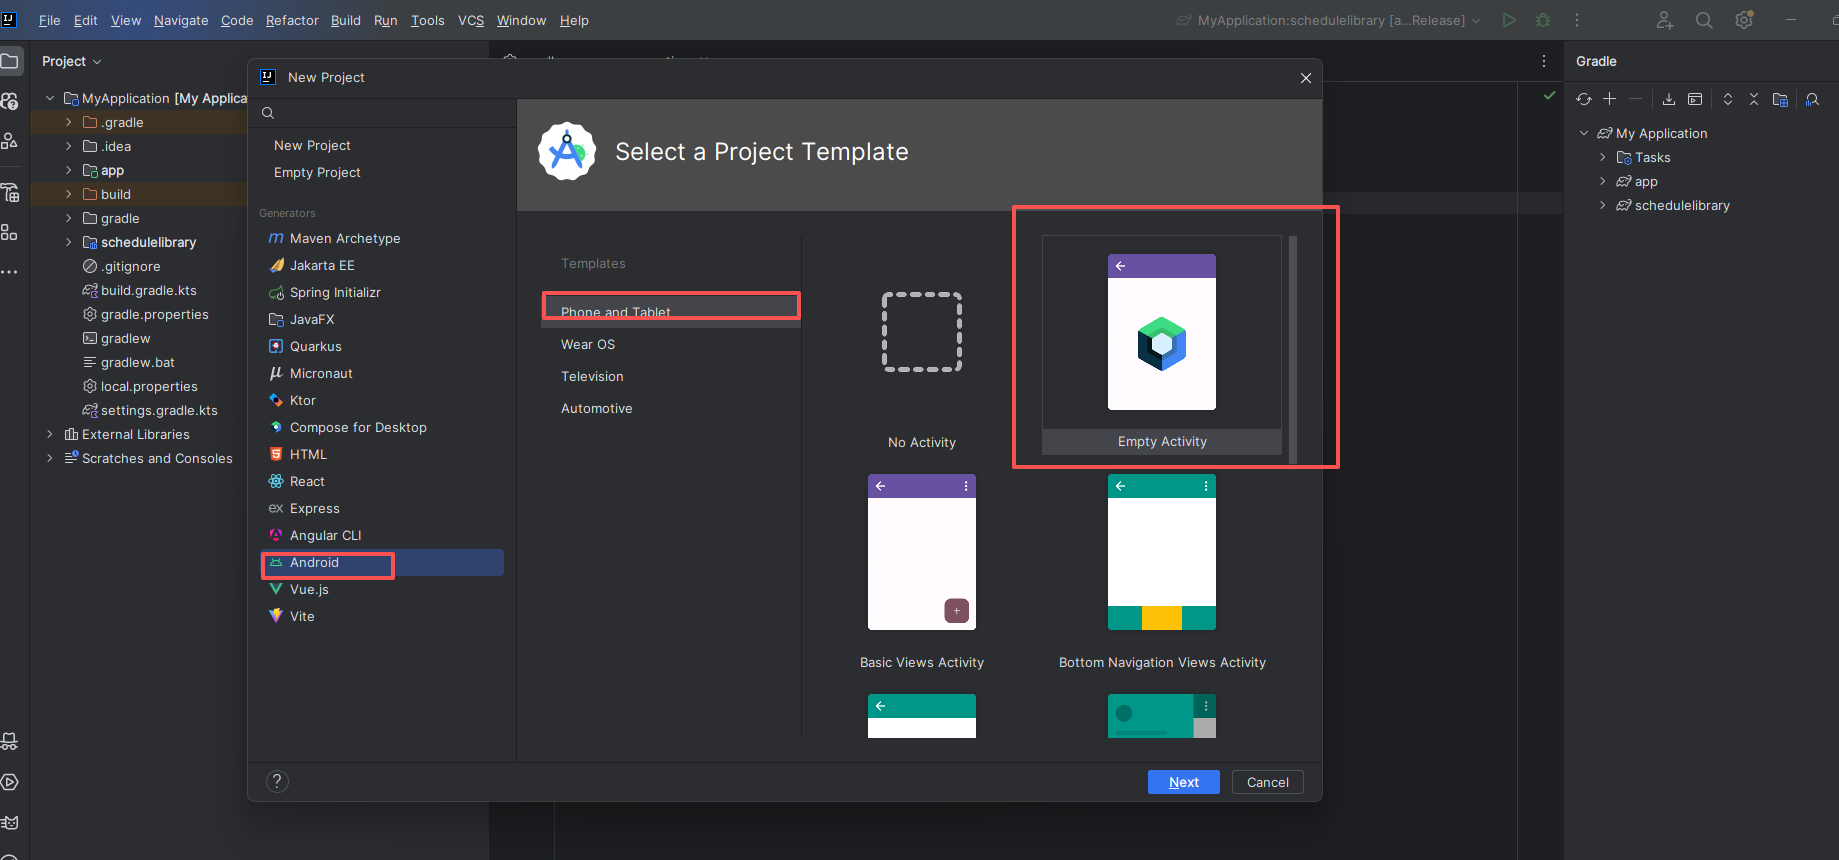
下一步这里如果有java 选择java 我这里没有只能 选择kotlin语言
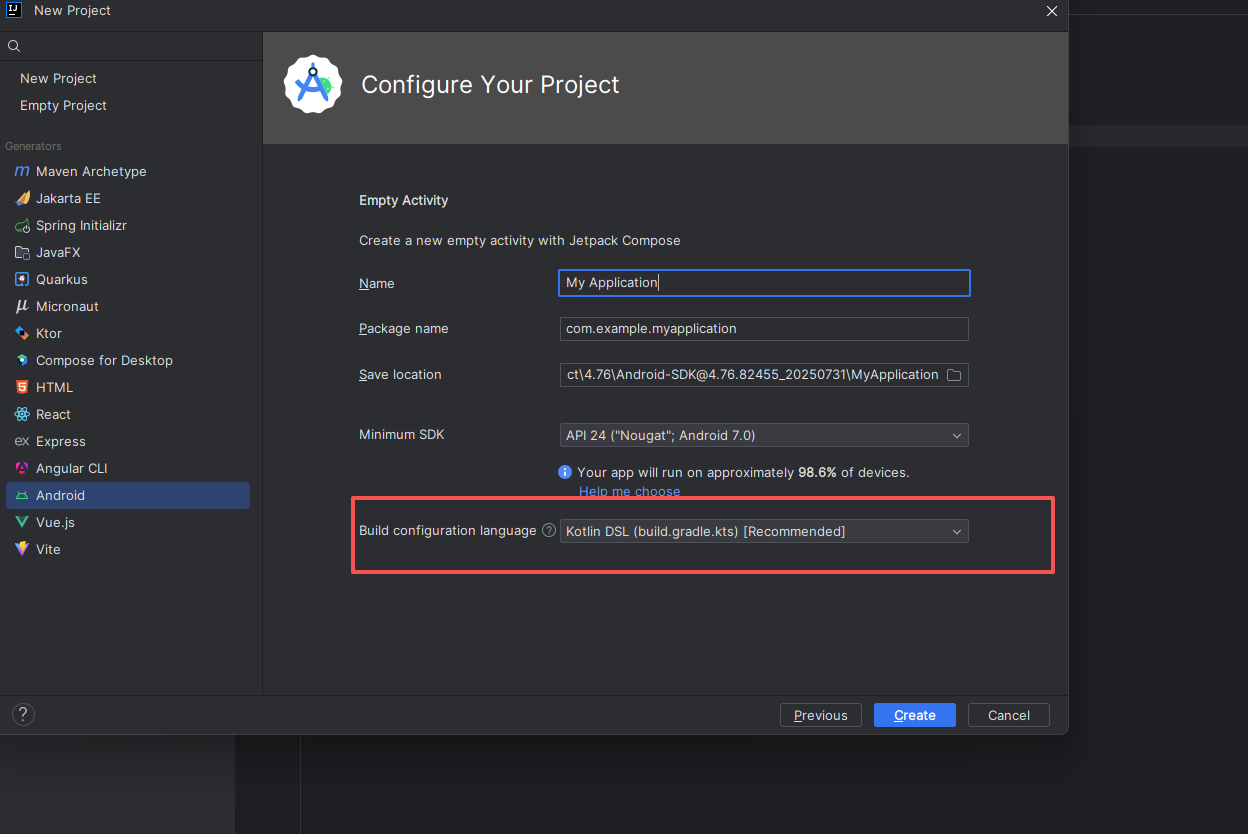
创建好之后,修改gradle目录;我用的JDK17,下载一个解压就可以,不需要配置环境变量;我已经有了jdk1.8 就没配置了
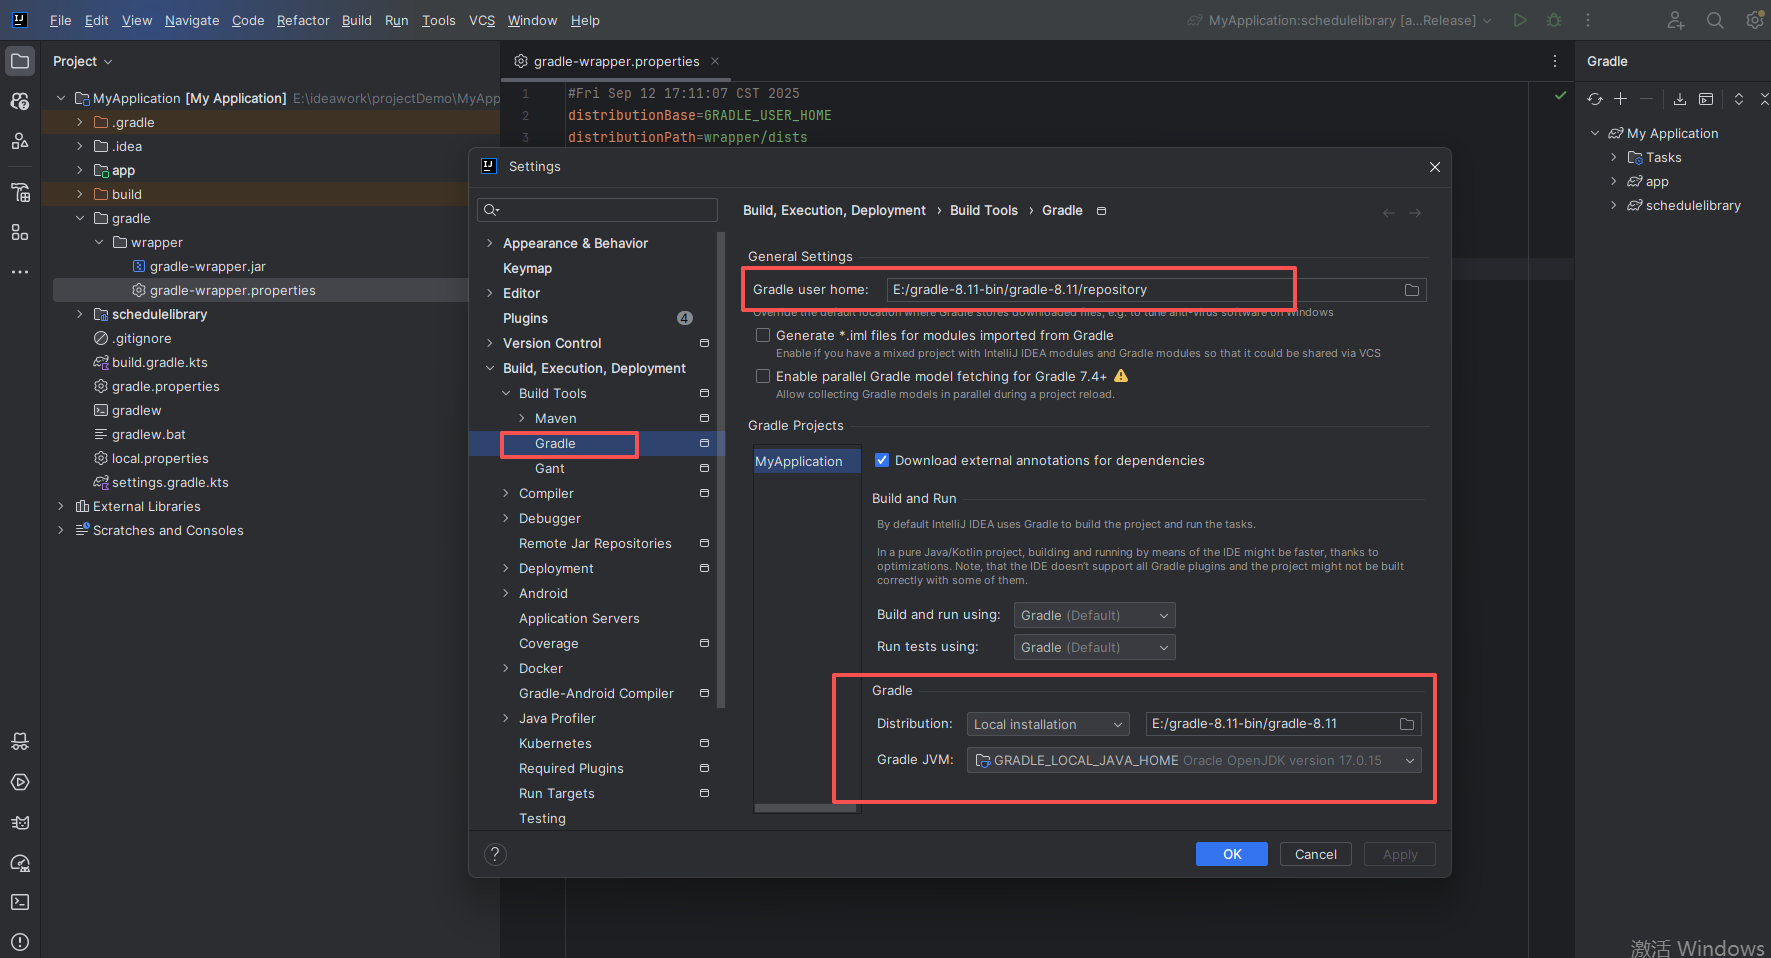
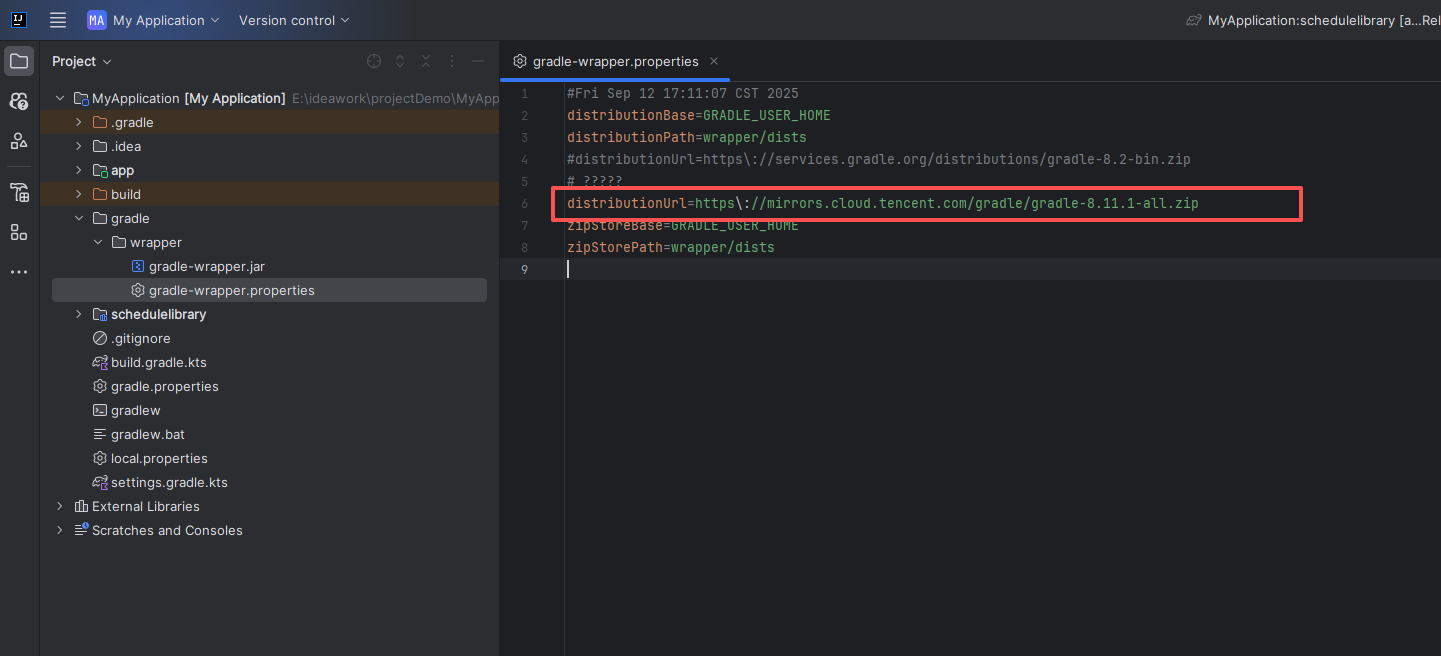
修改gradle-wrapper.properties里面的地址;改成腾讯或者阿里的都行
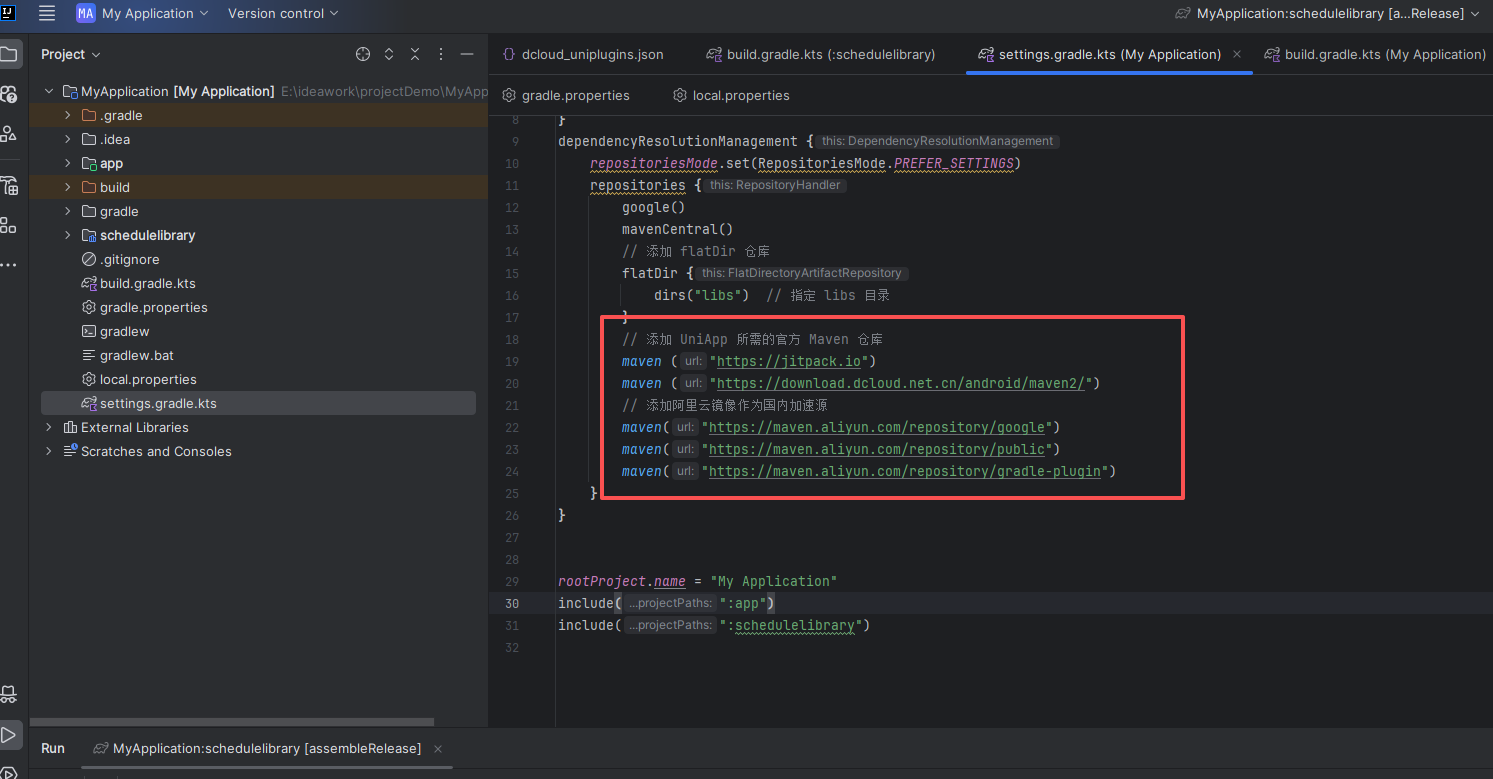
配置仓库,不然下载依赖很慢
创建安卓插件
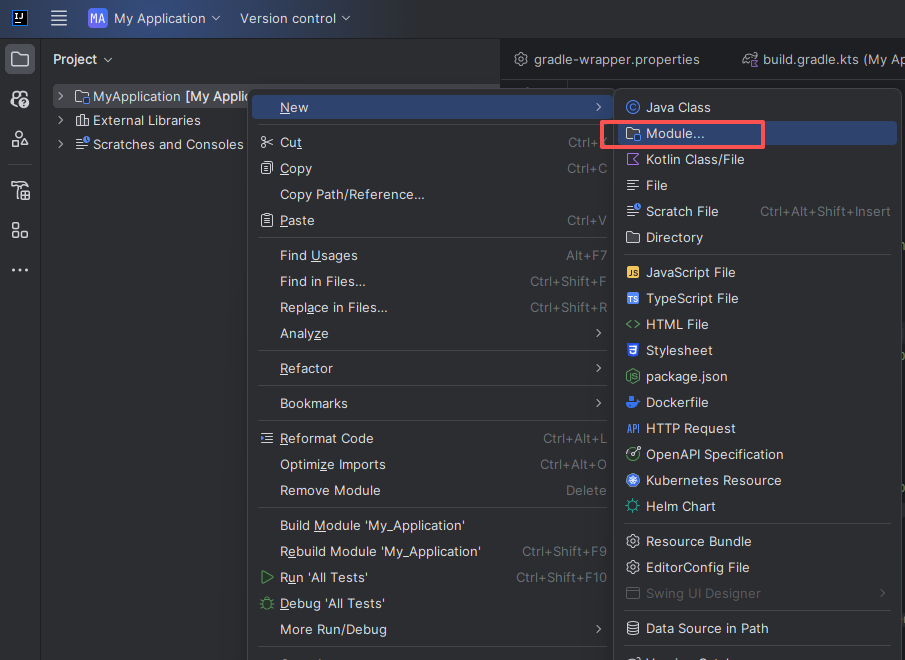
选择安卓项目,右击New,新建module;我这里插件名称是schedulelibrary,创建好等待导入包
导入插件依赖
创建好之后就可以导入必要的依赖,找到库项目 下面的 build.gradle.kts
参考官方文档:https://nativesupport.dcloud.net.cn/NativePlugin/course/android.html
先将uniapp-v8-release.aar放到libs 目录下,这个文件从官方下载
https://nativesupport.dcloud.net.cn/AppDocs/download/android.html

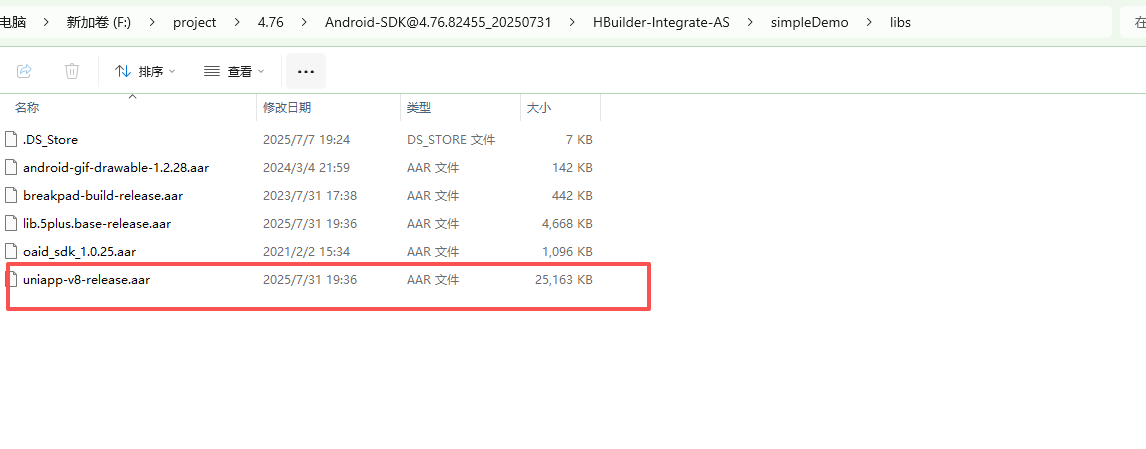
因为这个文件仓库里面没有 必须手动导入;
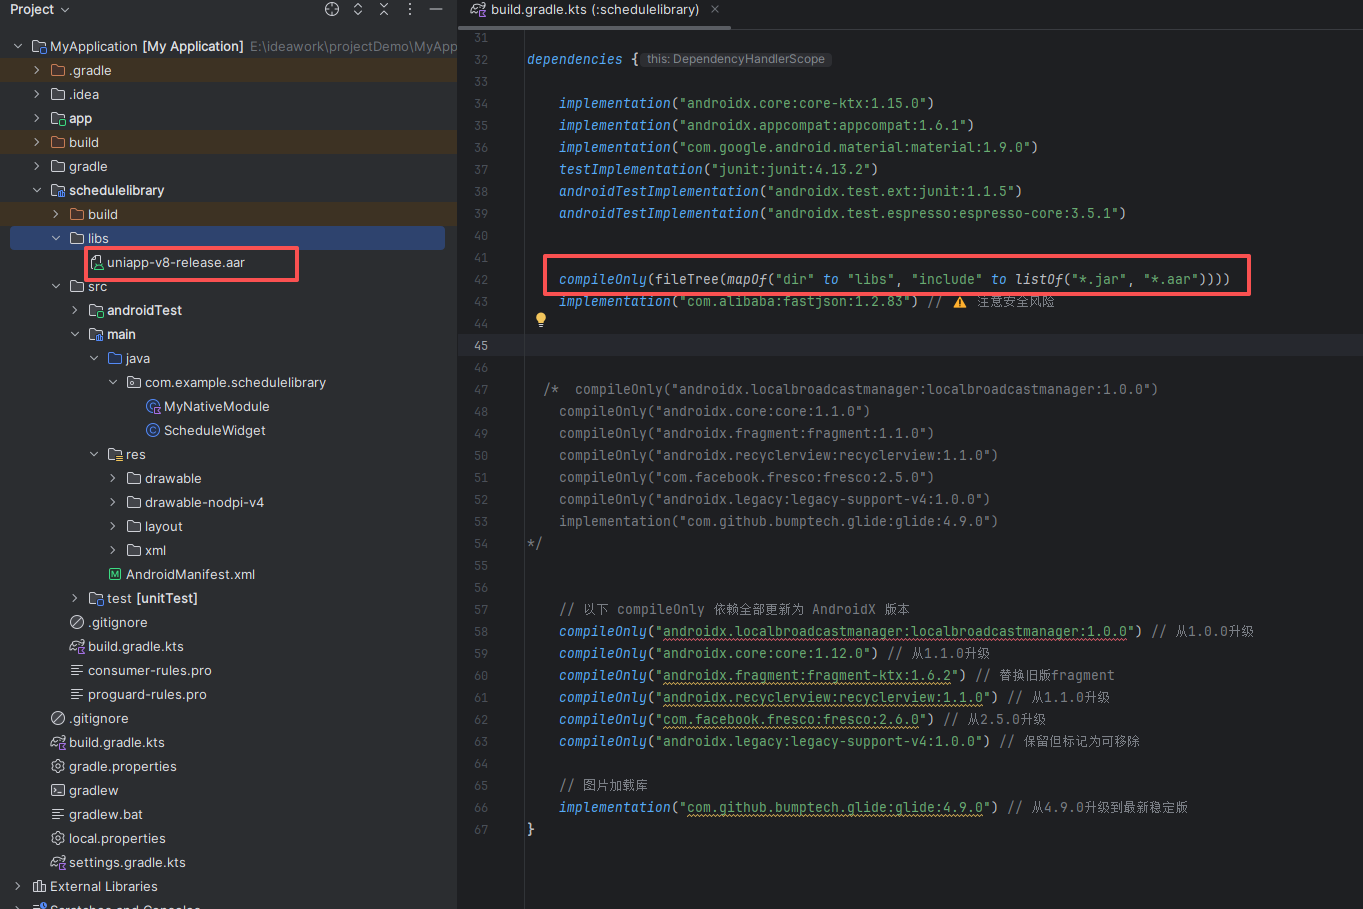
导入其他配置,由于官方文档用的库比较老,会出现不兼容我这里升级为新的库

整个文件
bash
plugins {
    id("com.android.library")
    id("org.jetbrains.kotlin.android")
}

android {
    namespace = "com.example.schedulelibrary"
    compileSdk = 34

    defaultConfig {
        minSdk = 24

        testInstrumentationRunner = "androidx.test.runner.AndroidJUnitRunner"
        consumerProguardFiles("consumer-rules.pro")
    }

    buildTypes {
        release {
            isMinifyEnabled = false
            proguardFiles(getDefaultProguardFile("proguard-android-optimize.txt"), "proguard-rules.pro")
        }
    }
    compileOptions {
        sourceCompatibility = JavaVersion.VERSION_1_8
        targetCompatibility = JavaVersion.VERSION_1_8
    }
    kotlinOptions {
        jvmTarget = "1.8"
    }
}

dependencies {

    implementation("androidx.core:core-ktx:1.15.0")
    implementation("androidx.appcompat:appcompat:1.6.1")
    implementation("com.google.android.material:material:1.9.0")
    testImplementation("junit:junit:4.13.2")
    androidTestImplementation("androidx.test.ext:junit:1.1.5")
    androidTestImplementation("androidx.test.espresso:espresso-core:3.5.1")


    compileOnly(fileTree(mapOf("dir" to "libs", "include" to listOf("*.jar", "*.aar"))))
    implementation("com.alibaba:fastjson:1.2.83") // ⚠️ 注意安全风险


  /*  compileOnly("androidx.localbroadcastmanager:localbroadcastmanager:1.0.0")
    compileOnly("androidx.core:core:1.1.0")
    compileOnly("androidx.fragment:fragment:1.1.0")
    compileOnly("androidx.recyclerview:recyclerview:1.1.0")
    compileOnly("com.facebook.fresco:fresco:2.5.0")
    compileOnly("androidx.legacy:legacy-support-v4:1.0.0")
    implementation("com.github.bumptech.glide:glide:4.9.0")
*/


    // 以下 compileOnly 依赖全部更新为 AndroidX 版本
    compileOnly("androidx.localbroadcastmanager:localbroadcastmanager:1.0.0") // 从1.0.0升级
    compileOnly("androidx.core:core:1.12.0") // 从1.1.0升级
    compileOnly("androidx.fragment:fragment-ktx:1.6.2") // 替换旧版fragment
    compileOnly("androidx.recyclerview:recyclerview:1.1.0") // 从1.1.0升级
    compileOnly("com.facebook.fresco:fresco:2.6.0") // 从2.5.0升级
    compileOnly("androidx.legacy:legacy-support-v4:1.0.0") // 保留但标记为可移除

    // 图片加载库
    implementation("com.github.bumptech.glide:glide:4.9.0") // 从4.9.0升级到最新稳定版
}
编写插件内容
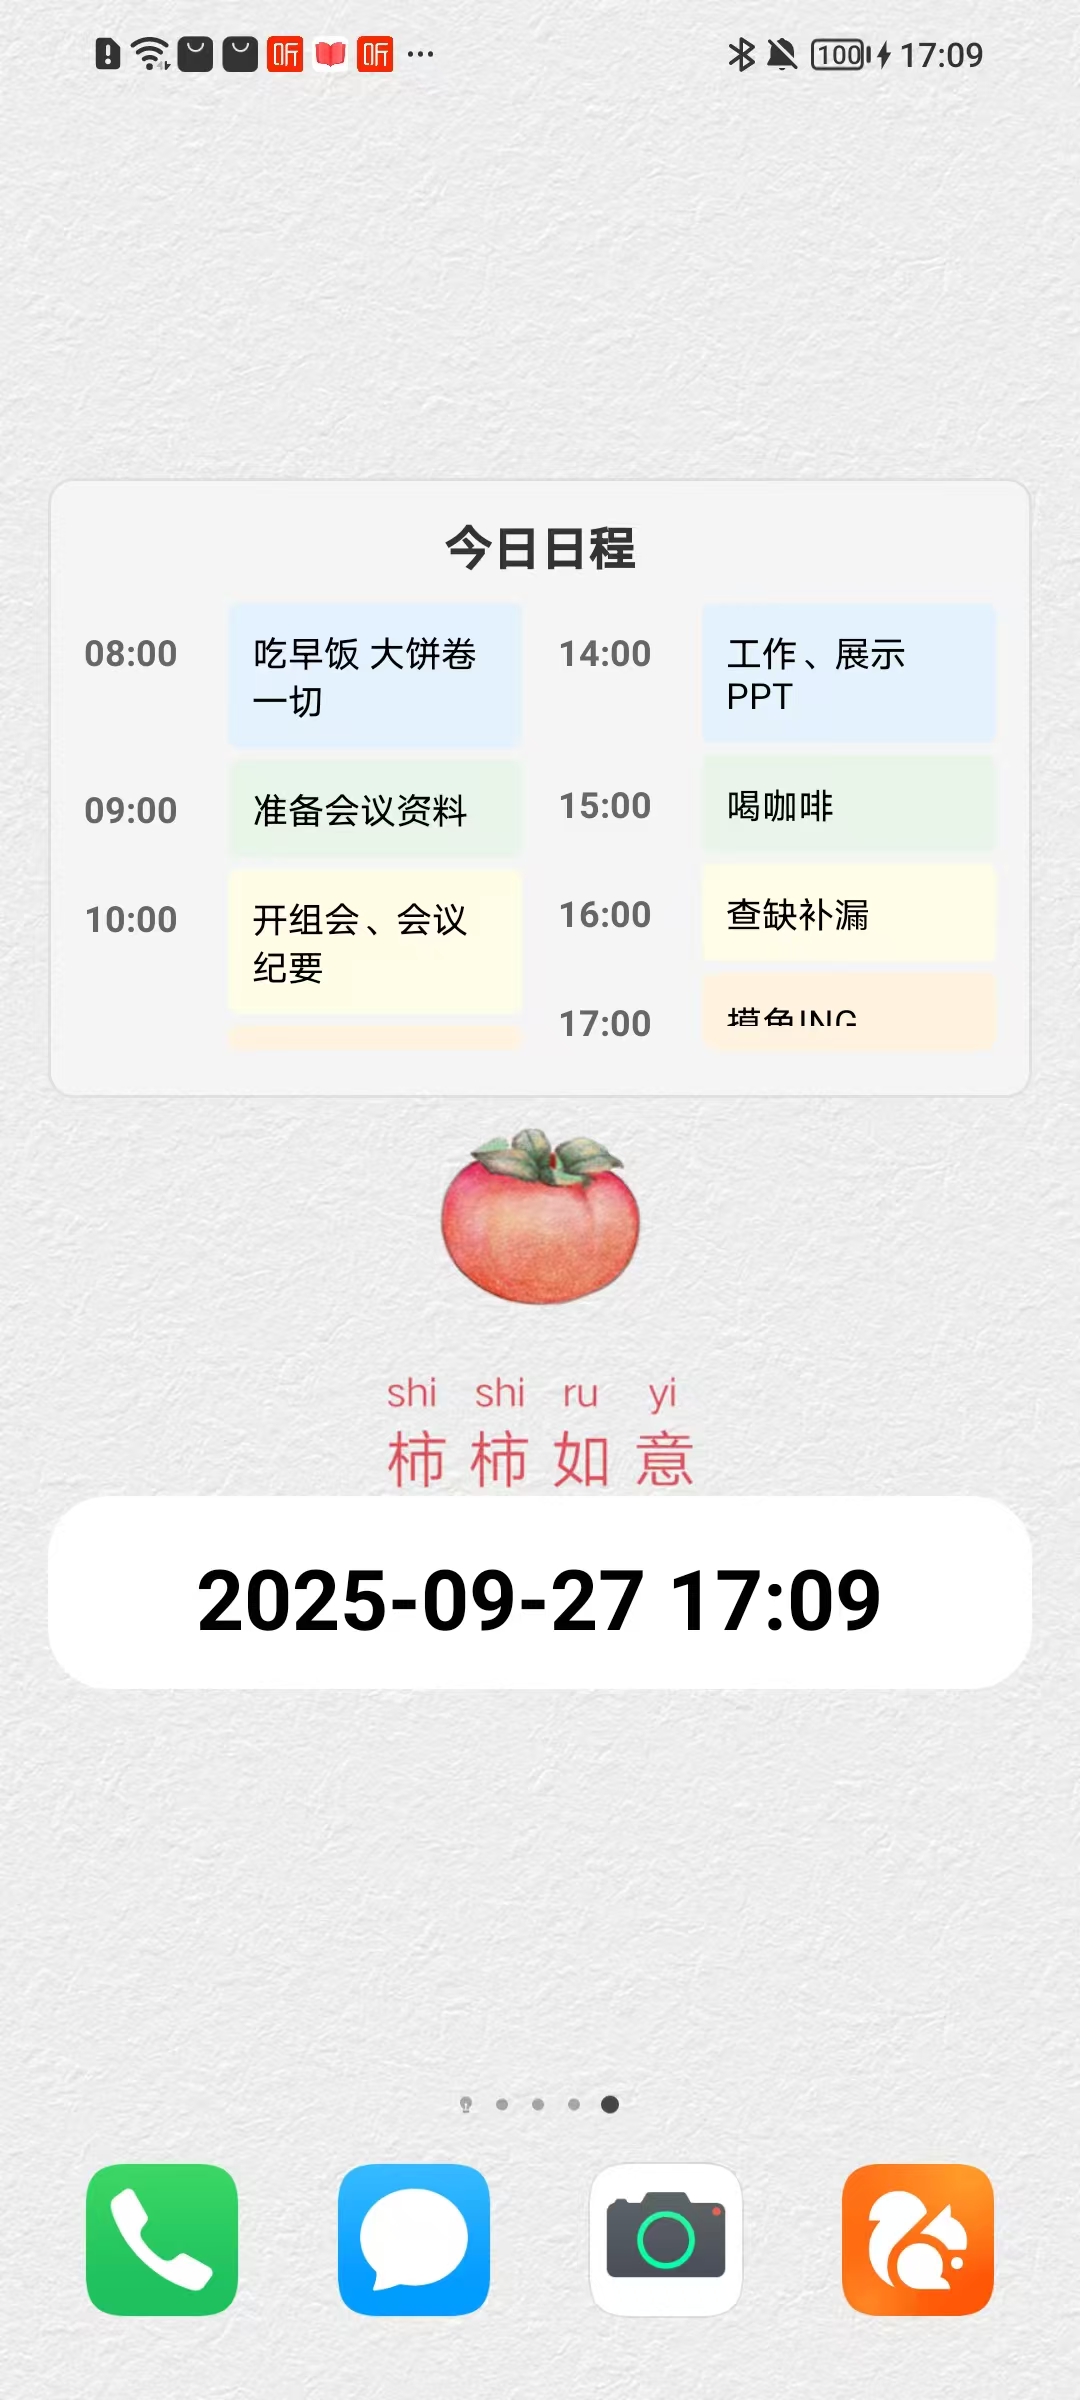
我这里用AI生成了一个今日日程的小组件的内容;AI用java写的 ;内容如下
java
package com.example.schedulelibrary;

import android.appwidget.AppWidgetManager;
import android.appwidget.AppWidgetProvider;
import android.content.Context;
import android.widget.RemoteViews;

/**
 * @author lsq
 * @date 2025-09-27 15:33:53
 */
public class ScheduleWidget extends AppWidgetProvider {

    static void updateAppWidget(Context context, AppWidgetManager appWidgetManager, int appWidgetId) {
        // 使用新的布局文件
        RemoteViews views = new RemoteViews(context.getPackageName(), R.layout.widget_calendar_schedule);

        // 设置标题为当前日期
        views.setTextViewText(R.id.title1,  " 今天日程");

        appWidgetManager.updateAppWidget(appWidgetId, views);
    }

}
然后写一个类实现UniModule;这个kt语言写的 不过不影响,这个类主要是将原生安卓的项目,暴露给uniapp调用;这个很重要
bash
package com.example.schedulelibrary

import android.app.PendingIntent
import android.appwidget.AppWidgetManager
import android.content.ComponentName
import android.content.Intent
import android.os.Build
import android.os.Bundle
import android.provider.Settings
import android.widget.Toast
import androidx.annotation.RequiresApi
import com.alibaba.fastjson.JSONObject
import io.dcloud.feature.uniapp.annotation.UniJSMethod
import io.dcloud.feature.uniapp.bridge.UniJSCallback
import io.dcloud.feature.uniapp.common.UniModule


class MyNativeModule : UniModule() {


    /**
     * 添加小组件到桌面
     */
    @UniJSMethod(uiThread = true)
    fun addShowSchedule(options: JSONObject?, callback: UniJSCallback?) {
        var type: String? = "day"

        try {
            if (options != null && options.containsKey("type")) {
                type = options.getString("type")
            }

            val context = mUniSDKInstance.context
            if (Build.VERSION.SDK_INT >= 26) {


                val appWidgetManager = context.getSystemService(
                    AppWidgetManager::class.java
                ) as AppWidgetManager
                val myProvider: ComponentName = ComponentName(context, ScheduleWidget::class.java)
                if (appWidgetManager.isRequestPinAppWidgetSupported) {
                    val pinnedWidgetCallbackIntent = Intent("android.intent.action.MAIN")
                    pinnedWidgetCallbackIntent.setClassName(context.packageName, "io.dcloud.PandoraEntry")
                    val successCallback = PendingIntent.getBroadcast(context, 0, pinnedWidgetCallbackIntent, 134217728)
                    appWidgetManager.requestPinAppWidget(myProvider, null as Bundle?, successCallback)
                }
            }

            //  this.onResult(callback, true, "success")
        } catch (var9: Exception) {
            var9.printStackTrace()
            //  this.onResult(callback, false, "requestPin error")
        }
    }
    @UniJSMethod(uiThread = true)
    fun testAsyncFunc(options: JSONObject, callback: UniJSCallback?) {
       // Log.e(TAG, "testAsyncFunc--$options")
        if (callback != null) {
            val data = JSONObject()
            data["code"] = "success"
            callback.invoke(data)
        }
    }

    // 同步方法(正确写法)
    @RequiresApi(Build.VERSION_CODES.CUPCAKE)
    @UniJSMethod(uiThread = false)
    fun getDeviceId(): String {
        return Settings.Secure.getString(
            mUniSDKInstance?.context?.contentResolver,
            Settings.Secure.ANDROID_ID
        ) ?: ""
    }

    // 异步方法(带安全检查)
    @UniJSMethod(uiThread = true)
    fun showNativeToast(options: JSONObject?, callback: UniJSCallback?) {
        val context = mUniSDKInstance?.context ?: run {
            callback?.invoke(JSONObject().apply { put("error", "Context is null") })
            return
        }

        val message = options?.getString("message") ?: "Default message"
        val duration = options?.getInteger("duration") ?: Toast.LENGTH_SHORT

        Toast.makeText(context, message, duration).show()

        callback?.invoke(JSONObject().apply {
            put("status", "success")
            put("message", message)
        })
    }


}
其他页面在附件代码里面找
配置插件入口
在插件AndroidManifest.xml 里面写上插件的主类和插件页面
bash
<?xml version="1.0" encoding="utf-8"?>
<manifest xmlns:android="http://schemas.android.com/apk/res/android"
          package="com.example.schedulelibrary">
    <application>
        <receiver
                android:name="com.example.schedulelibrary.ScheduleWidget"
                android:exported="false">
            <intent-filter>
                <action android:name="android.appwidget.action.APPWIDGET_UPDATE"/>
            </intent-filter>

            <meta-data
                    android:name="android.appwidget.provider"
                    android:resource="@xml/widget_info"/>
        </receiver>
    </application>


</manifest>
配置插件信息
在 主项目的assets 目录下新建 dcloud_uniplugins.json 文件,并注册插件信息;这个目录没有可以直接新建
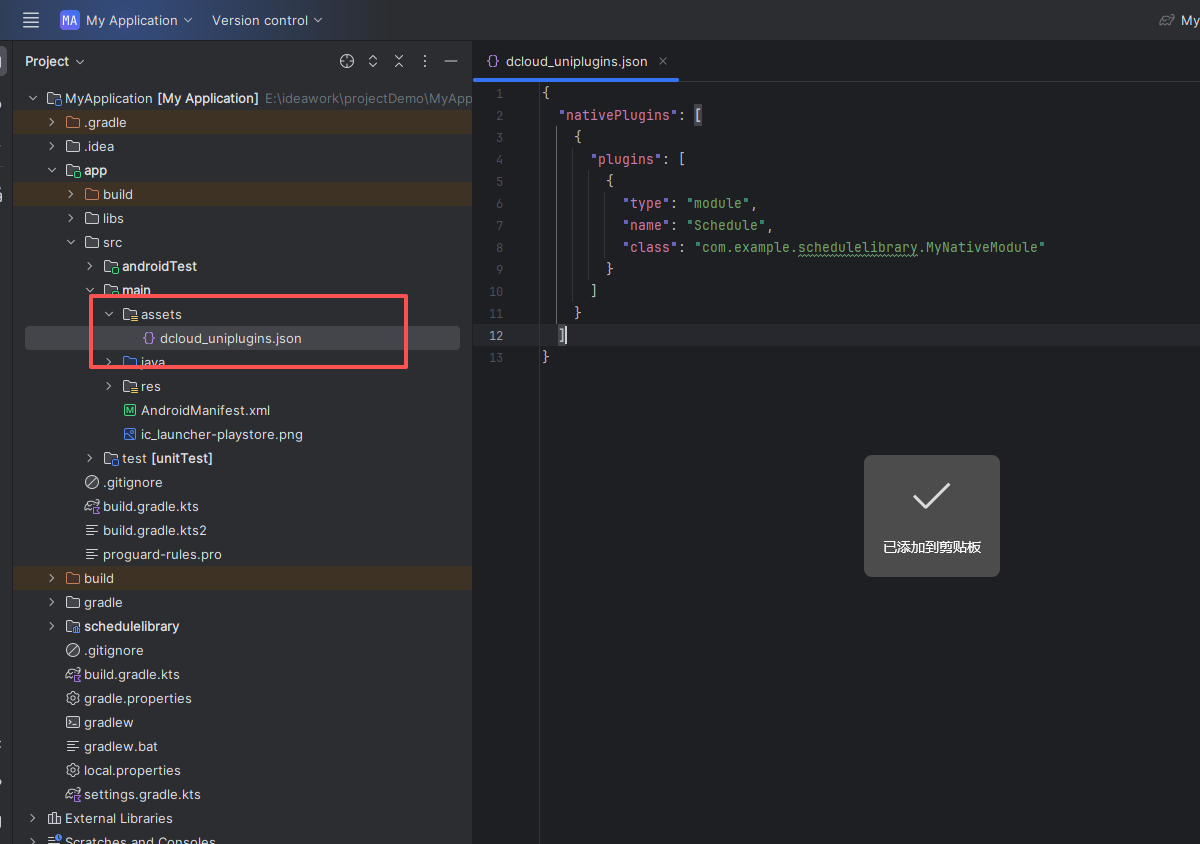
到此插件算是开发完成了
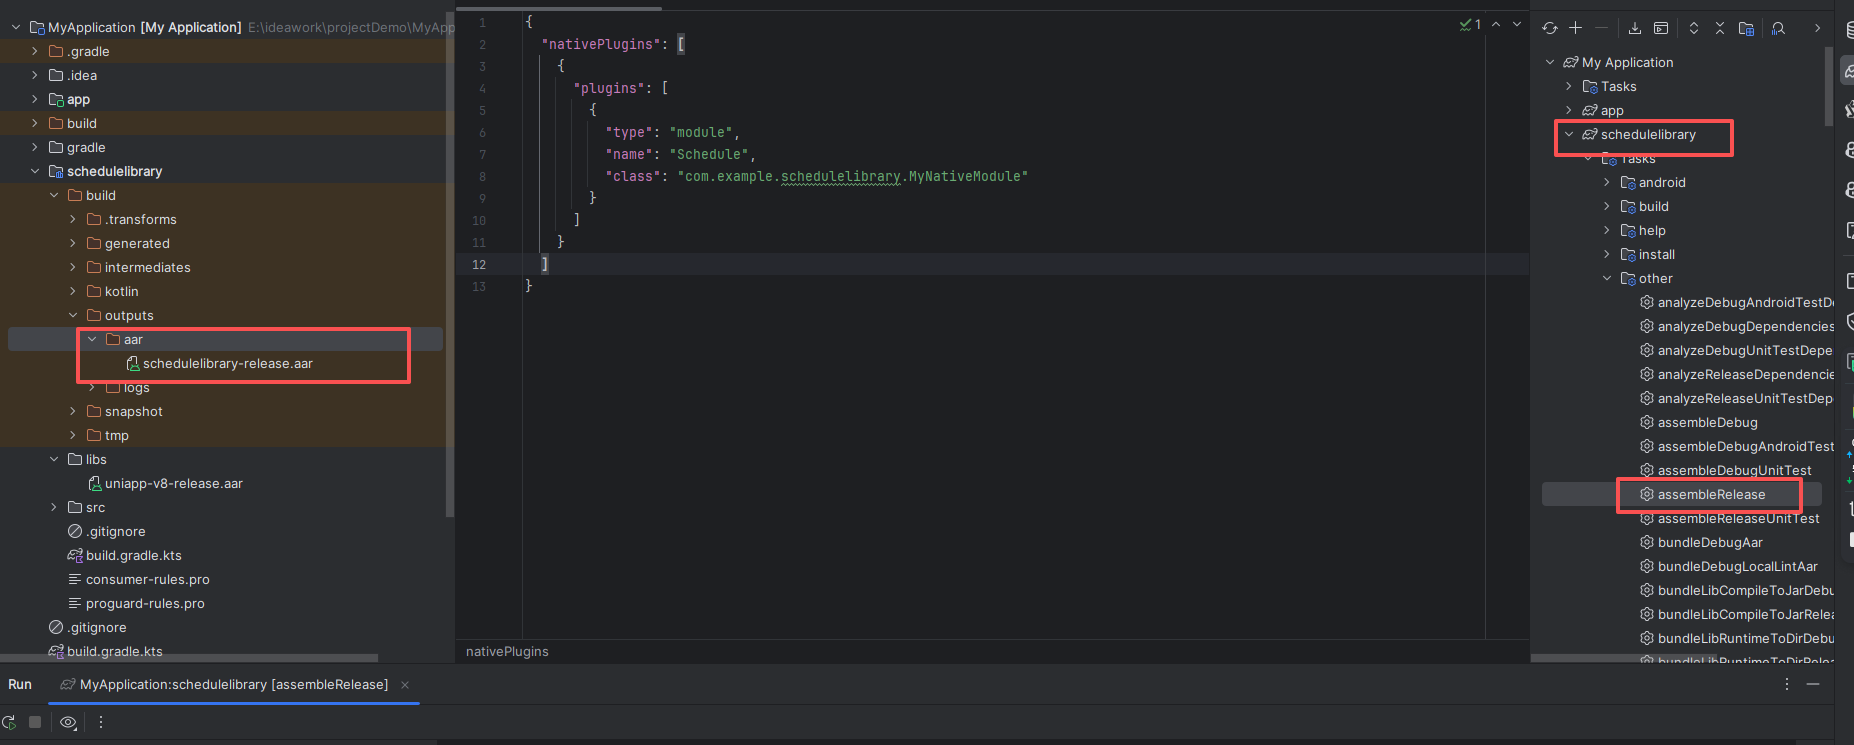
插件打包
选择Gradle--->插件module--->Tasks--->build--->assembleRelease编译module的aar文件
安卓主项目引入插件包【非必须】
引入插件
主要是build.gradle.kts这个文件;更新插件版本;不更新会报主项目和插件库版本不一致;必须要把控好版本;排除旧版本的冲突库【很重要,这里折腾了很久】
xml
plugins {
    id("com.android.application")
    id("org.jetbrains.kotlin.android")
}

android {
    namespace = "com.example.myapplication"
    compileSdk = 35


    defaultConfig {
        applicationId = "com.example.myapplication"
        minSdk = 24
        targetSdk = 35
        versionCode = 1
        versionName = "1.0"

        testInstrumentationRunner = "androidx.test.runner.AndroidJUnitRunner"
        vectorDrawables {
            useSupportLibrary = true
        }
    }

    buildTypes {
        release {
            isMinifyEnabled = false
            proguardFiles(getDefaultProguardFile("proguard-android-optimize.txt"), "proguard-rules.pro")
        }
    }
    compileOptions {
        sourceCompatibility = JavaVersion.VERSION_1_8
        targetCompatibility = JavaVersion.VERSION_1_8
    }
    kotlinOptions {
        jvmTarget = "1.8"
    }
    buildFeatures {
        compose = true
    }
    composeOptions {
        kotlinCompilerExtensionVersion = "1.5.1"
    }
    packaging {
        resources {
            excludes += "/META-INF/{AL2.0,LGPL2.1}"
        }
    }
}

dependencies {

    implementation("androidx.core:core-ktx:1.15.0")
    implementation("androidx.lifecycle:lifecycle-runtime-ktx:2.6.2") // 从2.6.1升级到2.6.2
    implementation("androidx.activity:activity-compose:1.8.2") // 从1.7.0升级到1.8.2
    implementation(platform("androidx.compose:compose-bom:2023.10.01")) // 更新BOM版本
    implementation("androidx.compose.ui:ui")
    implementation("androidx.compose.ui:ui-graphics")
    implementation("androidx.compose.ui:ui-tooling-preview")
    implementation("androidx.compose.material3:material3")
    testImplementation("junit:junit:4.13.2")
    androidTestImplementation("androidx.test.ext:junit:1.1.5")
    androidTestImplementation("androidx.test.espresso:espresso-core:3.5.1")
    androidTestImplementation(platform("androidx.compose:compose-bom:2023.10.01")) // 同步更新
    androidTestImplementation("androidx.compose.ui:ui-test-junit4")
    debugImplementation("androidx.compose.ui:ui-tooling")
    debugImplementation("androidx.compose.ui:ui-test-manifest")

    implementation("com.squareup.retrofit2:retrofit:2.9.0")
    implementation("com.squareup.retrofit2:converter-gson:2.9.0")
    implementation("com.squareup.okhttp3:okhttp:4.12.0") // 从4.10.0升级到4.12.0
    implementation("com.squareup.okhttp3:logging-interceptor:4.12.0") // 同步更新

		//引入自己的插件包
    implementation(project(":schedulelibrary"))

		//很重要,因为官方uniapp-v8-release.aar包太老了,会报冲突
    allprojects {
        configurations.all {
            resolutionStrategy {
                // 强制使用特定版本或排除冲突依赖
                force("androidx.core:core:1.15.0")
                exclude(group = "com.android.support", module = "support-compat")
            }
        }
    }

}
在AndroidManifest.xml 配置插件入口
bash
        <receiver android:name="com.example.schedulelibrary.ScheduleWidget"
                  android:exported="true">
            <intent-filter>
                <action android:name="android.appwidget.action.APPWIDGET_UPDATE"/>
            </intent-filter>
            <meta-data
                    android:name="android.appwidget.provider"
                    android:resource="@xml/widget_info"/>
        </receiver>
使用插件
直接 在主页面引入插件页面;这样你就可以在安卓项目里面使用自己的插件了

uniapp项目集成安卓插件
可以新创建一个uniapp项目;参考网上教程
引入插件包
参考下面页面 一定要主要插件名称 目录名称不能出错不然不能识别;将打包的aar文件放到这个目录 并重命名;这个class就是你之前暴露出来的可供uniapp调用的类;【没有的目录直接新建即可】

放好之后点击manifest.json。配置插件
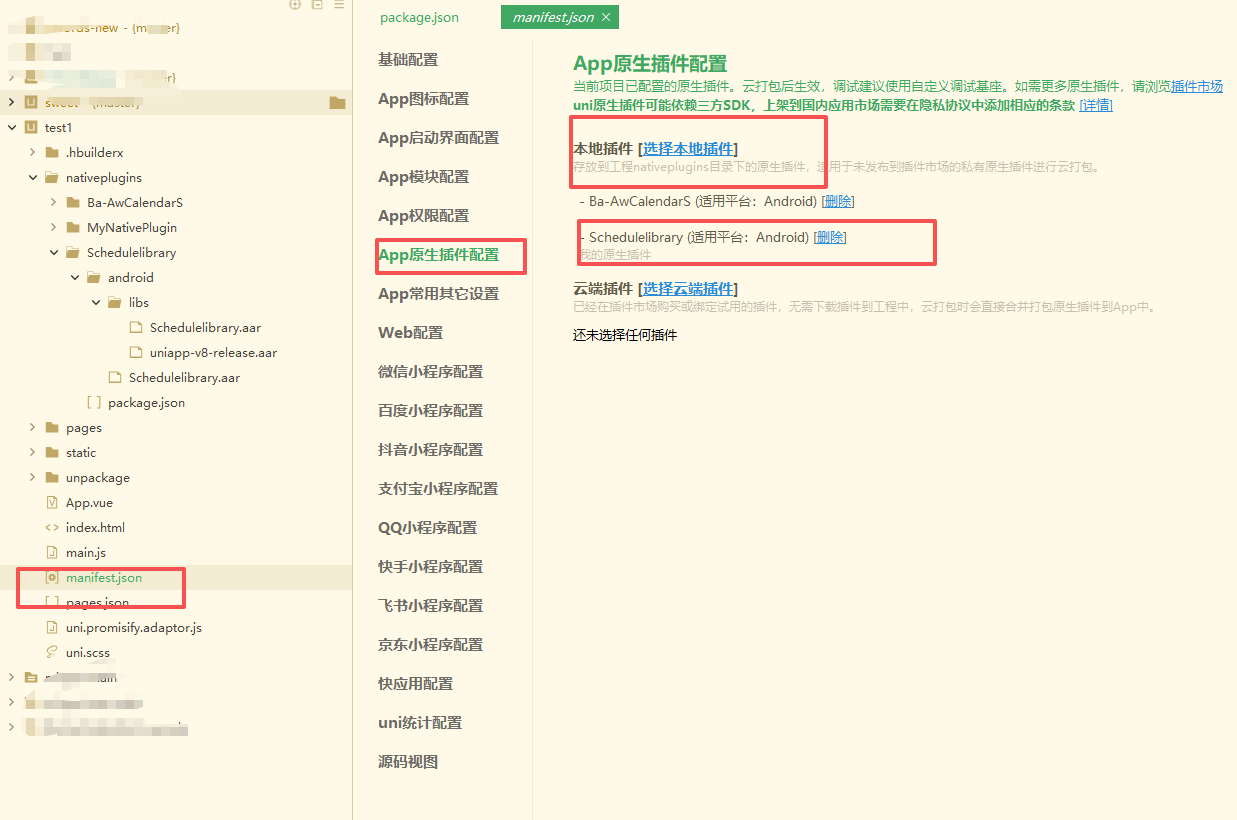
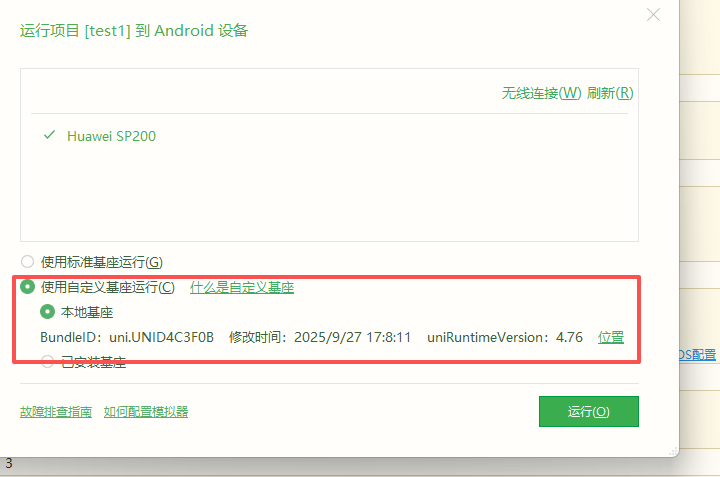
配置好直接就可以制做自定义基座;等待打包好
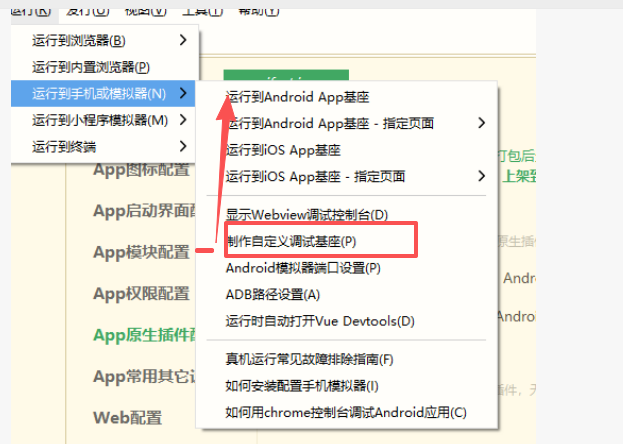
运行到自己手机上。一定要选择自定义基座
使用插件
bash
<template>
	<view>
		<button @click="addA">添加小组件</button>
	</view>
</template>

<script>
	const schedulelibrary = uni.requireNativePlugin('Schedulelibrary');
	export default {
		data() {
			return {
				msgList: [],
			}
		},
		methods: {

			addA() { //添加到桌面
				let that = this;
				schedulelibrary.addShowSchedule({},
					res => {
						console.log(res);
						that.msgList.unshift(JSON.stringify(res))
						uni.showToast({
							title: res.msg,
							icon: "none",
							duration: 3000
						})

					});
			}

	}
}
</script>
代码示例
等我整理一下