1.ConstraintLayout 本身的基本属性
在 Android 开发中,ConstraintLayout 是一个非常强大的布局容器,它允许你通过定义控件之间的约束关系来灵活地构建界面。
1.1 android:minHeight
- 作用 :用于指定
ConstraintLayout的最小高度。 - 示例 :
android:minHeight="200dp"表示这个ConstraintLayout的高度不能小于 200 密度无关像素(dp)。当布局内容较少,高度不足 200dp 时,ConstraintLayout会保持 200dp 的高度,避免布局过于紧凑而影响显示效果。
1.2 android:minWidth
- 作用 :用于指定
ConstraintLayout的最小宽度。 - 示例 :
android:minWidth="150dp"意味着这个ConstraintLayout的宽度至少为 150dp。如果布局内容的宽度不够 150dp,ConstraintLayout会扩展到 150dp,以保证布局有足够的宽度来展示内容或保持界面的美观性。
1.3 android:maxHeight
- 作用 :用于指定
ConstraintLayout的最大高度。 - 示例 :
android:maxHeight="500dp"表示这个ConstraintLayout的高度不能超过 500dp。当布局内容很多,高度超过 500dp 时,ConstraintLayout会限制在 500dp 的高度,超出部分的内容可能需要通过滚动等方式来查看,防止布局过高而超出屏幕范围。
1.4 android:maxWidth
- 作用 :用于指定
ConstraintLayout的最大宽度。 - 示例 :
android:maxWidth="300dp"说明这个ConstraintLayout的宽度最多为 300dp。若布局内容的宽度超过 300dp,ConstraintLayout会限制在 300dp 的宽度,超出的内容同样可能需要借助滚动等交互方式来完整呈现。
这些属性的存在,使得开发者能够更精确地控制 ConstraintLayout 的尺寸范围,在不同的屏幕尺寸和内容量情况下,都能让布局保持良好的显示效果,提升应用的用户体
1.5 android:minHeight
- 作用 :用于指定
ConstraintLayout的最小高度。 - 示例 :
android:minHeight="200dp"表示这个ConstraintLayout的高度不能小于 200 密度无关像素(dp)。当布局内容较少,高度不足 200dp 时,ConstraintLayout会保持 200dp 的高度,避免布局过于紧凑而影响显示效果。
1.6 android:minWidth
- 作用 :用于指定
ConstraintLayout的最小宽度。 - 示例 :
android:minWidth="150dp"意味着这个ConstraintLayout的宽度至少为 150dp。如果布局内容的宽度不够 150dp,ConstraintLayout会扩展到 150dp,以保证布局有足够的宽度来展示内容或保持界面的美观性。
1.7 android:maxHeight
- 作用 :用于指定
ConstraintLayout的最大高度。 - 示例 :
android:maxHeight="500dp"表示这个ConstraintLayout的高度不能超过 500dp。当布局内容很多,高度超过 500dp 时,ConstraintLayout会限制在 500dp 的高度,超出部分的内容可能需要通过滚动等方式来查看,防止布局过高而超出屏幕范围。
1.8 android:maxWidth
- 作用 :用于指定
ConstraintLayout的最大宽度。 - 示例 :
android:maxWidth="300dp"说明这个ConstraintLayout的宽度最多为 300dp。若布局内容的宽度超过 300dp,ConstraintLayout会限制在 300dp 的宽度,超出的内容同样可能需要借助滚动等交互方式来完整呈现。
这些属性的存在,使得开发者能够更精确地控制 ConstraintLayout 的尺寸范围,在不同的屏幕尺寸和内容量情况下,都能让布局保持良好的显示效果,提升应用的用户体
2ConstraintLayout 的相对定位属性
ConstraintLayout 的相对定位属性是其核心功能之一,通过这些属性可以精确控制控件在布局中的位置,下面为你详细解释并举例:
2.1 基准线对齐属性:app:layout_constraintBaseline_toBaselineOf
- 作用:用于将一个控件的基准线(通常是文本的基线,即文本底部的那条线)与另一个控件的基准线对齐。
- 示例:
xml
ini
<?xml version="1.0" encoding="utf-8"?>
<androidx.constraintlayout.widget.ConstraintLayout xmlns:android="http://schemas.android.com/apk/res/android"
xmlns:app="http://schemas.android.com/apk/res-auto"
xmlns:tools="http://schemas.android.com/tools"
android:id="@+id/root"
android:layout_width="match_parent"
android:layout_height="match_parent">
<TextView
android:id="@+id/textView1"
android:layout_width="wrap_content"
android:layout_height="wrap_content"
android:text="Hello"
android:textSize="100sp"
android:textColor="@color/color_3"
app:layout_constraintTop_toTopOf="parent"
app:layout_constraintStart_toStartOf="parent" />
<TextView
android:id="@+id/textView2"
android:layout_width="wrap_content"
android:layout_height="wrap_content"
android:text="World"
android:textSize="50sp"
android:textColor="@color/color_10"
app:layout_constraintStart_toEndOf="@id/textView1"
app:layout_constraintBaseline_toBaselineOf="@id/textView1" />
</androidx.constraintlayout.widget.ConstraintLayout>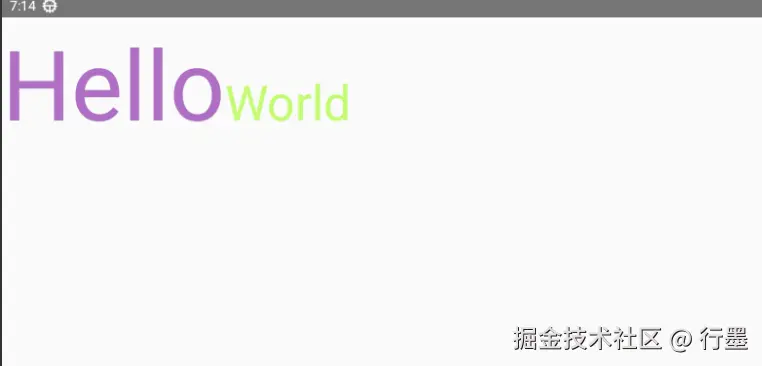 在这个例子中,
textView2 的基准线与 textView1 的基准线对齐,这样两个文本就会在同一水平线上显示,即使它们的字体大小不同,也能保证文本基线对齐,视觉效果更协调。
水平方向相对定位属性
2.2 app:layout_constraintStart_toEndOf
diff
-   作用:将当前控件的起始边(左边缘,在从左到右的布局中)与另一个控件的结束边(右边缘)对齐。
-   示例:
xml
ini
<?xml version="1.0" encoding="utf-8"?>
<androidx.constraintlayout.widget.ConstraintLayout xmlns:android="http://schemas.android.com/apk/res/android"
    xmlns:app="http://schemas.android.com/apk/res-auto"
    xmlns:tools="http://schemas.android.com/tools"
    android:id="@+id/root"
    android:layout_width="match_parent"
    android:layout_height="match_parent">

    <Button
        android:id="@+id/button1"
        android:layout_width="wrap_content"
        android:layout_height="wrap_content"
        android:text="Button 1"
        android:background="@color/color_10"
        app:layout_constraintTop_toTopOf="parent"
        app:layout_constraintStart_toStartOf="parent" />

    <Button
        android:id="@+id/button2"
        android:layout_width="wrap_content"
        android:layout_height="wrap_content"
        android:background="@color/color_12"
        android:text="Button 2"
        app:layout_constraintTop_toTopOf="parent"
        app:layout_constraintStart_toEndOf="@id/button1" />

</androidx.constraintlayout.widget.ConstraintLayout>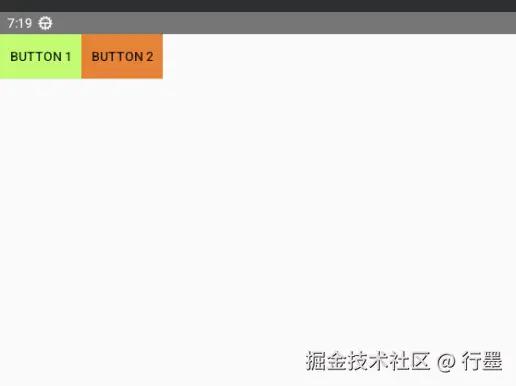
这里 button2 的起始边与 button1 的结束边对齐,所以 button2 会在 button1 的右侧显示。
-
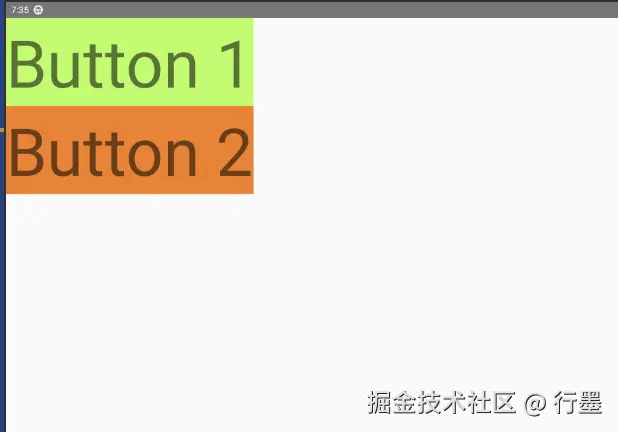
app:layout_constraintStart_toStartOf:- 作用:将当前控件的起始边与另一个控件的起始边对齐。
- 示例:
xml
ini
<?xml version="1.0" encoding="utf-8"?>
<androidx.constraintlayout.widget.ConstraintLayout xmlns:android="http://schemas.android.com/apk/res/android"
    xmlns:app="http://schemas.android.com/apk/res-auto"
    xmlns:tools="http://schemas.android.com/tools"
    android:id="@+id/root"
    android:layout_width="match_parent"
    android:layout_height="match_parent">

    <TextView
        android:id="@+id/imageView1"
        android:layout_width="wrap_content"
        android:layout_height="wrap_content"
        android:text="Button 1"
        android:textSize="100sp"
        android:background="@color/color_10"
        app:layout_constraintTop_toTopOf="parent"
        app:layout_constraintStart_toStartOf="parent" />

    <TextView
        android:id="@+id/imageView2"
        android:layout_width="wrap_content"
        android:layout_height="wrap_content"
        android:textSize="100sp"
        android:background="@color/color_12"
        android:text="Button 2"
        app:layout_constraintTop_toBottomOf="@id/imageView1"
        app:layout_constraintStart_toStartOf="@id/imageView1" />

</androidx.constraintlayout.widget.ConstraintLayout>
TextView2 的起始边与 TextView1 的起始边对齐,所以 TextView2 会在 TextView 的正下方,且水平位置相同。
-
app:layout_constraintLeft_toRightOf:- 作用 :与
app:layout_constraintStart_toEndOf类似,将当前控件的左边缘与另一个控件的右边缘对齐(更偏向于旧的布局方向概念,现在推荐使用Start和End相关属性以支持 RTL 布局)。
- 作用 :与
-
app:layout_constraintLeft_toLeftOf:- 作用 :与
app:layout_constraintStart_toStartOf类似,将当前控件的左边缘与另一个控件的左边缘对齐(推荐使用Start相关属性)。
- 作用 :与
-
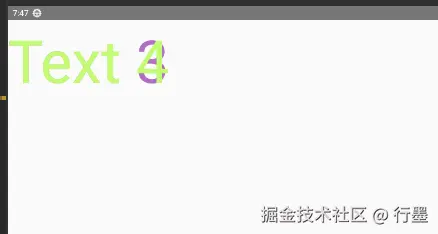
app:layout_constraintEnd_toStartOf:- 作用:将当前控件的结束边与另一个控件的起始边对齐。
- 示例:
xml
ini
<?xml version="1.0" encoding="utf-8"?>
<androidx.constraintlayout.widget.ConstraintLayout xmlns:android="http://schemas.android.com/apk/res/android"
    xmlns:app="http://schemas.android.com/apk/res-auto"
    xmlns:tools="http://schemas.android.com/tools"
    android:id="@+id/root"
    android:layout_width="match_parent"
    android:layout_height="match_parent">

    <TextView
        android:id="@+id/textView3"
        android:layout_width="wrap_content"
        android:layout_height="wrap_content"
        android:text="Text 3"
        android:textSize="100sp"
        android:textColor="@color/color_3"
        app:layout_constraintTop_toTopOf="parent"
        app:layout_constraintEnd_toEndOf="parent" />

    <TextView
        android:id="@+id/textView4"
        android:layout_width="wrap_content"
        android:layout_height="wrap_content"
        android:text="Text 4"
        android:textSize="100sp"
        android:textColor="@color/color_10"
        app:layout_constraintTop_toTopOf="parent"
        app:layout_constraintEnd_toStartOf="@id/textView3" />

</androidx.constraintlayout.widget.ConstraintLayout>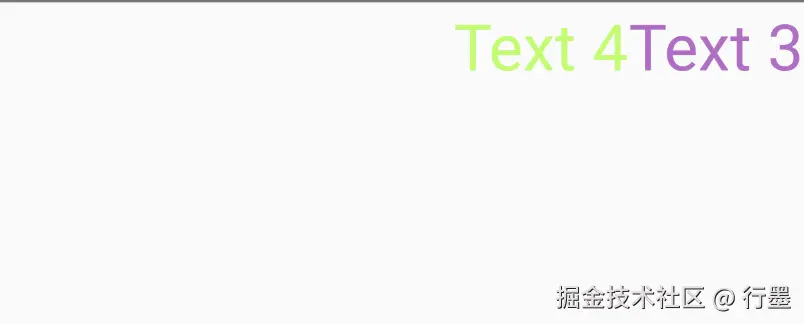
textView4 的结束边与 textView3 的起始边对齐,所以 textView4 会在 textView3 的左侧显示。
-
app:layout_constraintEnd_toEndOf:- 作用:将当前控件的结束边与另一个控件的结束边对齐。
- 示例:
xml
ini
<EditText
    android:id="@+id/editText1"
    android:layout_width="wrap_content"
    android:layout_height="wrap_content"
    app:layout_constraintTop_toTopOf="parent"
    app:layout_constraintStart_toStartOf="parent" />

<EditText
    android:id="@+id/editText2"
    android:layout_width="wrap_content"
    android:layout_height="wrap_content"
    app:layout_constraintTop_toTopOf="parent"
    app:layout_constraintEnd_toEndOf="@id/editText1" />
editText2 的结束边与 editText1 的结束边对齐,所以两个输入框在水平方向上右端对齐。
-
app:layout_constraintRight_toLeftOf:- 作用 :与
app:layout_constraintEnd_toStartOf类似,将当前控件的右边缘与另一个控件的左边缘对齐(推荐使用End相关属性)。
- 作用 :与
-
app:layout_constraintRight_toRightOf:- 作用 :与
app:layout_constraintEnd_toEndOf类似,将当前控件的右边缘与另一个控件的右边缘对齐(推荐使用End相关属性)。
- 作用 :与
3. 垂直方向相对定位属性
3.1 app:layout_constraintTop_toBottomOf
markdown
-   **作用**:将当前控件的顶部与另一个控件的底部对齐。
-   **示例**:
xml
ini
<Button
    android:id="@+id/button3"
    android:layout_width="wrap_content"
    android:layout_height="wrap_content"
    android:text="Button 3"
    app:layout_constraintTop_toTopOf="parent"
    app:layout_constraintStart_toStartOf="parent" />

<Button
    android:id="@+id/button4"
    android:layout_width="wrap_content"
    android:layout_height="wrap_content"
    android:text="Button 4"
    app:layout_constraintTop_toBottomOf="@id/button3"
    app:layout_constraintStart_toStartOf="parent" />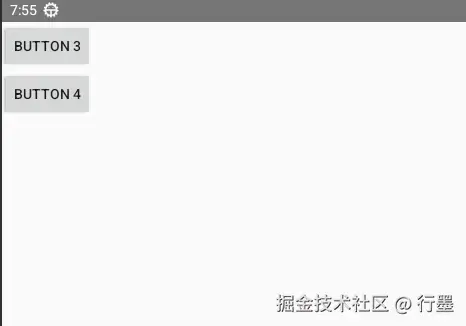
button4 的顶部与 button3 的底部对齐,所以 button4 会在 button3 的正下方显示。
3.2 app:layout_constraintTop_toTopOf
markdown
-   **作用**:将当前控件的顶部与另一个控件的顶部对齐。
-   **示例**:
xml
ini
<?xml version="1.0" encoding="utf-8"?>
<androidx.constraintlayout.widget.ConstraintLayout xmlns:android="http://schemas.android.com/apk/res/android"
    xmlns:app="http://schemas.android.com/apk/res-auto"
    xmlns:tools="http://schemas.android.com/tools"
    android:id="@+id/root"
    android:layout_width="match_parent"
    android:layout_height="match_parent">

    <TextView
        android:id="@+id/imageView3"
        android:layout_width="100dp"
        android:layout_height="100dp"
        android:background="@color/color_10"
        app:layout_constraintTop_toTopOf="parent"
        app:layout_constraintStart_toStartOf="parent" />

    <TextView
        android:id="@+id/imageView4"
        android:layout_width="100dp"
        android:layout_height="100dp"
        android:background="@color/color_4"
        app:layout_constraintTop_toTopOf="@id/imageView3"
        app:layout_constraintStart_toEndOf="@id/imageView3" />

</androidx.constraintlayout.widget.ConstraintLayout>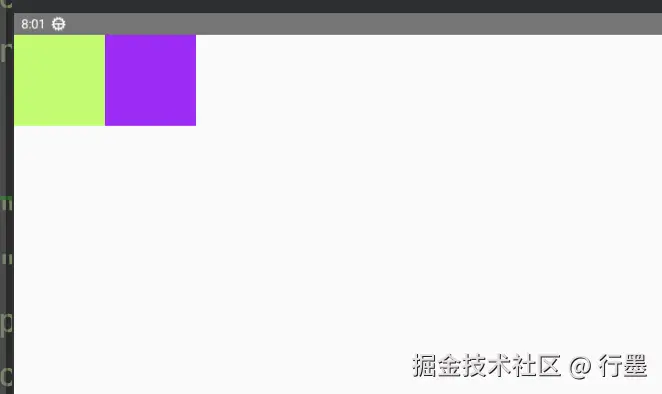
imageView4 的顶部与 imageView3 的顶部对齐,所以 imageView4 会在 imageView3 的右侧,且垂直方向顶端对齐。
3.3 app:layout_constraintBottom_toTopOf:
markdown
-   **作用**:将当前控件的底部与另一个控件的顶部对齐。
-   **示例**:
xml
ini
<?xml version="1.0" encoding="utf-8"?>
<androidx.constraintlayout.widget.ConstraintLayout xmlns:android="http://schemas.android.com/apk/res/android"
    xmlns:app="http://schemas.android.com/apk/res-auto"
    xmlns:tools="http://schemas.android.com/tools"
    android:id="@+id/root"
    android:layout_width="match_parent"
    android:layout_height="match_parent">

    <TextView
        android:id="@+id/textView5"
        android:layout_width="100dp"
        android:layout_height="100dp"
        android:background="@color/color_10"
        android:text="Text 5"
        app:layout_constraintBottom_toBottomOf="parent"
        app:layout_constraintStart_toStartOf="parent" />

    <TextView
        android:id="@+id/textView6"
        android:layout_width="100dp"
        android:layout_height="100dp"
        android:background="@color/color_4"
        android:text="Text 6"
        app:layout_constraintBottom_toTopOf="@id/textView5"
        app:layout_constraintStart_toStartOf="parent" />

</androidx.constraintlayout.widget.ConstraintLayout>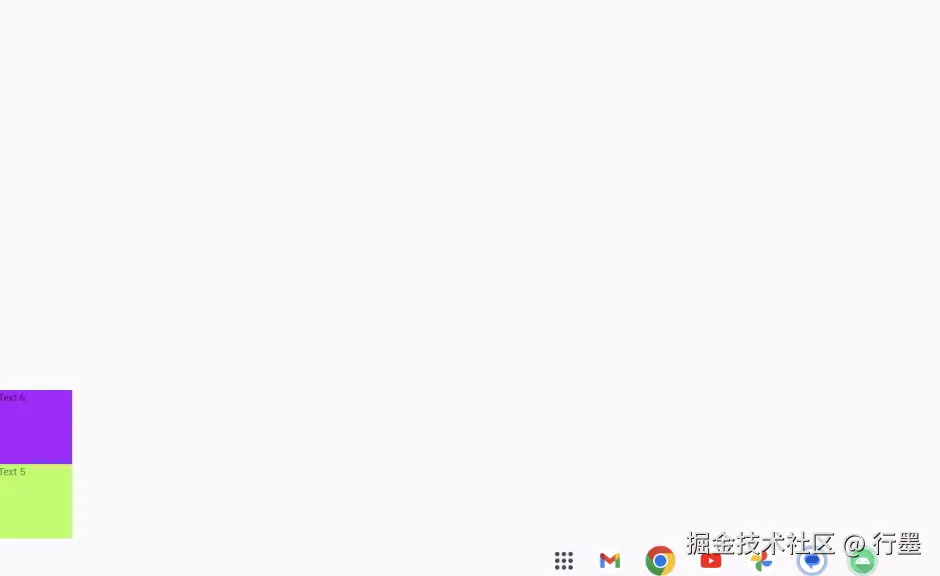
textView6 的底部与 textView5 的顶部对齐,所以 textView6 会在 textView5 的正上方显示。
3.4 app:layout_constraintBottom_toBottomOf:
markdown
-   **作用**:将当前控件的底部与另一个控件的底部对齐。
-   **示例**:
xml
ini
<?xml version="1.0" encoding="utf-8"?>
<androidx.constraintlayout.widget.ConstraintLayout xmlns:android="http://schemas.android.com/apk/res/android"
    xmlns:app="http://schemas.android.com/apk/res-auto"
    xmlns:tools="http://schemas.android.com/tools"
    android:id="@+id/root"
    android:layout_width="match_parent"
    android:layout_height="match_parent">

    <TextView
        android:id="@+id/editText3"
        android:layout_width="100dp"
        android:layout_height="100dp"
        android:background="@color/color_10"
        app:layout_constraintBottom_toBottomOf="parent"
        app:layout_constraintStart_toStartOf="parent" />

    <TextView
        android:id="@+id/editText4"
        android:layout_width="100dp"
        android:layout_height="100dp"
        android:background="@color/color_4"
        app:layout_constraintBottom_toBottomOf="@id/editText3"
        app:layout_constraintStart_toEndOf="@id/editText3" />

</androidx.constraintlayout.widget.ConstraintLayout>
editText4 的底部与 editText3 的底部对齐,所以两个输入框在垂直方向上底端对齐。
通过这些相对定位属性,你可以灵活地构建出各种复杂且布局合理的界面,满足不同的设计需求