1.用户通知
1.1请求通知授权
1.1.1概述
应用需要获得用户的授权信息才能发布通知。因此在发布前需要调用requestEnableNottification接口来让用户选择是否允许发送通知。
- 若用户拒绝授权之后,将无法通过该接口再次拉起选择弹窗
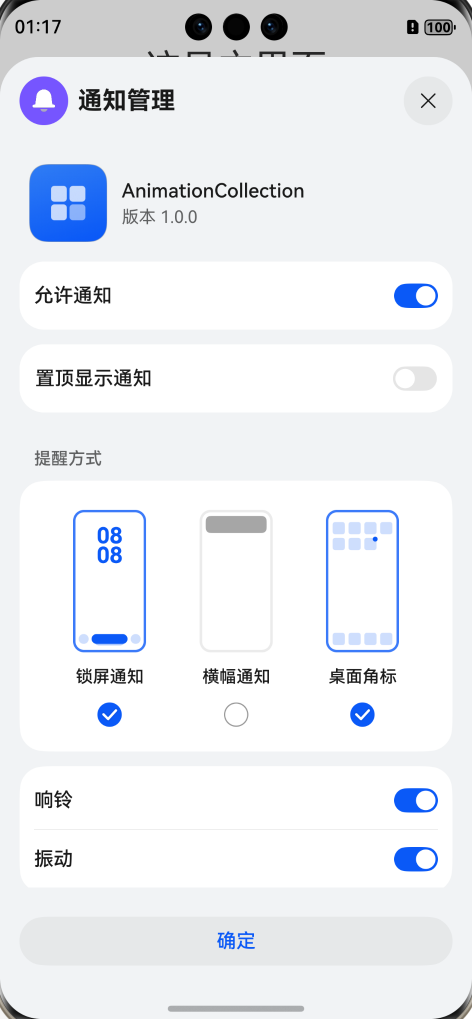
- 若应用需要再次向应用申请通知权限,需要使用openNotificationSetting接口来拉起响应通知
1.1.2接口说明
- isNotificationEnabled():Promise
- 查询当前应用是否获得通知权限
- requestEnableNotification(context: UIAbilityContext): Promise
- 向用户申请通知权限,用户拒绝后则无法再拉起请求弹窗
- openNotificationSettings(context: UIAbilityContext): Promise
- 拉起通知管理弹窗
1.2管理通知角标
1.2.1接口说明
当角标数量小于等于0时,不显示角标。当取值大于99时,将实现99+
- 增加角标数方法
- 发布通知时,在NotificationRequest的badgeNumber字段里携带,桌面收到通知后,会在原角标上累加上该字段中的数值
- 调用setBadgeNumber接口,直接设置应用角标数量
- 减少角标数
- 使用setBadgeNumber接口
由于setBadgeNumber为异步接口,所以在连续设置角标时可以配合async/await使用,以确保执行该次设置时上一次设置已经执行完毕
1.3管理通知渠道
1.3.1通知渠道的类型
| SlotType (枚举类) | 枚举值 | 说明 | 通知中心 | 横幅 | 锁屏 | 状态栏 |
|---|---|---|---|---|---|---|
| unkonw_type | 0 | 未知类型 | 支持 | no | no | no |
| social_communication | 1 | 社交通信 | 支持 | yes | yse | yes |
| service_information | 2 | 服务提醒 | 支持 | yes | yes | yes |
| content_information | 3 | 内容资讯 | 支持 | no | no | no |
| customer_service | 5 | 客服消息 | 支持 | no | no | yes |
| other_type | 0xFFFF | 其他 | 支持 | no | no | no |
1.3.2管理通知的接口
- addSlot:创建指定类型的通知渠道
addSlot(type: SlotType): Promise
- type:需要创建的通知渠道类型
-
getSlot:获取一个指定类型的通知渠道
typescriptgetSlot(slotType: SlotType): Promise<NotificationSlot>
- type:需要获取的通知渠道类型
- NotificationSlot:一个描述通知渠道的对象,信息包含
- 该通知渠道是否支持震动
- 是否绕过免打扰
- 通知级别
- ...
-
removeSlot:删除此应用中指定类型的通知渠道
typescriptremoveSlot(slotType: SlotType): Promise<void>
1.4发布通知
1.4.1发布文本类型通知
1.4.1.1文本类型分类
- Notification_content_basic_text:普通文本
- Notification_content_multiline:多行文本
1.4.1.2接口说明
typescript
publish(request: NotificationRequest): Promise<void>- request:设置发布通知的内容和相关的配置信息
- content:通知内容
- id:通知id,默认为0,当相同ID存在时,将更新该通知的内容
- NotificationSlotType:通知渠道类型
- updateOnly:是否仅更新通知,默认为false
- false:相同id存在则更新通知,不存在则创建新通知
- true:相同id不存在则发布失败,不创建新通知
- wantAgent:封装应用的行为意图
- ...
1.4.1.3开发步骤
- 导入相应模块
- 构造NotificationRequest对象
- 对普通型文本,content字段由标题、文本内容、附加信息三个字段组成
typescript
content: {
  notificationContentType: notificationManager.ContentType.NOTIFICATION_CONTENT_BASIC_TEXT, // 普通文本类型通知
  normal: {
    title: 'test_title',
    text: 'test_text',
    additionalText: 'test_additionalText',
  }
}- 多行文本类型继承了普通文本类型的字段,新增了多行文本内容,内容概要和通知展开时的标题
typescript
content: {
    notificationContentType: notificationManager.ContentType.NOTIFICATION_CONTENT_MULTILINE, // 多行文本类型通知
    multiLine: {
      title: 'test_title',
      text: 'test_text',
      briefText: 'test_briefText',
      longTitle: 'test_longTitle',
      lines: ['line_01', 'line_02', 'line_03'],
    }
}- 调用NotificationManger的publish方法
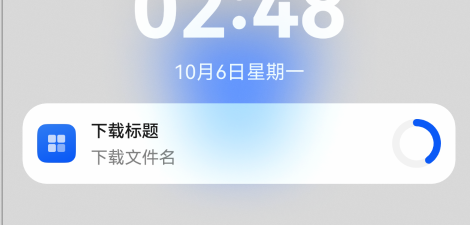
1.4.2发布进度条类型通知
目前HarmonyOS的系统模版仅支持表示下载进度的进度条通知模版
- isSupportTemplate:用于查询当前模版是否支持的接口
开发与发布文本类通知大体相似,只是在构造NotificationRequest对象时略有不同
typescript
content: {
    //....
  },
  // 构造进度条模板,name字段当前需要固定配置为downloadTemplate
  template: {
    name: 'downloadTemplate',
    data: { title: 'File Title', fileName: 'music.mp4', progressValue: 45 }
  }
1.4.3为通知添加行为意图
1.4.3.1概述
为通知添加行为意图就是说,应用向Ability Kit申请一个WantAgent,并且将WantAgent封装至通知中。
当发布通知时,用户便可以通过点击通知栏中的消息,实现拉起目标应用组件或者发布公共事件
1.4.3.2运行机制
- 首先应用向Ability Kit申请WantAgent
- 应用在得到WantAgent后,向Notification Kit发送携带WantAgent的通知
- Notification Kit再转发给通知中心
- 通知中心再将其中的WantAgent发送给Ability Kit,由其触发行为意图
1.4.3.3接口说明
- 创建WantAgent
getWantAgent(info: WantAgentInfo): Promise- info:是一个WantAgentInfo对象,表示创建WantAgent所需的配置信息,包括目标UIAbility、操作类型等,三方应用在WantAgentInfo对象中只能设置本应用的UIAbility
- wants:将被执行的动作列表,是一个want类型的数组,不过当前仅支持一个want,传入多个时取第一个want成员
- actionType:操作类型,即表示行为意图是发送公共事件还是拉起一个Ability
- ...
- info:是一个WantAgentInfo对象,表示创建WantAgent所需的配置信息,包括目标UIAbility、操作类型等,三方应用在WantAgentInfo对象中只能设置本应用的UIAbility
1.4.3.4开发步骤
- 导入相应模块
- 创建WantAgentInfo对象
- 使用getWantAgent方法创建行为意图
- 在NotificationRequest对象中增加wantAgent字段
1.5取消通知
1.5.1概述
用户收到通知提醒后,点击通知并拉起应用到前台时,应用可以选择取消某条通知或者所有通知
1.5.2接口说明
- cancel:取消指定的通知
typescript
cancel(id: number, label?: string): Promise<void>- id:通知id
- label:通知标签,默认为空
- cancelAll:取消所有的通知
typescript
cancelAll(): Promise<void>1.6实践
接下来我们发布一个进度条类型通知,并且为其添加行为意图,使用户能够在点击通知时拉起应用界面
1.6.1 向用户申请通知权限
typescript
 notificationEnable() {
    notificationManager.isNotificationEnabled()
      .then((res) => {
        if (res == false) {
          notificationManager.requestEnableNotification()
            .then(() => {
              console.log('[test]用户同意')
            })
            .catch((err: BusinessError) => {
              if (err.code == 1600004) {
                console.log('[test]用户拒绝')
              } else {
                console.log('[test]其他原因申请失败')
              }
            })
        }
      })
  }
需要注意使用requestEnableNotification方法,用户同意后默认不会打开横幅通知,如若需要则应使用openNotificationSetting方法让用户自行选择
1.6.2构造WantAgent行为意图
行为意图有拉起UIAbility 和发布公共事件两种类型,我们在这里构造拉起UIAbility的WantAgent
typescript
//构建WantAgentInfo对象
let wantAgentInfo: wantAgent.WantAgentInfo = {
wants: [
{
bundleName:'',
abilityName: ''
}
],
actionType: wantAgent.OperationType.START_ABILITY,
//自定义请求码,用于表示将要执行的动作
requestCode: 0,
//代表WantAgent的执行属性,在这里是代表该WantAgent不可变
actionFlags:[wantAgent.WantAgentFlags.CONSTANT_FLAG]
}
//使用getWantAgent方法创建WantAgent对象
let notificationWantAgent: WantAgent;
wantAgent.getWantAgent(wantAgentInfo,(err: BusinessError, data: WantAgent) => {
if(!err){
notificationWantAgent = data;
}
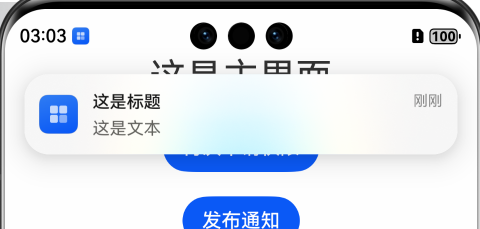
})1.6.3构造NotificationRequest并发布通知
typescript
 let notificationRequest: notificationManager.NotificationRequest = {
      id: 1,
      content:{
        notificationContentType: notificationManager.ContentType.NOTIFICATION_CONTENT_BASIC_TEXT,
        normal:{
          title: '这是标题',
          text: '这是文本',
          additionalText: '这是附加内容'
        }
      },
      // 构造进度条模板,name字段当前需要固定配置为downloadTemplate
      template:{
        name:'downloadTemplate',
        data:{title: '下载标题',fileName: '下载文件名',progressValue: 40}
      },
      wantAgent: notificationWantAgent!
    }

    notificationManager.publish(notificationRequest,(err: BusinessError)=>{
      if(!err){
        console.log('[test]发布成功')
      }else{
        console.log('[test]'+err.message)
      }
    })
1.6.4点击通知拉起应用后取消通知
typescript
  onForeground(): void {
    // Ability has brought to foreground
    //调用Manager的cancel方法
    NotificationUtils.notificationCancel()
  }
需要注意的是,若想要出现下图中的通知横幅弹窗,则需要为通知创建合适的通知渠道,具体可以参考上文中的通知渠道类型表,而且进度条类型的通知不支持横幅通知