前言
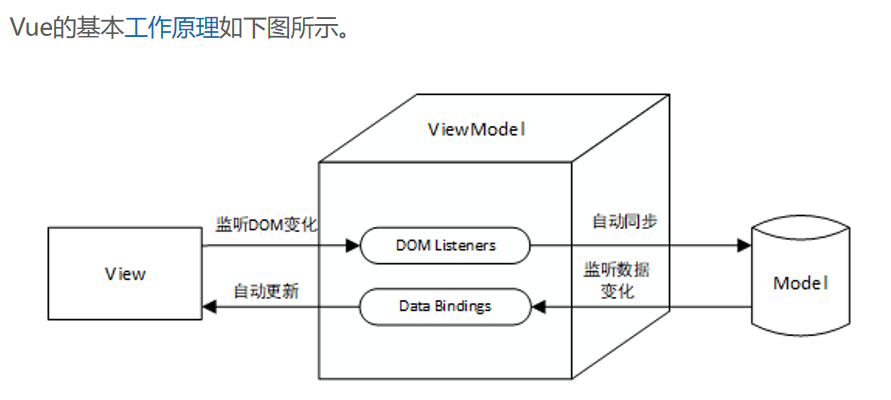
Vue是一款MVVM框架,一个用于构建用户界面的渐进式JavaScript框架,具有以下特点:
-
易于上手:Vue 设计简洁,文档清晰,易于学习和使用。它基于标准 HTML 和 JavaScript,开发者可以快速上手,无需复杂配置。
-
双向数据绑定 :Vue 通过
v-model指令实现数据和视图的双向绑定。当数据变化时,视图自动更新;反之亦然,视图的更改也会同步到数据,大大简化了数据管理。 -
组件化开发:Vue 强调组件化开发,每个组件都是一个独立的模块,可以复用和嵌套。这使得代码结构清晰,便于维护和扩展。
- 虚拟 DOM:Vue 使用虚拟 DOM 来提高性能。当数据变化时,Vue 会计算出最小的 DOM 更新操作,避免不必要的 DOM 操作,提高渲染效率。
-
响应式系统:Vue 的响应式系统能够自动追踪数据的变化,并在数据更新时触发视图的重新渲染。这使得开发者可以专注于数据的处理,而无需手动操作 DOM。
-
生态系统丰富:Vue 拥有庞大的社区和丰富的生态系统,包括 Vue Router(路由管理)、Vuex(状态管理)、Vue CLI(项目脚手架)等工具,支持构建大型应用。
-
灵活性高:Vue 是渐进式的,可以作为小型项目的库使用,也可以作为大型项目的框架。它不会强迫开发者使用特定的架构,提供了足够的灵活性来满足不同需求。
-
性能优化:Vue 在性能方面进行了优化,通过高效的更新算法和缓存机制,确保应用在不同设备上都能流畅运行。
1、安装Vue
1.1 npm/yarn安装(构建大型应用)
1.1.1 npm安装
bash
npm install vue@next1.1.2 yarn安装
bash
# 全局安装yarn
npm i -g yarn
# 安装Vue
yarn add vue@next
1.2 Vue CLI(vue脚手架) 安装(基于Webpack构建并配置项目)
bash
yarn global add @vue/cli   # 或 npm install -g @vue/cli
# 检查Vue CLI是否安装成功
vue -V   # 或 vue --version
# 创建Vue3应用
vue create [projectname]
# 切换到projectname项目路径
cd [projectname]
# 启动项目
npm run serve
或基于【可视化面板】创建vue项目
bash
vue ui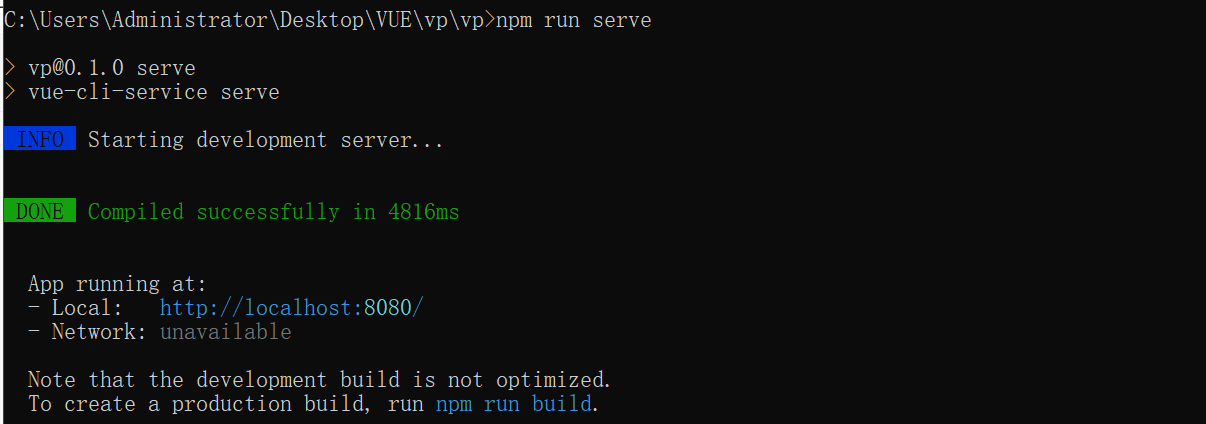
1.3 Vite安装(按需加载,启动速度更快)
1.3.1 使用npm安装
bash
# 使用npm 6或更低版本创建项目
npm create vite@latest [projectname] --template vue
# 使用npm 7或更高版本创建项目
npm create vite@latest [projectname] -- --template vue
# 切换到projectname项目路径
cd projectname
# 安装项目的全部依赖
npm install
# 运行项目
npm run dev
1.3.2 使用yarn安装
bash
yarn create vite [projectname] --template vue
# 切换到projectname项目路径
cd projectname
# 安装项目的全部依赖
yarn
# 运行项目
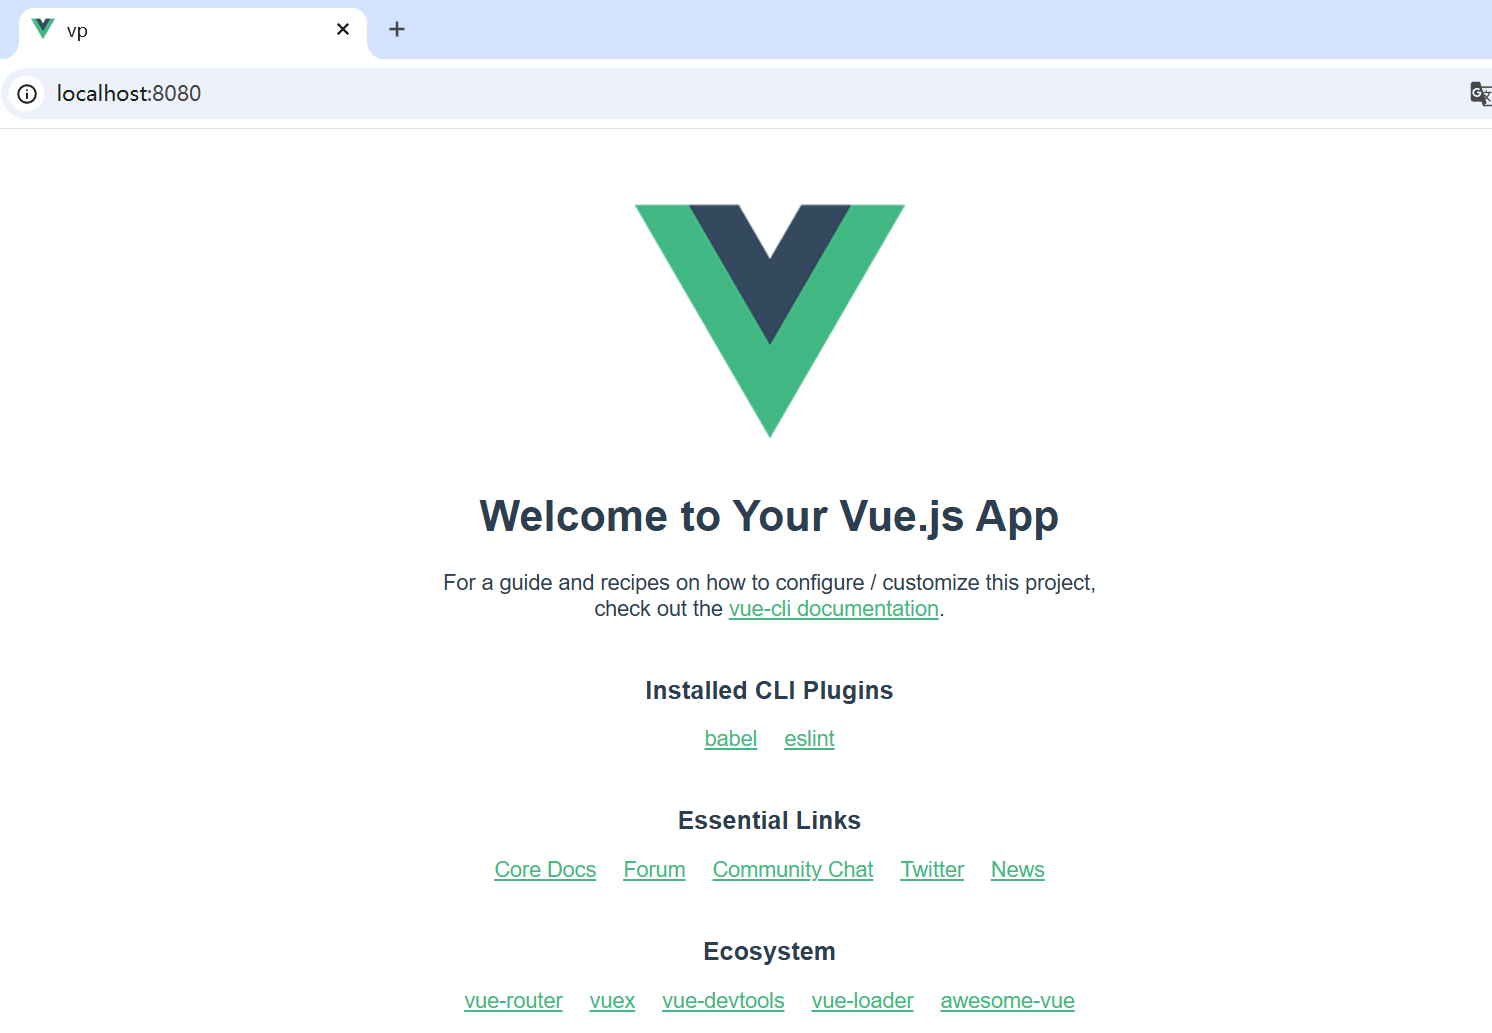
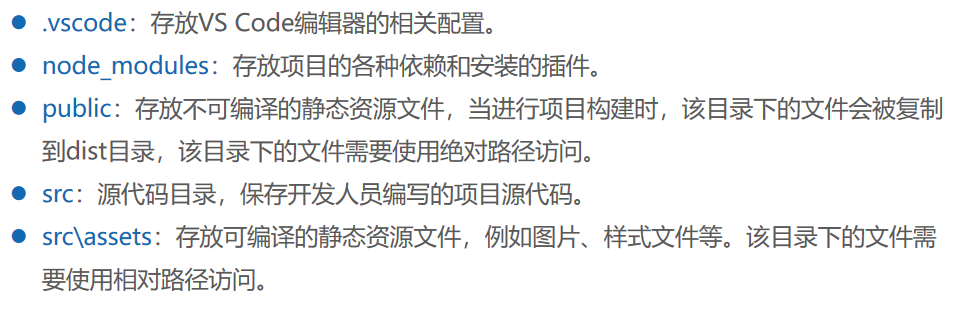
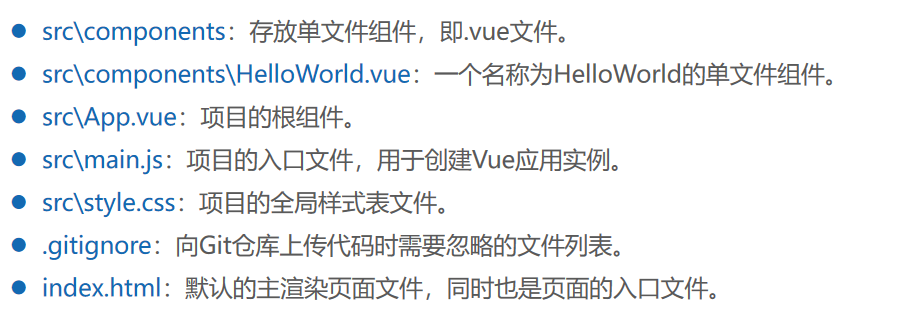
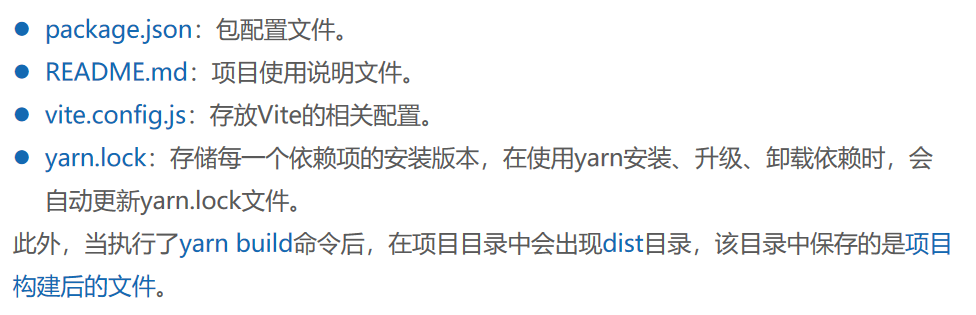
yarn dev2、Vue的项目结构
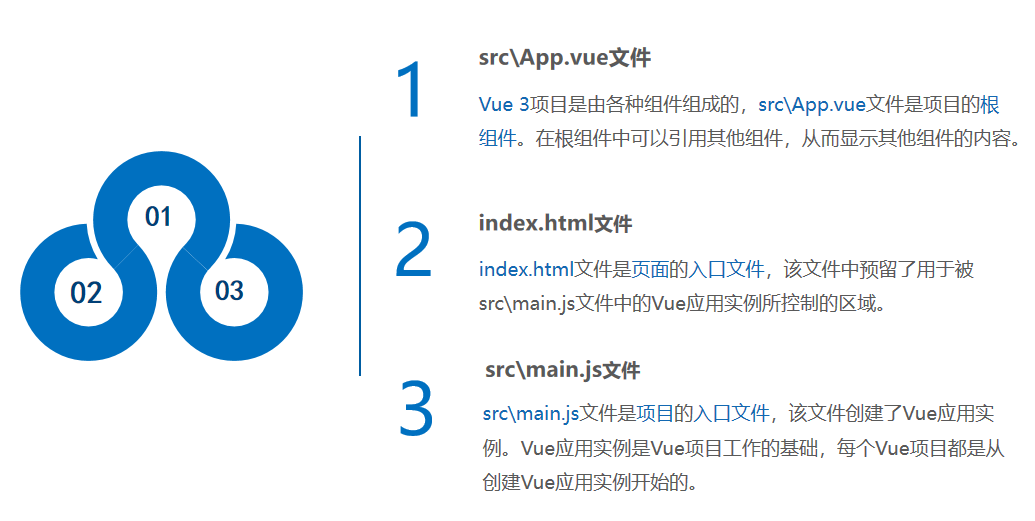
3、Vue 3项目的运行过程
通过main.js把App.vue渲染到index.html的指定区域。
4、Vue3指令
指令是vue为开发者提供的模板语法,辅助开发者渲染页面的基本结构。
4.1 内容渲染指令(渲染DOM元素的文本内容)
4.1.1 v-text
注意:v-text指令会覆盖元素内默认的指令。
html
<template>
    <div>
        <p v-text="name"></p>
        <p v-text="gender"></p>
    </div>
</template>
<script setup>
    const name='lili'
    const gender='girl'
</script>
<style>
</style>
4.1.2 {{}}(插值表达式,专门解决v-text会覆盖默认文本内容的问题)
html
<template>
    <div>
        <p>姓名:{{ name }}</p>
        <p>性别:{{ gender }}</p>
    </div>
</template>
<script setup>
    const name='lili'
    const gender='girl'
</script>
<style>
</style>
4.1.3 v-html(把包含HTML标签的字符串渲染为页面的HTML元素)
html
<template>
    <div>
        <p v-html="description"></p>
    </div>
</template>
<script setup>
    const description='<h2>我在看书</h2>'
</script>
<style>
</style>
4.2 属性绑定指令【v-bind(为元素属性动态绑定属性值),单向的,数据只能从父组件流向子组件或元素。适用于绑定属性、prop、组件】
html
<template>
    <div>
        <input type="text" v-bind:placeholder="inputValue"/><br>
        <!-- 简写 -->
        <input type="text" :placeholder="inputValue"/>
    </div>
</template>
<script setup>
    const inputValue='请输入账号'
</script>
<style>
</style>
4.2.2 动态绑定HTML的class
html
<template>
    <div>
        <!-- { fat: isFat }:对象语法,用于动态地绑定一个或多个 CSS 类 -->
        <h2 class="thin" :class="{ fat: isFat, del: isDel}">class动态</h2>
        <button @click="isFat = !isFat">点击</button>
        <!-- 数组语法:动态绑定多个class类名 -->
        <!-- <h2 class="thin" :class="[isFat?'fat':'', isDel?'del':'']">class动态</h2> -->
        <button @click="isDel = !isDel">点击</button>
    </div>
</template>
<script setup>
    import {ref} from 'vue'
    let isFat=ref(true)
    let isDel=ref(true)
</script>
<style scoped>
    .thin{
        font-weight: 100;
    }
    .fat{
        font-weight: 800;
    }
    .del{
        text-decoration: line-through;
    }
</style>
4.3 事件绑定指令【v-on(为DOM元素绑定事件监听)】
html
<template>
    <div>
        <button type="text" v-on:click="showLog">点击</button><br><br>
        <!-- 简写 -->
        <button type="text" @click="showLog">点击-简写版</button>
        <button type="text" @click="console.log('触发点击事件')">点击-简写版Plus</button>
        <!-- 传参 -->   <!-- $event表示原生的事件参数对象,$event解决事件参数对象event被覆盖的问题 -->
        <button type="text" @click="addCount(1, $event)">点击-传参版</button>
    </div>
</template>
<script setup>
    const showLog=(e)=>{
        // 事件对象e
        const nowBgColor=e.target.style.backgroundColor
        e.target.style.backgroundColor=nowBgColor==='red'?'':'red'
        console.log('触发点击事件')
    }
    // 传参
    let count=0
    const addCount=(param, e)=>{
        const nowBgColor=e.target.style.backgroundColor
        e.target.style.backgroundColor=nowBgColor==='pink'?'':'pink'
        count+=param
        console.log(count)
    }
</script>
<style>
</style>
4.3.2 事件修饰符
- .prevent:阻止默认行为(例如阻止a链接的跳转,阻止表单的提交)
- .stop:阻止事件冒泡(具体元素到最顶层节点的过程)
- .capture:以捕获模式(最顶层节点到具体元素的过程)触发当前事件处理函数
- .once:绑定的事件只触发1次
- .self:只有event.target是当前元素自身时触发事件处理函数
4.3.3 按键修饰符
html
<template>
    <div>
        <input type="text" @keyup.enter="submit"><br><br>
        <input type="text" @keyup.esc="clearInput">
    </div>
</template>
<script setup>
    const submit=(e)=>{
        console.log('按下了回车键,最新的值为:', e.target.value)
    }
    const clearInput=(e)=>{
        // 清空输入值
        e.target.value = ''
    }
</script>
<style>
</style>
4.4 双向绑定指令【v-model(不操作DOM的前提下,快速获取表单的数据。双向的,数据可以在父子组件之间或数据与表单控件之间双向流动。适用于表单控件,如 input、textarea、select 等】
html
<template>
    <div>
        <p>姓名:{{ name }}</p>
        <input type="text" v-model="name">
    </div>
</template>
<script setup>
    import { ref } from 'vue';
    const name = ref('lili');
</script>
<style>
</style>
4.4.2 v-model指令的修饰符
- .number:自动将用户的输入值转为数值类型;
- .trim:自动过滤用户输入的首尾空白字符;
- .lazy:在"change"时而非"input"时更新(即没有输入离开焦点时)
4.5 条件渲染指令(按需控制DOM的显示与隐藏)
4.5.1 v-if和v-show
区别:
实现原理不同:
- v-if指令会动态地创建或移除DOM元素,从而控制元素在页面上的显示与隐藏;
- v-show指令会动态为元素添加或移除style="display:none;"样式,从而控制元素的显示与隐藏
性能消耗不同:
- v-if有更高的切换开销,而v-show有更高的初始渲染开销
- 如果需要非常频繁地切换,使用v-show
- 如果在运行时条件很少改变,使用v-if
html
<template>
    <div>
        <button @click="flag=!flag">隐藏或显示</button>
        <p v-if="flag">v-if</p>
        <p v-show="flag">v-show</p>
    </div>
</template>
<script setup>
    import {ref} from 'vue'
    let flag=ref(false)
</script>
<style>
</style>
4.5.2 v-else和v-else-if
v-if可以单独使用,或配合v-else使用
html
<template>
    <div>
        <p v-if="Math.random() > 0.5">随机数大于0.5</p>
        <p v-else-if="Math.random() < 0.5">随机数小于0.5</p>
        <p v-else>随机数等于0.5</p>
    </div>
</template>
<script setup>
</script>
<style>
</style>
4.6 列表渲染指令
vue提供了v-for指令,辅助开发者基于一个数组来循环渲染相似的UI结构。
v-for指令需要使用item in items的特殊语法,其中items是待循环的数组,item是当前的循环项。
html
<template>
    <div>
        <ul>
            <!-- 当列表的数据变化时,默认情况下,vue会尽可能的复用已存在的DOM元素,从而提升渲染的性能。
            但这种默认的性能优化策略会导致有状态的列表无法被正确更新。
            为了给vue一个提示,以便它能跟踪每个节点的身份,从而保证有状态的列表被正确更新的前提下,提升渲染的性能。
            此时需要为每一项提供一个唯一的key属性。
            注意:
            1、key的值只能是字符串或数字类型;
            2、key的值必须具有唯一性;
            3、建议把数据线id属性的值作为key的值;
            4、使用index的值当做key的值没有意义(因为index的值不具有唯一性) -->
            <li v-for="(item, index) in list" :key="item.id">索引是:{{ index }}, 姓名为:{{ item.name }}</li>
        </ul>
    </div>
</template>
<script setup>
    let list=[
        {id:1, name:'keke'},
        {id:2, name:'lili'}
    ]
</script>
<style>
</style>
5、Vue组件
5.1 单页面应用程序(SPA)
SPA:顾名思义,指的是一个Web网站中只有唯一的一个HTML页面,所有的功能与交互都在这唯一的一个页面内完成。
特点:
- SPA将所有的功能局限于一个Web页面中,仅在该Web页面初始化时加载相应的资源(HTML、JavaScript和CSS)
- 一旦页面加载完成了,SPA不会因为用户的操作而进行页面的重新加载或跳转,而是利用JavaScript动态地变换HTML内容,从而实现页面与用户的交互。
优点:
- 良好的交互体验
- SPA内容的改变不需要重新加载整个页面;
- 获取数据通过Ajax异步获取;
- 没有页面之间的跳转,不会出现"白屏现象"
2.良好的前后端工作分离模式
- 后端专注于提供API接口,更容易实现API接口的复用;
- 前端专注于页面的渲染,更利于前端工程化的发展
3.减轻服务器压力
- 服务器只提供数据,不负责页面的合成与逻辑的处理,吞吐能力会提高几倍
缺点:
- 首页加载慢
- 路由懒加载;
- 代码压缩;
- CDN加速;
- 网络传输压缩
2.不利于SEO
- SSR服务器渲染
5.2 基于vite创建工程化项目(前面1.3 Vite已介绍)
5.3 vue组件组成结构
- template:组件的模板结构
- script:组件的JavaScript行为
- style:组件的样式
注意:每个组件必须包含template模板结构,另外两个可选。
5.3.1 template模板结构
- <template>支持定义多个根节点;
注意:<template>是vue提供的容器标签,只起到包裹性质的作用,不会被渲染为真正的DOM元素
5.3.2 style样式
<style>标签上的lang="css"属性是可选的,表示所使用的样式语言。默认只支持普通的css语法,可选值还有less(需npm install less -D安装依赖包),scss等。
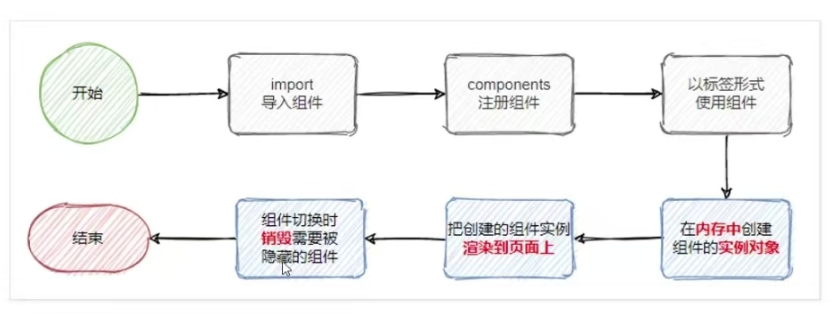
5.4 组件的注册
5.4.1 全局注册组件
使用app.component()方法注册的全局组件,直接以标签的形式进行使用即可。
demo.vue
html
<template>
    <div>
        <ul>
            <li v-for="(item, index) in list" :key="item.id">索引是:{{ index }}, 姓名为:{{ item.name }}</li>
        </ul>
    </div>
</template>
<script setup>
    let list=[
        {id:1, name:'keke'},
        {id:2, name:'lili'}
    ]
</script>
<style>
</style>
main.js
javascript
import { createApp } from 'vue'
import './style.css'
import App from './App.vue'
import DemoVue from './components/Demo.vue'

// 创建应用实例
const app = createApp(App)
// 全局注册Demo组件
app.component('DemoVue', DemoVue)
// 挂载应用
app.mount('#app')
App.vue
html
<template>
    <DemoVue />
</template>
<script setup>
</script>
<style>
</style>
5.4.2 局部注册组件
App.vue
html
<template>
    <DemoVue />
    <hr>
    <Demo/>
</template>
<script setup>
  import Demo from './components/Demo.vue';
</script>
<style>
</style>
5.4.3 组件注册名称的大小写
- 使用kebab-case命名法(俗称短横线命名法,例如my-demo)
- 使用PascalCase命名法(俗称帕斯卡命名法或大驼峰命名法,例如MyDemo)---推荐
5.5 解决组件样式冲突问题
5.5.1 vue为style节点提供了scoped属性,从而防止组件之间的样式冲突问题
5.5.2 当前组件的style节点添加了scoped属性,则当前组件的样式对其子组件是不生效的。如果想让某些样式对子组件生效,使用:deep() 伪类选择器(子组件里面需要包裹一个div)。
5.6 组件的props
props是组件的自定义属性,可以通过props把数据传递到子组件内部,供子组件内部进行使用。
props作用:父组件通过props向子组件传递要展示的数据。
props的优点:提高了组件的复用性。
Demo.vue
html
<template>
    <div>
        <h2>标题:{{ title }}</h2>
        <h2>作者:{{ author }}</h2>
    </div>
</template>
<script setup>
    // 外界可以传递指定的数据到当前组件
    import { defineProps } from 'vue';
    // 定义接收的 props
    const props = defineProps({
        title: String,
        author: String
    });
</script>
<style>
</style>
App.vue
html
<template>
  <div>
    <h2>App.vue根组件</h2>
    <hr>
    <DemoVue title="恋与深空" author="小鱼" />
  </div>

</template>
<script setup>
  import DemoVue from './components/Demo.vue'
</script>
<style>
</style>
main.js
javascript
import { createApp } from 'vue'
import './style.css'
import App from './App.vue'

// 创建应用实例
const app = createApp(App)
// 挂载应用
app.mount('#app')
5.6.2 动态绑定props的值
可以使用v-bind属性绑定的形式,为组件动态绑定props的值。
App.vue
html
<template>
  <div>
    <h2>App.vue根组件</h2>
    <hr>
    <DemoVue :title="book.title" :author="book.author" />
  </div>

</template>
<script setup>
  import DemoVue from './components/Demo.vue'
  const book = {
      title: '魔道祖师',
      author: '铜臭墨香'
};
</script>
<style>
</style>
5.6.3 props验证(在封装组件时对外界传递过来的props数据进行合法性的校验,从而防止数据不合法的问题)
使用数组类型的props节点的缺点:无法为每个prop指定具体的数据类型。
使用对象类型的props节点,可以对每个prop进行数据类型的校验。
对象类型的props节点提供了多种数据校验方案:
-
基础的类型检查
-
多个可能的类型
-
必填项校验
-
属性默认值
-
自定义验证函数
基础的类型检查
javascript
const props = defineProps({  // 支持8种基础类型
        propA:String,
        propB:Number,
        propC:Boolean,
        propD:Array,
        propE:Object,
        propF:Date,
        propG:Function,
        propH:Symbol        // 符号类型
});
多个可能的类型
javascript
const props = defineProps({
        propA:[String, Number],
});
必填项校验
javascript
const props = defineProps({
        propB:{
            type: String,
            required: true
        }
});
属性默认值
javascript
const props = defineProps({
        propC:{
            type: Number,
            default: 100    // 如果没有指定propC的值,则propC属性的默认值为100
        }
});
自定义验证函数
javascript
const props = defineProps({
        propD:{
           validator(value){
               return ['success', 'warning', 'danger'].indexOf(value) !== -1
           }
        }
});
6、Vue3的核心语法
6.1 OptionsAPI和CompositionAPI
6.1.1 OptionsAPI
Vue2的API设计是Options(配置)风格。
Options的API,数据、方法、计算属性等,是分散在data、methods、computed中的,若想新增或修改一个需求,就需要分别修改data、methods、computed,不利于维护和复用。
6.1.2 CompositionAPI
Vue3的API设计是Composition(组合)风格。
Composition的API可以用函数的方式,更加优雅的组织代码,让相关功能的代码更加有序的组织在一起。
6.2 setup
6.2.1 setup概述
setup是Vue3的一个新的配置项,值是一个函数,组件所用到的数据、方法、计算属性、监视均配置在setup中。
特点如下:
- setup函数返回的对象中的内容,可直接在模板使用;
- setup中访问this时是undefined;
- setup函数会在beforeCreate之前调用,领先所有钩子执行
6.2.2 setup语法糖
javascript
<script setup>

</script>
6.3 响应式数据
6.3.1 基本类型的响应式数据(ref)
作用:定义响应式变量。
语法:let xxx=ref(初始值)
返回值:一个RefImpl的实例对象,简称ref对象或ref,ref对象的value属性是响应式的。
注意:JS中操作数据需要xxx.value,但模板中不需要.value,直接使用即可;
对于let name=ref('珂珂'),name不是响应式,name.value才是。
html
<template>
    <div class="person">
        <h2>姓名:{{name}}</h2>
        <h2>年龄:{{age}}</h2>
        <button @click="changeName">修改姓名</button>
        <button @click="changeAge">修改年龄</button>
        <button @click="showTel">查看联系方式</button>
    </div>
</template>
<script setup>
    // ref创建:基本类型的响应式数据
    import {ref} from 'vue'
    // 数据
    let name=ref('珂珂')
    let age=ref(18)
    let tel='15014378953'
    // 方法
    function changeName(){
        name.value='lili'
        console.log(name.value)
    }
    function changeAge(){
        age.value+=1
        console.log(age.value)
    }
    function showTel(){
        alert(tel)
    }
</script>
<style>
   .person {
     border: 1px solid #ccc;
     padding: 10px;
     margin: 10px;
   }
   .person h2 {
     margin: 5px 0;
   }
   .person button {
     margin: 5px;
   }
</style>
6.3.2 对象类型的响应式数据(reactive或ref)
reactive
html
<template>
    <div>
        <h2>{{book.name}},价格{{book.price}}¥</h2>
        <button @click="changePrice">修改书本的价格</button>
    </div>
</template>
<script setup>
    import {reactive} from 'vue'
    // 数据
    let book = reactive({
        name: '傲慢与偏见',
        price: 89
    })
    function changePrice(){
        book.price += 10
    }
</script>
<style>
</style>
ref
html
<template>
    <div>
        <h2>{{book.name}},价格{{book.price}}¥</h2>
        <button @click="changePrice">修改书本的价格</button>
        <button @click="changeAll">同时改变</button>
    </div>
</template>
<script setup>
    import {ref} from 'vue'
    // 数据
    let book = ref({
        name: '傲慢与偏见',
        price: 89
    })
    function changePrice(){
        book.value.price += 10
    }
    // 整个对象都替换了
    function changeAll(){
        book.value={
            name: '查理九世',
            price: 102
        }
    }
</script>
<style>
</style>
6.3.3 对比
区别
- ref创建的变量必须使用.value(可以使用volar插件自动添加.value)
- reactive重新分配一个新对象(可以使用Object.assign整体替换),会失去响应式
使用原则
- 需要一个基本类型的响应式数据,必须使用ref;
- 需要一个响应式对象,层级不深,ref、reactive都可以;
- 需要一个响应式对象,层级较深,推荐reactive
6.4 toRefs和toRef
html
<template>
    <div>
        <h2>{{book.name}},价格{{book.price}}¥</h2>
        <button @click="changeName">修改书本的名字</button>
        <button @click="changePrice">修改书本的价格</button>
    </div>
</template>
<script setup>
    import {reactive, toRef, toRefs} from 'vue'
    // 数据
    let book = reactive({
        name: '傲慢与偏见',
        price: 89
    })

    let {name, price} = toRefs(book)
    let name2=toRef(book, 'name')
    console.log(name2.value)
    function changeName(){
        name.value = '小王子'
    }
    function changePrice(){
        price.value += 10
    }
</script>
<style>
</style>
6.5 计算属性(computed)【必须return一个结果】
html
<template>
    <div>
        姓:<input type="text" v-model="firstName"><br>
        名:<input type="text" v-model="lastName"><br>
        <button @click="changeFullName">修改全名</button>
        全名:<span>{{fullName}}</span>
        <!-- 全名:<span>{{fullName}}</span>
        全名:<span>{{fullName2()}}</span>
        全名:<span>{{fullName2()}}</span>
        全名:<span>{{fullName2()}}</span> -->
    </div>
</template>
<script setup>
    import {computed, ref} from 'vue'
    let firstName=ref('zhang')
    let lastName=ref('san')
    // 相对于方法来说,计算属性会缓存计算结果,只有计算属性的依赖项发生变化时,才会重新计算。
    // 因此计算属性的性能更好。
    // 方法无缓存(用几次就调用几次)
    function fullName2(){
        console.log(1)
        return firstName.value.slice(0,1).toUpperCase()+firstName.value.slice(1)+ '-' +lastName.value
    }
    // 计算属性拥有缓存,此时是只读
    // let fullName=computed(()=>{
    //     console.log(1)
    //     return firstName.value.slice(0,1).toUpperCase()+firstName.value.slice(1)+ '-' +lastName.value
    // })
    // 此时是可读可写的计算属性
    let fullName=computed({
        get(){
            return firstName.value.slice(0,1).toUpperCase()+firstName.value.slice(1)+ '-' +lastName.value
        },
        set(val){
            const [fn, ln]=val.split('-')
            firstName.value=fn
            lastName.value=ln
        }
    })
    function changeFullName(){
        fullName.value='ke-ke'
    }
</script>
<style>
</style>
6.6 监视(watch)
作用:监视数据的变化(懒监听,即仅在侦听源发生变化时才执行回调函数)
特点(只能监视以下四种数据):
- ref定义的数据;
- reactive定义的数据;
- 函数返回一个值(getter函数);
- 一个包含上述内容的数组
6.6.1 监视ref定义的基本类型数据
html
<template>
    <div>
       <h2>当前求和为:{{sum}}</h2>
       <button @click="changeSum">点我sum+1</button>
    </div>
</template>
<script setup>
    import {ref, watch} from 'vue'
    let sum=ref(0)
    function changeSum(){
        sum.value+=1
    }
    // 监视
    const stopWatch = watch(sum, (newValue, oldValue)=>{
        console.log('sum发生了变化', newValue, oldValue)
        // 解除监视
        if(newValue>=10){
            stopWatch()
        }
    })
</script>
<style>
</style>
6.6.2 监视ref定义的对象类型数据
注意:
- 如果修改的是ref定义的对象中的属性,newValue和oldValue都是新值,因为它们是同一个对象;
- 如果修改的是整个ref定义的对象,newValue是新值,oldValue是旧值,因为不是同一个对象了。
html
<template>
    <div>
       <h2>姓名:{{person.name}}</h2>
       <h2>年龄:{{person.age}}</h2>
       <button @click="changeName">修改名字</button>
       <button @click="changeAge">修改年龄</button>
       <button @click="changeAll">修改全部</button>
    </div>
</template>
<script setup>
    import {ref, watch} from 'vue'
    let person=ref({
        name: '珂珂',
        age:18
    })
    function changeName(){
        person.value.name+='-'
    }
    function changeAge(){
        person.value.age+=1
    }
    function changeAll(){
        person.value = {
            name: 'lili',
            age: 21
        }
    }
    watch(person, (newValue, oldValue)=>{
        // 监视ref定义的对象类型数据,监视的是对象的地址值;如果想监视对象内部属性的变化,需要手动开启深度监视
        // 第一个参数:被监视的数据
        // 第二个参数:监视的回溯
        // 第三个参数:配置对象(deep,immediate)
        console.log('person变化了', newValue, oldValue)
    // 默认情况下,组件初次加载完毕后不会调用watch侦听器。immediate可以让watch侦听器立即调用
    }, {deep:true, immediate:true})
</script>
<style>
</style>
6.6.3 监视reactive定义的对象类型数据(默认开启了深度监视)
html
<template>
    <div>
       <h2>姓名:{{person.name}}</h2>
       <h2>年龄:{{person.age}}</h2>
       <button @click="changeName">修改名字</button>
       <button @click="changeAge">修改年龄</button>
       <button @click="changeAll">修改全部</button>
    </div>
</template>
<script setup>
    import {reactive, watch} from 'vue'
    let person=reactive({
        name: '珂珂',
        age:18
    })
    function changeName(){
        person.name+='-'
    }
    function changeAge(){
        person.age+=1
    }
    function changeAll(){
        // 只是替换了属性值,对象地址值不变
        Object.assign(person, {
            name: 'lili',
            age: 21
        })
    }
    watch(person, (newValue, oldValue)=>{
        console.log('person变化了', newValue, oldValue)
    })
</script>
<style>
</style>
6.6.4 监视ref或reactive定义的对象类型数据中的某个属性
注意:
- 如果该属性不是对象类型,要写成函数形式;
- 如果属性值依然是对象类型,可以直接编,也可以写成函数(建议函数);
- 监视的是对象的属性,建议函数式,如果监视的是对象的地址值,需要关注对象内部,需要手动开启深度监视。
html
<template>
    <div>
       <h2>姓名:{{person.name}}</h2>
       <h2>年龄:{{person.age}}</h2>
       <h2>书本名字1:{{person.book.name1}}</h2>
       <h2>书本名字2:{{person.book.name2}}</h2>
       <button @click="changeName">修改名字</button>
       <button @click="changeAge">修改年龄</button>
       <button @click="changeAll">修改全部</button>
       <button @click="changeName1">修改书本名字1</button>
       <button @click="changeName2">修改书本名字2</button>
       <button @click="changeAllName">修改书本名字</button>
    </div>
</template>
<script setup>
    import {reactive, watch} from 'vue'
    let person=reactive({
        name: '珂珂',
        age:18,
        book:{
            name1: '哈利波特',
            name2: '秘密花园'
        }
    })
    function changeName(){
        person.name+='-'
    }
    function changeAge(){
        person.age+=1
    }
    function changeAll(){
        Object.assign(person, {
            name: 'lili',
            age: 21
        })
    }
    function changeName1(){
        person.book.name1='福尔摩斯探案集'
    }
    function changeName2(){
        person.book.name2='白夜行'
    }
    function changeAllName(){
        person.book={name1:'福尔摩斯探案集', name2:'白夜行'}
    }
    // watch(()=>{return person.name}, (newValue, oldValue)=>{
    //     console.log('person变化了', newValue, oldValue)
    // })
    // 部分
    // watch(person.book, (newValue, oldValue)=>{
    //     console.log('person变化了', newValue, oldValue)
    // })
    // 整体
    // watch(()=> person.book, (newValue, oldValue)=>{
    //     console.log('person变化了', newValue, oldValue)
    // })
    // 部分+整体
    watch(()=> person.book, (newValue, oldValue)=>{
        console.log('person变化了', newValue, oldValue)
    }, {deep:true})
</script>
<style>
</style>
6.6.5 监视上述多个数据
html
<template>
    <div>
       <h2>姓名:{{person.name}}</h2>
       <h2>年龄:{{person.age}}</h2>
       <h2>书本名字1:{{person.book.name1}}</h2>
       <h2>书本名字2:{{person.book.name2}}</h2>
       <button @click="changeName">修改名字</button>
       <button @click="changeAge">修改年龄</button>
       <button @click="changeAll">修改全部</button>
       <button @click="changeName1">修改书本名字1</button>
       <button @click="changeName2">修改书本名字2</button>
       <button @click="changeAllName">修改书本名字</button>
    </div>
</template>
<script setup>
    import {reactive, watch} from 'vue'
    let person=reactive({
        name: '珂珂',
        age:18,
        book:{
            name1: '哈利波特',
            name2: '秘密花园'
        }
    })
    function changeName(){
        person.name+='-'
    }
    function changeAge(){
        person.age+=1
    }
    function changeAll(){
        Object.assign(person, {
            name: 'lili',
            age: 21
        })
    }
    function changeName1(){
        person.book.name1='福尔摩斯探案集'
    }
    function changeName2(){
        person.book.name2='白夜行'
    }
    function changeAllName(){
        person.book={name1:'福尔摩斯探案集', name2:'白夜行'}
    }
    watch([ person.book, ()=>person.name], (newValue, oldValue)=>{
        console.log('person变化了', newValue, oldValue)
    }, {deep:true})
</script>
<style>
</style>
题外话:
计算属性VS侦听器
计算属性和侦听器侧重的应用场景不同:
- 计算属性侧重于监听多个值的变化,最终计算并返回一个新值;
- 侦听器侧重于监听单个数据的变化,最终执行特定的业务处理,不需要有任何的返回值
6.7 watchEffect
作用:立即运行一个函数,同时响应式地追踪其依赖,并在依赖更改时重新执行该函数。
watch VS watchEffect
- 都能监听响应式数据的变化,不同的是监听数据变化的方式不同;
- watch:要明确指出监视的数据
- watchEffect:不用明确指出监视的数据(函数中用到哪些属性,就监视哪些属性)
html
<template>
    <div>
        <h2>当前总次数为:{{count}}</h2>
        <h2>当前求和为:{{sum}}</h2>
        <button @click="changeCount">点击+1</button>
        <button @click="changeSum">点击+10</button>
    </div>
</template>
<script setup>
    import {ref, watch, watchEffect} from 'vue'
    let count=ref(0)
    let sum=ref(0)
    function changeCount(){
        count.value+=1
    }
    function changeSum(){
        sum.value+=10
    }
    // watch([count, sum], (value)=>{
    //     let [newCount, newSum] = value
    //     if(newCount>=6 || newSum>=60){
    //         console.log('标记')
    //     }
    // })
    watchEffect(()=>{
        if(count.value>=6 || sum.value>=60){
            console.log('标记')
        }
    })
</script>
<style>
</style>
6.8 标签的ref属性
作用:用于注册模板引用。
- 用在普通DOM标签上,获取的是DOM节点;
- 用在组件标签上,获取的是组件实例对象
Reactive.vue
html
<template>
    <div>
        <h2>九寨沟</h2>
        <h2 ref="title2">冰岛</h2>
        <h2>瑞士</h2>
        <button @click="showLog">点击输出h2普通标签里面的元素</button>
    </div>
</template>
<script setup>
    import {ref, defineExpose} from 'vue'
    let title2=ref()
    let a=ref(0)
    let b=ref(1)
    let c=ref(2)
    function showLog(){
        console.log(title2.value)
    }
    defineExpose({a,b,c})
</script>
// scoped表示局部样式
<style scoped>
</style>
App.vue
html
<template>
<ReactiveVue ref="rv"/>
<button @click="showLog">点击输出组件的元素</button>
</template>
<script setup>
import ReactiveVue from './components/Reactive.vue'
import {ref} from 'vue'
let rv=ref()
function showLog(){
console.log(rv.value)
}
</script>
<style>
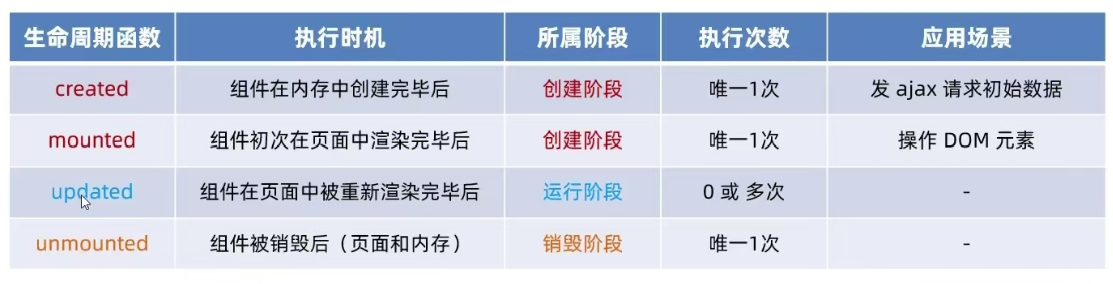
</style>6.9 组件的生命周期
组件的生命周期指的是:组件从创建-》运行(渲染)-》销毁的整个过程,强调的是一个时间段。
6.9.1 组件的运行过程
6.9.2 组件中主要的生命周期函数
6.10 组件之间的数据共享
6.10.1 父子组件之间的数据共享
- 父-》子
父组件通过v-bind属性绑定向子组件共享数据。同时,子组件需要使用props接受数据。
Demo.vue
html
<template>
    <div>
        <p>来自父组件的数据:{{ message }}</p>
    </div>
</template>
<script setup>
    import { defineProps } from 'vue';
    // 定义接收的 prop
    const props = defineProps({
        message: String
    });
</script>
<style scoped>
</style>
App.vue
html
<template>
  <div>
    <DemoVue :message="parentMessage" />
  </div>
</template>
<script setup>
  import DemoVue from './components/Demo.vue'
  import {ref} from 'vue'
  const parentMessage = ref('Hello from Parent');
</script>
<style>
</style>- 子-》父
子组件通过自定义事件的方式向父组件共享数据。
Demo.vue
html
<template>
    <div>
        <input :value="modelValue" @input="updateValue" />
    </div>
</template>
<script setup>
    // emits 是一个选项,用于在组件定义中声明它可能会触发的事件。
    // emits 通常与 defineEmits 函数一起使用,用于定义组件可能触发的事件列表。
    import { defineProps, defineEmits } from 'vue';
    // 定义接收的 prop
    const props = defineProps({
        modelValue: String
    });
    // 定义触发的事件
    const emit = defineEmits(['update:modelValue']);
    // 更新父组件的数据
    function updateValue(event) {
        emit('update:modelValue', event.target.value);
    }
</script>
<style scoped>
</style>

// 简化版
<template>
  <!-- $emit() 是 Vue 实例的一个方法,用于在组件内部触发一个事件 -->
  <!-- $emit('update:props名称') -->
  <input :value="modelValue" @input="$emit('update:modelValue', $event.target.value)" />
</template>
<script setup>
import { defineProps } from 'vue';
const props = defineProps({
  modelValue: String
});
</script>
App.vue
html
<template>
  <div>
    <DemoVue v-model="message"/>
    <p>父组件接收到的数据:{{ message }}</p>
  </div>
</template>
<script setup>
  import DemoVue from './components/Demo.vue'
  import {ref} from 'vue'
  const message = ref('');
</script>
<style>
</style>- 父《-》子
父组件使用子组件期间,可以使用v-model指令维护组件内外数据的双向同步。
6.10.2 兄弟组件之间的数据共享
实现共享的方案是EventBus。可以借助于第三方包mitt来创建eventBus对象,从而实现兄弟组件之间的数据共享。
6.10.3 后代关系组件之间的数据共享
指的是父节点的组件向其子孙组件共享数据。
父节点的组件可以通过provide方法,对其子孙组件共享数据。
父节点使用provide向下共享数据时,可以结合computed函数向下共享响应式数据。
子孙节点可以使用inject数组,接受父节点向下共享的数据。
6.10.4 全局数据共享(vuex)
Vuex 是一个专为 Vue.js 应用程序开发的状态管理模式和库。它采用集中式存储管理应用的所有组件的状态,并以相应的规则保证状态以一种可预测的方式发生变化。
6.11 nextTick 函数
nextTick是 Vue 提供的一个全局 API,它用于将回调延迟到下次 DOM 更新循环之后执行。在修改数据之后立即使用这个方法,可以在回调中访问更新后的 DOM。主要用于处理数据更新和 DOM 变化之间的同步问题。
html
<template>
  <div>
    <p>{{ message }}</p>
    <button @click="updateMessage">更新消息</button>
  </div>
</template>
<script setup>
import { ref, nextTick } from 'vue';
const message = ref('Hello');
function updateMessage() {
  message.value = 'Hello Vue 3';
  nextTick(() => {
    // 这个回调将在 DOM 更新完成后执行
    console.log(message.value); // 输出:Hello Vue 3
  });
}
</script>
6.12 动态组件(动态切换组件的显示与隐藏<component>)
Demo.vue
html
<template>
  <div>
    这是组件Demo
  </div>
</template>
<script setup>
</script>
Demo2.vue
html
<template>
  <div>
    这是组件Demo2
  </div>
</template>
<script setup>
</script>
App.vue
html
<template>
  <div>
    <button @click="currentComponent='DemoVue'">切换到组件Demo</button>
    <button @click="currentComponent='DemoVue2'">切换到组件Demo2</button>
    <hr>
    <component :is="components[currentComponent]"></component>
  </div>
</template>
<script setup>
  import DemoVue from './components/Demo.vue'
  import DemoVue2 from './components/Demo2.vue'
  import {ref} from 'vue'
  const components = {
      DemoVue,
      DemoVue2
  }
  const currentComponent=ref('DemoVue')
</script>
<style>
</style>
6.12.2 使用keep-alive保持状态
默认情况下,切换动态组件时无法保持组件的状态。此时可以使用vue内置的<keep-alive>组件保持动态组件的状态,以避免反复重渲染导致的性能问题。
App.vue
html
<template>
  <div>
    <button @click="currentComponent='DemoVue'">切换到组件Demo</button>
    <button @click="currentComponent='DemoVue2'">切换到组件Demo2</button>
    <hr>
    <!-- 使用 <keep-alive> 包裹了动态组件 <component>。当点击按钮切换组件时,
    不活动的组件实例会被缓存,而不是被销毁,从而在组件切换过程中节省资源和时间 -->
    <keep-alive>
      <component :is="components[currentComponent]"></component>
    </keep-alive>
  </div>
</template>
<script setup>
  import DemoVue from './components/Demo.vue'
  import DemoVue2 from './components/Demo2.vue'
  import {ref} from 'vue'
  const components = {
      DemoVue,
      DemoVue2
  }
  const currentComponent=ref('DemoVue')
</script>
<style>
</style>
6.13 插槽
插槽(slot)是vue为组件的封装者提供的能力,一种用于组件内容分发的机制。允许开发者在封装组件时,把不确定的、希望由用户指定的部分定义为插槽(可以认为是为用户预留的内容的占位符)。
6.13.1 后备内容(默认插槽)
Demo.vue
html
<template>
  <div>
    <!-- 注意:如果封装组件时没有预留任何<slot>插槽,则用户提供的任何自定义内容都会被丢弃 -->
    <slot>组件默认内容</slot>
  </div>
</template>
<script setup>
</script>
App.vue
html
<template>
  <div>
    <DemoVue>
      <template v-slot:default>
        <!-- 注意:如果组件的使用者没有为插槽提供任何内容,则默认内容生效 -->
        用户自定义标题内容
      </template>
    </DemoVue>
  </div>
</template>
<script setup>
  import DemoVue from './components/Demo.vue'
</script>
<style>
</style>
6.13.2 具名插槽
允许在组件内部定义多个插槽,然后在使用组件时指定要填充哪个插槽的内容。
子组件决定何时渲染,父组件决定渲染什么内容。
Demo.vue
html
<template>
  <div>
    <h2><slot name="header"></slot></h2>
    <slot>组件默认内容</slot>
    <p><slot name="footer"></slot></p>
  </div>
</template>
<script setup>
</script>
App.vue
html
<template>
  <div>
    <DemoVue>
      <!-- 简写:<template  #header> -->
      <template v-slot:header>
        自定义头部内容
      </template>
      <template v-slot:default>
        自定义主体内容
      </template>
      <template v-slot:footer>
        自定义底部内容
      </template>
    </DemoVue>
  </div>
</template>
<script setup>
  import DemoVue from './components/Demo.vue'
</script>
<style>
</style>
6.13.3 作用域插槽(绑定props数据)
Demo.vue
html
<template>
  <div>
    <li v-for="item in items" :key="item.id">
      <slot :item="item">{{ item }}</slot>
    </li>
  </div>
</template>
<script setup>
    import {ref} from 'vue'
    const items = ref([
      { id: 1, content: 'Item 1' },
      { id: 2, content: 'Item 2' },
      { id: 3, content: 'Item 3' }
    ]);
</script>
App.vue
html
<template>
  <div>
    <DemoVue>
      <template v-slot:default="slotProps">
        {{ slotProps.item.content }}
      </template>
    </DemoVue>
  </div>
</template>
<script setup>
  import DemoVue from './components/Demo.vue'
</script>
<style>
</style>
第二个案例
Demo.vue
html
<template>
  <div>
    <p>用户信息:</p>
    <!-- 把 user 数据通过插槽传给父组件 -->
    <slot :user="user" />
  </div>
</template>
<script setup>
  import {ref} from 'vue'
  const user = ref({ name: '小明', age: 16 })
</script>
App.vue
html
<template>
  <div>
    <DemoVue>
      <!-- 接收子组件传来的数据 -->
      <template #default="{ user }">
        <span>姓名:{{ user.name }},年龄:{{ user.age }}</span>
      </template>
    </DemoVue>
    <!-- 更简单的写法(v-slot 解构) -->
    <DemoVue v-slot="{ user }">
      <em>欢迎你,{{ user.name }}!</em>
    </DemoVue>
  </div>
</template>
<script setup>
  import DemoVue from './components/Demo.vue'
</script>
<style>
</style>
6.14 自定义指令
自定义指令允许扩展 HTML 元素的功能,通过自定义指令可以封装复杂的逻辑,使其可以在多个组件中重用。自定义指令可以在应用中全局注册,也可以局部注册到特定组件中。
自定义指令通常包含以下钩子:
-
beforeMount:在绑定元素的父组件挂载之前调用。 -
mounted:在绑定元素的父组件挂载完成后调用。 -
beforeUpdate:在绑定元素的父组件更新之前调用。 -
updated:在绑定元素的父组件更新完成后调用。 -
beforeUnmount:在绑定元素的父组件卸载之前调用。 -
unmounted:在绑定元素的父组件卸载完成后调用。
6.14.1 局部自定义指令(组件内)
html
<template>
  <div>
    <!-- 使用 v-focus 让 input 自动获取焦点 -->
    <input type="text" v-focus placeholder="自动聚焦" />
    <br /><br />
    <input type="text" v-my-directive="'red'" placeholder="变红边框" />
  </div>
</template>
<script setup>
  // 定义一个局部指令:v-focus
  const vFocus = {
    mounted(el) {
      el.focus()
    }
  }
  // 另一个指令:v-my-directive,带参数
  const vMyDirective = {
    // mounted函数:组件首次渲染完成后执行
    mounted(el, binding) {
      el.style.borderColor = binding.value // binding.value 是传入的值
    },
    // updated函数:组件数据变化导致 DOM 更新后执行
    updated(el, binding) {
      el.style.borderColor = binding.value
    }
  }
</script>
6.14.2 全局自定义指令
focus.js
javascript
// src/directives/focus.js
export default {
  mounted(el) {
    el.focus()
  }
}
main.js
javascript
import { createApp } from 'vue'
import './style.css'
import App from './App.vue'
// 导入自定义指令
import focus from './directives/focus'

// 创建应用实例
const app = createApp(App)
// 全局注册指令
app.directive('focus', focus)
// 挂载应用
app.mount('#app')
Demo.vue
html
<template>
  <div>
    <input type="text" v-focus />
  </div>
</template>
<script setup>
</script>
6.14.3 使用场景
v-permission - 权限控制(显示/隐藏)
javascript
// directives/permission.js
export default {
  mounted(el, binding) {
    const requiredPermission = binding.value
    const userPermissions = ['admin', 'editor'] // 模拟用户权限

    if (!userPermissions.includes(requiredPermission)) {
      el.style.display = 'none' // 隐藏元素
      // 或者:el.parentNode.removeChild(el) 删除元素
    }
  }
}
html
<!-- 使用 -->
<button v-permission="'admin'">管理员专用</button>
v-longpress - 长按指令
javascript
// directives/longpress.js
export default {
  mounted(el, binding) {
    let timer = null

    el.addEventListener('mousedown', () => {
      timer = setTimeout(() => {
        binding.value() // 执行传入的方法
      }, 1000) // 长按1秒触发
    })

    el.addEventListener('mouseup', () => clearTimeout(timer))
    el.addEventListener('mouseleave', () => clearTimeout(timer))
  },
  unmounted(el) {
    // 清理事件
    el.removeEventListener('mousedown', () => {})
    el.removeEventListener('mouseup', () => {})
  }
}
html
<!-- 使用 -->
<button v-longpress="onLongPress">长按我</button>
<script setup>
const onLongPress = () => {
  alert('长按触发!')
}
</script>
v-watermark - 添加水印
javascript
// directives/watermark.js
let watermarkDiv = null
export default {
  mounted(el, binding) {
    const text = binding.value || '内部文档'
    watermarkDiv = document.createElement('div')
    const style = watermarkDiv.style
    style.position = 'fixed'
    style.top = '0'
    style.left = '0'
    style.width = '100%'
    style.height = '100%'
    style.pointerEvents = 'none'
    style.opacity = '0.1'
    style.zIndex = '9999'
    style.background = `url("data:image/svg+xml,%3Csvg xmlns='http://www.w3.org/2000/svg' width='200' height='100'%3E%3Ctext x='50%' y='50%' font-size='20' fill='black' text-anchor='middle'%3E${text}%3C/text%3E%3C/svg%3E") repeat`
    document.body.appendChild(watermarkDiv)
  },
  unmounted() {
    if (watermarkDiv) {
      document.body.removeChild(watermarkDiv)
      watermarkDiv = null
    }
  }
}
html
<!-- 使用 -->
<div v-watermark="'机密文件'">内容区域</div>
总结
| 场景 | 推荐使用自定义指令 |
|---|---|
| 聚焦、滚动、拖拽 | ✅ 是 |
| 权限控制、水印、懒加载 | ✅ 是 |
| 简单样式或逻辑 | ❌ 用 v-if / class 更好 |
| 数据处理 | ❌ 用计算属性 |
7、Vue路由
7.1 安装 Vue Router
bash
npm install vue-router@47.2 vue-router基本用法
可以使用<router-link>标签声明路由链接,并使用<router-view>标签声明路由占位符。
创建路由配置文件index.js
javascript
// src/router/index.js
import { createRouter, createWebHistory } from 'vue-router'
// 导入页面组件
import Home from '../views/Home.vue'
import About from '../views/About.vue'
import User from '../views/User.vue'
// 定义路由规则
const routes = [
  { path: '/', component: Home, name: 'Home' },
  { path: '/about', component: About, name: 'About' },
  { path: '/user/:id', component: User, name: 'User', props: true }  // 开启 props 传参
]
// 创建路由器实例
const router = createRouter({
  history: createWebHistory(),  // 使用浏览器 history 模式(无 #)
  routes  // 等同于 routes: routes
})
// 把 router 导出去
export default router
在主应用中使用路由器main.js
javascript
import { createApp } from 'vue'
import './style.css'
import App from './App.vue'
// 导入自定义指令
import focus from './directives/focus'
// 引入路由
import router from './router'     // 可以起任何名字,因为它是 default 导出

// 创建应用实例
const app = createApp(App)
// 安装路由插件
app.use(router)
// 挂载应用
app.mount('#app')
创建页面组件
Home.vue
html
<template>
  <div>
    <h1>首页</h1>
    <p>欢迎来到主页!</p>
  </div>
</template>
About.vue
html
<template>
  <div>
    <h1>关于我们</h1>
    <p>这是一个关于页面。</p>
  </div>
</template>
User.vue
html
<template>
  <div>
    <h1>用户页面</h1>
    <p>这里是用户页面。</p>
  </div>
</template>
在模板中使用 <router-link> 和 <router-view>
App.vue
html
<template>
  <div>
    <!-- 导航链接 -->
    <nav>
      <router-link to="/">首页</router-link> |
      <!-- 相对于<a href="#/about" class="router-link-exact-active router-link-active">关于</a> -->
      <!-- 被激活的路由链接默认会应用router-link-active的类名选择器 -->
      <router-link to="/about">关于</router-link> |
      <router-link :to="{ name: 'User', params: { id: 123 } }">用户</router-link>
    </nav>
    <!-- 路由出口:匹配的组件会在这里渲染 -->
    <router-view />
  </div>
</template>
<script setup>
</script>
<style>
</style>
7.3 路由重定向(redirect)
路由重定向指的是用户在访问地址A的时候,强制用户跳转到地址C,从而展示特定的组件页面。
7.3.1 重定向写法
|-----------|------------------------------|-----------|
| 字符串路径 | redirect: '/home' | 最简单,静态跳转 |
| 命名路由 | redirect: { name: 'Home' } | 推荐,更灵活 |
| 函数形式 | redirect: (to) => '/home' | 可动态判断跳转目标 |
| 带参数传递 | redirect: '/profile/:id' | 参数会自动映射 |
路由配置文件index.js
javascript
// src/router/index.js
import { createRouter, createWebHistory } from 'vue-router'
// 导入页面组件
import Home from '../views/Home.vue'
import About from '../views/About.vue'
import User from '../views/User.vue'
// 定义路由规则
const routes = [
  { path: '/', component: Home, name: 'Home' },
  // 🔁 重定向:访问 /about 自动跳转到 /home
  { path: '/about', redirect: '/' },
  { path: '/user/:id', component: User, name: 'User', props: true }  // 开启 props 传参
]
// 创建路由器实例
const router = createRouter({
  history: createWebHistory(),  // 使用浏览器 history 模式(无 #)
  routes  // 等同于 routes: routes
})
// 把 router 导出去
export default router
7.4 路由链接高亮
7.4.1 使用 <router-link> 自动高亮
被激活的路由链接默认会应用router-link-active的类名选择器。
App.vue
html
<template>
  <div>
    <!-- 导航链接 -->
    <nav>
      <router-link to="/">首页</router-link> |
      <!-- 相对于<a href="#/about" class="router-link-exact-active router-link-active">关于</a> -->
      <!-- 被激活的路由链接默认会应用router-link-active的类名选择器 -->
      <router-link to="/about">关于</router-link> |
      <router-link :to="{ name: 'User', params: { id: 123 } }">用户</router-link>
    </nav>
    <!-- 路由出口:匹配的组件会在这里渲染 -->
    <router-view />
  </div>
</template>
<script setup>
</script>
<style scoped>
  /* 当前激活的链接样式 */
  /* router-link-active:只要路径前缀匹配就生效(比如 /user/1 也会激活 /user) */
  .router-link-active {
    color: red;
    text-decoration: none;
  }
  /* 精确匹配时(完全路径一致) */
  /* router-link-exact-active:完全精确匹配才生效(默认由 Vue Router 自动添加) */
  .router-link-exact-active {
    font-weight: bold;
    border-bottom: 2px solid blue;
  }
</style>
7.4.2 自定义高亮类名
通过 active-class 和 exact-active-class 自定义类名,避免与全局样式冲突。
App.vue
html
<template>
  <div>
    <!-- 导航链接 -->
    <nav class="nav">
      <router-link to="/" active-class="active" exact-active-class="exact-active">首页</router-link>
      <router-link to="/about" active-class="active" exact-active-class="exact-active">关于</router-link>
      <router-link :to="{ name: 'User', params: { id: 123 } }">用户中心</router-link>
    </nav>
    <!-- 路由出口:匹配的组件会在这里渲染 -->
    <router-view />
  </div>
</template>
<script setup>
</script>
<style scoped>
  .nav a {
    margin: 0 10px;
    text-decoration: none;
    color: #333;
    padding: 5px 0;
    transition: all 0.3s;
  }
  /* 激活时的颜色 */
  .nav a.active {
    color: #007bff;
  }
  /* 精确匹配时加粗和下划线 */
  .nav a.exact-active {
    font-weight: bold;
    border-bottom: 2px solid #007bff;
  }
</style>
7.5 嵌套路由(通过路由实现组件的嵌套展示)
使用children属性声明子路由规则。
注意:子路由的 path 不要加 /,否则会变成全局路径。
UserProfile.vue
html
<template>
  <div>
    <h3>👤 用户信息</h3>
    <p>姓名:张三</p>
    <p>邮箱:zhangsan@example.com</p>
  </div>
</template>
UserSettings.vue
html
<template>
  <div>
    <h2>⚙️ 用户设置</h2>
    <p>可以修改密码、通知偏好等</p>
  </div>
</template>
UserOrders.vue
html
<template>
  <div>
    <h3>📦 我的订单</h3>
    <p>你有 5 个待发货订单。</p>
  </div>
</template>
index.js
javascript
// src/router/index.js
import { createRouter, createWebHistory } from 'vue-router'
// 导入组件
import User from '../views/User.vue'
import UserProfile from '../views/UserProfile.vue'
import UserSettings from '../views/UserSettings.vue'
import UserOrders from '../views/UserOrders.vue'
const routes = [
  {
    path: '/user',
    component: User,
    // 子路由(嵌套路由)
    // 子路径是相对路径	profile 实际是 /user/profile
    children: [
      {
        path: 'profile',       // 实际路径:/user/profile
        component: UserProfile
      },
      {
        path: 'settings',
        component: UserSettings
      },
      {
        path: 'orders',
        component: UserOrders
      }
    ]
  },
  {
    path: '/',
    redirect: '/user' // 默认跳转到用户中心
  }
]
const router = createRouter({
  history: createWebHistory(),
  routes
})
export default router
User.vue
html
<!-- src/views/User.vue -->
<template>
  <div class="user-container">
    <h2>用户中心</h2>
    <!-- 导航菜单 -->
    <nav class="user-nav">
      <router-link to="/user/profile">个人信息</router-link> |
      <router-link to="/user/settings">设置</router-link> |
      <router-link to="/user/orders">订单</router-link>
    </nav>
    <hr />
    <!-- 子路由渲染在这里 -->
    <div class="user-content">
      <h2>子路由</h2>
      <router-view />
    </div>
  </div>
</template>
<style scoped>
.user-nav a {
  margin: 0 10px;
  text-decoration: none;
  color: #333;
}
.user-nav a.router-link-active {
  color: blue;
  font-weight: bold;
}
.user-content {
  margin-top: 20px;
  padding: 10px;
  background-color: #f9f9f9;
  border-radius: 4px;
}
</style>
App.vue
html
<template>
  <div>
    <!-- 路由出口:匹配的组件会在这里渲染 -->
    <router-view />
  </div>
</template>
<script setup>
</script>
<style scoped>
</style>
7.6 动态路由(把Hash地址中可变部分定义为参数项,提高路由规则的复用性)
使用英文冒号:定义路由的参数项。
获取动态路由参数值
-
使用$route.params对象访问到动态匹配的参数值;
-
使用props接受路由参数
UserDetail.vue
html
<!-- src/views/UserDetail.vue -->
<template>
  <div>
    <h2>用户详情</h2>
    <p>用户 ID:{{ $route.params.id }}</p>
    <!-- 或者用解构 props 接收(推荐) -->
    <p>用 props 接收的 ID:{{ id }}</p>
    <button @click="$router.go(-1)">返回</button>
  </div>
</template>
<script>
export default {
  // 开启 props 模式(推荐)
  props: ['id'],
  mounted() {
    console.log('当前用户ID:', this.id)
  }
}
</script>
index.js
javascript
// src/router/index.js
import { createRouter, createWebHistory } from 'vue-router'
import UserDetail from '../views/UserDetail.vue'

const routes = [
  {
    path: '/user/:id',           // :id 就是动态参数
    component: UserDetail,
    props: true                  // 把参数传给组件的 props
  },
  {
    path: '/',
    redirect: '/user/1'
  }
]
const router = createRouter({
  history: createWebHistory(),
  routes
})
export default router
App.vue
html
<template>
  <div>
    <h1>动态路由示例</h1>
    <!-- 导航链接 -->
    <p>
      <router-link to="/user/1">查看用户 1</router-link> |
      <router-link to="/user/2">查看用户 2</router-link> |
      <router-link to="/user/100">查看用户 100</router-link>
    </p>
    <!-- 路由出口:匹配的组件会在这里渲染 -->
    <router-view />
  </div>
</template>
<script setup>
</script>
<style scoped>
</style>
7.7 编程式导航(调用API实现导航的方式,普通网页调用location.href跳转到新页面,通过 JavaScript 代码来控制路由跳转到指定的hash地址,而不是通过 <router-link> 点击跳转)
声明式导航(点击链接实现导航的方式,<a>链接、vue中的<router-link>)
使用场景
- 表单提交后跳转
- 登录成功后跳转首页
- 权限判断后跳转
- 点击按钮、定时器、生命周期中跳转
常用方法
| 方法 | 说明 |
|---|---|
router.push(path) |
添加一条新记录(可以后退) |
router.replace(path) |
替换当前记录(不能后退) |
router.go(n) |
前进/后退 n 步(-1 后退,1 前进) |
router.back() |
等同于 go(-1) |
router.forward() |
等同于 go(1) |
index.js
javascript
import { createRouter, createWebHistory } from 'vue-router'
import Home from '../views/Home.vue'
import User from '../views/User.vue'
const routes = [
  { path: '/', component: Home, name: 'Home' },
  { path: '/user/:id', component: User, name: 'User' },
]
const router = createRouter({
  history: createWebHistory(),
  routes
})
export default router
Home.vue
html
<!-- src/views/Home.vue -->
<template>
  <div>
    <h1>首页 - 编程式导航示例</h1>
    <button @click="goToUser">跳转到用户ID=1</button>
    <button @click="goBack">后退</button>
    <button @click="replaceToHome">替换为首页(无法后退)</button>
  </div>
</template>
<script setup>
import { useRouter } from 'vue-router'
const router = useRouter()
// 1. 跳转到用户详情
const goToUser = () => {
  router.push({
    name: 'User',
    params: { id: 1 } // 对应 /user/1
  })
}
// 2. 后退一页
const goBack = () => {
  router.go(-1)        // 后退
  // router.back()     // 等价写法
}
// 3. 替换当前页面(不会留下历史记录)
const replaceToHome = () => {
  router.replace('/')  // 或 router.push({ path: '/', replace: true })
}
</script>
<style scoped>
button {
  margin: 5px;
  padding: 10px;
  font-size: 14px;
}
</style>
App.vue
html
<template>
  <div>
    <!-- 路由出口:匹配的组件会在这里渲染 -->
    <router-view />
  </div>
</template>
<script setup>
</script>
<style scoped>
</style>
7.8 命名路由(通过name属性为路由规则定义名称,name值不能重复,必须唯一 。期间还可以使用params属性指定跳转期间要携带的路由参数)
html
<router-link :to="{ name: 'User', params: { id: 123 } }">用户中心</router-link>7.9 导航守卫(控制路由的访问限制)
使用场景
- 拦截未登录用户
- 记录页面访问
- 提示用户保存数据
- 做权限控制
守卫参数说明
javascript
router.beforeEach((to, from, next) => {
  // to: 要去的路由
  // from: 来自哪个路由
  // next: 必须调用,否则页面卡住!
  next()
})
next() 的用法:
| 写法 | 说明 |
|---|---|
next() |
放行 |
next(false) |
中断导航 |
next('/login') |
跳转到其他页面 |
next({ path: '/login' }) |
更复杂的跳转 |
Home.vue
html
<!-- src/views/Home.vue -->
<template>
  <div>
    <h1>🏠 首页</h1>
    <p><router-link to="/dashboard">去控制台</router-link></p>
  </div>
</template>
Login.vue
html
<!-- src/views/Login.vue -->
<template>
  <div>
    <h1>🔑 登录页</h1>
    <button @click="login">点击登录</button>
    <p><router-link to="/">回首页</router-link></p>
  </div>
</template>
<script setup>
import { useRouter } from 'vue-router'
const router = useRouter()
const login = () => {
  // 模拟登录成功,保存状态
  localStorage.setItem('isLogin', 'true')
  // 跳转到控制台
  router.push('/dashboard')
}
</script>
Dashboard.vue
html
<!-- src/views/Dashboard.vue -->
<template>
  <div>
    <h1>📊 欢迎进入控制台</h1>
    <button @click="logout">登出</button>
  </div>
</template>
<script setup>
import { useRouter } from 'vue-router'
const router = useRouter()
const logout = () => {
  localStorage.removeItem('isLogin') // 清除登录状态
  router.push('/') // 返回首页
}
</script>
index.js
javascript
// src/router/index.js
import { createRouter, createWebHistory } from 'vue-router'
// 导入组件
import Home from '../views/Home.vue'
import Login from '../views/Login.vue'
import Dashboard from '../views/Dashboard.vue'
const routes = [
  { path: '/', component: Home },
  { path: '/login', component: Login },
  { path: '/dashboard', component: Dashboard }
]
const router = createRouter({
  history: createWebHistory(),
  routes
})
// 全局前置守卫
router.beforeEach((to, from, next) => {
  // 结合token控制后台主页的访问权限
  const isLoggedIn = localStorage.getItem('isLogin') === 'true'
  // 如果访问控制台但未登录
  if (to.path === '/dashboard' && !isLoggedIn) {
    next('/login') // 拦截到登录页
  } else {
    next() // 放行
  }
})
export default router
8、vue组件库(把自己封装的.vue组件整理、打包并发布为npm的包,从而供他人下载使用)
常用的vue组件库
PC端
-
Element UI
-
View UI
移动端
-
Mint UI
-
Vant
8.1 Element Plus(饿了么前端团队开源的PC端vue组件库)
8.1.1 安装element-ui
bash
npm install element-plus --save8.1.2 完整引入
main.js
javascript
import { createApp } from 'vue'
import './style.css'
import App from './App.vue'
// 引入 Element Plus
import ElementPlus from 'element-plus'
import 'element-plus/dist/index.css'
// 可选:中文语言包
import zhCn from 'element-plus/es/locale/lang/zh-cn'
// 创建应用实例
const app = createApp(App)
// 使用 Element Plus
app.use(ElementPlus, {
  locale: zhCn, // 设置语言
  size: 'default', // 组件默认大小
})
// 挂载应用
app.mount('#app')
App.vue
html
<template>
  <div>
    <h1>Element Plus 示例</h1>
    <el-button type="primary">主要按钮</el-button>
    <el-button type="success">成功按钮</el-button>
    <el-input v-model="input" placeholder="请输入内容" style="width: 200px; margin: 10px 0;" />
    <el-alert title="这是一条提示信息" type="info" />
  </div>
</template>
<script setup>
import { ref } from 'vue'
const input = ref('')
</script>
<style scoped>
</style>
8.1.3 按需引入
bash
# 安装自动按需导入插件(Vite 项目)
npm install -D unplugin-vue-components unplugin-auto-import
vite.config.js
javascript
// vite.config.js
import { defineConfig } from 'vite'
import vue from '@vitejs/plugin-vue'
import AutoImport from 'unplugin-auto-import/vite'
import Components from 'unplugin-vue-components/vite'
import { ElementPlusResolver } from 'unplugin-vue-components/resolvers'

export default defineConfig({
  plugins: [
    vue(),
    AutoImport({
      resolvers: [ElementPlusResolver()],
    }),
    Components({
      resolvers: [ElementPlusResolver()],
    }),
  ],
})
App.vue
html
<template>
  <div>
    <!-- 可以直接使用组件,无需 import -->
    <el-button type="primary" @click="openMessage">显示消息</el-button>
  </div>
</template>
<script setup>
const openMessage = () => {
  ElMessage.success('操作成功!')
}
</script>
<style scoped>
</style>
8.1.4 安装图标
bash
npm install @element-plus/icons-vueApp.vue
html
<template>
  <div>
    <el-button :icon="Search" />
  </div>
</template>
<script setup>
  import { Search } from '@element-plus/icons-vue'
</script>
<style scoped>
</style>
8.1.5 把组件的导入和注册封装为独立的模块
element.js
javascript
// src/plugins/element.js
// 封装 Element Plus 为独立插件模块
import ElementPlus from 'element-plus'
import 'element-plus/dist/index.css'
// 可选:中文语言包
import zhCn from 'element-plus/es/locale/lang/zh-cn'
// 导出以便在 main.js 中使用
export default function useElementPlus(app) {
  app.use(ElementPlus, {
    locale: zhCn, // 设置语言
    size: 'default', // 组件默认大小:'small' | 'default' | 'large'
  })
}
main.js
javascript
import { createApp } from 'vue'
import './style.css'
import App from './App.vue'
// 导入封装好的插件
import useElementPlus from './plugins/element'
// 创建应用实例
const app = createApp(App)
// 使用封装的 Element Plus 插件
useElementPlus(app)
// 挂载应用
app.mount('#app')
9、axios拦截器
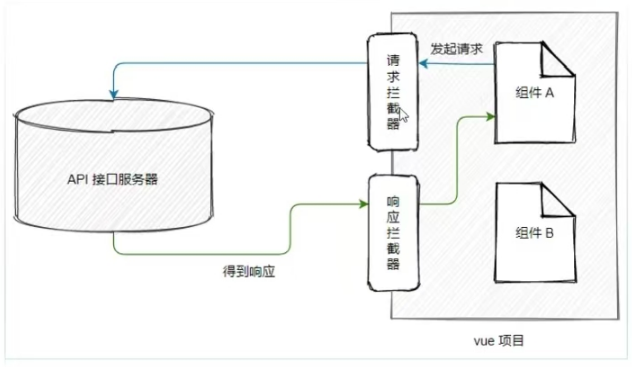
9.1 前言
Axios 拦截器用于在请求发送前或响应到达前统一处理数据。请求拦截器可添加认证头、参数序列化、加载提示;响应拦截器可统一处理响应数据、错误状态(如 401 未授权、500 服务器错误)、自动重试或提示用户。它提高了代码复用性和可维护性,避免在每个请求中重复写相同逻辑,是管理网络请求的常用手段。
9.2 安装axios
bash
npm install axioshttp.js
javascript
// src/utils/http.js
import axios from 'axios'
// 创建 axios 实例
const http = axios.create({
  baseURL: 'http://localhost:5173/',
  timeout: 10000, // 超时时间
  headers: {
    'Content-Type': 'application/json'
  }
})
// 请求拦截器
http.interceptors.request.use(
  config => {
    // 可添加 token
    const token = localStorage.getItem('token')
    if (token) {
      // 为当前请求配置Token认证字段
      config.headers.Authorization = `Bearer ${token}`
    }
    return config
  },
  error => {
    return Promise.reject(error)
  }
)
// 响应拦截器
http.interceptors.response.use(
  response => {
    // 可统一处理响应数据
    return response.data
  },
  error => {
    // 统一处理错误
    if (error.response?.status === 401) {
      // 未授权,跳转登录
      localStorage.removeItem('token')
      window.location.href = '/login'
    }
    return Promise.reject(error)
  }
)
export default http
App.vue
html
<template>
  <div>
  </div>
</template>
<script setup>
  import { onMounted } from 'vue'
  import http from './utils/http'
  const fetchData = async () => {
    try {
      const data = await http.get('/')
      console.log(data)
    } catch (error) {
      console.error('请求失败:', error)
    }
  }
  onMounted(() => {
    fetchData()
  })
</script>
<style scoped>
</style>
10、proxy跨域代理
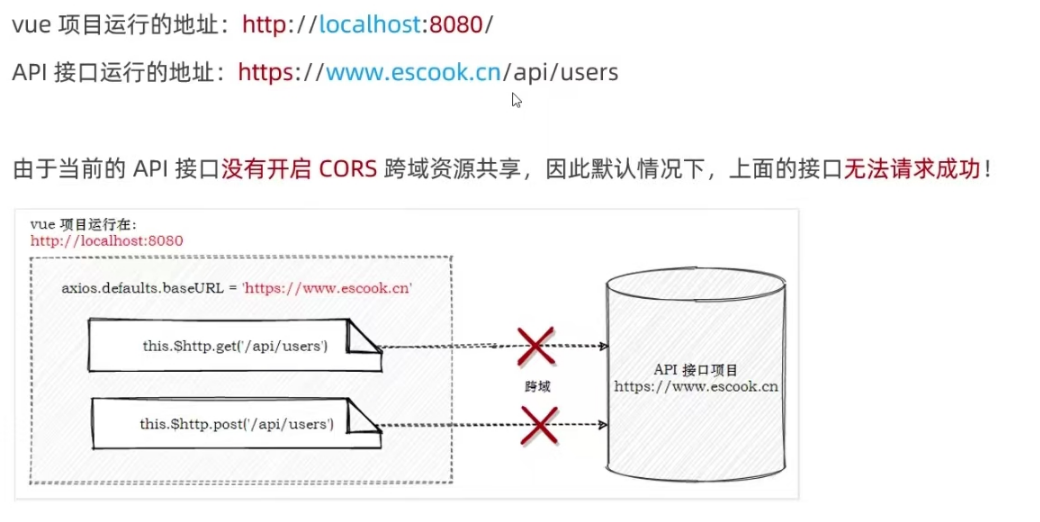
10.1 接口跨域问题
10.2 通过代理解决接口的跨域问题
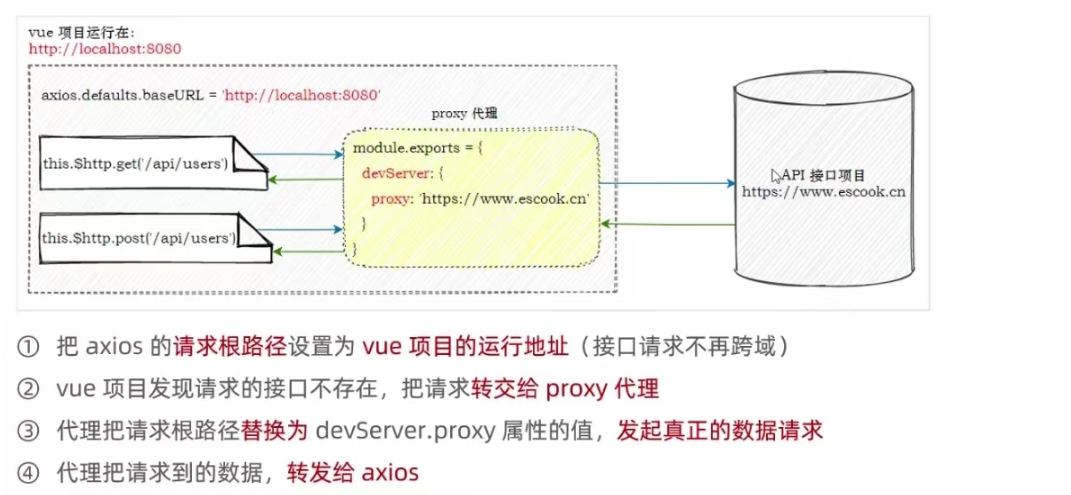
Vite 项目中配置代理
vite.config.js
javascript
// vite.config.js
import { defineConfig } from 'vite'
import vue from '@vitejs/plugin-vue'

export default defineConfig({
  plugins: [
    vue(),
  ],
  // 请求时使用 /api 开头
  // axios.get('/api/users')
  // 实际请求:http://localhost:3000/users(由 Vite 代理)
  // 注意:仅开发环境有效	生产环境需后端配置 CORS 或 Nginx 反向代理
  server: {
    proxy: {
      // 将所有以 /api 开头的请求代理到目标服务器
      '/api': {
        target: 'http://localhost:5173', // 后端接口地址
        changeOrigin: true, // 修改请求头中的 origin
        rewrite: (path) => path.replace(/^\/api/, '') // 重写路径,去掉 /api 前缀
      }
    }
  }
})