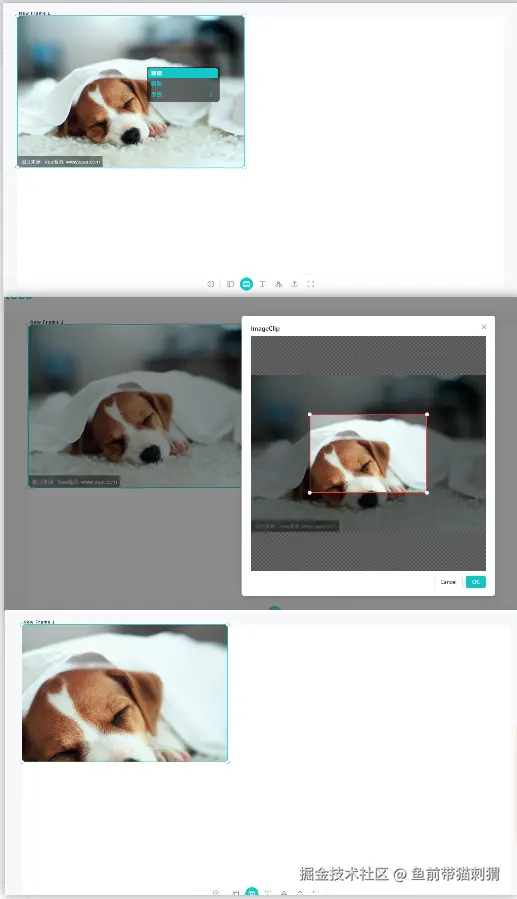
实现效果
图片右键菜单->裁剪,点击裁剪后弹窗,操作完成后回显
思路
- 创建app应用,用作工作区
- 创建frame,作为画板
- 实现insertImage方法(图片加载后缩放至合适尺寸,保证在frame能够看到整个图片)
- 创建clipApp,用作裁剪工作区
- 实现confirm方法(获取裁剪后的偏移位置、尺寸、缩放)
1、创建工作区
js
import { App, Rect, Resource, PointerEvent } from 'leafer-editor'
const app = new App({ view: window, editor: {} // 会自动创建 editor实例、tree层、sky层 })
2、创建frame
js
import { App, Rect, Resource, PointerEvent, Frame } from 'leafer-editor'
const app = new App({ view: window, editor: {} // 会自动创建 editor实例、tree层、sky层 })
const frame = new Frame({
    width: 1600,
    height: 900,
    fill: '#fff'
})
app.tree.add(frame)
3、实现insertImage方法
1、使用Resource.loadImage方法加载图片,可以得到图片自身尺寸等信息
2、图片使用Rect的fill属性来展示,通过修改fill属性中对应的数值,实现裁剪效果
3、rect使用on来注册PointerEvent.MENU_TAP事件,处理右键菜单
js
import { App, Rect, Resource, PointerEvent, Frame } from 'leafer-editor'
const app = new App({ view: window, editor: {} // 会自动创建 editor实例、tree层、sky层 })
const frame = new Frame({
    width: 1600,
    height: 900,
    fill: '#fff'
})
app.tree.add(frame)

const insertImage = async (frame, img) => {
    const data = await Resource.loadImage(img);

    // 获取合适的缩放比例,保证长图或者宽图都能显示
    const scaleX = frame.width / data.width;
    const scaleY = frame.height / data.height;
    const scale = Math.min(scaleX, scaleY);

    // 创建一份元数据,保存在自身data属性上
    const originData = {
      baseWidth: data.width * scale,
      baseHeight: data.height * scale,
      baseScale: scale,
      url: data.url,
    };

    // 创建图片rect
    const containerRect = new Rect({
      data: originData,
      width: originData.baseWidth,
      height: originData.baseHeight,
      lockRatio: true,
      draggable: true,
      editable: true,
      fill: {
        type: "image",
        url: originData.url,
        mode: "clip",
        scale: originData.baseScale,
        offset: {
          x: 0,
          y: 0,
        },
        clipSize: {
          width: originData.baseWidth,
          height: originData.baseHeight,
        },
      },
    });

    // 将图片添加到frame中
    frame.add(containerRect);


    containerRect.on(PointerEvent.MENU_TAP, e => {
        // rightMenuInstance是我自己实现的菜单调用,此处不做具体实现
        // 传入指定位置即可唤醒右键菜单
        // 通过imageClipRef导出的open方法来打开clipApp的弹窗
      const { left, top } = e.target.app.view.getBoundingClientRect();
      rightMenuInstance
        .openMenu({
          x: left + e.x,
          y: top + e.y,
          items: [
            { name: "裁剪", eventName: "clip" },
          ],
        })
        .then(res => {
          if (res === "clip") {
            // ...
          }
        });

    })

}
4、创建clipApp,用作裁剪工作区
1、创建app
2、创建frame,宽高和app的tree保持一致,并将背景设置为类似透明的样式,用svg做填充
3、使用frame创建一个clip区域,里面包含image和用rect实现的裁剪框,裁剪框可拖拽和编辑,但是不能移出clip
4、创建image对象,并将其插入至clip,监听image的ImageEvent.LOADED事件,加载完成后创建rect裁剪框,并插入至clip
5、裁剪完成后获取裁剪框相对于图片的位置等信息并返回
js
import { App, Frame, Image, Platform, ImageEvent, Rect, PointerEvent } from "leafer-editor";
const svg = Platform.toURL(
  `<svg width="10" height="10" xmlns="http://www.w3.org/2000/svg">
    <rect x="0" y="0" width="5" height="5" fill="#FFF"/><rect x="5" y="0" width="5" height="5" fill="#CCC"/>
    <rect x="0" y="5" width="5" height="5" fill="#CCC"/><rect x="5" y="5" width="5" height="5" fill="#FFF"/>
    </svg>`,
  "svg"
);

const imageSrc = 'xxx'//图片地址

// 记录一下传入图片的原始宽高
let size = { width: 0, height: 0 }
// 记录缩放的比例,后面获取相对位置要用
let scale = 0
// 记录裁剪框对象,后面获取相对位置要用
let target = null

// 创建app
const clipApp = new App({
  view: document.getElementById("clipApp"),
  tree: {
    type: "viewport",
  },
  editor: {
    stroke: "#F53F3F",
    strokeWidth: 0,
    mask: "rgba(0,0,0,0.6)",
  },
});

// 创建透明背景板
const frameContainer = new Frame({
  width: app.tree.width,
  height: app.tree.height,
  fill: {
    type: "image",
    url: svg,
    mode: "repeat",
    scaleFixed: false,
  },
});

// 创建图片
const image = new Image({
  url: imageSrc,
  lockRatio: true,
});

// 创建用来限制裁剪框活动的区域
const frame = new Frame({
  width: frameContainer.width,
  height: frameContainer.height,
  fill: "transparent",
})
frame.add(image);
image.on(ImageEvent.LOADED, e => {
  const { width, height } = e.image
  // 保存图片尺寸
  size = { width, height }
  // 缩放到合适大小
  const scaleX = frameContainer.width / width
  const scaleY = frameContainer.height / height
  const _scale = Math.min(scaleX, scaleY)
  // 保存缩放大小
  scale = _scale
  image.width = width * _scale
  image.height = height * _scale
  frame.width = image.width
  frame.height = image.height
  // 居中
  const offsetX = (frameContainer.width - frame.width) / 2
  const offsetY = (frameContainer.height - frame.height) / 2
  frame.offsetX = offsetX
  frame.offsetY = offsetY
  // 创建裁剪框
  const rect = new Rect({
    stroke: "#F53F3F",
    fill: "#13c2c200",
    strokeWidth: 2,
    width: frame.width * 0.5,
    height: frame.height * 0.5,
    offsetX: frame.width * 0.25,
    offsetY: frame.height * 0.25,
    editable: true,
    draggable: true,
    dragBounds: "parent", // 限制活动区域
  });
  frame.add(rect)
  target = rect
})
frameContainer.add(frame);
app.tree.add(frameContainer);


const confirm = () => {
    // 获取裁剪框相对于缩放后的图片的位置
    const bounds = target.getLayoutPoints("box", frame);
    const obj = {
      originWidth: size.width,
      originHeight: size.height,
      width: (bounds[1].x - bounds[0].x) / scale, // 获取还原之后的裁剪区域的宽
      height: ((bounds[2].y - bounds[1].y) / scale), // 获取还原之后的裁剪区域的高
      x: (bounds[0].x / scale), // 获取还原之后的裁剪区域的x偏移
      y: (bounds[0].y / scale), // 获取还原之后的裁剪区域的y偏移
      url: imageSrc,
    }
    return obj
}
5、实现confirm方法(获取裁剪后的偏移位置、尺寸、缩放)
js
// 这里通过调用confirm能够获取到裁剪信息res
// e.target是containerRect注册的PointerEvent.MENU_TAP事件,触发对象

// 将原图裁剪区域的信息按照实际缩放比例计算,得到最终的裁剪信息
const scaleX = e.target.data.baseWidth / res.originWidth;
const scaleY = e.target.data.baseHeight / res.originHeight;
const offsetX = res.x * scaleX;
const offsetY = res.y * scaleY;
// 设置containerRect相关属性,实现裁剪显示
e.target.width = res.width * e.target.data.baseScale;
e.target.height = res.height * e.target.data.baseScale;
e.target.fill = {
    type: "image",
    url: e.target.data.url,
    mode: "clip",
    scale: e.target.data.baseScale,
    offset: { x: -1 * offsetX, y: -1 * offsetY },
    clipSize: {
      width: scaleX * res.width,
      height: scaleY * res.height,
    },
};
附上截图: