目前, iOS小组件中无法直接显示LottieFiles动画,如果要实现iOS小组件的动画效果,必须通过一些黑科技将LottieFiles动画转换为GIF图片帧,通过一些自定义字体或者时钟旋转等方式,实现iOS小组件播放动画的功能。

Lottie动画依赖 Core Animation + CADisplayLink 来实时渲染帧动画。
但 WidgetKit 的设计理念是「静态快照」:
Widget 并不是实时渲染的 view,而是定期刷新生成的快照(snapshot)。
它运行在后台 extension 中,不允许持续的动画循环或渲染。
小组件不支持LottieFIles
即使引入 Lottie 库,也无法使用 AnimationView.play() 这种方法------因为 widget 不支持 RunLoop 或连续帧刷新。
Xcode运行时输出报错信息,表示SwiftUI 无法序列化(encode)一个自定义 UIViewRepresentable(或 NSViewRepresentable)类型:LottieView。
makefile
PotentialCrashError: BankletWidgetExtension may have crashed
ArchivingError: failedToEncode(types: [SwiftUI.(unknown context).PlatformViewRepresentableAdaptor<BankletWidgetExtension.LottieView>])
iOS系统显示的小组件也会因为无法序列化,显示一个黄底红色的禁止小组件(下图左侧样式)。

因此,在 widget 中「播放」Lottie 动画是不被允许的。
Lottie转换为GIF图片
需要将现有的Lottie文件转换为GIF图片格式,这样才可以在小组件中显示Lottie动画。
建议使用LottieFiles的格式转换页面:lottiefiles.com/tools/lotti...
此外还有其他两种LottieFiles格式转换方法,具体请见《Lottie动画转GIF图片》文章进行了解。
小组件显示GIF图片~~~~
1、Xcode导入并配置第三方库
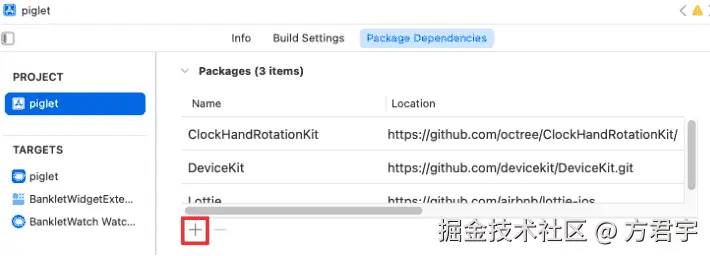
打开Xcode项目,点击左侧的项目名称 -- PROJECT -- 项目名 -- Package Dependencies,点击"添加"按钮,引入GitHub第三方库ClockHandRotationKit (github.com/octree/Cloc...)。
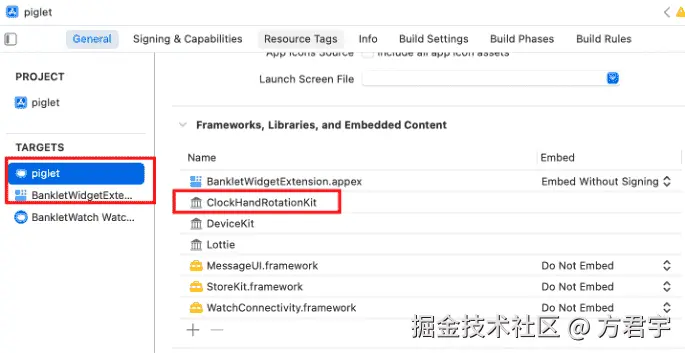
导入ClockHandRotationKit框架后,主应用和小组件都必须配置这一框架。
点击左侧的项目名称 -- TARGETS,分别检查主应用和小组件的General -- Frameworks, Libraries, and Embedded Content,是否包含ClockHandRotationKit框架。
2、导入Gif图片
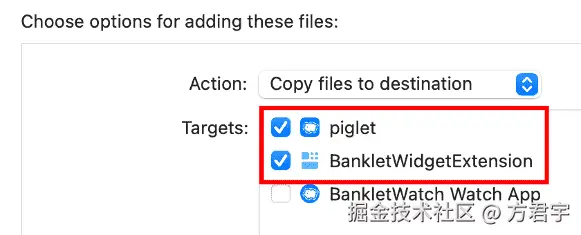
在Xcode小组件项目中,创建一个Gif组,将Gif图片拖入到这个组中。
在拖入Gif组时,Targets选择主应用和小组件,如果不勾选,后面可能无法从Bundle.main.path查找。
Xcode中Gif组:
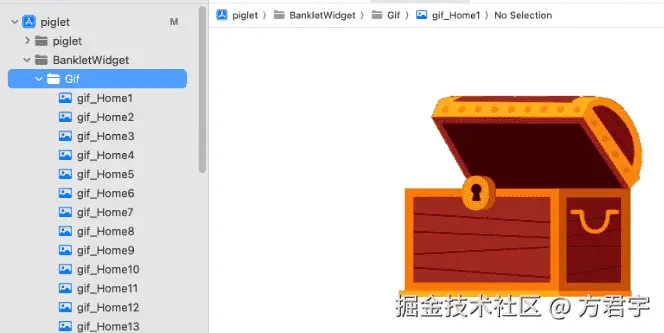
Gif图片放入Xcode项目的原因:因为需要通过Bundle.main.path访问Gif图片。
如果将Gif放到Assets资源文件夹中,就无法在文件系统里查找真实文件路径,Bundle.main.path会返回nil。
3、创建UIImage扩展和弧形视图
1、创建一个UIImage扩展文件
因为扩展代码过长,具体请见文章底部的扩展代码部分,或者参考GitHub代码(github.com/fangjunyu1/...)。
swift
import UIKit

extension UIImage {
    static func fromBundle(_ bundle: Bundle? = nil, forName name: String?, ofType ext: String?) -> UIImage? {
        guard let path = (bundle ?? Bundle.main).path(forResource: name, ofType: ext) else {
            return nil
        }
        return UIImage(contentsOfFile: path)
    }
}

...
2、创建一个弧形视图文件。
弧形视图文件代码:
less
import SwiftUI

struct ArcView: Shape {
    var arcStartAngle: Double
    var arcEndAngle: Double
    var arcRadius: Double
    func path(in rect: CGRect) -> Path {
        var path = Path()
        path.addArc(center: CGPoint(x: rect.midX, y: rect.midY),
                    radius: arcRadius,
                    startAngle: .degrees(arcStartAngle),
                    endAngle: .degrees(arcEndAngle),
                    clockwise: false)
        return path
    }
}
这个文件的三个变量,分别控制弧形的起始角度、结束角度和弧形半径。
4、创建Gif图片视图
创建一个SwiftUI自定义视图,将GIF动画拆分成帧,在每一帧图片上面添加一个圆弧遮罩,然后旋转所有圆弧遮罩,通过旋转效果组合成一个动态的弧形GIF展示效果。
less
import SwiftUI
import ClockHandRotationKit

struct GifImageView: View {
    var gifName: String // Bundle中 gif图片的名称

    func getGif(_ name: String) -> UIImage.GifResult? {
        guard let path = Bundle.main.path(forResource: "gif_(name)", ofType: "gif"),
              let data = try? Data(contentsOf: URL(fileURLWithPath: path)) else {
            print("未找到该数据")
            return nil
        }
        return UIImage.decodeGIF(data)
    }

    var body: some View {
        if let gif = getGif(gifName) {
            GeometryReader { proxy in
                let width = proxy.size.width
                let height = proxy.size.height

                let arcWidth = max(width, height)
                let arcRadius = arcWidth * arcWidth
                let angle = 360.0 / Double(gif.images.count)

                ZStack {
                    ForEach(1...gif.images.count, id: .self) { index in
                        Image(uiImage: gif.images[(gif.images.count - 1) - (index - 1)])
                            .resizable()
                            .scaledToFill()
                            .mask(
                                ArcView(arcStartAngle: angle * Double(index - 1),
                                        arcEndAngle: angle * Double(index),
                                        arcRadius: arcRadius)
                                .stroke(style: .init(lineWidth: arcWidth, lineCap: .square, lineJoin: .miter))
                                .clockHandRotationEffect(period: .custom(gif.duration))
                                .offset(y: arcRadius)
                            )
                    }
                }
                .frame(width: width, height: height)
            }
        } else {
            // 如果没有图片,显示空白占位符
            Image("png_Home0")
                .resizable()
        }
    }
}
这个代码可以理解为,首先通过getGif方法获取Gif图片的每一帧以及运行时间。
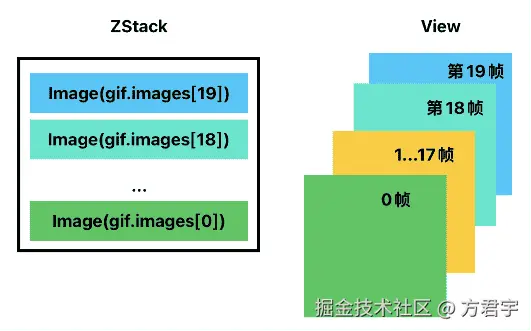
通过ZStack排列所有的图片帧,因为ZStack视图是从后往前,在ForEach循环时,也是从后往前的顺序遍历。
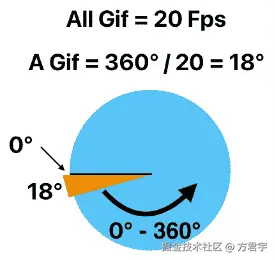
假设某个Gif图片共20帧,每帧在ZStack中显示的排序为:
在每一个Gif帧上设置一个mask遮罩层,Gif帧只会显示mask的视图部分,非mask的视图不显示。mask遮罩层显示一个弧形。
弧形的开始角度、结束角度都是根据Gif帧数平均计算。
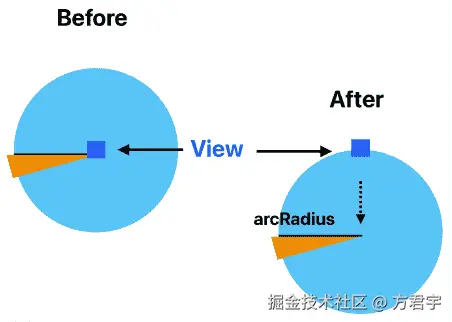
每个Gif帧的mask遮罩层都会对应到弧形上,通过设置弧形的边框,让遮罩层可以更好的显示每一个Gif帧。
设置描边可以让遮罩层覆盖到视图,弧形向下偏移半径的长度。
当对应黄色区域逆时针旋转,与蓝色的View视图区域重合时,对应的Gif图片帧就会显示出来。
因为每个Gif图片帧的黄色区域不同,所以当弧形蒙版不断旋转,就可以实现Gif图片的效果。
5、创建Gif图片小组件
css
import WidgetKit
import SwiftUI
import ClockHandRotationKit

struct GifView : View {
    var entry: GifWidgetEntry

    var body: some View {
        VStack {
            GifImageView(gifName: "(entry.loopAnimation)")
        }
    }
}

struct GifAnimateWidget: Widget {
    let kind: String = "GifWidget"

    var body: some WidgetConfiguration {
        StaticConfiguration(kind: kind, provider: GifWidgetProvider()) { entry in
            GifView(entry: entry)
                .containerBackground(.clear, for: .widget)
        }
        .configurationDisplayName("Animation Widget")
        .description("Play animation on the desktop in a loop.")
        .supportedFamilies([.systemSmall])
    }
}

#Preview(as: .systemSmall) {
    GifAnimateWidget()
} timeline: {
    GifWidgetEntry(date: Date(), loopAnimation: "Home33")
}
在GifView视图中,显示GifImage视图。
注意事项
1、主应用和小组件都需要导入框架
Xcode导入ClockHandRotationKit框架时,必须考虑导入到主应用和小组件中。
如果没有导入主应用,就会存在Xcode调试真机时,报错并断开连接的情况。
可能是主应用也需要编译小组件的代码,当缺少小组件代码运行的框架时,就会报错。
2、Xcode项目导入Gif图片
这里使用Group或者Folder等形式,管理Gif图片。在导入图片时,需要在Target Membership中勾选主应用和小组件。
可能只需要勾选主应用,因为Bundle.main.path通过主应用的包进行查询。如果这里没有勾选主应用,就会存在查不到的情况。
3、透明背景
透明背景需要使用私有API,具体请见《iOS App小组件(Widget)设置透明背景》
4、控制GIF播放速度
默认按照GIF动画时间进行播放,如果想要调整GIF播放速度,可以在GifImageView视图代码中,调整mask蒙版的代码:
less
.mask(
    ArcView(arcStartAngle: angle * Double(index - 1),
            arcEndAngle: angle * Double(index),
            arcRadius: arcRadius)
    .stroke(style: .init(lineWidth: arcWidth, lineCap: .square, lineJoin: .miter))
    .clockHandRotationEffect(period: .custom(gif.duration * 2)) // 控制 GIF 动画速度,选择 *2 或者 * 3
    .offset(y: arcRadius)
)
5、小组件播放卡顿或空白
因为iOS 小组件内容比较低,如果Gif图片过大,帧数过多,就可能导致超过30MB内存并无法运行小组件。
目前实际测试发现5MB以内的Gif图片,小组件显示存在压力。超过5MB的Gif图片可能会直接显示空白。
建议压缩Gif图片大小,将Gif图片尽量控制在1MB以内,这样可以正常的显示/切换Gif动画。否则Gif图片越大,小组件在显示/切换的过程中,就会出现卡顿或空白的情况。
总结
本文尽量通过简单的描述,来讲解iOS实现GIF图片的效果,通过蒙版和旋转弧形实现GIF图片动画。
除此之外,还可以通过字体实现GIF动画效果,具体请见GitHub仓库WidgetAnimation(github.com/brycebostwi...)。
我除了这两种方式外,还尝试使用倒计时显示每一帧图片,但实际上并不能实现GIF动画效果,我猜测原因是小组件不支持Image动态显示。
swift
struct GIFPlayerView: View {
    let gif: UIImage.GifResult
    @State private var currentFrameIndex = 0
    @State private var timer: Timer? = nil

    var body: some View {
        GeometryReader { proxy in
            let width = proxy.size.width
            let height = proxy.size.height

            Image(uiImage: gif.images[currentFrameIndex])
                .resizable()
                .scaledToFill()
                .frame(width: width, height: height)
                .clipped()
当使用计时器调整数组索引显示Gif图片时,小组件不会让Image动态切换,也就无法通过计时器实现GIF动画效果。
参考文章
1、Display lottie animation in iOS WidgetKit:stackoverflow.com/questions/7...
2、How to animate WidgetKit Widgets like other apps do it?
stackoverflow.com/questions/7...
3、Lottie动画转GIF图片:fangjunyu.com/2025/10/12/...
4、GitHub WidgetAnimation:github.com/brycebostwi...
5、ClockHandRotationKit:github.com/octree/Cloc...
6、WidgetsWall:github.com/MisterZhouZ...
7、【iOS】GIF小组件的巧妙实现:juejin.cn/post/739998...
8、【iOS小组件实战】gif动态小组件:juejin.cn/post/742669...
9、GitHub UIImage扩展代码:github.com/fangjunyu1/...
10、SwiftUI控制视图透明度可见区域的mask:fangjunyu.com/2025/03/20/...
11、iOS App小组件(Widget)设置透明背景:fangjunyu.com/2025/10/08/...
扩展代码
1、UIImage扩展代码
swift
import UIKit

extension UIImage {
    static func fromBundle(_ bundle: Bundle? = nil, forName name: String?, ofType ext: String?) -> UIImage? {
        guard let path = (bundle ?? Bundle.main).path(forResource: name, ofType: ext) else {
            return nil
        }
        return UIImage(contentsOfFile: path)
    }
}

extension UIImage {
    struct GifResult {
        let images: [UIImage]
        let duration: TimeInterval
    }

    static func decodeBundleGIF(_ bundle: Bundle? = nil, forName name: String) async -> GifResult? {
        guard let path = (bundle ?? Bundle.main).path(forResource: name, ofType: "gif") else {
            return nil
        }
        return await decodeLocalGIF(URL(fileURLWithPath: path))
    }

    static func decodeLocalGIF(_  url: URL) async -> GifResult? {
        guard let data = try? Data(contentsOf: url) else {
            return nil
        }
        return decodeGIF(data)
    }

    static func decodeGIF(_  data: Data) -> GifResult? {
        guard let imageSource = CGImageSourceCreateWithData(data as CFData, nil) else {
            return nil
        }

        let count = CGImageSourceGetCount(imageSource)

        var images: [UIImage] = []
        var duration: TimeInterval = 0

        for i in 0 ..< count {
            guard let cgImg = CGImageSourceCreateImageAtIndex(imageSource, i, nil) else { continue }

            let img = UIImage(cgImage: cgImg)
            images.append(img)

            guard let proertyDic = CGImageSourceCopyPropertiesAtIndex(imageSource, i, nil) else {
                duration += 0.1
                continue
            }

            guard let gifDicValue = CFDictionaryGetValue(proertyDic, Unmanaged.passRetained(kCGImagePropertyGIFDictionary).autorelease().toOpaque()) else {
                duration += 0.1
                continue
            }

            let gifDic = Unmanaged<CFDictionary>.fromOpaque(gifDicValue).takeUnretainedValue()

            guard let delayValue = CFDictionaryGetValue(gifDic, Unmanaged.passRetained(kCGImagePropertyGIFUnclampedDelayTime).autorelease().toOpaque()) else {
                duration += 0.1
                continue
            }

            var delayNum = Unmanaged<NSNumber>.fromOpaque(delayValue).takeUnretainedValue()
            var delay = delayNum.doubleValue

            if delay <= Double.ulpOfOne {
                if let delayValue2 = CFDictionaryGetValue(gifDic, Unmanaged.passRetained(kCGImagePropertyGIFDelayTime).autorelease().toOpaque()) {
                    delayNum = Unmanaged<NSNumber>.fromOpaque(delayValue2).takeUnretainedValue()
                    delay = delayNum.doubleValue
                }
            }

            if delay < 0.02 {
                delay = 0.1
            }

            duration += delay
        }

        guard images.count > 0 else {
            return nil
        }

        return GifResult(images: images, duration: duration)
    }
}