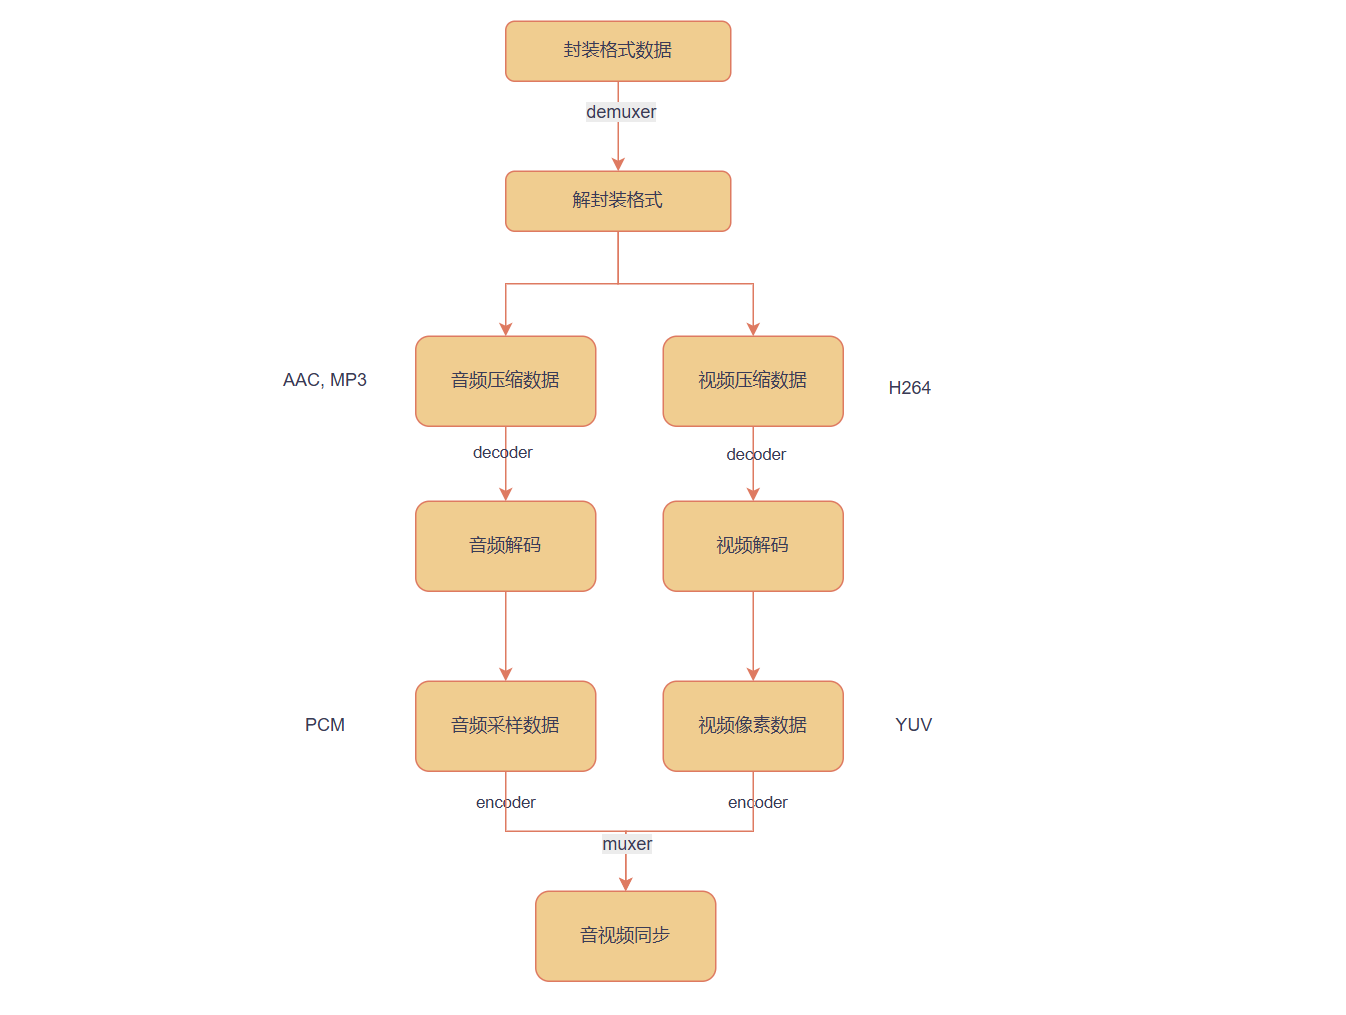
完整流程代码框架
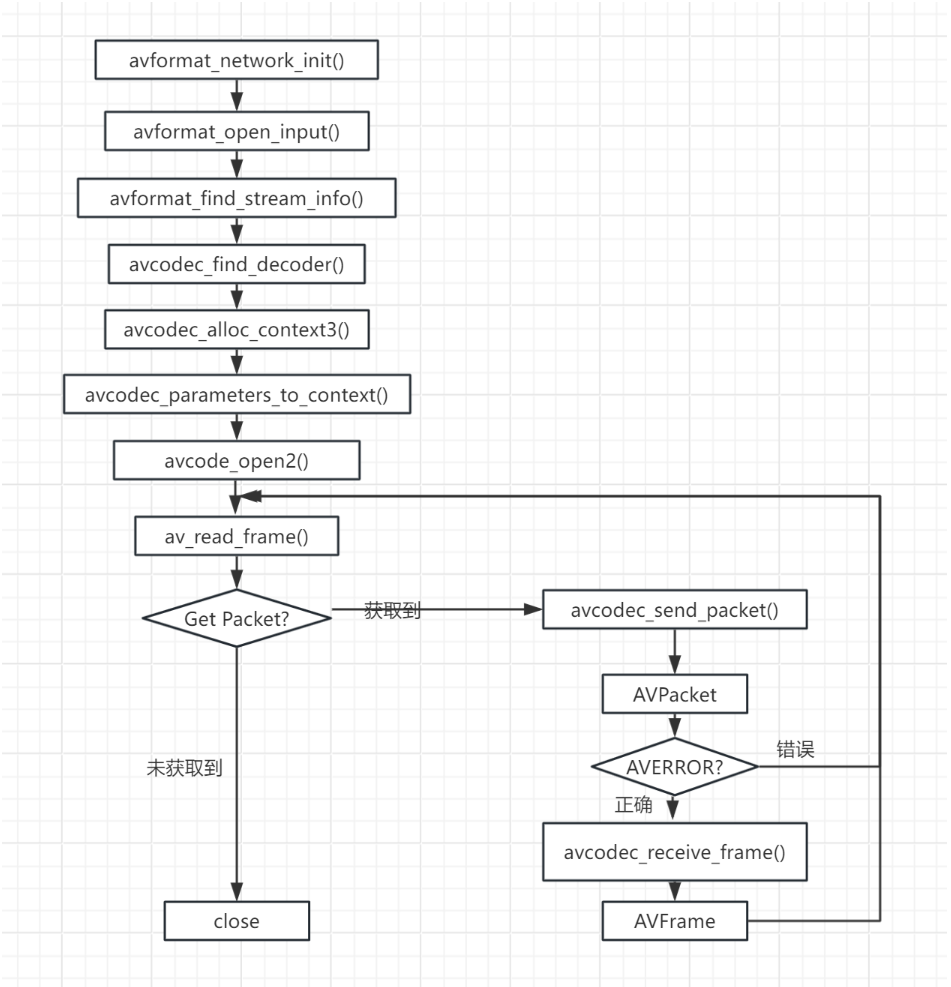
步骤 1:初始化 FFmpeg 并打开输入文件(解封装准备)
cpp
#include <libavformat/avformat.h>
#include <libavcodec/avcodec.h>
#include <libavutil/avutil.h>

int main() {
    // 初始化FFmpeg(旧版本需要,新版本可省略)
    av_register_all();
    avcodec_register_all();

    // 输入文件路径
    const char* input_path = "input.mp4";
    AVFormatContext* in_fmt_ctx = NULL;

    // 打开输入文件,获取封装格式上下文
    if (avformat_open_input(&in_fmt_ctx, input_path, NULL, NULL) != 0) {
        fprintf(stderr, "无法打开输入文件\n");
        return -1;
    }

    // 读取流信息(获取音频流、视频流的索引)
    if (avformat_find_stream_info(in_fmt_ctx, NULL) < 0) {
        fprintf(stderr, "无法获取流信息\n");
        avformat_close_input(&in_fmt_ctx);
        return -1;
    }

    // 查找音频流和视频流的索引
    int audio_stream_idx = -1, video_stream_idx = -1;
    for (int i = 0; i < in_fmt_ctx->nb_streams; i++) {
        if (in_fmt_ctx->streams[i]->codecpar->codec_type == AVMEDIA_TYPE_AUDIO) {
            audio_stream_idx = i;
        } else if (in_fmt_ctx->streams[i]->codecpar->codec_type == AVMEDIA_TYPE_VIDEO) {
            video_stream_idx = i;
        }
    }
    if (audio_stream_idx == -1 || video_stream_idx == -1) {
        fprintf(stderr, "未找到音视频流\n");
        avformat_close_input(&in_fmt_ctx);
        return -1;
    }
步骤 2:初始化解码器(解码准备)
需要分别为音频和视频初始化解码器:
cpp
    // 初始化视频解码器
    AVCodecParameters* video_codecpar = in_fmt_ctx->streams[video_stream_idx]->codecpar;
    const AVCodec* video_decoder = avcodec_find_decoder(video_codecpar->codec_id);
    AVCodecContext* video_dec_ctx = avcodec_alloc_context3(video_decoder);
    avcodec_parameters_to_context(video_dec_ctx, video_codecpar); // 复制流参数到解码器上下文
    if (avcodec_open2(video_dec_ctx, video_decoder, NULL) < 0) {
        fprintf(stderr, "无法打开视频解码器\n");
        // 错误处理...
    }

    // 初始化音频解码器(类似视频)
    AVCodecParameters* audio_codecpar = in_fmt_ctx->streams[audio_stream_idx]->codecpar;
    const AVCodec* audio_decoder = avcodec_find_decoder(audio_codecpar->codec_id);
    AVCodecContext* audio_dec_ctx = avcodec_alloc_context3(audio_decoder);
    avcodec_parameters_to_context(audio_dec_ctx, audio_codecpar);
    if (avcodec_open2(audio_dec_ctx, audio_decoder, NULL) < 0) {
        fprintf(stderr, "无法打开音频解码器\n");
        // 错误处理...
    }
步骤 3:初始化编码器和输出上下文(复用准备)
假设输出为output.mkv,重新编码为 H.265(视频)和 OPUS(音频):
cpp
    // 输出文件路径
    const char* output_path = "output.mkv";
    AVFormatContext* out_fmt_ctx = NULL;
    avformat_alloc_output_context2(&out_fmt_ctx, NULL, NULL, output_path); // 自动推断输出格式

    // 创建输出视频流(编码为H.265)
    const AVCodec* video_encoder = avcodec_find_encoder(AV_CODEC_ID_HEVC); // H.265编码器
    AVStream* out_video_stream = avformat_new_stream(out_fmt_ctx, video_encoder);
    AVCodecContext* video_enc_ctx = avcodec_alloc_context3(video_encoder);
    // 配置编码器参数(分辨率、帧率、码率等,参考输入视频)
    video_enc_ctx->width = video_dec_ctx->width;
    video_enc_ctx->height = video_dec_ctx->height;
    video_enc_ctx->pix_fmt = video_encoder->pix_fmts[0]; // 编码器支持的像素格式
    video_enc_ctx->time_base = (AVRational){1, 30}; // 30fps
    out_video_stream->time_base = video_enc_ctx->time_base;
    if (avcodec_open2(video_enc_ctx, video_encoder, NULL) < 0) { /* 错误处理 */ }
    avcodec_parameters_from_context(out_video_stream->codecpar, video_enc_ctx);

    // 创建输出音频流(编码为OPUS)
    const AVCodec* audio_encoder = avcodec_find_encoder(AV_CODEC_ID_OPUS);
    AVStream* out_audio_stream = avformat_new_stream(out_fmt_ctx, audio_encoder);
    AVCodecContext* audio_enc_ctx = avcodec_alloc_context3(audio_encoder);
    // 配置编码器参数(采样率、声道数等,参考输入音频)
    audio_enc_ctx->sample_rate = audio_dec_ctx->sample_rate;
    audio_enc_ctx->channels = audio_dec_ctx->channels;
    audio_enc_ctx->sample_fmt = audio_encoder->sample_fmts[0];
    audio_enc_ctx->time_base = (AVRational){1, audio_enc_ctx->sample_rate};
    out_audio_stream->time_base = audio_enc_ctx->time_base;
    if (avcodec_open2(audio_enc_ctx, audio_encoder, NULL) < 0) { /* 错误处理 */ }
    avcodec_parameters_from_context(out_audio_stream->codecpar, audio_enc_ctx);

    // 打开输出文件(写入头部)
    if (!(out_fmt_ctx->oformat->flags & AVFMT_NOFILE)) {
        if (avio_open(&out_fmt_ctx->pb, output_path, AVIO_FLAG_WRITE) < 0) {
            fprintf(stderr, "无法打开输出文件\n");
            // 错误处理...
        }
    }
    avformat_write_header(out_fmt_ctx, NULL); // 写入文件头部
步骤 4:读取数据包→解码→编码→写入输出(核心循环)
cpp
    AVPacket* pkt = av_packet_alloc(); // 压缩数据包(输入)
    AVFrame* frame = av_frame_alloc(); // 原始帧(解码后)
    AVPacket* enc_pkt = av_packet_alloc(); // 编码后的数据包(输出)

    // 循环读取输入文件的数据包
    while (av_read_frame(in_fmt_ctx, pkt) >= 0) {
        if (pkt->stream_index == video_stream_idx) {
            // 视频包:解码→编码→写入
            // 1. 解码
            if (avcodec_send_packet(video_dec_ctx, pkt) < 0) { /* 错误处理 */ }
            while (avcodec_receive_frame(video_dec_ctx, frame) >= 0) {
                // 2. 编码(注意:可能需要转换像素格式,这里简化)
                frame->pts = av_frame_get_best_effort_timestamp(frame); // 设置时间戳
                if (avcodec_send_frame(video_enc_ctx, frame) < 0) { /* 错误处理 */ }
                while (avcodec_receive_packet(video_enc_ctx, enc_pkt) >= 0) {
                    // 转换时间戳(从编码器时间基→输出流时间基)
                    av_packet_rescale_ts(enc_pkt, video_enc_ctx->time_base, out_video_stream->time_base);
                    enc_pkt->stream_index = out_video_stream->index;
                    // 3. 写入输出文件
                    av_interleaved_write_frame(out_fmt_ctx, enc_pkt);
                    av_packet_unref(enc_pkt); // 释放编码包
                }
            }
        } else if (pkt->stream_index == audio_stream_idx) {
            // 音频包:解码→编码→写入(逻辑同视频,略)
            // ...
        }
        av_packet_unref(pkt); // 释放输入包
    }

    // 刷新编码器(处理剩余帧)
    avcodec_send_frame(video_enc_ctx, NULL);
    while (avcodec_receive_packet(video_enc_ctx, enc_pkt) >= 0) { /* 写入输出 */ }
    // 音频同理...
步骤 5:释放资源
cpp
    // 写入文件尾部
    av_write_trailer(out_fmt_ctx);

    // 释放所有上下文和内存
    avformat_close_input(&in_fmt_ctx);
    avcodec_free_context(&video_dec_ctx);
    avcodec_free_context(&audio_dec_ctx);
    avcodec_free_context(&video_enc_ctx);
    avcodec_free_context(&audio_enc_ctx);
    if (!(out_fmt_ctx->oformat->flags & AVFMT_NOFILE)) {
        avio_closep(&out_fmt_ctx->pb);
    }
    avformat_free_context(out_fmt_ctx);
    av_frame_free(&frame);
    av_packet_free(&pkt);
    av_packet_free(&enc_pkt);

    return 0;
}
关键说明
-
格式转换 :解码后的 YUV/PCM 可能与编码器要求的格式不匹配(如像素格式、采样格式),需用
sws_scale(视频)或swr_convert(音频)转换。 -
时间戳同步 :通过
av_packet_rescale_ts转换时间基,确保音视频时序一致(核心是PTS/DTS的正确传递)。 -
错误处理:实际代码需更完善的错误检查(如内存分配失败、编解码失败等)。
-
编译命令 :需链接 FFmpeg 库,例如:
bash
gcc -o av_process av_process.c -lavformat -lavcodec -lavutil -lswscale -lswresample
通过这个框架,就能实现 "输入文件→解封装→解码→重新编码→复用→输出文件" 的完整流程。如需播放(而非输出文件),则在解码后将原始帧(YUV/PCM)交给渲染层(如 SDL 显示视频、播放音频)即可