tcpdump 是一个功能强大的命令行网络数据包分析工具,广泛用于 Linux、macOS 和其他类 Unix 系统中。能够捕获和显示通过网络接口传输的数据包(如 TCP、UDP、ICMP 等),用于诊断网络问题。类似的工具还有wireshark,使用图形化操作。强烈建议用tcpdump保存数据包后,使用图形化工具分析,命令行文字实在太难用了。
1.安装tcpdump
shell
apt -y install tcpdump

或者 yum -y isntall tcpdump
使用nginx搭建了一个简易的web serrver
shell
[root@node1 ~]# cat /etc/nginx/conf.d/hello.conf
server {
    listen 80;
    server_name localhost;
    location / {
        return 200 "hello wzy";
    }
}
启动nginx
shell
[root@node1 ~]# nginx -t
nginx: the configuration file /etc/nginx/nginx.conf syntax is ok
nginx: configuration file /etc/nginx/nginx.conf test is successful
[root@node1 ~]# nginx
2.使用windows电脑的cmd调用curl工具,发起请求,访问这个web server

3.在linux命令行输入 tcpdump -i eth0 port 80 -n -vvv
参数解释:
-i: interface,过滤端口为80
-w: write,写入数据到文件
-n: 默认情况下,tcpdump 会尝试将 IP 地址解析为主机名。用 -n 后,直接显示 IP 地址和端口号
-v: 非常详细的输出(verbose level 3)
更多参数请查看手册:man tcpdump 或者问AI
shell
[root@node1 ~]# tcpdump -i eth0 port 80 -n -vvv
tcpdump: listening on eth0, link-type EN10MB (Ethernet), snapshot length 262144 bytes
19:19:59.698139 IP (tos 0x0, ttl 128, id 19301, offset 0, flags [DF], proto TCP (6), length 52)
    10.0.0.253.31219 > 10.0.0.31.80: Flags [S], cksum 0x9959 (correct), seq 793517083, win 64240, options [mss 1460,nop,wscale 8,nop,nop,sackOK], length 0
19:19:59.698172 IP (tos 0x0, ttl 64, id 0, offset 0, flags [DF], proto TCP (6), length 52)
    10.0.0.31.80 > 10.0.0.253.31219: Flags [S.], cksum 0x1542 (incorrect -> 0xa609), seq 2770488861, ack 793517084, win 64240, options [mss 1460,nop,nop,sackOK,nop,wscale 7], length 0
19:19:59.698358 IP (tos 0x0, ttl 128, id 19302, offset 0, flags [DF], proto TCP (6), length 40)
    10.0.0.253.31219 > 10.0.0.31.80: Flags [.], cksum 0xdfcb (correct), seq 1, ack 1, win 513, length 0
19:19:59.698358 IP (tos 0x0, ttl 128, id 19303, offset 0, flags [DF], proto TCP (6), length 113)
    10.0.0.253.31219 > 10.0.0.31.80: Flags [P.], cksum 0xbbce (correct), seq 1:74, ack 1, win 513, length 73: HTTP, length: 73
	GET / HTTP/1.1
	Host: 10.0.0.31
	User-Agent: curl/7.83.1
	Accept: */*

19:19:59.698401 IP (tos 0x0, ttl 64, id 18752, offset 0, flags [DF], proto TCP (6), length 40)
    10.0.0.31.80 > 10.0.0.253.31219: Flags [.], cksum 0x1536 (incorrect -> 0xdf8d), seq 1, ack 74, win 502, length 0
19:19:59.698559 IP (tos 0x0, ttl 64, id 18753, offset 0, flags [DF], proto TCP (6), length 219)
    10.0.0.31.80 > 10.0.0.253.31219: Flags [P.], cksum 0x15e9 (incorrect -> 0x6f7e), seq 1:180, ack 74, win 502, length 179: HTTP, length: 179
	HTTP/1.1 200 OK
	Server: nginx/1.18.0 (Ubuntu)
	Date: Mon, 27 Oct 2025 11:19:59 GMT
	Content-Type: application/octet-stream
	Content-Length: 9
	Connection: keep-alive

	hello wzy [|http]
19:19:59.698875 IP (tos 0x0, ttl 128, id 19304, offset 0, flags [DF], proto TCP (6), length 40)
    10.0.0.253.31219 > 10.0.0.31.80: Flags [F.], cksum 0xdecf (correct), seq 74, ack 180, win 512, length 0
19:19:59.698917 IP (tos 0x0, ttl 64, id 18754, offset 0, flags [DF], proto TCP (6), length 40)
    10.0.0.31.80 > 10.0.0.253.31219: Flags [F.], cksum 0x1536 (incorrect -> 0xded8), seq 180, ack 75, win 502, length 0
19:19:59.699059 IP (tos 0x0, ttl 128, id 19305, offset 0, flags [DF], proto TCP (6), length 40)
    10.0.0.253.31219 > 10.0.0.31.80: Flags [.], cksum 0xdece (correct), seq 75, ack 181, win 512, length 0
4.数据包信息在终端上面不利于后期查阅和分析,使用 -w参数保存
shell
tcpdump -i eth0 port 80 -w web.pcap5.双击桌面的web.pcap文件用wiresheark打开,需要提前安装。安装地址请查看:https://www.wireshark.org/

打开后:
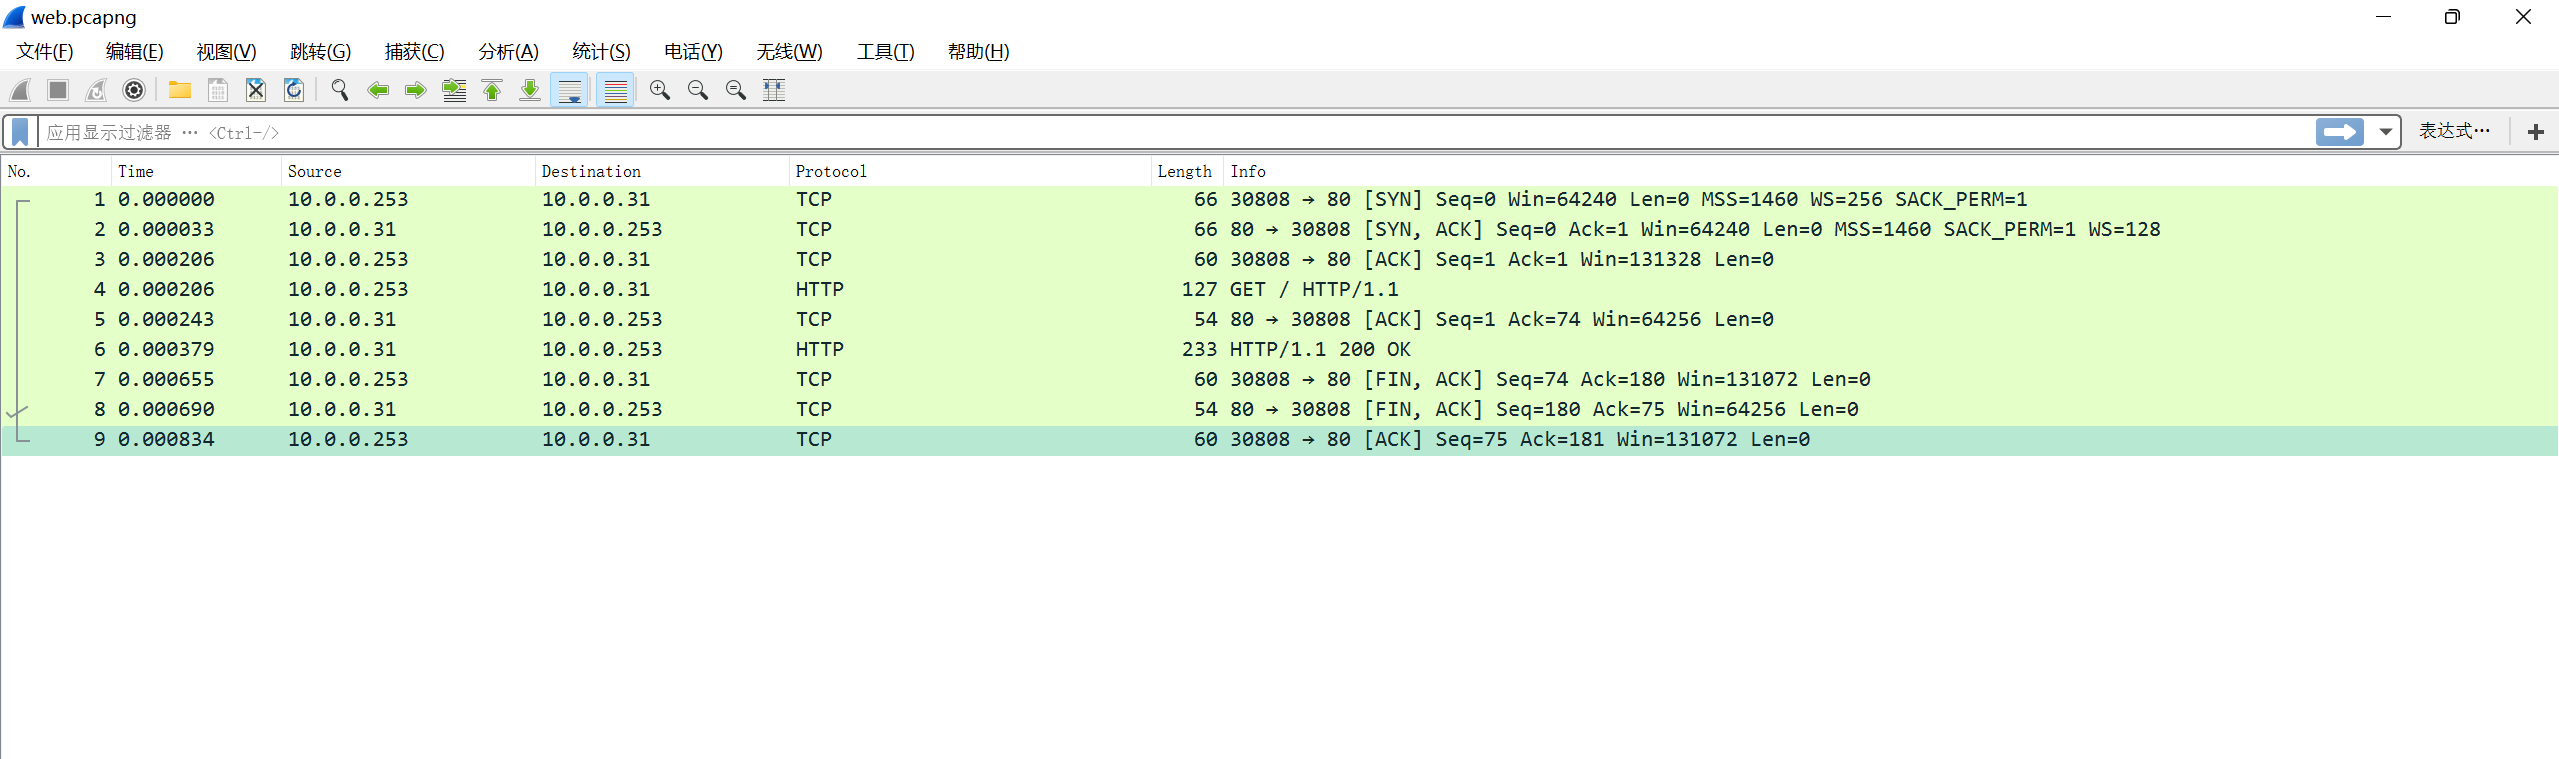
可以看到有详细的tcp握手和挥手过程,再也不用担心看不到tcp的"手"了

注意:服务器在收到客户端的 FIN 后,立即回复 ACK + 自己的 FIN(合并在一个包里),称为 "半关闭优化"或"延迟ACK合并",目的是减少网络开销。所以看到的是3个数据包
6.随后总结一下常用的用法
| wireshark语法 | 说明 |
|---|---|
| ip.src/dst X.X.X.X | 源/目为X.X.X.X |
| ip.addr eq X.X.X.X/ip.addr | 源或目ip包含X.X.X.X |
| eth.addr == 74:ea:cb:53:ea:a0 | |
| 192.168.16.1 <= ip.addr <= 192.168.16.254 | 区间的IP |
| tcp.port == X | 筛选TCP端口为XXXX的数据包 |
| tcp.dstport == X | TCP目的端口 |
| tcp.srcport == X | TCP源端口 |
| ip.len > 1500 | mtu大于1500 |
| ip.flags.df == 1 | 过滤不应分片的数据包 |
| && | 与 |
| || | 或 |
| >= | ip大于 |
| <= | ip小于 |
| tcpdump命令 | |
|---|---|
| -v | 详细数据包 |
| -c | 指定抓取数据包数量 |
| -n/-nn | 不解析域名/协议 |
| -i | 指定接口 |
| port 22 | 指定端口 |
| host 10.0.0.254 | 指定ip |
| src/dst 10.0.0.254 | 指定源目IP为10.0.0.254 |
| tcp udp arp | 指定协议 |
| -w filename.pcap | 把抓包写入到文件,可用wireshark打开 |