一、绘图代码实践
1、鼠标绘线图
用到setOnMousePressed和setOnMouseDragged两个属性
package org.example.testsc1;

import javafx.application.Application;
import javafx.application.Platform;
import javafx.fxml.FXMLLoader;
import javafx.scene.Parent;
import javafx.scene.Scene;
import javafx.scene.canvas.Canvas;
import javafx.scene.canvas.GraphicsContext;
import javafx.scene.control.Button;
import javafx.scene.control.Label;
import javafx.scene.layout.AnchorPane;
import javafx.scene.layout.Priority;
import javafx.scene.paint.Color;
import javafx.stage.Stage;

import javax.print.attribute.standard.PrinterMakeAndModel;
import java.io.IOException;

public class HelloApplication extends Application {
    public static final double WIDTH =800,HEIGHT = 600;
    private Canvas canvas =new Canvas(WIDTH,HEIGHT);
    private GraphicsContext graphicsContext = canvas.getGraphicsContext2D();
    private double x,y;//坐标

    public static void main(String[] args){
        Application.launch(args);
    }
    @Override
    public void start(Stage primaryStage)throws Exception {
        canvas.setLayoutX(0);
        canvas.setLayoutY(0);
        canvas.setOnMousePressed(event -> {//鼠标按下的初始位置
                x=event.getX();
                y=event.getY();
    });
        canvas.setOnMouseDragged(event->{//鼠标拖拽
            double x2=event.getX(),y2=event.getY();
            graphicsContext.strokeLine(x,y,x2,y2);
            x=x2;
            y=y2;
        });
        AnchorPane root=new AnchorPane(canvas);
        Scene scene=new Scene(root);
        primaryStage.setScene(scene);
        primaryStage.show();
    }
}
实现效果

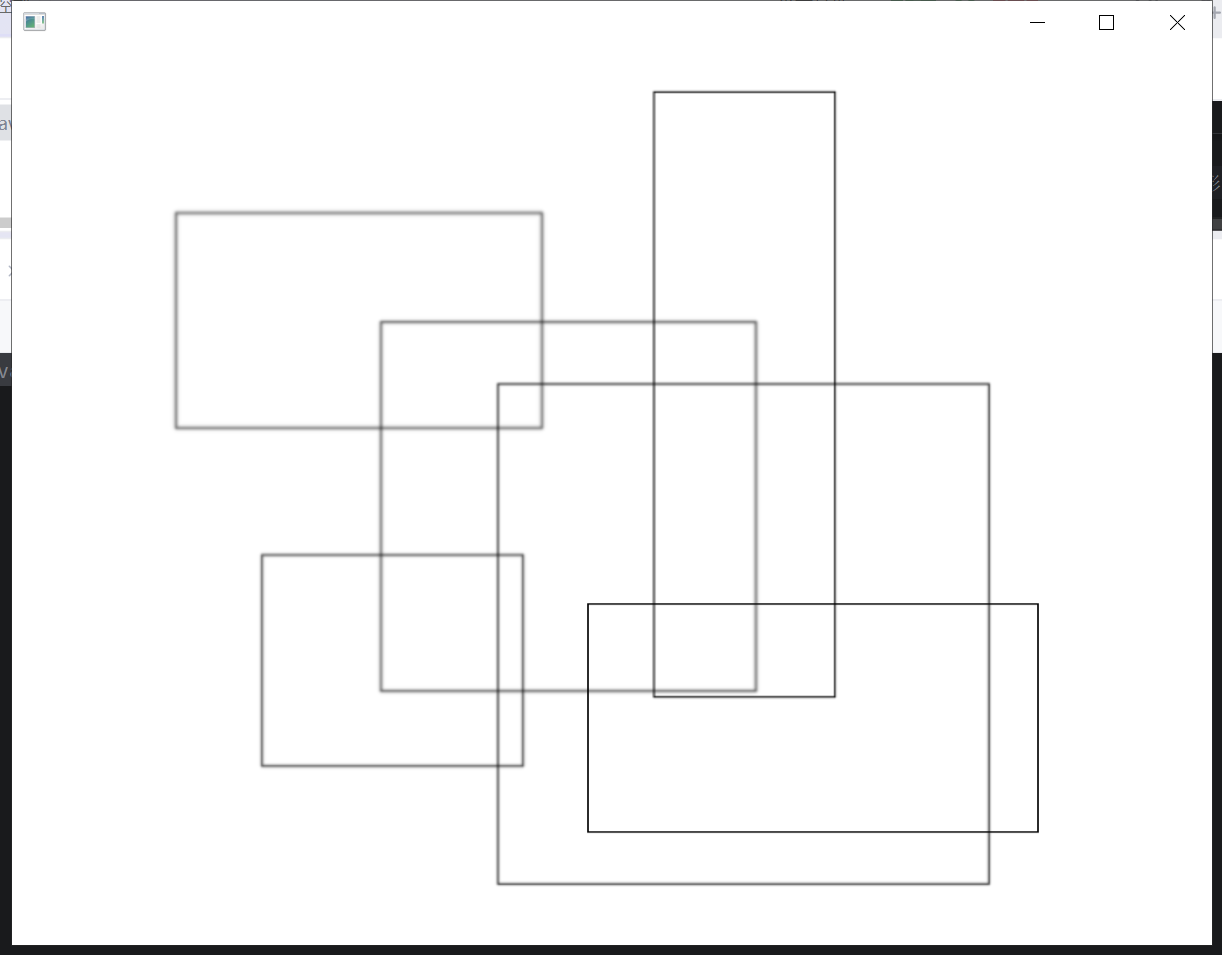
2、鼠标绘框图
在 JavaFX 的 GraphicsContext 类中,strokeRect 方法用于绘制一个矩形的边框。它不会填充矩形内部,只画轮廓。
/*
x:矩形左上角的 X 坐标。
y:矩形左上角的 Y 坐标。
width:矩形的宽度。
height:矩形的高度
*/
void strokeRect(double x, double y, double width, double height)
完整代码
其中注意清除过程框图、往上绘框图、保存快照的细节
package org.example.testsc1;
import javafx.application.Application;
import javafx.application.Platform;
import javafx.fxml.FXMLLoader;
import javafx.scene.Parent;
import javafx.scene.Scene;
import javafx.scene.canvas.Canvas;
import javafx.scene.canvas.GraphicsContext;
import javafx.scene.control.Button;
import javafx.scene.control.Label;
import javafx.scene.image.WritableImage;
import javafx.scene.layout.AnchorPane;
import javafx.scene.layout.Priority;
import javafx.scene.paint.Color;
import javafx.stage.Stage;

import javax.print.attribute.standard.PrinterMakeAndModel;
import java.io.IOException;
import java.io.WriteAbortedException;
import java.lang.ref.WeakReference;

public class HelloApplication extends Application {
    public static final double WIDTH =800,HEIGHT = 600;
    private Canvas canvas =new Canvas(WIDTH,HEIGHT);
    private GraphicsContext graphicsContext = canvas.getGraphicsContext2D();
    private double x,y;//坐标
    private WritableImage image=null;

    public static void main(String[] args){
        Application.launch(args);
    }
    @Override
    public void start(Stage primaryStage)throws Exception {//鼠标按下的初始位置
        canvas.setLayoutX(0);
        canvas.setLayoutY(0);
        canvas.setOnMousePressed(event -> {
                x=event.getX();
                y=event.getY();
    });
        canvas.setOnMouseDragged(event->{//鼠标拖拽
            double startx=x,starty=y;
            double endx=event.getX();
            double endy=event.getY();
            if(endx<startx){//解决不能往上绘制的问题
                startx=endx;
                endx=x;
            }
            if(endy<starty){
                starty=endy;
                endy=y;
            }
            double height=endy-starty;
            double width=endx-startx;
            graphicsContext.clearRect(0,0,WIDTH,HEIGHT);//清除画布上指定矩形区域内的所有内容
            graphicsContext.drawImage(image,0,0,WIDTH,HEIGHT);//保存快照
            graphicsContext.strokeRect(startx,starty,width,height);//绘制一个矩形的边框。它不会填充矩形内部,只画轮廓。
        });
        //设置松开手的快照
        canvas.setOnMouseReleased(event->{
            image=canvas.snapshot(null,null);
            //创建当前 Canvas 内容的快照,生成一个 WritableImage 对象,包含绘制在 Canvas 上的所有图形。
        });
        AnchorPane root=new AnchorPane(canvas);
        Scene scene=new Scene(root);
        primaryStage.setScene(scene);
        primaryStage.show();
    }
}
实现效果
二、保存所绘的图
作用: 将 JavaFX 的 WritableImage 转换为 Java AWT 的 BufferedImage
结果: 得到 BufferedImage(标准 Java 图像类型)
**特点:**这是 Java 标准库的图像格式,兼容性更好
BufferedImage bufferedImage = SwingFXUtils.fromFXImage(writableImage, null);转换的必要性:
文件保存: ImageIO.write() 只接受 BufferedImage
图像处理: 很多 Java 图像处理库只支持 BufferedImage
**兼容性:**与旧版 Swing 应用程序集成
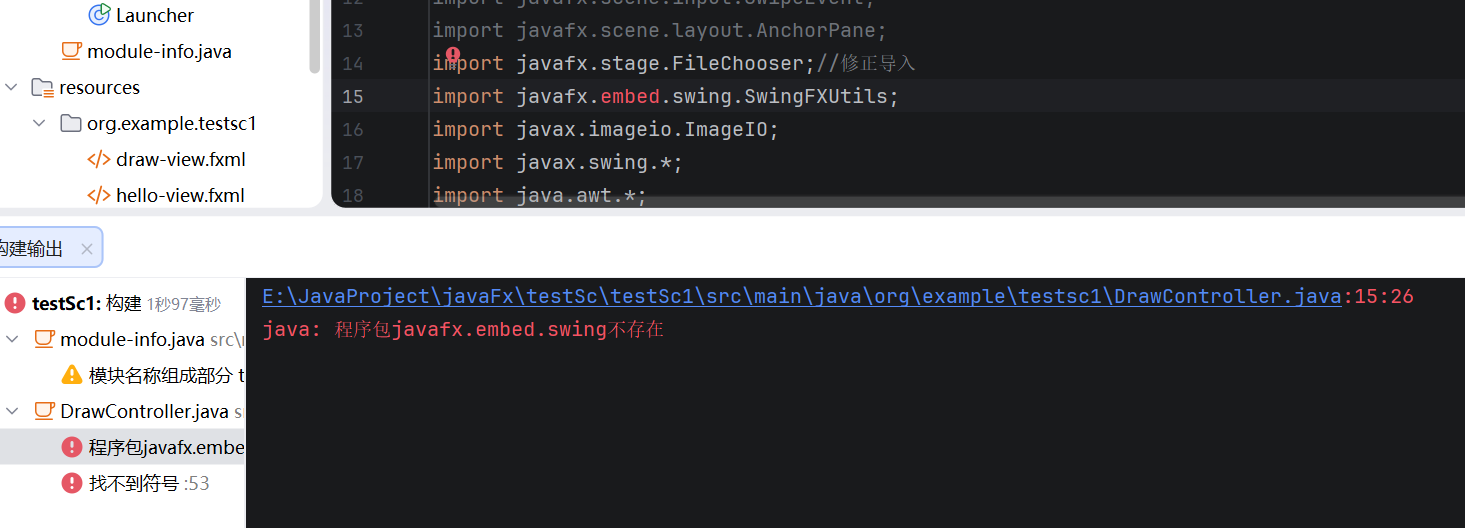
三、问题待解决
BufferedImage bufferedImage = SwingFXUtils.fromFXImage(writableImage, null);使用上述语句,会提示:java: 程序包javafx.embed.swing不存在