今天面试被问到Bean的生命周期,我就巴拉巴拉说了5个步骤,最后反问阶段面试官说不够详细。今天就来实战梳理一下!
一、定义一个Student类
为了方便看到生命周期过程,我直接使用print大法;
另外,将类交给Spring容器管理可以通过xml文件形式和注解形式,接下来我都实现一下
1、xml形式
java
package com.goahead.bean;

public class Student1 {
    private String name;

    public Student1() {
        System.out.println("1、实例化");
    }

    public Student1(String name) {
        this.name = name;
    }
    public void setName(String name) {
        System.out.println("2、依赖注入");
        this.name = name;
    }

    public void myInit() {
        System.out.println("3、初始化");
    }

    public void myDestroy() {
        System.out.println("5、销毁");
    }
}
2、注解形式
package com.goahead.bean;

import org.springframework.stereotype.Component;
import org.springframework.beans.factory.annotation.Value;
import javax.annotation.PostConstruct;
import javax.annotation.PreDestroy;

@Component
public class Student2 {
    private String name;

    public Student2() {
        System.out.println("1、实例化");
    }

    public Student2(String name) {
        this.name = name;
    }

    @Value("goahead")
    public void setName(String name) {
        System.out.println("2、依赖注入");
        this.name = name;
    }

    @PostConstruct
    public void myInit() {
        System.out.println("3、初始化");
    }

    @PreDestroy
    public void myDestroy() {
        System.out.println("5、销毁");
    }
}
二、将Student类交给Spring容器
1、xml文件形式
需要在resource文件夹下定义一个xml文件
<?xml version="1.0" encoding="UTF-8"?>
<beans xmlns="http://www.springframework.org/schema/beans"
       xmlns:xsi="http://www.w3.org/2001/XMLSchema-instance"
       xsi:schemaLocation="http://www.springframework.org/schema/beans
       http://www.springframework.org/schema/beans/spring-beans.xsd">

    <bean id="student" class="com.goahead.bean.Student" init-method="myInit" destroy-method="myDestroy">
        <property name="name" value="goahead"/>
    </bean>
</beans>
2、注解形式(推荐)
注解形式我们只需在Student2类上加相应的注解,然后加一个配置类
在config目录下创建一个 AppConfig 类
package com.goahead.config;

import org.springframework.context.annotation.ComponentScan;
import org.springframework.context.annotation.Configuration;

@Configuration
@ComponentScan("com.goahead.bean")  // 扫描包路径
public class AppConfig {
}
三、测试
由于我们第二步实现了两种方式,所以测试也对应两种方式
1、对应xml形式
import com.goahead.bean.Student1;
import org.junit.Test;
import org.springframework.context.ApplicationContext;
import org.springframework.context.support.ClassPathXmlApplicationContext;

public class AppTest1 {
    @Test
    public void test1() {
        ApplicationContext context = new ClassPathXmlApplicationContext("spring.xml");
        Student1 student1 = context.getBean(Student1.class);
        System.out.println("4、使用Bean");

        ((ClassPathXmlApplicationContext)context).close();
    }
}
2、注解形式
import com.goahead.bean.Student2;
import com.goahead.config.AppConfig;
import org.junit.Test;
import org.springframework.context.annotation.AnnotationConfigApplicationContext;
public class AppTest2 {
@Test
public void test2() {
// 使用AnnotationConfigApplicationContext替代ClassPathXmlApplicationContext
AnnotationConfigApplicationContext context =
new AnnotationConfigApplicationContext(AppConfig.class);
Student2 student = context.getBean(Student2.class);
System.out.println("4、使用Bean");
context.close(); // 触发销毁方法
}
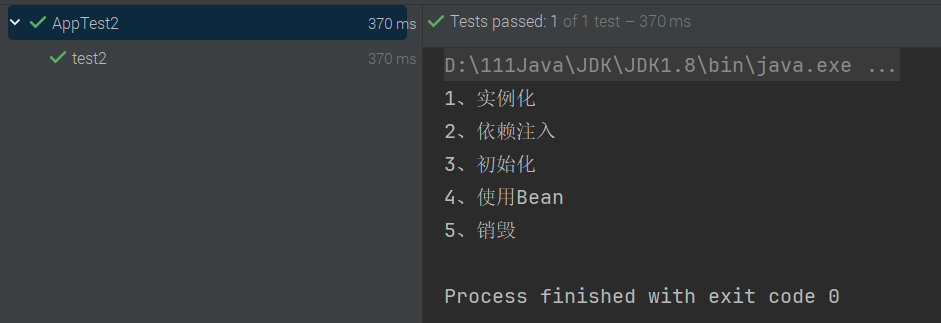
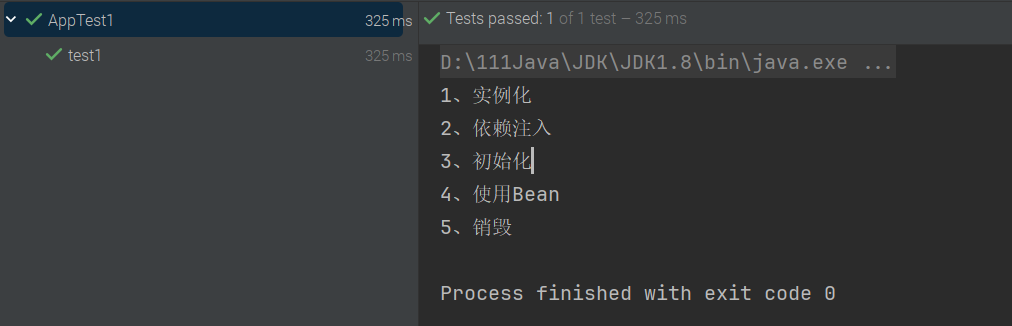
}四、测试结果
1、xml形式
2、注解形式