基于百度地图JSAPI Three的城市公交客流可视化(三)------实时公交

上一篇文章我们实现了六边形蜂窝的区域客流,这一篇我们的目标是实现 **实时公交**。实现实时公交的方式我们需要得数据:实时更新位置的公交车、 当前公交车排班路线, 还有就是线路所经过的站台
一般公交车更新实时位置都是socket,这里为了方便我们使用历史行进轨迹数据traceData.json进行调试,站台我们采用glb模型,并将模型朝向路线保证视觉正确,公交车运行时需要沿路行驶并且需要正确的朝向,开搞。
数据获取
基于上一篇文章的初始化地图代码,我们需要以下数据文件(文件在下方仓库地址):
- 线路数据(routeData)这是公交车司机当天排班的公交车指定行进线路,比如101路线路
- 站点数据(stand2Data)当天排班的公交车指定行进线路所经过的上下行站点,每个站点最少站台
- 轨迹数据(traceData)公交车的实际行进线路数据,一般都在指定行进线路上
资源文件准备:
ts
import traceData from '@/resources/trace/reace1.json';
import routeData from '@/resources/route/route2.json';
import stand2Data from '@/resources/stand/stand2.json';
routeData线路数据是上/下行两组 WGS84 点位:
1:8:src/resources/route/route2.json
{
    "up": [ { "lat": 33.27627349350771, "lon": 117.32730936865975 }, ... ],
    "down": [ ... ]
}
stand2Data站点数据结构与此相近,但包含名称、分组等属性,
json
{
    "up": [
            {
                "id": 862,
                "name": "小学",
                "remarks": "北",
                "lat": 33.3333833,
                "lon": 117.3255,
                ...
            }
    	],
    "down": [ ... ]
}
轨迹数据则提供车辆按时间序列格式的数据。
json
[
    {

        "routeName": "101路",
        "driverName": "张xx",
        "start": "2025-10-13 07:40:02",
        "end": "2025-10-13 09:39:50",
        "locations": [
            {
                "lineId": 15,
                "driverId": 37,
                "posTime": "2025-10-13 07:41:03", //上报时间
                "latitude1": 33.33392333984375,
                "longitude1": 117.32551574707031,
                "speed": 7000,  //当前速度
                "gpsMileage": 35010000,
            },
            ...
            ]
    }
]
车辆模型加载
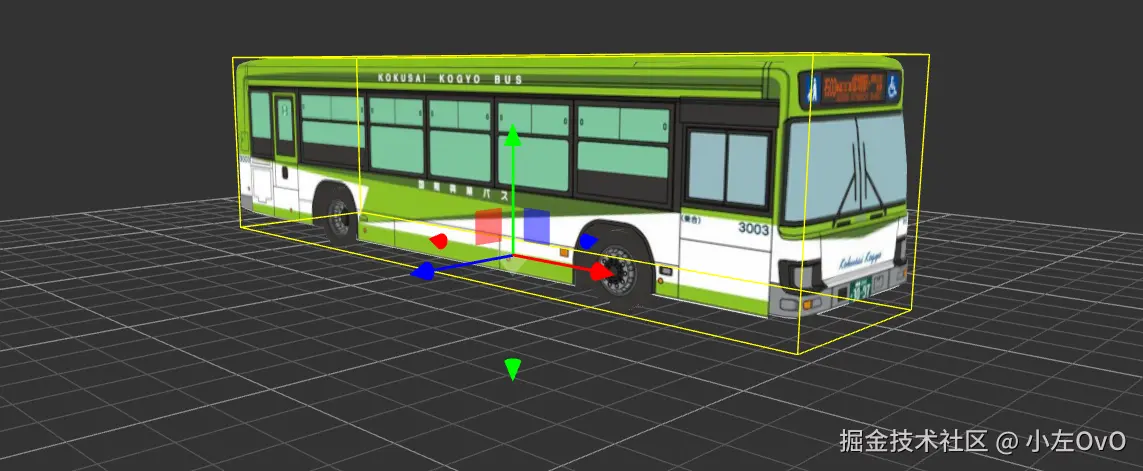
开始,我们用mapvthree.gltfLoader把公交车模型加载,分三步:定位、调整缩放和朝向、加入场景,这里需要注意three默认的加载地址在根目录public。
加载与首帧定位:
ts
//加载模型
mapvthree.gltfLoader.load('/model/bus.glb', (gltf: any) => {
    busModel = gltf.scene;

    // 取轨迹起点作为起始位置(WGS84 -> BD09 -> 墨卡托)
    const firstLocation = locations[0];
    if (firstLocation.latitude1 && firstLocation.longitude1) {
        const [bdLon, bdLat] = wgs84tobd09(firstLocation.longitude1, firstLocation.latitude1);
        const [x, y, z] = bd09ToMercator(bdLon, bdLat);
        busModel.position.set(x, y, z);
    }

    // 方向、大小合适
    busModel.rotateX(Math.PI / 2);
    busModel.rotateY(Math.PI * 3 / 2);
    busModel.scale.setScalar(0.9);

    engine.add(busModel);

    // 创建车上放的提示框,后续会更随车辆一起移动
    const tooltipDom = createBusTooltip();
    const firstLocationForTooltip = locations[0];
    if (firstLocationForTooltip.latitude1 && firstLocationForTooltip.longitude1) {
        const [bdLon, bdLat] = wgs84tobd09(firstLocationForTooltip.longitude1, firstLocationForTooltip.latitude1);
        busTooltip = engine.add(new mapvthree.DOMOverlay({
            point: [bdLon, bdLat, 50], //抬高50
            dom: tooltipDom
        }));
    }
});
这里的提示框,我们用自带的 DOMOverlay,传入位置和dom即可;它的跟随逻辑会在raf动画段落里和公交车同步更新。
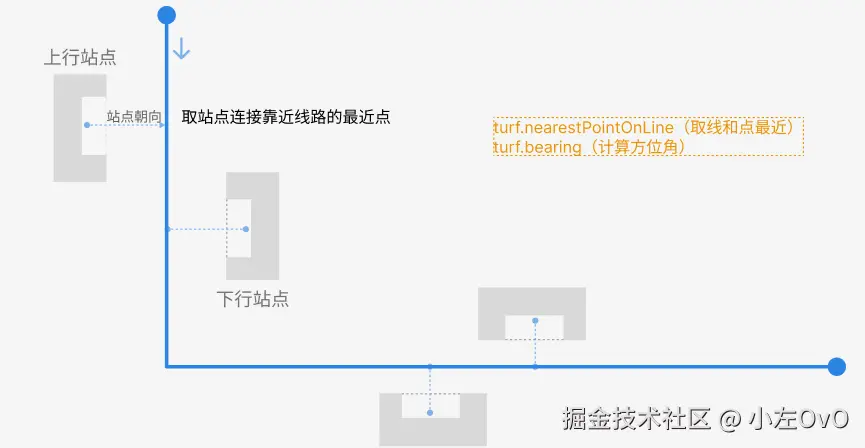
站台模型加载与朝向设置
我们不仅需要加载站台模型,还需要设置站台的朝向设,一般的站台都是面朝马路的,所以这里我们需要首先找到站台和线路中最近的交点A ,然后计算出 站点 和 A点 为站点的朝向向量,这样就能让站台正确的朝向马路了。示例图如下
清楚怎么设置之后,首先我们处理好我们的站点和线路的经纬度格式:
ts
// 创建站点标记
const createStationMarkers = () => {
    const standData = stand2Data as any;
    if (!standData || (!Array.isArray(standData.up) && !Array.isArray(standData.down))) {
        console.warn('站点数据格式不正确');
        return;
    }

    // 合并上行和下行站点数据
    const allStations = [
        ...(Array.isArray(standData.up) ? standData.up : []),
        ...(Array.isArray(standData.down) ? standData.down : [])
    ];

    // 转换为 GeoJSON 格式(wgs转 BD09)
    const features = allStations
        .filter((station: any) => typeof station?.lon === 'number' && typeof station?.lat === 'number')
        .map((station: any) => ({
            type: 'Feature',
            geometry: {
                type: 'Point',
                coordinates: [wgs84tobd09(station.lon, station.lat)[0], wgs84tobd09(station.lon, station.lat)[1]],
            },
            properties: {
                id: station.id,
                name: station.name,
                remarks: station.remarks,
                up: station.up || 0,
                down: station.down || 0,
                groupId: station.groupId,
                groupName: station.groupName || '',
                longitude: station.lon,
                latitude: station.lat,
            },
        }));

    const geojson = { type: 'FeatureCollection', features } as const;
    const dataSource = mapvthree.GeoJSONDataSource.fromGeoJSON(geojson as any);

    // 创建公交线路的 Turf LineString
    const routeLineString = createRouteLineString();
接着我们再加载站台模型,设置好大小、初始化朝向和位置
ts
// 加载车站模型
let busStopModel: any = null;
const stationModels: any[] = [];

mapvthree.gltfLoader.load('/model/bus_stop.glb', (gltf: any) => {
    busStopModel = gltf.scene;

    // 初始化朝向
    busStopModel.rotateX(Math.PI / 2);
    busStopModel.scale.set(7, 7, 7);

    // 为每个站点创建模型实例
    features.forEach((feature: any) => {
        const originalLon = feature.properties.longitude;
        const originalLat = feature.properties.latitude;
        const [bdLon, bdLat] = wgs84tobd09(originalLon, originalLat);
        const [x, y, z] = bd09ToMercator(bdLon, bdLat);

        const stationModel = busStopModel.clone();
        stationModel.position.set(x, y, z);

        engine.scene.add(stationModel);
        stationModels.push(stationModel);
    });
});
最后我们来设置站台的朝向,朝向马路,代码如下:
ts
// 如果存在公交线路,计算站点到线路的最近点并设置模型朝向
if (routeLineString) {
const stationPoint = turf.point([bdLon, bdLat]);
//找到最近的点
const nearestPoint = turf.nearestPointOnLine(routeLineString, stationPoint);
const nearestCoords = nearestPoint.geometry.coordinates;
// 计算方位角
const bearing = turf.bearing(stationPoint, turf.point(nearestCoords));
// 转换角度(正北为0、顺时针为正) → Three Y轴旋转
const rotationY = (bearing - 180) * Math.PI / 180;
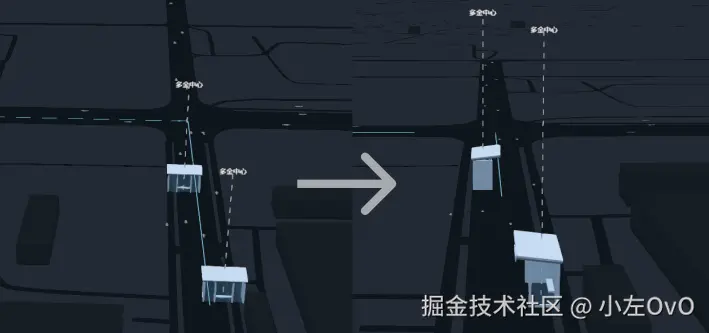
stationModel.rotateY(rotationY);
}站台model调整前后对比效果图如下:
沿路行驶与转向动画
因为原数据的行驶速度过慢,我们采用固定速度,让车辆匀速的方式沿线前进,同时在转弯处做平滑的朝向过渡,避免瞬间旋转。
核心变量与参数:
ts
// 动画参数
const speedKmh = 100;                // 行驶速度
const speedMs = speedKmh * 1000 / 3600; // m/s
const totalTimeSeconds = totalDistance / speedMs; // 总行驶时间

// 角度过渡
let currentRotationY = 0;            // 当前朝向(弧度)
const rotationSpeed = 2;             // 最大旋转速度(弧度/秒)
动画主循环负责两件事:位置插值与朝向插值。
- 位置插值(沿线段线性插值)
ts
const elapsed = (Date.now() - startTime) / 1000;
const progress = Math.min(elapsed / totalTimeSeconds, 1);
const currentDistance = progress * totalDistance;

// 通过累计里程数组 `distances` 定位当前所在的线段
let pointIndex = 0;
for (let i = 0; i < distances.length - 1; i++) {
  if (currentDistance >= (distances[i] || 0) && currentDistance <= (distances[i + 1] || 0)) {
    pointIndex = i; break;
  }
}

// 计算线段内比例,并对两端墨卡托坐标做线性插值
const segmentStart = distances[pointIndex] || 0;
const segmentEnd = distances[pointIndex + 1] || 0;
const t = segmentEnd > segmentStart ? (currentDistance - segmentStart) / (segmentEnd - segmentStart) : 0;

// WGS84 转 墨卡托
const [startBdLon, startBdLat] = wgs84tobd09(startLocation.longitude1, startLocation.latitude1);
const [endBdLon, endBdLat]   = wgs84tobd09(endLocation.longitude1, endLocation.latitude1);
const [startX, startY] = bd09ToMercator(startBdLon, startBdLat);
const [endX, endY]     = bd09ToMercator(endBdLon, endBdLat);

const currentX = startX + (endX - startX) * t;
const currentY = startY + (endY - startY) * t;
busModel.position.set(currentX, currentY, 0);- 朝向角插值(平滑转向,避免突变)
算法:用当前线段向量 end - start 求出航向角 targetAngle = atan2(dy, dx);再用"夹角归一到 (-π, π)"与"最大角速度"把 currentRotationY 朝 targetAngle 推进。这样在急转弯处也会过渡自然,当然你也可以直接用gsap过渡
ts
const directionX = endX - startX;
const directionY = endY - startY;
const directionLength = Math.sqrt(directionX * directionX + directionY * directionY);

if (directionLength > 0) {
  const targetAngle = Math.atan2(directionY, directionX);

  // 夹角归一 [-π, π]
  let angleDiff = targetAngle - currentRotationY;
  while (angleDiff > Math.PI) angleDiff -= 2 * Math.PI;
  while (angleDiff < -Math.PI) angleDiff += 2 * Math.PI;

  // 最大角速度限制
  const deltaTime = 1 / 60;
  const maxRotationChange = rotationSpeed * deltaTime;
  if (Math.abs(angleDiff) > maxRotationChange) {
    currentRotationY += Math.sign(angleDiff) * maxRotationChange;
  } else {
    currentRotationY = targetAngle;
  }

  busModel.rotation.y = currentRotationY;
}
效果示例:
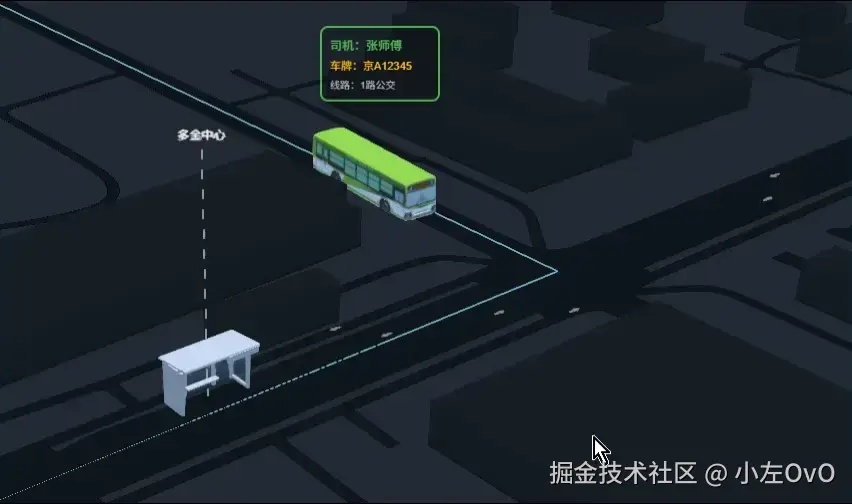
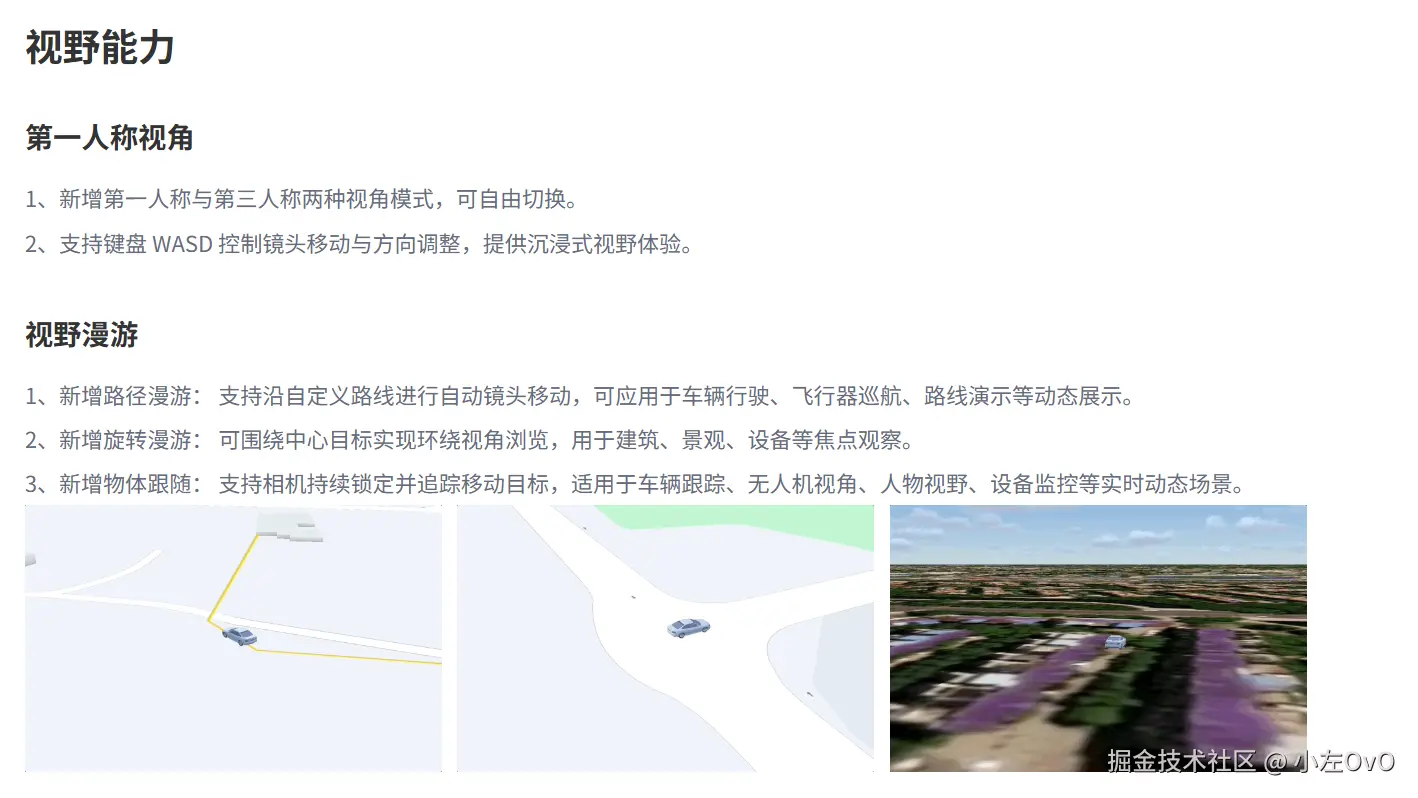
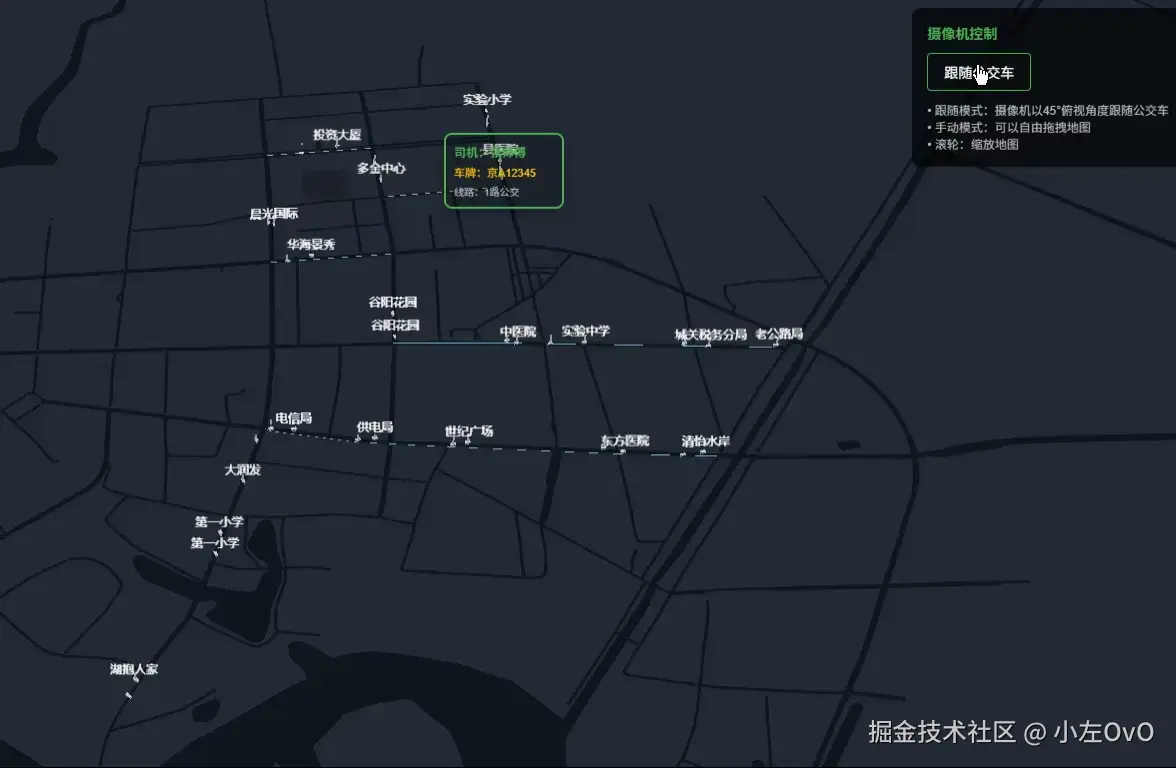
相机跟随与视角策略
我们需要提供"自由"和"跟随"两种视角模式的切换,在跟随时的时候我们只跟随距离,就像FPS游戏中TPP视角一样,吃鸡PUBG就是这种策略。
跟随实现:每帧在更新车辆位置中用mapthree中的 lookAt 把镜头看向车辆当前位置,设置固定距离 range: 300
ts
//raf动画循环
if (cameraFollowMode) {
  const [currentBdLon, currentBdLat] = mercatorToBd09(currentX, currentY);
  engine.map.lookAt([currentBdLon, currentBdLat], {
    range: 300
  } as any);
}
自由视角直接将cameraFollowMode设为false即可;
停之停之!文章写到这里我我发现百度地图的开发者更新了新功能,他们支持了自定义镜头动画,赶紧换上
现在只需要传入model即可,不需要再每一帧手动更新相机位置,相比于之前的拖动丝滑的很多,lock设置为true即可固定视角
ts
const tracker = engine.add(new mapvthree.ObjectTracker())
tracker.track(busModel, {
  range: 300,
  pitch: 80,
  heading: 10,
  lock: false, //不锁定视角
})
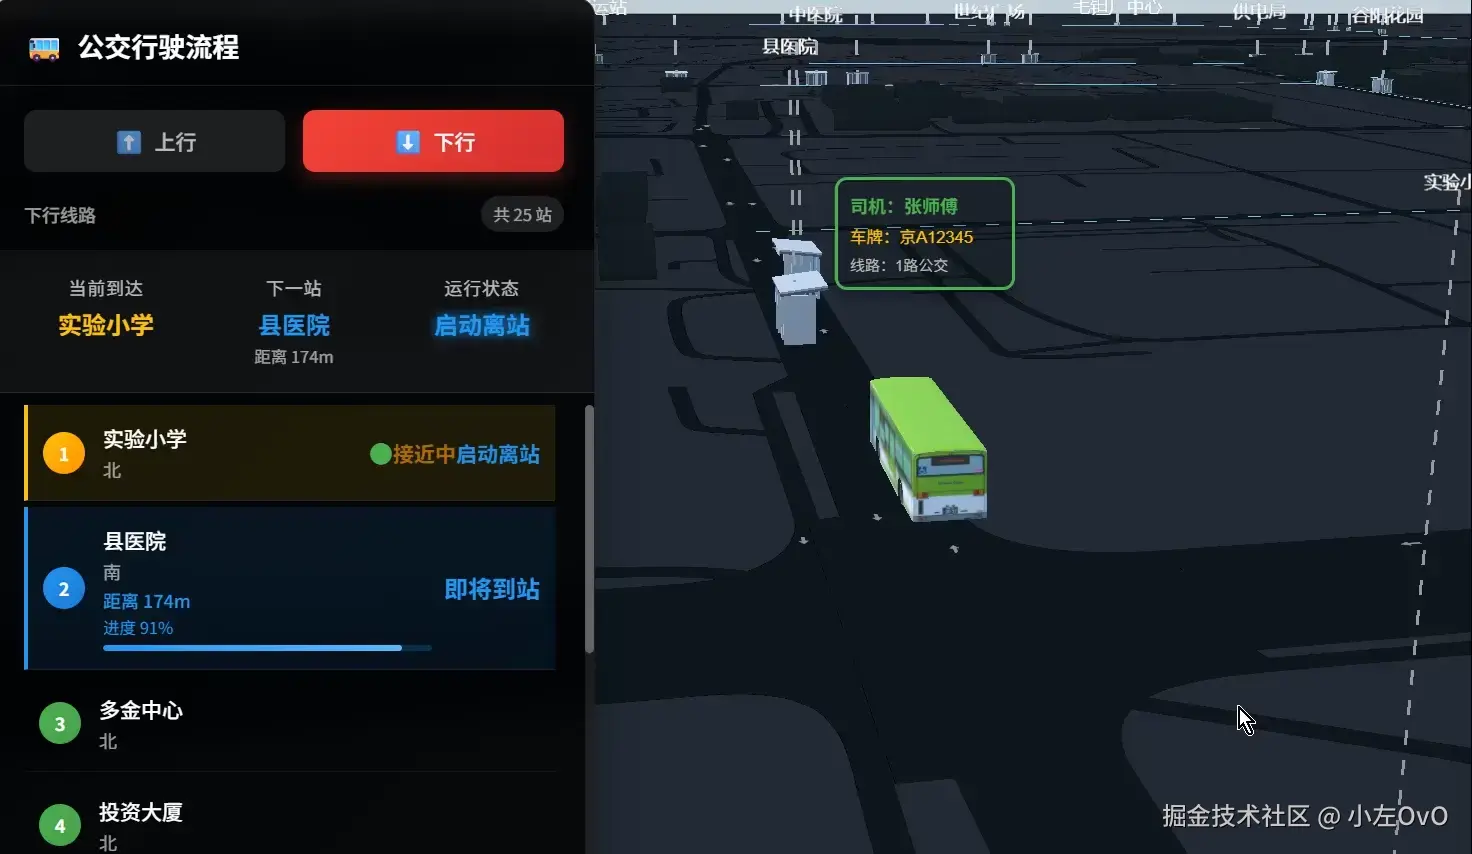
高级参数可视化
以上实现就已经完成实时公交的基本形式的可视化了,但是我们要做就要做的更详细一点,加入类似于电子公交屏的功能:距离下一站距离、当前到达、下一站和运行状态。
- 运行状态 :公交车运行状态机,包含四个状态
driving:正常行驶approaching:减速进站(距离站点 < 200米)stopped:站台停靠(距离站点 < 30米,停留3秒)departing:启动离站
- 距离计算:使用 Turf.js 计算车辆当前位置到下一站的直线距离(可以用线段截取计算的方式实际剩余距离)
- 进度显示:基于距离计算的到站进度
- 站点状态管理 :
passedStations:已通过站点数组currentStationIndex:当前最接近的站点nextStationIndex:下一站- 站点状态分为:已通过、当前站、下一站、未到达
通过在 updateBusStatus 函数每帧去更新:计算车辆到所有站点的距离,找到最近站点,更新到站状态,并计算到下一站的距离和进度即可~
ts
// raf更新函数....
// 更新公交车位置和状态
const updateBusStatus = (currentLon: number, currentLat: number) => {
    // 计算到所有站点的距离
    const currentPoint = turf.point([currentLon, currentLat]);
    const stationDistances = currentStations.value.map((station: any, index: number) => {
        const [bdLon, bdLat] = wgs84tobd09(station.lon, station.lat);
        const stationPoint = turf.point([bdLon, bdLat]);
        const distance = turf.distance(currentPoint, stationPoint, { units: 'meters' });
        return { index, distance, station };
    });

    // 找到最近的站点
    const nearestStation = stationDistances.reduce((min: any, current: any) =>
        current.distance < min.distance ? current : min
    );

    // 到站判断(距离小于50米认为到站)
    const stationThreshold = 50;
    const isAtStation = nearestStation.distance < stationThreshold;

    // 处理到站状态
    handleStationStateMachine(nearestStation.index, nearestStation.distance);

    // 计算到下一站的距离
    const nextStation = currentStations.value[busStatus.value.nextStationIndex];
    if (nextStation) {
        const [nextBdLon, nextBdLat] = wgs84tobd09(nextStation.lon, nextStation.lat);
        const nextStationPoint = turf.point([nextBdLon, nextBdLat]);
        busStatus.value.distanceToNext = turf.distance(currentPoint, nextStationPoint, { units: 'meters' });
    }
};
效果图:
其实上面的数据在实际业务中是后端不会再前端去计算,这里也只是阐述一下业务逻辑,实现一下效果,还有就是实际业务是要接入实时位置更新的,我们需要实时去更新公交车的位置,简单的阐述一下业务,一般的做法是每辆车需要维护一个信号队列,然后逐个去执行队列,这样车辆的延迟是第一个和第二个信号之间的时间差,画了一个逻辑图:
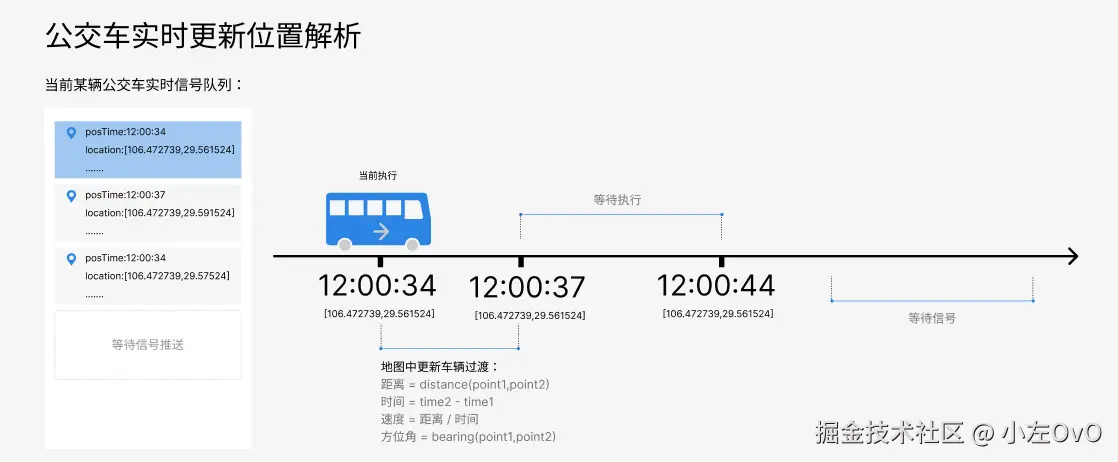
而且实际中实时数据是会抖动的,出现长时间没信号、信号批量涌入、gps信号乱跳这些都会出现,若接入真实 GPS,可对点做卡尔曼等滤波处理,减少抖动,让公交车的行进看起来更自然更流畅一些。
好了,以上就是线路客流、区域客流和实时公交的所有内容了,本人技术十分有限,如有不合理或者错误的地方还望指出