一.插件化的基本介绍
插件化apk并不安装,它是使用在宿主app的组件去加载插件的资源上,它有以下几个好处:
1.解决安装包太大;
2.方法655535;
3.动态使用;
插件化的基本实现:
1.占位式 (采用占坑和标准的方式去加载插件)
2.Hook式
1.合并插件和宿主的dex和res
2.新建loadedApk通过动态选择插件和宿主的loaderApk的方式
二.占位式(插装式)插件化
1.占位式Activity
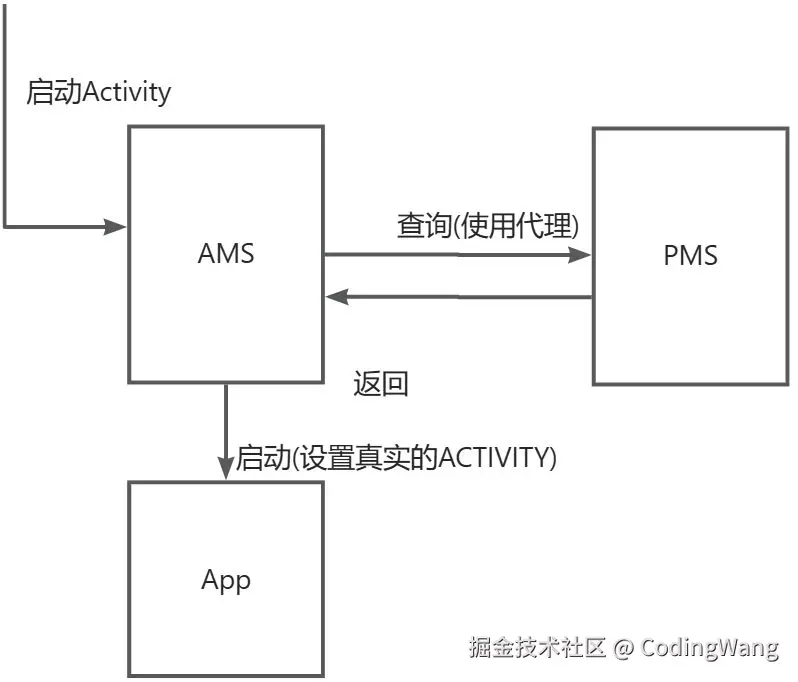
1.插件APK没有安装,没有上下文环境,需要用代理的Activity(占位或叫插装)来加载插件Activity的资源
2.插件Activity的跳转需要依赖宿主的占位Activity来完成入栈出栈的效果。

kotlin
//插件代理(占位)Activity
class ProxyActivity : Activity() {

    //占位的Activity 使用plugin Apk的资源文件
    override fun getResources(): Resources {
        return PluginManager.getInstance(this).resources
    }

    //占位Activity 使用Plugin的class 文件
    override fun getClassLoader(): ClassLoader {
        return PluginManager.getInstance(this).dexClassLoader
    }

    override fun onCreate(savedInstanceState: Bundle?) {
        super.onCreate(savedInstanceState)

        val clzName=intent.getStringExtra("clzName")
        val clz :Class<*> = classLoader.loadClass(clzName)
        val constructor = clz.getConstructor() //获取PluginActivity 构造方法
        val activity: ActivityInterface =
            constructor.newInstance() as ActivityInterface //强转成ActivityInterface
        //注入当前Activity
        activity.insertAppContext(this)
        activity.onCreate(savedInstanceState)

    }

    override fun startActivity(intent: Intent) {
        //接受插件Activity传过来的参数,再用自己去跳转。
        val clz=intent.getStringExtra("clzName")
        println("pluginPath ProxyActivity  startActivity :${clz}")
        val proxyIntent=Intent(this,ProxyActivity::class.java)
        proxyIntent.putExtra("clzName",clz)
        super.startActivity(proxyIntent)

    }
}
2.占位式Service
1.使用占位的Activity去启动占位的Service
2.通过占位的service去执行PluginService中的start方法
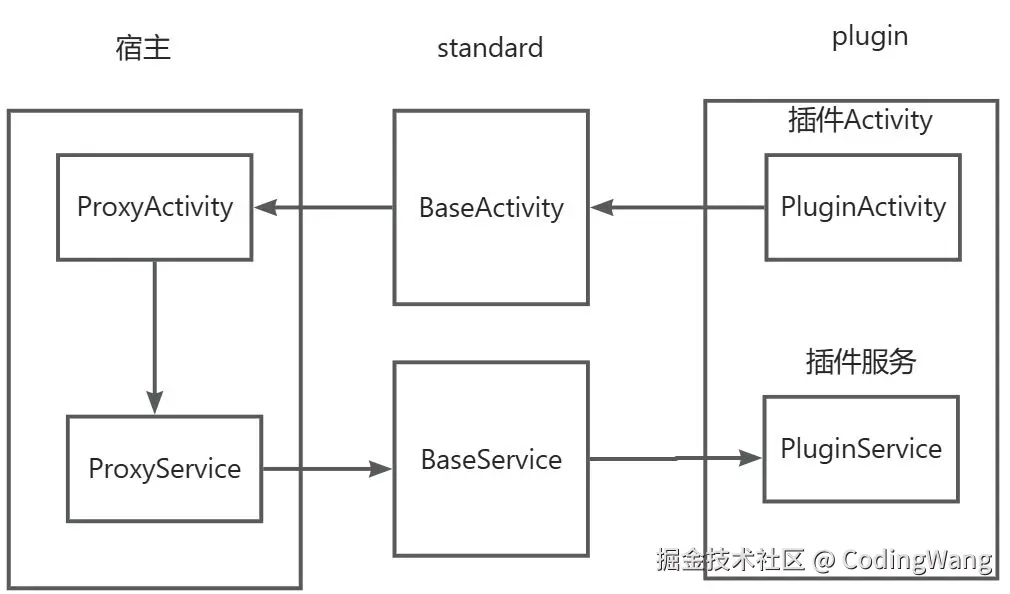
3.占位式广播
流程参考占位的Service。
4.静态广播的注册(Hook方式)
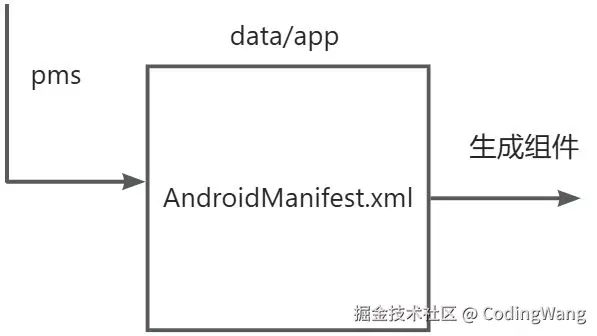
静态广播的注册时机:
设备启动时,app会重新安装,并且解析androidManifest.xml中的组件,然后自动注册;
app安装的时候,会在data/app中放置目录,并且在data/data/pkgName创建所属目录,然后再data/dalvik-cache中创建虚拟器加载指令的目录。所以我们需要关心的是app安装后的扫描的data/app中的目录,系统会解析这个apk下的AndroidManifest.xml的组件,
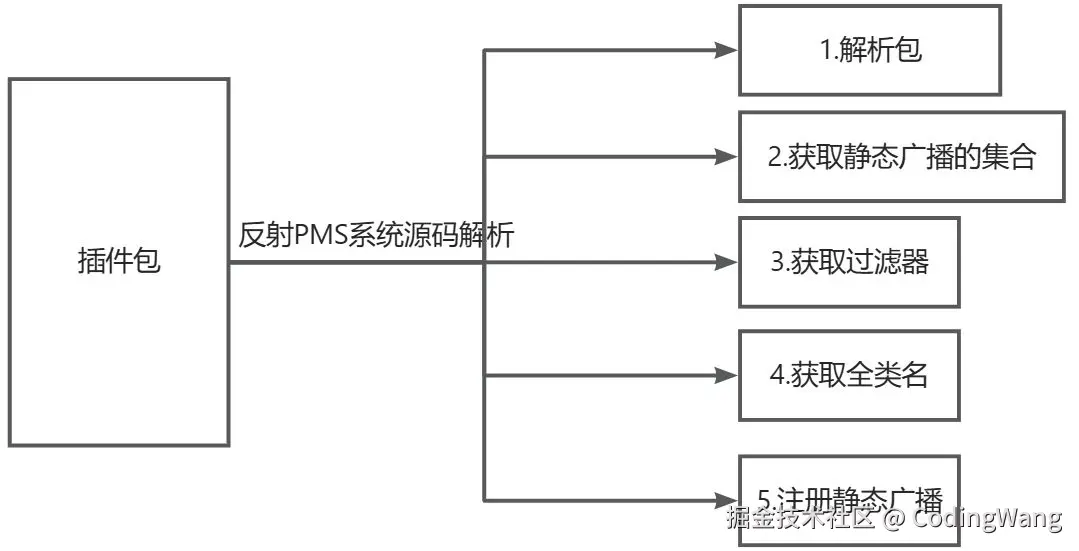
我们看下android11的解析源码:
scala
//1.PackageParser中加载apk的方法
public Package parsePackage(File packageFile, int flags) throws PackageParserException {
    return parsePackage(packageFile, flags, false /* useCaches */);
}

//2.存放Receiver列表
public final static class Package implements Parcelable {
    ...
     public final ArrayList<Activity> receivers = new ArrayList<Activity>(0);
    ...
}
//3.receiver具体的表示
  public final static class Activity extends Component<ActivityIntentInfo> implements Parcelable {


  }
 public static abstract class Component<II extends IntentInfo> {
        @UnsupportedAppUsage
        public final ArrayList<II> intents; //IntentFilter

 }

//5.全类名的获取
//ActivityInfo 持有了manifest的全类名,我们需要反射这个方法
 @UnsupportedAppUsage
    public static final ActivityInfo generateActivityInfo(Activity a, int flags,
            PackageUserState state, int userId) {
        ActivityInfo ai = new ActivityInfo(a.info);

        return ai;
    }
示例代码:
ini
public void pareApk() {

        try {
            File file = new File(Environment.getExternalStorageDirectory() + File.separator + "plugin.apk");
            Class mParser = Class.forName("android.content.pm.PackageParser");
            Object object = mParser.newInstance(); //1.获取packageParser对象

            /**
             *     public Package parsePackage(File packageFile, int flags) throws PackageParserException {
             */
            Method method = mParser.getMethod("parsePackage", File.class, int.class);

            Object objectPackage = method.invoke(object, file, PackageManager.GET_ACTIVITIES); //2.获取到解析的包
            //3获取manifest中的receiver清单文件的list
            Field field = objectPackage.getClass().getDeclaredField("receivers");


            ArrayList arrayList = (ArrayList) field.get(objectPackage);

            Class filterClz = Class.forName("android.content.pm.PackageParser$Component");
            Field intentField = filterClz.getField("intents");
            for (Object receiver : arrayList) {
                //获取intent-filter
                ArrayList<IntentFilter> intents = (ArrayList) intentField.get(receiver);
                //我们还有一个任务,就是要拿到android:name=".StaticReceiver"
                // activityInfo.name; == android:name=".StaticReceiver"
                //分析源码如何拿到ActivityInfo
                Class mPackageUserState = Class.forName("android.content.pm.PackageUserState");
                Class mUserHandle = Class.forName("android.os.UserHandle");
                int userId = (int) mUserHandle.getMethod("getCallingUserId").invoke(null);
                /**
                 *执行此方法,就能拿到ActivityInfo
                 *  public static final ActivityInfo generateActivityInfo(ActivityInfo ai, int flags,
                 *  PackageUserState state, int userId)
                 *
                 */
                Method generateActivityInfoMethod = mParser.getMethod("generateActivityInfo", receiver.getClass(),
                        int.class, mPackageUserState, int.class);
                //执行此方法,拿到ActivityInfo
                ActivityInfo mActivityInfo = (ActivityInfo) generateActivityInfoMethod.invoke(null, receiver,
                        0,
                        mPackageUserState.newInstance(),
                        userId);
                String receiverClassName = mActivityInfo.name; //com.seven.pluginapp.StaticReceiver
                System.out.println("pareApk--->>" + receiverClassName);
                Class mStaticReceiverClass = getDexClassLoader().loadClass(receiverClassName);
                System.out.println("pareApk1--->>" + receiverClassName);
                BroadcastReceiver broadcastReceiver = (BroadcastReceiver) mStaticReceiverClass.newInstance();
                for (IntentFilter intentFilter : intents) {
                    //注册广播
                    context.registerReceiver(broadcastReceiver, intentFilter);

                }
            }

        } catch (Exception e) {
            e.printStackTrace();
        }

    }
三.Hook式插件化
hook可以帮助我们改变系统的某些功能,动态的添加一些功能。
1.Hook初体验
当我们点击按钮时,会去设置监听事件,我们拦截系统view设置的监听事件,为其加盐后再执行后续操作,就实现了简单的钩子操作。
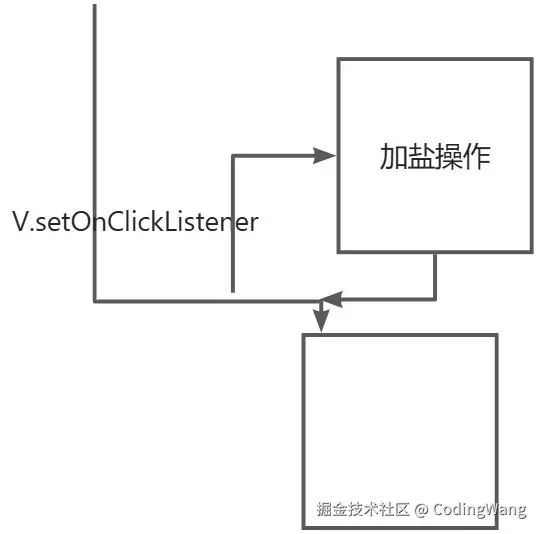
代码示例:我们通过实例化一个OnClickListener动态代理对象,并且通过反射修改源码的ListenerInfo中的OnClickListener为我们动态代理的对象,这样就可以加盐了。
kotlin
/**
     * 动态代理+加反射来hook操作
     * 替换view的OnClickListener 加入自己的操作
     */
fun hookButton(view: Button) {


    //替换Button中的listener 下面是view的设置监听的源码 我们需要用自己的方法设置
    //        public void setOnClickListener(@Nullable OnClickListener l) {
    //            if (!isClickable()) {
    //                setClickable(true);
    //            }
    //            getListenerInfo().mOnClickListener = l;
    //        }
    val listenerInfoClz = Class.forName("android.view.View$ListenerInfo")

    //        ListenerInfo getListenerInfo() {
    //            if (mListenerInfo != null) {
    //                return mListenerInfo;
    //            }
    //            mListenerInfo = new ListenerInfo();
    //            return mListenerInfo;
    //        }
    val listenerInfoObjectMethod = View::class.java.getDeclaredMethod("getListenerInfo")
    listenerInfoObjectMethod.isAccessible=true
    val listenerInfoObject = listenerInfoObjectMethod.invoke(view) //需要ListenerInfo对象
    var listenerInfo: Field =listenerInfoClz.getField("mOnClickListener") //获取默认的属性
    val onClickListener= listenerInfo.get(listenerInfoObject) //需要得到ClickListener对象 也是被代理的对象

    //view.OnClickListener的动态代理
    val proxyOnClickListener = Proxy.newProxyInstance(
        classLoader, arrayOf(OnClickListener::class.java)
    ) { proxy, method, args ->
        //加入自己的逻辑
        view.text = "hook it before click !"
        println("proxy do it-->>>> $args" )
        println("method:$method")
        method.invoke(onClickListener,view)//反射被代理对象的执行onClick方法
    }


    //换成动态代理的对象 当收到点击事件回调onClick事件时,会先执行代理对象的方法
    listenerInfo.set(listenerInfoObject,proxyOnClickListener)

}
2.Hook实现Activity注入
我们启动Activity时需要再Manifest中注册,如果不注册会报错,我们使用Hook技术绕过Manifest的检查,并且再实例化时Hook实例化需要跳转的Activity,从而实现Activity的启动。
代码示例:
ini
@Override
public void onCreate() {
super.onCreate();
try {
hookAms();
} catch (Exception e) {
e.printStackTrace();
}
try {
hookSystemHandler();
} catch (Exception e) {
e.printStackTrace();
}
}
/**
* 绕过清单检测
* @throws Exception
*/
public void hookAms() throws Exception {
//动态代理
Class mIActivityManagerClass = Class. forName("android.app.IActivityManager");
Class mActivityManagerNativeClass2 = Class.forName("android.app.ActivityManagerNative");
Object mIActivityManager = mActivityManagerNativeClass2.getMethod( "getDefault").invoke( null);
Object mIActivityManagerProxy = Proxy.newProxyInstance(
getClassLoader(),
new Class[]{mIActivityManagerClass},//要监听的接口
new AmsInvocationHandler(mIActivityManager));
Class mActivityManagerNativeClass = Class. forName("android.app.ActivityManagerNative");
Field gDefaultField = mActivityManagerNativeClass.getDeclaredField( "gDefault");
gDefaultField.setAccessible(true);//
Object gDefault = gDefaultField. get(null);
//替换点
Class mSingletonClass = Class. forName("android.util.Singleton");
//获取此字段 mInstance
Field mInstanceField = mSingletonClass. getDeclaredField( "mInstance");
mInstanceField.setAccessible(true);//让虚拟机不要检测权限修饰符
//替换
mInstanceField.set(gDefault,mIActivityManagerProxy);//替换是需要gDefault
}
/**
* 2.实例化自己的Activity
* @throws Exception
*/
public void hookSystemHandler() throws Exception {
Field mCallbackFiled = Handler.class.getDeclaredField("mCallback");
mCallbackFiled.setAccessible(true);//
Class mActivityThreadClass = Class.forName("android.app.ActivityThread");
Object mActivityThread = mActivityThreadClass.getMethod("currentActivityThread").invoke(null);
Field mHField = mActivityThreadClass.getDeclaredField("mH");
mHField.setAccessible(true);
//获取真正对象
Handler mH = (Handler) mHField.get(mActivityThread);
mCallbackFiled.set(mH, new ProxyHandlerCallback());//替换增加我们自己的实现代码
}
private class ProxyHandlerCallback implements Handler.Callback {
@Override
public boolean handleMessage(Message msg) {
Log.i("HookApp", "handleMessage: " + msg.what);
if (msg.what == 100) {
Log.i("HookApp", "---->: " + msg.obj.getClass());
try {
Object obj = msg.obj;
//我们要获取之前Hook携带过来的 Proxy
Field intentField = obj.getClass().getDeclaredField("intent");
intentField.setAccessible(true);
//获取intent对象,才能取出携带过来的I action Intent
Intent intent = (Intent) intentField.get(obj);
// actionIntent == TestActivityIntent
Intent actionIntent = intent.getParcelableExtra("oldIntent");
if (actionIntent != null) {
intent.setClass(HookApp.this, HookActivity.class);
intentField.set(obj, actionIntent);//把ProxyActivity 换成 HookActivity
Log.i("HookApp", "---->: SET--->>> " );
}
} catch (Exception e) {
e.printStackTrace();
}
}
return false;
}
}
class AmsInvocationHandler implements InvocationHandler {
private Object iActivityManagerObject;
public AmsInvocationHandler(Object iActivityManagerObject) {
this.iActivityManagerObject = iActivityManagerObject;
}
@Override
public Object invoke(Object proxy, Method method, Object[] args) throws Throwable {
Log.d("HookApp", "AmsInvocationHandler invoke--->>>>>>" + method.getName());
if ("startActivity".contains(method.getName())) {
Intent intent = null;
int index = 0;
for (int i = 0; i < args.length; i++) {
Object arg = args[i];
if (arg instanceof Intent) {
intent = (Intent) args[i]; // 原意图,过不了安检
index = i;
break;
}
}
Log.d("HookApp", "start ProxyActivity--->>>>>>"+index); //使用代理的绕过安检
Intent proxyIntent = new Intent(HookApp.this, ProxyActivity.class);
proxyIntent.putExtra("oldIntent", intent);
args[index] = proxyIntent;
}
return method.invoke(iActivityManagerObject, args);
}
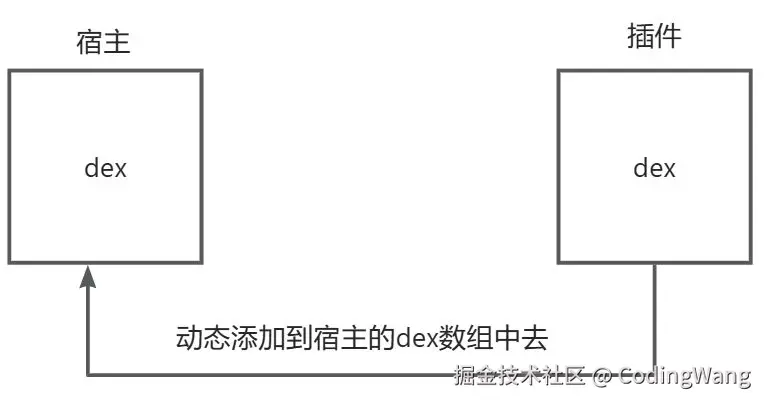
}3.Hook实现插件和宿主dex的合并
1.流程示意图
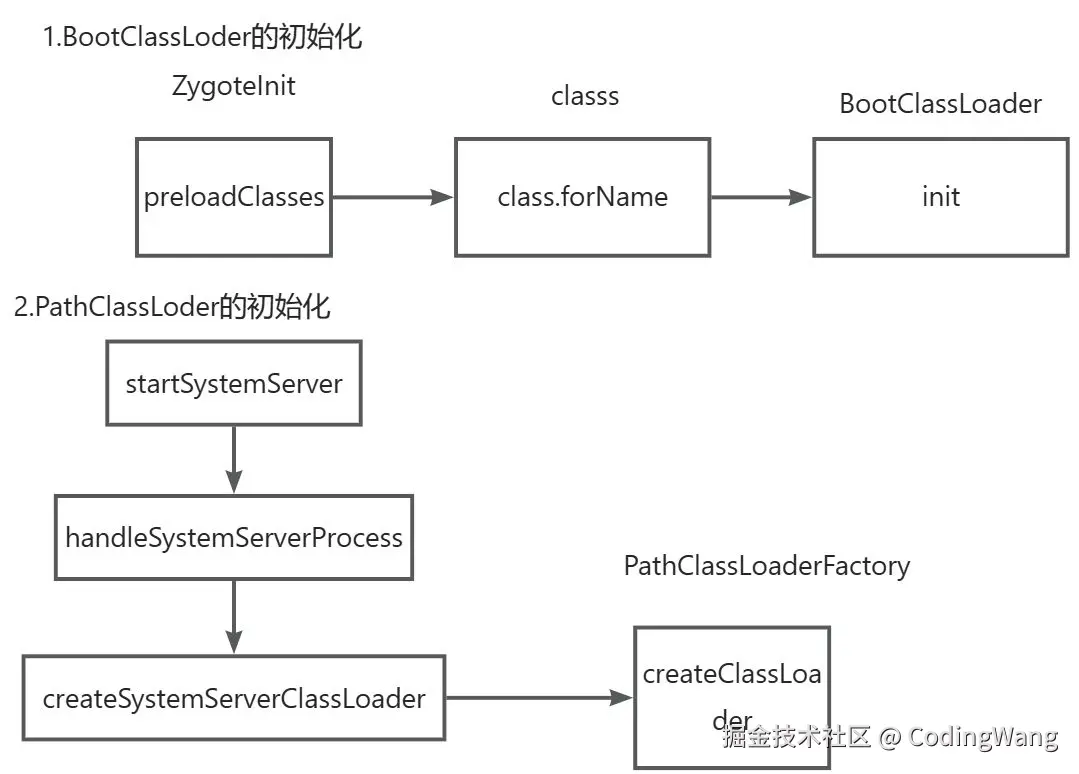
2.dexLoader初始化
BootClassLoader为java的类加载器;
PathClassLoader为android的dex加载器,它的内部设置的parent(并非父类设置的是BootClassLoader)。
3.loadClass流程
BathDexClassLoader是PathClassLoader的父类
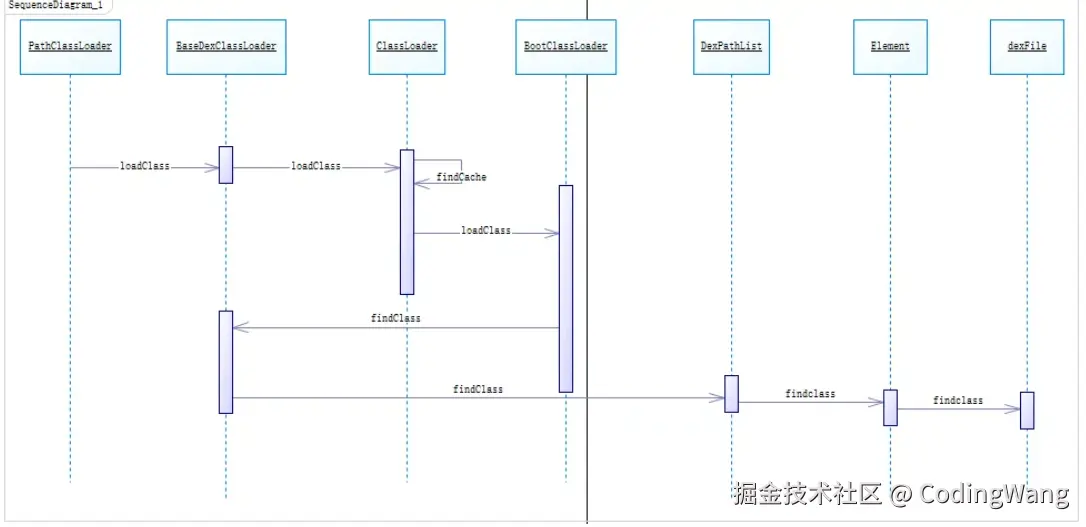
代码示例:hook点为将插件的dex插入的BaseDexClassLoader中的dexPathList中去。
ini
public class HookDexApp extends Application {


    @Override
    public void onCreate() {
        super.onCreate();

        try {
             mergePluginDex();
        } catch (Exception e) {
            e.printStackTrace();
        }
        try {
         mergePluginLayout();
        } catch (Exception e) {
            e.printStackTrace();
        }

    }

    @Override
    public Resources getResources() {
        Log.d("PluginDexManager", "getResources---->>>>:"+resources );
//        return resources == null ? super.getResources() : resources;
        return PluginDexManager.getInstance(this).getResource();
    }

    @Override
    public AssetManager getAssets() {
        Log.d("PluginDexManager", "getAssets---->>>>:"+assetManager );
       // return assetManager == null ? super.getAssets() : assetManager;

        return PluginDexManager.getInstance(this).getAssetManager();
    }

    private String pluginPath() {
        File file = new File(Environment.getExternalStorageDirectory() + File.separator + "pluginCompose.apk");
        System.out.println("composePluginDex:" + file.getPath());
        Log.d("PluginDexManager", "pluginPath---->>>>:" + file.getPath());
        if (!file.exists()) {
            System.out.println("composePluginDex 插件不存在");
            return null;
        }
        return file.getAbsolutePath();
    }

    /**
     * 1.找到宿主的dexElements
     * 2.找到插件的dexElements
     * 3.合并插件的dexElements到宿主中去
     */

    public void mergePluginDex() throws Exception {
        String path = pluginPath();
        if (TextUtils.isEmpty(path)) {
            return;
        }
        //1.获取宿主的dexElements
        PathClassLoader pathClassLoader = (PathClassLoader) getClassLoader();//获取的就是pathClassLoader
        Class<?> baseDexClassLoader = Class.forName("dalvik.system.BaseDexClassLoader");

        Field pathListField = baseDexClassLoader.getDeclaredField("pathList");//pathList的属性
        pathListField.setAccessible(true);
        Object mDexPathList = pathListField.get(pathClassLoader);//获取patList

        Field dexelementField = mDexPathList.getClass().getDeclaredField("dexElements"); //获取它的dexElements
        dexelementField.setAccessible(true);
        Object dexElements = dexelementField.get(mDexPathList);

        //2.获取插件的dexElements
        DexClassLoader dexClzLoaderPlugin = new DexClassLoader(path,
                getDir("plugin", Context.MODE_PRIVATE).getAbsolutePath(), null,
                getClassLoader());
        Class<?> baseDexClassLoaderPlugin = Class.forName("dalvik.system.BaseDexClassLoader");
        Field pathListFieldPlugin = baseDexClassLoaderPlugin.getDeclaredField("pathList");
        pathListFieldPlugin.setAccessible(true);
        Object objPathListPlugin = pathListFieldPlugin.get(dexClzLoaderPlugin);//获取patList
        Field dexElementPluginField = objPathListPlugin.getClass().getDeclaredField("dexElements"); //DexPathList中的获取它的dexElements
        dexElementPluginField.setAccessible(true);
        Object dexElementsPlugin = dexElementPluginField.get(objPathListPlugin);

        //3.合并
        //根据类型创建数组
        int mainLen = Array.getLength(dexElements);
        int pluginLen = Array.getLength(dexElementsPlugin);
        int mergeLen = mainLen + pluginLen;
        Object newElements = Array.newInstance(dexElements.getClass().getComponentType(),
                mergeLen);
        for (int i = 0; i < mergeLen; i++) {
            if (i<mainLen) {
                //合并数组
                Array.set(newElements, i, Array.get(dexElements, i));
            } else {
                //合并插件
                Array.set(newElements, i, Array.get(dexElementsPlugin, i - mainLen));
            }
        }
        Log.d("PluginDexManager", "pluginLen---->>>>:" + pluginLen+",mainLen:"+mainLen);


        Field dexelementField2 = mDexPathList.getClass().getDeclaredField("dexElements"); //获取它的dexElements
        dexelementField2.setAccessible(true);
        //设置到宿主中去
        dexelementField2.set(mDexPathList, newElements);

        Log.d("PluginDexManager", "set---->>>>newElements: success" );

    }

    private Resources resources;
    private AssetManager assetManager;

    /**
     * @throws Exception
     */
    public void mergePluginLayout() throws Exception {
        String pluginPath = pluginPath();
        if (TextUtils.isEmpty(pluginPath)) {
            return;
        }
        assetManager=AssetManager.class.newInstance();
        //执行此 public final int addAssetPath(String path)方法,才能把插件的路径添加进去
        Method method = assetManager.getClass().getDeclaredMethod("addAssetPath", String.class);//类类型
        method.setAccessible(true);
        method.invoke(assetManager, pluginPath);
        Resources r = getResources();//到的是宿主的配置信息
        //实例化此方法 final StringBlock[] ensureStringBlocks()
        Method ensureStringBlocksMethod = assetManager.getClass().getDeclaredMethod("ensureStringBlocks");
        ensureStringBlocksMethod.setAccessible(true);
        ensureStringBlocksMethod.invoke(assetManager);//执行了ensureStringBlocksstring.xmlcolor.xml anim.xml被
        //特殊:专门加载插件资源
        resources = new Resources(assetManager, r.getDisplayMetrics(), r.getConfiguration());

    }
插件中使用宿主的application的asset和resource
kotlin
open class BaseActivity:AppCompatActivity() {

    //使用宿主合并的的asset
    override fun getAssets(): AssetManager {
        if ((application!=null&&application.assets!=null)) {
            return application.assets
        }
        return super.getAssets()
    }
    //使用宿主合并的的resource
    override fun getResources(): Resources {
        if ((application!=null&&application.resources!=null)) {
            return application.resources
        }
        return super.getResources()
    }
}
四.LoadedApk方式实现插件化
ActivityThread启动Activity流程解析
csharp
 case LAUNCH_ACTIVITY: {
                    Trace.traceBegin(Trace.TRACE_TAG_ACTIVITY_MANAGER, "activityStart");
                        //Activity的跳转记录
                     final ActivityClientRecord r = (ActivityClientRecord) msg.obj;
                    //获取LoadedApk
                    r.packageInfo = getPackageInfoNoCheck(
                            r.activityInfo.applicationInfo, r.compatInfo);
                    handleLaunchActivity(r, null, "LAUNCH_ACTIVITY");
                    Trace.traceEnd(Trace.TRACE_TAG_ACTIVITY_MANAGER);
 }

    //从缓存中取,没有则新建一个
  private LoadedApk getPackageInfo(ApplicationInfo aInfo, CompatibilityInfo compatInfo,
            ClassLoader baseLoader, boolean securityViolation, boolean includeCode,
            boolean registerPackage) {
        final boolean differentUser = (UserHandle.myUserId() != UserHandle.getUserId(aInfo.uid));
        synchronized (mResourcesManager) {
            WeakReference<LoadedApk> ref;
            if (differentUser) {
                // Caching not supported across users
                ref = null;
            } else if (includeCode) {
                ref = mPackages.get(aInfo.packageName);
            } else {
                ref = mResourcePackages.get(aInfo.packageName);
            }

            LoadedApk packageInfo = ref != null ? ref.get() : null;
            if (packageInfo == null || (packageInfo.mResources != null
                    && !packageInfo.mResources.getAssets().isUpToDate())) {
                if (localLOGV) Slog.v(TAG, (includeCode ? "Loading code package "
                        : "Loading resource-only package ") + aInfo.packageName
                        + " (in " + (mBoundApplication != null
                                ? mBoundApplication.processName : null)
                        + ")");
                packageInfo =
                    new LoadedApk(this, aInfo, compatInfo, baseLoader,
                            securityViolation, includeCode &&
                            (aInfo.flags&ApplicationInfo.FLAG_HAS_CODE) != 0, registerPackage);

                if (mSystemThread && "android".equals(aInfo.packageName)) {
                    packageInfo.installSystemApplicationInfo(aInfo,
                            getSystemContext().mPackageInfo.getClassLoader());
                }

                if (differentUser) {
                    // Caching not supported across users
                } else if (includeCode) {
                    mPackages.put(aInfo.packageName,
                            new WeakReference<LoadedApk>(packageInfo));
                } else {
                    mResourcePackages.put(aInfo.packageName,
                            new WeakReference<LoadedApk>(packageInfo));
                }
            }
            return packageInfo;
        }
    }
通过流程分析,我们可以通过新建一个LoadedApk然后注入到ActivityThread的缓存中去,并且我们可以在此之前通过包名的控制当前使用的LoadedApk来决定运行时使用的LoadedApk,示例代码如下:
ini
private class ProxyHandlerCallback implements Handler.Callback {
        private Handler mH;
        public ProxyHandlerCallback(Handler mH) {
            this.mH = mH;
        }

        @Override
        public boolean handleMessage(Message msg) {

            Log.i("HookApp", "handleMessage: " + msg.what);

            if (msg.what == 100) {

                Log.i("HookApp", "---->: " + msg.obj.getClass());
                try {
                    Object obj = msg.obj;
                    //我们要获取之前Hook携带过来的 Proxy
                    Field intentField = obj.getClass().getDeclaredField("intent");
                    intentField.setAccessible(true);
                    //获取intent对象,才能取出携带过来的I action Intent
                    Intent intent = (Intent) intentField.get(obj);
                    // actionIntent == TestActivityIntent
                    Intent actionIntent = intent.getParcelableExtra("oldIntent");
                    if (actionIntent != null) {

                        /***
                         *我们在以下代码中,对插件和宿主进行区分
                         */
                        Field activityInfoField = obj.getClass().getDeclaredField("activityInfo");
                        activityInfoField.setAccessible(true);//授权
                        ActivityInfo activityInfo = (ActivityInfo) activityInfoField.get(obj);
                        //什么时候加载插件的?
                        if (actionIntent.getPackage() == null) {//证明是插件
                            System.out.println("start plugin --->>>>");
                            activityInfo.applicationInfo.packageName = actionIntent.getComponent().getPackageName();
                            System.out.println("start plugin --->>>>" + actionIntent.getComponent().getPackageName());
                            hookGetPackageInfo();
                        } else {//宿主
                            System.out.println("start home --->>>>");
                            activityInfo.applicationInfo.packageName = actionIntent.getPackage();

                        }
                        //实例化自己的真实的
                        intentField.set(obj, actionIntent);//把ProxyActivity 换成真正的
                        Log.i("HookApp", "---->: SET--->>> ");
                    }
                } catch (Exception e) {
                    e.printStackTrace();

                }
            }
            mH.handleMessage(msg);
            // 让系统继续正常往下执行
            // return false; // 系统就会往下执行
            return true; // 系统不会往下执行

        }
    }


/**
     * 自己创造一个LoadedApk.ClassLoader 添加到 mPackages,此LoadedApk 专门用来加载插件里面的 class
     */
    private void customLoadedApkAction() throws Exception {
        File pluginDirFile = getDir("plugin", Context.MODE_PRIVATE);
        File file = new File( pluginDirFile.getAbsoluteFile() + File.separator + "pluginLoaded.apk");
        if (!file.exists()) {
            throw new FileNotFoundException("插件包不存在..." + file.getAbsolutePath());
        }
        String pulginPath = file.getAbsolutePath();


        // mPackages 添加 自定义的LoadedApk
        // final ArrayMap<String, WeakReference<LoadedApk>> mPackages 添加自定义LoadedApk
        Class mActivityThreadClass = Class.forName("android.app.ActivityThread");


        // 执行此方法 public static ActivityThread currentActivityThread() 拿到 ActivityThread对象
        Object mActivityThread = mActivityThreadClass.getMethod("currentActivityThread").invoke(null);


        Field mPackagesField = mActivityThreadClass.getDeclaredField("mPackages");
        mPackagesField.setAccessible(true);
        // 拿到mPackages对象
        Object mPackagesObj = mPackagesField.get(mActivityThread);


        Map mPackages = (Map) mPackagesObj;


        // 如何自定义一个 LoadedApk,系统是如何创造LoadedApk的,我们就怎么去创造LoadedApk
        // 执行此 public final LoadedApk getPackageInfoNoCheck(ApplicationInfo ai, CompatibilityInfo compatInfo)
        Class mCompatibilityInfoClass = Class.forName("android.content.res.CompatibilityInfo");
        Field defaultField = mCompatibilityInfoClass.getDeclaredField("DEFAULT_COMPATIBILITY_INFO");
        defaultField.setAccessible(true);
        Object defaultObj = defaultField.get(null);


        /**
         * ApplicationInfo 如何获取, APK解析源码分析
         */
        ApplicationInfo applicationInfo = getApplicationInfoAction();


        Method mLoadedApkMethod = mActivityThreadClass.getMethod("getPackageInfoNoCheck", ApplicationInfo.class, mCompatibilityInfoClass); // 类类型
        // 执行 才能拿到 LoedApk 对象
        Object mLoadedApk = mLoadedApkMethod.invoke(mActivityThread, applicationInfo, defaultObj);


        // 自定义加载器 加载插件
        // String dexPath, String optimizedDirectory, String librarySearchPath, ClassLoader parent


        File fileDir = getDir("pulginPathDir", Context.MODE_PRIVATE);


        // 自定义 加载插件的 ClassLoader
        ClassLoader classLoader = new PluginClassLoader(pulginPath,fileDir.getAbsolutePath(), null, getClassLoader());


        Field mClassLoaderField = mLoadedApk.getClass().getDeclaredField("mClassLoader");
        mClassLoaderField.setAccessible(true);
        mClassLoaderField.set(mLoadedApk, classLoader); // 替换 LoadedApk 里面的 ClassLoader


        // 添加自定义的 LoadedApk 专门加载 插件里面的 class


        // 最终的目标 mPackages.put(插件的包名,插件的LoadedApk);
        WeakReference weakReference = new WeakReference(mLoadedApk); // 放入 自定义的LoadedApk --》 插件的
        mPackages.put(applicationInfo.packageName, weakReference); // 增加了我们自己的LoadedApk
    }


    /**
     * 获取 ApplicationInfo 为插件服务的
     * @return
     * @throws
     */
    private ApplicationInfo getApplicationInfoAction() throws Exception {
        // 执行此public static ApplicationInfo generateApplicationInfo方法,拿到ApplicationInfo
        Class mPackageParserClass = Class.forName("android.content.pm.PackageParser");


        Object mPackageParser = mPackageParserClass.newInstance();


        // generateApplicationInfo方法的类类型
        Class $PackageClass = Class.forName("android.content.pm.PackageParser$Package");
        Class mPackageUserStateClass = Class.forName("android.content.pm.PackageUserState");


        Method mApplicationInfoMethod = mPackageParserClass.getMethod("generateApplicationInfo",$PackageClass,
                int.class, mPackageUserStateClass);


        File dirFile = getDir("plugin", Context.MODE_PRIVATE);
        File file = new File(dirFile.getAbsoluteFile() + File.separator + "pluginLoaded.apk");
        String pulginPath = file.getAbsolutePath();


        // 执行此public Package parsePackage(File packageFile, int flags)方法,拿到 Package
        // 获得执行方法的对象
        Method mPackageMethod = mPackageParserClass.getMethod("parsePackage", File.class, int.class);
        Object mPackage = mPackageMethod.invoke(mPackageParser, file, PackageManager.GET_ACTIVITIES);


        // 参数 Package p, int flags, PackageUserState state
        ApplicationInfo applicationInfo = (ApplicationInfo)
                mApplicationInfoMethod.invoke(mPackageParser, mPackage, 0, mPackageUserStateClass.newInstance());


        // 获得的 ApplicationInfo 就是插件的 ApplicationInfo
        // 我们这里获取的 ApplicationInfo
        // applicationInfo.publicSourceDir = 插件的路径;
        // applicationInfo.sourceDir = 插件的路径;
        applicationInfo.publicSourceDir = pulginPath;
        applicationInfo.sourceDir = pulginPath;
        return applicationInfo;
    }

    /**
     * 自定义classLoader去加载插件
     */
    static class PluginClassLoader extends DexClassLoader {
        /**
         * @param dexPath
         * @param optimizedDirectory
         * @param librarySearchPath
         * @param parent
         */
        public PluginClassLoader(String dexPath, String optimizedDirectory, String librarySearchPath, ClassLoader parent) {
            super(dexPath, optimizedDirectory, librarySearchPath, parent);

        }
    }


    // Hook 拦截此 getPackageInfo 做自己的逻辑
    private void hookGetPackageInfo() {
        try {
            // sPackageManager 替换  我们自己的动态代理
            Class mActivityThreadClass = Class.forName("android.app.ActivityThread");
            Field sCurrentActivityThreadField = mActivityThreadClass.getDeclaredField("sCurrentActivityThread");
            sCurrentActivityThreadField.setAccessible(true);


            Field sPackageManagerField = mActivityThreadClass.getDeclaredField("sPackageManager");
            sPackageManagerField.setAccessible(true);
            final Object packageManager = sPackageManagerField.get(null);


            /**
             * 动态代理
             */
            Class mIPackageManagerClass = Class.forName("android.content.pm.IPackageManager");


            Object mIPackageManagerProxy = Proxy.newProxyInstance(getClassLoader(),


                    new Class[]{mIPackageManagerClass}, // 要监听的接口


                    new InvocationHandler() {
                        @Override
                        public Object invoke(Object proxy, Method method, Object[] args) throws Throwable {
                            if ("getPackageInfo".equals(method.getName())) {
                                // 如何才能绕过 PMS, 欺骗系统
                                // pi != null
                                return new PackageInfo(); // 成功绕过 PMS检测
                            }
                            // 让系统正常继续执行下去
                            return method.invoke(packageManager, args);
                        }
                    });


            // 替换  狸猫换太子   换成我们自己的 动态代理
            sPackageManagerField.set(null, mIPackageManagerProxy);


        } catch (Exception e) {
            e.printStackTrace();
        }
    }