基于 Cesium 的流体体渲染技术实现
整体渲染流程
项目采用多通道渲染架构,通过 GPU 计算实现流体模拟:
makefile
地形捕获阶段:
正交相机 → 深度渲染 → ENU坐标转换 → 高度图纹理

流体计算阶段(循环执行):
BufferA (地形+水位计算)
    ↓
BufferB (流出量计算1)
    ↓
BufferC (水位更新)
    ↓
BufferD (流出量计算2)
    ↓
循环回 BufferA

最终渲染阶段:
体渲染Pass → Ray Marching → 深度混合 → 屏幕输出
核心类设计
1. FluidRenderer - 流体渲染器
流体渲染的主控类,负责整个渲染生命周期管理。
配置参数:
javascript
const config = {
    resolution: new Cesium.Cartesian2(1024, 1024),  // 计算纹理分辨率
    dimensions: new Cesium.Cartesian3(10000, 10000, 1000), // 流体体积尺寸(米)
    heightRange: { min: 0, max: 1000 },  // 高度归一化范围
    fluidParams: new Cesium.Cartesian4(0.995, 0.25, 0.0001, 0.1),
    customParams: new Cesium.Cartesian4(10, 20, 3, 0),
    lonLat: [120.2099, 30.1365],  // 流体中心经纬度
}
关键方法实现思路:
_generateHeightMapTexture() - 地形高度图生成
- 创建正交投影相机俯视地形
- 拦截 Cesium 地形渲染命令
- 修改片段着色器输出局部坐标高度
- 将深度信息转换为高度纹理
_createComputePasses() - 计算通道初始化
- 创建 4 个浮点纹理作为双缓冲
- 配置每个计算 Pass 的 Uniform 映射
- 设置纹理依赖关系形成计算链
2. CustomPrimitive - 自定义渲染原语
封装 Cesium 的底层渲染命令,支持两种命令类型:
javascript
// 计算命令 - 用于流体模拟计算
new CustomPrimitive({
    commandType: 'Compute',
    fragmentShaderSource: shaderSource,
    uniformMap: uniforms,
    outputTexture: targetTexture
})

// 绘制命令 - 用于最终体渲染
new CustomPrimitive({
    commandType: 'Draw',
    geometry: boxGeometry,
    vertexShaderSource: vs,
    fragmentShaderSource: fs,
    uniformMap: uniforms,
    modelMatrix: transformMatrix
})
核心逻辑:
javascript
createCommand(context) {
    switch (this.commandType) {
        case 'Compute':
            return new Cesium.ComputeCommand({
                fragmentShaderSource: this.fragmentShaderSource,
                uniformMap: this.uniformMap,
                outputTexture: this.outputTexture
            });
        case 'Draw':
            return new Cesium.DrawCommand({
                vertexArray: VertexArray.fromGeometry(...),
                shaderProgram: ShaderProgram.fromCache(...),
                renderState: RenderState.fromCache(...)
            });
    }
}
流体模拟算法
物理模型
采用基于高度场的浅水方程 (Shallow Water Equations) 简化模型:
状态变量:
h: 地形高度d: 水深f: 流出量 (四方向: 右/上/左/下)
计算流程:
- 流出量计算 (BufferB/BufferD)
glsl
float computeOutFlowDir(vec2 centerHeight, ivec2 pos) {
    vec2 dirHeight = readHeight(pos);
    // 计算水位差 (地形高度 + 水深)
    return max(0.0, (centerHeight.x + centerHeight.y) - (dirHeight.x + dirHeight.y));
}

vec4 nOutFlow;
nOutFlow.x = computeOutFlowDir(height, p + ivec2( 1,  0));  // 向右
nOutFlow.y = computeOutFlowDir(height, p + ivec2( 0,  1));  // 向上
nOutFlow.z = computeOutFlowDir(height, p + ivec2(-1,  0));  // 向左
nOutFlow.w = computeOutFlowDir(height, p + ivec2( 0, -1));  // 向下

// 时间积分: 新流出量 = 衰减 * 旧流出量 + 强度 * 新计算值
nOutFlow = fluidParam.x * oOutFlow + fluidParam.y * nOutFlow;- 水位更新 (BufferA/BufferC)
glsl
// 计算总流出量
float totalOutFlow = OutFlow.x + OutFlow.y + OutFlow.z + OutFlow.w;

// 计算总流入量 (读取邻居的流出量)
float totalInFlow = 0.0;
totalInFlow += readOutFlow(p + ivec2( 1,  0)).z;  // 右侧流向我
totalInFlow += readOutFlow(p + ivec2( 0,  1)).w;  // 上方流向我
totalInFlow += readOutFlow(p + ivec2(-1,  0)).x;  // 左侧流向我
totalInFlow += readOutFlow(p + ivec2( 0, -1)).y;  // 下方流向我

// 更新水深
waterDept = height.y - totalOutFlow + totalInFlow;
水源添加机制
通过点击地形添加水源,坐标转换流程:
javascript
addWaterSource(cartesian) {
    // 1. 世界坐标转局部 ENU 坐标
    const center = Cesium.Cartesian3.fromDegrees(lon, lat, 0);
    const enuMatrix = Cesium.Transforms.eastNorthUpToFixedFrame(center);
    const localMat4 = Cesium.Matrix4.inverse(enuMatrix, new Cesium.Matrix4());
    const localPos = Cesium.Matrix4.multiplyByPoint(localMat4, cartesian, ...);

    // 2. 局部坐标转纹理 UV (0-1)
    const u = (localPos.x + halfX) / dimensions.x;
    const v = 1.0 - ((localPos.y + halfY) / dimensions.y);

    // 3. UV 转像素坐标
    const pixelX = u * resolution.x;
    const pixelY = v * resolution.y;
}
在着色器中添加水源:
glsl
if (waterSourcePos.x >= 0.0 && waterSourceAmount > 0.0) {
    float dist = distance(gl_FragCoord.xy, waterSourcePos);
    if (dist < waterSourceRadius) {
        waterDept += waterSourceAmount;
    }
}
体渲染实现
Ray Marching 算法
采用 Ray Marching 技术在三维体积中追踪光线:
glsl
vec3 Render(in vec3 ro, in vec3 rd) {
// 1. 射线与包围盒求交
vec2 ret = boxIntersection(ro, rd, boxSize, n);
if(ret.x <= 0.0) discard;
vec3 pi = ro + rd * ret.x; // 入射点
// 2. 追踪地形表面
float tt = ret.x;
for (int i = 0; i < 80; i++) {
vec3 p = ro + rd * tt;
float h = p.y - getHeight(p).x; // 当前高度 - 地形高度
if (h < 0.0002 || tt > ret.y) break;
tt += h * 0.1; // 步进距离自适应
}
// 3. 追踪水面
float wt = ret.x;
for (int i = 0; i < 80; i++) {
vec3 p = ro + rd * wt;
float h = p.y - getHeight(p).y; // 当前高度 - 水面高度
if (h < 0.0002 || wt > min(tt, ret.y)) break;
wt += h * 0.1;
}
return finalColor;
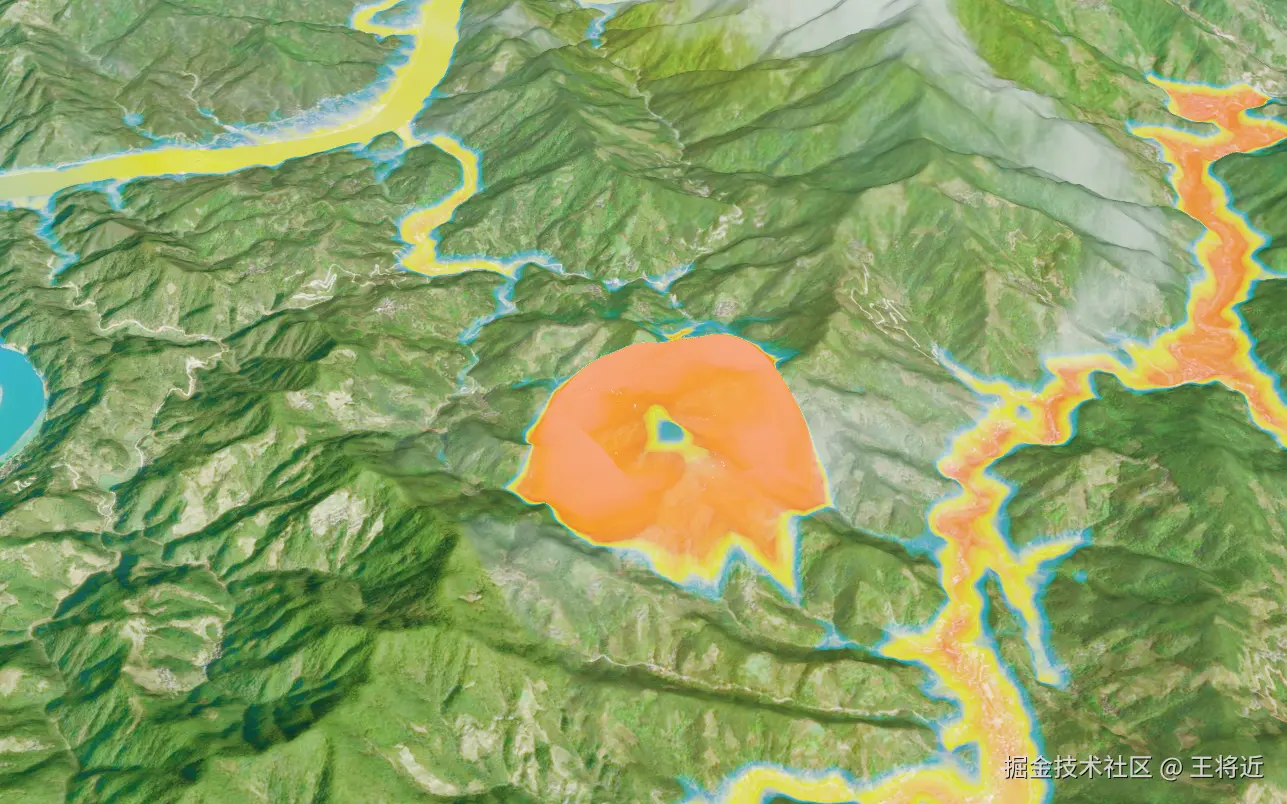
}水深可视化
根据水深映射不同颜色:
glsl
float normalizedDepth = clamp(dist / 0.05, 0.0, 1.0);
vec3 depthColor;

if (normalizedDepth > 0.8) {
    // 最深: 红色
    depthColor = mix(vec3(1.0, 0.35, 0.0), vec3(1.0, 0.05, 0.0), ...);
} else if (normalizedDepth > 0.55) {
    // 中深: 黄色
    depthColor = mix(vec3(1.0, 1.0, 0.0), vec3(1.0, 0.3, 0.0), ...);
} else if (normalizedDepth > 0.25) {
    // 中浅: 蓝色
    depthColor = mix(vec3(0.0, 0.4, 1.0), vec3(1.0, 1.0, 0.0), ...);
} else {
    // 最浅: 绿色
    depthColor = mix(vec3(0.0, 1.0, 0.4), vec3(0.0, 0.4, 1.0), ...);
}

// 应用雾效果混合
tc = applyFog(tc, depthColor, dist * customParam.x);
地形高度图捕获
着色器拦截技术
通过修改 Cesium 地形渲染着色器来捕获高度信息:
javascript
_processHeightMapShaders() {
    const enuMatrix = Cesium.Transforms.eastNorthUpToFixedFrame(
        Cesium.Cartesian3.fromDegrees(...lonLat, 0)
    );
    this._inverseEnuMatrix = Cesium.Matrix4.inverse(enuMatrix, ...);

    const commands = this._getDepthRenderCommands();
    commands.forEach(command => {
        command.uniformMap.u_inverseEnuMatrix = () => this._inverseEnuMatrix;
        command.shaderProgram = this._getDerivedShaderProgram(...);
    });
}
着色器修改:
glsl
// 原始主函数重命名
void czm_heightMap_main() {
    // ... 原始地形渲染逻辑
}

// 新主函数
uniform mat4 u_inverseEnuMatrix;
void main() {
    czm_heightMap_main();

    // 转换到局部 ENU 坐标
    vec3 posMC = (u_inverseEnuMatrix * vec4(v_positionMC, 1.0)).xyz;

    // 输出高度到纹理 R 通道
    out_FragColor = vec4(posMC.z, out_FragColor.gb, 1.0);
}
正交相机配置
创建俯视地形的正交投影相机:
javascript
_createOrthographicCamera() {
    const camera = new Cesium.Camera(scene);
    camera.frustum = new Cesium.OrthographicOffCenterFrustum();

    const frustum = camera.frustum;
    frustum.near = 0.01;
    frustum.far = dimensions.z * 2;
    frustum.left = -dimensions.x / 2;
    frustum.right = dimensions.x / 2;
    frustum.bottom = -dimensions.y / 2;
    frustum.top = dimensions.y / 2;

    // 相机位置: 中心点上方
    const offset = Cesium.Cartesian3.multiplyByScalar(dir, -frustum.far, ...);
    camera.position = Cesium.Cartesian3.add(center, offset, ...);
    camera.direction = dir;  // 向下

    return camera;
}
大气散射后处理
实现基于物理的大气散射效果:
Rayleigh 散射
glsl
float rayleigh_phase_func(float mu) {
    return 3. * (1. + mu*mu) / (16. * PI);
}

const vec3 betaR = vec3(5.5e-6, 13.0e-6, 22.4e-6);  // Rayleigh 散射系数
const float hR = 10e3;  // Rayleigh 尺度高度
Mie 散射
glsl
float henyey_greenstein_phase_func(float mu) {
    const float g = 0.76;  // 各向异性参数
    return (1. - g*g) / ((4. * PI) * pow(1. + g*g - 2.*g*mu, 1.5));
}

const vec3 betaM = vec3(21e-6);  // Mie 散射系数
const float hM = 3.8e3;  // Mie 尺度高度
Ray Marching 积分
glsl
vec4 get_incident_light(ray_t ray) {
    float march_step = (ray_length.y - ray_length.x) / float(num_samples);

    for (int i = 0; i < num_samples; i++) {
        vec3 s = ray.origin + ray.direction * march_pos;
        float height = length(s) - 6360e3;

        // 计算当前点的散射贡献
        float hr = exp(-height / hR) * march_step;
        float hm = exp(-height / hM) * march_step;

        // 累积光学深度
        optical_depthR += hr;
        optical_depthM += hm;

        // 计算光线到太阳的透射率
        bool overground = get_sun_light(light_ray, ...);
        if (overground) {
            vec3 attenuation = exp(-tau);
            sumR += hr * attenuation;
            sumM += hm * attenuation;
        }
    }

    return vec4(sumR * phaseR * betaR + sumM * phaseM * betaM, alpha);
}
性能优化策略
1. 纹理分辨率控制
javascript
// 降低计算纹理分辨率
const resolution = new Cesium.Cartesian2(512, 512);  // 从 1024 降到 512
2. Ray Marching 步数优化
glsl
// 根据距离自适应步进
for (int i = 0; i < 40; i++) {  // 从 80 降到 40
    tt += h * 0.2;  // 增大步进系数从 0.1 到 0.2
}
3. 计算频率控制
javascript
_startRenderLoop() {
    this.viewer.scene.postRender.addEventListener(() => {
        this._frameCount += this.config.timeStep;  // 控制计算速度
    });
}
调试技巧
可视化中间结果
glsl
// 查看高度图
out_FragColor = vec4(vec3(texture(heightMap, uv).r), 1.0);

// 查看水深
vec2 h = getHeight(p);
out_FragColor = vec4(0.0, 0.0, h.y * 10.0, 1.0);

// 查看流出量
vec4 flow = readOutFlow(p);
out_FragColor = vec4(flow.xy, 0.0, 1.0);
性能监控
javascript
viewer.scene.debugShowFramesPerSecond = true;  // 显示 FPS
viewer.resolutionScale = 1.0;  // 渲染分辨率缩放
viewer.scene.msaaSamples = 4;  // MSAA 抗锯齿
使用示例
初始化流体渲染器
javascript
const waterFluid = new FluidRenderer(viewer, {
    lonLat: [lon, lat],
    width: 1024,
    height: 1024,
    dimensions: new Cesium.Cartesian3(10000, 10000, 1000),
    minHeight: 0,
    maxHeight: 1000
});
添加交互控制
javascript
const viewModel = {
    param1: 10,   // 雾密度
    param2: 20,   // 高光混合
    param3: 3,    // 光强
};

function updateParam() {
    waterFluid.config.customParams.x = Number(viewModel.param1);
    waterFluid.config.customParams.y = Number(viewModel.param2);
    waterFluid.config.customParams.z = Number(viewModel.param3);
}

Cesium.knockout.track(viewModel);
Cesium.knockout.applyBindings(viewModel, toolbar);
点击添加水源
javascript
clickHandler.setInputAction((movement) => {
    let cartesian = viewer.scene.pickPosition(movement.position);
    if (!cartesian) return;

    waterFluid.addWaterSource(cartesian);
}, Cesium.ScreenSpaceEventType.LEFT_CLICK);
技术要点总结
- 坐标系统转换: 世界坐标 → ENU局部坐标 → 纹理UV → 像素坐标
- 双缓冲技术: 使用 4 个纹理实现 Ping-Pong 缓冲
- 着色器拦截: 通过 ShaderCache 修改 Cesium 内部着色器
- 体渲染优化: 自适应步进距离提高 Ray Marching 效率
- 物理模拟: 基于高度场的流体力学简化模型