在 Flutter 开发桌面端应用中,我们经常需要在一个滚动列表(如 ListView、GridView 或 Wrap)中让用户批量选择多个项目。传统的做法是点击每个项目逐一选中,或使用"全选"按钮,但这在项目数量多、布局密集的场景下体验不佳。
flutter_drag_selector 正是为解决这一痛点而生的轻量级 Flutter 插件。它让你像在桌面系统中用鼠标框选文件一样,通过拖拽鼠标(或手指)划出一个区域,自动选中该区域内的所有子组件,大幅提升交互效率。
✨ 核心功能概览
- 拖拽框选:按住鼠标左键(或触摸屏长按)并拖动,实时绘制一个半透明选择框。
- 自动识别 :自动检测拖拽区域内所有被
SelectableItem包裹的子组件,并动态选中/取消选中。 - 可定制:支持自定义选择区域的样式(颜色、圆角、边框)、选中状态回调、滚动容器控制等。
🛠️ 如何使用?
1. 添加依赖
在你的 pubspec.yaml 文件中添加:
yaml
dependencies:
  flutter_drag_selector: ^latest
2. 包装你的列表
将你的滚动容器(如 SingleChildScrollView + Wrap)用 CursorSelectorWidget 包裹,并用 SelectableItem 包裹每一个可选项目。
dart
import 'package:flutter/material.dart';
import 'package:flutter_drag_selector/flutter_drag_selector.dart';
class MyApp extends StatefulWidget {
const MyApp({super.key});
@override
State<MyApp> createState() => _MyAppState();
}
class _MyAppState extends State<MyApp> {
final _list = List.generate(50, (i) => i);
final _controller = StreamController<(Key?, bool)>.broadcast(); // 用于更新 UI 状态
final scrollController = ScrollController();
@override
void initState() {
super.initState();
}
@override
void dispose() {
_controller.close();
scrollController.dispose();
super.dispose();
}
@override
Widget build(BuildContext context) {
Widget buildBox(int index) {
final id = ValueKey<int>(index);
return StreamBuilder<(Key?, bool)>(
stream: _controller.stream.where((e) => e.$1 == id),
builder: (ctx, snapshot) {
return SelectableItem(
key: id,
child: GestureDetector(
onTap: () {
debugPrint('tap -> $index');
},
child: Container(
width: 200,
height: 200,
decoration: BoxDecoration(
color: index % 2 == 0 ? Colors.yellow : Colors.lightBlueAccent,
),
alignment: Alignment.center,
child: Row(
mainAxisAlignment: MainAxisAlignment.center,
children: [
Text('$index', style: const TextStyle(fontSize: 20)),
const SizedBox(width: 20),
Icon(
(snapshot.data?.$2 ?? false)
? Icons.check_box
: Icons.check_box_outline_blank,
size: 40,
color: Colors.red,
)
],
),
),
),
);
},
);
}
return MaterialApp(
home: Scaffold(
appBar: AppBar(title: const Text('拖拽选择示例')),
body: CursorSelectorTheme(
data: CursorSelectorThemeData(
selectedAreaDecoration: BoxDecoration(
color: Colors.blue.withOpacity(0.4),
borderRadius: BorderRadius.circular(10),
),
),
child: CursorSelectorWidget(
scrollController: scrollController, // 控制滚动
selectedChangedCallback: (selection) {
// 选中状态变更回调,用于更新 UI
_controller.add(selection);
},
child: SingleChildScrollView(
controller: scrollController,
child: Wrap(
spacing: 10,
runSpacing: 10,
children: _list.map<Widget>(buildBox).toList(),
),
),
),
),
),
);
}
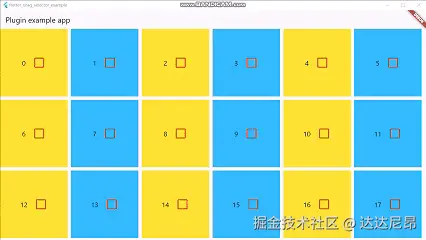
}3. 效果说明
- 用户按住鼠标左键(或在移动端长按)并拖动,会看到一个蓝色半透明矩形框跟随鼠标移动。
- 每次
SelectableItem的选中状态变化,都会通过selectedChangedCallback回调返回(Key, isSelected),开发者可据此更新数据模型或 UI。
🎨 自定义主题
你可以通过 CursorSelectorTheme 和 CursorSelectorThemeData 自定义选择框的视觉样式:
dart
CursorSelectorTheme(
  data: CursorSelectorThemeData(
    selectedAreaDecoration: BoxDecoration(
      color: Colors.green.withOpacity(0.3),
      border: Border.all(color: Colors.green, width: 2),
      borderRadius: BorderRadius.circular(8),
    )
  ),
  child: CursorSelectorWidget(...),
)
结语
如有设计不佳的点,欢迎指出。
👉 GitHub 地址 :github.com/bladeofgod/...
👉 Pub 地址 :pub.dev/packages/fl...