HarmonyOS 语音朗读功能同步教程
本文档详细介绍如何将 DigitalSprouting 项目中的语音朗读(TTS)功能同步到 langdu 项目中。
功能概述
语音朗读功能使用 HarmonyOS 的 @kit.MediaKit 实现音频播放,支持:
- 数字发音朗读 (0-10)
- 自定义文本音频播放
- 音量控制
- AI朗读任意字符
目录结构
完成后的目录结构:
langdu/
├── entry/src/main/ets/
│   ├── services/
│   │   └── AudioService.ets      # 音频服务
│   ├── entryability/
│   │   └── EntryAbility.ets      # 初始化服务
│   └── pages/
│       └── Index.ets             # 演示页面
└── entry/src/main/resources/
    └── rawfile/
        └── audio/
            └── numbers/          # 数字发音文件
                ├── number_0.mp3
                ├── number_1.mp3
                └── ...
步骤一:创建 AudioService 服务
1.1 创建 services 目录
在 entry/src/main/ets/ 下创建 services 文件夹。
1.2 创建 AudioService.ets 文件
创建文件:entry/src/main/ets/services/AudioService.ets
typescript
/**
 * 语音朗读服务 - 简化版
 * 用于播放数字发音
 */
import { media } from '@kit.MediaKit';
import { common } from '@kit.AbilityKit';
import { BusinessError } from '@kit.BasicServicesKit';

/**
 * 音频服务类
 */
export class AudioService {
  private static instance: AudioService | null = null;
  private context: common.UIAbilityContext | null = null;
  private isInitialized: boolean = false;

  private constructor() {}

  /**
   * 获取单例实例
   */
  static getInstance(): AudioService {
    if (AudioService.instance === null) {
      AudioService.instance = new AudioService();
    }
    return AudioService.instance;
  }

  /**
   * 初始化音频服务
   */
  async initialize(context: common.UIAbilityContext): Promise<void> {
    if (this.isInitialized) {
      console.info('[AudioService] Already initialized');
      return;
    }

    this.context = context;
    this.isInitialized = true;
    console.info('[AudioService] Initialized successfully');
  }

  /**
   * 播放数字发音(0-10)
   * @param number 要播放的数字(0-10)
   * @param volume 音量大小(0.0-1.0),默认 0.9
   */
  async playNumberPronunciation(number: number, volume: number = 0.9): Promise<void> {
    if (!this.isInitialized || this.context === null) {
      console.error('[AudioService] Service not initialized');
      return;
    }

    if (number < 0 || number > 10) {
      console.error(`[AudioService] Invalid number: ${number}. Must be between 0-10`);
      return;
    }

    try {
      // 获取音频文件描述符
      const path: string = `audio/numbers/number_${number}.mp3`;
      const fileDescriptor = await this.context.resourceManager.getRawFd(path);

      const fd: media.AVFileDescriptor = {
        fd: fileDescriptor.fd,
        offset: fileDescriptor.offset,
        length: fileDescriptor.length
      };

      // 创建播放器
      const player: media.AVPlayer = await media.createAVPlayer();

      // 设置错误监听
      player.on('error', async (error: BusinessError) => {
        console.error(`[AudioService] Player error: ${JSON.stringify(error)}`);
        try {
          await player.release();
        } catch (e) {
          console.error(`[AudioService] Release error: ${JSON.stringify(e)}`);
        }
      });

      // 等待播放
      return new Promise<void>((resolve, reject) => {
        player.on('stateChange', async (state: string) => {
          try {
            if (state === 'initialized') {
              await player.prepare();
            } else if (state === 'prepared') {
              await player.setVolume(volume);
              await player.play();
            } else if (state === 'playing') {
              console.info(`[AudioService] Playing number: ${number}`);
              resolve();
            } else if (state === 'completed') {
              await player.release();
            }
          } catch (error) {
            console.error(`[AudioService] State error: ${JSON.stringify(error)}`);
            try {
              await player.release();
            } catch (e) {
              console.error(`[AudioService] Release error: ${JSON.stringify(e)}`);
            }
            reject(error);
          }
        });

        // 设置音频源
        player.fdSrc = fd;
      });
    } catch (error) {
      console.error(`[AudioService] Failed to play: ${JSON.stringify(error)}`);
      throw error;
    }
  }

  /**
   * 释放资源
   */
  async release(): Promise<void> {
    this.isInitialized = false;
    console.info('[AudioService] Released');
  }
}

export const audioService = AudioService.getInstance();
代码说明:
- 使用单例模式确保全局只有一个音频服务实例
initialize()方法需要传入 UIAbilityContext 用于获取资源playNumberPronunciation()是核心方法,播放数字发音- 使用 AVPlayer 状态机:
initialized→prepared→playing→completed
步骤二:准备音频资源
2.1 创建目录结构
在 entry/src/main/resources/rawfile/ 下创建音频目录:
rawfile/
└── audio/
    └── numbers/
2.2 添加音频文件
将数字发音文件放入 audio/numbers/ 目录:
number_0.mp3- 零number_1.mp3- 一number_2.mp3- 二number_3.mp3- 三number_4.mp3- 四number_5.mp3- 五number_6.mp3- 六number_7.mp3- 七number_8.mp3- 八number_9.mp3- 九number_10.mp3- 十
音频要求:
- 格式:MP3
- 采样率:44.1kHz 或 48kHz
- 比特率:128-192kbps
- 时长:1-2秒
注意:您需要自行准备这些音频文件,可以使用 TTS 软件生成或录制。
步骤三:修改 EntryAbility 初始化服务
3.1 编辑 EntryAbility.ets
修改文件:entry/src/main/ets/entryability/EntryAbility.ets
在文件顶部添加导入:
typescript
import { audioService } from '../services/AudioService';在 onCreate 方法中初始化服务:
typescript
async onCreate(want: Want, launchParam: AbilityConstant.LaunchParam): Promise<void> {
  hilog.info(DOMAIN, TAG, '%{public}s', 'Ability onCreate');

  // 初始化音频服务
  await audioService.initialize(this.context);
}
在 onDestroy 方法中释放资源:
typescript
async onDestroy(): Promise<void> {
  hilog.info(DOMAIN, TAG, '%{public}s', 'Ability onDestroy');

  // 释放音频服务资源
  await audioService.release();
}
完整的 EntryAbility.ets 示例见附录A。
步骤四:创建演示页面
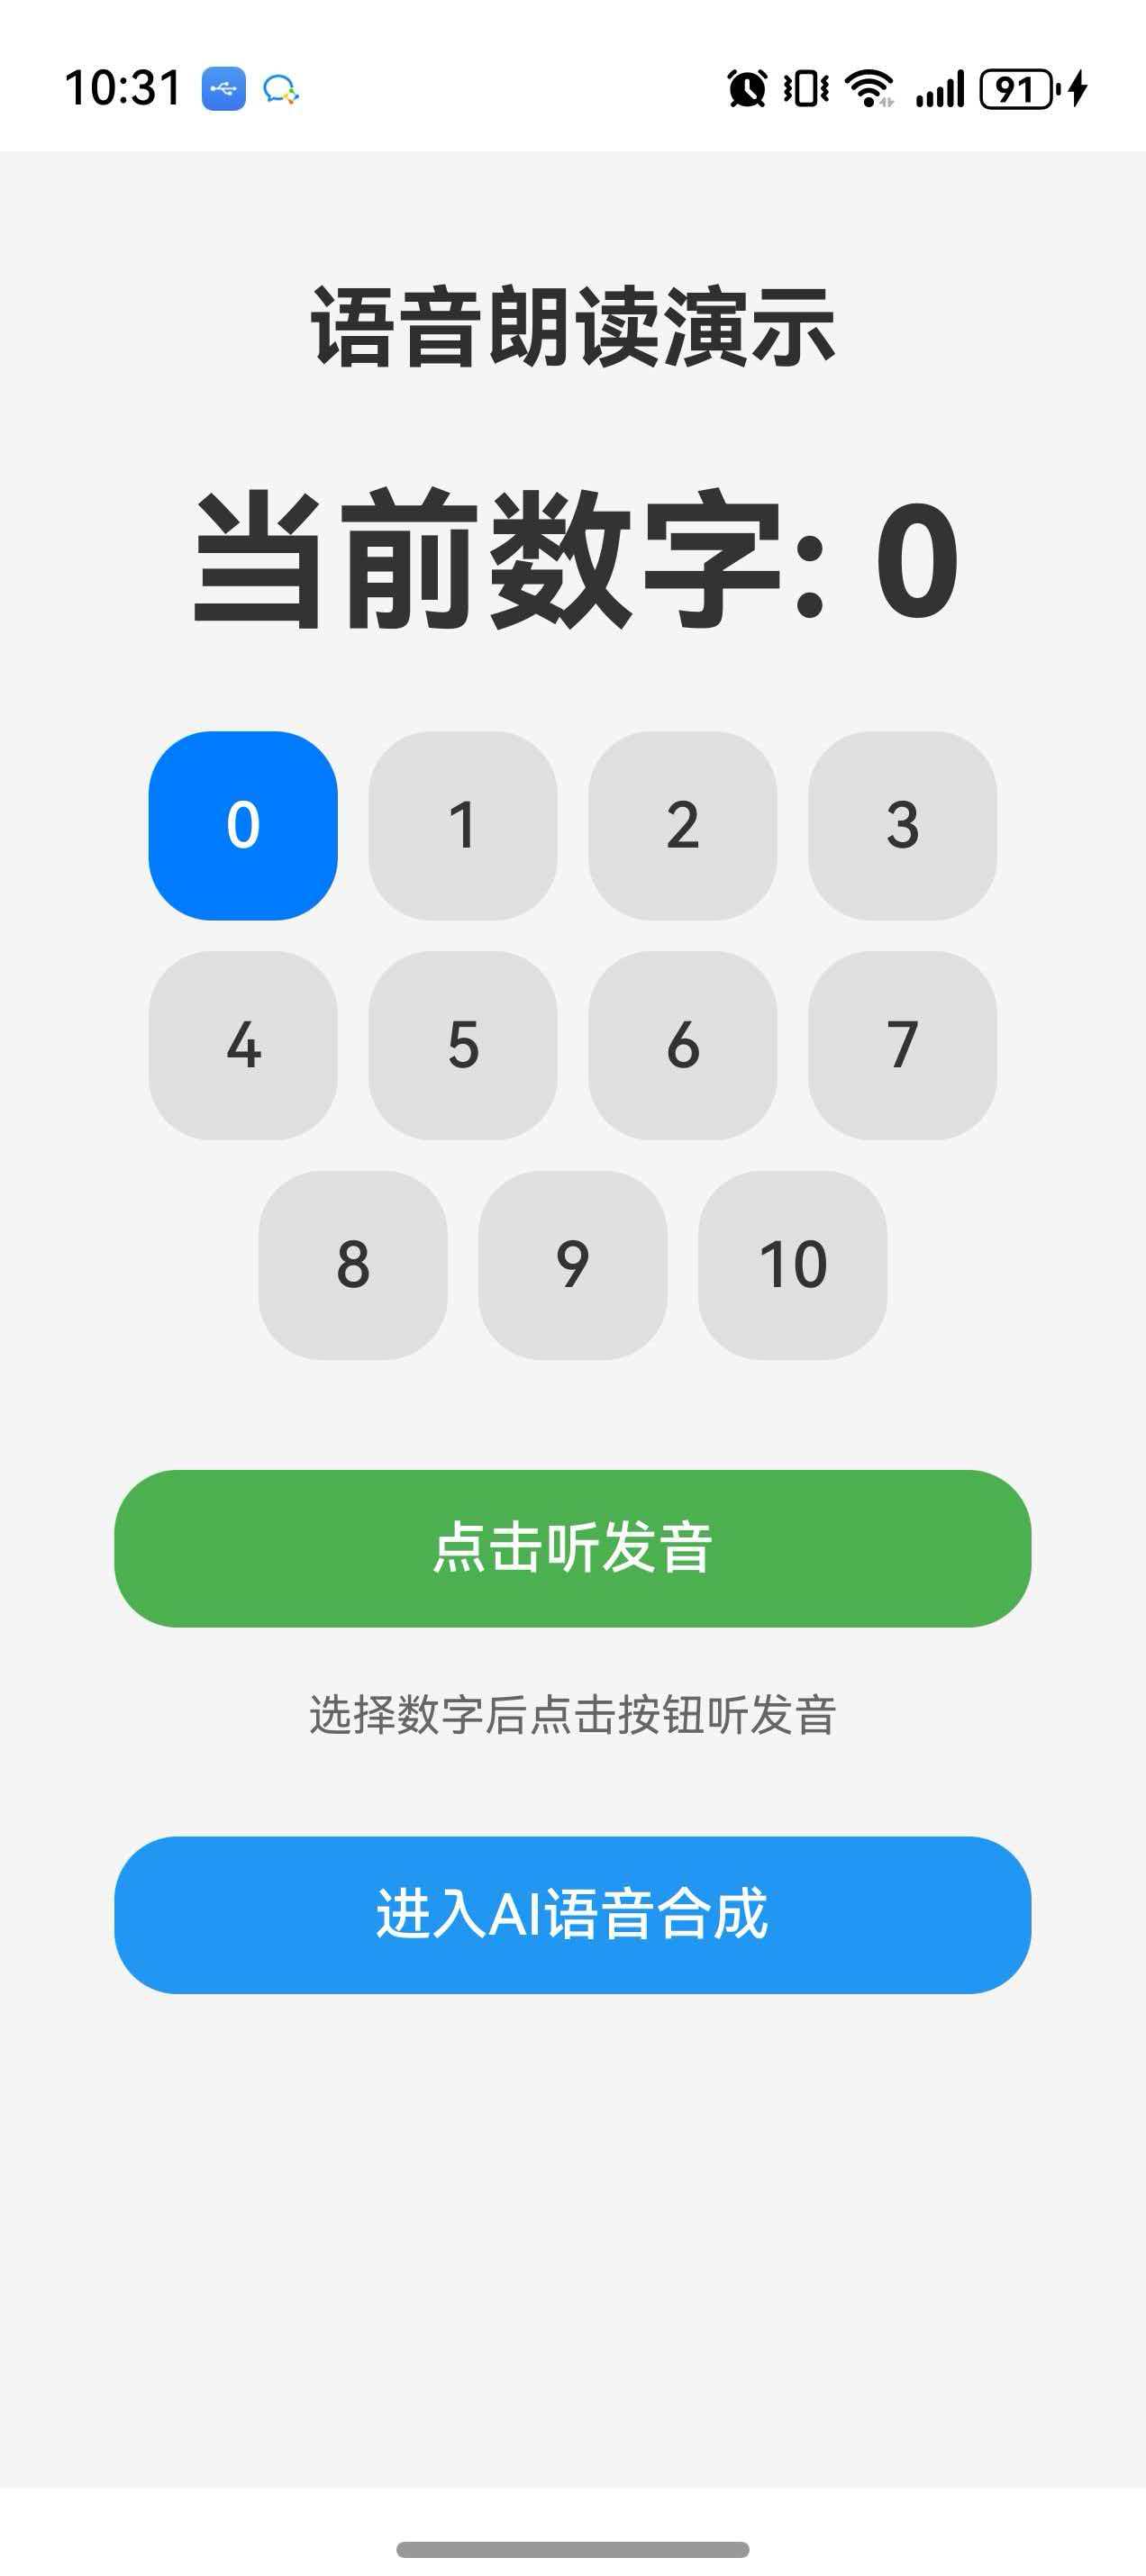
4.1 修改 Index.ets
修改文件:entry/src/main/ets/pages/Index.ets
typescript
import { audioService } from '../services/AudioService';

@Entry
@Component
struct Index {
  @State selectedNumber: number = 0;
  @State isPlaying: boolean = false;

  build() {
    Column() {
      // 标题
      Text('语音朗读演示')
        .fontSize(28)
        .fontWeight(FontWeight.Bold)
        .margin({ top: 40, bottom: 30 })

      // 数字选择区域
      Text(`当前数字: ${this.selectedNumber}`)
        .fontSize(48)
        .fontWeight(FontWeight.Bold)
        .fontColor('#333333')
        .margin({ bottom: 20 })

      // 数字选择按钮
      Flex({ wrap: FlexWrap.Wrap, justifyContent: FlexAlign.Center }) {
        ForEach([0, 1, 2, 3, 4, 5, 6, 7, 8, 9, 10], (num: number) => {
          Button(num.toString())
            .width(60)
            .height(60)
            .fontSize(20)
            .margin(5)
            .backgroundColor(this.selectedNumber === num ? '#007AFF' : '#E0E0E0')
            .fontColor(this.selectedNumber === num ? '#FFFFFF' : '#333333')
            .onClick(() => {
              this.selectedNumber = num;
            })
        })
      }
      .width('90%')
      .margin({ bottom: 30 })

      // 播放按钮
      Button(this.isPlaying ? '播放中...' : '点击听发音')
        .width('80%')
        .height(50)
        .fontSize(18)
        .backgroundColor(this.isPlaying ? '#CCCCCC' : '#4CAF50')
        .fontColor('#FFFFFF')
        .enabled(!this.isPlaying)
        .onClick(async () => {
          this.isPlaying = true;
          try {
            await audioService.playNumberPronunciation(this.selectedNumber, 0.9);
          } catch (error) {
            console.error(`播放失败: ${JSON.stringify(error)}`);
          }
          // 延迟重置状态,让音频播放完成
          setTimeout(() => {
            this.isPlaying = false;
          }, 1500);
        })

      // 使用说明
      Text('选择数字后点击按钮听发音')
        .fontSize(14)
        .fontColor('#666666')
        .margin({ top: 20 })
    }
    .width('100%')
    .height('100%')
    .justifyContent(FlexAlign.Start)
    .alignItems(HorizontalAlign.Center)
    .backgroundColor('#F5F5F5')
  }
}
功能说明:
- 显示数字选择按钮 (0-10)
- 点击数字选择当前要朗读的数字
- 点击"听发音"按钮播放对应数字的发音
步骤五:运行测试
5.1 构建项目
在 DevEco Studio 中:
- 点击 Build > Build Hap(s)/APP(s) > Build Hap(s)
- 等待构建完成
5.2 运行到设备
- 连接真机或启动模拟器
- 点击 Run 运行项目
- 在应用中选择数字并点击播放按钮测试
5.3 常见问题
Q: 音频播放没有声音?
- 检查设备音量是否开启
- 确认音频文件路径正确
- 查看日志确认 AudioService 初始化成功
Q: 找不到音频文件?
- 确保音频文件放在
rawfile/audio/numbers/目录 - 文件名格式为
number_X.mp3
附录A:完整的 EntryAbility.ets
typescript
import { AbilityConstant, UIAbility, Want } from '@kit.AbilityKit';
import { hilog } from '@kit.PerformanceAnalysisKit';
import { window } from '@kit.ArkUI';
import { audioService } from '../services/AudioService';

const DOMAIN = 0x0000;
const TAG = 'EntryAbility';

export default class EntryAbility extends UIAbility {
  async onCreate(want: Want, launchParam: AbilityConstant.LaunchParam): Promise<void> {
    hilog.info(DOMAIN, TAG, '%{public}s', 'Ability onCreate');

    // 初始化音频服务
    await audioService.initialize(this.context);
  }

  async onDestroy(): Promise<void> {
    hilog.info(DOMAIN, TAG, '%{public}s', 'Ability onDestroy');

    // 释放音频服务资源
    await audioService.release();
  }

  onWindowStageCreate(windowStage: window.WindowStage): void {
    hilog.info(DOMAIN, TAG, '%{public}s', 'Ability onWindowStageCreate');

    windowStage.loadContent('pages/Index', (err) => {
      if (err.code) {
        hilog.error(DOMAIN, TAG, 'Failed to load the content. Cause: %{public}s', JSON.stringify(err));
        return;
      }
      hilog.info(DOMAIN, TAG, 'Succeeded in loading the content.');
    });
  }

  onWindowStageDestroy(): void {
    hilog.info(DOMAIN, TAG, '%{public}s', 'Ability onWindowStageDestroy');
  }

  onForeground(): void {
    hilog.info(DOMAIN, TAG, '%{public}s', 'Ability onForeground');
  }

  onBackground(): void {
    hilog.info(DOMAIN, TAG, '%{public}s', 'Ability onBackground');
  }
}
附录B:技术要点
AVPlayer 状态机
idle → initialized → prepared → playing → completed → released
         ↓              ↓          ↓
      prepare()      play()    release()
核心 API
| API | 说明 |
|---|---|
media.createAVPlayer() |
创建音频播放器 |
player.fdSrc |
设置音频文件描述符 |
player.prepare() |
准备播放 |
player.play() |
开始播放 |
player.setVolume(volume) |
设置音量 (0.0-1.0) |
player.release() |
释放资源 |
resourceManager.getRawFd(path) |
获取 rawfile 文件描述符 |
扩展功能
如需扩展功能,可参考 DigitalSprouting 项目的完整 AudioService,支持:
- 背景音乐播放与控制
- 音效播放器池
- 音量持久化设置
- 预加载优化
总结
通过以上步骤,您已成功将语音朗读功能同步到 langdu 项目。核心要点:
- 使用单例模式管理音频服务
- 在 EntryAbility 中初始化和释放服务
- 使用 AVPlayer 状态机播放音频
- 将音频文件放在 rawfile 目录
如有问题,请检查控制台日志中的 [AudioService] 标签信息。
第二部分:AI 语音合成 (TextToSpeech)
功能概述
除了播放预录制的音频文件,HarmonyOS 还提供了 AI 语音合成能力,可以将任意文本实时转换为语音。使用 @kit.CoreSpeechKit 中的 textToSpeech API 实现。
特点:
- 支持任意中文文本朗读(最大10000字符)
- 无需预先准备音频文件
- 支持语速、音量调节
- 离线模式,无需网络
两种方式对比
| 特性 | AudioService (预录制音频) | TTSService (AI语音合成) |
|---|---|---|
| 实现方式 | 播放预录制的MP3文件 | AI实时合成语音 |
| 依赖 | @kit.MediaKit |
@kit.CoreSpeechKit |
| 音频来源 | rawfile目录下的音频文件 | 文本实时转换 |
| 内容限制 | 需要每个内容单独录制 | 支持任意文本 |
| 音色 | 取决于录制内容 | 聆小珊女声音色 |
| 文件大小 | 需要存储音频文件 | 无需额外文件 |
| 响应速度 | 即时播放 | 需要合成时间 |
| 适用场景 | 固定内容、特定音效 | 动态文本、大量内容 |
| 语速控制 | 不支持 | 支持 (0.5-2.0) |
| 音量控制 | 支持 | 支持 |
选择建议
-
选择 AudioService:
- 内容固定不变(如数字、字母)
- 需要特定音色或音效
- 对响应速度要求高
-
选择 TTSService:
- 内容动态变化
- 大量文本需要朗读
- 不想维护音频文件
步骤一:创建 TTSService 服务
1.1 创建 TTSService.ets 文件
创建文件:entry/src/main/ets/services/TTSService.ets
typescript
/**
 * AI语音合成服务 - 使用 TextToSpeech API
 * 将文本实时转换为语音播报
 */
import { textToSpeech } from '@kit.CoreSpeechKit';
import { BusinessError } from '@kit.BasicServicesKit';

/**
 * TTS服务类
 */
export class TTSService {
  private static instance: TTSService | null = null;
  private ttsEngine: textToSpeech.TextToSpeechEngine | null = null;
  private isInitialized: boolean = false;

  private constructor() {}

  /**
   * 获取单例实例
   */
  static getInstance(): TTSService {
    if (TTSService.instance === null) {
      TTSService.instance = new TTSService();
    }
    return TTSService.instance;
  }

  /**
   * 初始化TTS引擎
   */
  async initialize(): Promise<void> {
    if (this.isInitialized) {
      console.info('[TTSService] Already initialized');
      return;
    }

    try {
      // 配置引擎参数
      let extraParam: Record<string, Object> = {
        'style': 'interaction-broadcast',
        'locate': 'CN',
        'name': 'LangduTTS'
      };

      let initParamsInfo: textToSpeech.CreateEngineParams = {
        language: 'zh-CN',
        person: 0,  // 聆小珊女声音色
        online: 1,  // 离线模式
        extraParams: extraParam
      };

      // 创建TTS引擎
      this.ttsEngine = await textToSpeech.createEngine(initParamsInfo);
      this.isInitialized = true;
      console.info('[TTSService] Initialized successfully');
    } catch (error) {
      const err = error as BusinessError;
      console.error(`[TTSService] Failed to initialize: ${err.code} - ${err.message}`);
      throw new Error(`TTS initialization failed: ${err.message}`);
    }
  }

  /**
   * 朗读文本
   * @param text 要朗读的文本(最大10000字符)
   * @param speed 语速(0.5-2.0),默认1.0
   * @param volume 音量(0.0-1.0),默认1.0
   */
  async speak(text: string, speed: number = 1.0, volume: number = 1.0): Promise<void> {
    if (!this.isInitialized || this.ttsEngine === null) {
      console.error('[TTSService] Service not initialized');
      throw new Error('TTS service not initialized');
    }

    if (text.length === 0) {
      console.warn('[TTSService] Empty text');
      return;
    }

    if (text.length > 10000) {
      console.warn('[TTSService] Text too long, truncating to 10000 characters');
      text = text.substring(0, 10000);
    }

    try {
      // 配置播报参数
      let extraParam: Record<string, Object> = {
        'speed': speed,
        'volume': volume,
        'pitch': 1.0,
        'languageContext': 'zh-CN',
        'audioType': 'pcm'
      };

      let speakParams: textToSpeech.SpeakParams = {
        requestId: Date.now().toString(),
        extraParams: extraParam
      };

      // 设置监听器
      return new Promise<void>((resolve, reject) => {
        let speakListener: textToSpeech.SpeakListener = {
          onStart: (requestId: string, response: textToSpeech.StartResponse) => {
            console.info(`[TTSService] Started speaking, requestId: ${requestId}`);
          },
          onComplete: (requestId: string, response: textToSpeech.CompleteResponse) => {
            console.info(`[TTSService] Completed, requestId: ${requestId}`);
            resolve();
          },
          onStop: (requestId: string, response: textToSpeech.StopResponse) => {
            console.info(`[TTSService] Stopped, requestId: ${requestId}`);
            resolve();
          },
          onError: (requestId: string, errorCode: number, errorMessage: string) => {
            console.error(`[TTSService] Error: ${errorCode} - ${errorMessage}`);
            reject(new Error(`TTS error: ${errorMessage}`));
          },
          onData: (requestId: string, audio: ArrayBuffer, response: textToSpeech.SynthesisResponse) => {
            // 音频数据回调,可用于自定义处理
          }
        };

        // 设置监听器并开始播报
        this.ttsEngine!.setListener(speakListener);
        this.ttsEngine!.speak(text, speakParams);
      });
    } catch (error) {
      const err = error as BusinessError;
      console.error(`[TTSService] Failed to speak: ${err.message}`);
      throw new Error(`TTS speak failed: ${err.message}`);
    }
  }

  /**
   * 停止当前播报
   */
  stop(): void {
    if (this.ttsEngine !== null) {
      this.ttsEngine.stop();
      console.info('[TTSService] Stopped');
    }
  }

  /**
   * 判断是否正在播报
   */
  isBusy(): boolean {
    if (this.ttsEngine !== null) {
      return this.ttsEngine.isBusy();
    }
    return false;
  }

  /**
   * 释放资源
   */
  async release(): Promise<void> {
    if (this.ttsEngine !== null) {
      await this.ttsEngine.shutdown();
      this.ttsEngine = null;
    }
    this.isInitialized = false;
    console.info('[TTSService] Released');
  }
}

export const ttsService = TTSService.getInstance();
代码说明:
- 使用
textToSpeech.createEngine()创建语音合成引擎 speak()方法支持语速和音量参数- 通过
SpeakListener回调监听播报状态 - 支持
stop()中断当前播报
步骤二:创建 AI 朗读演示页面
2.1 创建 TTSDemo.ets 文件
创建文件:entry/src/main/ets/pages/TTSDemo.ets
typescript
import { ttsService } from '../services/TTSService';
@Entry
@Component
struct TTSDemo {
@State inputText: string = '你好,欢迎使用华为鸿蒙语音合成功能。';
@State isPlaying: boolean = false;
@State speed: number = 1.0;
@State volume: number = 1.0;
@State statusText: string = '准备就绪';
aboutToAppear(): void {
// 初始化TTS服务
ttsService.initialize()
.then(() => {
this.statusText = 'TTS引擎已就绪';
})
.catch((error: Error) => {
this.statusText = `初始化失败: ${error.message}`;
});
}
aboutToDisappear(): void {
// 释放资源
ttsService.release();
}
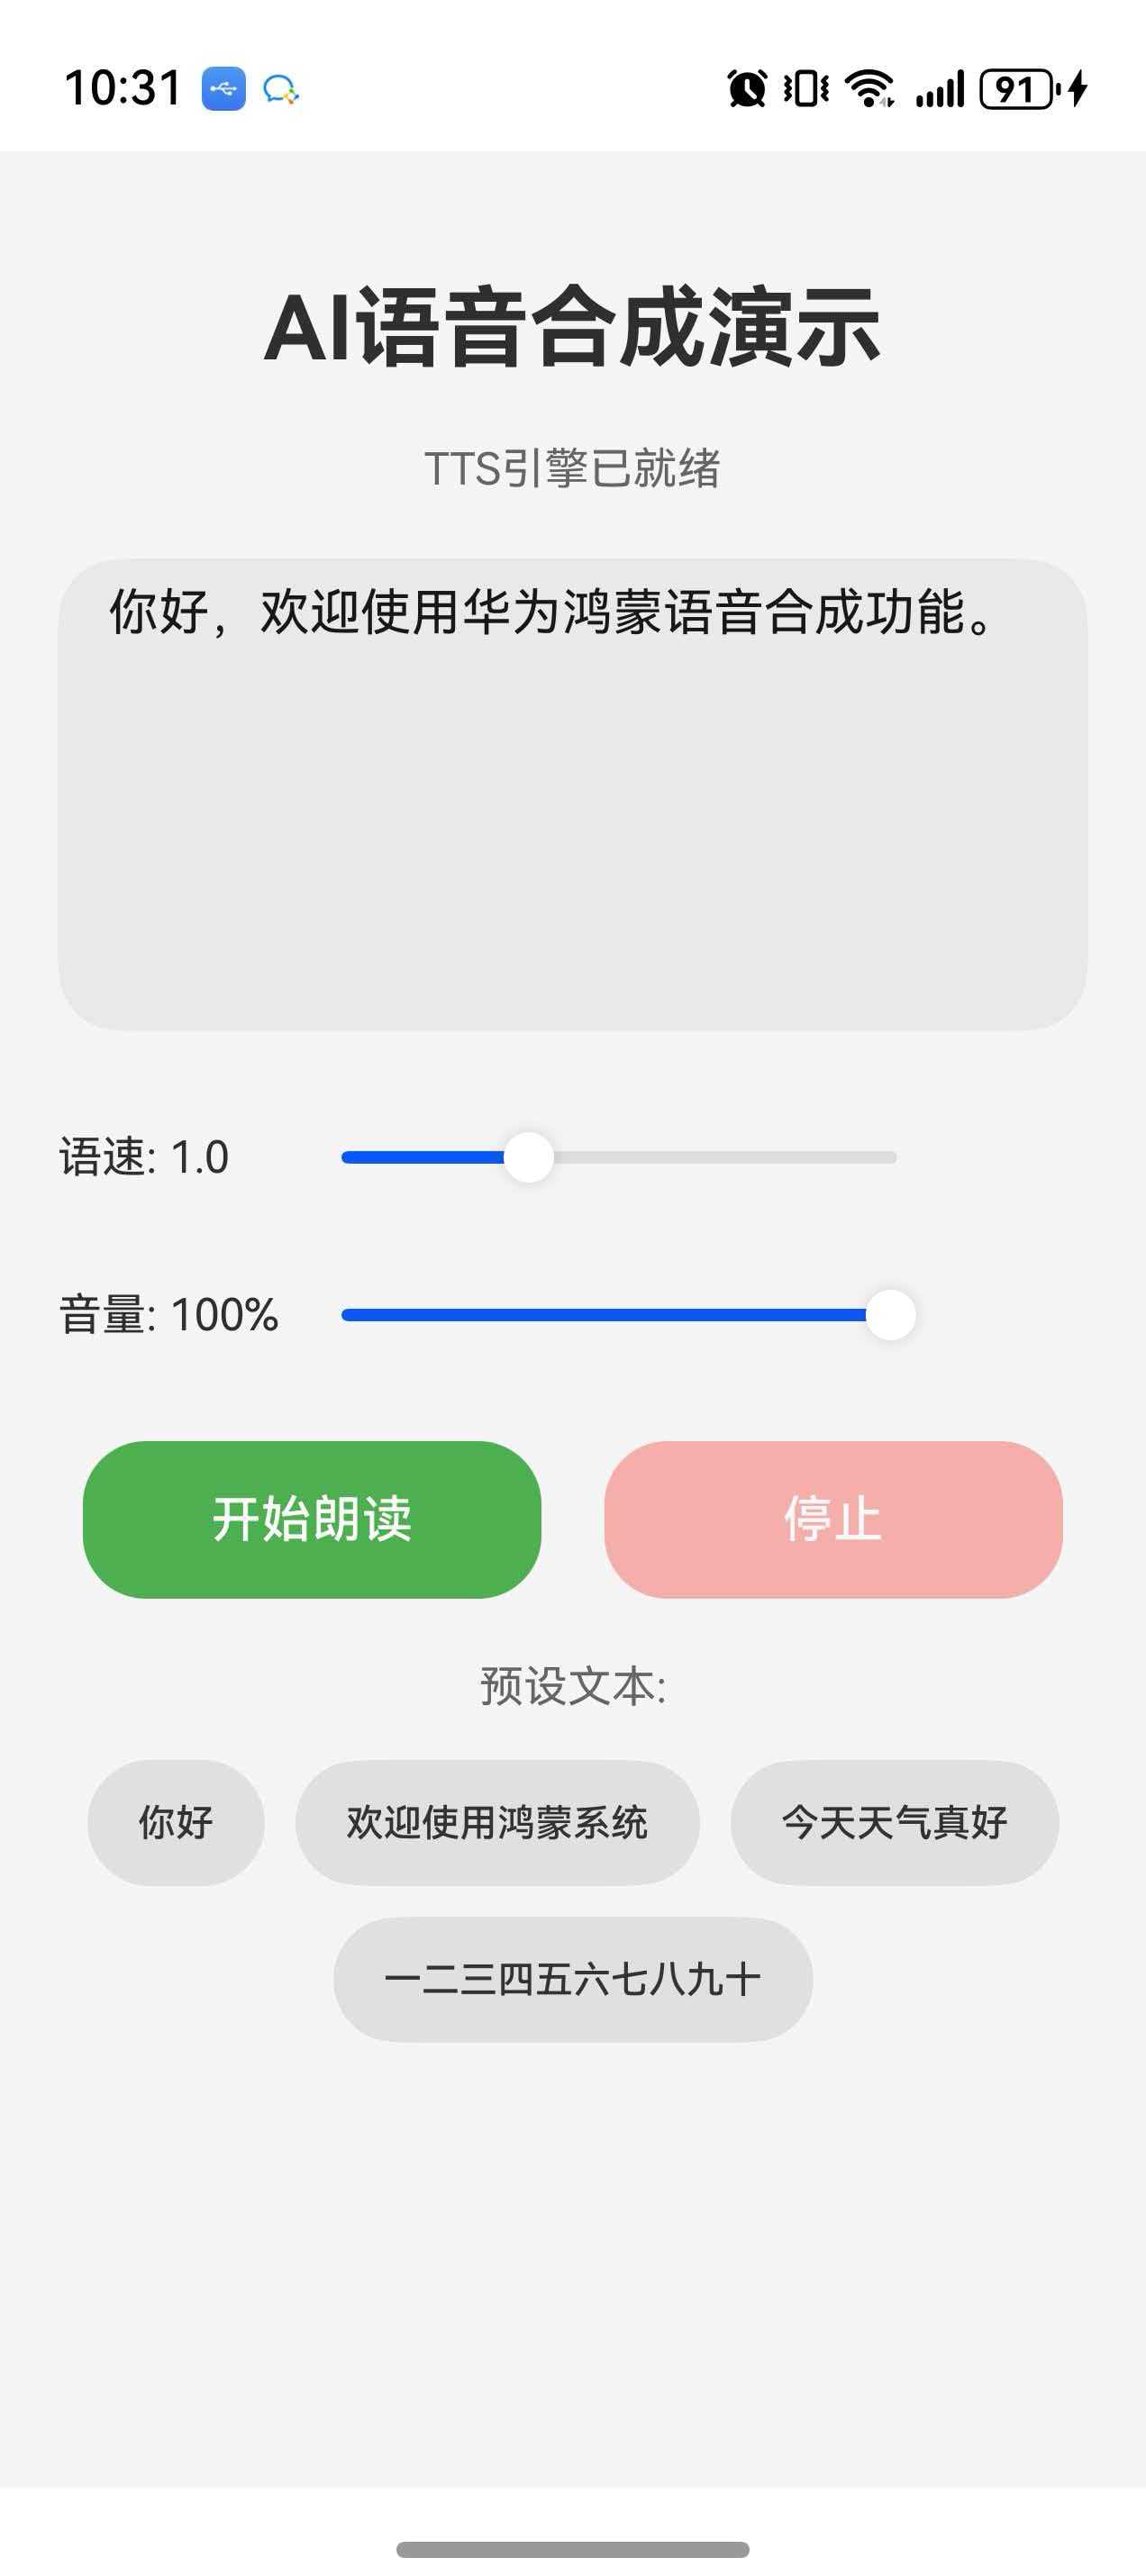
build() {
Column() {
// 标题
Text('AI语音合成演示')
.fontSize(28)
.fontWeight(FontWeight.Bold)
.margin({ top: 40, bottom: 20 })
// 状态显示
Text(this.statusText)
.fontSize(14)
.fontColor(this.statusText.includes('失败') ? '#FF0000' : '#666666')
.margin({ bottom: 20 })
// 文本输入区域
TextArea({ text: this.inputText, placeholder: '请输入要朗读的文本...' })
.width('90%')
.height(150)
.fontSize(16)
.onChange((value: string) => {
this.inputText = value;
})
.margin({ bottom: 20 })
// 语速控制
Row() {
Text(`语速: ${this.speed.toFixed(1)}`)
.fontSize(14)
.width(80)
Slider({
value: this.speed,
min: 0.5,
max: 2.0,
step: 0.1
})
.width('60%')
.onChange((value: number) => {
this.speed = value;
})
}
.width('90%')
.margin({ bottom: 10 })
// 音量控制
Row() {
Text(`音量: ${(this.volume * 100).toFixed(0)}%`)
.fontSize(14)
.width(80)
Slider({
value: this.volume,
min: 0,
max: 1,
step: 0.1
})
.width('60%')
.onChange((value: number) => {
this.volume = value;
})
}
.width('90%')
.margin({ bottom: 20 })
// 播放/停止按钮
Row({ space: 20 }) {
Button(this.isPlaying ? '播放中...' : '开始朗读')
.width('40%')
.height(50)
.fontSize(16)
.backgroundColor(this.isPlaying ? '#CCCCCC' : '#4CAF50')
.enabled(!this.isPlaying)
.onClick(async () => {
if (this.inputText.trim().length === 0) {
this.statusText = '请输入文本';
return;
}
this.isPlaying = true;
this.statusText = '正在朗读...';
try {
await ttsService.speak(this.inputText, this.speed, this.volume);
this.statusText = '朗读完成';
} catch (error) {
const err = error as Error;
this.statusText = `朗读失败: ${err.message}`;
}
this.isPlaying = false;
})
Button('停止')
.width('40%')
.height(50)
.fontSize(16)
.backgroundColor('#F44336')
.enabled(this.isPlaying)
.onClick(() => {
ttsService.stop();
this.isPlaying = false;
this.statusText = '已停止';
})
}
.margin({ bottom: 20 })
// 预设文本按钮
Text('预设文本:')
.fontSize(14)
.fontColor('#666666')
.margin({ bottom: 10 })
Flex({ wrap: FlexWrap.Wrap, justifyContent: FlexAlign.Center }) {
ForEach([
'你好',
'欢迎使用鸿蒙系统',
'今天天气真好',
'一二三四五六七八九十'
], (text: string) => {
Button(text)
.fontSize(12)
.margin(5)
.backgroundColor('#E0E0E0')
.fontColor('#333333')
.onClick(() => {
this.inputText = text;
})
})
}
.width('90%')
}
.width('100%')
.height('100%')
.justifyContent(FlexAlign.Start)
.alignItems(HorizontalAlign.Center)
.backgroundColor('#F5F5F5')
}
}2.2 注册页面路由
在 entry/src/main/resources/base/profile/main_pages.json 中添加页面:
json
{
  "src": [
    "pages/Index",
    "pages/TTSDemo"
  ]
}
步骤三:运行测试
3.1 构建并运行
- 在 DevEco Studio 中构建项目
- 运行到真机或模拟器
- 在应用中可以测试两个页面:
Index- 预录制音频播放TTSDemo- AI语音合成
3.2 测试 AI 语音合成
- 打开 TTSDemo 页面
- 等待 TTS 引擎初始化完成
- 输入或选择预设文本
- 调整语速和音量
- 点击"开始朗读"按钮
附录C:TextToSpeech API 说明
引擎参数
| 参数 | 说明 | 取值 |
|---|---|---|
language |
语种 | 'zh-CN' (仅支持中文) |
person |
音色 | 0 (聆小珊女声) |
online |
模式 | 1 (离线模式) |
播报参数
| 参数 | 说明 | 取值范围 |
|---|---|---|
speed |
语速 | 0.5 - 2.0 |
volume |
音量 | 0.0 - 1.0 |
pitch |
音调 | 0.5 - 2.0 |
回调接口
| 回调 | 说明 |
|---|---|
onStart |
开始播报 |
onComplete |
播报完成 |
onStop |
播报停止 |
onError |
发生错误 |
onData |
音频数据 |
常见错误码
| 错误码 | 说明 |
|---|---|
1002200001 |
引擎初始化失败 |
1002200002 |
引擎繁忙 |
1002200003 |
文本为空 |
1002200004 |
文本过长 |
总结
本教程介绍了两种 HarmonyOS 语音朗读实现方式:
-
预录制音频播放 (AudioService)
- 使用
@kit.MediaKit的 AVPlayer - 适合固定内容、高响应要求
- 使用
-
AI 语音合成 (TTSService)
- 使用
@kit.CoreSpeechKit的 TextToSpeech - 适合动态内容、无需维护音频文件
- 使用
根据实际需求选择合适的方案,也可以两者结合使用。
效果图
项目源代码
https://gitcode.com/daleishen/yuyinlangdu/
班级链接