Vue3的生命周期
前置代码
代码还跟讲VUE2生命周期一样
vue
<template>
   <div class="person">
    <h2>{{ sum }}</h2>
    <button @click="add">点我+1</button>
   </div>
</template>

<script lang="ts" setup>
import { ref } from 'vue';

let sum = ref(0)

function add() {
  sum.value += 1
}


</script>

<style scoped>
  .person{
    background-color: rgb(39, 148, 191);
    padding-left: 50px;
  }
  .btn {
    display: flex;
    gap:20px
  }
</style>
Vue3生命周期流程图
vue
创建阶段
├── setup()           // Composition API 的入口
├── onBeforeMount()   // 挂载前
├── onMounted()       // 挂载完成

更新阶段
├── onBeforeUpdate()  // 更新前
├── onUpdated()       // 更新完成

卸载阶段
├── onBeforeUnmount() // 卸载前
├── onUnmounted()     // 卸载完成

错误处理
├── onErrorCaptured() // 错误捕获
生命周期钩子详解
创建阶段
- 初始化阶段
Vue3没有这个阶段了,因为组件初始化阶段被setup()替代了
- 使用setup创建组件实例时,在beforeCreate和created之前
- 它是组合式API的入口,在这里定义响应式数据、方法等等
- 在setup中是无法访问this的
- 挂载前
onBeforeMount()
vue
<template>
   <div class="person">
    <h2>{{ sum }}</h2>
    <button @click="add">点我+1</button>
   </div>
</template>

<script lang="ts" setup>
import { onBeforeMount, ref } from 'vue';

let sum = ref(0)

function add() {
  sum.value += 1
}

onBeforeMount(() => {
  console.log('组件即将挂载到DOM上');
  console.log('但此时还不能访问DOM元素')
})


</script>

<style scoped>
  .person{
    background-color: rgb(39, 148, 191);
    padding-left: 50px;
  }
  .btn {
    display: flex;
    gap:20px
  }
</style>
- 这个时机是挂载到DOM之前
-
挂载完毕
onMounted()vue<template> <div class="person"> <h2>{{ sum }}</h2> <button @click="add">点我+1</button> </div> </template> <script lang="ts" setup> import { onBeforeMount, onMounted, ref } from 'vue'; let sum = ref(0) function add() { sum.value += 1 } //1.挂载前 onBeforeMount(() => { console.log('组件即将挂载到DOM上'); console.log('但此时还不能访问DOM元素') }) //2.挂载完成 onMounted(() => { console.log('组件已经挂载到DOM上了'); console.log('可以访问DOM元素了',sum.value); }) </script> <style scoped> .person{ background-color: rgb(39, 148, 191); padding-left: 50px; } .btn { display: flex; gap:20px } </style>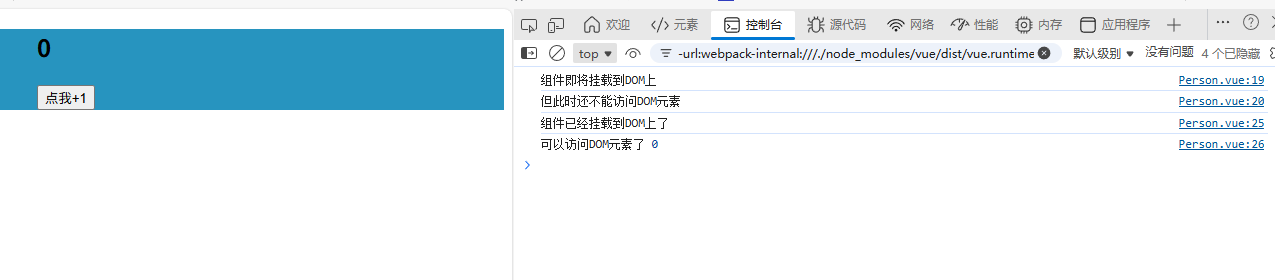
- 这个时机是组件挂载到DOM之后了,这个钩子函数最常用,常常会用于DOM操作,发起网络请求、初始化第三方库等等
更新阶段
1.更新前onBeforeUpdate()
js
//3.更新前
onBeforeUpdate(()=>{
  console.log('数组已经变化,DOM即将更新');
})- 这个阶段是在响应式数据变化之后,在页面渲染之前。
- 更新完成
onUpdated()
js
onUpdated(()=>{
  console.log('DOM更新已经完成');
})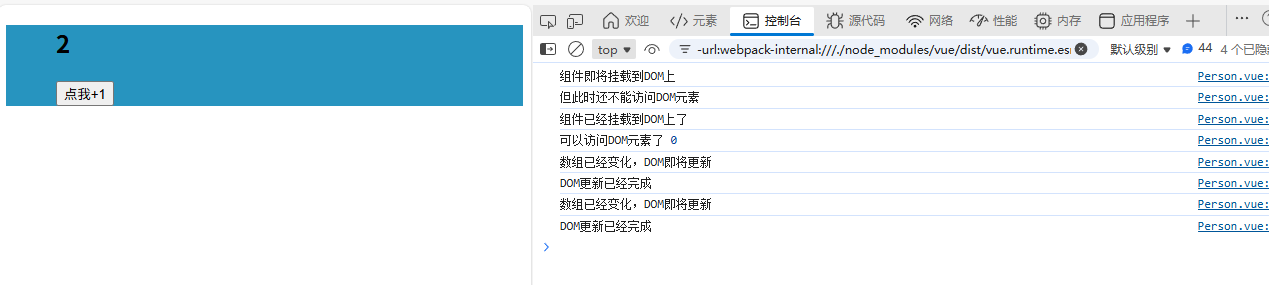
- 注意不要在这个钩子函数中随意修改响应式数据,可能会导致无限循环
卸载阶段
- 卸载前
onBeforeUnmount()
这个钩子函数常用于比如清除定时器,取消事件监听,取消网络请求等等
js
//5.卸载前
onBeforeUnmount(()=>{
  console.log('组件即将被清理');
})- 卸载完成
onUnmounted()
js
//6.卸载完成
onUnmounted(()=>{
  console.log('组件已经被清理');
})- 为了验证一下,我们还是使用定时器来让父组件清理掉这个组件
js
<template>
    <Person v-if="isShow"/>
</template>
<script lang="ts" setup>
    import Person from './components/Person.vue'
    import {ref} from 'vue'
    let timers: number
    let isShow = ref(true)

 timers = setTimeout(()=>{
        isShow.value = false
    },5000)
</script>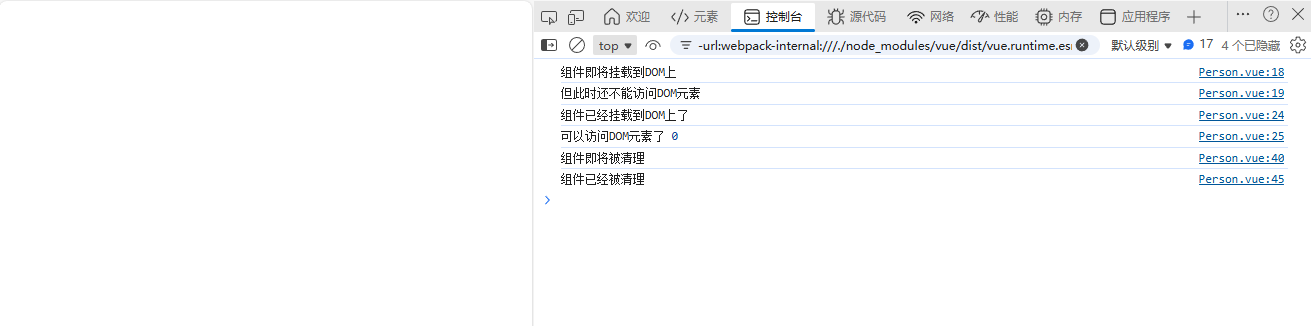
错误处理onErrorCaptured()
- 这个钩子函数用于错误处理,可以向上传递操作或阻止错误继续传播
js
<script setup>
import { onErrorCaptured } from 'vue'

onErrorCaptured((error, instance, info) => {
  console.error('捕获到错误:', error)
  console.log('错误来源:', info)

  // 阻止错误继续向上传播
  return false
})
</script>
注
- 每个组件都有自己的生命周期;那么父组件的生命周期和子组件的生命周期谁先执行呢?
当然是子组件先执行;
原因:VUE3的入口文件是index.html,这个文件会引入main.ts,main.ts会引入根组件,而根组件前面就会先解析子组件,所以子组件的生命周期会先执行,根组件往往都是最后一个执行的