DevUI 实战教程:从零构建电商后台管理系统(完整版)
本教程将带你使用 Angular 18 和 DevUI 组件库,从零开始构建一个功能完整的电商后台管理系统。
📚 教程目录
- 项目效果预览
- 前置要求
- 第一章:项目初始化
- [第二章:安装和配置 DevUI](#第二章:安装和配置 DevUI)
- 第三章:创建数据模型
- 第四章:实现国际化服务
- 第五章:构建商品服务
- 第六章:搭建页面布局
- 第七章:实现商品列表
- 第八章:实现添加编辑功能
- 第九章:实现删除功能
- 第十章:添加响应式样式
- 总结与扩展
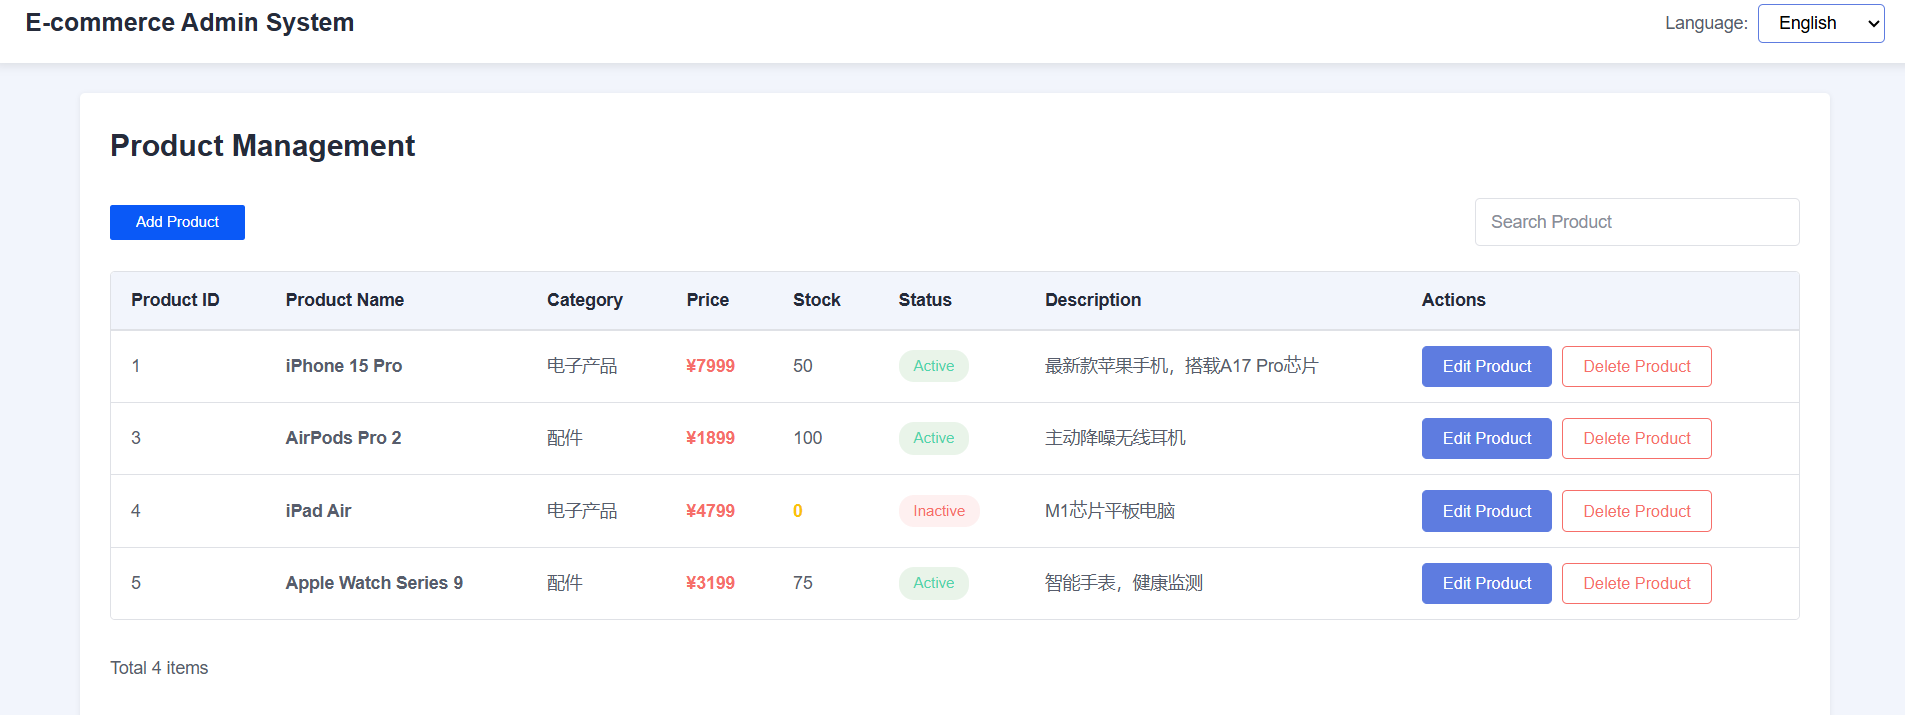
🎯 项目效果预览
完成本教程后,你将获得:
- ✅ 商品列表展示(表格形式)
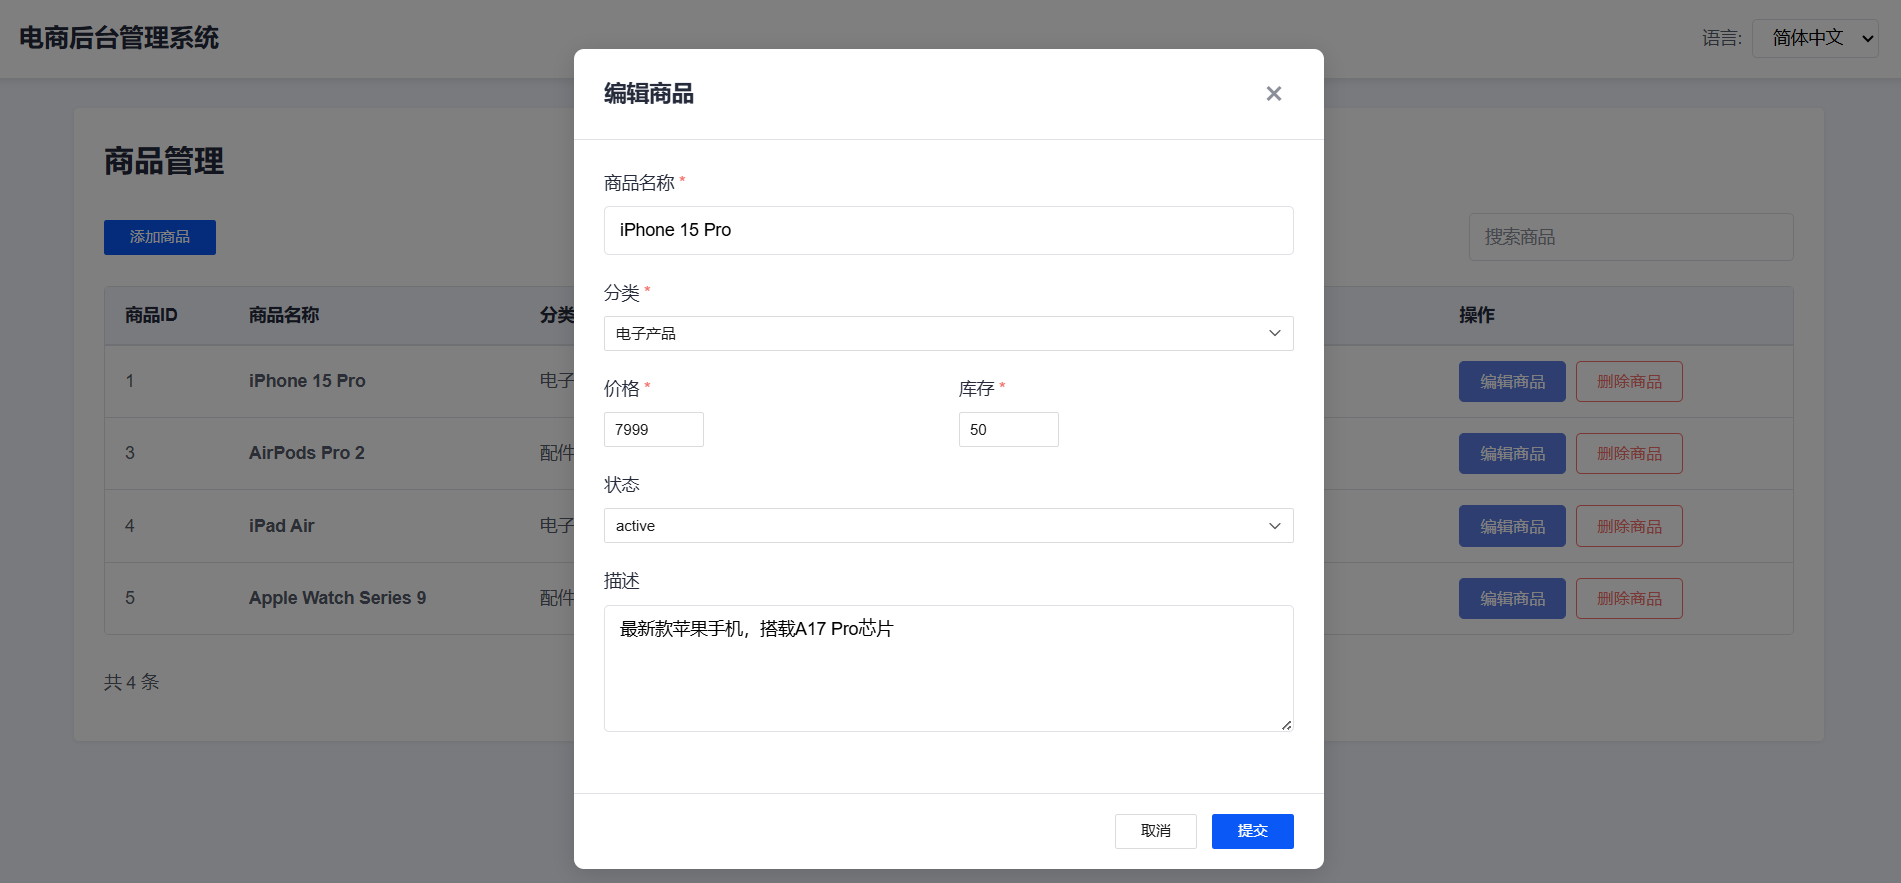
- ✅ 添加新商品(模态框表单)
- ✅ 编辑商品信息
- ✅ 删除商品(带确认对话框)
- ✅ 搜索商品功能
- ✅ 多语言切换(中文/英文)
- ✅ 响应式布局(支持桌面和移动端)
📋 前置要求
在开始之前,请确保你的开发环境满足以下要求:
- Node.js: 18.x 或更高版本
- npm: 9.x 或更高版本
- Angular CLI: 18.x
- 代码编辑器: VS Code(推荐)
第一章:项目初始化
1.1 安装 Angular CLI
首先,全局安装 Angular CLI:
bash
npm install -g @angular/cli@18验证安装:
bash
ng version1.2 创建新项目
使用 Angular CLI 创建新项目:
bash
ng new devui-project在创建过程中,选择以下选项:
- Would you like to add Angular routing? →
No(本教程不需要路由) - Which stylesheet format would you like to use? →
SCSS
1.3 进入项目目录
bash
cd devui-project1.4 启动开发服务器
bash
ng serve打开浏览器访问 http://localhost:4200,你应该能看到 Angular 的欢迎页面。
第二章:安装和配置 DevUI
2.1 安装 DevUI
在项目根目录下执行:
bash
npm install ng-devui --save
npm install @devui-design/icons --save
npm install @angular/localize@18 --save --legacy-peer-deps
2.2 配置 DevUI 样式
打开 angular.json 文件,在 styles 数组中添加 DevUI 的 CSS 文件。
需要在两个地方添加(build 和 test 配置中):
json
"styles": [
  "src/styles.scss",
  "node_modules/ng-devui/devui.min.css"
]
2.3 配置动画支持
打开 src/app/app.config.ts,添加动画支持:
typescript
import { ApplicationConfig, provideZoneChangeDetection } from '@angular/core';
import { provideRouter } from '@angular/router';
import { provideAnimations } from '@angular/platform-browser/animations';

import { routes } from './app.routes';

export const appConfig: ApplicationConfig = {
  providers: [
    provideZoneChangeDetection({ eventCoalescing: true }),
    provideRouter(routes),
    provideAnimations()  // 添加这一行
  ]
};
2.4 禁用 SSR(可选)
如果遇到 SSR 相关问题,可以在 angular.json 中移除 SSR 配置:
找到 build 配置下的这几行并删除:
json
"server": "src/main.server.ts",
"prerender": true,
"ssr": {
  "entry": "server.ts"
}
第三章:创建数据模型
3.1 创建 models 目录
bash
mkdir src/app/models3.2 创建商品模型
创建文件 src/app/models/product.model.ts:
typescript
export interface Product {
  id: number;
  name: string;
  category: string;
  price: number;
  stock: number;
  description: string;
  status: 'active' | 'inactive';
  createdAt: Date;
}

export interface ProductFormData {
  name: string;
  category: string;
  price: number;
  stock: number;
  description: string;
  status: 'active' | 'inactive';
}
代码说明:
Product: 完整的商品数据模型,包含 ID 和创建时间ProductFormData: 表单数据模型,用于添加和编辑商品时的数据绑定
第四章:实现国际化服务
4.1 创建 services 目录
bash
mkdir src/app/services4.2 创建国际化服务
创建文件 src/app/services/i18n.service.ts。
由于代码较长,这里展示核心结构:
typescript
import { Injectable } from '@angular/core';
import { BehaviorSubject, Observable } from 'rxjs';

export type Language = 'zh-CN' | 'en-US';

@Injectable({
  providedIn: 'root'
})
export class I18nService {
  private currentLang = new BehaviorSubject<Language>('zh-CN');
  public currentLang$: Observable<Language> = this.currentLang.asObservable();

  private translations: Record<Language, any> = {
    'zh-CN': {
      app: { title: '电商后台管理系统', language: '语言' },
      product: {
        title: '商品管理',
        add: '添加商品',
        edit: '编辑商品',
        delete: '删除商品',
        // ... 更多翻译
      }
    },
    'en-US': {
      app: { title: 'E-commerce Admin System', language: 'Language' },
      product: {
        title: 'Product Management',
        add: 'Add Product',
        // ... 更多翻译
      }
    }
  };

  constructor() {
    // 从 localStorage 读取保存的语言设置(需要处理 SSR)
    if (typeof window !== 'undefined' && typeof localStorage !== 'undefined') {
      const savedLang = localStorage.getItem('language') as Language;
      if (savedLang && (savedLang === 'zh-CN' || savedLang === 'en-US')) {
        this.currentLang.next(savedLang);
      }
    }
  }

  setLanguage(lang: Language): void {
    this.currentLang.next(lang);
    if (typeof window !== 'undefined' && typeof localStorage !== 'undefined') {
      localStorage.setItem('language', lang);
    }
  }

  translate(key: string, params?: any[]): string {
    const keys = key.split('.');
    let value: any = this.translations[this.currentLang.value];

    for (const k of keys) {
      value = value?.[k];
    }

    if (typeof value === 'string' && params) {
      params.forEach((param, index) => {
        value = value.replace(`{${index}}`, param);
      });
    }

    return value || key;
  }

  t(key: string, params?: any[]): string {
    return this.translate(key, params);
  }
}
完整的翻译内容请参考项目源码中的 i18n.service.ts 文件。
代码说明:
- 使用
BehaviorSubject管理当前语言状态 - 支持中英文两种语言
- 提供参数化翻译功能(如:
'共 {0} 条') - 使用 localStorage 持久化语言选择
- SSR 兼容性处理
第五章:构建商品服务
5.1 创建商品服务文件
创建文件 src/app/services/product.service.ts:
typescript
import { Injectable } from '@angular/core';
import { BehaviorSubject, Observable } from 'rxjs';
import { Product, ProductFormData } from '../models/product.model';

@Injectable({
  providedIn: 'root'
})
export class ProductService {
  private products = new BehaviorSubject<Product[]>([]);
  public products$: Observable<Product[]> = this.products.asObservable();

  constructor() {
    this.initMockData();
  }

  private initMockData(): void {
    const mockProducts: Product[] = [
      {
        id: 1,
        name: 'iPhone 15 Pro',
        category: '电子产品',
        price: 7999,
        stock: 50,
        status: 'active',
        description: '最新款苹果手机,搭载A17 Pro芯片',
        createdAt: new Date('2024-01-15')
      },
      // ... 更多示例数据
    ];
    this.products.next(mockProducts);
  }

  getProducts(): Observable<Product[]> {
    return this.products$;
  }

  addProduct(formData: ProductFormData): void {
    const currentProducts = this.products.value;
    const newId = Math.max(...currentProducts.map(p => p.id), 0) + 1;

    const newProduct: Product = {
      ...formData,
      id: newId,
      createdAt: new Date()
    };

    this.products.next([...currentProducts, newProduct]);
  }

  updateProduct(id: number, formData: ProductFormData): void {
    const currentProducts = this.products.value;
    const index = currentProducts.findIndex(p => p.id === id);

    if (index !== -1) {
      const updatedProduct: Product = {
        ...currentProducts[index],
        ...formData
      };
      currentProducts[index] = updatedProduct;
      this.products.next([...currentProducts]);
    }
  }

  deleteProduct(id: number): void {
    const currentProducts = this.products.value;
    this.products.next(currentProducts.filter(p => p.id !== id));
  }

  getProductById(id: number): Product | undefined {
    return this.products.value.find(p => p.id === id);
  }
}
代码说明:
- 使用
BehaviorSubject实现响应式数据管理 initMockData()初始化 5 个示例商品- 提供完整的 CRUD 操作方法
- 所有数据变更都会自动通知订阅者
由于篇幅限制,完整教程内容请查看项目中的以下文件:
- 第六章到第十章的详细内容
- 完整的代码示例
- 样式文件的完整代码
或访问项目源码查看 app.component.ts、app.component.html 和 app.component.scss 文件。
快速参考:核心代码结构
组件类结构 (app.component.ts)
typescript
export class AppComponent implements OnInit {
  // 数据属性
  products: Product[] = [];
  filteredProducts: Product[] = [];
  searchText = '';
  showProductModal = false;

  // 表单相关
  isEditMode = false;
  editingProductId: number | null = null;
  productForm: ProductFormData = { /* ... */ };

  // 下拉选项
  categories = [/* ... */];
  statusOptions = [/* ... */];
  languages = [/* ... */];

  // 核心方法
  ngOnInit(): void { /* 订阅数据 */ }
  onSearch(): void { /* 搜索过滤 */ }
  openAddModal(): void { /* 打开添加表单 */ }
  openEditModal(product: Product): void { /* 打开编辑表单 */ }
  submitForm(): void { /* 提交表单 */ }
  deleteProduct(product: Product): void { /* 删除商品 */ }
  changeLanguage(lang: Language): void { /* 切换语言 */ }
}
模板结构 (app.component.html)
html
<d-layout>
  <d-header><!-- 头部:标题 + 语言切换 --></d-header>
  <d-content>
    <!-- 工具栏:添加按钮 + 搜索框 -->
    <!-- 商品列表表格 -->
    <!-- 表格底部统计 -->
  </d-content>
</d-layout>

<!-- 商品表单模态框 -->
<div class="modal-overlay" *ngIf="showProductModal">
  <!-- 表单内容 -->
</div>
总结与扩展
🎉 恭喜完成!
通过本教程,你已经学会了:
- ✅ Angular 18 项目搭建 - 使用 CLI 创建和配置项目
- ✅ DevUI 组件库集成 - 安装和使用 DevUI 组件
- ✅ 数据模型设计 - TypeScript 接口定义
- ✅ 服务层开发 - 使用 RxJS 管理状态
- ✅ 国际化实现 - 多语言切换功能
- ✅ CRUD 操作 - 完整的增删改查功能
- ✅ 响应式设计 - 适配多种屏幕尺寸
- ✅ 用户体验优化 - Toast 提示、确认对话框等
🚀 扩展建议
功能扩展
- 分页功能 - 使用 DevUI 的 Pagination 组件
- 批量操作 - 添加复选框和批量删除
- 数据导出 - 导出为 Excel 或 CSV
- 图片上传 - 为商品添加图片
- 权限管理 - 添加用户登录和权限控制
- 数据统计 - 使用图表展示销售数据
技术优化
- 状态管理 - 集成 NgRx 或 Akita
- 后端集成 - 连接真实的 REST API
- 单元测试 - 使用 Jasmine 和 Karma
- E2E 测试 - 使用 Cypress 或 Playwright
- PWA 支持 - 添加离线功能
- 性能优化 - 虚拟滚动、懒加载等
📚 学习资源
MateChat:https://gitcode.com/DevCloudFE/MateChat
MateChat官网:https://matechat.gitcode.com
DevUI官网:https://devui.design/home
💡 最佳实践
- 组件化开发 - 将大组件拆分为小组件
- 类型安全 - 充分利用 TypeScript 的类型系统
- 响应式编程 - 使用 Observable 而不是 Promise
- 代码复用 - 提取公共逻辑到服务或工具函数
- 性能优化 - 使用 OnPush 变更检测策略
- 可维护性 - 保持代码简洁,添加必要的注释
💡 效果图
源代码
https://gitcode.com/daleishen/DevUI
感谢学习本教程!完整详细的代码请查看项目源文件。如有问题,欢迎交流讨论。 🎓