使用vite-plugin-federation实现微前端的搭建开发
使用背景
老板说了,项目比较大,不好维护要拆分成多个子项目,这样每次维护发包时候及时报错了也不会影响其他的项目(我现在用的是microapp,因为之前他们用的iframe拆分了,只有弹框问题不好解决,用microapp改造下是最快的,插件那块microapp嵌套报错用了联邦实现了)。
注意:联邦搭建微前端适合新项目,如果已经有用iframe拆分实现微前端过的老项目还是用microapp比较好,啥都不用改直接引入就能实现微前端。
- 官方描述的是去中心画,我还是按照老板现在想法实现1+n+n,
- 1个框架(登录,接口封装,layout布局等)只要搭建好基本上不会在改的(新开项目这个也直接能拿去用)
- n个应用(大屏,多个后台管理模块)就是改动相对较少的
- n个插件(要给不同客户部署,他们都会提自己需求,例如大屏的某块展示,客户不提我们就展示默认的,客户提了就渲染他们个性化的内容)
使用方法
- 首先创建两个项目:base,运营管理 全是vite+vue3
pnpm create vue - 安装联邦
pnpm add @originjs/vite-plugin-federation --save-dev - 官方使用方法
- base项目可以dev启动,运营管理必须build之后用preview预览
js
// vite.config.js 运营管理
import federation from "@originjs/vite-plugin-federation";
export default {
    plugins: [
        federation({
            name: 'remote-app',
            filename: 'remoteEntry.js',
            // Modules to expose
            exposes: {
                './Button': './src/Button.vue',
            },
            shared: ['vue']
        })
    ]
}
js
// vite.config.js base项目
import federation from "@originjs/vite-plugin-federation";
export default {
    plugins: [
        federation({
            name: 'host-app',
            remotes: {
                remote_app: "http://localhost:5001/assets/remoteEntry.js",
            },
            shared: ['vue']
        })
    ]
}
vue
// 页面使用
const RemoteButton = defineAsyncComponent(() => import("remote_app/Button"));
<template>
    <div>
        <RemoteButton />
    </div>
</template>
推荐使用方法(超级坑:他们中文文档没有介绍,找了好久发现写在了英文文档的最下面)
用上面这个方法,在做定制化时候,不好用,例如后台配置个性化接口时候,前端自动通过接口展示对应的个性化。所以需要有个能够动态加载组件方法。
运营管理那块导出不用修改,base的导入方式需要修改下
js
// vite.config.js base项目
federation({
  remotes:{
    "None": "" //这个不加就报错,他们issues里找到的别人的解决办法
  },
  shared: ['vue', 'pinia', 'vue-router'],
}),
先定一个公共的util方法获取动态组件和方法
js
//util.ts
import {
  __federation_method_getRemote as getRemote,
  __federation_method_setRemote as setRemote,
  __federation_method_unwrapDefault as unwrap,
} from 'virtual:__federation__'

interface RemoteOptions {
  url: string
  moduleName: string,
  type?: 'ts' | 'component'
}

export const getRemoteComponent = async (options: RemoteOptions): Promise<any> => {
  try {
      const { url, moduleName, type = 'component' } = options
      const remoteName = `remote_${Math.random().toString(36).slice(2)}`
      // 1. 注册 remote 信息
      setRemote(remoteName, {
        url: () => Promise.resolve(url),
        format: 'esm',
        from: 'vite',
      })

      // 2. 加载模块
      const mod = await getRemote(remoteName, `./${moduleName}`)
      console.log('======', type)
      if(type === 'ts') return mod
      // 3. 解包模块
      const Comp = await unwrap(mod)

      return Comp
  } catch (error) {

  }
}
js
//使用导出的方法
const util = await getRemoteComponent({
    url: 'http://localhost:20001/assets/remoteEntry.js',
    moduleName: 'Util',
    type: 'ts'
})
console.log('util', util?.add(1, 2))
//引入组件
const remoteButton = getRemoteComponent({
  url: 'http://localhost:5001/assets/remoteEntry.js',
  moduleName: "Button"
})
<template>
<Suspense>
  <!-- 具有深层异步依赖的组件 -->
  <remoteButton />

  <!-- 在 #fallback 插槽中显示 "正在加载中" -->
  <template #fallback>
    Loading...
  </template>
</Suspense>
</template>
这样就可以通过base里面设置动态路由来加载不同子项目的组件了
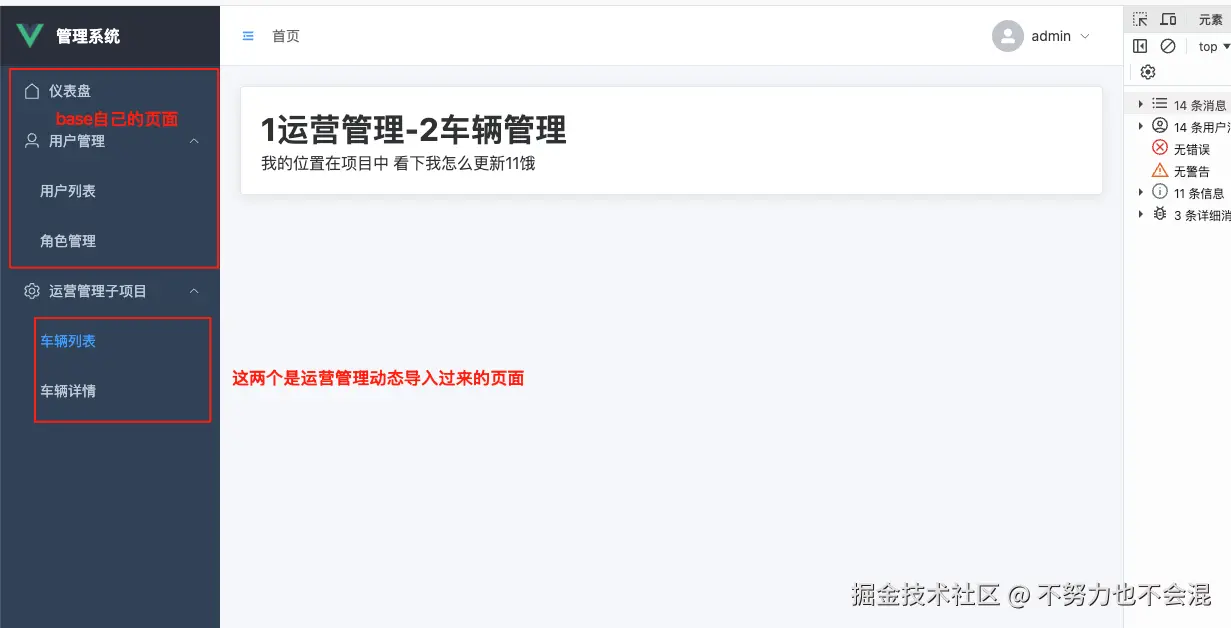
我的示例
base项目内容
- 登录页面
- layout布局
- 获取用户菜单动态加载菜单路由
- 一些他自己的页面,用户管理,角色管理等
js
//模拟的用户菜单
export const getMenuList = () => {
  return new Promise((resolve) => {
    setTimeout(() => {
      resolve([
        {
          id: 1,
          title:'运营管理',
          children:[
            {
              id: 11,
              title:'车辆管理',
              name: 'CarManage',
              path: '/business/CarManage',
              component: 'CarManage',
              source: 'http://localhost:20001/assets/remoteEntry.js'
            },
            {
              id: 12,
              title:'车辆详情',
              name: 'CarDetail',
              path: '/business/CarDetail',
              component: 'CarDetail',
              source: 'http://localhost:20001/assets/remoteEntry.js'
            }
          ]
        },
        {
          id: 2,
          title:'用户管理',
          children:[
            {
              id: 21,
              title:'用户列表',
              name: 'UserList',
              path: '/user/UserList',
              component: '/user/UserListView',
            },
            {
              id: 22,
              title:'用户角色',
              name: 'UserRole',
              path: '/user/UserRole',
              component: '/user/UserRoleView',
            }
          ]
        }
      ])
    }, 1000)
  })
}
js
/**
 * 动态加载组件(支持本地和远程组件)
 */
const modules = import.meta.glob("../views/**/*.vue")
export function loadDynamicComponent(menu: MenuType) {
  if (menu.source && menu.component) {
    // 远程组件加载
    return () => getRemoteComponent({
      url: menu.source as string,
      moduleName: menu.component
    })
  } else if (menu.component) {
    // 本地组件加载 - 使用 import.meta.glob
    let componentPath: string

    if (menu.component.startsWith('/')) {
      // 如果是路径格式 (如 /user/UserList),转换为相对路径
      componentPath = `../views${menu.component}.vue`
    } else {
      // 如果是组件名格式 (如 UserList),添加路径前缀
      componentPath = `../views/${menu.component}.vue`
    }

    const moduleLoader = modules[componentPath]

    if (moduleLoader) {
      return moduleLoader
    } else {
      console.warn(`组件未找到: ${componentPath},可用组件:`, Object.keys(modules))
      return () => Promise.resolve({
        template: '<div>组件未找到</div>'
      })
    }
  }
  return undefined
}
运营管理内容
只需要把要导出的东西都导出就行
javascript
export const remoteExport = {
  CarManage: 'src/views/CarManage/CarManage.vue',
  CarDetail: 'src/views/CarManage/CarDetail.vue',
  Util: 'src/utils/index.ts'
}
// vite.config.ts
federation({
  name: 'remote-business',
  filename: 'remoteEntry.js',
  exposes: Object.fromEntries(
    Object.entries(remoteExport).map(([key, value]) => [`./${key}`, value])
  ),
  shared: ['vue', 'pinia', 'vue-router']
}),
到现在已经实现了微前端了
开发时候的优化
现在子项目必须build之后才能生成remoteEntry,也就没办法热更新。
可以使用通知,base项目全局刷新,实现伪热更新效果
参考下下面的插件
ts
interface Options {
  role: 'remote' | 'host';
  host?: string;
}
export default function syncReloadPlugin(options: Options) {
  const role = options.role;
  const hostUrl = options.host;

  return {
    name: 'vite-plugin-sync-reload',

    apply(config: any, { command }: any) {
      if (role !== 'remote') return 'dev';
      return Boolean(command === 'build' && config.build?.watch);
    },

    async buildEnd(error: any) {
      if (role !== 'remote') return;
      if (error) return;

      try {
        await fetch(`${hostUrl}/__fullReload`);
        console.log(`[remote] 已通知 host 刷新`);
      } catch (e) {
        console.log(`[remote] 通知 host 失败(可能 host 未启动)`);
      }
    },

    configureServer(server: any) {

      if (role !== 'host') return;

      server.middlewares.use((req: any, res: any, next: any) => {

          // remote build 后会访问这里
          if (req.url === '/__fullReload') {

            console.log('[host] 收到 remote 通知,即将刷新页面');

            // 触发浏览器刷新
            setTimeout(() =>{
              server.hot.send({
                type: 'full-reload'
              });
            },100)

            res.end('Full reload triggered');
          } else {
            next(); // 继续下一个中间件
          }
        });
    }
  };
}

syncReloadPlugin({ role: 'host' }),
syncReloadPlugin({
  role: 'remote',
  host: 'http://localhost:20000'
})