一、简介
BitsAndBytes 是一个专门用于神经网络高效量化的 Python 库,由 Hugging Face 团队开发维护。它提供了多种量化方法,特别是 8-bit 和 4-bit 量化,广泛应用于大语言模型的部署和训练优化。
主要特性
- INT8 量化:减少 2 倍内存占用
- NF4 量化:减少 4 倍内存占用(4-bit NormalFloat)
- 训练时量化:支持 QLoRA(Quantized Low-Rank Adaptation)
- 无性能损失推理:在特定条件下保持原始精度
- Hugging Face 集成:与 Transformers 库无缝集成
二、安装依赖库:
bash
pip install bitsandbytes accelerate --index-url https://pypi.org/simple/三、示例代码
bits_and_bytes_quantize.py代码:
python
import torch
from transformers import AutoTokenizer, AutoModelForCausalLM, BitsAndBytesConfig
from typing import Optional


# pip install bitsandbytes --index-url https://pypi.org/simple/
# pip install accelerate --index-url https://pypi.org/simple/
import torch
from transformers import AutoTokenizer, AutoModelForCausalLM, BitsAndBytesConfig
from typing import Optional

def bits_and_bytes_quantize(
    model_path: str,
    quantization_config: Optional[BitsAndBytesConfig] = None,
    device_map: str = "auto",
    quant_path: str = "."
) -> bool:
    """
    使用BitsAndBytes量化模型并保存

    Args:
        model_path: 原始模型路径
        quantization_config: 量化配置,如果为None则启用默认4-bit量化
        device_map: 设备映射
        quant_path: 量化模型保存路径

    Returns:
        bool: 量化成功返回True,失败返回False
    """
    model = None
    tokenizer = None

    # 1. 量化配置验证与默认设置
    if quantization_config is None:
        print("警告: 未提供量化配置,将使用默认4-bit量化")
        quantization_config = BitsAndBytesConfig(load_in_4bit=True)

    # 确保至少有一种量化被启用
    if not (quantization_config.load_in_4bit or quantization_config.load_in_8bit):
        print("警告: 量化配置未启用,将启用4-bit量化")
        quantization_config.load_in_4bit = True

    try:
        # 2. 加载tokenizer
        tokenizer = AutoTokenizer.from_pretrained(model_path)

        # 3. 加载并量化模型
        model = AutoModelForCausalLM.from_pretrained(
            model_path,
            device_map=device_map,
            dtype=torch.float16,  # 使用dtype而不是torch_dtype
            quantization_config=quantization_config,
            trust_remote_code=True  # 如果需要远程代码
        )

        print(model)
        # 4. 保存量化模型和tokenizer
        model.save_pretrained(quant_path)
        tokenizer.save_pretrained(quant_path)

        print(f"量化成功! 模型已保存到: {quant_path}")
        return True

    except Exception as e:
        print(f"量化失败: {str(e)}")
        return False

    finally:
        # 5. 清理资源
        if model is not None:
            del model
        if tokenizer is not None:
            del tokenizer

        # 如果有CUDA可用,清理缓存
        if torch.cuda.is_available():
            torch.cuda.empty_cache()

# 主执行部分
if __name__ == "__main__":
    try:
        # 4位量化,推理时计算数据类型为bfloat16
        print("开始4位量化...")
        quantization_config = BitsAndBytesConfig(
            load_in_4bit=True,
            bnb_4bit_compute_dtype=torch.bfloat16,
            bnb_4bit_quant_type="nf4",  # 添加量化类型,更稳定
            bnb_4bit_use_double_quant=True  # 使用双重量化,进一步减小模型大小
        )
        ok = bits_and_bytes_quantize(
            "/data2/model/zhipu/glm-4-9b-chat-hf",
            quantization_config,
            "auto",
            "./glm-4-9b-chat-hf-4bit"
        )

        if ok:
            print("4位量化完成!")
        else:
            print("4位量化失败!")

        # 如果需要8位量化,可以取消注释下面的代码
        # 注意:不要同时运行4位和8位量化,否则会冲突

        # print("开始8位量化...")
        # quantization_config = BitsAndBytesConfig(
        #     load_in_8bit=True,
        #     llm_int8_enable_fp32_cpu_offload=True
        # )
        # ok = bnb_quantize(
        #     "/data2/model/zhipu/glm-4-9b-chat-hf",
        #     quantization_config,
        #     "auto",
        #     "./glm-4-9b-chat-hf-8bit"
        # )

        # if ok:
        #     print("8位量化完成!")
        # else:
        #     print("8位量化失败!")

    except Exception as e:
        print(f"程序执行出错: {e}")
执行:
bash
python bits_and_bytes_quantize.py执行结果如下所示:
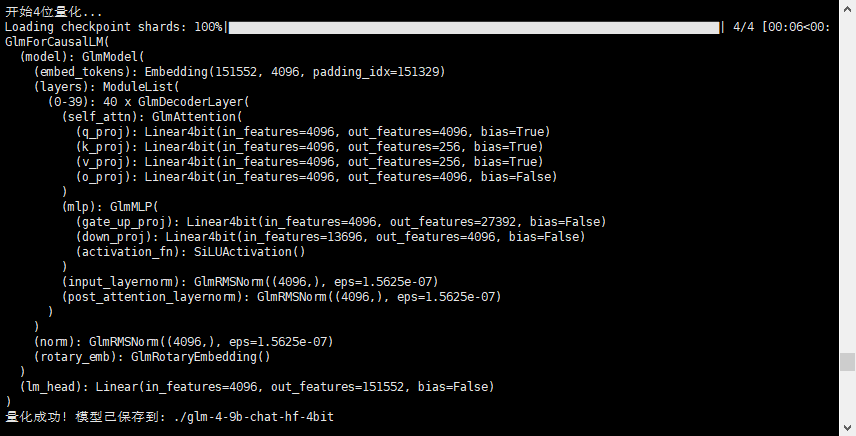
可以明显从上面的截图中看到,模型中的很多层已经被替换为Linear4bit了
查看生成的模型目录,模型文件大约为6.5G,而原始模型大概为18.3G,明显减少了很多。
四、用vllm加载量化后的模型
bash
vllm serve /home/data/cdy/glm-4-9b-chat-hf-4bit --dtype auto --served-model-name glm-4-9b-chat-hf-4bit --trust-remote-code --max-model-len=4096 --api-key AI-GLM4-12345678 --chat-template ./template_chatglm.jinja --uvicorn-log-level warning --port 8000无论是量化的时候,还是vllm所在环境,都要安装bitsandbytes包,否则会报错。
采用curl验证:
bash
curl -X POST http://0.0.0.0:8603/v1/chat/completions \
  -H "content-type:application/json" \
  -H "Authorization: Bearer AI-GLM4-12345678 " \
  -d '{
    "messages":[{"role":"user","content":"中华人民共和国成立日期是哪一天?"}],
    "model": "glm-4-9b-chat-hf-4bit",
    "stream": false,
    "max_tokens": 256
  }'