文章目录
工程化开发
脚手架Vue CLI
开发Vue有两种两种方式:
- 核心包传统开发模式:基于html / css / js 文件,直接引入核心包,开发Vue。
- 工程化开发模式:基于构建工具(例如:webpack ) 的环境中开发Vue。
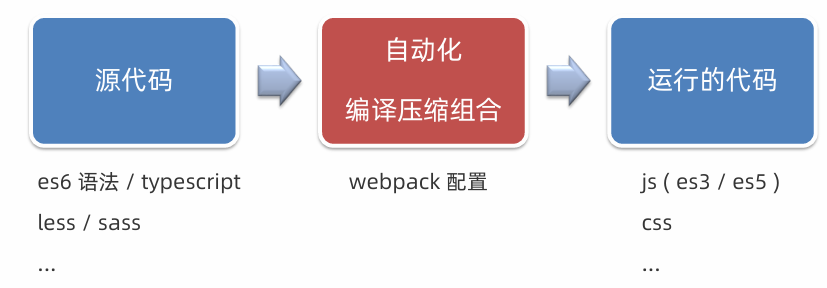
但是:webpack配置复杂、缺乏统一标准,需要一个工具,生成标准化的配置。
Vue CLI 是 Vue 官方提供的一个全局命令工具。可以帮助我们快速创建一个开发Vue 项目的标准化基础架子,集成了webpack配置。开箱即用零配置、内置babel 等工具、标准化。
使用步骤:
- 全局安装(一次) :yarn global add @vue/cli 或 npm i @vue/cli -g
- 查看 Vue 版本:vue --version
- 创建项目架子:vue create project-name(项目名-不能用中文)
- 启动项目:yarn serve 或 npm run serve(找package.json)
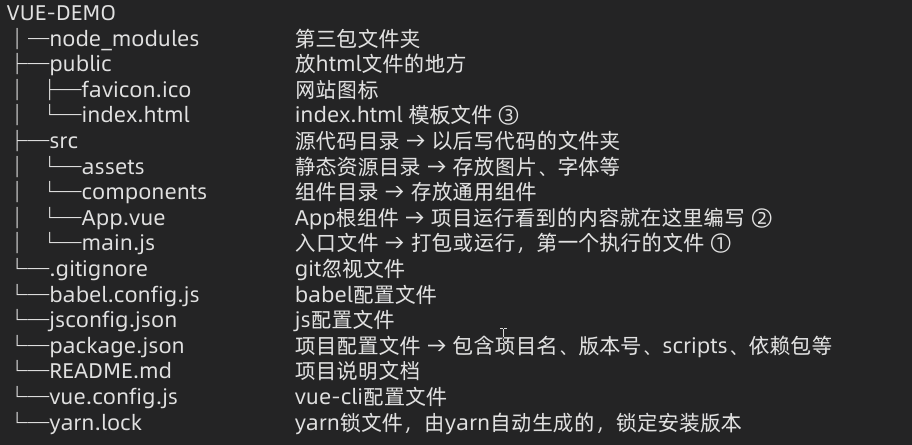
脚手架目录文件
项目运行流程

组件
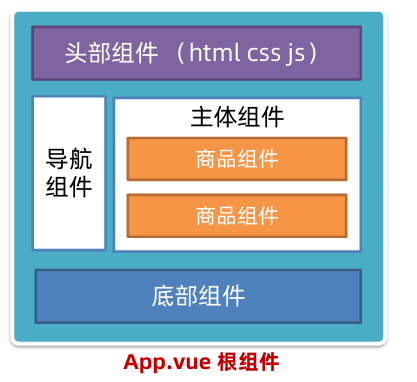
组件化:一个页面可以拆分成一个个组件,每个组件有着自己独立的结构、样式、行为,便于维护,利于复用。
组件分类:普通组件、根组件。
根组件:整个应用最上层的组件,包裹所有普通小组件。
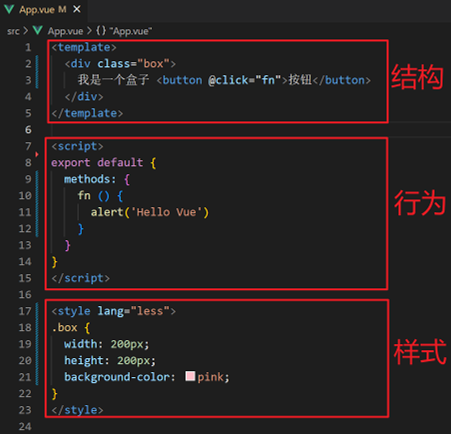
组件的三个组成部分
- template:结构(有且只能一个根元素)
- script: js逻辑,el 根实例独有, data 是一个函数, 其他配置项一致
- style:样式(可支持less,需要装包)。默认写在组件中的样式会全局生效, 因此很容易造成多个组件之间的样式冲突问题,可以给组件加上scoped属性, 可以让样式只作用于当前组件
组件支持less:
- style标签,lang="less" 开启less功能
- 装包: yarn add less less-loader
scoped原理
当前组件内标签都被添加data-v-hash值的属性,css选择器都被添加data-v-hash值 的属性选择器

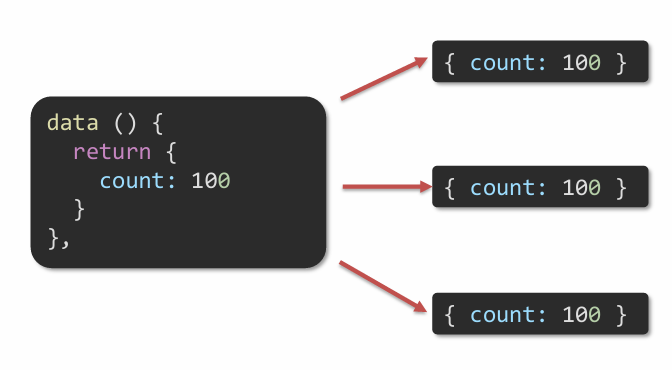
data 是一个函数
一个组件的data选项必须是一个函数,保证每个组件实例,维护独立的一份数据对象。
每次创建新的组件实例,都会新执行一次data 函数,得到一个新对象。
普通组件的注册使用
组件注册的两种方式:
- 局部注册:只能在注册的组件内使用
- 创建.vue 文件(三个组成部分)
- 在使用的组件内导入并注册
html
<template>
 <div>
   <UserProfile />
 </div>
</template>

<script>
import UserProfile from './UserProfile.vue'

export default {
 components: {
   UserProfile
 }
}
</script>- 全局注册:所有组件内都能使用
- 创建.vue 文件(三个组成部分)
- main.js 中进行全局注册
js
// main.js
import Vue from 'vue'
import App from './App.vue'
import MyButton from './components/MyButton.vue'

// 全局注册
Vue.component('MyButton', MyButton)

new Vue({
 render: h => h(App)
}).$mount('#app')

<!-- 任意子组件中都可以直接使用 -->
<template>
 <div>
   <MyButton>点击我</MyButton>
 </div>
</template>
组件通信
组件的数据是独立的,无法直接访问其他组件的数据,组件通信,就是指组件与组件之间的数据传递。
组件通信解决方案
组件关系分为:父子关系和非父子关系
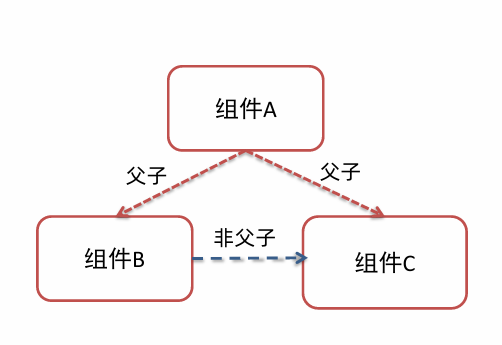
组件通信解决方案:
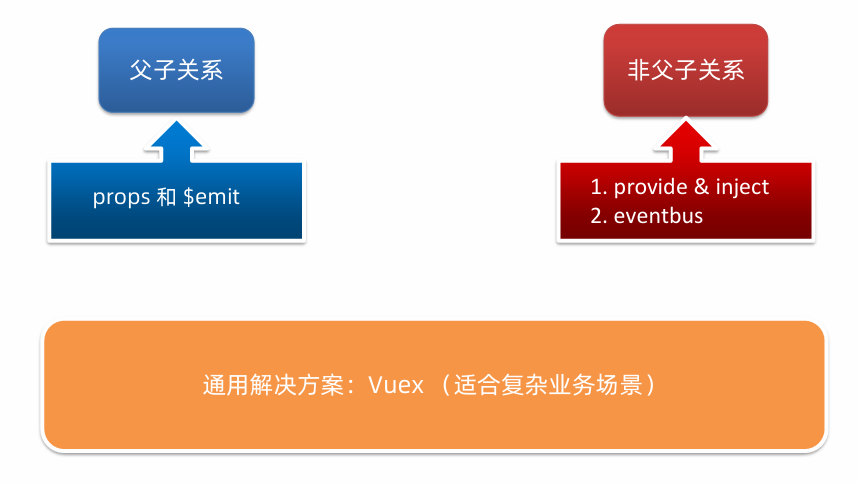
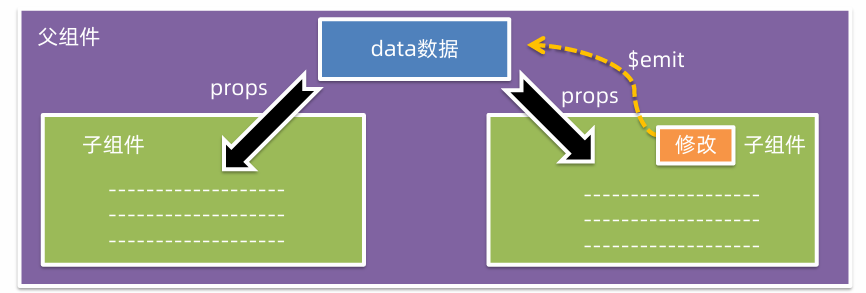
父子组件通信
父组件通过props将数据传递给子组件,子组件利用$emit通知父组件,进行修改更新。
下面为示例,父组件Parent.vue,子组件Child.vue。
- 父 → 子:用 props(如 parentMsg)
- 子 → 父:用 emit 触发自定义事件(如 this.emit('child-say', 数据)),父组件用 @child-say 监听
Parent.vue
html
<template>
  <div>
    <h2>父组件</h2>
    <p>子组件说:{{ messageFromChild }}</p>
    <!-- 向子组件传递数据(props) -->
    <Child :parent-msg="msgToChild" @child-say="getChildMessage" />
  </div>
</template>

<script>
import Child from './Child.vue';

export default {
  name: 'Parent',
  components: { Child },
  data() {
    return {
      msgToChild: 'Hello 子组件!',
      messageFromChild: ''
    };
  },
  methods: {
    // 接收子组件传来的数据
    getChildMessage(data) {
      this.messageFromChild = data;
    }
  }
};
</script>
Child.vue
html
<template>
<div>
<h3>子组件</h3>
<p>父组件说:{{ parentMsg }}</p>
<button @click="sendToParent">告诉父组件</button>
</div>
</template>
<script>
export default {
name: 'Child',
// 接收父组件传来的数据
props: ['parentMsg'],
methods: {
sendToParent() {
// 向父组件发送事件和数据
this.$emit('child-say', '我收到啦!');
}
}
};
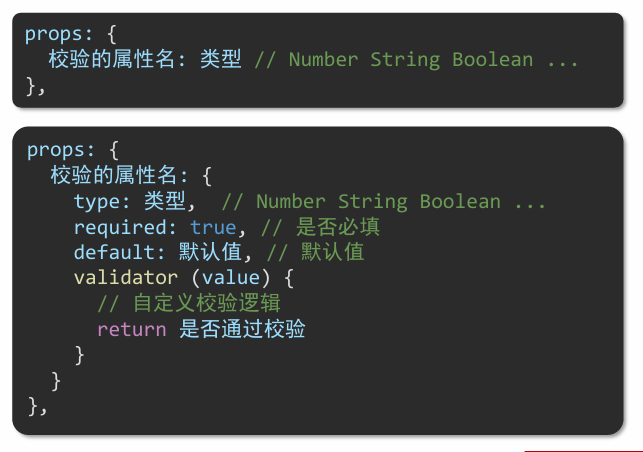
</script>props 校验
Prop是组件上注册的一些自定义属性,用于向子组件传递数据,可以传递任意数量、任意类型的prop。
prop支持校验:
Child.vue增加prop校验
html
<template>
  <div>
    <h3>子组件</h3>
    <p>父组件说:{{ parentMsg }}</p>
    <button @click="sendToParent">告诉父组件</button>
  </div>
</template>

<script>
export default {
  name: 'Child',
  // props 校验
  props: {
    parentMsg: {
      type: String,        // 期望是字符串类型
      required: true,      // 必须传入
      validator(value) {   // 自定义校验:非空字符串
        return typeof value === 'string' && value.trim() !== '';
      }
    }
  },
  methods: {
    sendToParent() {
      this.$emit('child-say', '我收到啦!');
    }
  }
};
</script>
prop 和 data
共同点:都可以给组件提供数据。
区别: data 的数据是自己的,可以修改;prop 的数据是外部的,不能直接改,要遵循单向数据流。
单向数据流:父级prop 的数据更新,会向下流动,影响子组件。这个数据流动是单向的。
非父子组件通信
event bus 事件总线
非父子组件通信可以使用event bus 事件总线,进行简易消息传递。(复杂场景使用Vuex)
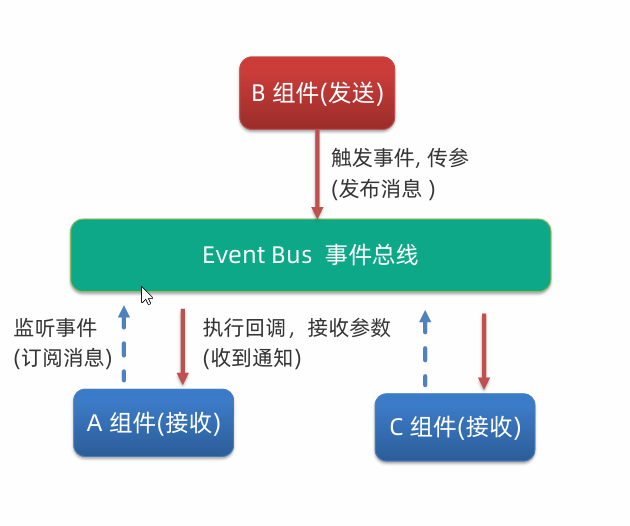
两个兄弟组件通过 Event Bus 通信:
第一步:创建事件总线(eventBus.js)
js
// src/utils/eventBus.js
import Vue from 'vue';
export const EventBus = new Vue();
第二步:组件 A ------ 发送消息(Sender.vue)
html
<!-- Sender.vue -->
<template>
  <div>
    <h3>发送者组件</h3>
    <button @click="sendMessage">向其他组件发消息</button>
  </div>
</template>

<script>
import { EventBus } from '@/utils/eventBus';

export default {
  name: 'Sender',
  methods: {
    sendMessage() {
      EventBus.$emit('message-sent', '你好!我是 Sender 发来的消息!');
    }
  }
};
</script>
第三步:组件 B ------ 接收消息(Receiver.vue)
html
<!-- Receiver.vue -->
<template>
<div>
<h3>接收者组件</h3>
<p>{{ message || '暂无消息' }}</p>
</div>
</template>
<script>
import { EventBus } from '@/utils/eventBus';
export default {
name: 'Receiver',
data() {
return {
message: ''
};
},
created() {
// 监听事件
EventBus.$on('message-sent', (data) => {
this.message = data;
});
},
beforeDestroy() {
// 组件销毁前移除监听,防止内存泄漏
EventBus.$off('message-sent');
}
};
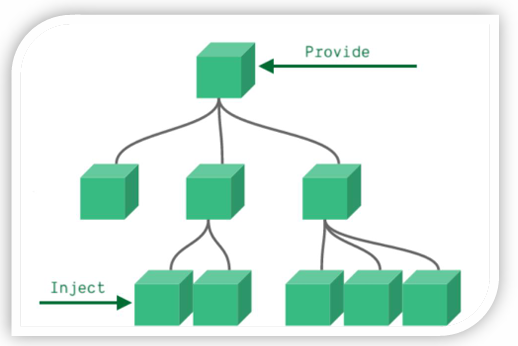
</script>provide & inject
provide & inject 作用是跨层级共享数据,用于实现祖先组件向任意后代组件传递数据,避免层层透传 props。
爷爷组件(GrandParent.vue)--- 使用 provide
html
<!-- GrandParent.vue -->
<template>
  <div>
    <h2>爷爷组件</h2>
    <p>我的名字:{{ name }}</p>
    <!-- 中间不传 prop,直接放子组件 -->
    <Child />
  </div>
</template>

<script>
import Child from './Child.vue';

export default {
  name: 'GrandParent',
  components: { Child },
  data() {
    return {
      name: '张爷爷',
      theme: 'dark'
    };
  },
  // 提供数据给所有后代组件
  provide() {
    return {
      grandName: this.name,
      appTheme: this.theme,
      // 也可以提供方法
      updateTheme: (newTheme) => {
        this.theme = newTheme;
      }
    };
  }
};
</script>
父组件(Child.vue)--- 无需任何处理
html
<!-- Child.vue -->
<template>
  <div style="margin-left: 20px; border-left: 2px solid #ccc; padding-left: 10px;">
    <h3>爸爸组件(中间层)</h3>
    <!-- 它不需要知道 grandName,但孙子能拿到 -->
    <GrandChild />
  </div>
</template>

<script>
import GrandChild from './GrandChild.vue';

export default {
  name: 'Child',
  components: { GrandChild }
  // 注意:这里没有 props,也没有 emit!
};
</script>
孙子组件(GrandChild.vue)--- 使用 inject
html
<!-- GrandChild.vue -->
<template>
  <div style="margin-left: 20px; color: #555;">
    <h4>孙子组件</h4>
    <p>从爷爷那里拿到的名字:{{ grandpaName }}</p>
    <p>当前主题:{{ theme }}</p>
    <button @click="changeTheme">切换主题</button>
  </div>
</template>

<script>
export default {
  name: 'GrandChild',
  // 注入爷爷提供的数据
  inject: ['grandName', 'appTheme', 'updateTheme'],
  computed: {
    grandpaName() {
      return this.grandName;
    },
    theme() {
      return this.appTheme;
    }
  },
  methods: {
    changeTheme() {
      this.updateTheme(this.theme === 'dark' ? 'light' : 'dark');
    }
  }
};
</script>
表单类组件封装v-model 简化
v-model本质上是一个语法糖,提供数据的双向绑定。例如应用在输入框上,就是value属性和input事件的合写。
html
基本用法
<input v-model="message" />
等价于:
<input  :value="message"  @input="message = $event.target.value" />
组件中的 v-model:
在子组件中:
html
<!-- Child.vue -->
<template>
  <input :value="value" @input="$emit('input', $event.target.value)" />
</template>

<script>
export default {
  props: ['value']
};
</script>
父组件使用:
html
<Child :value="msg" @input="msg = $event" />等价于:
html
<Child :value="msg" @input="msg = $event" />.sync 修饰符
作用:可以实现子组件与父组件数据的双向绑定,简化代码
特点:prop属性名,可以自定义,非固定为value
场景:封装弹框类的基础组件,visible属性 true显示false隐藏
本质:就是:属性名和@update:属性名合写
父组件(Parent.vue)
html
<template>
  <div>
    <h2>父组件</h2>
    <p>当前标题:{{ title }}</p>

    <!-- 使用 .sync 修饰符 -->
    <Child :title.sync="title" />
    <!-- 等价于 -->
    <Child  :title="title"   @update:title="title = $event"
/>
  </div>
</template>

<script>
import Child from './Child.vue';

export default {
  components: { Child },
  data() {
    return {
      title: '默认标题'
    };
  }
};
</script>
子组件(Child.vue)
html
<template>
  <div>
    <h3>子组件</h3>
    <p>接收到的标题:{{ title }}</p>
    <button @click="changeTitle">修改标题</button>
  </div>
</template>

<script>
export default {
  props: ['title'],
  methods: {
    changeTitle() {
      // 关键:触发 update:title 事件
      this.$emit('update:title', '新标题 - 来自子组件');
    }
  }
};
</script>
ref 和 $refs
作用:利用ref 和$refs 可以用于获取dom 元素, 或组件实例
获取dom元素:
html
<!-- Parent.vue -->
<template>
  <div>
    <h2>获取 DOM 元素</h2>
    <!-- 给 input 添加 ref -->
    <input ref="myInput" placeholder="点按钮聚焦" />
    <button @click="focusInput">聚焦输入框</button>
  </div>
</template>

<script>
export default {
  methods: {
    focusInput() {
      // this.$refs.myInput 指向真实的 DOM 元素
      this.$refs.myInput.focus();
    }
  }
};
</script>
获取组件:
子组件:Child.vue
html
<!-- Child.vue -->
<template>
  <div>
    <p>子组件内容</p>
    <p>计数:{{ count }}</p>
  </div>
</template>

<script>
export default {
  data() {
    return {
      count: 0
    };
  },
  methods: {
    increment() {
      this.count++;
    },
    reset() {
      this.count = 0;
    }
  }
};
</script>
父组件:使用 ref 获取子组件实例
html
<!-- Parent.vue -->
<template>
  <div>
    <h2>获取子组件实例</h2>
    <!-- 给子组件添加 ref -->
    <Child ref="childComp" />
    <button @click="add">让子组件 +1</button>
    <button @click="reset">重置子组件</button>
  </div>
</template>

<script>
import Child from './Child.vue';

export default {
  components: { Child },
  methods: {
    add() {
      // 调用子组件的方法
      this.$refs.childComp.increment();
    },
    reset() {
      this.$refs.childComp.reset();
    }
  }
};
</script>
vue异步更新、$nextTick
Vue 的数据更新是异步的。当你修改了响应式数据(如 this.msg = 'new'),DOM 不会立即更新,而是被推入一个队列,等到当前事件循环结束才批量更新。所以如果你在修改数据后立刻操作 DOM,可能会拿到旧的 DOM 状态。$nextTick 就是用来"等 DOM 更新完再做事"的。
html
<template>
  <div>
    <button @click="showInput">显示输入框</button>
    <!-- 条件渲染 -->
    <input v-if="show" ref="input" placeholder="自动聚焦" />
  </div>
</template>

<script>
export default {
  data() {
    return {
      show: false
    };
  },
  methods: {
    showInput() {
      this.show = true; // 显示 input

      // input 还没渲染到 DOM!直接 focus 会报错或无效
      // this.$refs.input.focus(); ❌

      this.$nextTick(() => {
        // ✅ 此时 input 已挂载,可以安全操作
        this.$refs.input.focus();
      });
    }
  }
};
</script>
自定义指令
自定义指令:自己定义的指令, 可以封装一些 dom 操作, 扩展额外功能
语法:
js
// 全局注册
Vue.directive('focus', {
  inserted(el) {
    el.focus();
  }
});

// 局部注册(在组件内)
export default {
  directives: {
    focus: {
      inserted(el) {
        el.focus();
      }
    }
  }
};

// 模板中使用:
<input v-focus />
带参数的自定义指令:在绑定指令时,可以通过"等号"的形式为指令 绑定 具体的参数值
html
<div v-color="color">我是内容</div>通过 binding.value 可以拿到指令值,指令值修改会 触发 update 函数。
js
directives: {
	color: {
		inserted (el, binding) {
			el.style.color = binding.value
		},
		update (el, binding) {
			el.style.color = binding.value
		}
	}
}
插槽
插槽(Slot) = 父组件向子组件"注入"自定义内容的占位符。
插槽的三种类型
- 默认插槽(Default Slot)
子组件(BaseCard.vue)
html
<template>
  <div class="card">
    <div class="header">卡片标题</div>
    <div class="body">
      <!-- 默认插槽 -->
      <slot></slot>
    </div>
  </div>
</template>
父组件
html
<BaseCard>
  <p>这是父组件传入的内容!</p>
  <button>操作按钮</button>
</BaseCard>- 具名插槽(Named Slot)
通过 name 属性区分多个插槽。
子组件
html
<template>
  <div class="modal">
    <header>
      <!-- 具名插槽:header -->
      <slot name="header">默认标题</slot>
    </header>
    <main>
      <!-- 默认插槽 -->
      <slot></slot>
    </main>
    <footer>
      <!-- 具名插槽:footer -->
      <slot name="footer"></slot>
    </footer>
  </div>
</template>
父组件
html
<Modal>
  <template v-slot:header>
    <h2>登录</h2>
  </template>

  <!-- 默认插槽可直接写,也可用 v-slot/default -->
  <p>请输入账号密码</p>

  <template #footer> <!-- # 是 v-slot: 的缩写 -->
    <button>取消</button>
    <button>确定</button>
  </template>
</Modal>- 作用域插槽(Scoped Slot)
子组件向父组件传递数据,父组件根据这些数据渲染内容。slot 可以带 prop
子组件(传递数据)
html
<template>
  <ul>
    <li v-for="item in list" :key="item.id">
      <!-- 将 item 和 index 暴露给父组件 -->
      <slot :item="item" :index="index"></slot>
    </li>
  </ul>
</template>

<script>
export default {
  data() {
    return {
      list: [
        { id: 1, name: '苹果' },
        { id: 2, name: '香蕉' }
      ]
    };
  }
};
</script>
父组件(接收并使用数据)
html
<List>
  <template v-slot="{ item, index }">
    <span>{{ index + 1 }}. {{ item.name }}</span>
    <button @click="edit(item)">编辑</button>
  </template>
</List>
路由
单页应用程序 SPA - Single Page Application
| 对比维度 | 单页面应用(SPA) | 多页面应用(MPA) |
|---|---|---|
| 核心原理 | 整个应用只有一个 HTML 页面,通过 JavaScript 动态更新 DOM(如 Vue、React、Angular) | 每个功能/页面对应一个独立的 HTML 文件,跳转即刷新(传统 Web 应用) |
| 页面跳转方式 | 前端路由(如 Vue Router、React Router),无整页刷新 | 浏览器发起新请求,服务器返回新 HTML,整页刷新 |
| 首屏加载速度 | ⚠️ 初次加载较慢(需下载 JS/CSS bundle) ✅ 后续交互极快(无需重载页面) | ✅ 首屏通常较快(只加载当前页资源) ⚠️ 每次跳转都需重新请求 + 渲染 |
| 用户体验 | 类似原生 App:流畅、无白屏、状态保持 | 有刷新感,体验偏"传统网页" |
| SEO(搜索引擎优化) | ❌ 默认较差(爬虫难以执行 JS) ✅ 可通过 SSR(服务端渲染)或预渲染解决 | ✅ 天然友好(每个页面是完整 HTML) |
| 开发复杂度 | 较高:需管理前端路由、状态、懒加载、内存泄漏等 | 较低:页面独立,逻辑解耦简单 |
| 技术栈 | 现代前端框架(Vue、React、Angular 等) | 传统后端模板(如 PHP、JSP、Thymeleaf)或静态 HTML |
| 资源缓存 | ✅ 静态资源(JS/CSS)可长期缓存,后续访问快 | ❌ 每个页面可能重复加载相同资源(除非手动优化) |
| 构建与部署 | 需要构建工具(Webpack、Vite 等),部署为静态资源 | 可直接部署 HTML,或由后端动态生成 |
| 适用场景 | - 后台管理系统 - 富交互应用(如在线文档、地图、仪表盘) - 类 App 体验的产品 | - 内容型网站(新闻、博客、电商首页) - 对 SEO 要求高的营销页 - 简单展示型网站 |
| 典型代表 | Gmail、Vue 官网、Trello、Notion | 早期淘宝、知乎(部分页面)、政府官网 |
| 状态管理 | 需要全局状态管理(如 Vuex、Redux) | 状态通常由 URL 或 Cookie/Session 管理,页面间隔离 |
| 内存占用 | ⚠️ 长时间使用可能内存增长(需注意组件销毁) | ✅ 每次跳转释放内存,更稳定 |
路由的介绍
Vue中路由:路径和组件的映射关系
VueRouter是Vue 官方的一个路由插件,是一个第三方包,其作用为修改地址栏路径时,切换显示匹配的组件
VueRouter的使用
5个基础步骤 (固定)
① 下载: 下载 VueRouter 模块到当前工程,版本3.6.5
shell
yarn add vue-router@3.6.4② 引入
js
import VueRouter from 'vue-router'③ 安装注册
js
Vue.use(VueRouter )④ 创建路由对象
js
const router = new VueRouter()⑤ 注入,将路由对象注入到new Vue实例中,建立关联
js
new Vue({
  render: h => h(App),
  router
}).$mount('#app')
2个核心步骤
① 创建需要的组件 (views目录),配置路由规则
js
import Find from '../views/Find.vue'
import My from '../views/My.vue'
import Friend from '../views/Friend .vue'

const routes = [
  { path: '/find', name: 'Home', component: Find },
  { path: '/my', name: 'About', component: My },
  { path: '/friend', name: 'About', component: Friend },
]
② 配置导航,配置路由出口(路径匹配的组件显示的位置
html
<div class="footer_wrap">
	<a href="#/find">find</a>
	<a href="#/my">my</a>
	<a href="#/friend">friend</a>
</div>
<div class="top">
	<router-view></router-view>
</div>
声明式导航
vue-router 提供了一个全局组件 router-link (取代 a 标签)
- 能跳转,配置 to 属性指定路径(必须) 。本质还是 a 标签 ,to 无需 #
- 能高亮,默认就会提供高亮类名,可以直接设置高亮样式
html
<div class="footer_wrap">
	<router-link to="/find">find</router-link>
	<router-link to="/my">my</router-link>
	<router-link to="/friend">friend</router-link>
</div>
<div class="top">
	<router-view></router-view>
</div>
router-link 自动给当前导航添加了 两个高亮类名:
① router-link-active 模糊匹配 (用的多):to="/my" 可以匹配 /my /my/a /my/b
② router-link-exact-active 精确匹配:to="/my" 仅可以匹配 /my
声明式导航传参
- 查询参数传参 (比较适合传多个参数)
① 跳转:to="/path?参数名=值&参数名2=值"
② 获取:$route.query.参数名 - 动态路由传参 (优雅简洁,传单个参数比较方便)
① 配置动态路由:path: "/path/:参数名"
② 跳转:to="/path/参数值"
③ 获取:$route.params.参数名
js
const routes = [
  // 1. 查询参数传参:/search?name=张三&age=25
  {
    path: '/search',
    name: 'UserSearch',
    component: UserSearch
  },

  // 2. 动态路由传参:/user/1001
  {
    path: '/user/:id', // :id 是动态参数
    name: 'UserProfile',
    component: UserProfile,
    props: true // 可选:将 $route.params 作为 props 传入组件
  }
]
/search/:words 表示,必须要传参数。如果不传参数,也希望匹配,可以加个可选符 "?"," /search/:words?"
编程式导航
① 通过路径跳转 (简易方便)
js
this.$router.push('路由路径')

this..$router.push({
	path: '路由路径'
})
② 通过路由名字跳转 (适合路径名字长的场景)
js
this..$router.push({
	name: '路由名'
})

{name: '路由名', path: '/path/xxx', ...}
编程式导航传参
- path 路径跳转
① query传参
js
this.$router.push('/路由路径?参数名1=参数值1&参数名2=参数值2')

this..$router.push({
	path: '/路由路径',
	query: {
		参数名1:参数值1,
		参数名2: 参数值2
	}
})
② 动态路由传参 (需要配动态路由)
js
this.$router.push('/路由路径/参数值')

this..$router.push({
	path: '/路由路径/参数值',
})- name 命名路由跳转
① query传参
js
this..$router.push({
	name: '路由名',
	query: {
		参数名1:参数值1,
		参数名2: 参数值2
	}
})
② 动态路由传参 (需要配动态路由)
js
this..$router.push({
	name: '路由名',
	params: {
		参数名:参数值
	}
})
Vue路由重定向
问题:网页打开, url 默认是 / 路径,未匹配到组件时,会出现空白
说明:重定向 → 匹配path后, 强制跳转path路径
语法: { path: 匹配路径, redirect: 重定向到的路径 },
js
const routes = [
  { path: '/', redirect: '/home'},
]
Vue路由 404
作用:当路径找不到匹配时,给个提示页面
位置:配在路由最后
语法:path: "*" (任意路径) -- 前面不匹配就命中最后这个
js
const routes = [
  { path: '/', redirect: '/home'},
  { path: '*', component: NotFind},
]
Vue路由模式设置
问题: 路由的路径看起来不自然, 有#,能否切成真正路径形式?
-
hash路由(默认) 例如: http://localhost:8080/#/home
-
history路由(常用) 例如: http://localhost:8080/home (以后上线需要服务器端支持)
const router = new VueRouter({
routes,
mode: 'history'
})
这里的 "服务器端支持",指的是:当用户直接访问一个非根路径的 URL(如 /home、/user/profile)时,服务器必须返回 index.html 页面,而不是返回 404 错误。常见服务器配置示例:
Nginx(最常用)
server {
  listen 80;
  server_name yourdomain.com;
  root /path/to/your/vue/dist;

  location / {
    try_files $uri $uri/ /index.html;
  }
}
try_files 表示:先找真实文件 uri,再找目录 uri/,都找不到就返回 /index.html
路由模块封装
项目结构建议
src/
├── router/
│   ├── index.js          # 路由入口
│   ├── routes.js         # 路由定义(可拆分为 modules/)
│   └── guard.js          # 路由守卫
├── views/
│   ├── layout/
│   │   └── BasicLayout.vue
│   ├── login/
│   │   └── Login.vue
│   ├── dashboard/
│   │   └── Dashboard.vue
│   └── error/
│       └── NotFound.vue
└── store/ # Vuex(用于权限/用户状态)- 路由定义(src/router/routes.js)
js
// 路由配置 - 支持懒加载 + meta 权限控制
const routes = [
  // 登录页(无需权限)
  {
    path: '/login',
    name: 'Login',
    component: () => import('@/views/login/Login.vue'),
    meta: { hidden: true } // 不在菜单中显示
  },

  // 主布局(带导航栏、侧边栏)
  {
    path: '/',
    component: () => import('@/views/layout/BasicLayout.vue'),
    meta: { requiresAuth: true },
    children: [
      {
        path: '',
        name: 'Dashboard',
        component: () => import('@/views/dashboard/Dashboard.vue'),
        meta: { title: '首页', icon: 'home', requiresAuth: true }
      },
      {
        path: 'user',
        name: 'User',
        component: () => import('@/views/user/UserList.vue'),
        meta: { title: '用户管理', icon: 'user', permission: 'user:view' }
      },
      {
        path: 'role',
        name: 'Role',
        component: () => import('@/views/role/RoleList.vue'),
        meta: { title: '角色管理', permission: 'role:view' }
      }
    ]
  },

  // 404 页面(必须放在最后)
  {
    path: '*',
    name: 'NotFound',
    component: () => import('@/views/error/NotFound.vue')
  }
]

export default routes- 路由守卫(src/router/guard.js)
js
import store from '@/store'
import { Message } from 'element-ui' // 或你用的 UI 库

// 白名单:无需登录即可访问
const whiteList = ['/login']

/**
 * 路由前置守卫
 */
export function createRouterGuard(router) {
  router.beforeEach(async (to, from, next) => {
    try {
      // 1. 判断是否已登录(通过 token 或 vuex 状态)
      const hasToken = store.getters['user/token']

      if (hasToken) {
        // 已登录
        if (to.path === '/login') {
          // 如果是登录页,直接跳首页
          next({ path: '/' })
        } else {
          // 检查用户信息是否已加载
          const hasRoles = store.getters['user/roles'] && store.getters['user/roles'].length > 0
          if (hasRoles) {
            // 已有权限,直接放行
            next()
          } else {
            // 首次进入,拉取用户信息和权限
            try {
              await store.dispatch('user/getUserInfo')
              // 可选:根据权限动态添加路由(见下文扩展)
              next({ ...to, replace: true })
            } catch (error) {
              // 获取用户信息失败,清除 token 并跳转登录
              await store.dispatch('user/logout')
              Message.error('登录已过期,请重新登录')
              next(`/login?redirect=${to.path}`)
            }
          }
        }
      } else {
        // 未登录
        if (whiteList.includes(to.path)) {
          // 在白名单内,直接放行
          next()
        } else {
          // 重定向到登录页,并带上目标路径
          next(`/login?redirect=${to.path}`)
        }
      }
    } catch (error) {
      console.error('路由守卫异常:', error)
      next('/500') // 可选:全局错误页
    }
  })

  // 后置钩子(可用于页面标题设置、埋点等)
  router.afterEach((to) => {
    // 设置页面标题
    const title = to.meta.title || '管理系统'
    document.title = ` ${title} - My Admin`
  })
}- 路由入口(src/router/index.js)
js
import Vue from 'vue'
import VueRouter from 'vue-router'
import routes from './routes'
import { createRouterGuard } from './guard'

Vue.use(VueRouter)

// 创建 router 实例
const router = new VueRouter({
  mode: 'history', // 去掉 #
  base: process.env.BASE_URL || '/', // 支持部署子路径
  scrollBehavior: () => ({ y: 0 }), // 切换路由时回到顶部
  routes
})

// 注册守卫
createRouterGuard(router)

export default router- 在 main.js 中使用
js
// src/main.js
import Vue from 'vue'
import App from './App.vue'
import router from './router'
import store from './store'

// 全局注册 UI 库等...
import ElementUI from 'element-ui'
import 'element-ui/lib/theme-chalk/index.css'
Vue.use(ElementUI)

Vue.config.productionTip = false

new Vue({
  router,
  store,
  render: h => h(App)
}).$mount('#app')- 布局组件示例(BasicLayout.vue)
html
<template>
  <div class="basic-layout">
    <Header />
    <div class="main-content">
      <Sidebar :menu-list="menuList" />
      <div class="page-wrapper">
        <!-- 路由出口 -->
        <router-view :key="$route.fullPath" />
      </div>
    </div>
  </div>
</template>

<script>
import Header from './components/Header.vue'
import Sidebar from './components/Sidebar.vue'

export default {
  components: { Header, Sidebar },
  computed: {
    // 从路由 meta 动态生成菜单(过滤 hidden 和无权限项)
    menuList() {
      const routes = this.$router.options.routes.find(r => r.path === '/')?.children || []
      return routes.filter(route => {
        if (route.meta?.hidden) return false
        // 可加权限判断:this.$store.getters['user/hasPermission'](route.meta.permission)
        return true
      })
    }
  }
}
</script>
组件缓存 keep-alive
缓存动态组件或路由组件,避免重复创建/销毁,保留状态(如表单、滚动位置)。
基本用法
html
<!-- 缓存所有路由组件 -->
<keep-alive>
  <router-view />
</keep-alive>

<!-- 只缓存指定组件(匹配组件的 name) -->
<keep-alive include="Home,User">
  <router-view />
</keep-alive>

<!-- 排除某些组件 -->
<keep-alive exclude="Detail">
  <router-view />
</keep-alive>
缓存组件的生命周期钩子
html
// Home.vue
export default {
  name: 'Home',
  created() {
    console.log('created') // 只执行一次
  },
  activated() {
    console.log('activated') // 每次进入都触发(包括从缓存恢复)
    // 可在这里刷新数据
  },
  deactivated() {
    console.log('deactivated') // 离开时触发
    // 可在这里暂停定时器、保存状态等
  }
}
结合 key 强制刷新(即使被缓存)
<keep-alive>
  <router-view :key="$route.fullPath" />
</keep-alive>
ESlint 代码规范
基于 vscode 插件 ESLint 高亮错误,并通过配置自动帮助我们修复错误。
