背景
在 浅解 JUnit 4 第十一篇:@Before 注解和 @After 注解如何发挥作用? 一文中,我们探讨了 @Before/@After 注解是如何发挥作用的。一个类似的问题是 ⬇️
@BeforeClass/@AfterClass 注解是如何发挥作用的?
本文会对此进行探讨。本文的主角是以下几位
- org.junit.BeforeClass 注解
- org.junit.AfterClass 注解
- org.junit.runners.model.Statement 抽象类
要点
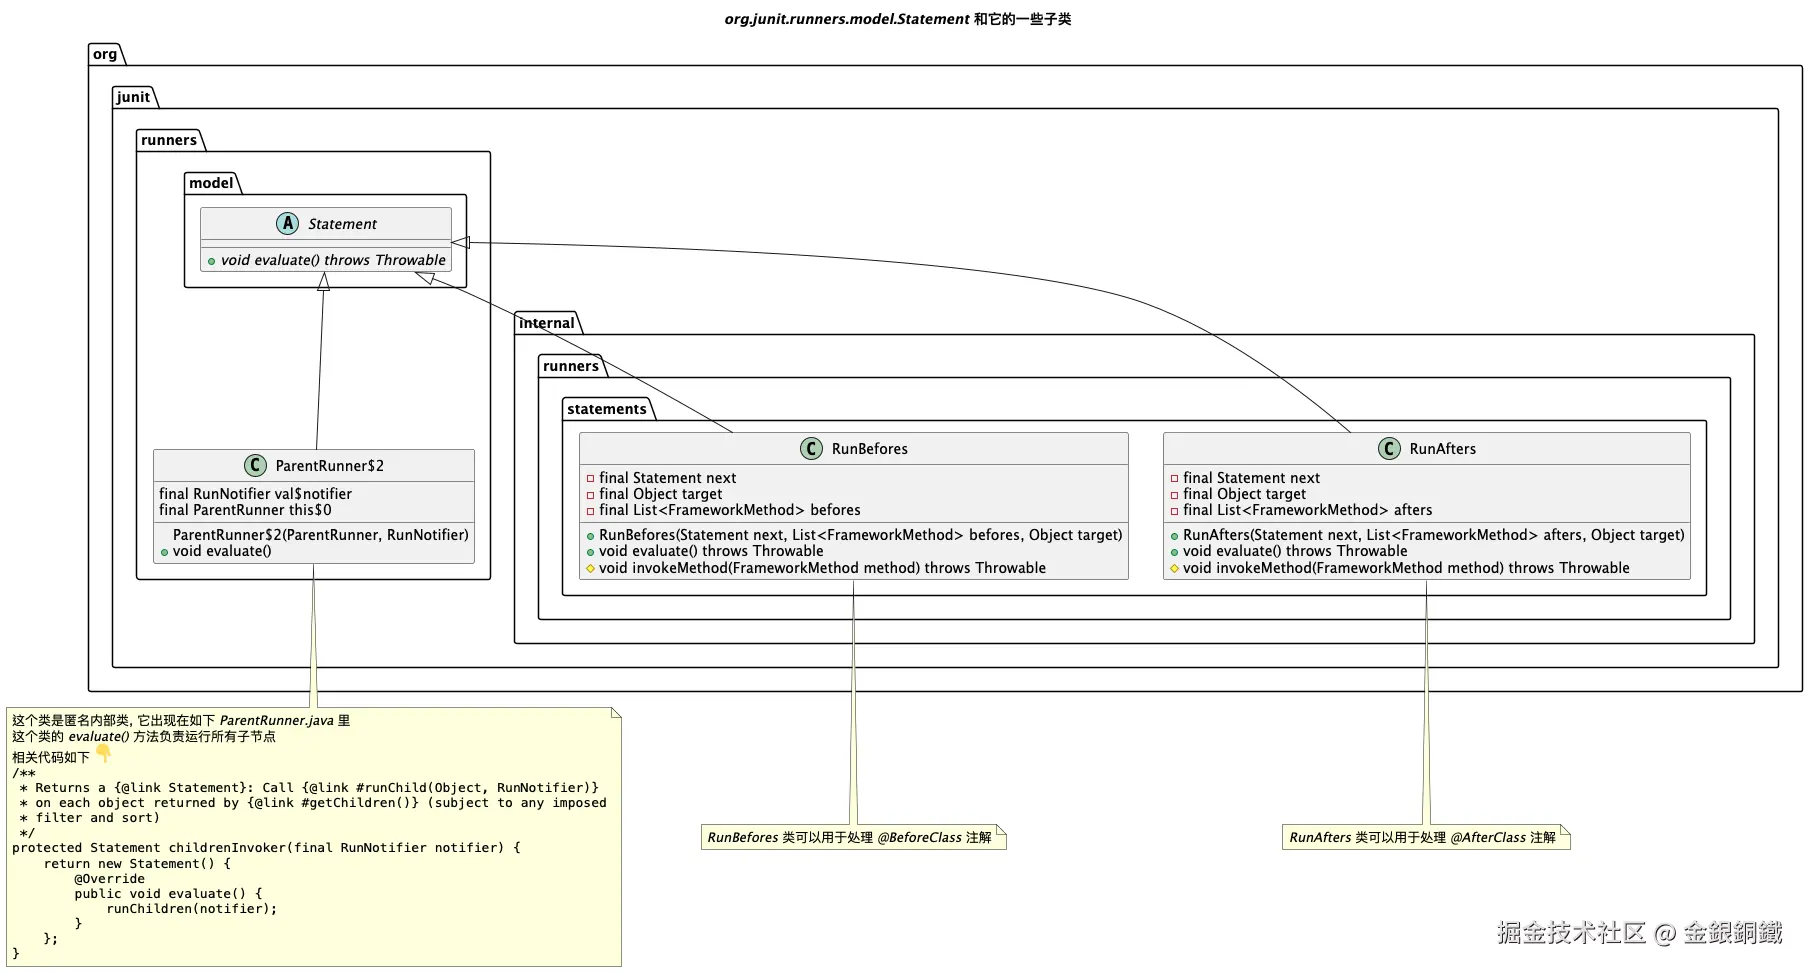
Statement 以及它的一些子类的类图如下 ⬇️
文中提到的 statement1,statement2,statement3 的精确类型列举如下
| 文中提到的重要对象 | 精确类型 |
|---|---|
| statement1 | org.junit.runners.ParentRunner2 |
| statement2 | org.junit.internal.runners.statements.RunBefores |
| statement3 | org.junit.internal.runners.statements.RunAfters |
一些类的全限定类名
文中提到 JUnit 4 中的类,它们的全限定类名一般都比较长,所以文中有时候会用简略的写法(例如将 org.junit.BeforeClass 写成 @BeforeClass)。我在这一小节把简略类名和全限定类名的对应关系列出来
| 简略的类名 | 全限定类名(Fully Qualified Class Name) |
|---|---|
AfterClass 或 @AfterClass |
org.junit.AfterClass |
BeforeClass 或 @BeforeClass |
org.junit.BeforeClass |
BlockJUnit4ClassRunner |
org.junit.runners.BlockJUnit4ClassRunner |
JUnit4 |
org.junit.runners.JUnit4 |
ParentRunner |
org.junit.runners.ParentRunner |
RunAfters |
org.junit.internal.runners.statements.RunAfters |
RunBefores |
org.junit.internal.runners.statements.RunBefores |
Runner |
org.junit.runner.Runner |
TestClass |
org.junit.runners.model.TestClass |
Statement |
org.junit.runners.model.Statement |
正文
一个具体的例子
我创建了一个小项目来以便探讨本文的问题,这个项目的结构如下 ⬇️
text
.
├── pom.xml
└── src
    ├── main
    │   └── java
    │       └── org
    │           └── example
    │               └── SimpleCalculator.java
    └── test
        └── java
            └── org
                └── study
                    └── SimpleCalculatorTest.java
SimpleCalculator.java
SimpleCalculator.java 的内容如下 ⬇️
java
package org.example;

public class SimpleCalculator {

    public int add(int a, int b) {
        return a + b;
    }

    public int minus(int a, int b) {
        return a - b;
    }
}
SimpleCalculatorTest.java
SimpleCalculatorTest.java 的内容如下 ⬇️
java
package org.study;
import org.example.SimpleCalculator;
import org.junit.*;
import org.junit.runner.JUnitCore;
import java.util.concurrent.ThreadLocalRandom;
public class SimpleCalculatorTest {
private int a;
private int b;
private final SimpleCalculator calculator = new SimpleCalculator();
private static final int BOUND = 10;
@BeforeClass
public static void init() {
System.out.println("Just assume there are some expensive resource allocation here.");
}
@AfterClass
public static void destroy() {
System.out.println("Just assume there are some resource release operation here.");
}
@Before
public void prepare() {
a = ThreadLocalRandom.current().nextInt(BOUND);
b = ThreadLocalRandom.current().nextInt(BOUND);
}
@Test
public void testAdd() {
int expectedResult = a + b;
Assert.assertEquals(expectedResult, calculator.add(a, b));
System.out.println("test in testAdd() passed...");
}
@Test
public void testMinus() {
int expectedResult = a - b;
Assert.assertEquals(expectedResult, calculator.minus(a, b));
System.out.println("test in testMinus() passed...");
}
public static void main(String[] args) {
JUnitCore.runClasses(SimpleCalculatorTest.class);
}
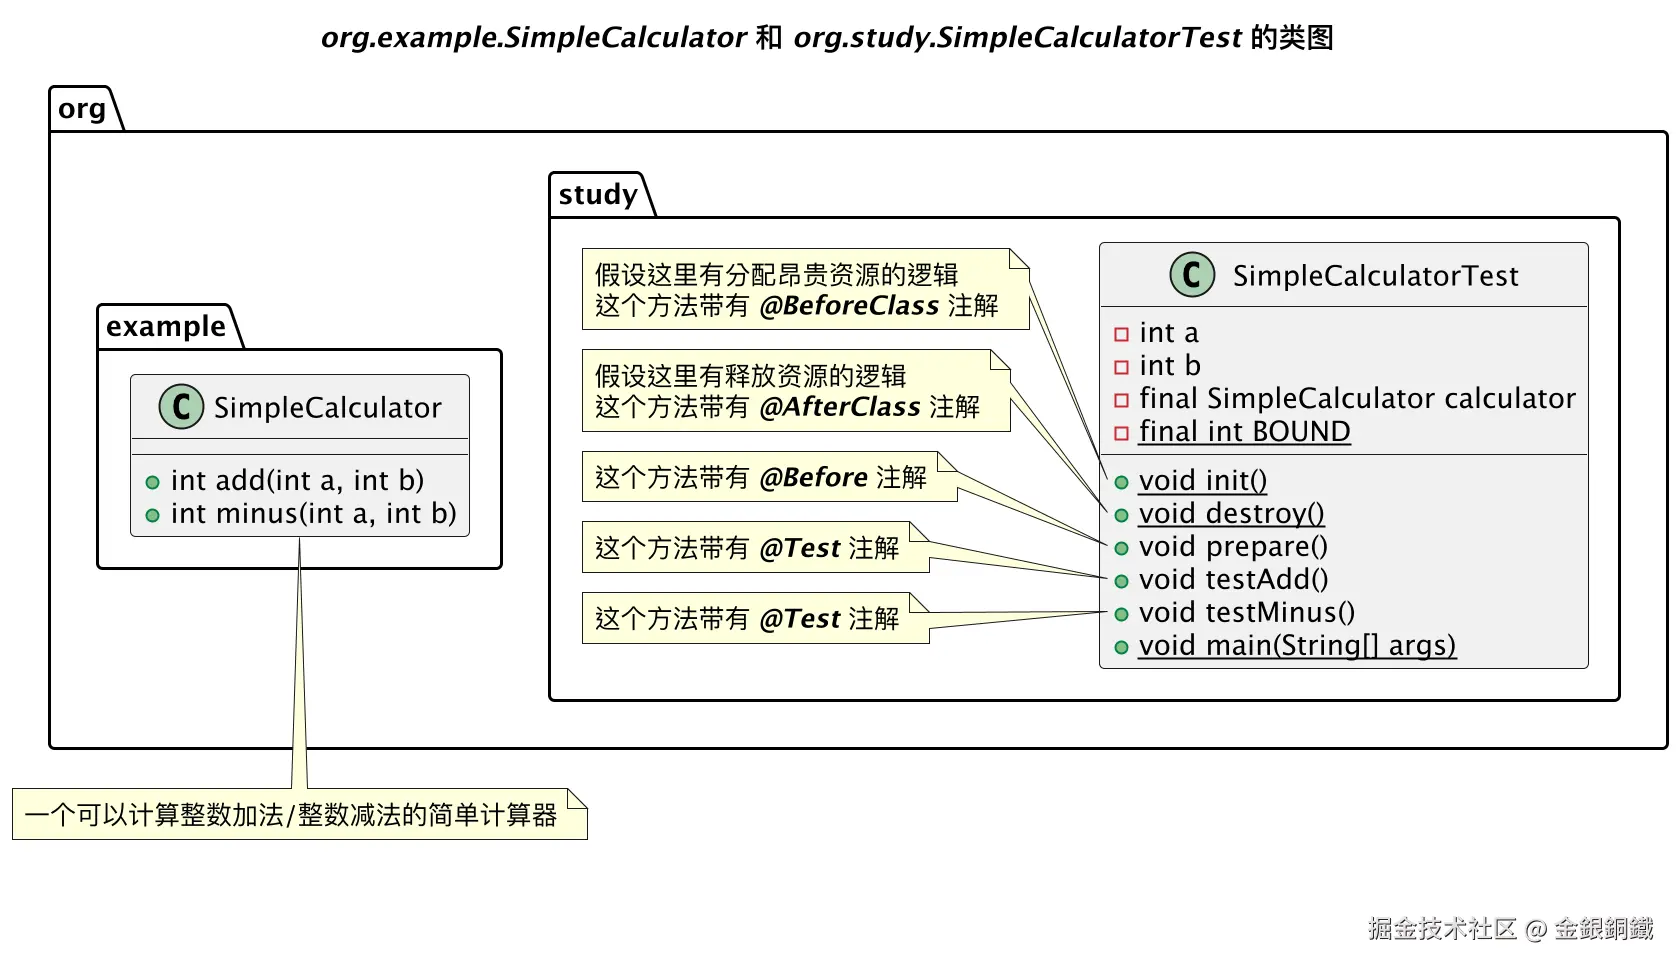
}SimpleCalculator 和 SimpleCalculatorTest 的类图如下
pom.xml
pom.xml 的内容如下 ⬇️
xml
<?xml version="1.0" encoding="UTF-8"?>
<project xmlns="http://maven.apache.org/POM/4.0.0"
         xmlns:xsi="http://www.w3.org/2001/XMLSchema-instance"
         xsi:schemaLocation="http://maven.apache.org/POM/4.0.0 http://maven.apache.org/xsd/maven-4.0.0.xsd">
    <modelVersion>4.0.0</modelVersion>

    <groupId>org.example</groupId>
    <artifactId>junit-study</artifactId>
    <version>1.0-SNAPSHOT</version>

    <properties>
        <maven.compiler.source>25</maven.compiler.source>
        <maven.compiler.target>25</maven.compiler.target>
        <project.build.sourceEncoding>UTF-8</project.build.sourceEncoding>
    </properties>
    <dependencies>
        <dependency>
            <groupId>junit</groupId>
            <artifactId>junit</artifactId>
            <version>4.13.2</version>
            <scope>test</scope>
        </dependency>
    </dependencies>

</project>
如何找到 @BeforeClass/@AfterClass 注解
在 浅解 JUnit 4 第一篇: TestClass 一文中提到,对测试类 T 而言,JUnit 4 会生成对应的 TestClass:TestClassT。借助 TestClassT,我们就可以知道测试类 T 中的哪些方法带有 @BeforeClass/@AfterClass 注解。
何时执行带有 @BeforeClass/@AfterClass 注解的方法
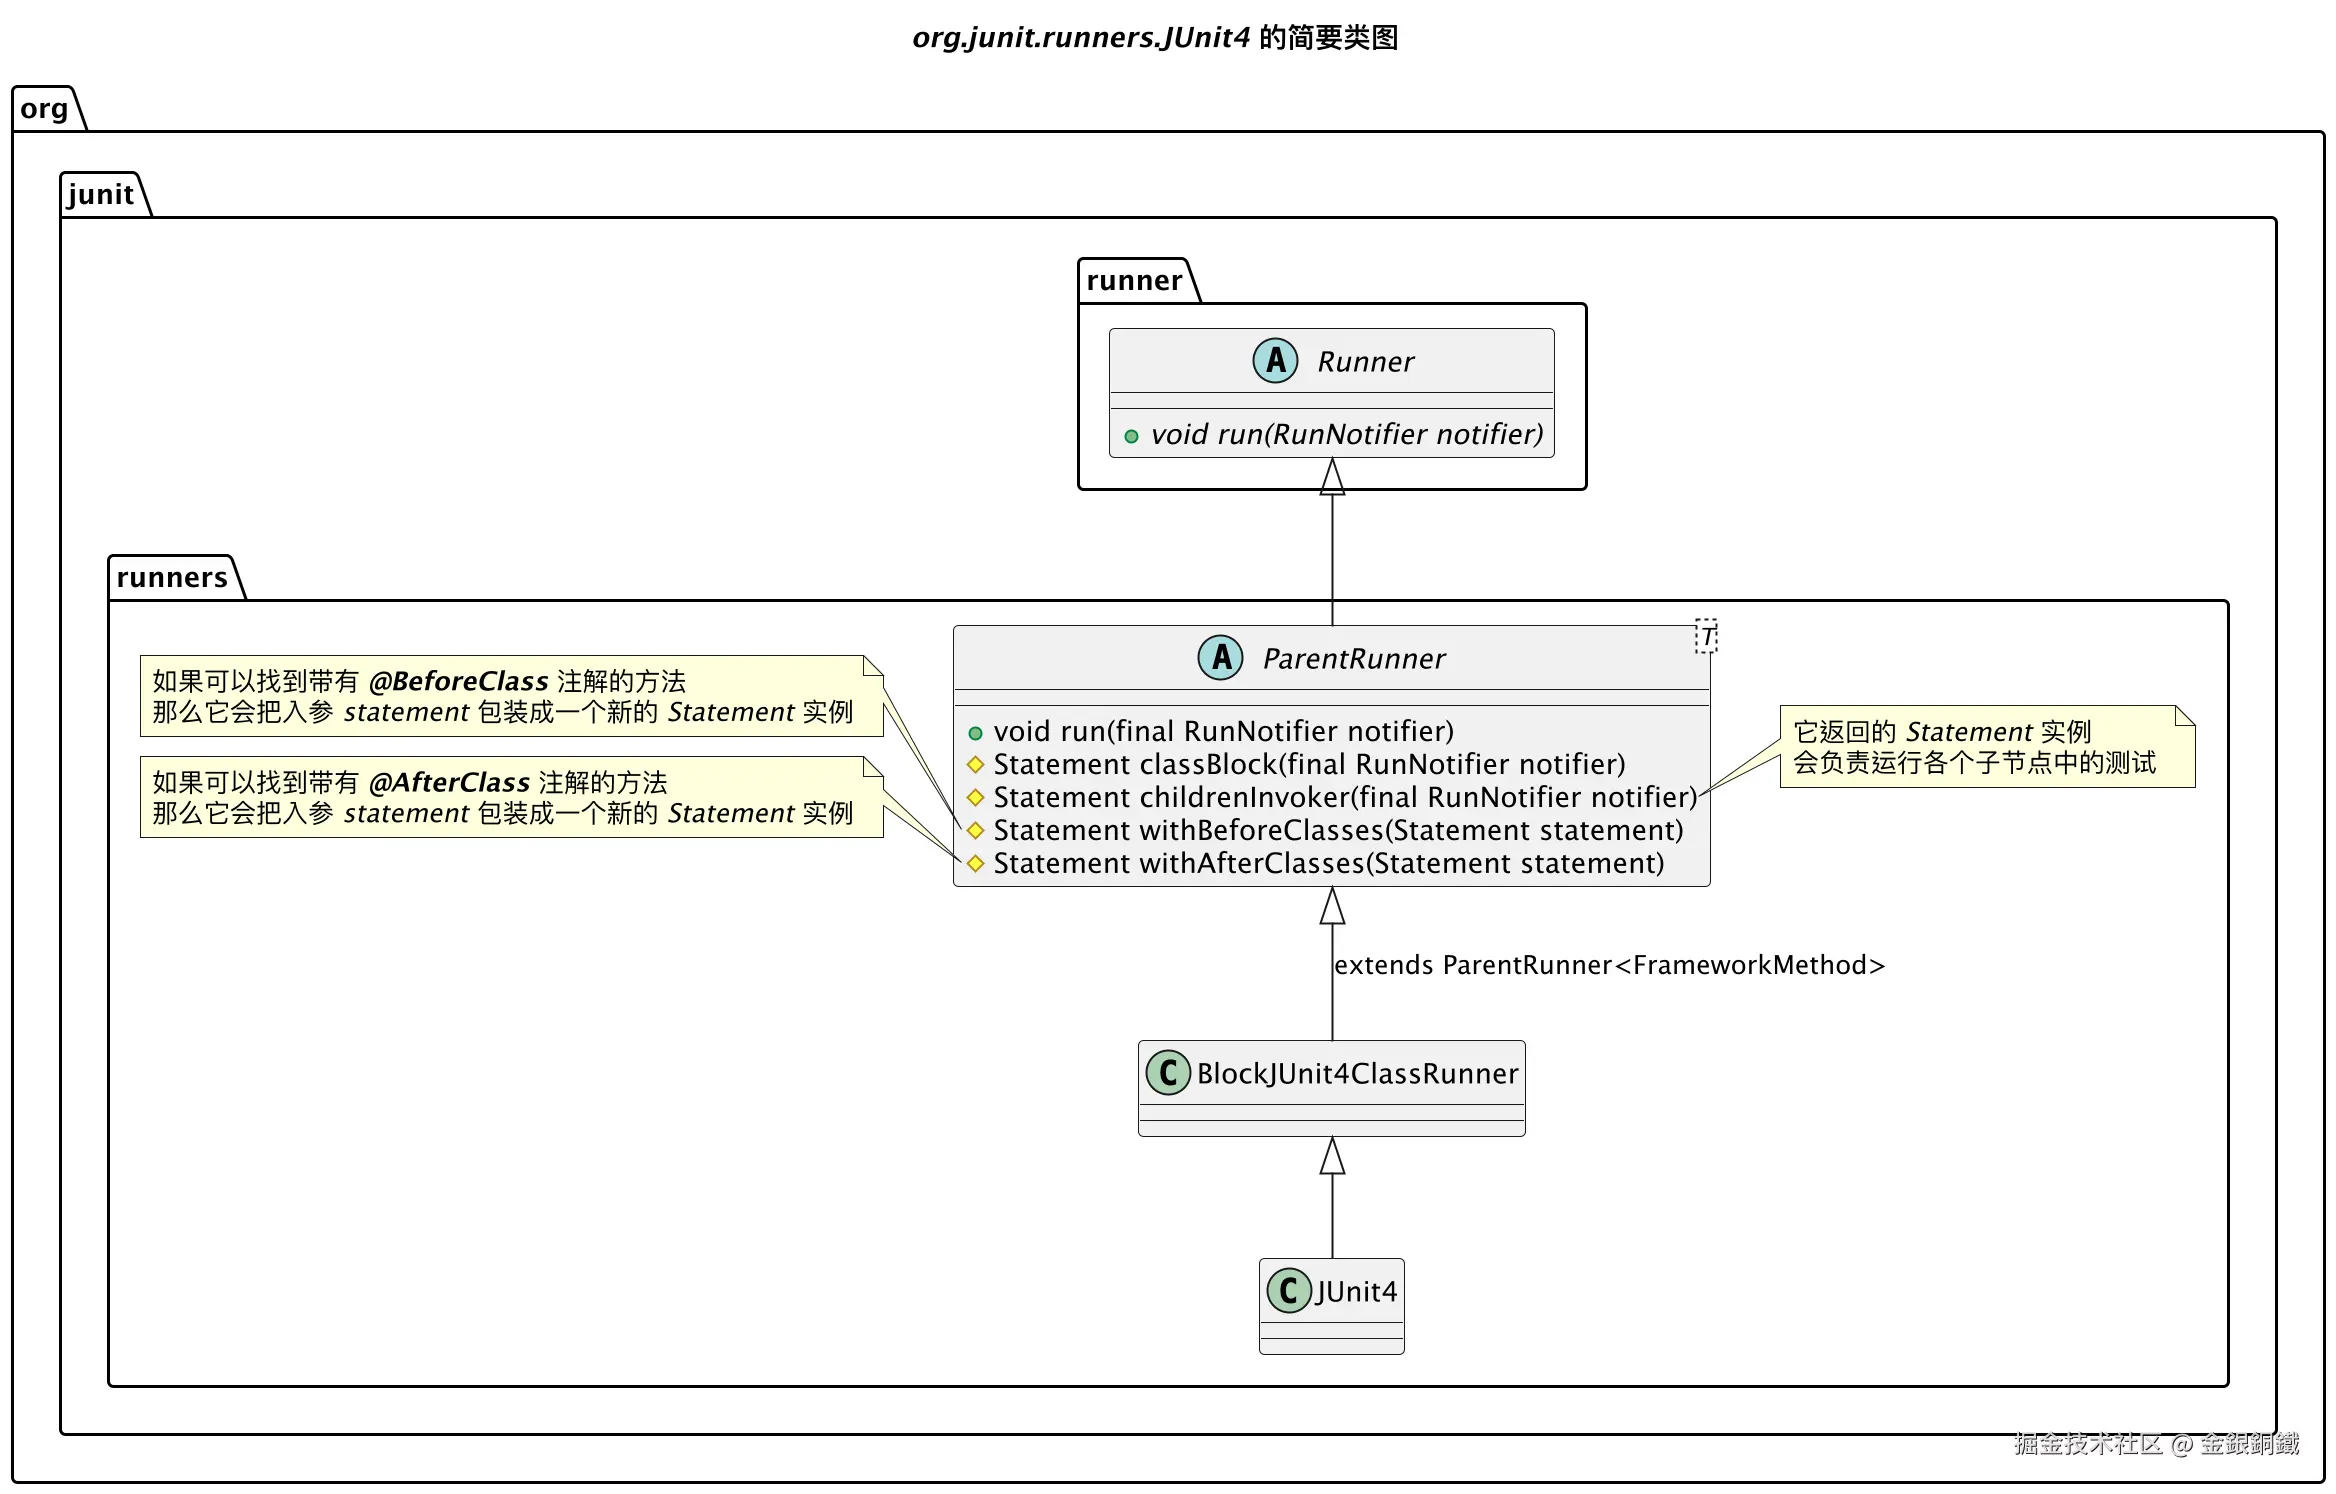
对普通的测试类 T 而言,它对应的 Runner:RunnerT 会是 org.junit.runners.JUnit4 的实例。 org.junit.runners.JUnit4 的简要类图如下 ⬇️
run(final RunNotifier notifier) 方法的细节
- org.junit.runners.JUnit4 继承了 org.junit.runners.BlockJUnit4ClassRunner
- org.junit.runners.BlockJUnit4ClassRunner 继承了 org.junit.runners.ParentRunner
org.junit.runners.ParentRunner 里的 run(final RunNotifier notifier) 方法的代码如下 ⬇️
java
@Override
public void run(final RunNotifier notifier) {
    EachTestNotifier testNotifier = new EachTestNotifier(notifier,
            getDescription());
    testNotifier.fireTestSuiteStarted();
    try {
        Statement statement = classBlock(notifier);
        statement.evaluate();
    } catch (AssumptionViolatedException e) {
        testNotifier.addFailedAssumption(e);
    } catch (StoppedByUserException e) {
        throw e;
    } catch (Throwable e) {
        testNotifier.addFailure(e);
    } finally {
        testNotifier.fireTestSuiteFinished();
    }
}除去发送通知,异常处理这些支线逻辑,主线逻辑 其实只有以下两行
java
Statement statement = classBlock(notifier);
statement.evaluate();
这里做了两件事
- 1. 调用
classBlock(RunNotifier)方法,得到 Statement 实例: statement - 2. 调用 statement 对象上的
evaluate()方法
但这样的描述太粗略了,约等于没说。我们得仔细看看。
classBlock(RunNotifier) 方法做了什么
先来看看 Statement。我把 Statement 的代码复制到下方了 ⬇️
java
package org.junit.runners.model;


/**
 * Represents one or more actions to be taken at runtime in the course
 * of running a JUnit test suite.
 *
 * @since 4.5
 */
public abstract class Statement {
    /**
     * Run the action, throwing a {@code Throwable} if anything goes wrong.
     */
    public abstract void evaluate() throws Throwable;
}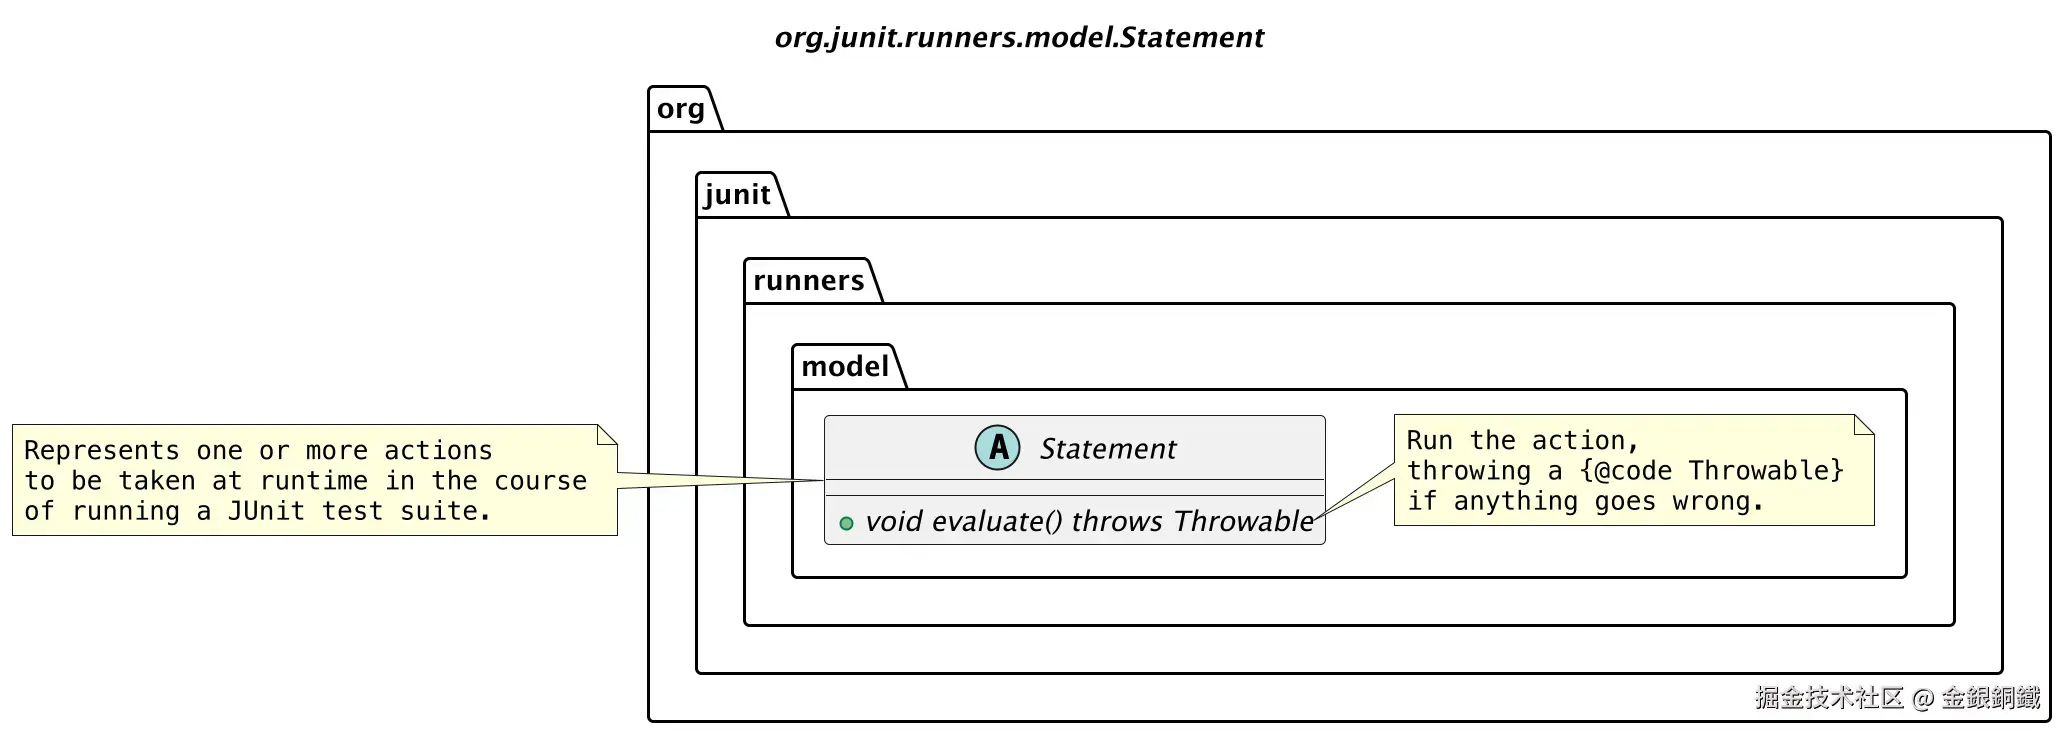
Statement 看起来是对测试的封装。
如果我们需要运行测试类 T 中的某个测试方法 method1,可以把 运行测试类 T 中的 method1 方法 这个逻辑封装为一个 Statement 对象 s。在 s 的 evaluate() 方法里运行 T 中的 method1 方法。
也可以让 Statement 表示更高层的逻辑。假设测试类 T′ 里共有以下三个测试方法需要运行
- methoda
- methodb
- methodc
那么我们可以把 运行测试类 T′ 中的 methoda,methodb,methodc 这些方法 的逻辑整体封装为一个 Statement 对象 s′。 在 s′ 的 evaluate() 方法里运行 T′ 中的下列方法
- methoda
- methodb
- methodc
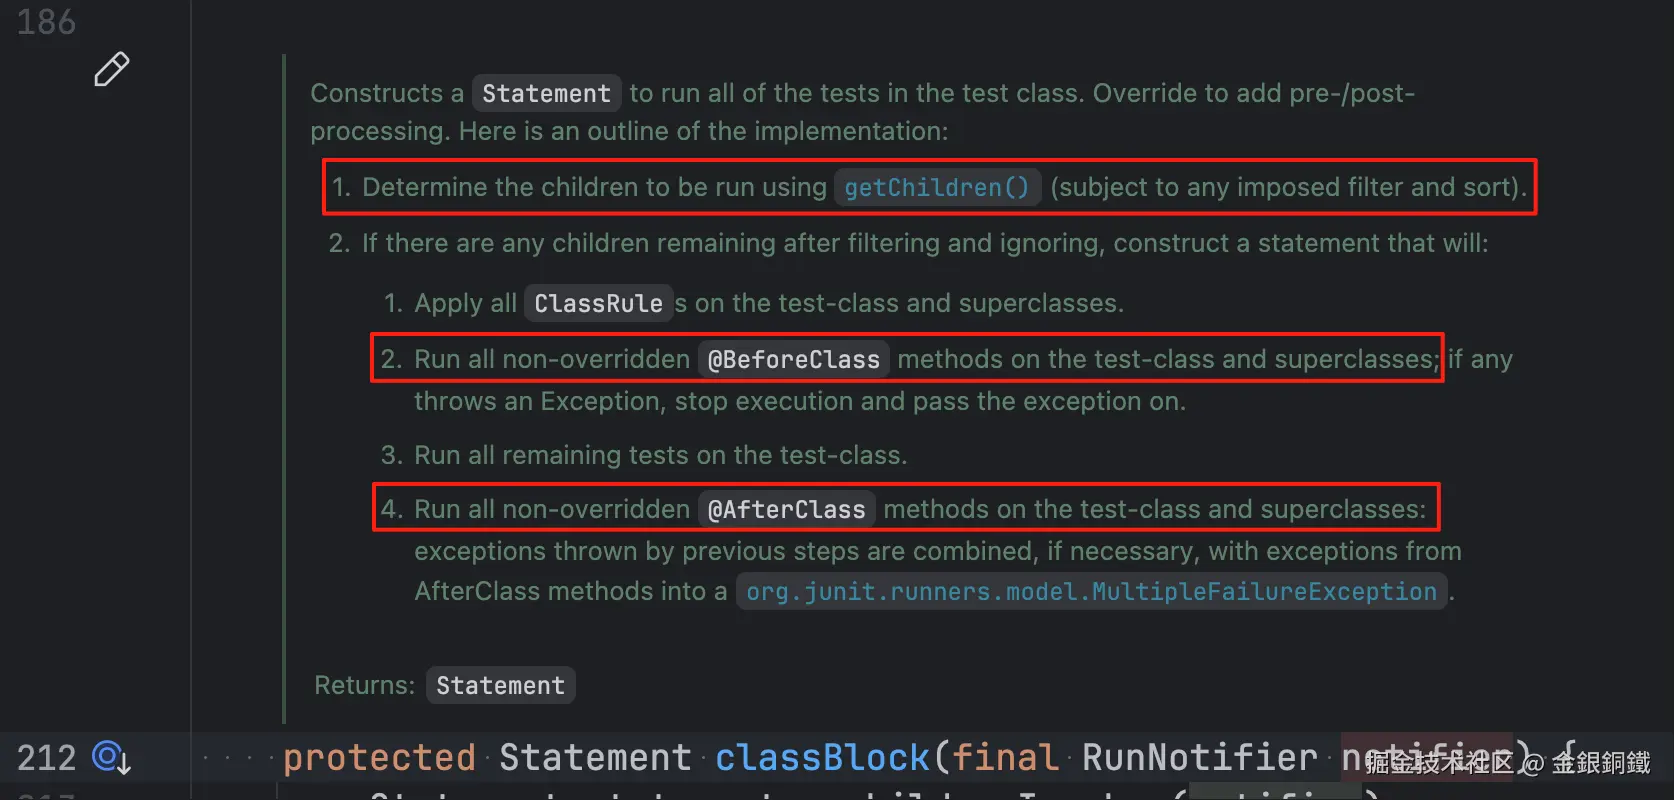
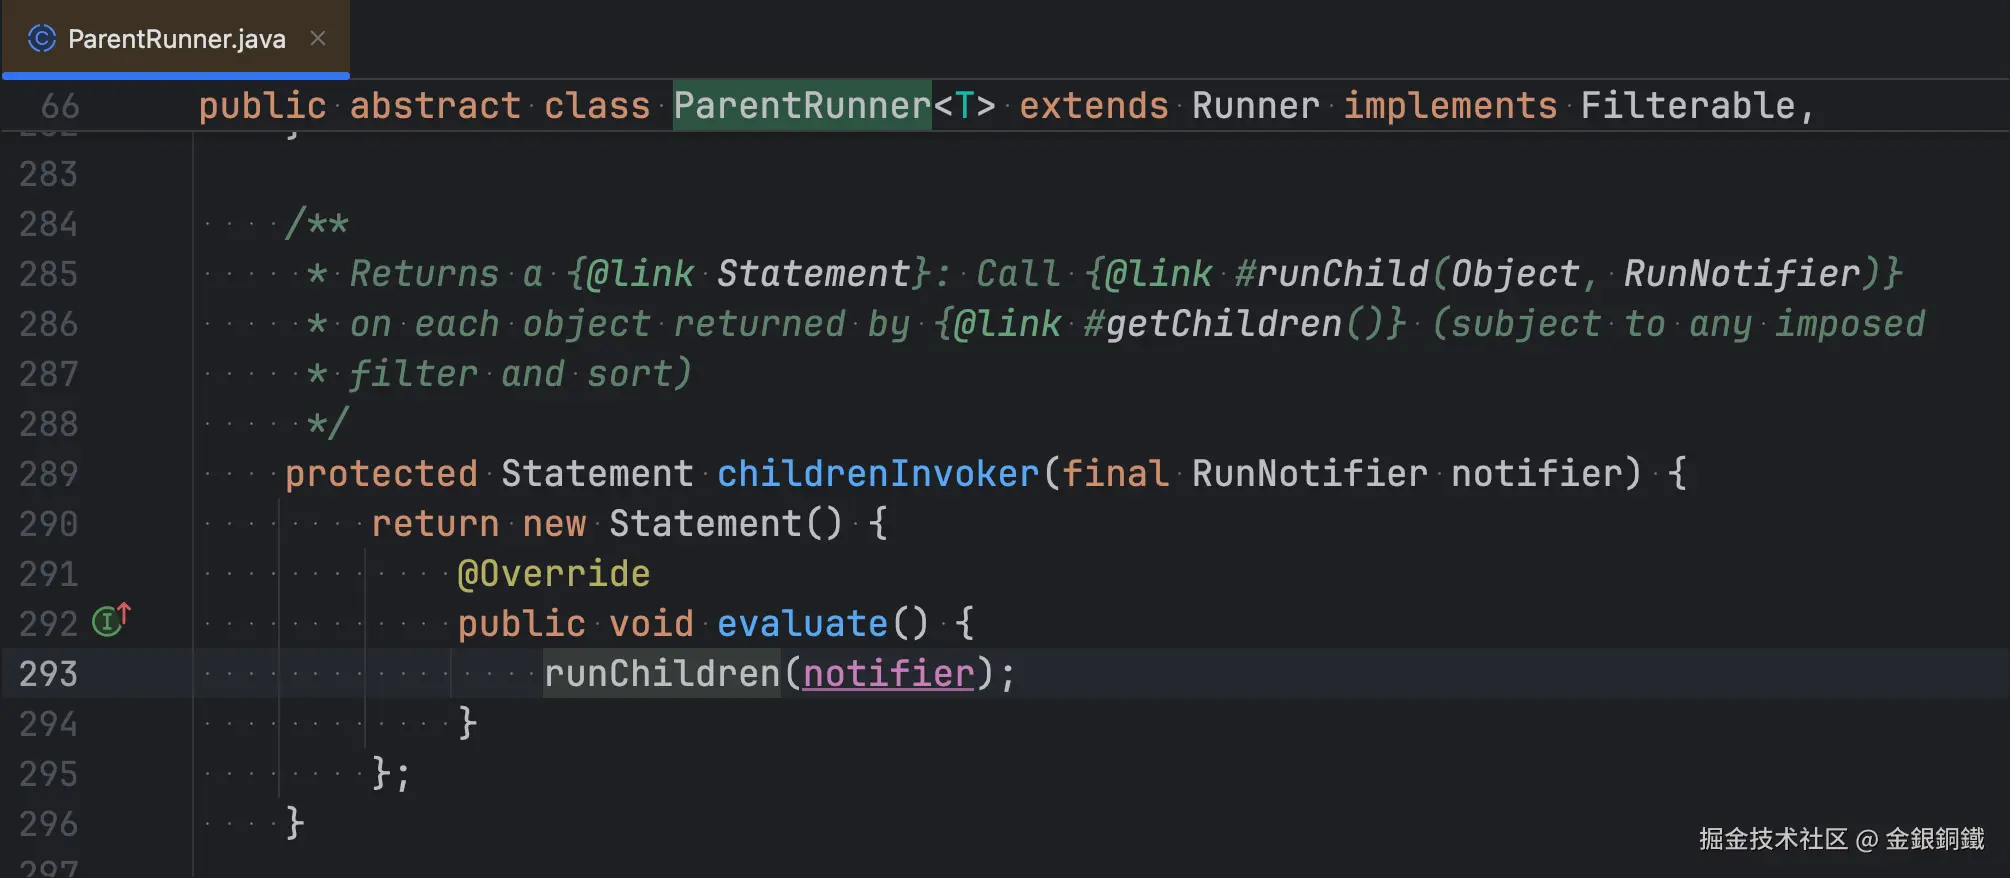
我们来看看 classBlock(RunNotifier) 方法里构建 Statement 实例的过程。我把这个方法的代码复制到下方了 ⬇️
java
protected Statement classBlock(final RunNotifier notifier) {
Statement statement = childrenInvoker(notifier);
if (!areAllChildrenIgnored()) {
statement = withBeforeClasses(statement);
statement = withAfterClasses(statement);
statement = withClassRules(statement);
statement = withInterruptIsolation(statement);
}
return statement;
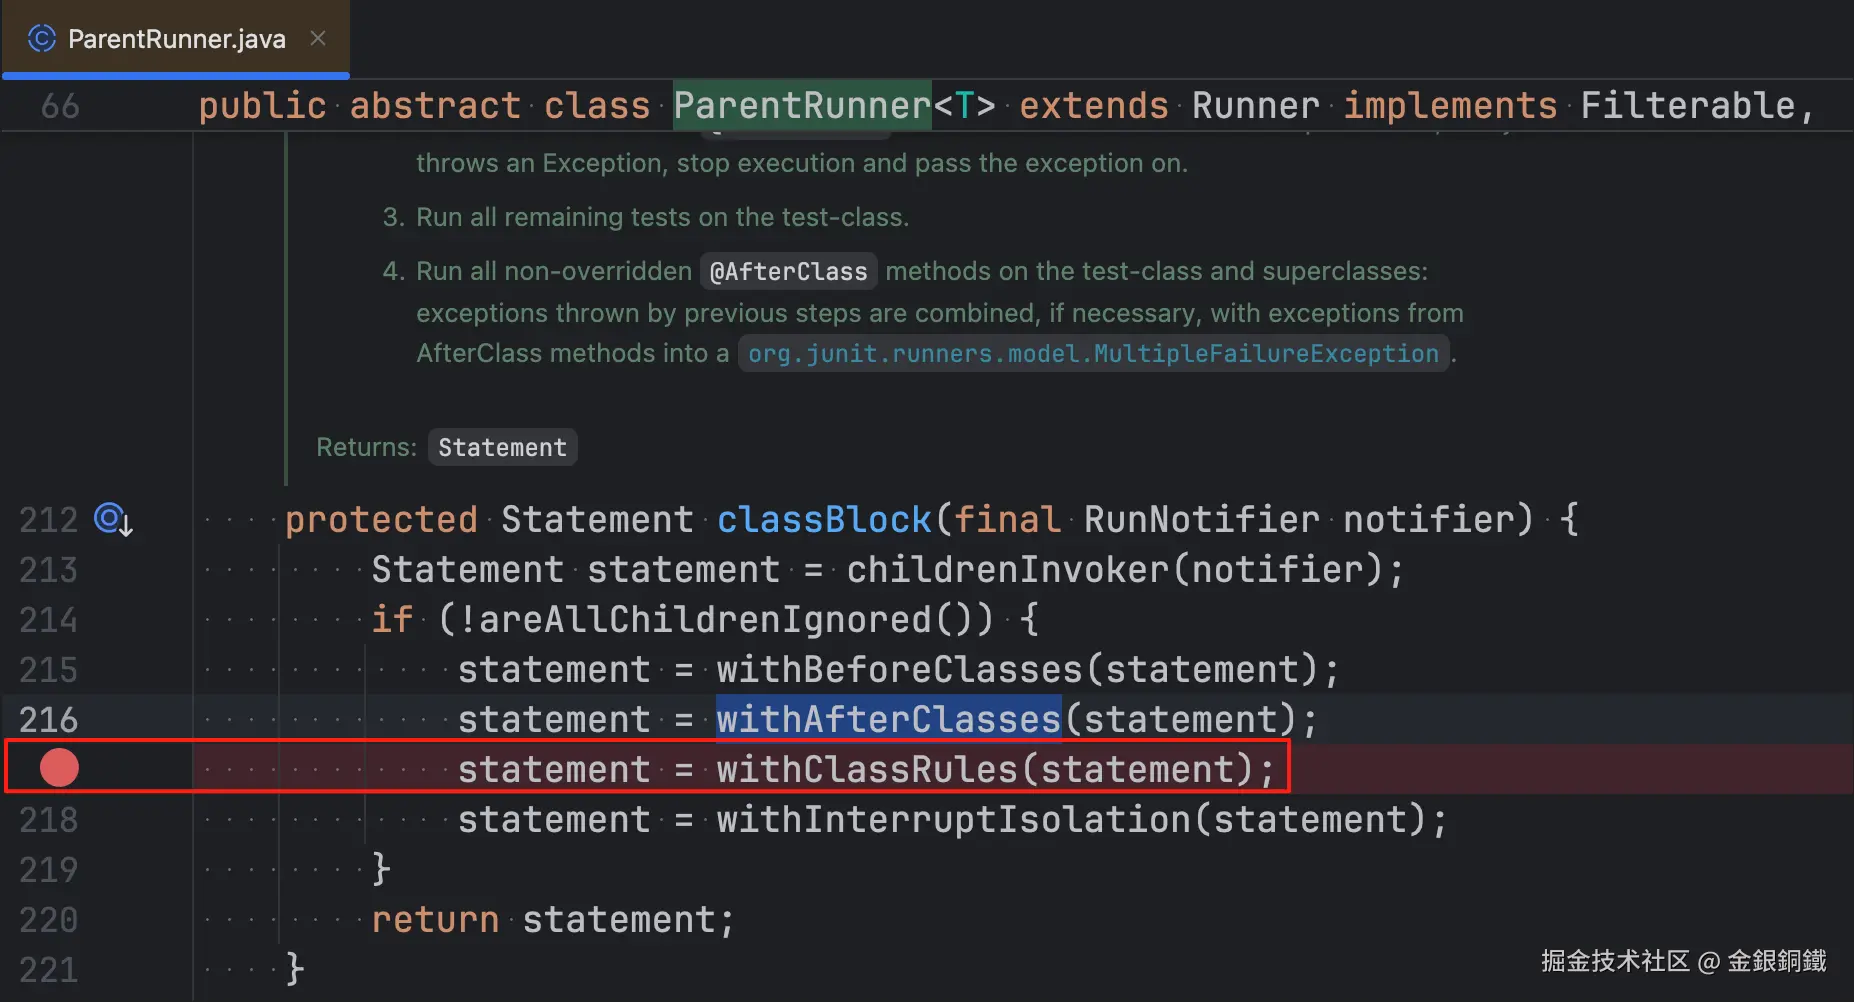
}这个方法的 javadoc 比较长,我截了对应的图 ⬇️ 本文会探讨红框里的步骤
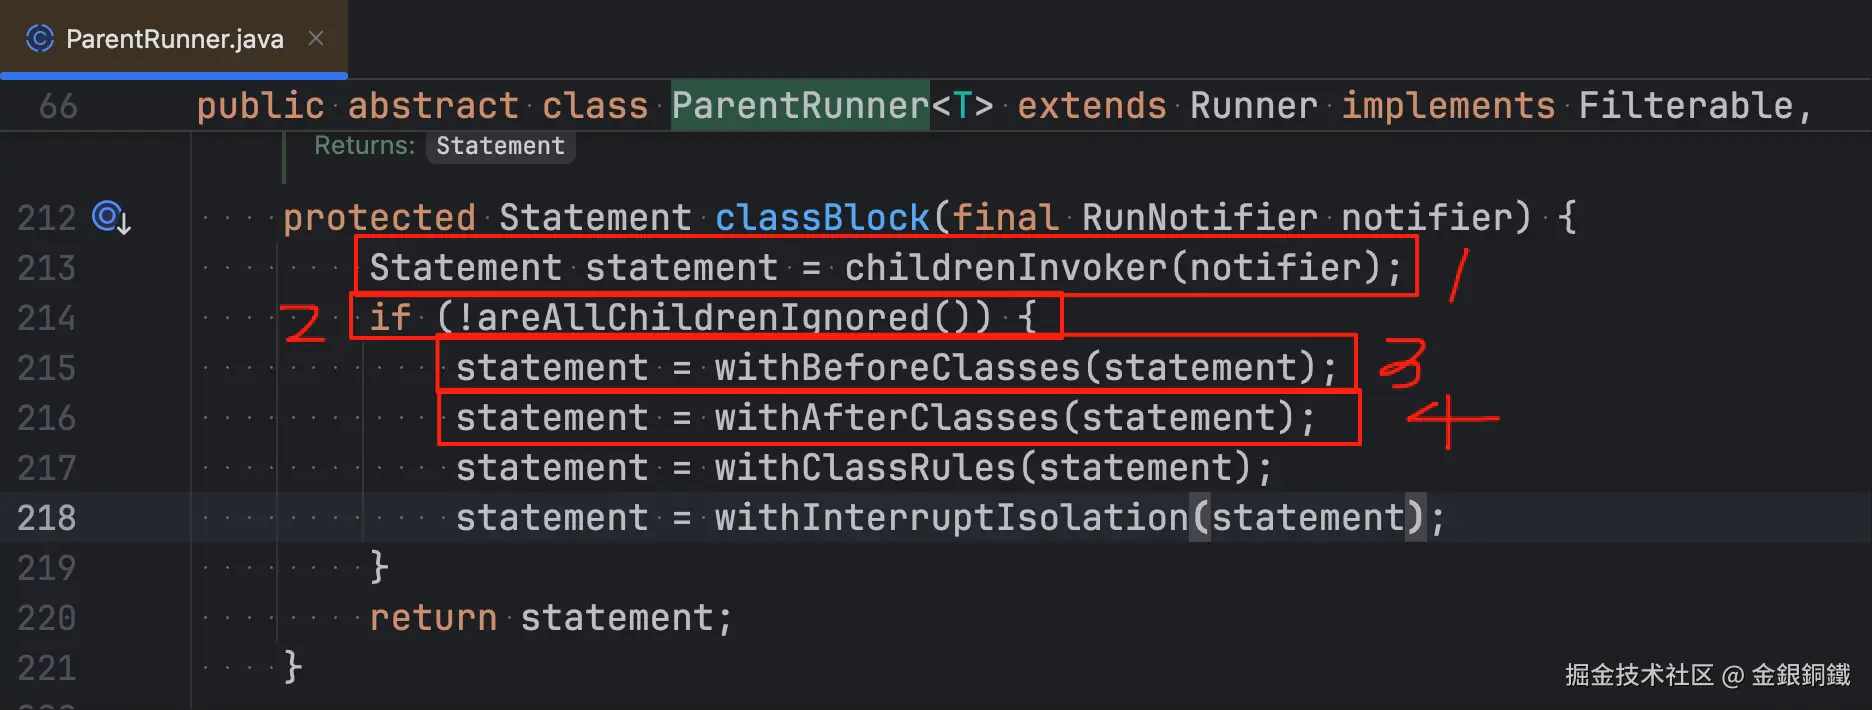
classBlock(RunNotifier) 这个方法里做了很多事情,本文会探讨其中的四件事情。这四件事情我在下图中用红框标出来 ⬇️
任务列表更新如下 ⬇️
- 1. 调用
classBlock(RunNotifier)方法,得到 Statement 实例: statement- 1.1 调用
childrenInvoker(RunNotifier)方法得到 statement1 - 1.2 判断是否所有子节点都被 ignore
- 1.3 调用
withBeforeClasses(Statement)方法得到 statement2 - 1.4 调用
withAfterClasses(Statement statement)方法得到 statement3
- 1.1 调用
- 2. 调用 statement 对象上的
evaluate()方法
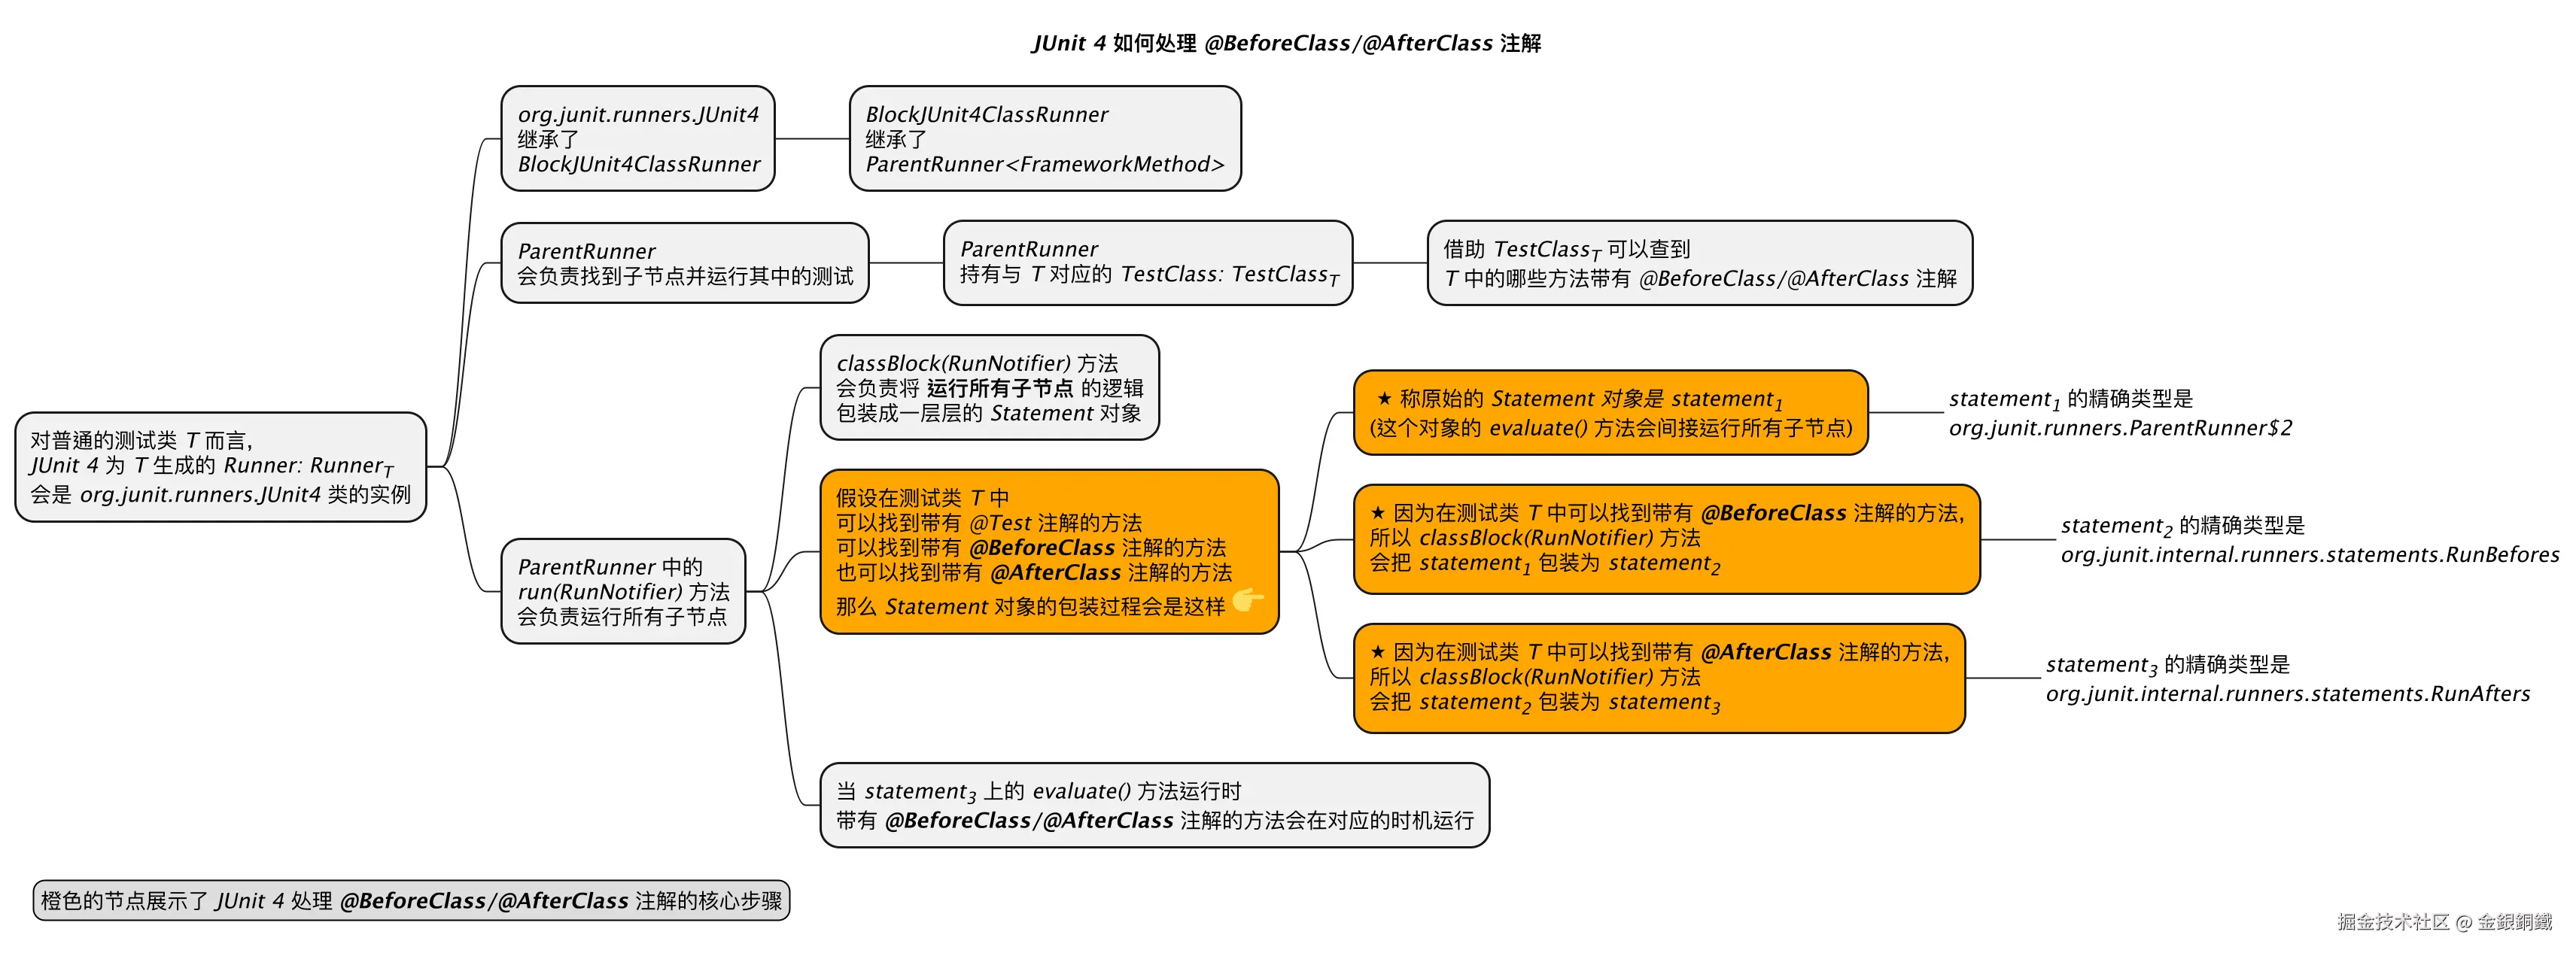
我们结合具体的例子来看。假设我们当前在处理 SimpleCalculatorTest 这个测试类。下方的思维导图中展示了 classBlock(RunNotifier) 方法所做的四件事情 ⬇️
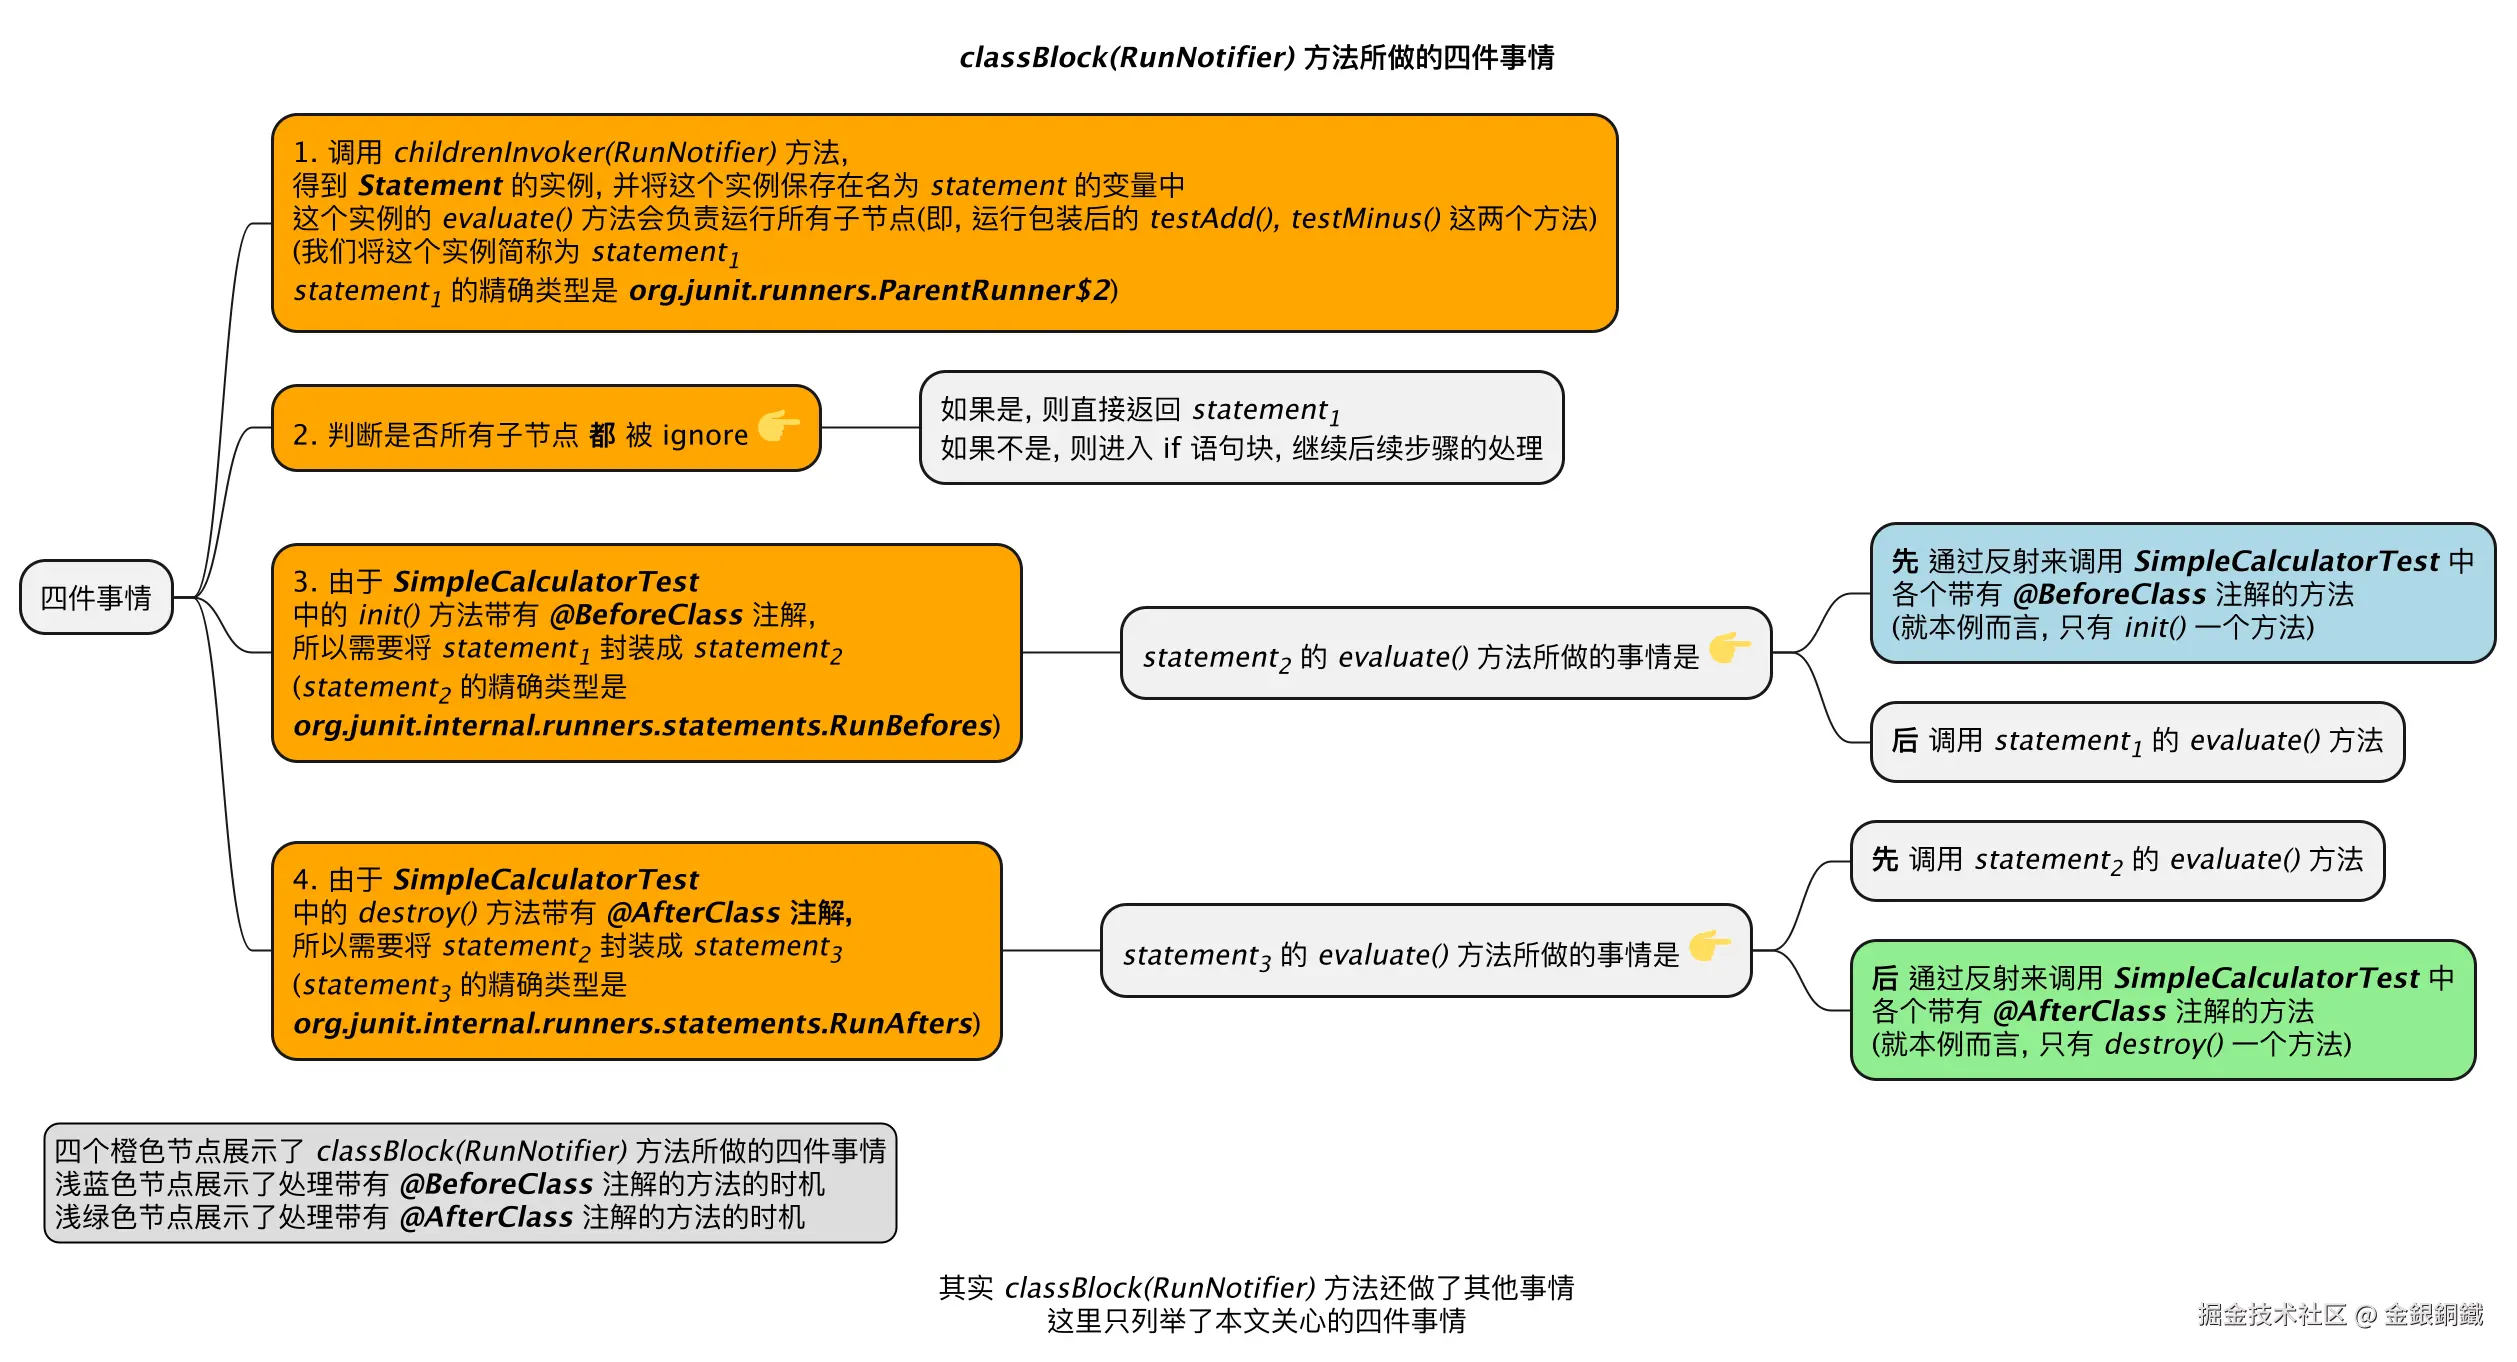
classBlock(RunNotifier) 方法中做的第一件事:调用 childrenInvoker(RunNotifier) 方法
相关的代码不复杂,读者朋友如果有兴趣的话,可以自己看看其中的细节
调用 childrenInvoker(RunNotifier) 方法后,会得到一个 Statement 的一个匿名子类(这个匿名子类的全限定类名是 org.junit.runners.ParentRunner2,但我们不必关心它的具体名称)的实例,调用这个实例的 evaluate() 方法,就能运行所有子节点。
为了便于描述,我们把 childrenInvoker(RunNotifier) 方法所返回的对象称为 statement1。
任务列表更新如下 ⬇️
- 1. 调用
classBlock(RunNotifier)方法,得到 Statement 实例: statement- 1.1 调用
childrenInvoker(RunNotifier)方法得到 statement1 - 1.2 判断是否所有子节点都被 ignore
- 1.3 调用
withBeforeClasses(Statement)方法得到 statement2 - 1.4 调用
withAfterClasses(Statement statement)方法得到 statement3
- 1.1 调用
- 2. 调用 statement 对象上的
evaluate()方法
关于匿名内部类 org.junit.runners.ParentRunner2 的补充说明
如果想看到 org.junit.runners.ParentRunner2 类的结构,可以执行如下的命令
bash
javap -cp junit-4.13.2.jar -v -p 'org.junit.runners.ParentRunner$2'基于它的输出,我们可以手动反编译出 org.junit.runners.ParentRunner2 类的内容
java
// 以下内容是我手动反编译的结果,不保证绝对准确,仅供参考
class ParentRunner$2 extends Statement {
    final RunNotifier val$notifier;
    final ParentRunner this$0;

    ParentRunner$2(ParentRunner arg0, RunNotifier arg1) {
        this.this$0 = arg0;
        this.val$notifier = arg1;
        super();
    }

    public void evaluate() {
        ParentRunner.access$100(this.this$0, this.val$notifier);
        // 这里的逻辑相当于 this.this$0.runChildren(this.val$notifier);
        // 但是由于 runChildren(...) 是 private 方法, 所以(在 java 11 之前)
        // 编译器会在 ParentRunner 里合成默认访问级别的 access$100(...) 方法,
        // 以便 ParentRunner$2 调用
    }
}
evaluate() 方法里内容看起来有点古怪 ⬇️
ParentRunner.access$100(this.this$0, this.val$notifier)
在 java 11 之前,处理内部类访问权限的方式比较特殊。由于 ParentRunner 中的 runChildren(final RunNotifier notifier) 方法是 private 级别的,所以编译器在 ParentRunner 中合成了 access$100(ParentRunner, RunNotifier) 这个静态方法。
- org.junit.runners.ParentRunner2 可以调用 ParentRunner 中的
access$100(ParentRunner, RunNotifier)方法 - ParentRunner 中的
access$100(ParentRunner, RunNotifier)方法会调用runChildren(final RunNotifier notifier)方法
这样间接做到了 让 org.junit.runners.ParentRunner2 访问 ParentRunner 中的 runChildren(final RunNotifier notifier) 方法 的效果
查看 ParentRunner 的 class 文件后,可以认为 ParentRunner 中的 runChildren(final RunNotifier notifier) 方法的内容是这样的 ⬇️
java
// 以下内容是我手动反编译的结果,不保证绝对准确,仅供参考
public abstract class ParentRunner<T> extends Runner implements Filterable, Orderable {
    ...
    ... (其他方法/字段的内容都略去了)

    static void access$100(ParentRunner x0, RunNotifier x1) {
        x0.runChildren(x1);
    }

    ...
    ... (其他方法/字段的内容都略去了)
}
classBlock(RunNotifier) 方法中做的第二件事:判断是否所有子节点都被 ignore
这一部分的的代码也不复杂,我在下图中把关键的地方标出来了
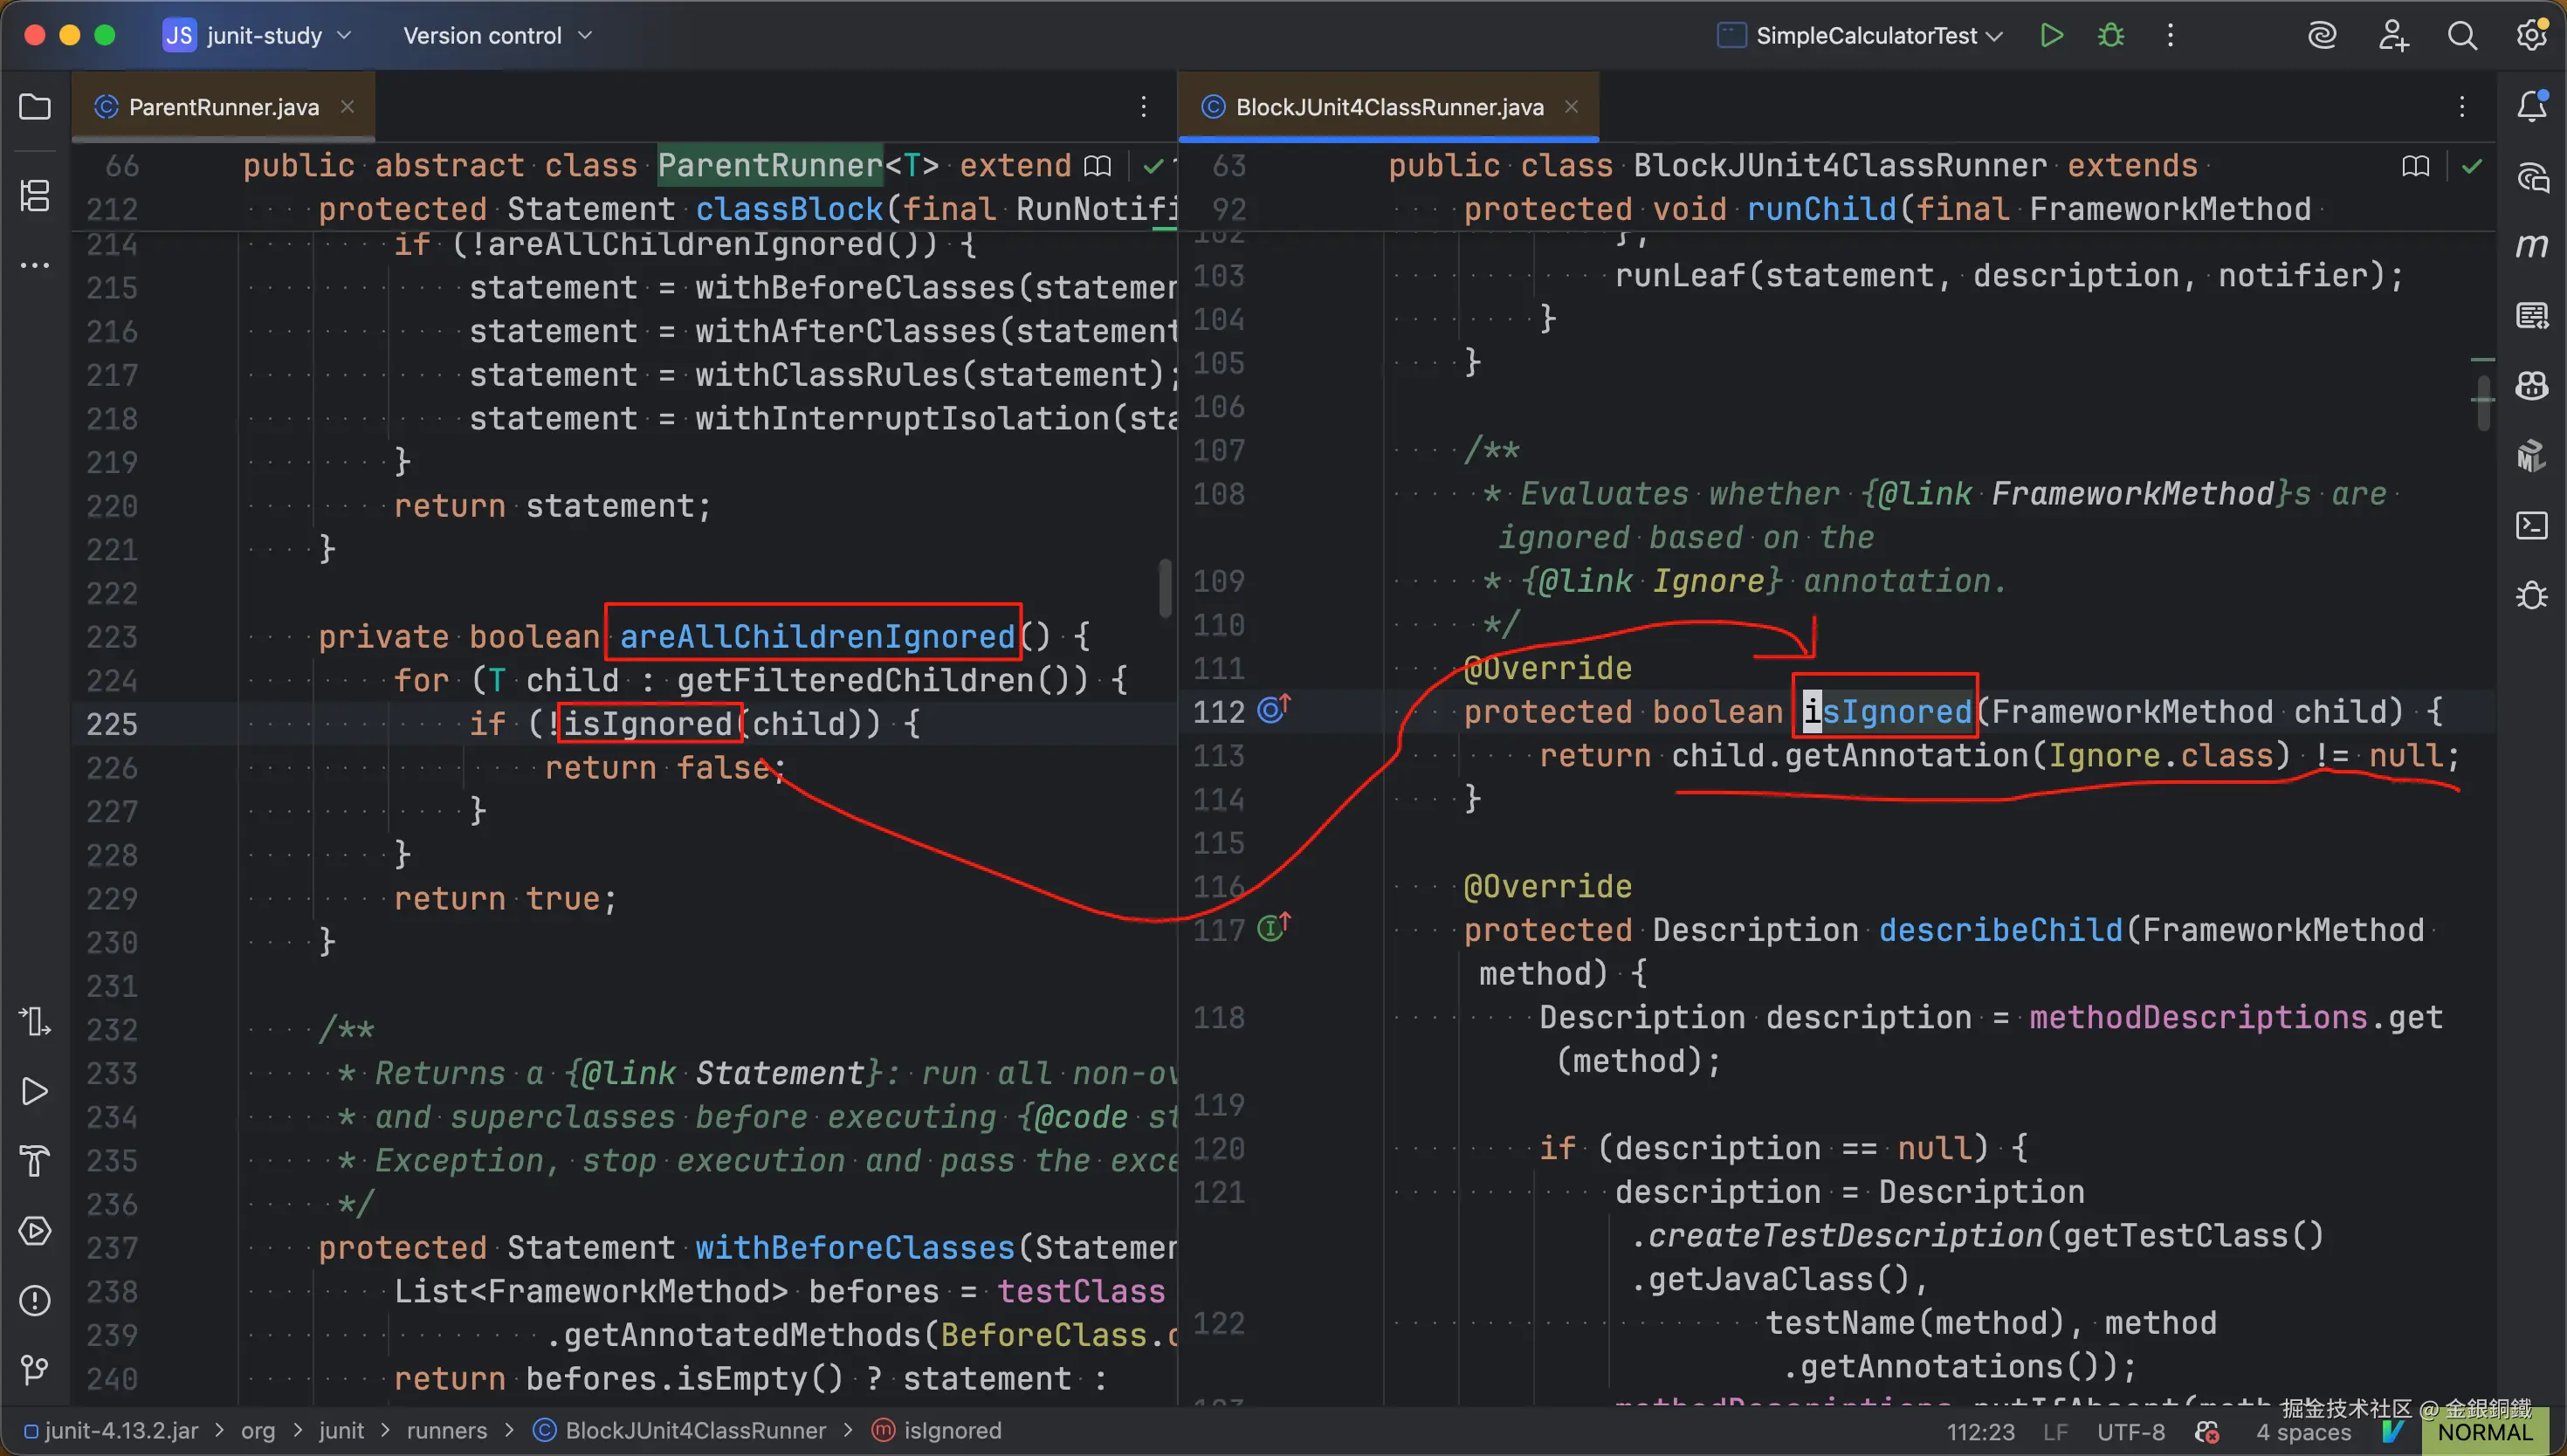
就我们的例子而言,第二件事就是在判断 SimpleCalculatorTest 类中的以下两个方法是否 都 带有 @Ignore 注解
testAdd()testMinus()
如果它们 都 带有 @Ignore 注解,那就意味着它们 都不应该 运行,皮之不存毛将焉附,自然也就不用再去处理 @BeforeClass/@AfterClass 注解了
任务列表更新如下
- 1. 调用
classBlock(RunNotifier)方法,得到 Statement 实例: statement- 1.1 调用
childrenInvoker(RunNotifier)方法得到 statement1 - 1.2 判断是否所有子节点都被 ignore
- 1.3 调用
withBeforeClasses(Statement)方法得到 statement2 - 1.4 调用
withAfterClasses(Statement statement)方法得到 statement3
- 1.1 调用
- 2. 调用 statement 对象上的
evaluate()方法
classBlock(RunNotifier) 方法中做的第三件事:调用 withBeforeClasses(Statement statement) 方法得到 Statement 的实例 statement2
withBeforeClasses(Statement statement) 方法会找到带有 @BeforeClass 注解的方法(在本文的例子中,就是 init() 方法),于是会得到 org.junit.internal.runners.statements.RunBefores 的一个实例 statement2。而 org.junit.internal.runners.statements.RunBefores 继承了 org.junit.runners.model.Statement。在 statement2 的 evaluate() 方法中,会
- 先 通过反射调用测试类中带有
@BeforeClass注解的各个方法 - 后 调用 statement1 中的
evaluate()方法
我把这些内容画在下图中了 ⬇️

任务列表更新如下
- 1. 调用
classBlock(RunNotifier)方法,得到 Statement 实例: statement- 1.1 调用
childrenInvoker(RunNotifier)方法得到 statement1 - 1.2 判断是否所有子节点都被 ignore
- 1.3 调用
withBeforeClasses(Statement)方法得到 statement2 - 1.4 调用
withAfterClasses(Statement statement)方法得到 statement3
- 1.1 调用
- 2. 调用 statement 对象上的
evaluate()方法
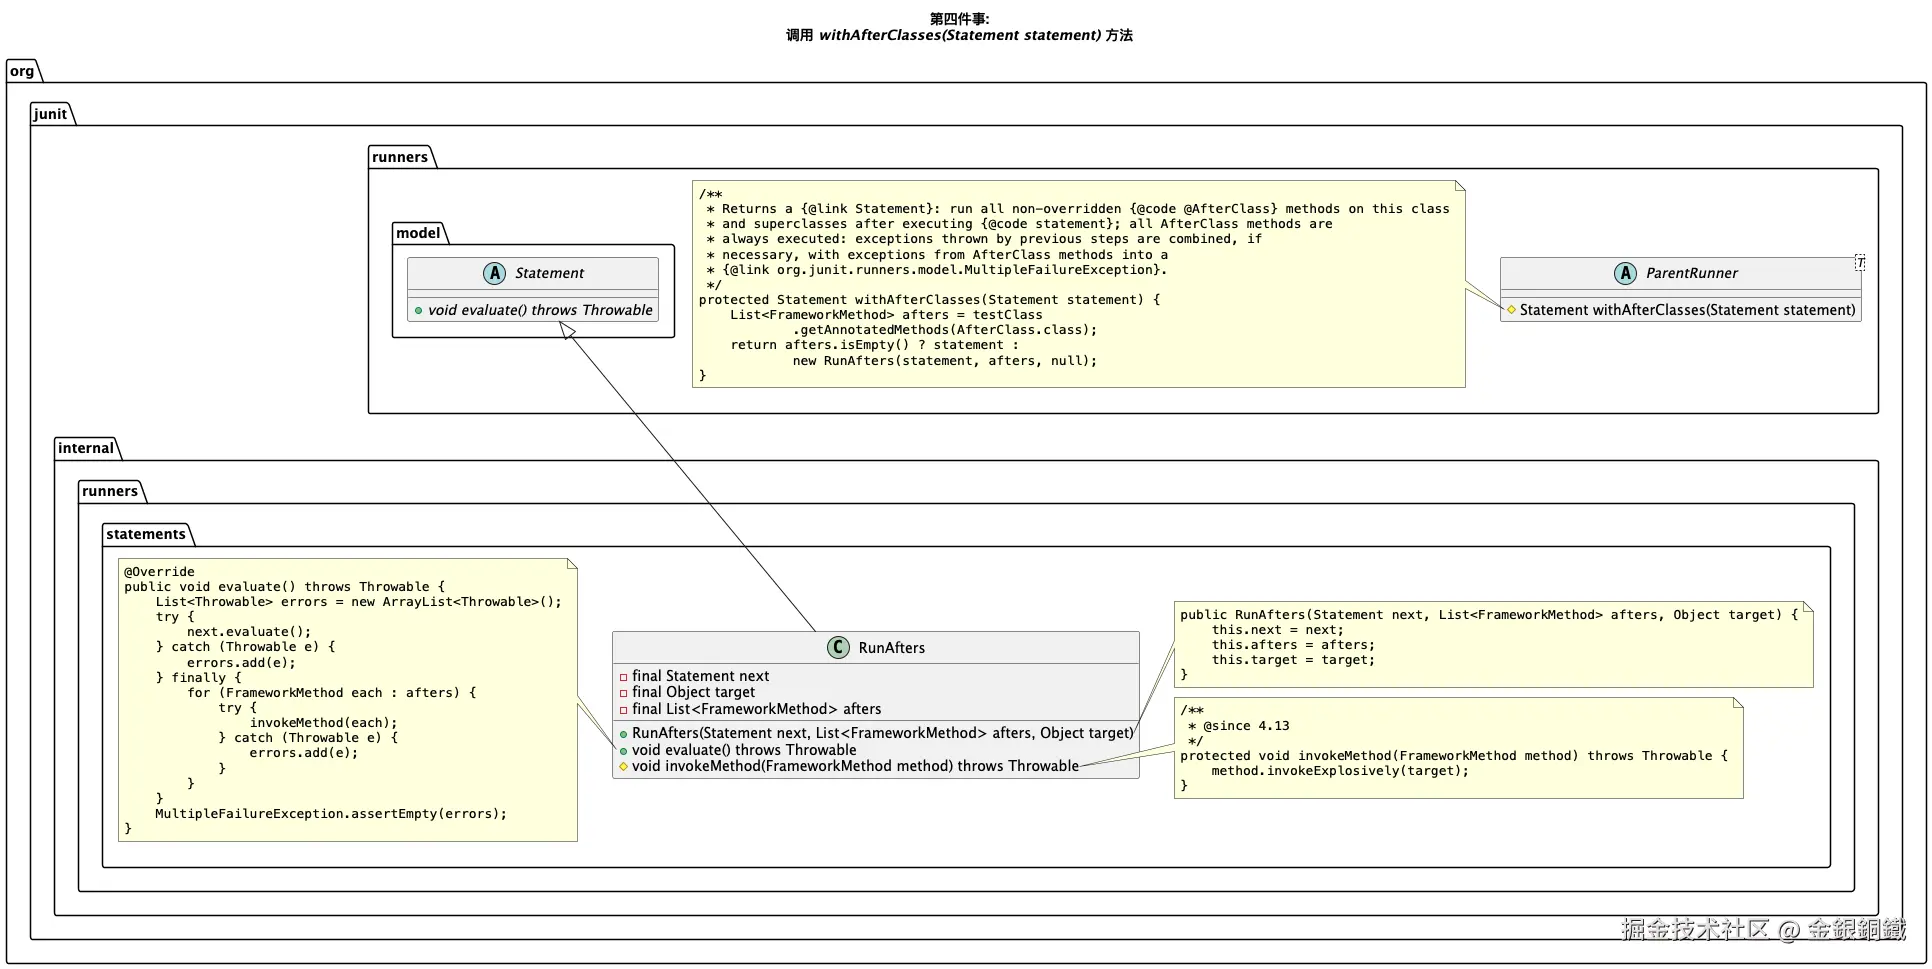
classBlock(RunNotifier) 方法中做的第四件事:调用 withAfterClasses(Statement statement) 方法得到 Statement 的实例 statement3
withAfterClasses(Statement statement) 方法会找到带有 @AfterClass 注解的方法(在本文的例子中,就是 destroy() 方法),于是会得到 org.junit.internal.runners.statements.RunAfters 的一个实例 statement3。而 org.junit.internal.runners.statements.RunAfters 继承了 org.junit.runners.model.Statement。在 statement3 的 evaluate() 方法中,会
- 先 调用 statement2 中的
evaluate()方法 - 后 通过反射调用测试类中带有
@AfterClass注解的各个方法
我把这些内容画在下图中了 ⬇️
说了这么多,但还没有进行验证呢。我们来打个断点验证一下,断点的位置如下图所示 👇
 为了便于描述,我们将这个断点称为 断点甲 。 然后
 debug SimpleCalculatorTest 类的 main 方法,当程序 第二次 运行到 断点甲 这里时,可以观察到 ⬇️
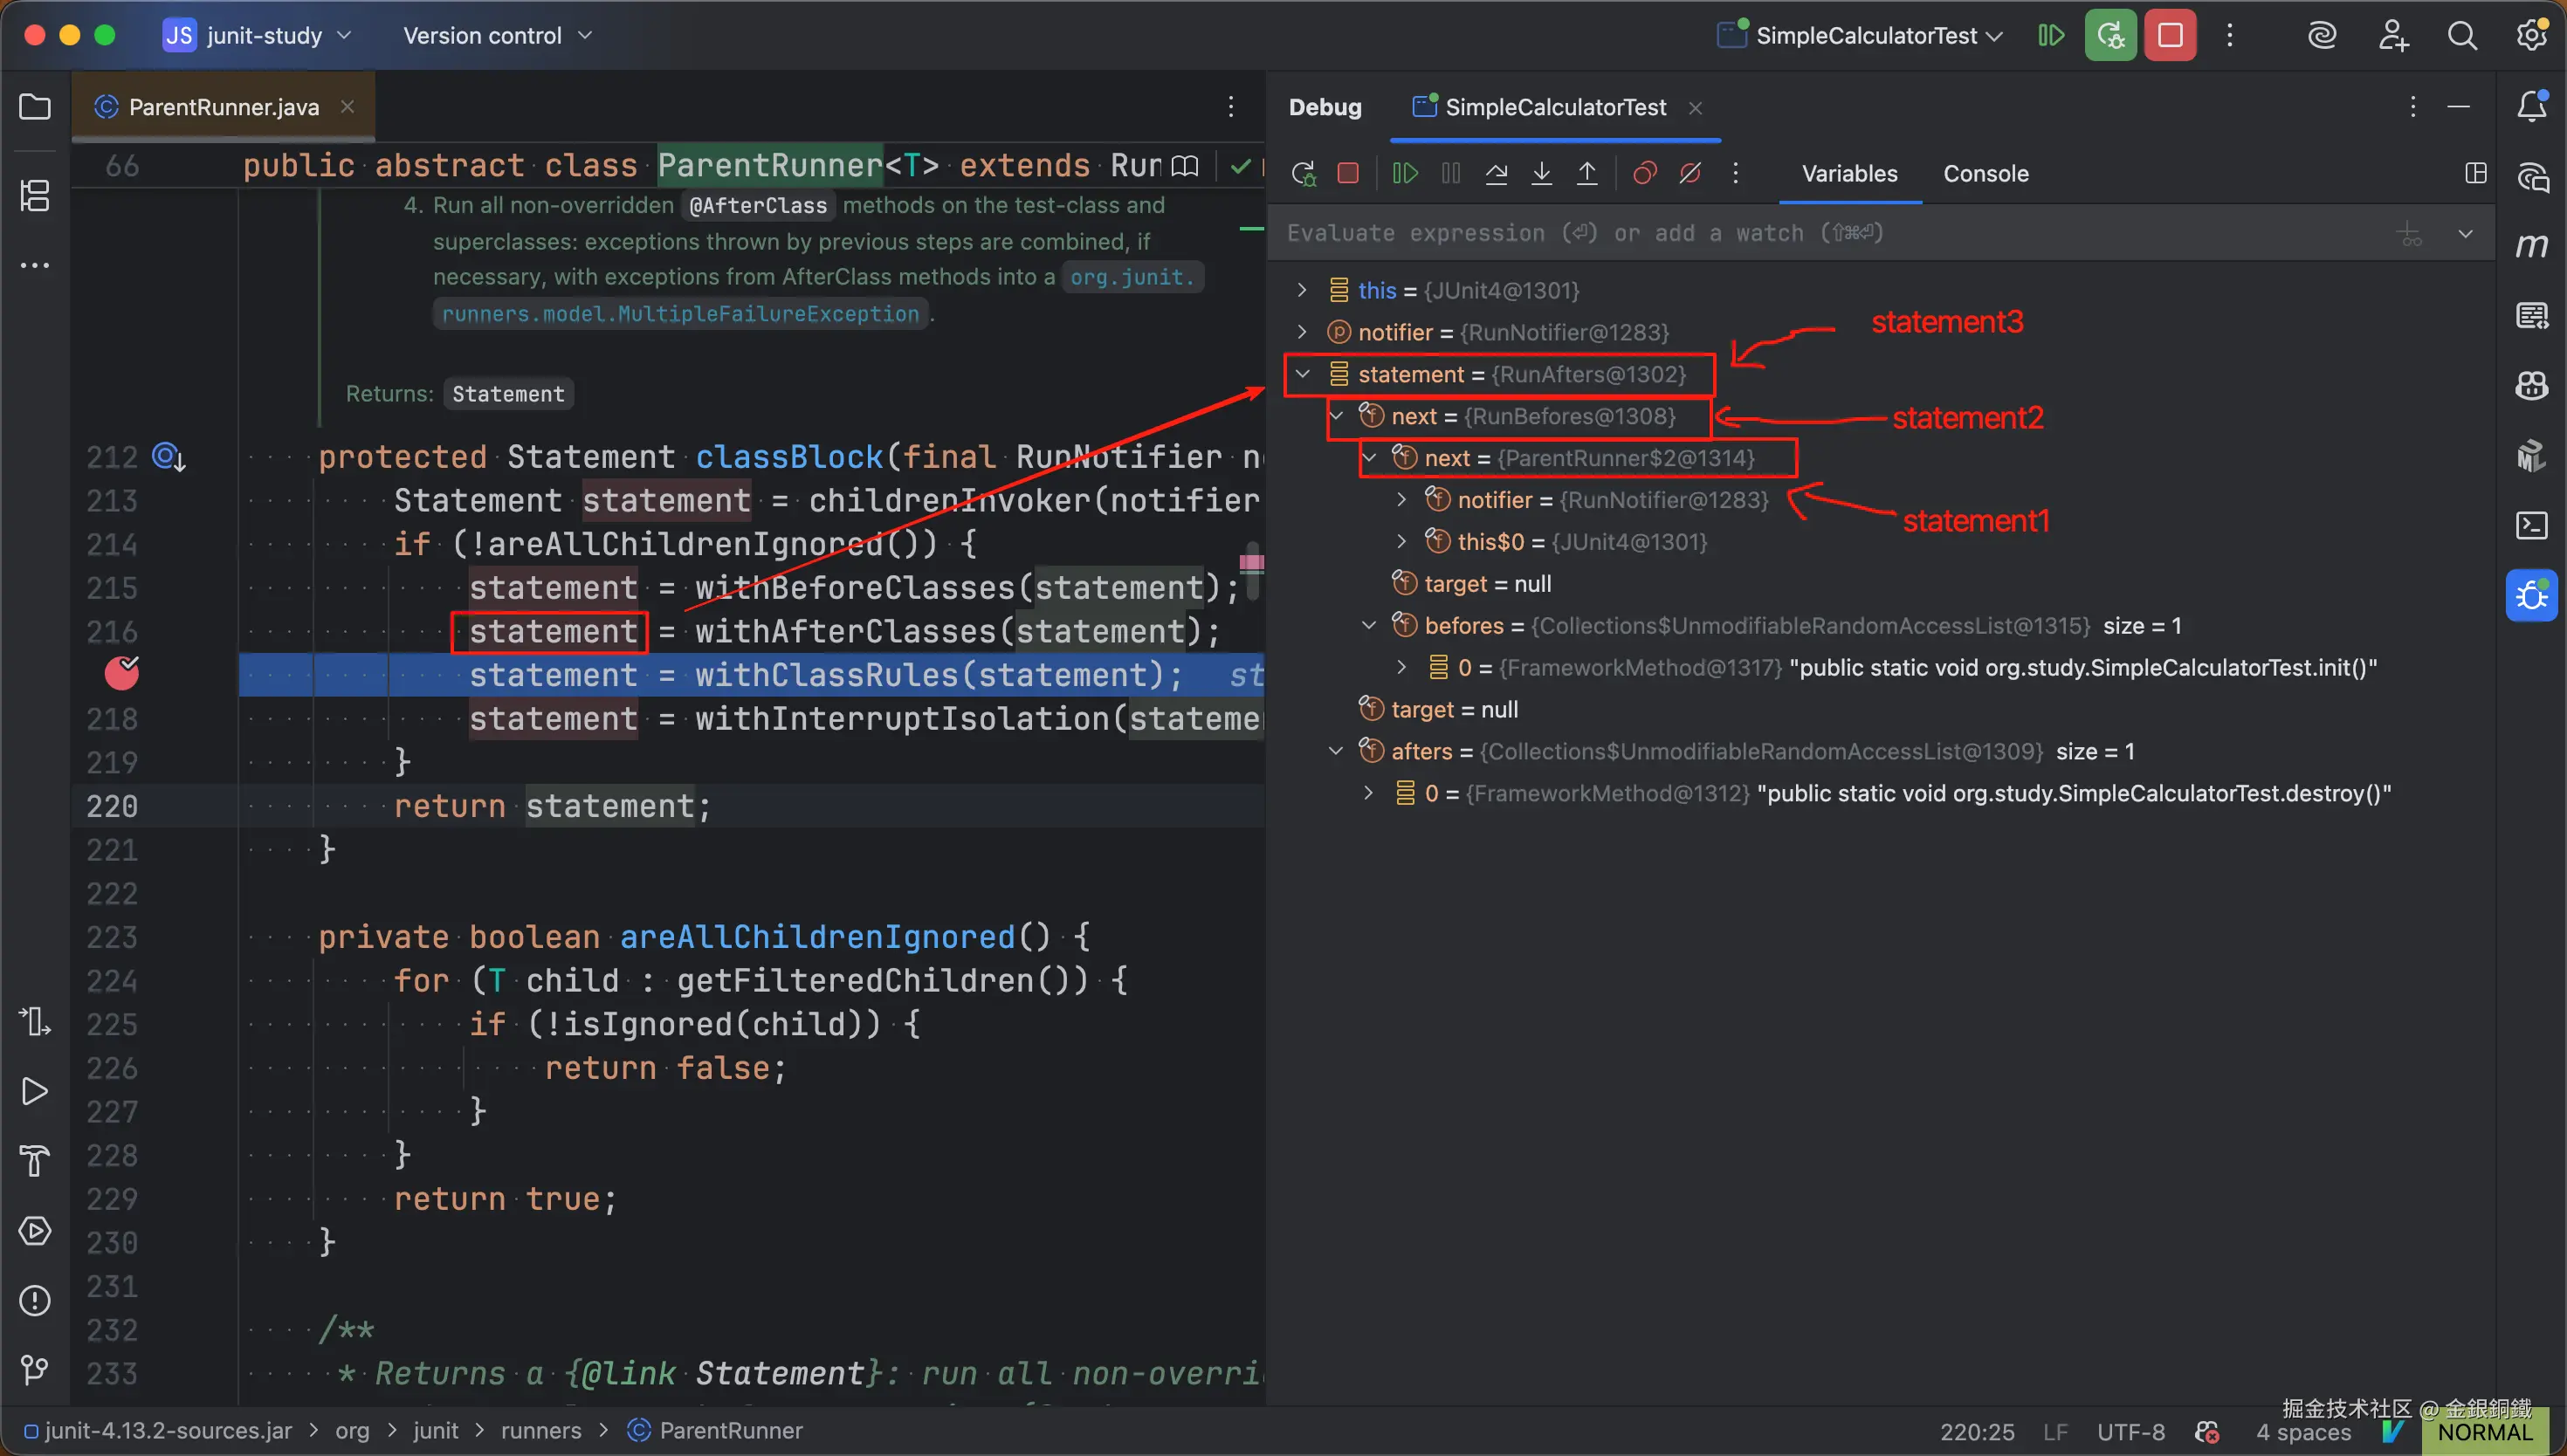
当程序运行到断点这里时,可以看到前文所描述的 statement1,statement2,statement3。
- statement2 将 statement1 包装了一层
- statement3 又将 statement2 包装了一层
这有点像拆月饼的包装,当我们拆开一层又一层的包装之后,最终还是可以看到月饼的 ( statement1 就是最里面的月饼)。
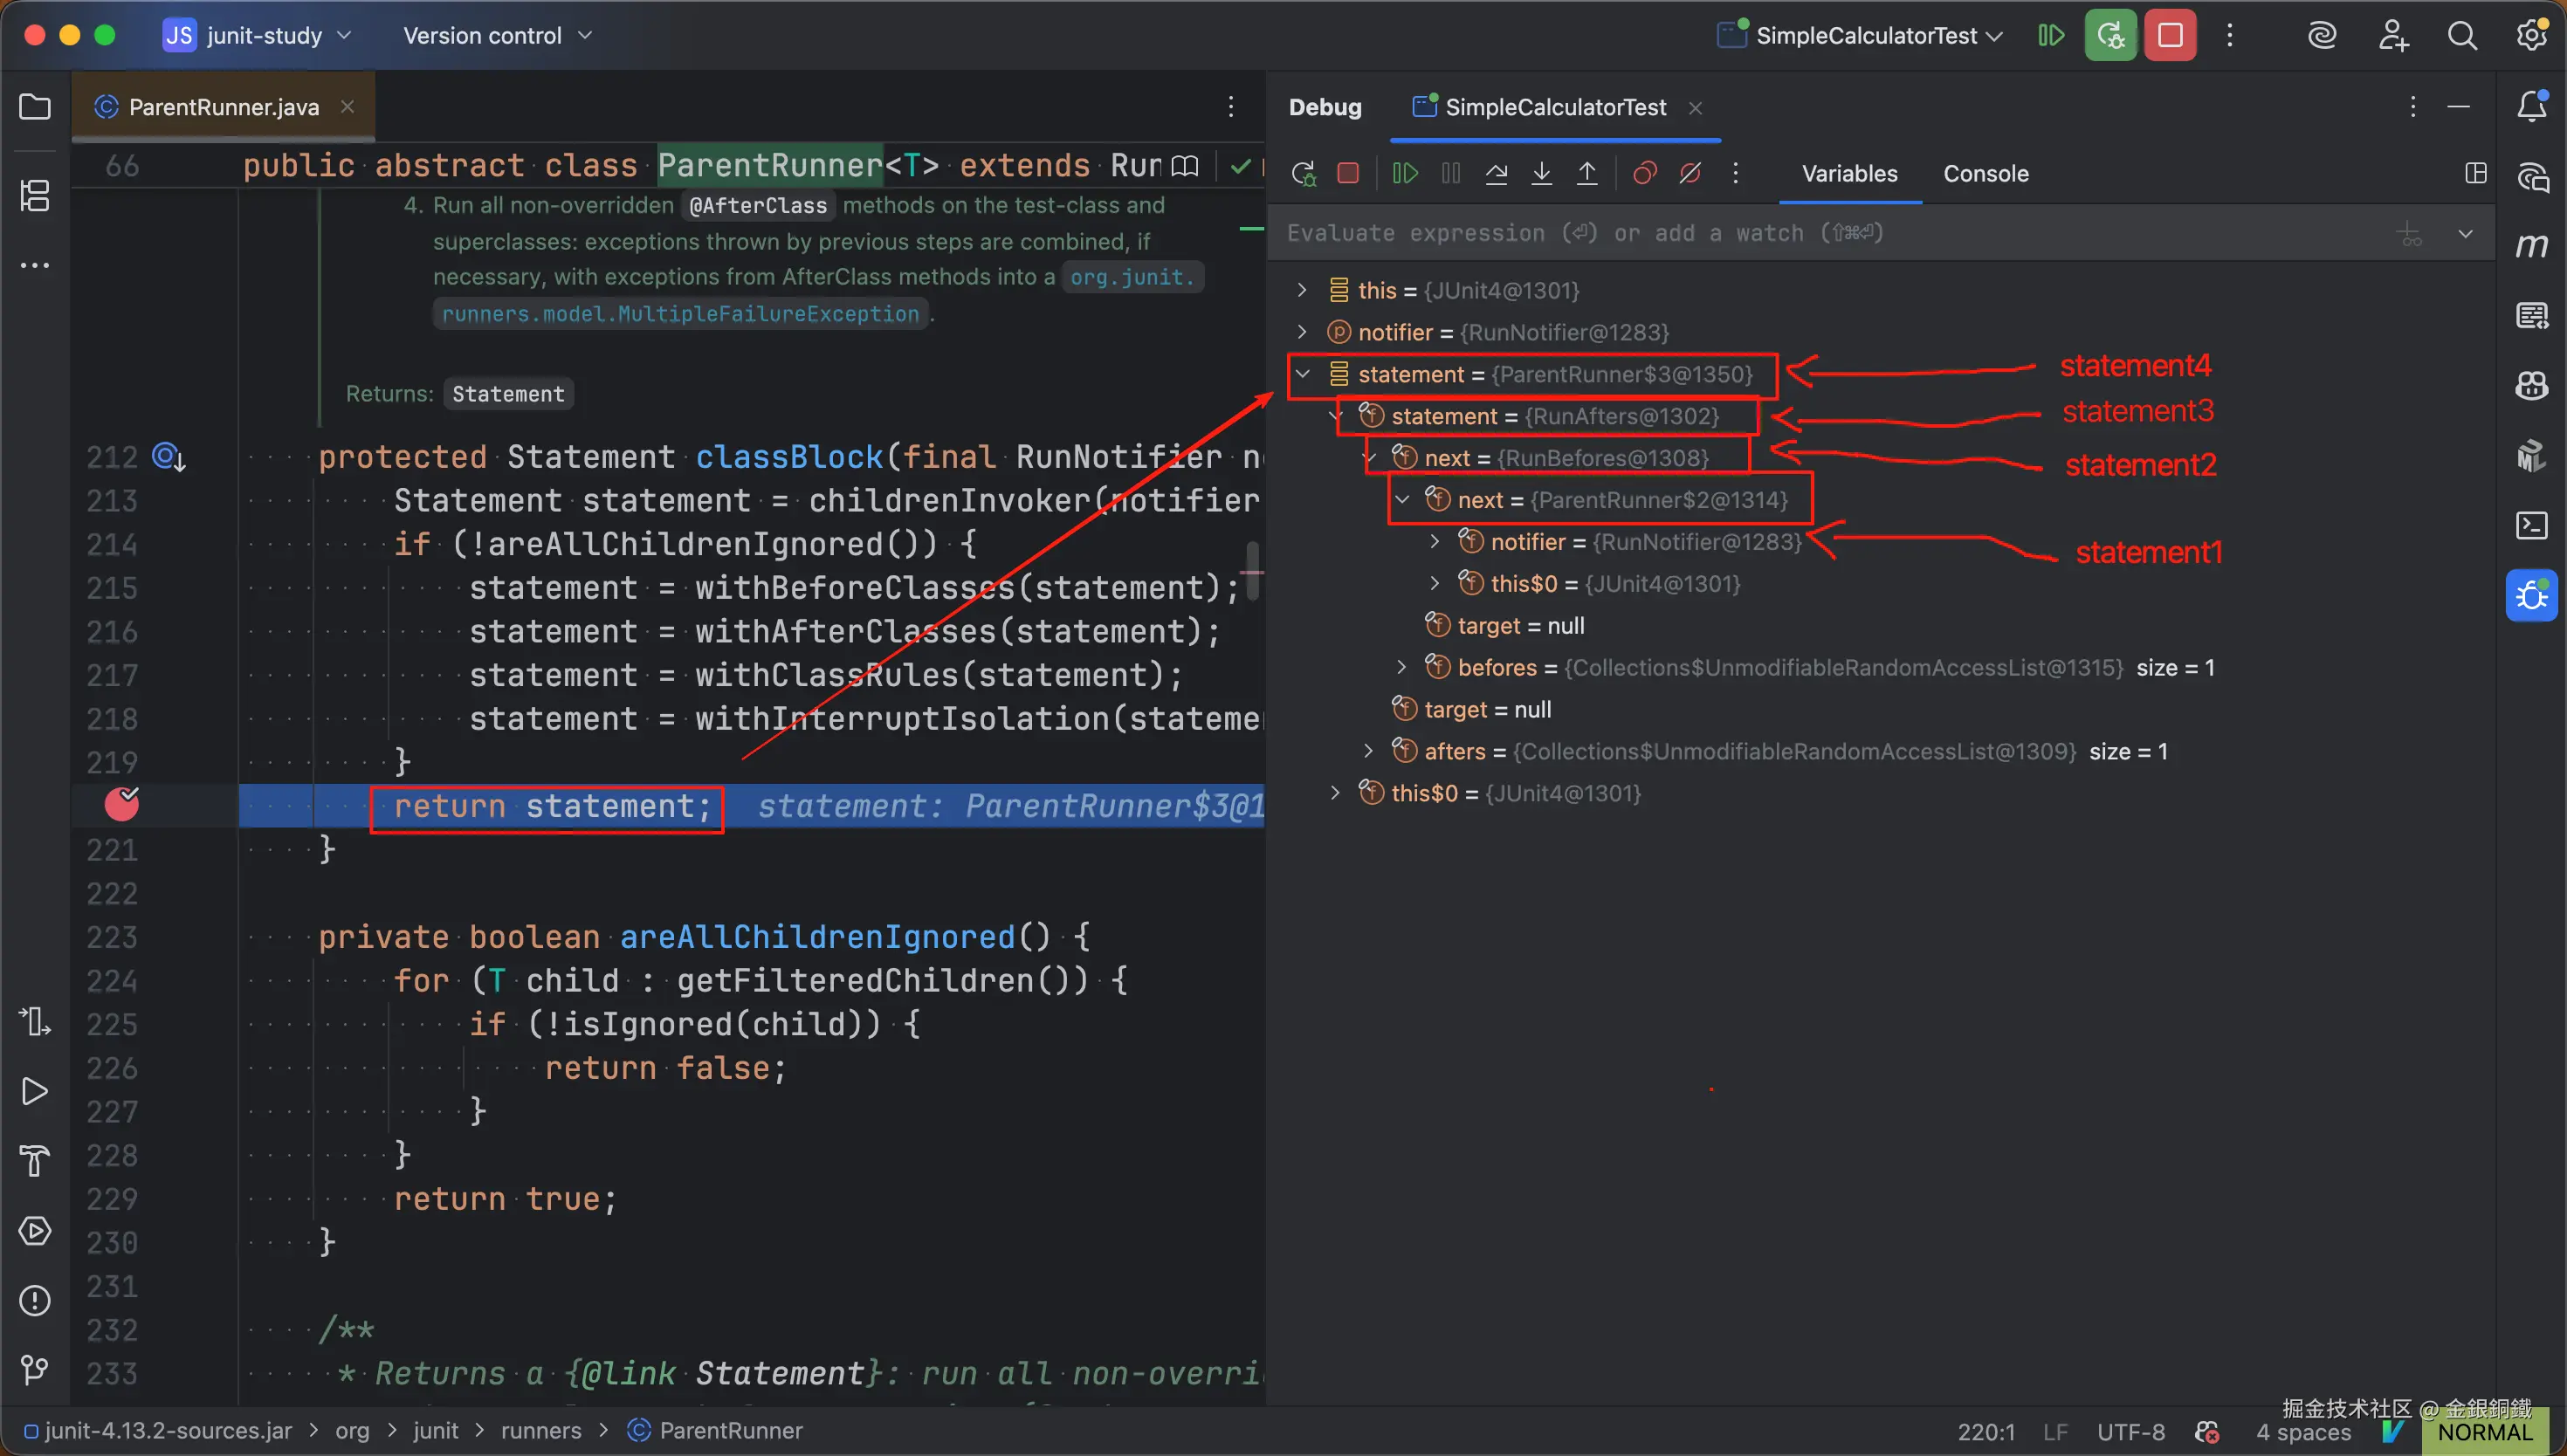
这里多啰嗦几句,如果在 return 语句那里打断点,那么会看到 statement3 还会继续被包装为 statement4(如下图所示)。不过这一层包装和 @BeforeClass/@AfterClass 注解的处理没有直接的关系,所以就一笔带过了。
到这里就把 classBlock(RunNotifier) 方法里做的四件事情都讲清楚了。
任务列表更新如下
- 1. 调用
classBlock(RunNotifier)方法,得到 Statement 实例: statement- 1.1 调用
childrenInvoker(RunNotifier)方法得到 statement1 - 1.2 判断是否所有子节点都被 ignore
- 1.3 调用
withBeforeClasses(Statement)方法得到 statement2 - 1.4 调用
withAfterClasses(Statement statement)方法得到 statement3
- 1.1 调用
- 2. 调用 statement 对象上的
evaluate()方法
至于执行 evaluate() 方法时发生了什么,可以参考下方的思维导图 ⬇️

任务列表更新如下
- 1. 调用
classBlock(RunNotifier)方法,得到 Statement 实例: statement- 1.1 调用
childrenInvoker(RunNotifier)方法得到 statement1 - 1.2 判断是否所有子节点都被 ignore
- 1.3 调用
withBeforeClasses(Statement)方法得到 statement2 - 1.4 调用
withAfterClasses(Statement statement)方法得到 statement3
- 1.1 调用
- 2. 调用 statement 对象上的
evaluate()方法
其他
本文中的很多图片是用 PlantUML 的插件绘制的,我把画这些图所用的原始代码汇总在 这篇笔记 里了