欢迎加入开源鸿蒙跨平台社区 :https://openharmonycrossplatform.csdn.net
📋 前言
在移动应用开发中,图片选择和裁剪是最常见的功能需求之一。无论是用户头像上传、身份证拍照、还是商品图片编辑,都需要一个强大且易用的图片处理组件。react-native-image-crop-picker 是 React Native 生态中最流行的图片选择裁剪库,支持从相册选择、相机拍照、图片裁剪等多种功能,是图片处理场景的必备组件。
🎯 库简介
基本信息
- 库名称 :
react-native-image-crop-picker - 官方仓库: https://github.com/react-native-oh-library/react-native-image-crop-picker
- 主要功能 :
- 📷 从相机拍照获取图片
- 🖼️ 从相册选择图片/视频
- ✂️ 图片裁剪功能
- 🔄 图片旋转功能
- 📦 支持 Base64 编码
- 🎨 自定义裁剪区域
版本对应关系
| 版本 | 包名 | RN 版本 | Autolink 支持 |
|---|---|---|---|
| <= 0.40.3-0.0.14@deprecated | @react-native-oh-tpl/react-native-image-crop-picker | 0.72 | ❌ |
| 0.40.5 | @react-native-ohos/react-native-image-crop-picker | 0.72 | ✅ |
| 0.50.2 | @react-native-ohos/react-native-image-crop-picker | 0.77 | ❌ |
| 0.51.2 | @react-native-ohos/react-native-image-crop-picker | 0.82 | ❌ |
⚠️ 注意: 版本 >= 0.51.2 需要在 DevEco Studio 6.0.1 (API21) 及以上版本编译。
为什么选择 image-crop-picker?
| 特性 | react-native-image-picker | react-native-image-crop-picker |
|---|---|---|
| 相册选择 | ✅ | ✅ |
| 相机拍照 | ❌(文档上暂不支持) | ✅ |
| 图片裁剪 | ❌ 需额外库 | ✅ 内置支持 |
| 自由裁剪 | ❌ | ✅ |
| 圆形裁剪 | ❌ | ✅ |
| 多图选择 | ✅ | ✅ |
| 视频选择 | ✅ | ✅ |
| HarmonyOS支持 | ✅ | ✅ |
支持的 API
| API | 说明 | HarmonyOS 支持 |
|---|---|---|
openPicker |
从相册选择图片 | ✅ |
openCamera |
从相机拍照 | ✅ |
openCropper |
裁剪图片 | ✅ |
clean |
清除所有临时文件 | ✅ |
cleanSingle |
清除单个临时文件 | ✅ |
兼容性验证
在以下环境验证通过:
- RNOH : 0.72.96; SDK : HarmonyOS 6.0.0 Release SDK; IDE : DevEco Studio 6.0.0.858; ROM: 6.0.0.112
- RNOH : 0.72.33; SDK : HarmonyOS NEXT B1; IDE : DevEco Studio 5.0.3.900; ROM: Next.0.0.71
- RNOH : 0.77.18; SDK : HarmonyOS 6.0.0 Release SDK; IDE : DevEco Studio 6.0.0.858; ROM: 6.0.0.112
- RNOH : 0.82.1; SDK : HarmonyOS 6.0.0 Release SDK; IDE : DevEco Studio 6.0.0.858; ROM: 6.0.0.120
📦 安装步骤
1. 安装依赖
在项目根目录执行以下命令,本文基于 RN 0.72.90 版本开发:
bash
# RN 0.72 版本
npm install @react-native-ohos/react-native-image-crop-picker@0.40.5-rc.1

# 或者使用 yarn
yarn add @react-native-ohos/react-native-image-crop-picker@0.40.5-rc.1
2. 验证安装
安装完成后,检查 package.json 文件,应该能看到新增的依赖:
json
{
  "dependencies": {
    "@react-native-ohos/react-native-image-crop-picker": "0.40.5-rc.1",
    // ... 其他依赖
  }
}
🔧 HarmonyOS 平台配置 ⭐
由于 HarmonyOS 暂不支持 AutoLink,需要手动配置原生端代码。本文提供 HAR 包引入 和 源码引入 两种方式,可根据实际需求选择。
1. 在工程根目录的 oh-package.json5 添加 overrides 字段
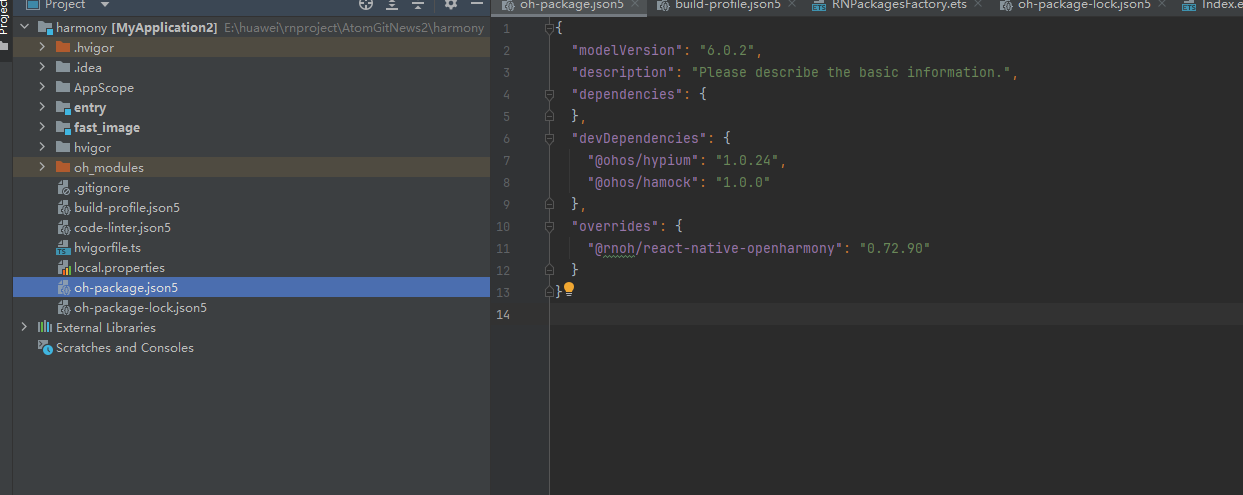
打开 harmony/oh-package.json5,添加以下配置:
json5
{
  // ... 其他配置
  "overrides": {
    "@rnoh/react-native-openharmony": "0.72.90"
  }
}
方式一:HAR 包引入(推荐)📦
HAR 包引入方式简单快捷,适合大多数场景。
💡 提示 :HAR 包位于三方库安装路径的
harmony文件夹下。
2.1 在 entry/oh-package.json5 添加依赖
打开 harmony/entry/oh-package.json5,添加以下依赖:
json5
"dependencies": {
  "@rnoh/react-native-openharmony": "0.72.90",
  + "@react-native-ohos/react-native-image-crop-picker": "file:../../node_modules/@react-native-ohos/react-native-image-crop-picker/harmony/image_crop_picker.har"
}
2.2 同步依赖
点击 DevEco Studio 右上角的 sync 按钮,或者在终端执行:
bash
cd harmony/entry
ohpm install
2.3 配置 CMakeLists.txt
打开 harmony/entry/src/main/cpp/CMakeLists.txt,添加以下配置:
cmake
project(rnapp)
cmake_minimum_required(VERSION 3.4.1)
set(CMAKE_SKIP_BUILD_RPATH TRUE)
set(RNOH_APP_DIR "${CMAKE_CURRENT_SOURCE_DIR}")
set(NODE_MODULES "${CMAKE_CURRENT_SOURCE_DIR}/../../../../../node_modules")
+ set(OH_MODULES "${CMAKE_CURRENT_SOURCE_DIR}/../../../oh_modules")
set(RNOH_CPP_DIR "${CMAKE_CURRENT_SOURCE_DIR}/../../../../../../react-native-harmony/harmony/cpp")
set(LOG_VERBOSITY_LEVEL 1)
set(CMAKE_ASM_FLAGS "-Wno-error- unused-command-line-argument -Qunused-arguments")
set(CMAKE_CXX_FLAGS "-fstack-protector-strong -Wl,-z,relro,-z,now,-z,noexecstack -s -fPIE -pie")
set(WITH_HITRACE_SYSTRACE 1)
add_compile_definitions(WITH_HITRACE_SYSTRACE)

add_subdirectory("${RNOH_CPP_DIR}" ./rn)

# 添加 ImageCropPicker 模块(HAR方式)
+ add_subdirectory("${OH_MODULES}/@react-native-ohos/react-native-image-crop-picker/src/main/cpp" ./image-crop-picker)

file(GLOB GENERATED_CPP_FILES "./generated/*.cpp")

add_library(rnoh_app SHARED
    ${GENERATED_CPP_FILES}
    "./PackageProvider.cpp"
    "${RNOH_CPP_DIR}/RNOHAppNapiBridge.cpp"
)
target_link_libraries(rnoh_app PUBLIC rnoh)

# 链接 ImageCropPicker 库
+ target_link_libraries(rnoh_app PUBLIC rnoh_image_crop_picker)
2.4 修改 PackageProvider.cpp
打开 harmony/entry/src/main/cpp/PackageProvider.cpp,添加:
cpp
#include "RNOH/PackageProvider.h"
#include "generated/RNOHGeneratedPackage.h"
+ #include "ImageCropPickerPackage.h"

using namespace rnoh;

std::vector<std::shared_ptr<Package>> PackageProvider::getPackages(Package::Context ctx) {
    return {
        std::make_shared<RNOHGeneratedPackage>(ctx),
        + std::make_shared<ImageCropPickerPackage>(ctx),
    };
}
2.5 在 ArkTs 侧引入 ImageCropPickerPackage
打开 harmony/entry/src/main/ets/RNPackagesFactory.ts,添加:
typescript
import type { RNPackageContext, RNPackage } from 'rnoh/ts';
+ import { ImageCropPickerPackage } from '@react-native-ohos/react-native-image-crop-picker/ts';

export function createRNPackages(ctx: RNPackageContext): RNPackage[] {
  return [
    // ... 其他包
    + new ImageCropPickerPackage(ctx),
  ];
}
方式二:源码引入 📁
源码引入方式适合需要调试或修改原生代码的场景。
2.1 复制源码到 harmony 工程根目录
把 <RN工程>/node_modules/@react-native-ohos/react-native-image-crop-picker/harmony 目录下的源码复制到 harmony(鸿蒙壳工程)工程根目录下。
bash
# 复制源码目录
cp -r node_modules/@react-native-ohos/react-native-image-crop-picker/harmony/image_crop_picker harmony/
2.2 在 build-profile.json5 添加模块
打开 harmony/build-profile.json5,添加以下模块:
json5
modules: [
  // ... 其他模块
  + {
  +   name: 'image_crop_picker',
  +   srcPath: './image_crop_picker',
  + }
]
💡 提示 :如果存在
build-profile.template.json5文件,也需要同步添加上述模块配置。
2.3 修改 image_crop_picker/oh-package.json5
打开 harmony/image_crop_picker/oh-package.json5,修改 react-native-openharmony 版本与项目版本一致:
json5
{
  "dependencies": {
    "@rnoh/react-native-openharmony": "0.72.90"
  }
}
2.4 在 entry/oh-package.json5 添加依赖
打开 harmony/entry/oh-package.json5,添加以下依赖:
json5
"dependencies": {
"@rnoh/react-native-openharmony": "0.72.90",
+ "@react-native-ohos/react-native-image-crop-picker": "file:../image_crop_picker"
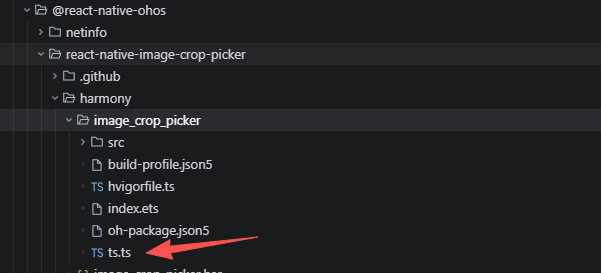
}2.5 修改ts文件后缀
把ts.ts调整为ts.ets
2.5 同步依赖
点击 DevEco Studio 右上角的 sync 按钮,或者在终端执行:
bash
cd harmony/entry
ohpm install
2.6 配置 CMakeLists.txt
打开 harmony/entry/src/main/cpp/CMakeLists.txt,添加以下配置:
cmake
project(rnapp)
cmake_minimum_required(VERSION 3.4.1)
set(CMAKE_SKIP_BUILD_RPATH TRUE)
set(RNOH_APP_DIR "${CMAKE_CURRENT_SOURCE_DIR}")
set(NODE_MODULES "${CMAKE_CURRENT_SOURCE_DIR}/../../../../../node_modules")
+ set(OH_MODULES "${CMAKE_CURRENT_SOURCE_DIR}/../../../oh_modules")
set(RNOH_CPP_DIR "${CMAKE_CURRENT_SOURCE_DIR}/../../../../../../react-native-harmony/harmony/cpp")
set(LOG_VERBOSITY_LEVEL 1)
set(CMAKE_ASM_FLAGS "-Wno-error- unused-command-line-argument -Qunused-arguments")
set(CMAKE_CXX_FLAGS "-fstack-protector-strong -Wl,-z,relro,-z,now,-z,noexecstack -s -fPIE -pie")
set(WITH_HITRACE_SYSTRACE 1)
add_compile_definitions(WITH_HITRACE_SYSTRACE)

add_subdirectory("${RNOH_CPP_DIR}" ./rn)

# 添加 ImageCropPicker 模块(源码方式)
+ add_subdirectory("${OH_MODULES}/@react-native-ohos/react-native-image-crop-picker/src/main/cpp" ./image-crop-picker)

file(GLOB GENERATED_CPP_FILES "./generated/*.cpp")

add_library(rnoh_app SHARED
    ${GENERATED_CPP_FILES}
    "./PackageProvider.cpp"
    "${RNOH_CPP_DIR}/RNOHAppNapiBridge.cpp"
)
target_link_libraries(rnoh_app PUBLIC rnoh)

# 链接 ImageCropPicker 库
+ target_link_libraries(rnoh_app PUBLIC rnoh_image_crop_picker)
2.7 修改 PackageProvider.cpp
打开 harmony/entry/src/main/cpp/PackageProvider.cpp,添加:
cpp
#include "RNOH/PackageProvider.h"
#include "generated/RNOHGeneratedPackage.h"
+ #include "ImageCropPickerPackage.h"

using namespace rnoh;

std::vector<std::shared_ptr<Package>> PackageProvider::getPackages(Package::Context ctx) {
    return {
        std::make_shared<RNOHGeneratedPackage>(ctx),
        + std::make_shared<ImageCropPickerPackage>(ctx),
    };
}
2.8 在 ArkTs 侧引入 ImageCropPickerPackage
打开 harmony/entry/src/main/ets/RNPackagesFactory.ts,添加:
typescript
import type { RNPackageContext, RNPackage } from 'rnoh/ts';
+ import { ImageCropPickerPackage } from '@react-native-ohos/react-native-image-crop-picker/ts';

export function createRNPackages(ctx: RNPackageContext): RNPackage[] {
  return [
    // ... 其他包
    + new ImageCropPickerPackage(ctx),
  ];
}
🔐 权限配置
在 entry/src/main/module.json5 中添加以下权限:
json5
{
  "module": {
    "requestPermissions": [
      {
        "name": "ohos.permission.READ_MEDIA",
        "reason": "$string:read_media_reason",
        "usedScene": {
          "abilities": ["EntryAbility"],
          "when": "inuse"
        }
      },
      {
        "name": "ohos.permission.WRITE_MEDIA",
        "reason": "$string:write_media_reason",
        "usedScene": {
          "abilities": ["EntryAbility"],
          "when": "inuse"
        }
      },
      {
        "name": "ohos.permission.CAMERA",
        "reason": "$string:camera_reason",
        "usedScene": {
          "abilities": ["EntryAbility"],
          "when": "inuse"
        }
      }
    ]
  }
}
然后在 entry/src/main/resources/base/element/string.json 中添加对应的 reason 说明:
json
{
  "string": [
    {
      "name": "read_media_reason",
      "value": "用于从相册选择图片"
    },
    {
      "name": "write_media_reason",
      "value": "用于保存裁剪后的图片"
    },
    {
      "name": "camera_reason",
      "value": "用于拍照获取图片"
    }
  ]
}
🎨 必要的配置项(ImageEditAbility)
⚠️ 重要:该模块的内容无法通过 Autolink 自动生成,始终需要手动配置。缺少此配置将导致裁剪功能无法正常工作。
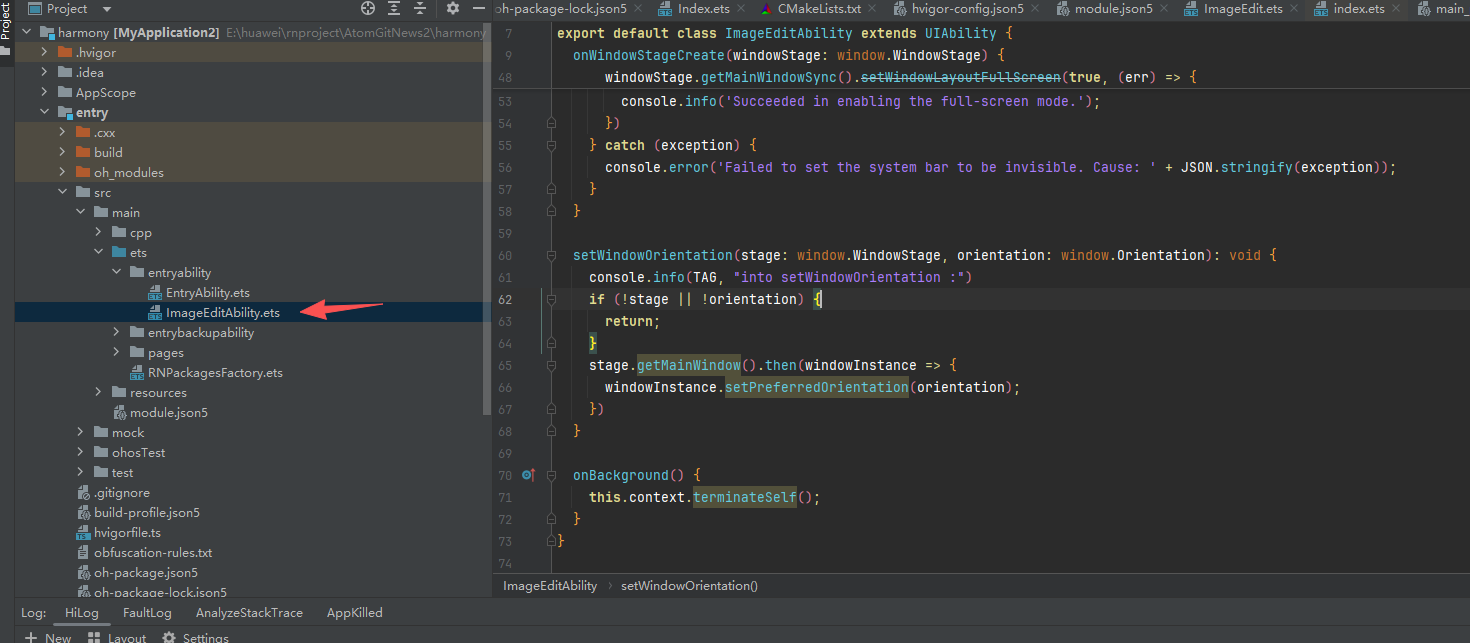
1. 创建 ImageEditAbility.ets
在 entry/src/main/ets/entryability 目录下创建 ImageEditAbility.ets 文件:
typescript
import UIAbility from '@ohos.app.ability.UIAbility'
import window from '@ohos.window'
import { BusinessError } from "@ohos.base";

const TAG = 'ImageEditAbility';

export default class ImageEditAbility extends UIAbility {

  onWindowStageCreate(windowStage: window.WindowStage) {
    this.setWindowOrientation(windowStage, window.Orientation.PORTRAIT)
    windowStage.loadContent('pages/ImageEdit', (err, data) => {
      let windowClass: window.Window = windowStage.getMainWindowSync()
      let isLayoutFullScreen = true
      windowClass.setWindowLayoutFullScreen(isLayoutFullScreen).then(() => {
        console.info('Succeeded in setting the window layout to full-screen mode.')
      }).catch((err: BusinessError) => {
        console.error(`Failed to set the window layout to full-screen mode. Code is ${err.code}, message is ${err.message}`)
      })

      let type = window.AvoidAreaType.TYPE_NAVIGATION_INDICATOR;
      let avoidArea = windowClass.getWindowAvoidArea(type);
      let bottomRectHeight = avoidArea.bottomRect.height;
      AppStorage.setOrCreate('bottomRectHeight', bottomRectHeight);

      type = window.AvoidAreaType.TYPE_SYSTEM;
      avoidArea = windowClass.getWindowAvoidArea(type);
      let topRectHeight = avoidArea.topRect.height;
      AppStorage.setOrCreate('topRectHeight', topRectHeight);

      windowClass.on('avoidAreaChange', (data) => {
        if (data.type === window.AvoidAreaType.TYPE_SYSTEM) {
          let topRectHeight = data.area.topRect.height;
          AppStorage.setOrCreate('topRectHeight', topRectHeight);
        } else if (data.type == window.AvoidAreaType.TYPE_NAVIGATION_INDICATOR) {
          let bottomRectHeight = data.area.bottomRect.height;
          AppStorage.setOrCreate('bottomRectHeight', bottomRectHeight);
        }
      });

      if (err.code) {
        console.info(TAG, 'Failed to load the content. Cause: %{public}s',
          JSON.stringify(err) ?? '')
        return;
      }
      console.info(TAG, 'Succeeded in loading the content')
    });
    try {
      windowStage.getMainWindowSync().setWindowLayoutFullScreen(true, (err) => {
        if (err.code) {
          console.error('Failed to enable the full-screen mode. Cause: ' + JSON.stringify(err));
          return;
        }
        console.info('Succeeded in enabling the full-screen mode.');
      })
    } catch (exception) {
      console.error('Failed to set the system bar to be invisible. Cause: ' + JSON.stringify(exception));
    }
  }

  setWindowOrientation(stage: window.WindowStage, orientation: window.Orientation): void {
    console.info(TAG, "into setWindowOrientation :")
    if (!stage || !orientation) {
      return;
    }
    stage.getMainWindow().then(windowInstance => {
      windowInstance.setPreferredOrientation(orientation);
    })
  }

  onBackground() {
    this.context.terminateSelf();
  }
}
2. 在 module.json5 注册 ImageEditAbility
打开 entry/src/main/module.json5,在 abilities 数组中添加:
json5
{
"module": {
"abilities": [
// ... 其他 Ability
{
"name": "ImageEditAbility",
"srcEntry": "./ets/entryability/ImageEditAbility.ets",
"description": "$string:EntryAbility_desc",
"icon": "$media:icon",
"startWindowIcon": "$media:startIcon",
"startWindowBackground": "$color:start_window_background",
"removeMissionAfterTerminate": true,
}
]
}
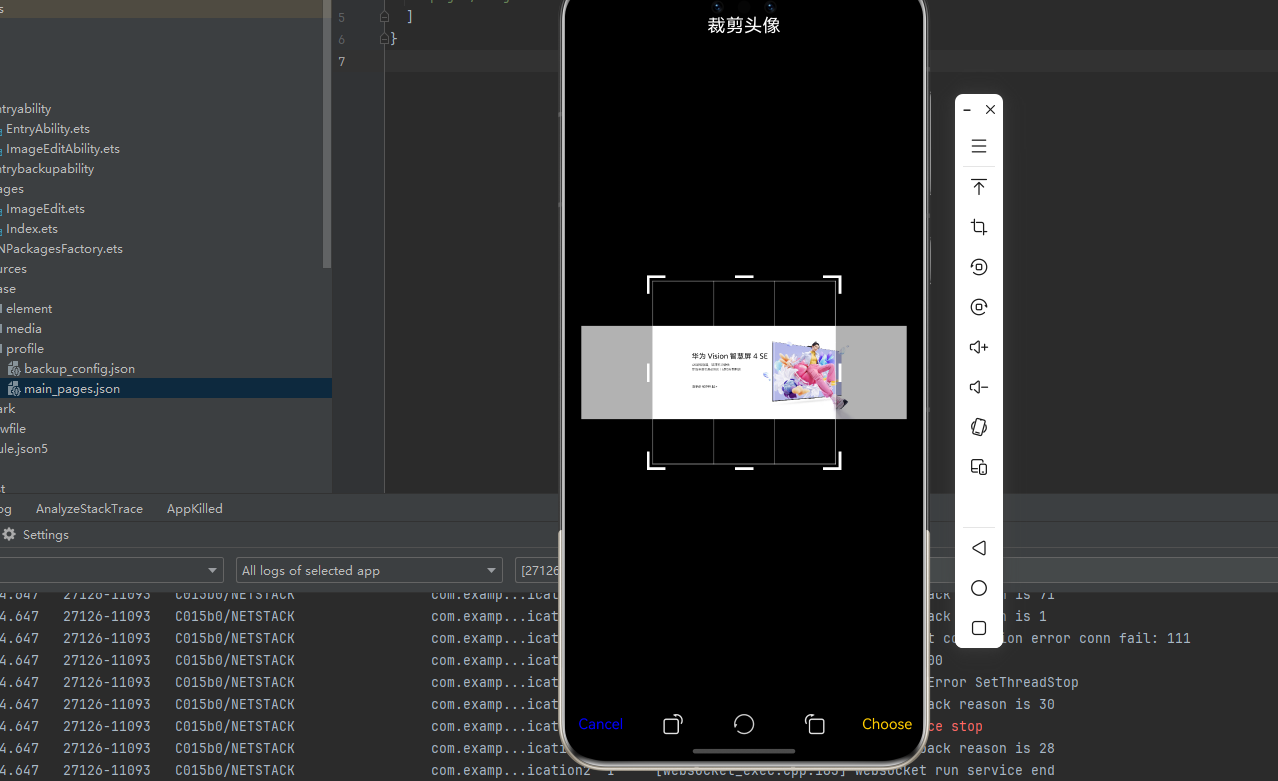
}3. 创建 ImageEdit.ets 页面

在 entry/src/main/ets/pages 目录下创建 ImageEdit.ets 文件:
typescript
import { ImageEditInfo } from '@react-native-ohos/react-native-image-crop-picker';

@Entry
@Component
struct ImageEdit {
  @State cropperCircleOverlay: boolean = false;

  aboutToAppear(): void {
    this.cropperCircleOverlay = AppStorage.Get('cropperCircleOverlay') || false
  }

  build() {
    Row() {
      Column() {
        if (!this.cropperCircleOverlay) {
          ImageEditInfo()
        }
      }
      .width('100%')
    }
    .height('100%')
  }
}
4. 配置 main_pages.json
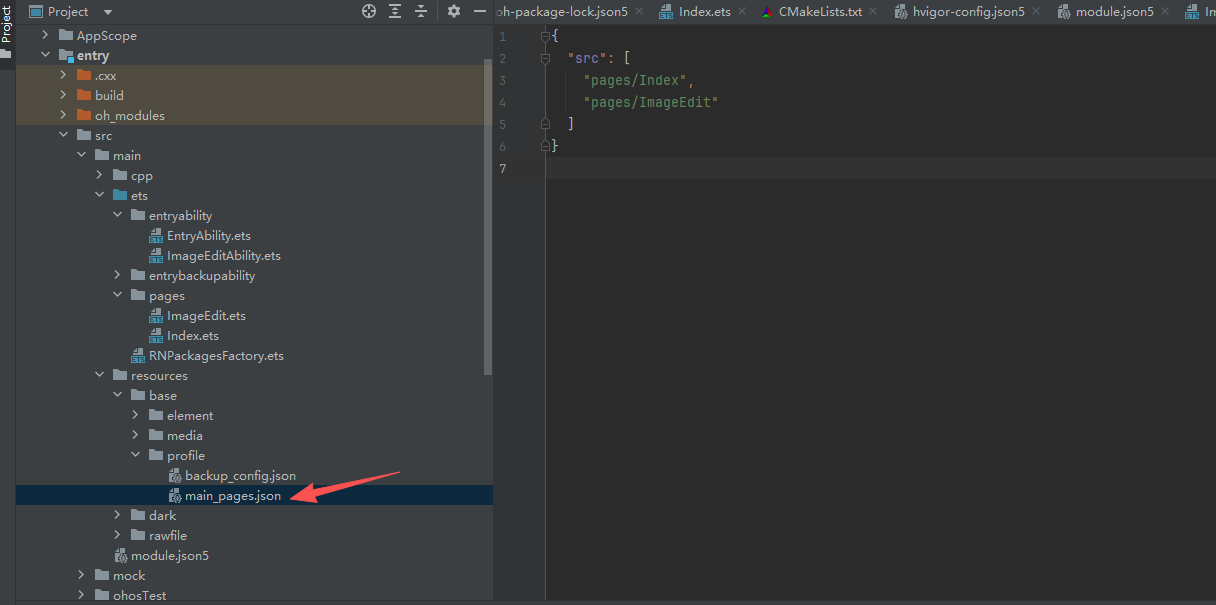
打开 entry/src/main/resources/base/profile/main_pages.json,添加 ImageEdit 页面:
json
{
  "src": [
    "pages/Index",
    "pages/ImageEdit"
  ]
}
同步并运行 🚀
同步依赖
点击 DevEco Studio 右上角的 sync 按钮,或者在终端执行:
bash
cd harmony/entry
ohpm install
然后编译、运行即可。
📖 API 详解(不同版本可能存在差异)
🔷 openPicker - 从相册选择图片
openPicker 是最常用的 API,用于从相册中选择图片或视频。
typescript
import ImagePicker from 'react-native-image-crop-picker';

const image = await ImagePicker.openPicker({
  width: 300,
  height: 400,
  cropping: true,
});返回数据结构:
| 属性 | 类型 | 说明 |
|---|---|---|
path |
string | 图片路径 |
size |
number | 文件大小(字节) |
data |
string | Base64 数据(需设置 includeBase64) |
width |
number | 图片宽度 |
height |
number | 图片高度 |
mime |
string | MIME 类型(如 image/jpeg) |
filename |
string | 文件名 |
creationDate |
string | 创建日期 |
应用场景:
typescript
import ImagePicker from 'react-native-image-crop-picker';

// 场景1:选择单张图片并裁剪
const pickAndCrop = async () => {
  try {
    const image = await ImagePicker.openPicker({
      width: 300,
      height: 300,
      cropping: true,
    });
    console.log('裁剪后的图片:', image.path);
  } catch (error) {
    console.log('用户取消选择');
  }
};

// 场景2:多图选择(最多5张)
const pickMultiple = async () => {
  try {
    const images = await ImagePicker.openPicker({
      multiple: true,
      maxFiles: 5,
      mediaType: 'photo',
    });
    console.log(`已选择 ${images.length} 张图片`);
  } catch (error) {
    console.log('选择失败:', error);
  }
};

// 场景3:选择视频文件
const pickVideo = async () => {
  try {
    const video = await ImagePicker.openPicker({
      mediaType: 'video',
    });
    console.log('视频路径:', video.path);
    console.log('视频时长:', video.duration);
  } catch (error) {
    console.log('选择失败:', error);
  }
};

// 场景4:获取图片Base64数据
const pickWithBase64 = async () => {
  try {
    const image = await ImagePicker.openPicker({
      includeBase64: true,
      compressImageQuality: 0.8,
    });
    console.log('Base64数据:', image.data);
  } catch (error) {
    console.log('选择失败:', error);
  }
};
🔷 openCamera - 从相机拍照
openCamera 用于调用相机拍照或录像。
typescript
import ImagePicker from 'react-native-image-crop-picker';

const image = await ImagePicker.openCamera({
  width: 300,
  height: 400,
  cropping: true,
});应用场景:
typescript
import ImagePicker from 'react-native-image-crop-picker';

// 场景1:拍照并裁剪为正方形
const takeSquarePhoto = async () => {
  try {
    const image = await ImagePicker.openCamera({
      width: 300,
      height: 300,
      cropping: true,
      mediaType: 'photo',
    });
    console.log('照片路径:', image.path);
  } catch (error) {
    console.log('拍照失败:', error);
  }
};

// 场景2:使用前置摄像头自拍
const takeSelfie = async () => {
  try {
    const image = await ImagePicker.openCamera({
      useFrontCamera: true,
      cropping: true,
      cropperCircleOverlay: true,
    });
    console.log('自拍照片:', image.path);
  } catch (error) {
    console.log('拍照失败:', error);
  }
};

// 场景3:录制视频
const recordVideo = async () => {
  try {
    const video = await ImagePicker.openCamera({
      mediaType: 'video',
    });
    console.log('视频路径:', video.path);
    console.log('视频时长:', video.duration);
  } catch (error) {
    console.log('录制失败:', error);
  }
};
🔷 openCropper - 裁剪图片
openCropper 用于裁剪已有的图片,适用于需要二次编辑的场景。
typescript
import ImagePicker from 'react-native-image-crop-picker';

const croppedImage = await ImagePicker.openCropper({
  path: imagePath,
  width: 300,
  height: 300,
});应用场景:
typescript
import ImagePicker from 'react-native-image-crop-picker';

// 场景1:圆形裁剪(头像)
const cropAvatar = async (imagePath: string) => {
  try {
    const avatar = await ImagePicker.openCropper({
      path: imagePath,
      width: 200,
      height: 200,
      cropperCircleOverlay: true,
    });
    console.log('头像路径:', avatar.path);
  } catch (error) {
    console.log('裁剪失败:', error);
  }
};

// 场景2:自由裁剪模式
const freeStyleCrop = async (imagePath: string) => {
  try {
    const cropped = await ImagePicker.openCropper({
      path: imagePath,
      freeStyleCropEnabled: true,
      showCropGuidelines: true,
      showCropFrame: true,
    });
    console.log('裁剪结果:', cropped.path);
  } catch (error) {
    console.log('裁剪失败:', error);
  }
};

// 场景3:身份证裁剪
const cropIDCard = async (imagePath: string) => {
  try {
    const cropped = await ImagePicker.openCropper({
      path: imagePath,
      width: 400,
      height: 250,
      cropperToolbarTitle: '裁剪身份证',
    });
    console.log('身份证图片:', cropped.path);
  } catch (error) {
    console.log('裁剪失败:', error);
  }
};
🔷 clean - 清理临时文件
clean 用于清除由该库生成的临时文件,避免占用过多存储空间。
typescript
import ImagePicker from 'react-native-image-crop-picker';

// 清除所有临时文件
await ImagePicker.clean();

// 清除单个文件
await ImagePicker.cleanSingle(path);应用场景:
typescript
import ImagePicker from 'react-native-image-crop-picker';

// 场景1:应用退出时清理缓存
const cleanupOnExit = async () => {
  try {
    await ImagePicker.clean();
    console.log('临时文件已清理');
  } catch (error) {
    console.log('清理失败:', error);
  }
};

// 场景2:上传完成后删除临时文件
const uploadAndClean = async (imagePath: string) => {
  try {
    await uploadImage(imagePath);
    await ImagePicker.cleanSingle(imagePath);
    console.log('上传完成,临时文件已删除');
  } catch (error) {
    console.log('操作失败:', error);
  }
};
🔷 配置属性详解
📝 说明:"Platform" 列表示该属性在原三方库上支持的平台;"HarmonyOS Support" 列表示 HarmonyOS 平台的支持情况:✅ 支持、❌ 不支持、⚠️ 部分支持。
裁剪配置项
| 属性 | 类型 | 默认值 | 说明 | Platform | HarmonyOS |
|---|---|---|---|---|---|
cropping |
boolean | false | 启用或禁用裁剪功能 | All | ✅ |
width |
number | - | 启用 cropping 选项时,结果图片的宽度 |
All | ✅ |
height |
number | - | 启用 cropping 选项时,结果图片的高度 |
All | ✅ |
multiple |
boolean | false | 启用或禁用多图选择功能 | All | ✅ |
writeTempFile |
boolean | true | 设为 false 时,不会为选中的图片生成临时文件 | iOS | ✅ |
includeBase64 |
boolean | false | 设为 true 时,图片文件内容将以 Base64 编码字符串的形式存在于 data 属性中 |
All | ✅ |
includeExif |
boolean | false | 在响应中包含图片的 EXIF 数据 | All | ✅ |
avoidEmptySpaceAroundImage |
boolean | true | 设为 true 时,图片将始终填充遮罩区域 | iOS | ❌ |
freeStyleCropEnabled |
boolean | false | 允许用户自定义裁剪区域的矩形范围 | All | ✅ |
cropperToolbarTitle |
string | 'Edit Photo' | 裁剪图片时,指定工具栏的标题 | All | ✅ |
cropperCircleOverlay |
boolean | false | 启用或禁用圆形裁剪遮罩 | All | ✅ |
minFiles |
number | 1 | 启用 multiple 选项时,最少选择的文件数量 |
iOS | ❌ |
maxFiles |
number | 5 | 启用 multiple 选项时,最多选择的文件数量 |
iOS | ✅ |
useFrontCamera |
boolean | false | 打开相机时是否默认使用前置摄像头 | All | ✅ |
compressImageQuality |
number | 1(Android)/0.8(iOS) | 按指定质量压缩图片(取值范围 0-1) | All | ✅ |
compressImageMaxWidth |
number | none | 按最大宽度压缩图片 | All | ❌ |
compressImageMaxHeight |
number | none | 按最大高度压缩图片 | All | ❌ |
mediaType |
string | 'any' | 媒体类型:'photo'/'video'/'any' | All | ✅ |
forceJpg |
boolean | false | 是否将照片转换为 JPG 格式 | iOS | ✅ |
showCropGuidelines |
boolean | true | 裁剪过程中是否显示 3x3 网格线 | Android | ✅ |
showCropFrame |
boolean | true | 裁剪过程中是否显示裁剪框 | Android | ✅ |
enableRotationGesture |
boolean | false | 是否允许通过手势旋转图片 | Android | ✅ |
裁剪器 UI 配置
| 属性 | 类型 | 默认值 | 说明 | Platform | HarmonyOS |
|---|---|---|---|---|---|
cropperChooseText |
string | 'Choose' | 确认选择按钮的文本 | iOS | ✅ |
cropperChooseColor |
string | '#FFCC00' | 确认选择按钮的颜色(十六进制) | iOS | ✅ |
cropperCancelText |
string | 'Cancel' | 取消按钮的文本 | iOS | ✅ |
cropperCancelColor |
string | tint color | 取消按钮的颜色 | iOS | ✅ |
cropperRotateButtonsHidden |
boolean | false | 启用或禁用裁剪器的旋转按钮 | iOS | ✅ |
cropperActiveWidgetColor |
string | '#424242' | 裁剪图片时,活动组件的颜色 | Android | ❌ |
cropperStatusBarColor |
string | '#424242' | 裁剪图片时,状态栏的颜色(已弃用) | Android | ❌ |
cropperToolbarColor |
string | '#424242' | 裁剪图片时,工具栏的颜色 | Android | ❌ |
cropperToolbarWidgetColor |
string | darker orange | 裁剪图片时,工具栏文本和按钮的颜色 | Android | ❌ |
hideBottomControls |
boolean | false | 是否显示底部控制栏 | Android | ❌ |
💻 完整代码示例
下面是一个完整的示例,展示了 react-native-image-crop-picker 的各种功能应用:
typescript
import React, { useState, useCallback } from 'react';
import {
  View,
  Text,
  StyleSheet,
  SafeAreaView,
  ScrollView,
  TouchableOpacity,
  Image,
  Alert,
} from 'react-native';
import ImagePicker from 'react-native-image-crop-picker';

function ImagePickerDemo() {
  const [avatar, setAvatar] = useState<string | null>(null);
  const [images, setImages] = useState<string[]>([]);
  const [videoInfo, setVideoInfo] = useState<{ path: string; duration: number } | null>(null);

  const pickAndCropAvatar = useCallback(async () => {
    try {
      const image = await ImagePicker.openPicker({
        width: 200,
        height: 200,
        cropping: true,
        cropperCircleOverlay: true,
        cropperToolbarTitle: '裁剪头像',
        compressImageQuality: 0.8,
      });
      setAvatar(image.path);
    } catch (error) {
      console.log('用户取消选择');
    }
  }, []);

  const takePhotoWithCamera = useCallback(async () => {
    try {
      const image = await ImagePicker.openCamera({
        width: 300,
        height: 400,
        cropping: true,
        mediaType: 'photo',
        compressImageQuality: 0.8,
      });
      setAvatar(image.path);
    } catch (error) {
      console.log('拍照失败:', error);
    }
  }, []);

  const pickMultipleImages = useCallback(async () => {
    try {
      const results = await ImagePicker.openPicker({
        multiple: true,
        maxFiles: 5,
        mediaType: 'photo',
        compressImageQuality: 0.7,
      });
      setImages(results.map((img) => img.path));
    } catch (error) {
      console.log('选择失败:', error);
    }
  }, []);

  const pickVideo = useCallback(async () => {
    try {
      const video = await ImagePicker.openPicker({
        mediaType: 'video',
      });
      setVideoInfo({ path: video.path, duration: video.duration || 0 });
    } catch (error) {
      console.log('选择失败:', error);
    }
  }, []);

  const recordVideo = useCallback(async () => {
    try {
      const video = await ImagePicker.openCamera({
        mediaType: 'video',
      });
      setVideoInfo({ path: video.path, duration: video.duration || 0 });
    } catch (error) {
      console.log('录制失败:', error);
    }
  }, []);

  const cleanCache = useCallback(async () => {
    try {
      await ImagePicker.clean();
      Alert.alert('提示', '临时文件已清理');
    } catch (error) {
      console.log('清理失败:', error);
    }
  }, []);

  return (
    <SafeAreaView style={styles.container}>
      <ScrollView style={styles.scrollView} contentContainerStyle={styles.scrollContent}>
        <Text style={styles.title}>📷 图片选择裁剪演示</Text>

        <View style={styles.section}>
          <Text style={styles.sectionTitle}>头像选择</Text>
          <View style={styles.avatarContainer}>
            {avatar ? (
              <Image source={{ uri: avatar }} style={styles.avatar} />
            ) : (
              <View style={styles.avatarPlaceholder}>
                <Text style={styles.avatarPlaceholderText}>点击选择头像</Text>
              </View>
            )}
          </View>
          <View style={styles.buttonRow}>
            <TouchableOpacity style={styles.button} onPress={pickAndCropAvatar}>
              <Text style={styles.buttonText}>从相册选择</Text>
            </TouchableOpacity>
            <TouchableOpacity style={styles.button} onPress={takePhotoWithCamera}>
              <Text style={styles.buttonText}>拍照</Text>
            </TouchableOpacity>
          </View>
        </View>

        <View style={styles.section}>
          <Text style={styles.sectionTitle}>多图选择</Text>
          <View style={styles.imageGrid}>
            {images.map((uri, index) => (
              <Image key={index} source={{ uri }} style={styles.gridImage} />
            ))}
          </View>
          <TouchableOpacity style={styles.button} onPress={pickMultipleImages}>
            <Text style={styles.buttonText}>选择多张图片(最多5张)</Text>
          </TouchableOpacity>
        </View>

        <View style={styles.section}>
          <Text style={styles.sectionTitle}>视频选择</Text>
          {videoInfo && (
            <View style={styles.videoInfo}>
              <Text style={styles.videoText}>路径: {videoInfo.path}</Text>
              <Text style={styles.videoText}>时长: {(videoInfo.duration / 1000).toFixed(1)}秒</Text>
            </View>
          )}
          <View style={styles.buttonRow}>
            <TouchableOpacity style={styles.button} onPress={pickVideo}>
              <Text style={styles.buttonText}>从相册选择</Text>
            </TouchableOpacity>
            <TouchableOpacity style={styles.button} onPress={recordVideo}>
              <Text style={styles.buttonText}>录制视频</Text>
            </TouchableOpacity>
          </View>
        </View>

        <View style={styles.section}>
          <Text style={styles.sectionTitle}>缓存管理</Text>
          <TouchableOpacity style={[styles.button, styles.cleanButton]} onPress={cleanCache}>
            <Text style={styles.buttonText}>清理临时文件</Text>
          </TouchableOpacity>
        </View>
      </ScrollView>
    </SafeAreaView>
  );
}

const styles = StyleSheet.create({
  container: {
    flex: 1,
    backgroundColor: '#f5f5f5',
  },
  scrollView: {
    flex: 1,
  },
  scrollContent: {
    padding: 20,
  },
  title: {
    fontSize: 24,
    fontWeight: 'bold',
    color: '#333',
    textAlign: 'center',
    marginBottom: 30,
  },
  section: {
    backgroundColor: '#fff',
    borderRadius: 12,
    padding: 16,
    marginBottom: 16,
    shadowColor: '#000',
    shadowOffset: { width: 0, height: 2 },
    shadowOpacity: 0.1,
    shadowRadius: 4,
    elevation: 3,
  },
  sectionTitle: {
    fontSize: 18,
    fontWeight: 'bold',
    color: '#333',
    marginBottom: 16,
  },
  avatarContainer: {
    alignItems: 'center',
    marginBottom: 16,
  },
  avatar: {
    width: 100,
    height: 100,
    borderRadius: 50,
  },
  avatarPlaceholder: {
    width: 100,
    height: 100,
    borderRadius: 50,
    backgroundColor: '#e0e0e0',
    justifyContent: 'center',
    alignItems: 'center',
  },
  avatarPlaceholderText: {
    fontSize: 12,
    color: '#999',
    textAlign: 'center',
  },
  buttonRow: {
    flexDirection: 'row',
    justifyContent: 'space-around',
  },
  button: {
    backgroundColor: '#667eea',
    paddingHorizontal: 20,
    paddingVertical: 12,
    borderRadius: 8,
    flex: 1,
    marginHorizontal: 4,
    alignItems: 'center',
  },
  buttonText: {
    color: '#fff',
    fontSize: 14,
    fontWeight: '500',
  },
  imageGrid: {
    flexDirection: 'row',
    flexWrap: 'wrap',
    marginBottom: 16,
  },
  gridImage: {
    width: 80,
    height: 80,
    borderRadius: 8,
    margin: 4,
  },
  videoInfo: {
    backgroundColor: '#f0f0f0',
    padding: 12,
    borderRadius: 8,
    marginBottom: 16,
  },
  videoText: {
    fontSize: 14,
    color: '#666',
    marginBottom: 4,
  },
  cleanButton: {
    backgroundColor: '#FF6B6B',
  },
});

export default ImagePickerDemo;
📊 API 支持情况总览
| API | 说明 | HarmonyOS 支持 |
|---|---|---|
openPicker |
从相册选择图片 | ✅ |
openCamera |
从相机拍照 | ✅ |
openCropper |
裁剪图片 | ✅ |
clean |
清除所有临时文件 | ✅ |
cleanSingle |
清除单个临时文件 | ✅ |
⚠️ 注意事项
1. 权限申请
在 HarmonyOS 上使用图片选择和相机功能需要申请相应权限:
ohos.permission.READ_MEDIA- 读取媒体文件ohos.permission.WRITE_MEDIA- 写入媒体文件ohos.permission.CAMERA- 相机权限
2. 临时文件管理
- 选择/裁剪后的图片会存储在临时目录
- 建议在适当时机调用
clean()清理临时文件 - 上传完成后及时删除不再需要的临时文件
3. 常见问题
问题 1: 选择图片后返回路径为空
- 检查是否正确配置了读写权限
- 确认
writeTempFile参数设置正确
问题 2: 裁剪功能无法使用
- 确保设置了
cropping: true - 检查是否同时设置了
width和height
问题 3: 相机无法打开
- 检查相机权限是否正确配置
- 确认设备相机功能正常
🔴 遗留问题
以下是当前版本已知的问题,使用时请注意规避:
| 问题 | 说明 | Issue |
|---|---|---|
| 图像填充蒙版空间 | 图像将始终填充蒙版空间功能未适配 | #4 |
| ActiveWidget 颜色 | Android Demo 中 ActiveWidget 改变颜色未适配 | #5 |
| 状态栏颜色 | Android Demo 中改变状态栏颜色未适配 | #6 |
| 工具栏颜色 | Android Demo 中改变工具栏颜色未适配 | #7 |
| 最小文件数 | 使用 multiple 选项时无法设置最小文件数 | #39 |
| 选中数量显示 | 使用 multiple 选项时无法设置是否显示选中的资产数量 | #40 |
| Loading 动画 | photoAccessHelper 选取完成之后没有 loading 过渡动画效果 | #45 |
| 圆形裁切 | @ohos.multimedia.image 无法进行圆形效果裁切(已解决) | #46 |
| 宽高属性 | @ohos.multimedia.image 中 PackingOption 无法设置宽高属性 | #47 |
| 导航栏颜色 | Android Demo 中改变导航栏图标深浅颜色 | #48 |
📝 总结
通过集成 react-native-image-crop-picker,我们为项目添加了完整的图片选择和裁剪能力。该库提供了丰富的配置选项,支持单选/多选、裁剪、压缩等功能,是处理图片上传场景的理想选择。