test.apk与BootStrap模块完整实现
一、目录结构规划
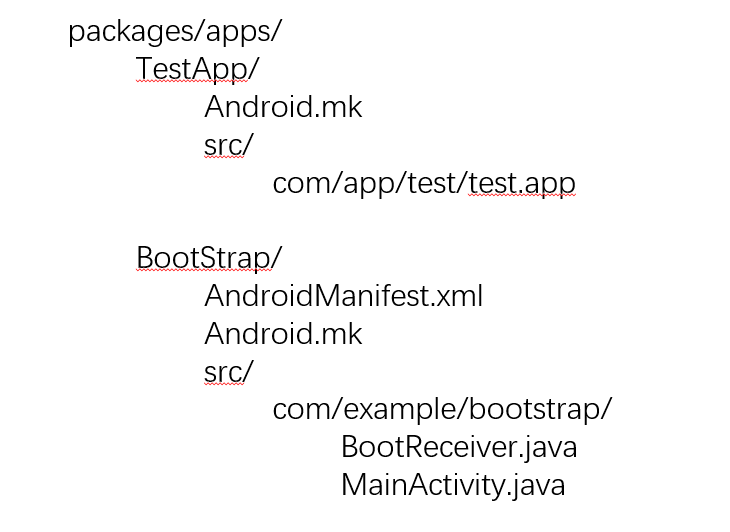
二、test.apk模块集成
1、将apk文件放到 packages/apps/TestApp/src/com/app/test 文件中
2、Android.mk配置文件
文件路径:packages / apps / TestApp / Android.mk
cs
LOCAL_PATH := $(call my-dir)
include $(CLEAR_VARS)

# 模块名称
LOCAL_MODULE := TestApp
# 模块类型
LOCAL_MODULE_CLASS := APPS
# 预编译 APK 文件路径
LOCAL_SRC_FILES := src/com/app/test/test.apk
# 后缀
LOCAL_MODULE_SUFFIX := .apk
# 平台签名
LOCAL_CERTIFICATE := platform
# 安装到 priv-app 目录(获得系统权限)
LOCAL_PRIVILEGED_MODULE := true

include $(BUILD_PREBUILT)
三、BootStrap模块实现
1、AndroidManifest.xml
文件路径:packages / apps / BootStrap / AndroidManifest.xml
cs
<?xml version="1.0" encoding="utf-8"?>
<manifest xmlns:android="http://schemas.android.com/apk/res/android"
    package="com.example.bootstrap">

    <!-- 必要权限 -->
    <uses-permission android:name="android.permission.RECEIVE_BOOT_COMPLETED" />
    <uses-permission android:name="android.permission.WAKE_LOCK" />
    <!-- Android 13 中如果需要从后台启动 Activity,需声明 -->
    <uses-permission android:name="android.permission.START_ACTIVITIES_FROM_BACKGROUND" />

    <application
        android:label="System BootStrap"
        android:persistent="true">

        <!-- 主Activity -->
	<activity android:name=".MainActivity"
		android:exported="false"
		android:launchMode="singleInstance">
	</activity>

        <receiver android:name=".BootReceiver"
		android:exported="true"
		android:enabled="true"
		android:directBootAware="true"> <!-- 添加 directBootAware -->
		<intent-filter android:priority="-1000"> <!-- 降低优先级 -->
			<action android:name="android.intent.action.BOOT_COMPLETED" />
			<action android:name="android.intent.action.LOCKED_BOOT_COMPLETED" />
		</intent-filter>
	</receiver>

    </application>
</manifest>2、Android.mk
文件路径:packages / apps / BootStrap / Android.mk
cs
LOCAL_PATH := $(call my-dir)
include $(CLEAR_VARS)

LOCAL_PACKAGE_NAME := BootStrap
#LOCAL_MODULE := BootStrap
LOCAL_SDK_VERSION := current
LOCAL_SRC_FILES := $(call all-java-files-under, src)
LOCAL_CERTIFICATE := platform
LOCAL_PRIVILEGED_MODULE := true

include $(BUILD_PACKAGE)
3、BootReceiver.java
文件路径:packages / apps / BootStrap / src / com / example / bootstrap / BootReceiver.java
cs
package com.example.bootstrap;

import android.content.BroadcastReceiver;
import android.content.Context;
import android.content.Intent;
import android.os.Handler;
import android.os.SystemClock;
import android.util.Log;

public class BootReceiver extends BroadcastReceiver {
    private static final String TAG = "BootStrap";
    private static final long BOOT_COMPLETE_DELAY = 15000; // 15秒延迟

    @Override
    public void onReceive(final Context context, Intent intent) {
        String action = intent.getAction();
        Log.i(TAG, "Received boot action: " + action);

        if (Intent.ACTION_BOOT_COMPLETED.equals(action)) {
            // 使用 Handler 延迟启动,确保系统完全就绪
            new Handler().postDelayed(new Runnable() {
                @Override
                public void run() {
                    // 检查系统是否真正就绪
                    if (isSystemReady(context)) {
                        startTargetApp(context);
                    } else {
                        // 如果未就绪,再延迟5秒重试
                        new Handler().postDelayed(this, 5000);
                    }
                }
            }, BOOT_COMPLETE_DELAY);
        }
    }

    private boolean isSystemReady(Context context) {
        try {
            // 检查系统服务是否可用
            if (context.getPackageManager() == null) {
                return false;
            }
            // 检查系统 UI 是否已启动
            Intent homeIntent = new Intent(Intent.ACTION_MAIN);
            homeIntent.addCategory(Intent.CATEGORY_HOME);
            if (context.getPackageManager().resolveActivity(homeIntent, 0) == null) {
                return false;
            }
            return true;
        } catch (Exception e) {
            Log.e(TAG, "Error checking system ready: ", e);
            return false;
        }
    }

    private void startTargetApp(Context context) {
        try {
            String targetPackage = "com.app.test";
            Intent intent = context.getPackageManager()
                .getLaunchIntentForPackage(targetPackage);

            if (intent != null) {
                intent.addFlags(Intent.FLAG_ACTIVITY_NEW_TASK);
                intent.addFlags(Intent.FLAG_ACTIVITY_RESET_TASK_IF_NEEDED);

                // 添加额外标志避免干扰启动动画
                intent.addFlags(Intent.FLAG_FROM_BACKGROUND);

                context.startActivity(intent);
                Log.i(TAG, "Successfully launched: " + targetPackage);
            }
        } catch (Exception e) {
            Log.e(TAG, "Exception launching app: ", e);
        }
    }
}
4、MainActivity.java
文件路径:packages / apps / BootStrap / src / com / example / bootstrap / MainActivity.java
cs
package com.example.bootstrap;

import android.app.Activity;
import android.content.Intent;
import android.os.Bundle;
import android.util.Log;

public class MainActivity extends Activity {
    private static final String TARGET_PACKAGE = "com.app.test";
    private static final String TAG = "BootStrap";

    @Override
    protected void onCreate(Bundle savedInstanceState) {
        super.onCreate(savedInstanceState);

        try {
            // 延迟 2 秒,确保系统服务完全启动 可能会造成白色闪屏
            //Thread.sleep(2000);

            Intent intent = getPackageManager().getLaunchIntentForPackage(TARGET_PACKAGE);
            if (intent != null) {
                intent.addFlags(Intent.FLAG_ACTIVITY_NEW_TASK | Intent.FLAG_ACTIVITY_RESET_TASK_IF_NEEDED);
                startActivity(intent);
                Log.i(TAG, "Successfully launched: " + TARGET_PACKAGE);
            } else {
                Log.e(TAG, "Failed to find launch intent for: " + TARGET_PACKAGE);
            }
        } catch (Exception e) {
            Log.e(TAG, "Exception while launching app: ", e);
        }

        finish();
    }
}
四、产品配置集成
文件路径 device / rockchip / rk356x / rk3568_t / rk3568_t.mk
cs
# 预置系统应用
PRODUCT_PACKAGES += \
    TestApp \
    BootStrap