教程来自Claude问答。
OkHttp 使用教程:从入门到精通(Kotlin)
先建立整体架构认知:
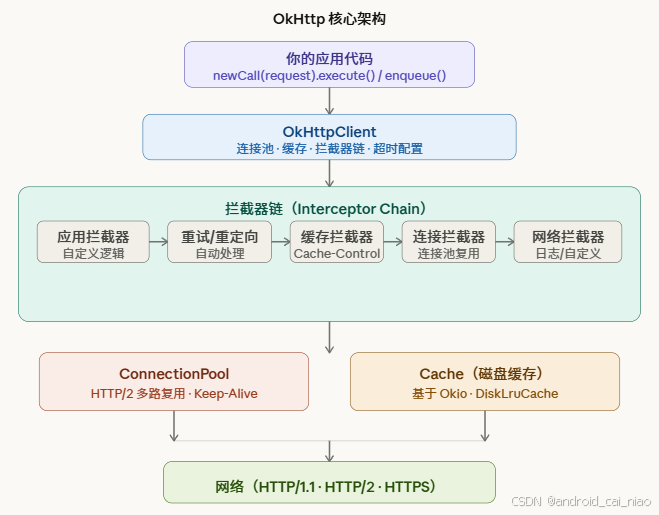
第一章:环境准备
添加依赖
kotlin
kotlin
// build.gradle.kts
dependencies {
    implementation("com.squareup.okhttp3:okhttp:4.12.0")
    // 可选:日志拦截器(开发调试必备)
    implementation("com.squareup.okhttp3:logging-interceptor:4.12.0")
}
OkHttpClient 的黄金法则
OkHttpClient 内部持有连接池和线程池,整个应用应只创建一个实例,用单例共享:
kotlin
kotlin
// 推荐:应用级单例
object HttpClient {
    val instance: OkHttpClient = OkHttpClient.Builder()
        .connectTimeout(10, TimeUnit.SECONDS)
        .readTimeout(30, TimeUnit.SECONDS)
        .writeTimeout(30, TimeUnit.SECONDS)
        .build()
}

// 错误示范:每次请求都 new 一个,会耗尽连接/线程资源
fun badPractice() {
    val client = OkHttpClient() // 每次 new ❌
    client.newCall(request).execute()
}
第二章:入门 --- GET 请求
2.1 同步 GET(阻塞,不能在 Android 主线程调用)
kotlin
kotlin
val client = OkHttpClient()

fun getSync(url: String): String {
    val request = Request.Builder()
        .url(url)
        .build()

    // execute() 阻塞当前线程直到响应返回
    client.newCall(request).execute().use { response ->
        if (!response.isSuccessful) {
            throw IOException("请求失败: ${response.code}")
        }
        // response.body 只能读一次!use{} 会自动关闭
        return response.body!!.string()
    }
}

// 调用
val json = getSync("https://api.github.com/users/octocat")
println(json)
2.2 异步 GET(推荐方式,回调在 OkHttp 内部线程池执行)
kotlin
kotlin
fun getAsync(url: String) {
    val request = Request.Builder()
        .url(url)
        .header("Accept", "application/json")        // 设置请求头
        .addHeader("X-Custom-Header", "my-value")    // 追加请求头
        .build()

    client.newCall(request).enqueue(object : Callback {
        override fun onFailure(call: Call, e: IOException) {
            // 网络错误(无网、超时、DNS 解析失败等)
            println("请求失败: ${e.message}")
        }

        override fun onResponse(call: Call, response: Response) {
            response.use {  // 确保 body 被关闭,防止资源泄漏
                if (!it.isSuccessful) {
                    println("HTTP 错误: ${it.code}")
                    return
                }
                val body = it.body!!.string()
                println("响应: $body")
                // ⚠️ 注意:这里是子线程,更新 UI 需切换到主线程
            }
        }
    })
}
2.3 结合 Kotlin 协程(现代最佳实践)
kotlin
kotlin
// 用扩展函数把回调包装成 suspend 函数
suspend fun OkHttpClient.getAsync(url: String): String {
    val request = Request.Builder().url(url).build()

    return suspendCancellableCoroutine { continuation ->
        val call = newCall(request)

        // 协程取消时自动取消 HTTP 请求
        continuation.invokeOnCancellation { call.cancel() }

        call.enqueue(object : Callback {
            override fun onFailure(call: Call, e: IOException) {
                continuation.resumeWithException(e)
            }
            override fun onResponse(call: Call, response: Response) {
                response.use {
                    if (!it.isSuccessful) {
                        continuation.resumeWithException(
                            IOException("HTTP ${it.code}")
                        )
                        return
                    }
                    continuation.resume(it.body!!.string())
                }
            }
        })
    }
}

// 使用(在协程作用域中调用)
viewModelScope.launch {
    try {
        val result = client.getAsync("https://api.github.com/users/octocat")
        println(result)
    } catch (e: IOException) {
        println("出错: ${e.message}")
    }
}
实际项目中更推荐直接使用 Retrofit(底层是 OkHttp),它原生支持协程,不需要手动包装。
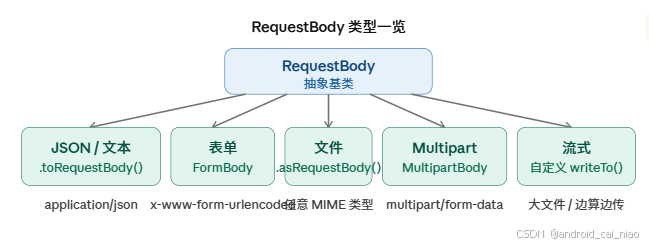
第三章:POST 请求与请求体
OkHttp 用 RequestBody 封装各种格式的请求体:
3.1 POST JSON
kotlin
kotlin
// application/json; charset=utf-8
val JSON = "application/json".toMediaType()

fun postJson(url: String, jsonBody: String): String {
    val body = jsonBody.toRequestBody(JSON)

    val request = Request.Builder()
        .url(url)
        .post(body)
        .build()

    client.newCall(request).execute().use { response ->
        return response.body!!.string()
    }
}

// 调用示例
val result = postJson(
    url = "https://httpbin.org/post",
    jsonBody = """{"name": "Kotlin", "version": 2.0}"""
)
3.2 POST 表单(Form)
kotlin
kotlin
fun postForm(url: String): String {
    val formBody = FormBody.Builder()
        .add("username", "alice")
        .add("password", "secret123")
        .addEncoded("token", "abc%2Fdef")  // 已编码的值用 addEncoded
        .build()

    val request = Request.Builder()
        .url(url)
        .post(formBody)
        .build()

    client.newCall(request).execute().use {
        return it.body!!.string()
    }
}
3.3 Multipart 上传文件
kotlin
kotlin
fun uploadFile(url: String, file: File): String {
    val MEDIA_IMAGE = "image/jpeg".toMediaType()

    val multipartBody = MultipartBody.Builder()
        .setType(MultipartBody.FORM)
        // 普通表单字段
        .addFormDataPart("description", "我的头像")
        // 文件字段:字段名、文件名、文件体
        .addFormDataPart(
            name = "avatar",
            filename = file.name,
            body = file.asRequestBody(MEDIA_IMAGE)
        )
        .build()

    val request = Request.Builder()
        .url(url)
        .post(multipartBody)
        .build()

    client.newCall(request).execute().use {
        return it.body!!.string()
    }
}
3.4 流式上传(大文件,带进度)
kotlin
kotlin
fun uploadWithProgress(
url: String,
file: File,
onProgress: (Long, Long) -> Unit
): String {
val fileBody = object : RequestBody() {
override fun contentType() = "application/octet-stream".toMediaType()
override fun contentLength() = file.length()
override fun writeTo(sink: BufferedSink) {
val total = file.length()
var uploaded = 0L
val buffer = ByteArray(8192)
file.inputStream().use { input ->
var read: Int
while (input.read(buffer).also { read = it } != -1) {
sink.write(buffer, 0, read)
uploaded += read
onProgress(uploaded, total)
}
}
}
}
val request = Request.Builder().url(url).post(fileBody).build()
client.newCall(request).execute().use { return it.body!!.string() }
}
// 调用
uploadWithProgress(
url = "https://example.com/upload",
file = File("/sdcard/video.mp4"),
onProgress = { done, total ->
val pct = (done * 100 / total)
println("上传进度: $pct%")
}
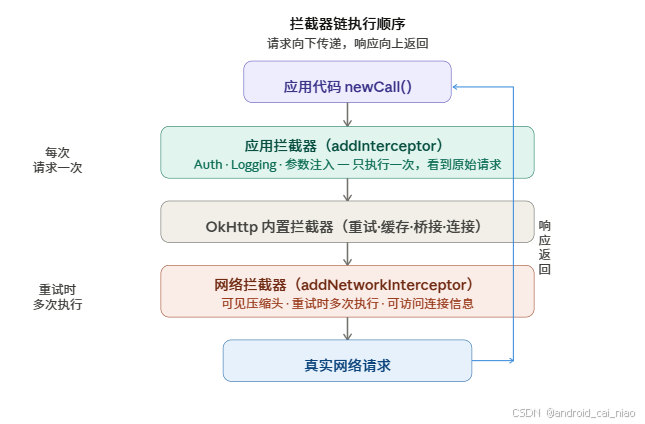
)第四章:进阶 --- 拦截器(Interceptor)
拦截器是 OkHttp 最核心的扩展机制,理解它相当于理解了 OkHttp 的灵魂。
4.1 日志拦截器(开发必备)
kotlin
kotlin
val loggingInterceptor = HttpLoggingInterceptor { message ->
    println("[HTTP] $message")
}.apply {
    // NONE / BASIC / HEADERS / BODY
    level = HttpLoggingInterceptor.Level.BODY
}

val client = OkHttpClient.Builder()
    .addInterceptor(loggingInterceptor)  // 应用拦截器
    .build()
4.2 认证拦截器(自动附加 Token)
kotlin
kotlin
class AuthInterceptor(private val tokenProvider: () -> String) : Interceptor {
    override fun intercept(chain: Interceptor.Chain): Response {
        val originalRequest = chain.request()

        // 在原请求上追加 Authorization 头,构造新请求
        val authenticatedRequest = originalRequest.newBuilder()
            .header("Authorization", "Bearer ${tokenProvider()}")
            .build()

        return chain.proceed(authenticatedRequest)
    }
}

// 使用
val client = OkHttpClient.Builder()
    .addInterceptor(AuthInterceptor { UserSession.getToken() })
    .build()
4.3 自动重试拦截器(含指数退避)
kotlin
kotlin
class RetryInterceptor(
    private val maxRetries: Int = 3,
    private val initialDelayMs: Long = 500
) : Interceptor {

    override fun intercept(chain: Interceptor.Chain): Response {
        var retryCount = 0
        var lastException: IOException? = null

        while (retryCount <= maxRetries) {
            try {
                val response = chain.proceed(chain.request())

                // 5xx 服务端错误才重试,4xx 客户端错误不重试
                if (response.isSuccessful || response.code < 500) {
                    return response
                }
                response.close()
            } catch (e: IOException) {
                lastException = e
            }

            retryCount++
            if (retryCount <= maxRetries) {
                // 指数退避:500ms, 1000ms, 2000ms...
                val delay = initialDelayMs * (1L shl (retryCount - 1))
                println("第 $retryCount 次重试,等待 ${delay}ms")
                Thread.sleep(delay)
            }
        }

        throw lastException ?: IOException("重试 $maxRetries 次后失败")
    }
}
4.4 请求/响应计时拦截器
kotlin
kotlin
class TimingInterceptor : Interceptor {
    override fun intercept(chain: Interceptor.Chain): Response {
        val request = chain.request()
        val startNs = System.nanoTime()

        val response = chain.proceed(request)

        val elapsedMs = (System.nanoTime() - startNs) / 1_000_000
        println("${request.method} ${request.url} --- ${response.code} (${elapsedMs}ms)")

        return response
    }
}
第五章:缓存
OkHttp 内置基于 HTTP 标准协议(Cache-Control)的磁盘缓存:
kotlin
kotlin
// 配置缓存:指定缓存目录 + 最大缓存大小
val cacheDir = File(context.cacheDir, "http_cache")
val cache = Cache(directory = cacheDir, maxSize = 50L * 1024 * 1024) // 50MB

val client = OkHttpClient.Builder()
    .cache(cache)
    .build()

// --- 请求策略 ---

// 1. 优先使用缓存,缓存过期才请求网络
val request = Request.Builder()
    .url("https://api.example.com/data")
    .cacheControl(CacheControl.Builder()
        .maxAge(60, TimeUnit.SECONDS)   // 允许最多 60 秒的缓存
        .build())
    .build()

// 2. 强制走网络,不读缓存
val freshRequest = Request.Builder()
    .url("https://api.example.com/data")
    .cacheControl(CacheControl.FORCE_NETWORK)
    .build()

// 3. 强制走缓存,无网络时也能返回数据(适合离线模式)
val offlineRequest = Request.Builder()
    .url("https://api.example.com/data")
    .cacheControl(CacheControl.FORCE_CACHE)
    .build()

// 4. 网络可用时用网络,无网时用缓存(常用离线策略)
val smartRequest = Request.Builder()
    .url("https://api.example.com/data")
    .cacheControl(
        if (isNetworkAvailable()) CacheControl.FORCE_NETWORK
        else CacheControl.FORCE_CACHE
    )
    .build()

// 查看缓存命中情况
client.newCall(request).execute().use { response ->
    println("缓存响应: ${response.cacheResponse}")   // 非 null = 命中缓存
    println("网络响应: ${response.networkResponse}") // 非 null = 走了网络
}
第六章:HTTPS 与安全
6.1 自定义证书(内网/自签名证书)
kotlin
kotlin
fun buildClientWithCustomCert(certInputStream: InputStream): OkHttpClient {
    val cf = CertificateFactory.getInstance("X.509")
    val cert = cf.generateCertificate(certInputStream)

    val keyStore = KeyStore.getInstance(KeyStore.getDefaultType()).apply {
        load(null, null)
        setCertificateEntry("ca", cert)
    }

    val tmf = TrustManagerFactory.getInstance(TrustManagerFactory.getDefaultAlgorithm()).apply {
        init(keyStore)
    }

    val sslContext = SSLContext.getInstance("TLS").apply {
        init(null, tmf.trustManagers, null)
    }

    return OkHttpClient.Builder()
        .sslSocketFactory(sslContext.socketFactory, tmf.trustManagers[0] as X509TrustManager)
        .build()
}
6.2 证书固定(Certificate Pinning,防止中间人攻击)
kotlin
kotlin
// sha256/ 后面的值从服务器证书中提取
val certificatePinner = CertificatePinner.Builder()
    .add("api.example.com", "sha256/AAAAAAAAAAAAAAAAAAAAAAAAAAAAAAAAAAAAAAAAAAA=")
    .add("api.example.com", "sha256/BBBBBBBBBBBBBBBBBBBBBBBBBBBBBBBBBBBBBBBBBBB=") // 备用
    .build()

val client = OkHttpClient.Builder()
    .certificatePinner(certificatePinner)
    .build()

// 获取服务器 pin 值(调试用)
// 运行后在日志里找 "Certificate pinning failure",里面有正确的 sha256 值
第七章:WebSocket
kotlin
kotlin
class WebSocketManager {
    private val client = OkHttpClient.Builder()
        .pingInterval(20, TimeUnit.SECONDS) // 每 20 秒 ping 一次,保持连接
        .build()

    private var webSocket: WebSocket? = null

    fun connect(url: String) {
        val request = Request.Builder().url(url).build()

        webSocket = client.newWebSocket(request, object : WebSocketListener() {

            override fun onOpen(webSocket: WebSocket, response: Response) {
                println("连接成功")
                webSocket.send("Hello Server!") // 发送文本
            }

            override fun onMessage(webSocket: WebSocket, text: String) {
                println("收到文本: $text")
            }

            override fun onMessage(webSocket: WebSocket, bytes: ByteString) {
                println("收到二进制: ${bytes.hex()}")
            }

            override fun onClosing(webSocket: WebSocket, code: Int, reason: String) {
                println("服务端关闭: $code / $reason")
                webSocket.close(1000, null)
            }

            override fun onFailure(webSocket: WebSocket, t: Throwable, response: Response?) {
                println("连接失败: ${t.message}")
                // 这里可以实现重连逻辑
            }
        })
    }

    fun send(message: String) = webSocket?.send(message)

    fun sendBytes(data: ByteArray) = webSocket?.send(data.toByteString())

    fun disconnect() = webSocket?.close(1000, "正常关闭")
}
第八章:精通 --- 连接池与性能调优
kotlin
kotlin
val client = OkHttpClient.Builder()
    // 连接池:最多 10 个空闲连接,每个连接最长空闲 5 分钟
    .connectionPool(ConnectionPool(
        maxIdleConnections = 10,
        keepAliveDuration = 5,
        timeUnit = TimeUnit.MINUTES
    ))
    // 协议优先级:优先 HTTP/2,降级到 HTTP/1.1
    .protocols(listOf(Protocol.HTTP_2, Protocol.HTTP_1_1))
    // 连接规格:TLS 1.2+ 和现代密码套件
    .connectionSpecs(listOf(ConnectionSpec.MODERN_TLS, ConnectionSpec.CLEARTEXT))
    // DNS 解析:可自定义,实现 DNS-over-HTTPS 或负载均衡
    .dns { hostname ->
        // 先尝试 IPv6,再 IPv4(Happy Eyeballs 算法)
        Dns.SYSTEM.lookup(hostname)
    }
    // 调度器:控制最大并发请求数
    .dispatcher(Dispatcher().apply {
        maxRequests = 64          // 全局最大并发
        maxRequestsPerHost = 10   // 单个 host 最大并发(默认 5)
    })
    .build()

// 批量并发请求示例
fun fetchAllConcurrently(urls: List<String>): List<String> {
    val latch = CountDownLatch(urls.size)
    val results = Array<String?>(urls.size) { null }

    urls.forEachIndexed { index, url ->
        val request = Request.Builder().url(url).build()
        client.newCall(request).enqueue(object : Callback {
            override fun onFailure(call: Call, e: IOException) {
                results[index] = "Error: ${e.message}"
                latch.countDown()
            }
            override fun onResponse(call: Call, response: Response) {
                response.use { results[index] = it.body?.string() }
                latch.countDown()
            }
        })
    }

    latch.await(30, TimeUnit.SECONDS)
    return results.map { it ?: "" }
}
第九章:EventListener --- 全链路监控
这是 OkHttp 最高级的能力,可以精确追踪每个请求的每个阶段耗时:
kotlin
kotlin
class MetricsEventListener : EventListener() {
    private val startNs = mutableMapOf<String, Long>()

    private fun mark(call: Call, tag: String) {
        startNs[tag] = System.nanoTime()
    }
    private fun elapsed(call: Call, tag: String): Long {
        val start = startNs[tag] ?: return -1
        return (System.nanoTime() - start) / 1_000_000
    }

    override fun callStart(call: Call) = mark(call, "call")
    override fun dnsStart(call: Call, domainName: String) = mark(call, "dns")
    override fun dnsEnd(call: Call, domainName: String, inetAddressList: List<InetAddress>) {
        println("DNS 解析: ${elapsed(call, "dns")}ms → $inetAddressList")
    }
    override fun connectStart(call: Call, inetSocketAddress: InetSocketAddress, proxy: Proxy) = mark(call, "connect")
    override fun secureConnectStart(call: Call) = mark(call, "tls")
    override fun secureConnectEnd(call: Call, handshake: Handshake?) {
        println("TLS 握手: ${elapsed(call, "tls")}ms")
    }
    override fun connectEnd(call: Call, inetSocketAddress: InetSocketAddress, proxy: Proxy, protocol: Protocol?) {
        println("TCP 连接: ${elapsed(call, "connect")}ms,协议: $protocol")
    }
    override fun requestBodyStart(call: Call) = mark(call, "reqBody")
    override fun requestBodyEnd(call: Call, byteCount: Long) {
        println("请求体发送: ${elapsed(call, "reqBody")}ms,$byteCount bytes")
    }
    override fun responseBodyStart(call: Call) = mark(call, "resBody")
    override fun responseBodyEnd(call: Call, byteCount: Long) {
        println("响应体读取: ${elapsed(call, "resBody")}ms,$byteCount bytes")
    }
    override fun callEnd(call: Call) {
        println("总耗时: ${elapsed(call, "call")}ms")
    }
    override fun callFailed(call: Call, ioe: IOException) {
        println("请求失败: ${ioe.message},已耗时: ${elapsed(call, "call")}ms")
    }
}

val client = OkHttpClient.Builder()
    .eventListenerFactory(EventListener.Factory { MetricsEventListener() })
    .build()
总结:学习路径图
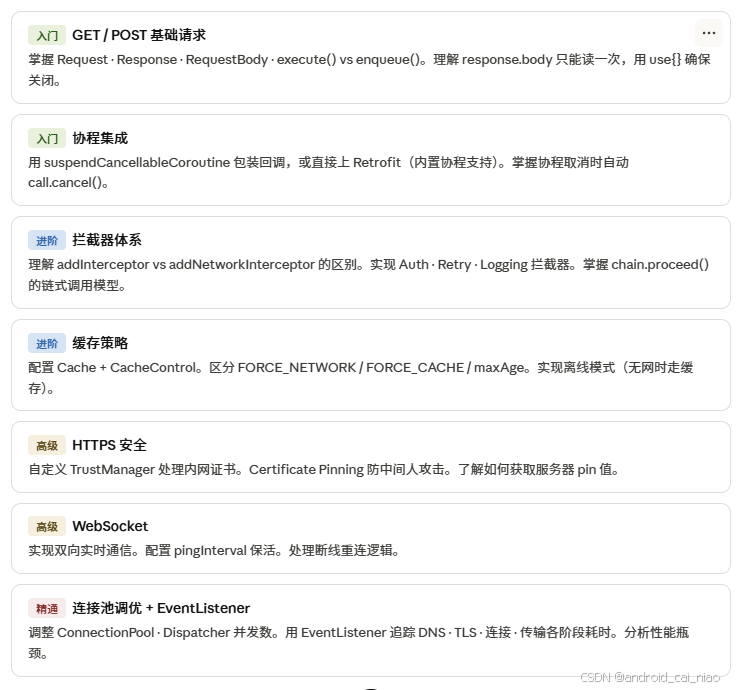
几个贯穿始终的关键原则:
OkHttpClient 全局单例,避免重建连接池。response.body 只能读一次,读完立即关闭(用 use{})。拦截器是横切逻辑的最优解,不要把认证、日志、重试散落在业务代码里。生产环境日志拦截器设为 BASIC 或 NONE,避免打印敏感信息。如果你的项目用到 Kotlin 协程,直接搭配 Retrofit 使用,OkHttp 作为底层传输层即可,不需要手动包装回调。