在很多企业级应用中,流程图是一种常见的数据可视化方式,无论是审批流、任务流,还是业务流程,直观的图形界面都能极大提高用户体验。今天我就分享一下我在 Vue2 项目中,使用 LogicFlow 搭建流程图编辑器的经验。附上完整代码,常用属性解释放注释里啦~
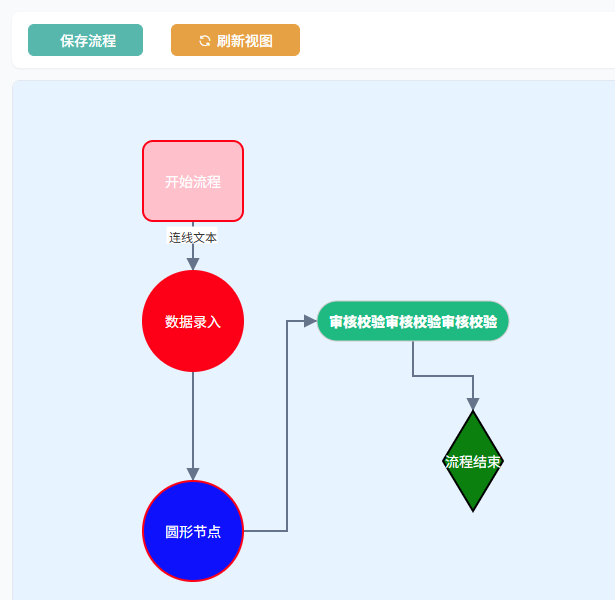
1.效果图
官网文档:LogicFlow
2.下载依赖
bash
# 安装 LogicFlow 核心包
npm install @logicflow/core@2.0.7 --save
# 若需要官方拓展组件(可选)
npm install @logicflow/extension@2.0.7 --save
3.完整代码
bash
<template>
  <div class="flow-editor h100%">
    <!-- 操作工具栏 -->
    <div class="toolbar">
      <el-button type="success" icon="el-icon-save" @click="saveData">保存流程</el-button>
      <el-button type="warning" icon="el-icon-refresh" @click="refreshGraph">刷新视图</el-button>
    </div>
    <!-- LogicFlow 画布容器 -->
    <div ref="lfContainer" class="lf-container"></div>
  </div>
</template>

<script>
import LogicFlow from '@logicflow/core'
import { RectNode, RectNodeModel } from '@logicflow/core'
import '@logicflow/core/dist/index.css'

export default {
  name: 'FlowEditor',
  data() {
    return {
      lf: null, // 流程图实例
      initData: {
        nodes: [ // 节点数据
          {
            id: 'node1', // 节点ID,可选参数,不传时内部会自动生成 连线会用到
            type: 'rect', // 节点类型-方形节点,必穿,可以是内置的基础类型,也可自定义
            x: 180, // 节点x坐标,必传
            y: 100, // 节点y坐标,必传
            text: '开始流程', // 节点文本,可选
            properties: { // 自定义属性
              style: { // 自定义样式
                fill:'pink', // 填充色
                stroke: 'red', // 边框颜色
                strokeWidth: 2, // 边框宽度
                rx: 10 // 圆角
              },
              hierarchy: 1, // 比如我自定义了一个层级 后续可根据层级去判断节点颜色
              desc: '流程启动节点' // 描述
            }
          },
          {
            id: 'node2',
            type: 'circle', // 圆形节点
            x: 180,
            y: 240,
            text: '数据录入',
            properties: {
              style: {
                stroke: 'red', // 边框颜色
                strokeWidth: 2 // 边框宽度
              }
            }
          },
          {
            id: 'node3',
            type: 'circle', // 圆形节点
            x: 180,
            y: 450,
            text: '圆形节点',
            properties: {
              style: {
                fill:'blue', // 填充色- 这里优先级高于全局设置的填充色
                stroke: 'red', // 边框颜色
                strokeWidth: 2 // 边框宽度

              }
            }
          },
          {
            id: 'node4',
            type: 'custom-rect', // 自定义矩形节点
            x: 400,
            y: 240,
            text: { value: '审核校验审核校验审核校验', x: 400, y: 240 }, // text也可以这样写 单独定义文字的坐标
            properties: { hierarchy: 2, desc: '系统自动审核' }
          },
          {
            id: 'node5',
            type: 'diamond', // 菱形节点
            x: 460,
            y: 380,
            text: '流程结束',
            properties: { hierarchy: 3, desc: '菱形节点',style:{fill:'green'} }
          }

        ],
        edges: [ // 边数据 sourceNodeId-起始节点ID targetNodeId-目标节点ID
          { id: 'edge_1', type: 'polyline', sourceNodeId: 'node1', targetNodeId: 'node2', text: '连线文本' },
          { id: 'edge_2', type: 'polyline', sourceNodeId: 'node2', targetNodeId: 'node3' },
          { id: 'edge_3', type: 'polyline', sourceNodeId: 'node3', targetNodeId: 'node4' },
          { id: 'edge_4', type: 'polyline', sourceNodeId: 'node4', targetNodeId: 'node5' }
        ]
      } // 初始化流程图数据
    }
  },
  mounted() {
    this.initLogicFlow() // 初始化LogicFlow
  },
  /**
   * 组件销毁前的清理操作
   * 确保LogicFlow实例被正确销毁,防止内存泄漏
   */
  beforeDestroy() {
    if (this.lf) {
      this.lf.destroy() // 销毁LogicFlow实例
      this.lf = null // 清空引用
    }
  },
  methods: {
    /**
     * 初始化LogicFlow画布
     * 配置自定义节点样式和画布属性,渲染流程图数据
     */
    initLogicFlow() {
      // 注册自定义矩形节点
      class CustomRectNode extends RectNode {}

      /**
       * 自定义矩形节点模型
       * 负责设置节点属性、样式和文本样式
       */
      class CustomRectModel extends RectNodeModel {
        /**
         * 设置节点属性
         * 包括动态计算宽度、设置高度和圆角、根据层级设置颜色
         */
        setAttributes() {
          super.setAttributes()
          // 获取节点文本内容
          const text = this.text?.value || ''

          // 动态计算节点宽度
          const canvas = document.createElement('canvas')
          const ctx = canvas.getContext('2d')
          ctx.font = '14px Microsoft YaHei' // 设置字体样式
          const textWidth = ctx.measureText(text).width // 测量文本宽度
          // 宽度限制在120-300px之间,确保节点大小合理
          this.width = Math.min(300, Math.max(120, textWidth + 24))
          this.height = 40 // 固定节点高度
          this.style.rx=20 // 圆角半径
          // 根据层级设置颜色
          const level = this.properties?.hierarchy || 2 // 获取节点层级,默认值为2
          const colorMap = {
            1: '#3B82F6', // 一级节点:蓝色
            2: '#10B981', // 二级节点:绿色
            3: '#F59E0B'  // 三级节点:橙色
          }
          this.fill = colorMap[level] // 设置节点填充色
          this.stroke = 'none' // 无边框
        }

        /**
         * 获取节点样式
         * 重写父类方法,添加自定义样式
         * @returns {Object} 节点样式对象
         */
        getNodeStyle() {
          const style = super.getNodeStyle()
          style.fill = this.fill // 使用自定义填充色
          style.cursor = 'pointer' // 设置鼠标指针为手型
          return style
        }

        /**
         * 获取文本样式
         * 重写父类方法,设置文本为白色、14px字体大小、中等字重
         * @returns {Object} 文本样式对象
         */
        getTextStyle() {
          const style = super.getTextStyle()
          style.color = '#fff' // 文本颜色为白色
          style.fontSize = 14 // 字体大小14px
          style.fontWeight = 800 // 字重 加粗
          return style
        }
      }

      // 画布样式配置
      const style = {
        rect: { fill: '#fff', stroke: '#ccc', strokeWidth: 1 }, // 矩形样式
        circle: { fill: '#fff', stroke: '#ccc' }, // 圆形样式
        polygon: { fill: '#fff', stroke: '#ccc' }, // 多边形样式
        polyline: { stroke: '#64748b', strokeWidth: 2, endArrow: true } // 连接线样式,带箭头
      }

      // 清空容器,确保每次初始化都是全新的画布
      this.$refs.lfContainer.innerHTML = ''

      // 创建LogicFlow实例
      this.lf = new LogicFlow({
        container: this.$refs.lfContainer, // 容器元素
        background: {
          backgroundColor:'#e7f3fe'
        },
        grid: false,
        style, // 应用样式配置
        keyboard: { enabled: true } // 启用键盘操作
      })

      // 注册自定义节点类型
      this.lf.register({
        type: 'custom-rect', // 节点类型名称
        view: CustomRectNode, // 节点视图
        model: CustomRectModel // 节点模型
      })

      // 设置全局样式
      this.lf.setTheme({
        baseNode: { // 全局节点样式
          fill: '#e8f8ff' // 节点背景色
        },
        nodeText: {
          fontSize: 14, // 字体大小
          color: '#fff' // 全局设置文字颜色
        },
        baseEdge: {
          stroke: 'blue',
          strokeWidth: 2
        },
        circle: {
          fill: 'red' // 填充为红色
        } // 圆形节点样式
      })

      // 渲染流程图数据
      this.lf.render(this.initData)
    },

    /**
     * 保存流程图数据
     * 获取当前画布的图形数据并打印,然后提示保存成功
     */
    saveData() {
      const data = this.lf.getGraphData() // 获取流程图数据
      console.log('===== 流程图最终数据 =====', data) // 打印数据到控制台
      this.$message.success('流程数据已保存!') // 显示成功提示
      // 在这里调用接口传给后端即可
    },

    /**
     * 刷新视图
     * 重新初始化LogicFlow画布并显示刷新成功提示
     */
    refreshGraph() {
      this.initLogicFlow() // 重新初始化画布
      this.$message.info('视图已刷新') // 显示刷新成功提示
    }

  }
}
</script>

<style lang="scss" scoped>
.flow-editor {
  width: 100%;
  height: 100vh;
  padding: 16px;
  box-sizing: border-box;
  display: flex;
  flex-direction: column;
  background: #f8fafc;

  .toolbar {
    padding: 12px 16px;
    background: #fff;
    border-radius: 8px;
    margin-bottom: 12px;
    box-shadow: 0 1px 2px rgba(0, 0, 0, 0.05);

    ::v-deep .el-button {
      margin-right: 8px;
    }
  }

  .lf-container {
    flex: 1;
    border-radius: 8px;
    background: #fff;
    border: 1px solid #e2e8f0;
    overflow: hidden;
  }

  .dialog-footer {
    text-align: center;
  }
}
</style>