注:本文为 "Linux 设备驱动" 相关合辑。
英文引文,机翻未校。
如有内容异常,请看原文。
Linux Device Drivers: Tutorial for Linux Driver Development
Linux 设备驱动:Linux 驱动开发教程
February 16, 2026
Key takeaways:
要点
- Building a reliable device driver is key to seamless communication between the Linux operating system and hardware.
构建可靠的设备驱动是 Linux 操作系统与硬件实现无缝通信的关键。 - Linux drivers are typically developed through the loadable kernel module approach, enabling quick integration and updates without kernel recompilation.
Linux 驱动通常采用可加载内核模块方式开发,可实现快速集成与更新,无需重新编译内核。 - This hands-on example provides a solid foundation for creating a fully functional Linux device driver.
本文实操示例为开发功能完整的 Linux 设备驱动奠定了扎实基础。
Linux device drivers serve as a critical link between the operating system and hardware, making their reliability and performance essential for overall Linux system stability. So, how can you ensure this stability right from the development stage?
Linux 设备驱动是操作系统与硬件之间的关键连接层,其可靠性与性能对 Linux 系统整体稳定性至关重要。因此,如何从开发阶段就保障这种稳定性?
Building a Linux device driver demands in-depth knowledge of the operating system's internals. Apart from understanding kernel architecture and memory management, your team also needs to have strong expertise in driver programming.
开发 Linux 设备驱动需要深入掌握操作系统底层原理。除内核架构与内存管理知识外,开发团队还需具备扎实的驱动编程专业能力。
In this tutorial, Apriorit experts provide you with step-by-step instructions on how to build a driver in Linux (starting from kernel version 6.14.0), including code samples.
本教程中,Apriorit 专家以 Linux 内核 6.14.0 版本为起点,分步讲解驱动开发方法并提供代码示例。
You'll get insights on:
你将学习到以下内容:
- Kernel logging
内核日志 - Principles of working with kernel modules
内核模块工作原理 - Character devices
字符设备 - The
file_operationsstructure
file_operations结构体 - Accessing user-level memory from the kernel
在内核中访问用户态内存
You'll also find source code for a simple Linux driver that you can augment with any functionality you need.
文中还提供简易 Linux 驱动的源代码,可在此基础上扩展所需功能。
This article will be useful for development teams involved in Linux device driver programming, as well as CTOs and heads of engineering who are looking for vendors with deep expertise in driver development.
本文适用于从事 Linux 设备驱动开发的技术团队,以及寻求专业驱动开发服务商的技术总监与工程负责人。
Getting started with the Linux kernel module
Linux 内核模块入门
The Linux kernel is written in the C and Assembler programming languages. C implements the main part of the kernel, while Assembler implements architecture-dependent parts. In the past, it was only possible to use these two languages for Linux kernel development. Starting from Linux version 6.1, you can also use Rust. However, since Rust support in the Linux kernel is still in the active development phase, in this article, we will focus on C.
Linux 内核采用 C 语言与汇编语言编写。C 语言实现内核主体逻辑,汇编语言实现与体系结构相关的部分。早期 Linux 内核开发仅支持使用这两种语言。自 Linux 6.1 版本起,可使用 Rust 语言进行开发。但由于内核对 Rust 的支持仍处于活跃开发阶段,本文以 C 语言为主要讲解内容。
Note that you can't use C++ as you can with the Windows kernel, as some parts of the Linux kernel source code (such as header files) may include keywords from C++ (for example, delete or new), while in Assembler, you may encounter lexemes such as :: .
注意:与 Windows 内核不同,Linux 内核开发不支持使用 C++,因为内核部分源码(如头文件)可能包含 C++ 关键字(如 delete、new),汇编代码中也可能出现 :: 等词法单元。
There are two ways of writing device drivers in Linux:
Linux 设备驱动有两种开发方式:
- Compile the driver along with the kernel, which is monolithic in Linux --- this is the traditional approach.
将驱动与内核一同编译,Linux 为宏内核架构,这是传统开发方式。 - Implement the driver as a kernel module, in which case you won't need to recompile the kernel.
将驱动实现为内核模块,无需重新编译内核。
The second approach is more efficient and flexible than the traditional one. Instead of recompiling the entire kernel, developers can create loadable kernel modules (LKMs) containing device driver code. You can load LKMs into the kernel dynamically at runtime without requiring a system reboot.
第二种方式相比传统方式效率更高、灵活性更强。开发者无需重新编译整个内核,只需编写包含驱动代码的可加载内核模块(LKM)。可在系统运行时将 LKM 动态加载到内核,无需重启系统。
In this tutorial, we'll develop a device driver in the form of a kernel module. A module is a specifically designed object file. When working with modules, Linux links them to the kernel by loading them into the kernel address space.
本教程将以内核模块形式开发设备驱动。内核模块是经过特殊设计的目标文件。Linux 加载模块至内核地址空间,完成模块与内核的链接。
Module code operates in the kernel context. This requires developers to be very attentive. If a developer makes a mistake when implementing a user-level application, in most cases, it won't cause problems outside the user application. But mistakes in the implementation of a kernel module can lead to system-level issues.
模块代码运行在内核上下文。这要求开发者格外谨慎。用户态应用程序出现错误时,通常仅影响应用自身,不会波及系统其他部分。而内核模块中的错误可能引发系统级故障。
Luckily for us, the Linux kernel is resistant to non-critical errors in module code. When the kernel encounters such errors (for example, null pointer dereferencing), it displays the oops message --- an indicator of insignificant malfunctions during Linux operation. After that, the malfunctioning module is unloaded, allowing the kernel and other modules to work as usual. In addition, you can analyze logs that precisely describe non-critical errors. Keep in mind that continuing driver execution after an oops message may lead to instability and kernel panic.
Linux 内核可耐受模块代码中的非关键性错误。内核遇到空指针解引用等错误时,会输出 oops 信息,标识运行中出现的非严重异常。随后内核卸载异常模块,保证内核与其他模块正常运行。需注意,出现 oops 信息后继续运行驱动可能导致系统不稳定甚至内核恐慌。同时可通过日志详细分析非关键性错误信息。
A kernel module:
内核模块具备以下特征:
Is a specifically designed object file
为专用设计的目标文件
Operates in the kernel context
运行于内核上下文
Is linked to the kernel by being loaded to its address space
通过加载至内核地址空间与内核链接
The kernel and its modules represent a single program module and use a single global namespace. In order to minimize the namespace, you must control what's exported by the module. Exported global characters must have unique names and be cut to the bare minimum. A commonly used workaround is to simply use the name of the module that's exporting the characters as the prefix for a global character name.
内核与其模块构成统一程序实体,共用全局命名空间。为缩减命名空间占用,需严格控制模块导出符号。导出的全局符号需保证名称唯一,且数量尽可能精简。常用处理方式为以模块名作为全局符号名称的前缀。
With this basic information in mind, let's proceed to writing Linux device drivers.
掌握以上基础内容后,开始进行 Linux 设备驱动开发。
Creating a kernel module
内核模块创建
You can start by creating a simple prototype of a kernel module that can be loaded and unloaded.
首先创建可加载与卸载的简易内核模块原型。
Let's do that with the following code:
使用如下代码实现:
c
#include <linux/init.h>
#include <linux/module.h>


MODULE_DESCRIPTION("Simple Linux driver");
MODULE_LICENSE("GPL");
MODULE_AUTHOR("Apriorit, Inc");


static int simple_driver_init(void)
{
   return 0;
}


static void simple_driver_exit(void)
{
   return;
}


module_init(simple_driver_init);
module_exit(simple_driver_exit);
Where:
代码说明:
- The
simple_driver_initfunction is the driver initialization entry point and is called during system startup (if the driver is statically compiled into the kernel) or when the module is loaded into the kernel.
simple_driver_init为驱动初始化入口函数,驱动静态编译进内核时在系统启动时调用,模块加载时在内核加载阶段调用。 - The
simple_driver_exitfunction is the driver exit point. It is called when unloading a module from the Linux kernel.
simple_driver_exit为驱动退出函数。内核卸载模块时调用该函数。
This function has no effect if the driver is statically compiled into the kernel. These functions are declared in the linux/module.h header file. The simple_driver_init and simple_driver_exit functions must have identical signatures, such as these:
驱动静态编译进内核时,该函数无实际作用。上述函数在 linux/module.h 头文件中声明。simple_driver_init 与 simple_driver_exit 需遵循固定函数签名,格式如下:
c
int init(void);
void exit(void);
Now, our simple module is complete. Let's make it log in to the kernel and interact with device files. These operations will be useful for Linux kernel driver development.
至此简易模块开发完成。接下来为模块添加内核日志与设备文件交互功能。这些操作在 Linux 内核驱动开发中具有实际应用价值。
Registering a character device
字符设备注册
Note: In this tutorial, we describe how to create a character device (with a corresponding character device file) that doesn't require any additional command execution in the Linux terminal (such as the mknod command in the basic solutions).
注 :本教程讲解如何创建字符设备及对应设备文件,无需在终端执行 mknod 等额外命令。
Device files are usually stored in the /dev folder. They facilitate interactions between the user space and kernel code. To make the kernel receive user-space data, you can write this data to a device file and pass it to the module serving this file. User-space data that's read from a device file originates from the module serving it.
设备文件通常存放于 /dev 目录。设备文件为用户态与内核态代码提供交互通道。向设备文件写入数据,即可由内核接收并传递给对应管理模块。从设备文件读取的用户态数据来源于对应管理模块。
There are two groups of devices :
设备分为两大类:
-
Character devices --- character device files are non-buffered and allow you to read and write data character by character. We'll focus on this type of file in this tutorial.
字符设备 --- 字符设备文件无缓冲,支持逐字节读写数据。本教程以该类设备文件为讲解对象。 -
Block devices --- block device files are buffered and allow you to read and write only whole blocks of data.
块设备 --- 块设备文件带缓冲,仅支持按数据块读写。
Linux systems have two ways of identifying device files :
Linux 系统通过两种标识区分设备文件:
- Major device numbers identify modules serving device files or groups of devices.
主设备号 --- 标识管理设备文件的模块或设备组。 - Minor device numbers identify specific device files among a group of devices specified by a major device number.
次设备号 --- 在主设备号对应的设备组内标识具体设备文件。
You can define these numbers in the driver code, or they can be allocated dynamically by the kernel. If a number defined as a constant has already been used, the system will return an error. When a number is allocated dynamically, the function reserves that number to prevent other device files from using the same number.
设备号可在驱动代码中指定,或由内核动态分配。若指定的固定设备号已被占用,系统将返回错误。动态分配时,函数会占用设备号,避免被其他设备文件复用。
To create and register a character device, you need to perform a few steps:
创建并注册字符设备需执行以下步骤:
-
Allocate a character device region (if you want to allocate a major device number dynamically) or register one (if you want to use a predefined major device number).
分配字符设备区域(动态分配主设备号)或直接注册(使用预设主设备号)。
-
Add a character device to the system.
向系统添加字符设备。
-
Create a device class and register a character device file.
创建设备类并注册字符设备文件。
Let's explore these steps in detail.
下面详细讲解各步骤实现。
1. Allocate a character device region
分配字符设备区域
To allocate a character device region, you need to use the alloc_chrdev_region function:
分配字符设备区域需调用 alloc_chrdev_region 函数:
c
int alloc_chrdev_region(dev_t *dev, unsigned baseminor, unsigned count,
                       const char *name)
Here, we specify:
各参数含义:
-
The pointer to the device number. This is the result device number (combination of major and minor numbers) after the function call. In our case, we use a global variable to keep the received device number available for different parts of our driver.
设备号指针。为函数调用后返回的设备号(主设备号与次设备号组合)。本例使用全局变量存储设备号,供驱动各部分调用。 -
The first requested number from the requested range of minor numbers. If you're not sure about this parameter, you may specify
0.
申请次设备号范围的起始值 。不确定时可设为0。 -
The number of required minor numbers. You may need more than one allocated minor number (for example, a few minor numbers may be required for one device, or a few separated devices may require one minor number each). But for one simple character device, it's enough to have one allocated minor number.
所需次设备号数量。单个设备可能需要多个次设备号,或多个独立设备各占用一个次设备号。简易字符设备仅需分配一个次设备号。 -
The name of the associated device or driver. You may use the name of your module or another name. This name will be related to the allocated range of device numbers, but it won't be used as the device file name in the /dev folder.
关联设备或驱动名称 。可使用模块名或自定义名称。该名称与设备号分配区间关联,不作为/dev目录下的设备文件名。
2. Add a character device to the system
2. 向系统添加字符设备
To add a character device to the system, you need to initialize the representation of the character device in the kernel module --- an instance of the cdev structure.
向系统添加字符设备需初始化内核模块中的字符设备结构体 cdev 实例。
Here's how it looks:
结构体定义如下:
c
struct cdev
{
   struct kobject kobj;
   struct module *owner;
   const struct file_operations *ops;
   struct list_head list;
   dev_t dev;
   unsigned int count;
} __randomize_layout;
This instance will be declared as a static variable to keep it available for different parts of our driver. If you don't understand the instance's fields to initialize them correctly, you can use a helper for cdev structure initialization:
该实例声明为静态变量,供驱动各部分访问。若不熟悉结构体成员初始化,可使用 cdev 初始化辅助函数:
c
void cdev_init(struct cdev *cdev, const struct file_operations *fops)For initialization, this helper requires only one additional parameter --- a pointer to the file_operations structure, which we'll discuss later.
在初始化过程中,该辅助函数仅需额外传入 file_operations 结构体指针,后续将详细讲解该结构体。
The file_operations structure contains pointers to functions defined by the driver. Each field of the structure corresponds to the address of a function defined by the driver to handle a requested operation.
file_operations结构体包含驱动定义的函数指针。结构体每个成员对应驱动实现的操作处理函数地址。
When the cdev instance is initialized, you may add it to the system using the following function:
cdev 实例初始化完成后,通过如下函数添加至系统:
c
int cdev_add(struct cdev *p, dev_t dev, unsigned count);This function requires two parameters, in addition to the cdev instance:
除 cdev 实例外,该函数还需两个参数:
- The device number (received from
alloc_chrdev_region)
设备号(由alloc_chrdev_region获取) - The number of minor numbers that will be associated with this device (in our case,
1)
与该设备关联的次设备号数量(本例为1)
At this step, basic registration of the device in the system is finished. There are currently no device files in the system, but they can be created using console commands. In our example, we'll use an alternative approach that, from our perspective, is more convenient for real-world products: creating device files from the driver code. But before proceeding with this functionality, let's take a look at the file_operations structure used.
至此设备在系统中的基础注册完成。此时系统尚未生成设备文件,可通过终端命令创建。本例采用更适合实际产品的实现方式:在驱动代码中直接创建设备文件。实现该功能前,先了解所用的 file_operations 结构体。
file_operations structure
file_operations 结构体
The file_operations structure contains pointers to the functions that will be called to handle specified operations performed on the character device file. For example, it may involve writing to or reading from our character device file.
file_operations 结构体包含用于处理字符设备文件指定操作的函数指针。例如设备文件的读写操作对应函数。
In the Linux 6.14.0 kernel, the file_operations structure looks like this:
Linux 6.14.0 内核中 file_operations 结构体定义如下:
c
struct file_operations
{
   struct module *owner;
   fop_flags_t fop_flags;
   loff_t (*llseek)(struct file *, loff_t, int);
   ssize_t (*read)(struct file *, char __user *, size_t, loff_t *);
   ssize_t (*write)(struct file *, const char __user *, size_t, loff_t *);
   ssize_t (*read_iter)(struct kiocb *, struct iov_iter *);
   ssize_t (*write_iter)(struct kiocb *, struct iov_iter *);
   int (*iopoll)(struct kiocb *kiocb, struct io_comp_batch *,
                 unsigned int flags);
   int (*iterate_shared)(struct file *, struct dir_context *);
   __poll_t (*poll)(struct file *, struct poll_table_struct *);
   long (*unlocked_ioctl)(struct file *, unsigned int, unsigned long);
   long (*compat_ioctl)(struct file *, unsigned int, unsigned long);
   int (*mmap)(struct file *, struct vm_area_struct *);
   int (*open)(struct inode *, struct file *);
   int (*flush)(struct file *, fl_owner_t id);
   int (*release)(struct inode *, struct file *);
   int (*fsync)(struct file *, loff_t, loff_t, int datasync);
   int (*fasync)(int, struct file *, int);
   int (*lock)(struct file *, int, struct file_lock *);
   unsigned long (*get_unmapped_area)(struct file *, unsigned long, unsigned long, unsigned long, unsigned long);
   int (*check_flags)(int);
   int (*flock)(struct file *, int, struct file_lock *);
   ssize_t (*splice_write)(struct pipe_inode_info *, struct file *, loff_t *, size_t, unsigned int);
   ssize_t (*splice_read)(struct file *, loff_t *, struct pipe_inode_info *, size_t, unsigned int);
   void (*splice_eof)(struct file *file);
   int (*setlease)(struct file *, int, struct file_lease **, void **);
   long (*fallocate)(struct file *file, int mode, loff_t offset,
                     loff_t len);
   void (*show_fdinfo)(struct seq_file *m, struct file *f);
#ifndef CONFIG_MMU
   unsigned (*mmap_capabilities)(struct file *);
#endif
   ssize_t (*copy_file_range)(struct file *, loff_t, struct file *,
                              loff_t, size_t, unsigned int);
   loff_t (*remap_file_range)(struct file *file_in, loff_t pos_in,
                              struct file *file_out, loff_t pos_out,
                              loff_t len, unsigned int remap_flags);
   int (*fadvise)(struct file *, loff_t, loff_t, int);
   int (*uring_cmd)(struct io_uring_cmd *ioucmd, unsigned int issue_flags);
   int (*uring_cmd_iopoll)(struct io_uring_cmd *, struct io_comp_batch *,
                           unsigned int poll_flags);
} __randomize_layout;
If this structure contains functions that aren't required for your driver, you can still use the device file without implementing them. A pointer to an unimplemented function can simply be set to NULL. After that, the system will take care of implementing the function and make it behave normally. In our case, we'll just implement the read function.
结构体中无需实现的函数可不编写具体逻辑。未实现函数的指针直接设为 NULL。系统将自动处理并保证正常运行。本例仅实现 read 函数。
As we're going to ensure the operation of only a single type of device with our Linux driver, our file_operations structure will be global and static.
由于驱动仅管理单一设备类型,file_operations 结构体设为全局静态变量。
After it's created, you'll need to fill it statically like this:
创建后按如下方式静态初始化:
c
static const struct file_operations simple_driver_fops =
{
   .owner = THIS_MODULE,
   .read = device_file_read,
};
The declaration of the THIS_MODULE macro is contained in the linux/init.h header file. We'll transform the macro into a pointer to the module structure of the required module. Later, we'll write the body of the function with a prototype. But for now, we have only the device_file_read pointer to it:
THIS_MODULE 宏在 linux/init.h 头文件中声明。该宏会转换为对应模块结构体的指针。后续将实现该函数的具体逻辑。目前仅声明 device_file_read 函数指针:
c
static ssize_t device_file_read(
   struct file *file_ptr, char __user *user_buffer, size_t count, loff_t *position)
3. Create a device class and register a character device file
3. 创建设备类并注册字符设备文件
The last step of developing our character device involves creating a device class and registering a device file. A device class is a high-level view of the logical device group in the Linux Device Model, which abstracts implementation details. You need a device class to create a device, which is a specific instance of the device with an allocated device number. Based on this device instance, the system creates a device file in the /dev directory.
字符设备开发的最后一步为创建设备类并注册设备文件。设备类是 Linux 设备模型中对逻辑设备组的高层抽象,隐藏底层实现细节。需通过设备类创建设备实例,设备实例包含已分配的设备号。系统依据该设备实例在 /dev 目录生成设备文件。
Note: This step is optional, so you can stop after the Add a character device to the system step and proceed with the mknod user space command to create a device file in the /dev folder. However, it's usually much more helpful to use the kernel module to create a character device file.
注 :该步骤为可选操作,完成"向系统添加字符设备"后,可通过用户态 mknod 命令在 /dev 目录创建设备文件。但通过内核模块创建设备文件在实际开发中更为便捷。
Let's examine what functions are required to complete the creation of a character device in the kernel module.
下面讲解内核模块中完成字符设备创建所需函数。
The function to create a device class requires only the name for the new device class:
创建设备类函数仅需传入设备类名称:
c
struct class *class_create(const char *name);The device_create function is more complicated:
device_create 函数参数相对复杂:
c
struct device *device_create(
   const struct class *class, struct device *parent,
   dev_t devt, void *drvdata, const char *fmt, ...)
You need to pass the following arguments to the device_create function:
device_create 函数参数说明:
- Pointer to the created class
已创建设备类的指针 - Pointer (for the new device) to the parent device;
NULLmay be used if there is no parent device
新设备的父设备指针,无父设备时设为NULL - Device number received from the
alloc_chrdev_regionfunction
由alloc_chrdev_region获取的设备号 - Pointer to the data to be passed to the device callbacks; as we don't use the pointer, we'll use
NULLfor this parameter
传递给设备回调函数的数据指针,本例未使用该功能,设为NULL - String for the device name; may be parametrized, but in our case, we'll use a regular string
设备名称字符串,支持参数格式化,本例使用普通字符串
Here's what calling this function looks like in the kernel module:
内核模块中该函数调用示例如下:
c
  g_device = device_create(g_class, NULL, g_devno, NULL, device_name);
   if (IS_ERR(g_device))
   {
       result = PTR_ERR(g_device);
       pr_err("Simple-driver: device_create failed: %d\n", result);
       goto err_class_destroy;
   }
Logging macros
日志宏
In the code above, we've added the pr_err macro that logs kernel messages. You can find other macros of this type, such as pr_info and pr_warn, in linux/printk.h. Pay attention to the macro's name. It must contain a log level.
上述代码中使用 pr_err 宏输出内核日志信息。linux/printk.h 中还包含 pr_info、pr_warn 等同类宏。注意宏名称的规范。宏名称需包含日志等级标识。
The levels range from insignificant (pr_devel) to critical (pr_emerg), alerting about kernel instability.The pr_* macros form a string, which we add to the circular buffer. From there, the klog daemon reads it and sends it to the system log. Implementation of the pr_err macros allows for calling them from almost any point in the kernel.
日志等级从调试级(pr_devel)到内核异常紧急级(pr_emerg)。pr_* 系列宏生成字符串并写入循环缓冲区。klog 守护进程读取缓冲区内容并输出至系统日志。pr_err 等宏可在内核几乎任意位置调用。
Use these macros carefully, as they might cause overflow of the circular buffer, in which case the oldest message will not be logged.
谨慎使用日志宏,避免循环缓冲区溢出导致最早日志丢失。
Implementation of the character device's registering function
字符设备注册函数实现
Once you use all the functions described above (i.e., functions implemented in the kernel), you'll get your own function for registering a character device:
整合上述内核函数,实现自定义字符设备注册函数:
c
int register_device(void)
{
   int result = 0;
   pr_notice("Simple-driver: register_device() is called.\n");
   unsigned baseminor = 0;
   unsigned minor_count_required = 1;

   result = alloc_chrdev_region(&g_devno, baseminor, minor_count_required, device_name);
   if (result)
   {
       pr_err("Simple-driver: alloc_chrdev_region failed: %d\n", result);
       goto err_out;
   }

   cdev_init(&g_cdev, &simple_driver_fops);
   g_cdev.owner = THIS_MODULE;
   result = cdev_add(&g_cdev, g_devno, minor_count_required);
   if (result)
   {
       pr_err("Simple-driver: cdev_add failed: %d\n", result);
       goto err_unregister_chrdev_region;
   }

   g_class = class_create(class_name);
   if (IS_ERR(g_class))
   {
       result = PTR_ERR(g_class);
       pr_err("Simple-driver: class_create failed: %d\n", result);
       goto err_cdev_del;
   }

   g_device = device_create(g_class, NULL, g_devno, NULL, device_name);
   if (IS_ERR(g_device))
   {
       result = PTR_ERR(g_device);
       pr_err("Simple-driver: device_create failed: %d\n", result);
       goto err_class_destroy;
   }

   pr_notice("Simple-driver: Registered character device with major number = %i, minor number = %i\n", MAJOR(g_devno), MINOR(g_devno));
   return 0;

err_class_destroy:
   if (!IS_ERR_OR_NULL(g_class))
   {
       class_destroy(g_class);
       g_class = NULL;
   }

err_cdev_del:
   cdev_del(&g_cdev);

err_unregister_chrdev_region:
   if (g_devno)
   {
       unsigned minor_count_allocated = 1;
       unregister_chrdev_region(g_devno, minor_count_allocated);
       g_devno = 0;
   }

err_out:
   return result;
}
Unregistering a device
设备注销
Having explored all the functions required to create and register a character device, you can implement safe device unregistering. This operation must be performed during kernel module unloading for cleanup.
掌握字符设备创建与注册的全部函数后,可实现安全的设备注销逻辑。该操作在内核模块卸载时执行,用于资源释放。
To unregister a device, use the following code:
设备注销实现代码如下:
c
void unregister_device(void)
{
   pr_notice("Simple-driver: unregister_device() is called\n");
   if (!IS_ERR_OR_NULL(g_device))
   {
       device_destroy(g_class, g_devno);
       g_device = NULL;
   }
   if (!IS_ERR_OR_NULL(g_class))
   {
       class_destroy(g_class);
       g_class = NULL;
   }
   cdev_del(&g_cdev);
   if (g_devno)
   {
       unsigned minor_count_allocated = 1;
       unregister_chrdev_region(g_devno, minor_count_allocated);
       g_devno = 0;
   }
   pr_info("Simple-driver: Unregistered\n");
}
The next stage of implementing functions for our kernel module is to work with memory allocated in user mode.
内核模块函数实现的下一阶段为用户态内存操作。
Let's see how to do it.
下面讲解具体实现方法。
Using memory allocated in user mode
用户态内存操作
The read function we're going to create will handle read operations performed on a character device file from the user space. The signature of this function must be appropriate for the function from the file_operations structure:
待实现的 read 函数用于处理用户态对字符设备文件的读操作。函数签名需与 file_operations 结构体中定义一致:
c
ssize_t (*read)(struct file *filep, char __user * buffer, size_t len, loff_t * offset);Where:
参数说明:
-
The
filepparameter is the pointer to thefilestructure.
filep为file结构体指针。This
filestructure allows us to get the necessary information about the file we're working with, data related to this file, and more.通过该结构体可获取文件相关信息、关联数据等内容。
-
The
bufferis a pointer to the memory allocated in the user space where we store the requested data.
buffer为用户态分配的内存指针,用于存储读取数据。 -
The number of bytes to be read is defined in the
lenparameter, and we start reading bytes from a certain offset defined in theoffsetparameter.
len为待读取字节数,offset为读取起始偏移量。
After executing the function, the number of bytes that have been successfully read must be returned.
函数执行后需返回实际成功读取的字节数。
read function characteristics
read 函数特性
To work with information from the device file, the user allocates a special buffer in the user-mode address space. Then, the read function copies the information to this buffer. The address to which a pointer from the user space points and the address in the kernel address space may have different values. That's why you cannot simply dereference the pointer.
用户在自身地址空间分配专用缓冲区,用于读取设备文件数据。read 函数将数据拷贝至该缓冲区。用户态指针地址与内核态地址空间数值不同。因此不能直接解引用用户态指针。
When working with these pointers, we have a set of specific macros and functions we declare in the linux/uaccess.h file. The most suitable function in our case is copy_to_user. Its name speaks for itself: this function copies specific data from the kernel buffer to the buffer allocated in the user space. It also verifies if a pointer is valid and if the buffer size is large enough.
操作此类指针需使用 linux/uaccess.h 中定义的专用宏与函数。本例最适用的函数为 copy_to_user。函数功能为将指定数据从内核缓冲区拷贝至用户态分配的缓冲区。该函数同时校验指针有效性与缓冲区容量是否充足。
Here's the copy_to_user function interface:
copy_to_user 函数接口如下:
c
copy_to_user(void __user *to, const void *from, unsigned long n)First of all, this function must receive three parameters:
该函数需传入三个参数:
- A pointer to the userspace-allocated buffer
用户态分配缓冲区指针 - A pointer to the data source allocated in the kernel space
内核态数据源指针 - The number of bytes to be copied
待拷贝字节数
If there are any errors in execution, the function will return a value other than 0. In case of successful execution, the value will be 0. The copy_to_user function contains the __user macro that documents the process. This function also allows us to find out if the code uses pointers from the address space correctly. This is done using Sparse, an analyzer for static code. To be sure that it works correctly, always mark the user address space pointers as __user.
执行出错时函数返回非 0 值。执行成功时返回 0。copy_to_user 包含 __user 宏,用于标识指针属性。该函数可辅助检测代码对地址空间指针的使用是否规范。该检测通过静态代码分析工具 Sparse 实现。
为保证检测有效,需将用户态地址空间指针标记为 __user。
Here's the code for implementing the read function:
read 函数实现代码如下:
c
static ssize_t device_file_read(
   struct file *file_ptr, char __user *user_buffer, size_t count, loff_t *position)
{
   pr_notice("Simple-driver: Read from device file offset = %i, read bytes count = %u\n", (int)*position, (unsigned int)count);
   if (*position >= g_s_Hello_World_size)
       return 0;
   if (*position + count > g_s_Hello_World_size)
       count = g_s_Hello_World_size - *position;
   if (copy_to_user(user_buffer, g_s_Hello_World_string + *position, count) != 0)
       return -EFAULT;
   *position += count;
   return count;
}
With this function, the code for our driver is ready. Now, it's time to build the kernel module and see if it works as expected.
添加该函数后,驱动代码开发完成。接下来编译内核模块并验证功能是否正常。
Building the kernel module
内核模块编译
In modern kernel versions, the Makefile does most of the building for a developer. It starts the kernel build system and provides the kernel with information about the components required to build the module.
新版内核中,Makefile 承担大部分编译工作。Makefile 启动内核编译系统,向内核提供模块编译所需组件信息。
A module built from a single source file requires a single string in the Makefile . After creating this file, you only need to initiate the kernel build system with the obj-m := source_file_name.o command. As you can see, in our example, we've assigned the source file name to the module (the *.ko file).
单源码文件编译模块仅需在 Makefile 中添加一行配置。创建 Makefile 后,通过 obj-m := source_file_name.o 命令启动内核编译系统。本例中将源码文件名对应生成 .ko 模块文件。
If there are several source files, only two strings are required for the kernel build:
多源码文件编译模块仅需两行配置:
c
obj-m := module_name.o
module_name-objs := source_1.o source_2.o ... source_n.o
To initialize the kernel build system and build the module, use the make --C KERNEL_MODULE_BUILD_SYSTEM_FOLDER M=pwd`` modules command.
初始化内核编译系统并编译模块,使用命令:make --C 内核编译系统目录 M=pwd modules。
To clean up the build folder, you can use the make --C KERNEL_MODULES_BUILD_SYSTEM_FOLDER M=pwd clean command.
清理编译目录使用命令:make --C 内核模块编译系统目录 M=pwd clean。
The module build system is commonly located in /lib/modules/uname -r/build . Now, it's time to prepare the module build system. To build our first module, we'll execute the make modules_prepare command from the folder where the build system is located.
模块编译系统通常位于 /lib/modules/$(uname -r)/build。准备模块编译系统环境。在编译系统目录执行 make modules_prepare 命令完成环境准备。
Finally, we'll combine everything we've learned into one Makefile :
整合上述内容,编写完整 Makefile:
c
TARGET_MODULE:=simple-module
# If we are running with kernel building system
ifneq ($(KERNELRELEASE),)
   $(TARGET_MODULE)-objs := main.o device_file.o
   obj-m := $(TARGET_MODULE).o
# If we are running without kernel build system
else
   BUILDSYSTEM_DIR:=/lib/modules/$(shell uname -r)/build
   PWD:=$(shell pwd)
all :
# run kernel build system to make module
   $(MAKE) -C $(BUILDSYSTEM_DIR) M=$(PWD) modules
clean:
# run kernel build system to clean up in current directory
   $(MAKE) -C $(BUILDSYSTEM_DIR) M=$(PWD) clean
load:
   insmod ./$(TARGET_MODULE).ko
unload:
   rmmod ./$(TARGET_MODULE).ko
endif
The load target loads the build module, and the unload target deletes it from the kernel.
load 目标用于加载编译好的模块,unload 目标用于从内核卸载模块。
In our tutorial for device driver development in Linux, we've used code from main.c and device_file.c to compile a driver. The resulting driver is named simple-module.ko . Let's see how to use it.
本 Linux 驱动开发教程使用 main.c 与 device_file.c 源码编译驱动。生成驱动文件名为 simple-module.ko。下面讲解模块使用方法。
Loading the kernel module
内核模块加载
To load the module, you have to execute the make load command from the source file folder.
在源码目录执行 make load 命令加载模块。
After this, the name of the driver is added to the /proc/modules file, while the device that the module registers is added to /proc/devices .
加载后驱动名称写入 /proc/modules,模块注册的设备写入 /proc/devices。
The added records look like this:
新增记录示例如下:
c
$> cat /proc/devices
Character devices:
  1 mem
  4 /dev/vc/0
  4 tty
  4 ttyS
  5 /dev/tty
.....
506 simple-driver
.....
In the /dev folder, you can find the created character device file: /dev/simple-driver .
在 /dev 目录可找到生成的字符设备文件:/dev/simple-driver。
To perform the final verification and be sure that everything works as expected, you can use the cat command to display the device file contents:
通过 cat 命令读取设备文件内容,完成最终功能验证:
c
$> cat /dev/simple-driver
Hello world from kernel mode!
If you see the contents of your driver, it's working correctly. As a result of all the work above, you'll get a basic device driver that you can use as a starting point to build a full-fledged Linux driver solution.
正常输出内容说明驱动运行正常。通过上述步骤可得到基础设备驱动,可作为开发完整 Linux 驱动方案的起点。
Services in Linux driver development
Linux 驱动开发中的服务
Developing secure and reliable Linux device drivers requires deep expertise in the field.
开发安全可靠的 Linux 设备驱动需要深厚的专业技术积累。
-
Custom device driver development.
定制设备驱动开发Whatever tasks and requirements you have in mind, we'll help you build customized Linux driver solutions that meet your goals.
无论需求与场景如何,均可定制符合目标的 Linux 驱动方案。
-
Legacy driver modernization.
遗留驱动现代化改造根据需求制定升级方案,保障安全性并提升性能,以延长项目生命周期。
Develop an upgrade plan according to requirements to ensure security and enhance performance, thereby prolonging the life of your project.
-
Driver security improvements.
驱动安全加固通过安全代码审计、驱动安全测试与静态代码分析强化驱动防护。
Strengthen driver protection through security code audits, driver security testing, and static code analysis.
-
Driver solution support and maintenance.
驱动方案运维支持如需全面可靠的驱动方案发布后运维服务,可以考虑专业团队负责。
If you require robust full-scale post-release maintenance for your driver solution, consider having a professional team manage it.
Conclusion
总结
Building stable device drivers is important for ensuring smooth interaction between the Linux operating system and hardware.
开发稳定的设备驱动对 Linux 操作系统与硬件的顺畅交互至关重要。
In this article, we show a practical example of how you can create a simple Linux device driver that can be used as the starting point for developing complex driver solutions.
本文通过实操示例讲解简易 Linux 设备驱动开发方法,可作为复杂驱动方案的开发基础。
FAQ
常见问题
-
What is Linux device driver development?
什么是 Linux 设备驱动开发?
Linux device driver development involves creating software that enables the Linux kernel to communicate with hardware devices like keyboards, network cards, and custom peripherals. These drivers operate in kernel space, bridging user-space applications and hardware through system calls and device files.
Linux 设备驱动开发是编写软件,使 Linux 内核与键盘、网卡、自定义外设等硬件设备通信。此类驱动运行于内核态,通过系统调用与设备文件连接用户态应用与硬件。
Developers typically build Linux device drivers as loadable kernel modules for dynamic loading without rebooting. Developing a robust and stable Linux device driver requires deep expertise in hardware architecture, operating system internals, C programming, modular design, rigorous testing, and secure coding practices.
开发者通常将 Linux 设备驱动开发为可加载内核模块,实现动态加载无需重启。开发健壮稳定的 Linux 设备驱动需要掌握硬件架构、操作系统底层、C 语言、模块化设计、严格测试与安全编码规范。
-
What are the key aspects of developing a Linux device driver?
Linux 设备驱动开发的核心要点有哪些?
The key aspects of Linux device driver development are the following:
Linux 设备驱动开发核心要点如下:
-
Kernel-level programming.
内核态编程Drivers run in kernel space, using kernel-specific libraries and functions.
驱动运行于内核态,使用内核专用库与函数。
-
Loadable kernel modules.
可加载内核模块This is the core method for developing drivers. You can load or remove drivers from the kernel at runtime without a system reboot. This allows for greater flexibility than traditional kernel integration.
这是驱动开发的主流方式。可在系统运行时加载或卸载驱动,无需重启。相比传统内核集成方式灵活性更高。
-
Deep knowledge of hardware.
深入的硬件知识It's crucial to understand the specific hardware component you're developing the driver for, its architecture, and its communication protocols (such as I2C, SPI, or PCIe).
需掌握目标硬件组件、架构与通信协议(如 I2C、SPI、PCIe)。
-
C language.
C 语言As C is still the primary programming language for Linux device drivers, developers must have a solid understanding of this language.
C 语言仍是 Linux 设备驱动的主流开发语言,开发者需熟练掌握。
-
Kernel APIs.
内核应用程序接口Driver development involves the use of various kernel programming interfaces (KPIs) and subsystems, such as the regmap framework for memory access, DMA for memory copies, and subsystems for input, output (GPIO, IIO), and I2C/SPI communication.
驱动开发需使用各类内核编程接口与子系统,如内存访问 regmap 框架、DMA 内存拷贝、输入输出子系统(GPIO、IIO)与 I2C/SPI 通信子系统。
-
-
What are the different types of Linux device drivers?
Linux 设备驱动有哪些类型?
The main types of Linux device drivers are:
Linux 设备驱动主要类型包括:
-
Character drivers.
字符设备驱动These drivers manage stream-oriented devices that transfer data byte by byte, such as keyboards, mice, serial ports, and sound cards. They implement the file_operations structure for sequential read/write operations without buffering.
该类驱动管理逐字节传输的流式设备,如键盘、鼠标、串口、声卡。通过实现
file_operations结构体完成无缓冲顺序读写。 -
Block drivers.
块设备驱动These drivers are designed for random-access storage devices like hard drives, SSDs, and USB sticks to handle fixed-size blocks (typically 512 bytes or more). They use a block layer for caching, buffering, and I/O scheduling to optimize performance.
该类驱动面向硬盘、SSD、U 盘等随机访问存储设备,处理固定大小数据块(通常 512 字节及以上)。通过块层实现缓存、缓冲与 I/O 调度,优化性能。
-
Network drivers.
网络设备驱动These drivers facilitate packet-based communication for Ethernet, Wi-Fi, or Bluetooth interfaces, transmitting frames rather than bytes or blocks. They integrate with the networking stack, handling protocols like TCP/IP and managing interrupts for incoming data.
该类驱动实现以太网、Wi-Fi、蓝牙等接口的数据包通信,传输帧而非字节或数据块。驱动与网络协议栈集成,处理 TCP/IP 等协议并管理数据接收中断。
-
-
What are the components of a Linux device driver architecture?
Linux 设备驱动架构包含哪些组件?
The core components of a Linux device driver are:
Linux 设备驱动核心组件包括:
-
Device and driver structures.
设备与驱动结构体struct devicerepresents hardware entities with attributes like name, parent bus, and sysfs integration for discovery.
struct device表示硬件实体,包含名称、父总线、用于设备发现的 sysfs 集成等属性。struct device_driverdefines driver metadata, including bus type, probe/remove callbacks, and suspend/resume handlers for power management.
struct device_driver定义驱动元数据,包括总线类型、探测/移除回调、电源管理的挂起/恢复处理函数。 -
Bus abstraction.
总线抽象层Buses like PCI and USB connect devices logically --- even virtual ones.
PCI、USB 等总线实现设备的逻辑连接,也可管理虚拟设备。
-
File operations layer.
文件操作层For character/block drivers, struct file_operations provides callbacks like open, read, write, and release, which are dispatched by the virtual file system to handle I/O on /dev nodes.
对于字符/块设备驱动,
struct file_operations提供 open、read、write、release 等回调,由虚拟文件系统调度,处理/dev节点的 I/O 操作。 -
Module framework.
模块框架Drivers are built as loadable kernel modules with module_init/module_exit for registration (driver_register) and cleanup.At runtime, sysfs exposes driver and device attributes for monitoring and configuration, while interaction with interrupts, direct memory access, and other low-level mechanisms is handled through dedicated kernel subsystem APIs.
驱动以可加载内核模块形式构建,使用
module_init/module_exit完成注册(driver_register)与资源清理。运行时 sysfs 暴露驱动与设备属性用于监控与配置,中断、直接内存访问等底层操作通过专用内核子系统 API 实现。
-
-
What are the key functions of a Linux device driver?
Linux 设备驱动的核心功能有哪些?
The key functions of a Linux device driver are:
Linux 设备驱动核心功能包括:
-
Device initialization and cleanup.
设备初始化与清理This involves detecting and initializing hardware, allocating resources, and releasing resources when the driver is unloaded.
包括硬件检测与初始化、资源分配,以及驱动卸载时的资源释放。
-
Device registration.
设备注册This makes the device known to the kernel and registers the device with kernel subsystems.
向内核声明设备并在各内核子系统中完成注册。
-
Data transfer.
数据传输This feature aims to move data between the user space and the hardware and to support synchronous or asynchronous I/O.
实现用户态与硬件之间的数据搬运,支持同步或异步 I/O。
-
Interrupt handling.
中断处理This involves responding to hardware interrupts and performing fast interrupt service routines.
响应硬件中断并执行快速中断服务程序。
-
Memory management.
内存管理This feature serves to allocate and release kernel memory and map device memory to kernel or user space.
分配与释放内核内存,将设备内存映射到内核态或用户态。
-
Synchronization and concurrency control.
同步与并发控制This includes preventing race conditions and deadlocks, as well as handling multi-process access.
避免竞态与死锁,处理多进程并发访问。
-
Power management.
电源管理This allows for reducing power usage, supports runtime power management, and handles suspend and resume.
降低功耗,支持运行时电源管理,处理挂起与恢复操作。
-
Error handling and recovery.
错误处理与恢复This feature helps with detecting hardware faults, returning proper error codes, and recovering from failures.
检测硬件故障,返回规范错误码,实现故障恢复。
-
-
What is the Linux driver development process?
Linux 驱动开发流程是什么?
The process of developing a Linux driver consists of these main stages:
Linux 驱动开发主要包含以下阶段:
- Setting up a loadable kernel module
搭建可加载内核模块框架 - Registering a character driver
注册字符设备驱动 - Defining and populating the file_operations structure
定义并填充file_operations结构体 - Implementing the read callback
实现read回调函数 - Implementing kernel logging
实现内核日志功能 - Creating a build file
编写编译配置文件
- Setting up a loadable kernel module
Writing a Simple Linux Device Driver
简易 Linux 设备驱动编写
July 31, 2025 I/O Management & Device Drivers
By Pavitra Kamat
Linux device drivers are essential components that enable the operating system to communicate with various hardware devices. Whether it is a keyboard, mouse, disk, or any other peripheral, device drivers play a critical role in managing the interaction between the hardware and the software. In this guide, we will walk through the process of writing a simple Linux device driver. By the end of this article, you should be equipped with the foundational knowledge necessary to create your own drivers.
Linux 设备驱动是操作系统与各类硬件设备通信的基础组件,负责管理键盘、鼠标、磁盘等外设的软硬件交互。本文将讲解简易 Linux 设备驱动的编写流程,帮助读者掌握自主开发驱动的基础能力。
Understanding Device Drivers
设备驱动基础认知
Device drivers are specialized software modules that act as an interface between the operating system and hardware devices. They are responsible for translating the high-level operations of the OS into low-level operations that the hardware can understand and vice versa.
设备驱动是衔接操作系统与硬件的专用软件模块,实现操作系统高层操作与硬件底层指令的双向转换。
Linux drivers can be classified into several categories:
Linux 驱动主要分为以下类别:
- Character Drivers: Handle data as streams of bytes. Examples include keyboards and mice.
字符设备驱动:以字节流形式处理数据,如键盘、鼠标驱动 - Block Drivers: Deal with data as blocks, typically used for storage devices like SSDs and HDDs.
块设备驱动:以数据块为单位处理数据,适用于固态硬盘、机械硬盘等存储设备 - Network Drivers: Manage network devices and communication.
网络设备驱动:负责网络设备管理与数据通信
Setting Up the Development Environment
开发环境搭建
Before we start writing our driver, it's critical to set up a development environment. Follow these steps:
驱动编写前需完成开发环境配置,步骤如下:
-
Install a Linux distribution (Debian, Ubuntu, Fedora, etc.).
安装 Linux 发行版(Debian、Ubuntu、Fedora 等)
-
Install build tools:
安装编译工具链
bashsudo apt-get install build-essential linux-headers-$(uname -r) -
Optionally, install additional tools for debugging:
可选安装调试工具
bashsudo apt-get install gcc gdb make
Writing Your First Character Device Driver
编写首个字符设备驱动
In this section, we will write a simple character device driver that can be compiled and loaded into the kernel.
本节将编写可编译并加载至内核的简易字符设备驱动。
1. Create a Directory for Your Driver
创建驱动工程目录
Start by creating a directory for your new driver:
执行命令创建驱动专属目录:
bash
mkdir simple_char_driver && cd simple_char_driver2. Create a C File for Your Driver
创建驱动 C 语言文件
Create a new C file called simple_char_driver.c :
创建名为 simple_char_driver.c 的源码文件:
bash
nano simple_char_driver.cInsert the following code snippet:
写入以下代码:
c
#include <linux/init.h>
#include <linux/module.h>
#include <linux/fs.h>

#define DEVICE_NAME "simple_char_device"

static int major_number;
static char message[256] = {0}; // Memory for the string that is received
static short size_of_message;

static int device_open(struct inode *inode, struct file *file) {
    return 0;
}

static int device_release(struct inode *inode, struct file *file) {
    return 0;
}

static ssize_t device_read(struct file *file, char __user *buffer, size_t len, loff_t *offset) {
    return 0;
}

static ssize_t device_write(struct file *file, const char __user *buffer, size_t len, loff_t *offset) {
    return len;
}

struct file_operations fops = {
    .open = device_open,
    .release = device_release,
    .read = device_read,
    .write = device_write,
};

static int __init simple_char_init(void) {
    major_number = register_chrdev(0, DEVICE_NAME, &fops);
    if (major_number < 0) {
        printk(KERN_ALERT "SimpleCharDevice failed to register a major number\n");
        return major_number;
    }
    printk(KERN_INFO "SimpleCharDevice registered with major number %d\n", major_number);
    return 0;
}

static void __exit simple_char_exit(void) {
    unregister_chrdev(major_number, DEVICE_NAME);
    printk(KERN_INFO "SimpleCharDevice unregistered\n");
}

module_init(simple_char_init);
module_exit(simple_char_exit);

MODULE_LICENSE("GPL");
MODULE_AUTHOR("Your Name");
MODULE_DESCRIPTION("A simple Linux char driver");
MODULE_VERSION("0.1");
3. Compiling the Driver
驱动程序编译
Next, create a Makefile to compile your driver. Create a file named Makefile :
创建编译用 Makefile 文件:
bash
nano MakefileAdd the following content:
写入以下内容:
obj-m += simple_char_driver.o

all:
    make -C /lib/modules/$(shell uname -r)/build M=$(PWD) modules

clean:
    make -C /lib/modules/$(shell uname -r)/build M=$(PWD) clean
Now, compile the driver:
执行编译命令:
bash
makeLoading and Testing the Driver
驱动加载与测试
After successfully compiling the driver, it's time to load it into the kernel.
驱动编译完成后,执行内核加载操作。
1. Load the Driver
加载驱动
Use insmod to insert your driver module:
通过 insmod 命令加载驱动模块:
bash
sudo insmod simple_char_driver.koCheck the system logs to ensure it was loaded successfully:
查看系统日志确认加载状态:
bash
dmesg | tail2. Unload the Driver
卸载驱动
Unload the driver when you're done:
使用完毕后卸载驱动:
bash
sudo rmmod simple_char_driverAnd verify it has been removed using:
通过日志验证卸载结果:
bash
dmesg | tailTesting the Character Device
字符设备功能测试
To interact with your newly created character device, you can use commands such as mknod to create a device file:
通过 mknod 命令创建设备文件,实现与字符设备交互:
bash
sudo mknod /dev/simple_char_device c [major_number] 0Replace major_number with the actual value you received during registration.
将 major_number 替换为驱动注册时获取的主设备号。
Once created, you can read and write to your device using echo and cat commands:
设备文件创建后,通过 echo 与 cat 命令执行读写测试:
bash
echo 'Hello' > /dev/simple_char_device
cat /dev/simple_char_device
Common Errors and Debugging Tips
常见错误与调试方法
While writing a device driver, you may encounter several common issues:
驱动开发过程中常见问题如下:
- Registration Errors: Make sure to check the return value of
register_chrdevand inspect dmesg logs for error messages.
注册异常 :检查register_chrdev返回值,通过 dmesg 日志定位错误 - Memory Access Issues: Ensure that you've properly allocated and released memory.
内存访问异常:保障内存申请与释放操作合规 - File Operations: Double-check your file operations structure for correctness.
文件操作异常:核对文件操作结构体配置准确性
Conclusion
结语
In this tutorial, we covered the essential steps to write a simple Linux character device driver. By understanding the basics of driver development, you can expand your knowledge to more complex drivers, including block and network drivers. Remember to refer to the [Linux Kernel Documentation for in-depth details for advanced implementations.
本文讲解了简易 Linux 字符设备驱动的核心编写步骤,掌握基础后可进一步学习块设备、网络设备等复杂驱动。高级实现细节可参考 Linux 内核文档。
As you gain experience, consider exploring kernel programming concepts, such as interrupt handling, DMA, and direct kernel object manipulation. Happy coding!
积累经验后,可深入学习中断处理、直接内存访问、内核对象操作等内核编程知识。祝各位开发顺利!
Writing device drivers in Linux: A brief tutorial
Linux 设备驱动编写:简明教程
By Xavier Calbet in hacking 4/26/2006
"Do you pine for the nice days of Minix-1.1, when men were men and wrote their own device drivers?" Linus Torvalds
"你是否怀念 Minix-1.1 的美好岁月,那时人们亲自动手编写自己的设备驱动?"------林纳斯·托瓦兹
Pre-requisites
预备知识
In order to develop Linux device drivers, it is necessary to have an understanding of the following:
开发 Linux 设备驱动需要掌握以下内容:
- C programming . Some in-depth knowledge of C programming is needed, like pointer usage, bit manipulating functions, etc.
C 语言编程。需要具备一定深度的 C 语言编程知识,例如指针使用、位操作函数等。 - Microprocessor programming . It is necessary to know how microcomputers work internally: memory addressing, interrupts, etc. All of these concepts should be familiar to an assembler programmer.
微处理器编程。需要了解微型计算机的内部工作机制,包括内存寻址、中断等。汇编语言程序员应对这些概念十分熟悉。
There are several different devices in Linux. For simplicity, this brief tutorial will only cover type char devices loaded as modules. Kernel 2.6.x will be used (in particular, kernel 2.6.8 under Debian Sarge, which is now Debian Stable).
Linux 中存在多种不同类型的设备。为简化说明,本教程仅讲解以模块形式加载的字符型(char)设备。教程使用 2.6.x 版本内核,具体为 Debian Sarge 发行版中的 2.6.8 内核,该版本现已归入 Debian 稳定版。
User space and kernel space
用户空间与内核空间
When you write device drivers, it's important to make the distinction between "user space" and "kernel space".
编写设备驱动时,区分"用户空间"与"内核空间"十分重要。
- Kernel space . Linux (which is a kernel) manages the machine's hardware in a simple and efficient manner, offering the user a simple and uniform programming interface. In the same way, the kernel, and in particular its device drivers, form a bridge or interface between the end-user/programmer and the hardware. Any subroutines or functions forming part of the kernel (modules and device drivers, for example) are considered to be part of kernel space.
内核空间。Linux 作为内核,以简洁高效的方式管理硬件,并向用户提供统一易用的编程接口。内核及其设备驱动在终端用户、程序员与硬件之间搭建桥梁。所有属于内核的子程序或函数(如模块与设备驱动)均归属于内核空间。 - User space . End-user programs, like the UNIX
shellor other GUI based applications (kpresenterfor example), are part of the user space. Obviously, these applications need to interact with the system's hardware . However, they don't do so directly, but through the kernel supported functions.
用户空间 。终端用户程序,如 UNIXshell或图形界面应用(如kpresenter),均属于用户空间。这类程序需要与系统硬件交互,但不会直接操作,而是通过内核提供的函数完成。
All of this is shown in figure 1.
相关关系如图 1 所示。
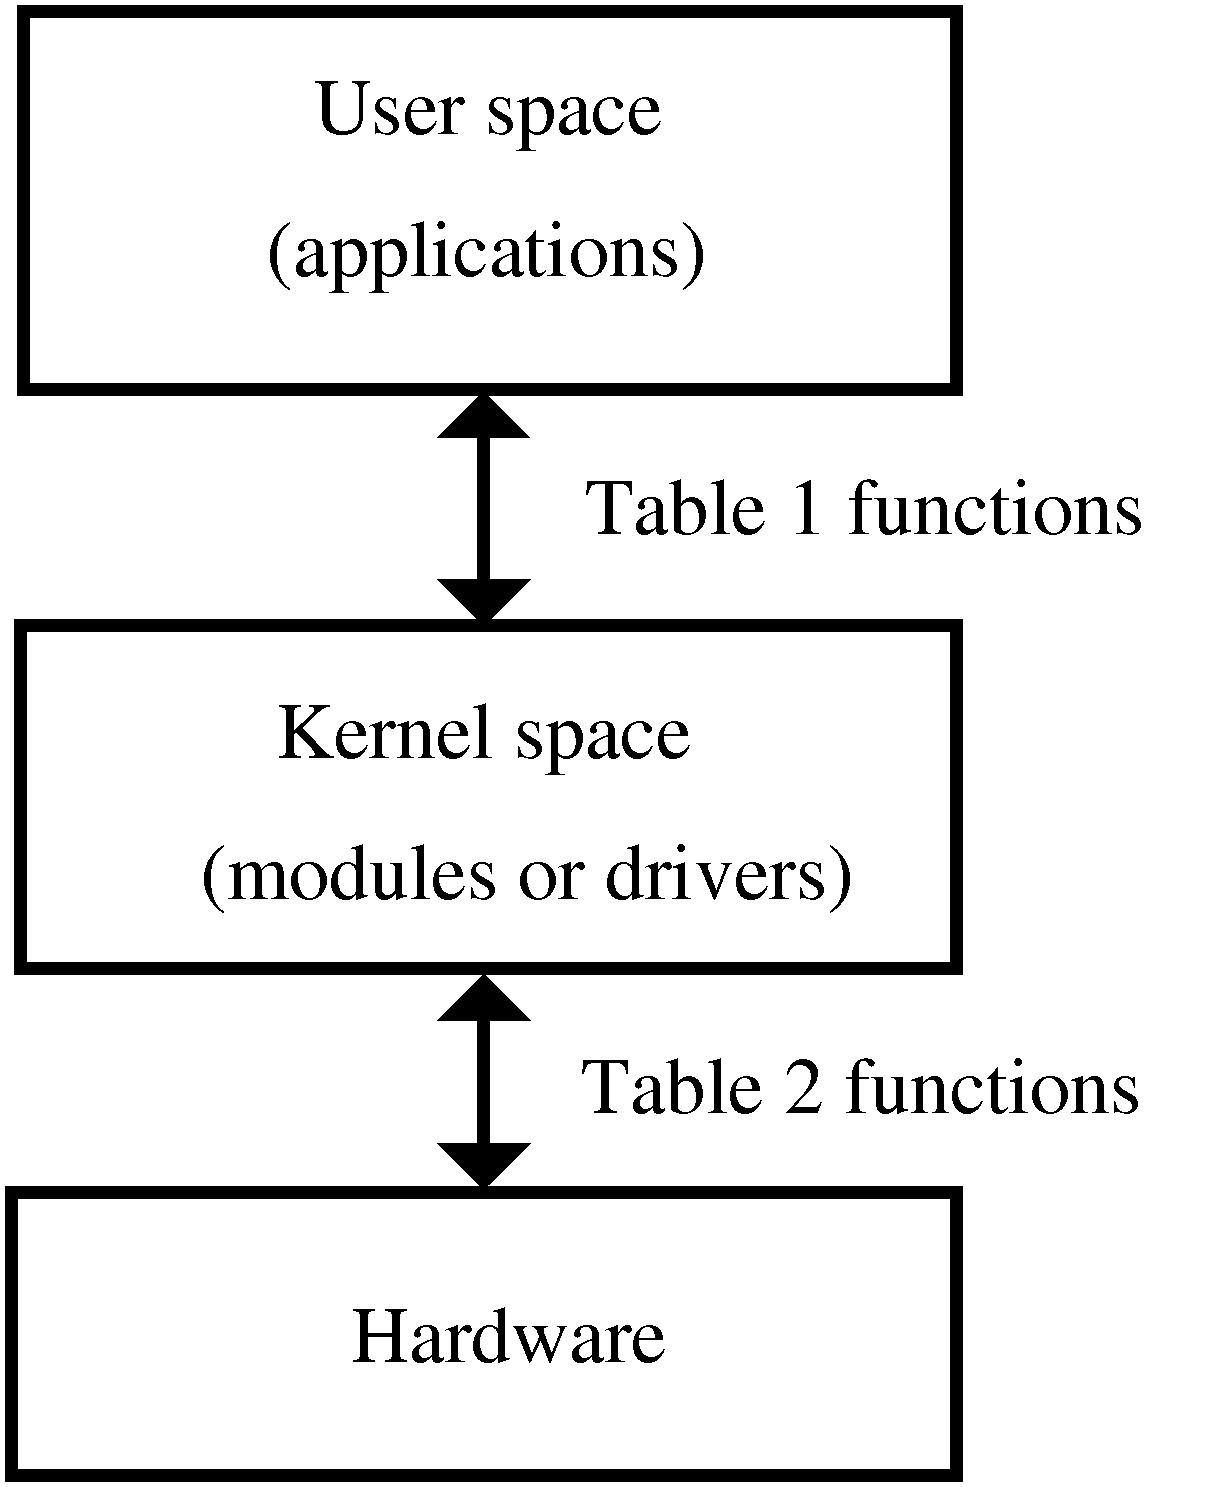
Figure 1: User space where applications reside, and kernel space where modules or device drivers reside
图 1:应用程序所在的用户空间与模块、设备驱动所在的内核空间
Interfacing functions between user space and kernel space
用户空间与内核空间的接口函数
The kernel offers several subroutines or functions in user space, which allow the end-user application programmer to interact with the hardware. Usually, in UNIX or Linux systems, this dialogue is performed through functions or subroutines in order to read and write files. The reason for this is that in Unix devices are seen, from the point of view of the user, as files.
内核在用户空间提供若干子程序,使应用程序开发者可与硬件交互。在 UNIX 与 Linux 系统中,这类交互通常通过文件读写相关函数完成,原因是在用户视角下,UNIX 中的设备均被抽象为文件。
On the other hand, in kernel space Linux also offers several functions or subroutines to perform the low level interactions directly with the hardware, and allow the transfer of information from kernel to user space.
同时,Linux 在内核空间提供若干函数,用于直接与硬件进行底层交互,并实现内核与用户空间之间的数据传输。
Usually, for each function in user space (allowing the use of devices or files), there exists an equivalent in kernel space (allowing the transfer of information from the kernel to the user and vice-versa). This is shown in Table 1, which is, at this point, empty. It will be filled when the different device drivers concepts are introduced.
通常,用户空间中用于操作设备或文件的每个函数,在内核空间中均存在对应函数,用于实现内核与用户空间的数据双向传输。相关内容如表 1 所示,该表目前为空,将在后续讲解驱动相关概念时逐步填充。
| Events | User functions | Kernel functions |
|---|---|---|
| Load module | ||
| Open device | ||
| Read device | ||
| Write device | ||
| Close device | ||
| Remove module |
Table 1. Device driver events and their associated interfacing functions in kernel space and user space.
表 1. 设备驱动事件及其在用户空间与内核空间的对应接口函数
Interfacing functions between kernel space and the hardware device
内核空间与硬件设备的接口函数
There are also functions in kernel space which control the device or exchange information between the kernel and the hardware. Table 2 illustrates these concepts. This table will also be filled as the concepts are introduced.
内核空间中同样存在用于控制硬件、实现内核与硬件数据交互的函数。相关内容如表 2 所示,该表将随概念讲解逐步完善。
| Events | Kernel functions |
|---|---|
| Read data | |
| Write data |
Table 2. Device driver events and their associated functions between kernel space and the hardware device.
表 2. 设备驱动事件及其在内核空间与硬件之间的对应函数
The first driver: loading and removing the driver in user space
第一个驱动:在用户空间加载与卸载驱动
I'll now show you how to develop your first Linux device driver, which will be introduced in the kernel as a module.
下面讲解如何编写第一个 Linux 设备驱动,该驱动将以模块形式加载到内核中。
For this purpose I'll write the following program in a file named nothing.c
为此,在名为 nothing.c 的文件中编写如下代码:
c
<nothing.c> =
##include <linux/module.h>

MODULE_LICENSE("Dual BSD/GPL");
Since the release of kernel version 2.6.x, compiling modules has become slightly more complicated. First, you need to have a complete, compiled kernel source-code-tree. If you have a Debian Sarge system, you can follow the steps in Appendix B (towards the end of this article). In the following, I'll assume that a kernel version 2.6.8 is being used.
自 2.6.x 内核版本发布后,模块编译流程略有复杂。首先需要具备完整且已编译的内核源码树。若使用 Debian Sarge 系统,可参考本文附录 B 中的步骤。后续内容默认使用 2.6.8 版本内核。
Next, you need to generate a makefile. The makefile for this example, which should be named Makefile, will be:
接下来需要编写 Makefile,本示例的 Makefile 内容如下:
makefile
<Makefile1> =
obj-m := nothing.o
Unlike with previous versions of the kernel, it's now also necessary to compile the module using the same kernel that you're going to load and use the module with. To compile it, you can type:
与早期内核版本不同,2.6.x 内核中模块必须使用目标加载内核的环境进行编译。编译命令如下:
bash
$ make -C /usr/src/kernel-source-2.6.8 M=`pwd` modulesThis extremely simple module belongs to kernel space and will form part of it once it's loaded.
该极简模块属于内核空间,加载后即成为内核的一部分。
In user space, you can load the module as root by typing the following into the command line:
在用户空间中,以 root 权限执行以下命令加载模块:
bash
## insmod nothing.koThe insmod command allows the installation of the module in the kernel. However, this particular module isn't of much use.
insmod 命令用于将模块加载至内核,但该模块并无实际功能。
It is possible to check that the module has been installed correctly by looking at all installed modules:
可通过查看已加载模块列表验证模块是否正确加载:
bash
## lsmodFinally, the module can be removed from the kernel using the command:
使用以下命令可从内核卸载该模块:
bash
## rmmod nothingBy issuing the lsmod command again, you can verify that the module is no longer in the kernel.
再次执行 lsmod 可确认模块已从内核移除。
The summary of all this is shown in Table 3.
相关内容汇总如表 3 所示。
| Events | User functions | Kernel functions |
|---|---|---|
| Load module | insmod | |
| Open device | ||
| Read device | ||
| Write device | ||
| Close device | ||
| Remove module | rmmod |
Table 3. Device driver events and their associated interfacing functions between kernel space and user space.
表 3. 设备驱动事件及其在用户空间与内核空间的对应接口函数
The "Hello world" driver: loading and removing the driver in kernel space
"Hello world"驱动:在内核空间加载与卸载驱动
When a module device driver is loaded into the kernel, some preliminary tasks are usually performed like resetting the device, reserving RAM, reserving interrupts, and reserving input/output ports, etc.
模块形式的设备驱动加载至内核时,通常需要执行初始化操作,如设备复位、内存申请、中断与 I/O 端口资源预留等。
These tasks are performed, in kernel space, by two functions which need to be present (and explicitly declared): module_init and module_exit; they correspond to the user space commands insmod and rmmod , which are used when installing or removing a module. To sum up, the user commands insmod and rmmod use the kernel space functions module_init and module_exit.
内核空间中通过两个必须显式声明的函数完成上述操作:module_init 与 module_exit,分别对应用户空间加载与卸载模块的 insmod 和 rmmod 命令。简言之,用户命令 insmod 与 rmmod 会调用内核空间的 module_init 与 module_exit 函数。
Let's see a practical example with the classic program Hello world:
以经典的 Hello world 程序为例进行说明:
c
<hello.c> =
##include <linux/init.h>
##include <linux/module.h>
##include <linux/kernel.h>

MODULE_LICENSE("Dual BSD/GPL");

static int hello_init(void) {
  printk("<1> Hello world!\n");
  return 0;
}

static void hello_exit(void) {
  printk("<1> Bye, cruel world\n");
}

module_init(hello_init);
module_exit(hello_exit);
The actual functions hello_init and hello_exit can be given any name desired. However, in order for them to be identified as the corresponding loading and removing functions, they have to be passed as parameters to the functions module_init and module_exit.
hello_init 与 hello_exit 函数可自定义命名,但需作为参数传入 module_init 与 module_exit,才能被内核识别为模块加载与卸载函数。
The printk function has also been introduced. It is very similar to the well known printf apart from the fact that it only works inside the kernel. The <1> symbol shows the high priority of the message (low number). In this way, besides getting the message in the kernel system log files, you should also receive this message in the system console.
代码中使用了 printk 函数,该函数与常用的 printf 类似,仅能在内核中运行。<1> 表示消息优先级(数值越小优先级越高),该优先级可使消息同时输出至系统控制台与内核日志文件。
This module can be compiled using the same command as before, after adding its name into the Makefile.
将模块名称添加至 Makefile 后,可使用相同命令编译。
makefile
<Makefile2> =
obj-m := nothing.o hello.o
In the rest of the article, I have left the Makefiles as an exercise for the reader. A complete Makefile that will compile all of the modules of this tutorial is shown in Appendix A.
本文后续内容不再单独给出 Makefile,由读者自行编写。附录 A 提供可编译本教程所有模块的完整 Makefile。
When the module is loaded or removed, the messages that were written in the printk statement will be displayed in the system console. If these messages do not appear in the console, you can view them by issuing the dmesg command or by looking at the system log file with cat /var/log/syslog.
模块加载与卸载时,printk 输出的信息会显示在系统控制台。若控制台未显示,可执行 dmesg 命令或查看 /var/log/syslog 日志文件。
Table 4 shows these two new functions.
表 4 中补充了这两个新函数。
| Events | User functions | Kernel functions |
|---|---|---|
| Load module | insmod | module_init() |
| Open device | ||
| Read device | ||
| Write device | ||
| Close device | ||
| Remove module | rmmod | module_exit() |
Table 4. Device driver events and their associated interfacing functions between kernel space and user space.
表 4. 设备驱动事件及其在用户空间与内核空间的对应接口函数
The complete driver "memory": initial part of the driver
完整驱动"memory":驱动初始部分
I'll now show how to build a complete device driver: memory.c. This device will allow a character to be read from or written into it. This device, while normally not very useful, provides a very illustrative example since it is a complete driver; it's also easy to implement, since it doesn't interface to a real hardware device (besides the computer itself).
下面讲解如何编写完整设备驱动 memory.c。该设备支持单字节数据读写。该设备实用性有限,但作为完整驱动示例十分典型,且无需与真实硬件交互,易于实现。
To develop this driver, several new #include statements which appear frequently in device drivers need to be added:
开发该驱动需要添加设备驱动中常用的头文件:
c
<memory initial> =
/* Necessary includes for device drivers */
##include <linux/init.h>
##include <linux/config.h>
##include <linux/module.h>
##include <linux/kernel.h> /* printk() */
##include <linux/slab.h> /* kmalloc() */
##include <linux/fs.h> /* everything... */
##include <linux/errno.h> /* error codes */
##include <linux/types.h> /* size_t */
##include <linux/proc_fs.h>
##include <linux/fcntl.h> /* O_ACCMODE */
##include <asm/system.h> /* cli(), *_flags */
##include <asm/uaccess.h> /* copy_from/to_user */

MODULE_LICENSE("Dual BSD/GPL");

/* Declaration of memory.c functions */
int memory_open(struct inode *inode, struct file *filp);
int memory_release(struct inode *inode, struct file *filp);
ssize_t memory_read(struct file *filp, char *buf, size_t count, loff_t *f_pos);
ssize_t memory_write(struct file *filp, char *buf, size_t count, loff_t *f_pos);
void memory_exit(void);
int memory_init(void);

/* Structure that declares the usual file */
/* access functions */
struct file_operations memory_fops = {
  read: memory_read,
  write: memory_write,
  open: memory_open,
  release: memory_release
};

/* Declaration of the init and exit functions */
module_init(memory_init);
module_exit(memory_exit);

/* Global variables of the driver */
/* Major number */
int memory_major = 60;
/* Buffer to store data */
char *memory_buffer;
After the #include files, the functions that will be defined later are declared. The common functions which are typically used to manipulate files are declared in the definition of the file_operations structure. These will also be explained in detail later. Next, the initialization and exit functions---used when loading and removing the module---are declared to the kernel. Finally, the global variables of the driver are declared: one of them is the major number of the driver, the other is a pointer to a region in memory, memory_buffer, which will be used as storage for the driver data.
头文件之后声明后续实现的函数,文件操作相关函数在 file_operations 结构体中定义,后续将详细讲解。随后向内核注册模块加载与卸载函数,最后声明驱动全局变量,包括主设备号 major number 与数据缓存指针 memory_buffer。
The "memory" driver: connection of the device with its files
"memory"驱动:设备与设备文件的关联
In UNIX and Linux, devices are accessed from user space in exactly the same way as files are accessed. These device files are normally subdirectories of the /dev directory.
UNIX 与 Linux 系统中,用户空间对设备的访问方式与文件完全一致,设备文件通常位于 /dev 目录下。
To link normal files with a kernel module two numbers are used: major number and minor number. The major number is the one the kernel uses to link a file with its driver. The minor number is for internal use of the device and for simplicity it won't be covered in this article.
普通文件与内核模块通过主设备号 major number 与次设备号 minor number 关联。主设备号用于内核将设备文件与驱动绑定,次设备号供设备内部使用,本文为简化内容不做讲解。
To achieve this, a file (which will be used to access the device driver) must be created, by typing the following command as root:
以 root 权限执行以下命令创建用于访问驱动的设备文件:
bash
## mknod /dev/memory c 60 0In the above, c means that a char device is to be created, 60 is the major number and 0 is the minor number.
命令中 c 表示创建字符设备,60 为主设备号,0 为次设备号。
Within the driver, in order to link it with its corresponding /dev file in kernel space, the register_chrdev function is used. It is called with three arguments: major number, a string of characters showing the module name, and a file_operations structure which links the call with the file functions it defines. It is invoked, when installing the module, in this way:
驱动内部通过 register_chrdev 函数在内核空间将驱动与 /dev 文件关联。该函数接收三个参数:主设备号、模块名称字符串、绑定文件操作函数的 file_operations 结构体。模块加载时调用方式如下:
c
<memory init module> =
int memory_init(void) {
  int result;

  /* Registering device */
  result = register_chrdev(memory_major, "memory", &memory_fops);
  if (result < 0) {
    printk(
      "<1>memory: cannot obtain major number %d\n", memory_major);
    return result;
  }

  /* Allocating memory for the buffer */
  memory_buffer = kmalloc(1, GFP_KERNEL);
  if (!memory_buffer) {
    result = -ENOMEM;
    goto fail;
  }
  memset(memory_buffer, 0, 1);

  printk("<1>Inserting memory module\n");
  return 0;

  fail:
    memory_exit();
    return result;
}
Also, note the use of the kmalloc function. This function is used for memory allocation of the buffer in the device driver which resides in kernel space. Its use is very similar to the well known malloc function. Finally, if registering the major number or allocating the memory fails, the module acts accordingly.
代码中使用 kmalloc 函数为内核空间驱动缓存分配内存,用法与常用的 malloc 相似。若主设备号注册或内存分配失败,模块执行相应错误处理。
The "memory" driver: removing the driver
"memory"驱动:卸载驱动
In order to remove the module inside the memory_exit function, the function unregsiter_chrdev needs to be present. This will free the major number for the kernel.
memory_exit 函数中通过 unregister_chrdev 卸载模块,释放主设备号。
c
<memory exit module> =
void memory_exit(void) {
  /* Freeing the major number */
  unregister_chrdev(memory_major, "memory");

  /* Freeing buffer memory */
  if (memory_buffer) {
    kfree(memory_buffer);
  }

  printk("<1>Removing memory module\n");

}
The buffer memory is also freed in this function, in order to leave a clean kernel when removing the device driver.
该函数同时释放缓存内存,确保驱动卸载后内核环境干净。
The "memory" driver: opening the device as a file
"memory"驱动:以文件形式打开设备
The kernel space function, which corresponds to opening a file in user space (fopen), is the member open: of the file_operations structure in the call to register_chrdev. In this case, it is the memory_open function. It takes as arguments: an inode structure, which sends information to the kernel regarding the major number and minor number; and a file structure with information relative to the different operations that can be performed on a file. Neither of these functions will be covered in depth within this article.
用户空间打开文件的 fopen 函数,对应内核空间 register_chrdev 中 file_operations 结构体的 open 成员,即 memory_open 函数。该函数接收两个参数:包含主、次设备号信息的 inode 结构体,以及描述文件操作的 file 结构体。本文不对这两个结构体做深入讲解。
When a file is opened, it's normally necessary to initialize driver variables or reset the device. In this simple example, though, these operations are not performed.
文件打开时通常需要初始化驱动变量或复位设备,本简单示例未执行此类操作。
The memory_open function can be seen below:
memory_open 函数实现如下:
c
<memory open> =
int memory_open(struct inode *inode, struct file *filp) {

  /* Success */
  return 0;
}
This new function is now shown in Table 5.
表 5 中补充该新函数。
| Events | User functions | Kernel functions |
|---|---|---|
| Load module | insmod | module_init() |
| Open device | fopen | file_operations: open |
| Read device | ||
| Write device | ||
| Close device | ||
| Remove module | rmmod | module_exit() |
Table 5. Device driver events and their associated interfacing functions between kernel space and user space.
表 5. 设备驱动事件及其在用户空间与内核空间的对应接口函数
The "memory" driver: closing the device as a file
"memory"驱动:以文件形式关闭设备
The corresponding function for closing a file in user space (fclose) is the release: member of the file_operations structure in the call to register_chrdev. In this particular case, it is the function memory_release, which has as arguments an inode structure and a file structure, just like before.
用户空间关闭文件的 fclose 函数,对应内核空间 file_operations 结构体的 release 成员,即 memory_release 函数,参数与 memory_open 一致。
When a file is closed, it's usually necessary to free the used memory and any variables related to the opening of the device. But, once again, due to the simplicity of this example, none of these operations are performed.
文件关闭时通常需要释放内存与设备相关变量,本示例同样未执行此类操作。
The memory_release function is shown below:
memory_release 函数实现如下:
c
<memory release> =
int memory_release(struct inode *inode, struct file *filp) {

  /* Success */
  return 0;
}
This new function is shown in Table 6.
表 6 中补充该新函数。
| Events | User functions | Kernel functions |
|---|---|---|
| Load module | insmod | module_init() |
| Open device | fopen | file_operations: open |
| Read device | ||
| Write device | ||
| Close device | fclose | file_operations: release |
| Remove module | rmmod | module_exit() |
Table 6. Device driver events and their associated interfacing functions between kernel space and user space.
表 6. 设备驱动事件及其在用户空间与内核空间的对应接口函数
The "memory" driver: reading the device
"memory"驱动:读取设备
To read a device with the user function fread or similar, the member read: of the file_operations structure is used in the call to register_chrdev. This time, it is the function memory_read. Its arguments are: a type file structure; a buffer (buf), from which the user space function (fread) will read; a counter with the number of bytes to transfer (count), which has the same value as the usual counter in the user space function (fread); and finally, the position of where to start reading the file (f_pos).
用户空间通过 fread 等函数读取设备时,对应 file_operations 结构体的 read 成员,即 memory_read 函数。该函数参数包括:file 结构体、用户空间读取缓存 buf、传输字节数 count、文件读取起始位置 f_pos。
In this simple case, the memory_read function transfers a single byte from the driver buffer (memory_buffer) to user space with the function copy_to_user:
本示例中 memory_read 通过 copy_to_user 函数将驱动缓存 memory_buffer 中的单字节数据传输至用户空间:
c
<memory read> =
ssize_t memory_read(struct file *filp, char *buf,
                    size_t count, loff_t *f_pos) {

  /* Transfering data to user space */
  copy_to_user(buf,memory_buffer,1);

  /* Changing reading position as best suits */
  if (*f_pos == 0) {
    *f_pos+=1;
    return 1;
  } else {
    return 0;
  }
}
The reading position in the file (f_pos) is also changed. If the position is at the beginning of the file, it is increased by one and the number of bytes that have been properly read is given as a return value, 1. If not at the beginning of the file, an end of file (0) is returned since the file only stores one byte.
函数同时更新文件读取位置 f_pos。若位于文件起始位置,位置偏移加 1 并返回成功读取字节数 1;否则返回 0 表示文件结束,因设备仅存储 1 字节数据。
In Table 7 this new function has been added.
表 7 中补充该新函数。
| Events | User functions | Kernel functions |
|---|---|---|
| Load module | insmod | module_init() |
| Open device | fopen | file_operations: open |
| Read device | fread | file_operations: read |
| Write device | ||
| Close device | fclose | file_operations: release |
| Remove modules | rmmod | module_exit() |
Table 7. Device driver events and their associated interfacing functions between kernel space and user space.
表 7. 设备驱动事件及其在用户空间与内核空间的对应接口函数
The "memory" driver: writing to a device
"memory"驱动:写入设备
To write to a device with the user function fwrite or similar, the member write: of the file_operations structure is used in the call to register_chrdev. It is the function memory_write, in this particular example, which has the following as arguments: a type file structure; buf, a buffer in which the user space function (fwrite) will write; count, a counter with the number of bytes to transfer, which has the same values as the usual counter in the user space function (fwrite); and finally, f_pos, the position of where to start writing in the file.
用户空间通过 fwrite 等函数写入设备时,对应 file_operations 结构体的 write 成员,即 memory_write 函数。参数包括 file 结构体、用户空间写入缓存 buf、传输字节数 count、文件写入起始位置 f_pos。
c
<memory write> =
ssize_t memory_write( struct file *filp, char *buf,
                      size_t count, loff_t *f_pos) {

  char *tmp;

  tmp=buf+count-1;
  copy_from_user(memory_buffer,tmp,1);
  return 1;
}
In this case, the function copy_from_user transfers the data from user space to kernel space.
函数通过 copy_from_user 将用户空间数据传输至内核空间。
In Table 8 this new function is shown.
表 8 中补充该新函数。
| Events | User functions | Kernel functions |
|---|---|---|
| Load module | insmod | module_init() |
| Open device | fopen | file_operations: open |
| Close device | fread | file_operations: read |
| Write device | fwrite | file_operations: write |
| Close device | fclose | file_operations: release |
| Remove module | rmmod | module_exit() |
Device driver events and their associated interfacing functions between kernel space and user space.
设备驱动事件及其在用户空间与内核空间的对应接口函数
The complete "memory" driver
完整"memory"驱动
By joining all of the previously shown code, the complete driver is achieved:
将上述代码整合后得到完整驱动:
c
<memory.c> =
`<memory initial>`
`<memory init module>`
`<memory exit module>`
`<memory open>`
`<memory release>`
`<memory read>`
`<memory write>`
Before this module can be used, you will need to compile it in the same way as with previous modules. The module can then be loaded with:
模块使用前需按相同方式编译,编译后执行加载命令:
bash
## insmod memory.koIt's also convenient to unprotect the device:
为设备开放读写权限:
bash
## chmod 666 /dev/memoryIf everything went well, you will have a device /dev/memory to which you can write a string of characters and it will store the last one of them. You can perform the operation like this:
操作成功后,/dev/memory 设备可接收字符串并存储最后一个字符,操作示例:
bash
$ echo -n abcdef >/dev/memoryTo check the content of the device you can use a simple cat:
使用 cat 命令查看设备内容:
bash
$ cat /dev/memoryThe stored character will not change until it is overwritten or the module is removed.
存储的字符会保持不变,直至被覆盖或模块卸载。
The real "parlelport" driver: description of the parallel port
真实驱动"parlelport":并口概述
I'll now proceed by modifying the driver that I just created to develop one that does a real task on a real device. I'll use the simple and ubiquitous computer parallel port and the driver will be called parlelport.
下面修改已有驱动,开发可操作真实硬件的驱动。选用常见的计算机并行端口,驱动命名为 parlelport。
The parallel port is effectively a device that allows the input and output of digital information. More specifically it has a female D-25 connector with twenty-five pins. Internally, from the point of view of the CPU, it uses three bytes of memory. In a PC, the base address (the one from the first byte of the device) is usually 0x378. In this basic example, I'll use just the first byte, which consists entirely of digital outputs.
并口是数字信号输入输出设备,采用 25 针 D 型母口接口。从 CPU 视角看,其内部占用 3 字节内存空间,PC 中基地址通常为 0x378。本基础示例仅使用第一个字节,该字节全部为数字输出引脚。
The connection of the above-mentioned byte with the external connector pins is shown in figure 2.
该字节与外部接口引脚的对应关系如图 2 所示。
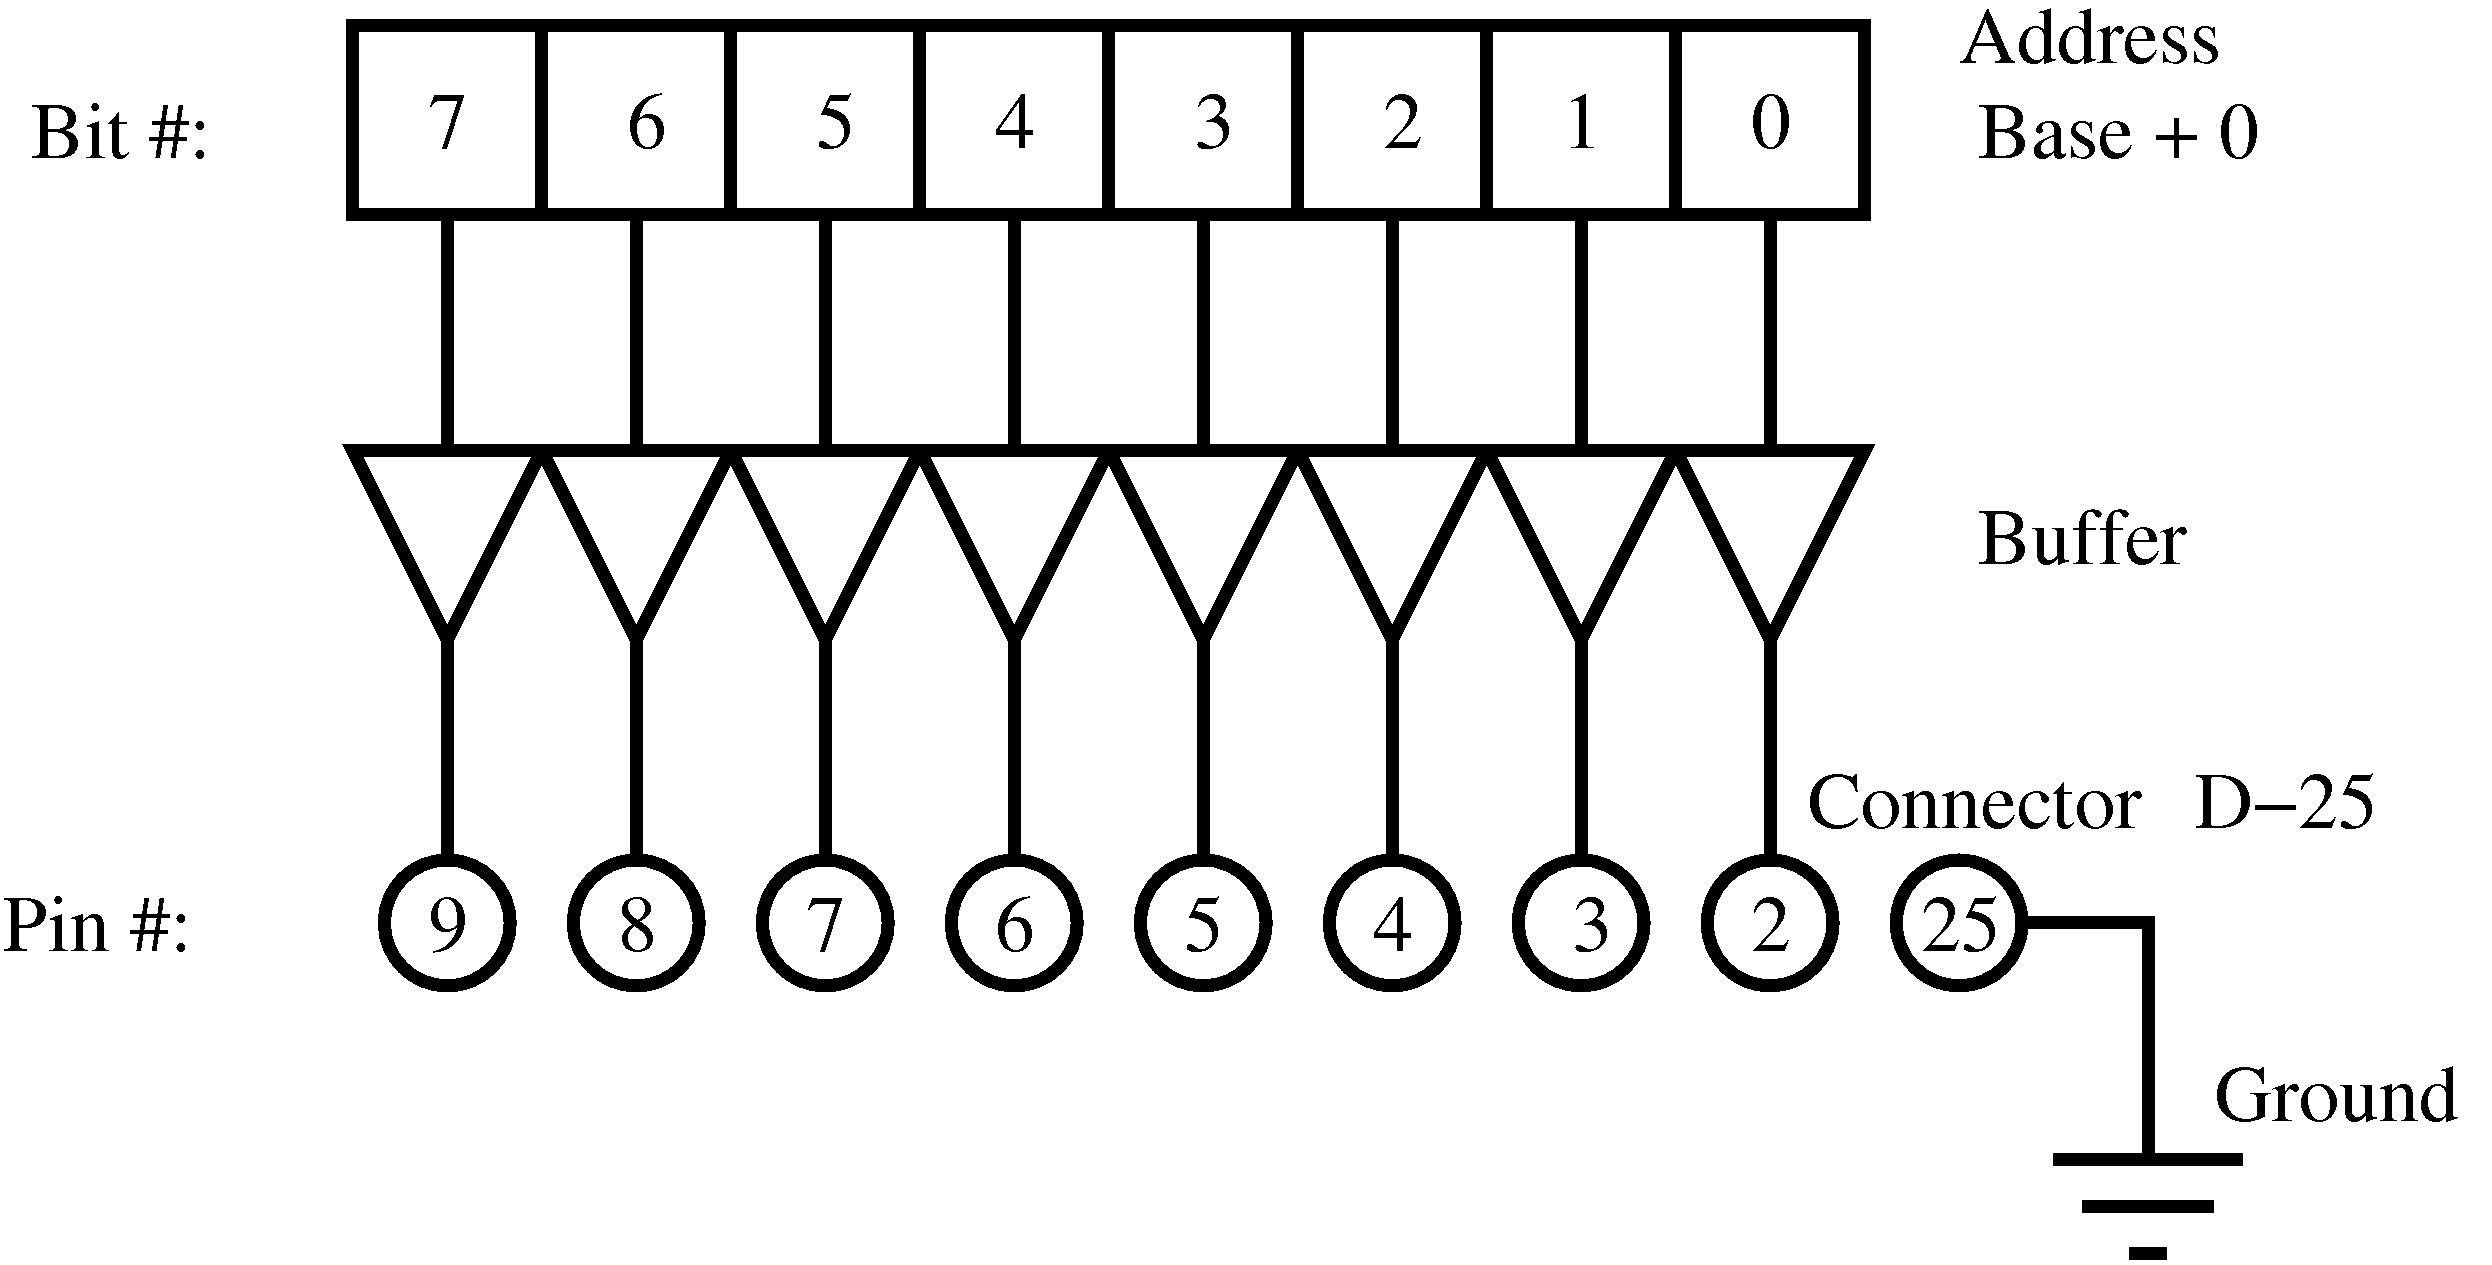
Figure 2: The first byte of the parallel port and its pin connections with the external female D-25 connector
图 2:并口第一个字节与外部 25 针 D 型母口的引脚对应关系
The "parlelport" driver: initializing the module
"parlelport"驱动:模块初始化
The previous memory_init function needs modification---changing the RAM memory allocation for the reservation of the memory address of the parallel port (0x378). To achieve this, use the function for checking the availability of a memory region (check_region), and the function to reserve the memory region for this device (request_region). Both have as arguments the base address of the memory region and its length. The request_region function also accepts a string which defines the module.
需修改原有 memory_init 函数,将内存申请改为并口地址 0x378 资源预留。使用 check_region 检查内存区域可用性,request_region 为设备预留内存区域,两个函数均接收基地址与长度参数,request_region 额外接收模块名称字符串。
c
<parlelport modified init module> =
  /* Registering port */
  port = check_region(0x378, 1);
  if (port) {
    printk("<1>parlelport: cannot reserve 0x378\n");
    result = port;
    goto fail;
  }
  request_region(0x378, 1, "parlelport");
The "parlelport" driver: removing the module
"parlelport"驱动:模块卸载
It will be very similar to the memory module but substituting the freeing of memory with the removal of the reserved memory of the parallel port. This is done by the release_region function, which has the same arguments as check_region.
卸载逻辑与 memory 模块相似,仅将内存释放改为并口资源释放,通过 release_region 函数实现,参数与 check_region 一致。
c
<parlelport modified exit module> =
  /* Make port free! */
  if (!port) {
    release_region(0x378,1);
  }
The "parlelport" driver: reading the device
"parlelport"驱动:读取设备
In this case, a real device reading action needs to be added to allow the transfer of this information to user space. The inb function achieves this; its arguments are the address of the parallel port and it returns the content of the port.
本次需要添加真实设备读取操作并将数据传输至用户空间,通过 inb 函数实现,该函数接收并口地址参数并返回端口内容。
c
<parlelport inport> =
/* Reading port */
parlelport_buffer = inb(0x378);
Table 9 (the equivalent of Table 2) shows this new function.
表 9(对应表 2)中补充该新函数。
| Events | Kernel functions |
|---|---|
| Read data | inb |
| Write data |
Device driver events and their associated functions between kernel space and the hardware device.
设备驱动事件及其在内核空间与硬件之间的对应函数
The "parlelport" driver: writing to the device
"parlelport"驱动:写入设备
Again, you have to add the "writing to the device" function to be able to transfer later this data to user space. The function outb accomplishes this; it takes as arguments the content to write in the port and its address.
同样需要添加设备写入函数,通过 outb 函数实现,该函数接收待写入数据与端口地址参数。
c
<parlelport outport> =
/* Writing to the port */
outb(parlelport_buffer,0x378);
Table 10 summarizes this new function.
表 10 汇总该新函数。
| Events | Kernel functions |
|---|---|
| Read data | inb |
| Write data | outb |
Device driver events and their associated functions between kernel space and the hardware device.
设备驱动事件及其在内核空间与硬件之间的对应函数
The complete "parlelport" driver
完整"parlelport"驱动
I'll proceed by looking at the whole code of the parlelport module. You have to replace the word memory for the word parlelport throughout the code for the memory module. The final result is shown below:
下面展示 parlelport 模块完整代码,将 memory 模块代码中所有 memory 替换为 parlelport,最终代码如下:
c
<parlelport.c> =
`<parlelport initial>`
`<parlelport init module>`
`<parlelport exit module>`
`<parlelport open>`
`<parlelport release>`
`<parlelport read>`
`<parlelport write>`
Initial section
初始部分
In the initial section of the driver a different major number is used (61). Also, the global variable memory_buffer is changed to port and two more #include lines are added: ioport.h and io.h.
驱动初始部分使用新的主设备号 61,全局变量 memory_buffer 改为 port,并新增两个头文件 ioport.h 与 io.h。
c
<parlelport initial> =
/* Necessary includes for drivers */
#include <linux/init.h>
#include <linux/config.h>
#include <linux/module.h>
#include <linux/kernel.h> /* printk() */
#include <linux/slab.h> /* kmalloc() */
#include <linux/fs.h> /* everything... */
#include <linux/errno.h> /* error codes */
#include <linux/types.h> /* size_t */
#include <linux/proc_fs.h>
#include <linux/fcntl.h> /* O_ACCMODE */
#include <linux/ioport.h>
#include <asm/system.h> /* cli(), *_flags */
#include <asm/uaccess.h> /* copy_from/to_user */
#include <asm/io.h> /* inb, outb */

MODULE_LICENSE("Dual BSD/GPL");

/* Function declaration of parlelport.c */
int parlelport_open(struct inode *inode, struct file *filp);
int parlelport_release(struct inode *inode, struct file *filp);
ssize_t parlelport_read(struct file *filp, char *buf,
                       size_t count, loff_t *f_pos);
ssize_t parlelport_write(struct file *filp, char *buf,
                       size_t count, loff_t *f_pos);
void parlelport_exit(void);
int parlelport_init(void);

/* Structure that declares the common */
/* file access fcuntions */
struct file_operations parlelport_fops = {
  read: parlelport_read,
  write: parlelport_write,
  open: parlelport_open,
  release: parlelport_release
};

/* Driver global variables */
/* Major number */
int parlelport_major = 61;

/* Control variable for memory */
/* reservation of the parallel port*/
int port;

module_init(parlelport_init);
module_exit(parlelport_exit);
Module init
模块初始化
In this module-initializing-routine I'll introduce the memory reserve of the parallel port as was described before.
模块初始化函数中实现前述并口资源预留逻辑。
c
<parlelport init module> =
int parlelport_init(void) {
  int result;

  /* Registering device */
  result = register_chrdev(parlelport_major, "parlelport",
      &parlelport_fops);
  if (result < 0) {
    printk(
      "<1>parlelport: cannot obtain major number %d\n",
      parlelport_major);
    return result;
  }

  `<parlelport modified init module>`

  printk("<1>Inserting parlelport module\n");
  return 0;

  fail:
    parlelport_exit();
    return result;
}
Removing the module
模块卸载
This routine will include the modifications previously mentioned.
卸载函数包含前述资源释放逻辑。
c
<parlelport exit module> =
void parlelport_exit(void) {

  /* Make major number free! */
  unregister_chrdev(parlelport_major, "parlelport");

  `<parlelport modified exit module>`

  printk("<1>Removing parlelport module\n");
}
Opening the device as a file
以文件形式打开设备
This routine is identical to the memory driver.
该函数与 memory 驱动完全相同。
c
<parlelport open> =
int parlelport_open(struct inode *inode, struct file *filp) {

  /* Success */
  return 0;

}
Closing the device as a file
以文件形式关闭设备
Again, the match is perfect.
该函数同样与 memory 驱动完全相同。
c
<parlelport release> =
int parlelport_release(struct inode *inode, struct file *filp) {

  /* Success */
  return 0;
}
Reading the device
读取设备
The reading function is similar to the memory one with the corresponding modifications to read from the port of a device.
读取函数与 memory 驱动相似,仅修改为从设备端口读取数据。
c
<parlelport read> =
ssize_t parlelport_read(struct file *filp, char *buf,
  size_t count, loff_t *f_pos) {

  /* Buffer to read the device */
  char parlelport_buffer;

  `<parlelport inport>`

  /* We transfer data to user space */
  copy_to_user(buf,&parlelport_buffer,1);

  /* We change the reading position as best suits */
  if (*f_pos == 0) {
    *f_pos+=1;
    return 1;
  } else {
    return 0;
  }
}
Writing to the device
写入设备
It is analogous to the memory one except for writing to a device.
写入函数与 memory 驱动相似,仅修改为向设备端口写入数据。
c
<parlelport write> =
ssize_t parlelport_write( struct file *filp, char *buf,
  size_t count, loff_t *f_pos) {

  char *tmp;

  /* Buffer writing to the device */
  char parlelport_buffer;

  tmp=buf+count-1;
  copy_from_user(&parlelport_buffer,tmp,1);

  `<parlelport outport>`

  return 1;
}
LEDs to test the use of the parallel port
用于测试并口的 LED 电路
In this section I'll detail the construction of a piece of hardware that can be used to visualize the state of the parallel port with some simple LEDs.
本节讲解搭建简易 LED 硬件电路,用于直观显示并口状态。
WARNING : Connecting devices to the parallel port can harm your computer. Make sure that you are properly earthed and your computer is turned off when connecting the device. Any problems that arise due to undertaking these experiments is your sole responsibility.
警告:将设备接入并口可能损坏计算机。连接设备前确保计算机断电且自身做好接地防护。实验产生的任何问题由操作者自行承担。
The circuit to build is shown in figure 3 You can also read "PC & Electronics: Connecting Your PC to the Outside World" by Zoller as reference.
搭建电路如图 3 所示,可参考 Zoller 所著《PC & Electronics: Connecting Your PC to the Outside World》。
In order to use it, you must first ensure that all hardware is correctly connected. Next, switch off the PC and connect the device to the parallel port. The PC can then be turned on and all device drivers related to the parallel port should be removed (for example, lp, parport, parport_pc, etc.). The hotplug module of the Debian Sarge distribution is particularly annoying and should be removed. If the file /dev/parlelport does not exist, it must be created as root with the command:
使用前确保硬件连接正确,关闭计算机后将设备接入并口,开机后卸载所有并口相关驱动(如 lp、parport、parport_pc 等)。Debian Sarge 中的 hotplug 模块需一并卸载。若 /dev/parlelport 不存在,以 root 权限执行以下命令创建:
bash
# mknod /dev/parlelport c 61 0Then it needs to be made readable and writable by anybody with:
为设备开放读写权限:
bash
# chmod 666 /dev/parlelportThe module can now be installed, parlelport. You can check that it is effectively reserving the input/output port addresses 0x378 with the command:
加载 parlelport 模块,通过以下命令验证模块已预留 0x378 端口地址:
bash
$ cat /proc/ioportsTo turn on the LEDs and check that the system is working, execute the command:
执行以下命令点亮 LED 并验证系统工作正常:
bash
$ echo -n A >/dev/parlelportThis should turn on LED zero and six, leaving all of the others off.
该操作应点亮 0 号与 6 号 LED,其余 LED 熄灭。
You can check the state of the parallel port issuing the command:
执行以下命令查看并口状态:
bash
$ cat /dev/parlelport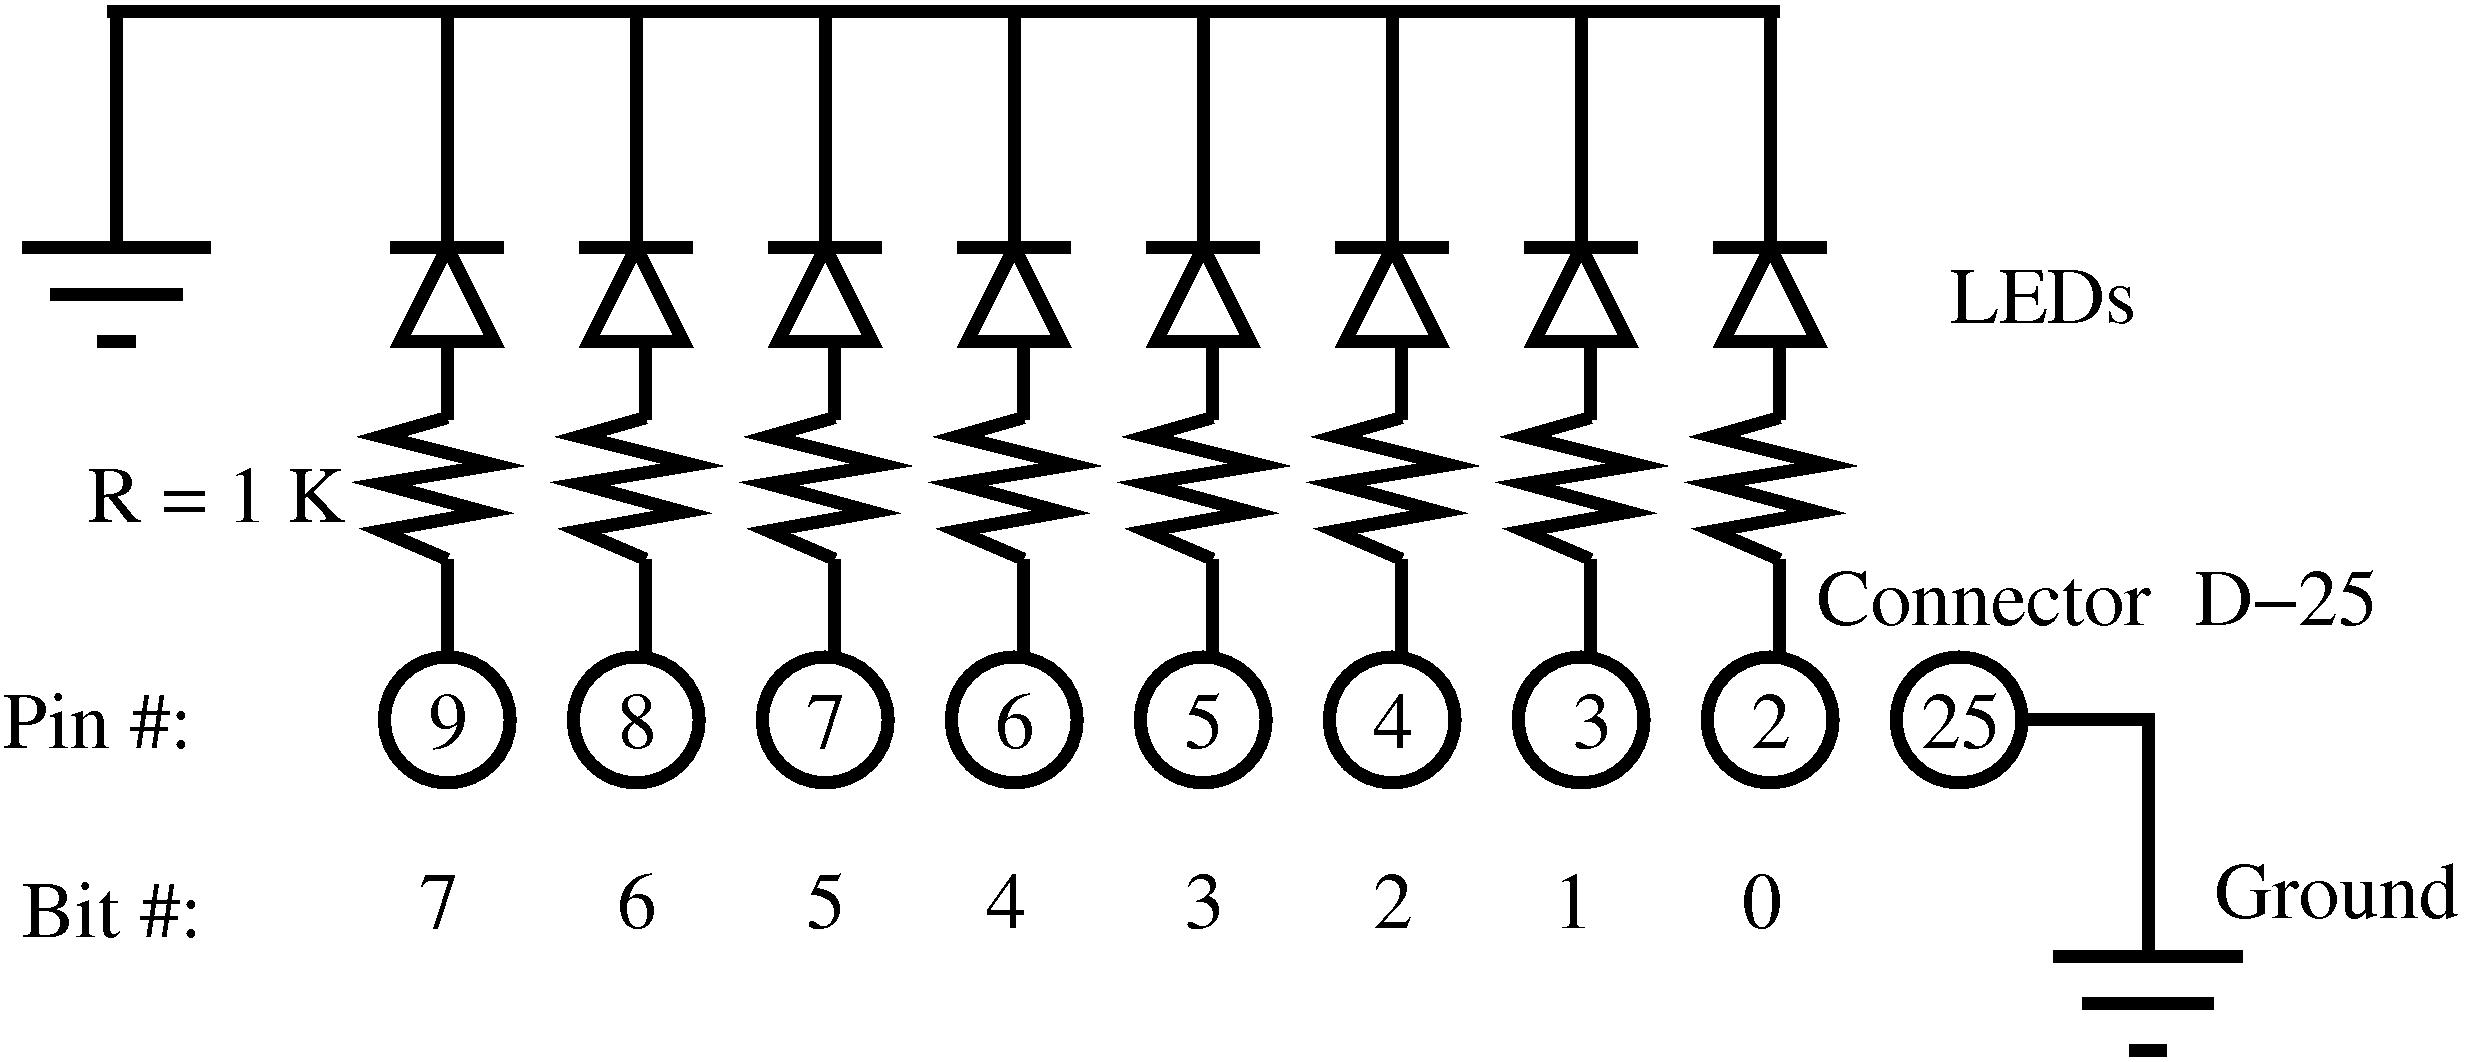
Figure 3: Electronic diagram of the LED matrix to monitor the parallel port
图 3:用于监测并口状态的 LED 矩阵电路原理图
Final application: flashing lights
最终应用:LED 流水灯
Finally, I'll develop a pretty application which will make the LEDs flash in succession. To achieve this, a program in user space needs to be written with which only one bit at a time will be written to the /dev/parlelport device.
最后开发一个应用程序实现 LED 流水灯效果。需要在用户空间编写程序,逐位向 /dev/parlelport 设备写入数据。
c
<lights.c> =
#include <stdio.h>
#include <unistd.h>

int main() {
  unsigned char byte,dummy;
  FILE * PARLELPORT;

  /* Opening the device parlelport */
  PARLELPORT=fopen("/dev/parlelport","w");
  /* We remove the buffer from the file i/o */
  setvbuf(PARLELPORT,&dummy,_IONBF,1);

  /* Initializing the variable to one */
  byte=1;

  /* We make an infinite loop */
  while (1) {
    /* Writing to the parallel port */
    /* to turn on a LED */
    printf("Byte value is %d\n",byte);
    fwrite(&byte,1,1,PARLELPORT);
    sleep(1);

    /* Updating the byte value */
    byte<<=1;
    if (byte == 0) byte = 1;
  }

  fclose(PARLELPORT);

}
It can be compiled in the usual way:
常规方式编译程序:
bash
$ gcc -o lights lights.cand can be executed with the command:
执行程序:
bash
$ lightsThe lights will flash successively one after the other! The flashing LEDs and the Linux computer running this program are shown in figure 4.
LED 将依次循环点亮!运行程序的 Linux 计算机与流水灯电路如图 4 所示。
Conclusion
总结
Having followed this brief tutorial you should now be capable of writing your own complete device driver for simple hardware like a relay board (see Appendix C), or a minimal device driver for complex hardware. Learning to understand some of these simple concepts behind the Linux kernel allows you, in a quick and easy way, to get up to speed with respect to writing device drivers. And, this will bring you another step closer to becoming a true Linux kernel developer.
学习本教程后,读者可独立编写简单硬件(如继电器板,见附录 C)的完整设备驱动,或复杂硬件的基础驱动。掌握 Linux 内核相关基础概念,可快速上手设备驱动开发,向 Linux 内核开发者迈进。
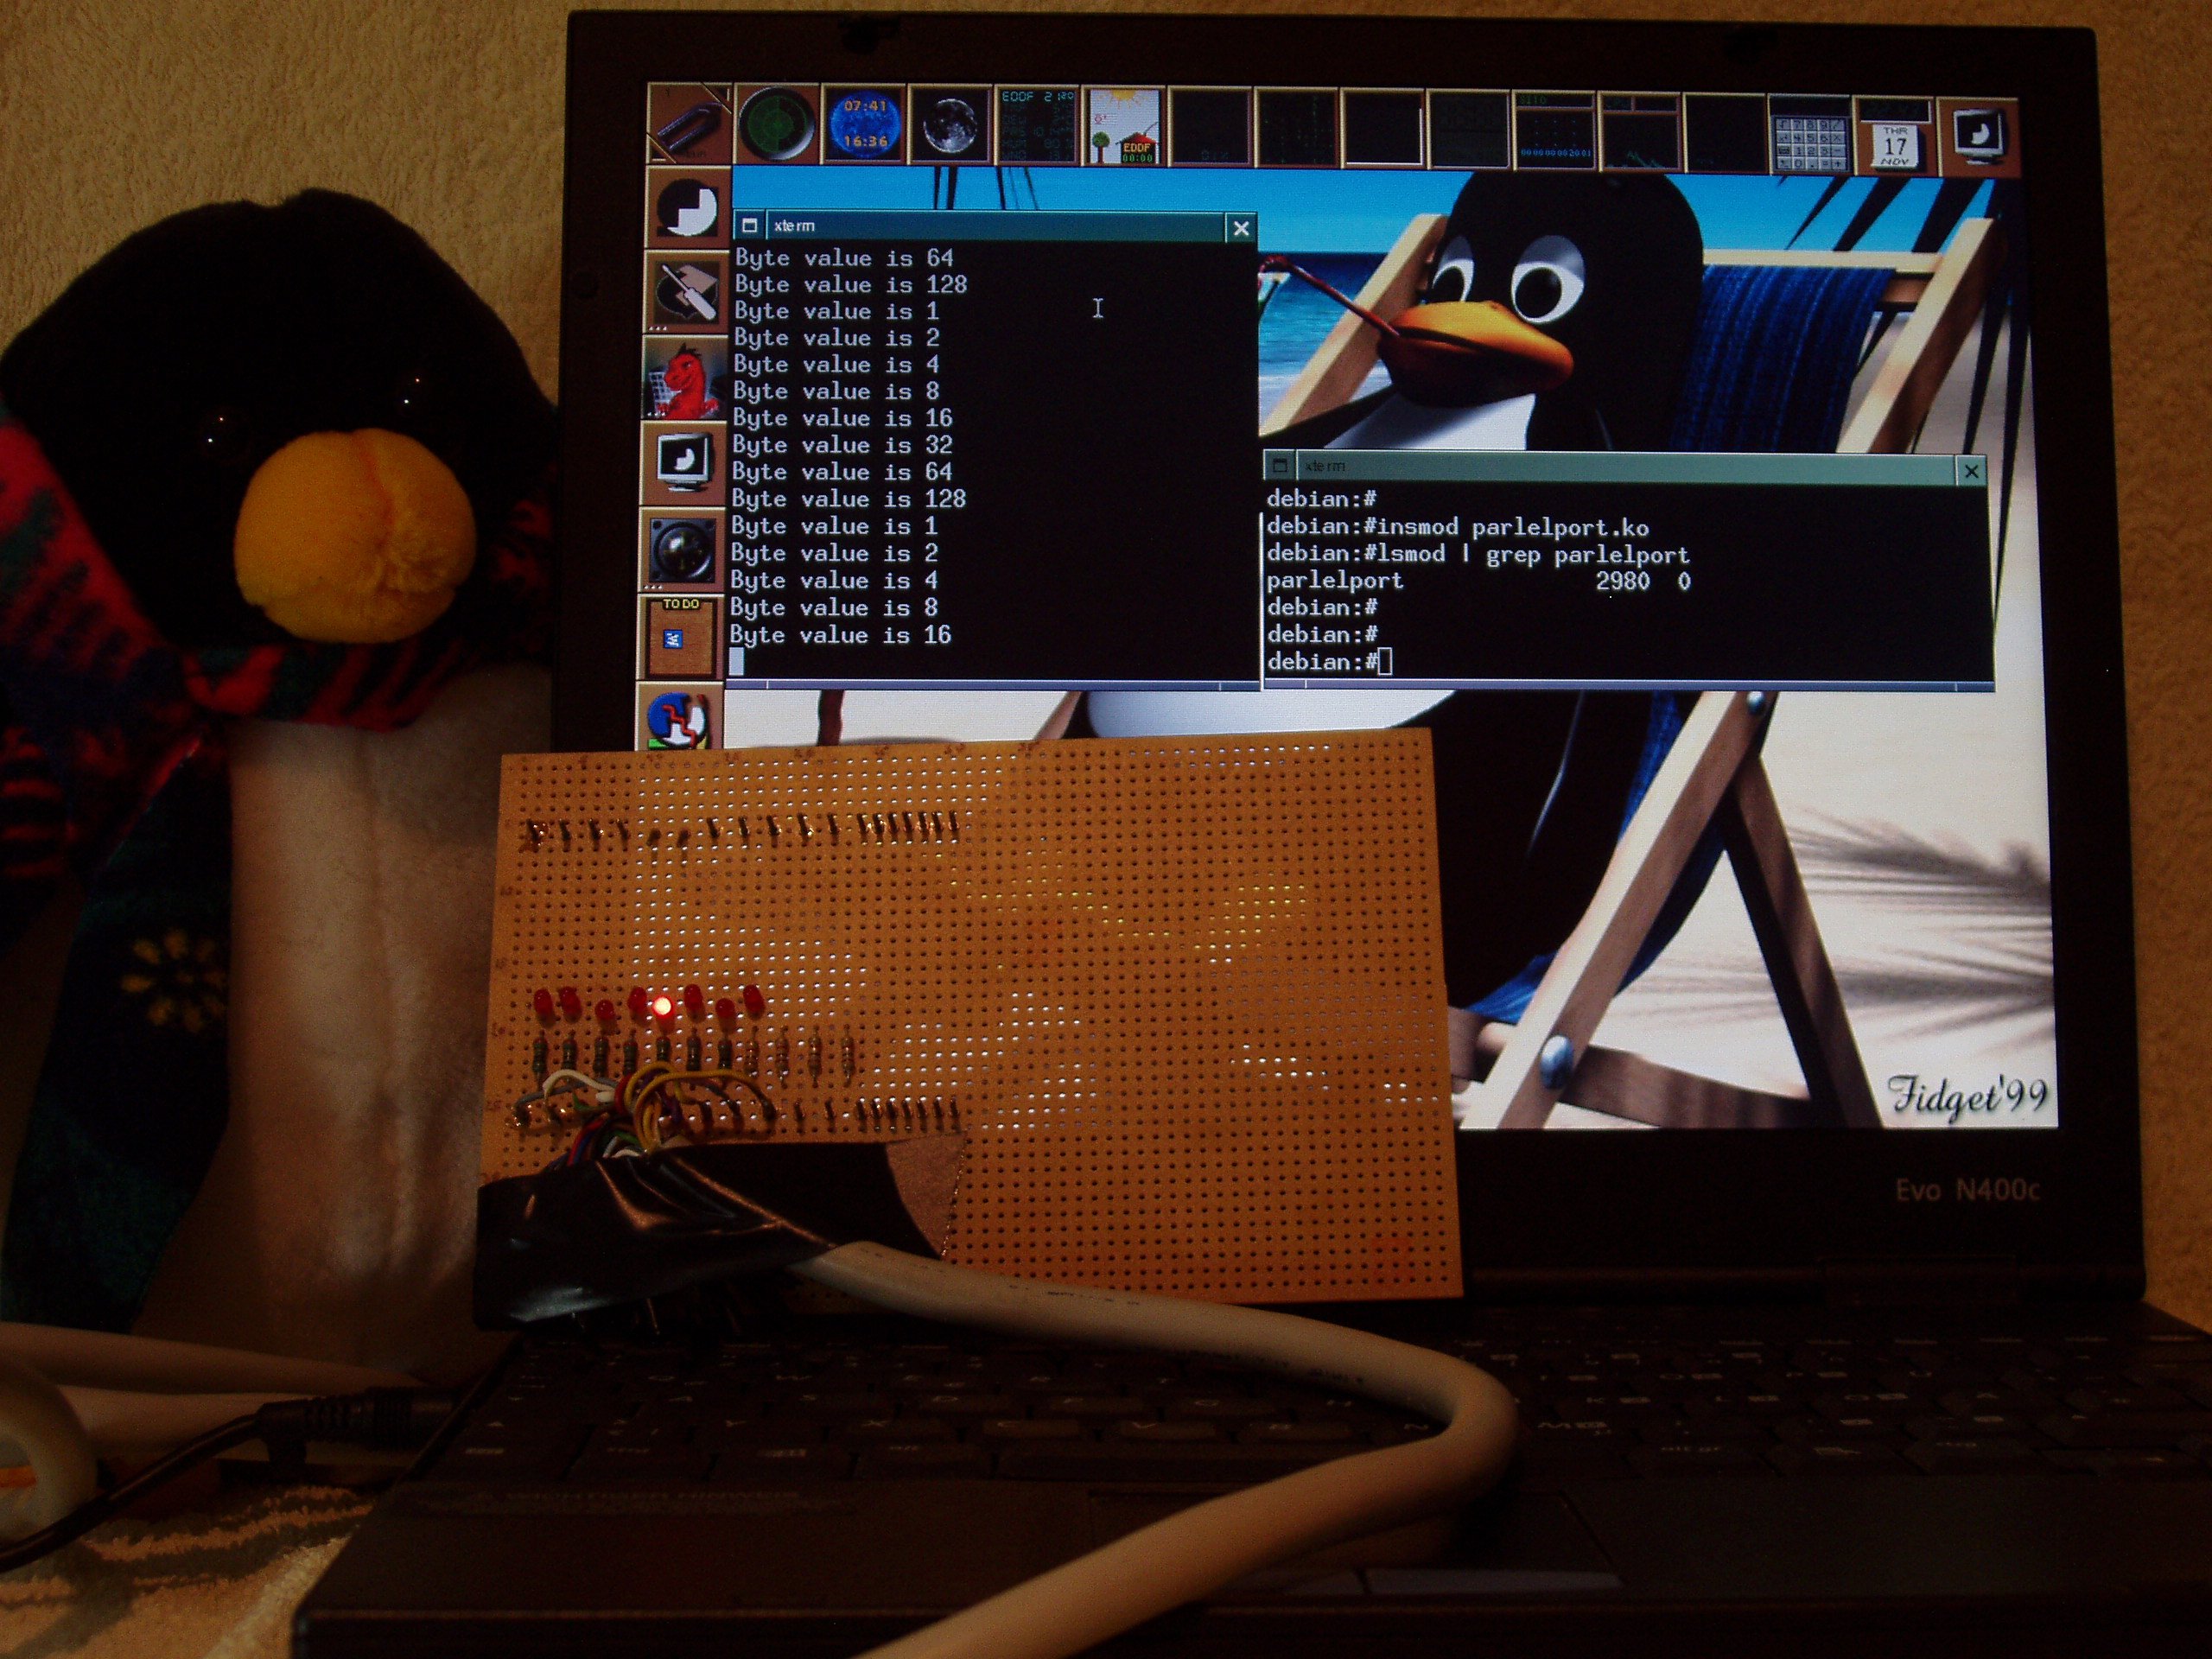
Figure 4: Flashing LEDs mounted on the circuit board and the computer running Linux. Two terminals are shown: one where the "parlelport" module is loaded and another one where the "lights" program is run. Tux is closely following what is going on
图 4:搭载流水灯电路的电路板与运行 Linux 的计算机,图中两个终端分别加载 parlelport 模块与运行 lights 程序
Bibliography
参考文献
A. Rubini, J. Corbert. 2001. Linux device drivers (second edition). Ed. O'Reilly. This book is available for free on the internet.
A. Rubini、J. Corbert 著,2001 年。《Linux 设备驱动(第 2 版)》,O'Reilly 出版社。本书可在互联网上免费获取。
Jonathan Corbet. 2003/2004. Porting device drivers to the 2.6 kernel. This is a very valuable resource for porting drivers to the new 2.6 Linux kernel and also for learning about Linux device drivers.
Jonathan Corbet 著,2003--2004 年。《将设备驱动移植至 2.6 内核》。该文档是驱动移植至 Linux 2.6 内核以及学习 Linux 设备驱动的重要参考资料。
B. Zoller. 1998. PC & Electronics: Connecting Your PC to the Outside World (Productivity Series). Nowadays it is probably easier to surf the web for hardware projects like this one.
B. Zoller 著,1998 年。《PC 与电子技术:计算机与外部设备连接》(生产力系列丛书)。如今可通过网络更便捷地查找此类硬件项目相关资料。
M. Waite, S. Prata. 1990. C Programming. Any other good book on C programming would suffice.
M. Waite、S. Prata 著,1990 年。《C 语言编程》。其他优质 C 语言编程书籍均可作为替代参考。
Appendix A. Complete Makefile
附录 A. 完整 Makefile
makefile
<Makefile> =
obj-m := nothing.o hello.o memory.o parlelport.o
Appendix B. Compiling the kernel on a Debian Sarge system
附录 B. 在 Debian Sarge 系统中编译内核
To compile a 2.6.x kernel on a Debian Sarge system you need to perform the following steps, which should be run as root:
在 Debian Sarge 系统中编译 2.6.x 版本内核需以 root 权限执行以下步骤:
-
Install the "kernel-image-2.6.x" package.
安装
kernel-image-2.6.x软件包。 -
Reboot the machine to make this the running kernel image. This is done semi-automatically by Debian. You may need to tweak the lilo configuration file
/etc/lilo.confand then runliloto achieve this.重启计算机使该内核镜像生效。Debian 系统会半自动完成该配置,必要时需修改 LILO 配置文件
/etc/lilo.conf并执行lilo命令。 -
Install the "kernel-source-2.6.x" package.
安装
kernel-source-2.6.x软件包。 -
Change to the source code directory,
cd /usr/srcand unzip and untar the source code withbunzip2 kernel-source-2.6.x.tar.bz2andtar xvf kernel-source-2.6.x.tar. Change to the kernel source directory withcd /usr/src/kernel-source-2.6.x进入源码目录
cd /usr/src,使用bunzip2 kernel-source-2.6.x.tar.bz2与tar xvf kernel-source-2.6.x.tar解压源码,再通过cd /usr/src/kernel-source-2.6.x进入内核源码目录。 -
Copy the default Debian kernel configuration file to your local kernel source directory
cp /boot/config-2.6.x .config.将 Debian 默认内核配置文件复制至本地内核源码目录:
cp /boot/config-2.6.x .config。 -
Make the kernel and the modules with
makeand thenmake modules.依次执行
make与make modules编译内核与模块。
Appendix C. Exercises
附录 C. 练习
If you would like to take on some bigger challenges, here are a couple of exercises you can do:
若希望尝试更复杂的任务,可完成以下练习:
-
I once wrote two device drivers for two ISA [Meilhaus boards, an analog to digital converter (ME26) and a relay control board (ME53). The software is available from the [ADQ project. Get the newer PCI versions of these Meilhaus boards and update the software.
作者曾为两款 Meilhaus 公司的 ISA 板卡编写驱动,分别为模数转换卡 ME26 与继电器控制卡 ME53。相关软件可从 ADQ 项目获取。尝试获取该类板卡的新版 PCI 型号并升级驱动程序。
-
Take any device that doesn't work on Linux, but has a very similar chipset to another device which does have a proven device driver for Linux. Try to modify the working device driver to make it work for the new device. If you achieve this, submit your code to the kernel and become a kernel developer yourself!
选取一款 Linux 下无驱动但芯片组与已有 Linux 驱动设备高度相似的硬件,尝试修改已有驱动使其适配新设备。完成后可将代码提交至内核社区,成为内核开发者。
Comments and acknowledgements
评论与致谢
Three years have elapsed since the [first version of this document was written. It was originally written in Spanish and intended for version 2.2 of the kernel, but kernel 2.4 was already making its first steps at that time. The reason for this choice is that good documentation for writing device drivers, the Linux device drivers book (see bibliography), lagged the release of the kernel in some months. This new version is also coming out soon after the release of the new 2.6 kernel, but up to date documentation is now readily available in [Linux Weekly News making it possible to have this document synchronized with the newest kernel.
本文档第一版发布至今已过去三年。文档最初以西班牙语编写,面向内核 2.2 版本,彼时内核 2.4 版本已开始逐步推广。选择该版本的原因是,设备驱动编写的优质参考资料《Linux 设备驱动》(见参考文献)的发布时间滞后内核版本数月。本次新版本文档同样在内核 2.6 发布后不久推出,而 Linux Weekly News 已提供最新参考资料,使本文档可与最新内核版本保持同步。
Fortunately enough, PCs still come with a built-in parallel port, despite the actual trend of changing everything inside a PC to render it obsolete in no time. Let us hope that PCs still continue to have built-in parallel ports for some time in the future, or that at least, parallel port PCI cards are still being sold.
尽管计算机硬件更新迭代迅速,当前 PC 仍保留内置并口,实属幸运。希望未来 PC 可继续内置并口,或至少并口 PCI 扩展卡仍可正常采购。
This tutorial has been originally typed using a text editor (i.e. emacs) in noweb format. This text is then processed with the noweb tool to create a LaTeX file ( .tex ) and the source code files ( .c ). All this can be done using the supplied makefile.document with the command make -f makefile.document.
本教程最初使用 emacs 编辑器以 noweb 格式编写,通过 noweb 工具处理后生成 LaTeX 文件(.tex)与 C 语言源码文件(.c)。全套流程可通过附带的 makefile.document 执行 make -f makefile.document 完成。
I would like to thank the "Instituto Politécnico de Bragança", the "Núcleo Estudantil de Linux del Instituto Politécnico de Bragança (NUX)", the "Asociación de Software Libre de León (SLeón)" and the "Núcleo de Estudantes de Engenharia Informática da Universidade de Évora" for making this update possible.
感谢布拉干萨理工学院、布拉干萨理工学院 Linux 学生社团(NUX)、莱昂自由软件协会(SLeón)与埃武拉大学信息工程学生社团对本文档更新工作的支持。
- Linux 设备驱动 | 模型原理、架构与开发(1)
https://blog.csdn.net/u013669912/article/details/159930562
reference
- Linux Device Drivers: Linux Driver Development Tutorial -- Apriorit
https://www.apriorit.com/dev-blog/195-simple-driver-for-linux-os - Writing a Simple Linux Device Driver - NamasteDev Blogs
https://namastedev.com/blog/writing-a-simple-linux-device-driver/ - Writing device drivers in Linux: A brief tutorial
https://freesoftwaremagazine.com/articles/drivers_linux/ - linux 设备驱动模型 | The Ship of Zenlian
https://zenlian.github.io/linux-bus-driver-device/