本项目基于 ZYNQ 实现了一个比较完整的视频系统:

ZYNQ 上的嵌入式 Linux!Petalinux 上的网络摄像头
Zybo Z7-20 板集成了 PetaLinux,支持使用 Pcam 5C 摄像头的实时嵌入式视觉应用。
使用 Petalinux 工具和 Yocto 框架添加和定制硬件设备,但为了本次演示,简化了流程,使其尽可能简单易懂。
- 设置 Petalinux 工具环境
-
- 从 BSP 版本构建的 Petalinux 启动镜像
-
- 在 ZYNQ 板上启动 Petalinux
-
- Petalinux 上的网络摄像头服务
1. 设置 Petalinux 工具环境
ZYBO Z7 的官方发布版本为 2022.1。虽然可以下载该项目并使用 TCL 而不是 BSP 文件生成硬件项目,但本文将重点介绍使用 BSP 版本的便捷方法。
下载 v2022.1 Petalinux 工具:
https://www.xilinx.com/support/download/index.html/content/xilinx/en/downloadNav/embedded-design-tools/archive.html
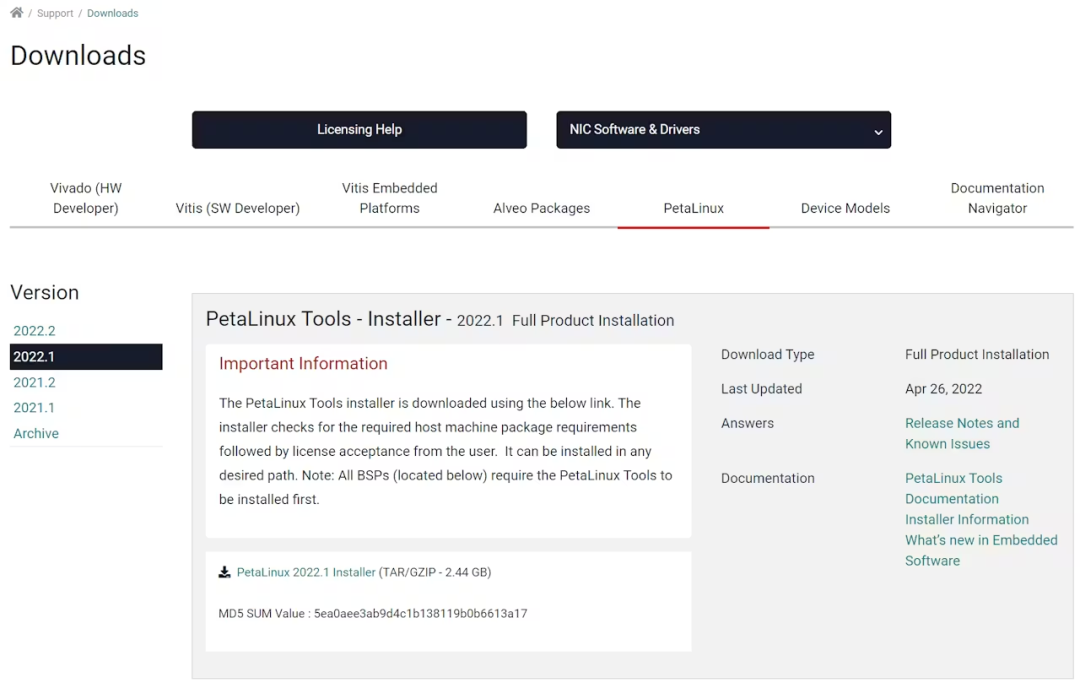 下载 v2022.1 Petalinux 工具
安装 v2022.1 版 Petalinux 工具:
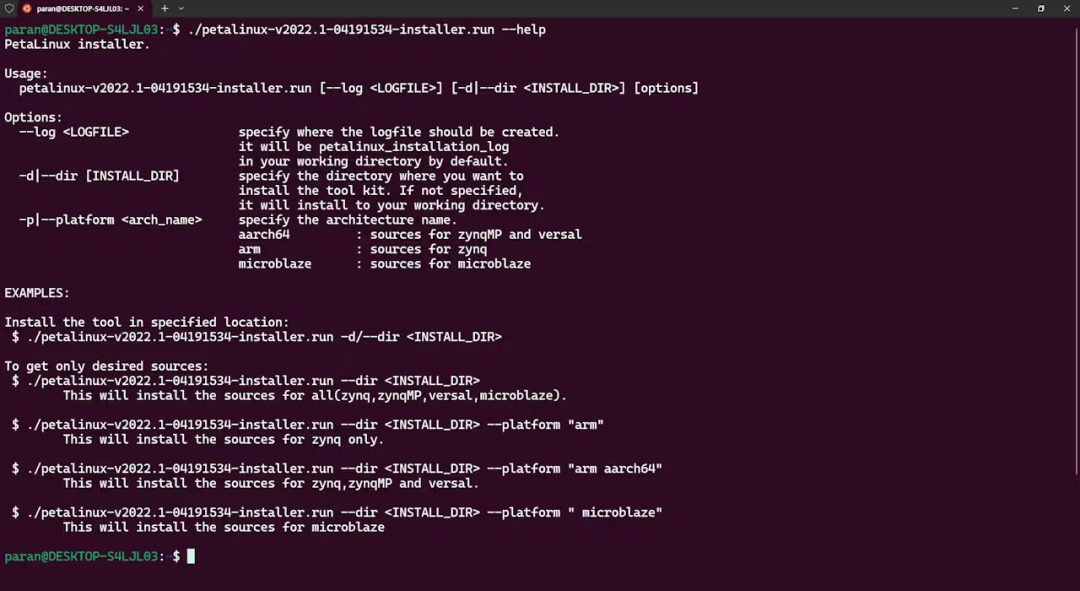
go# mkdir -p ~/petalinux/<petalinux-version> # ./petalinux-v<petalinux-version>-installer.run --dir ~/petalinux/<petalinux-version> # https://github.com/Digilent/Zybo-Z7/releases/tag/20%2FPetalinux%2F2022.1-1 $ mkdir -p ~/petalinux/petalinux-v2022.1-04191534 # Zybo Z7 : 667MHz dual-core Cortex-A9 processor with tightly integrated Xilinx FPGA # Cortex-A9 -> arm v7 $ chmod +x petalinux-v2022.1-04191534-installer.run $ ./petalinux-v2022.1-04191534-installer.run --dir ~/petalinux/petalinux-v2022.1-04191534 --platform "arm"需要为 ZYBO Z7 SoC 安装 arm v7 软件包。
 petalinux 安装程序
继续~
go$ ./petalinux-v2022.1-04191534-installer.run --dir ~/petalinux/petalinux-v2022.1-04191534 --platform "arm" INFO: Checking installation environment requirements... WARNING: This is not a supported OS INFO: Checking free disk space INFO: Checking installed tools INFO: Checking installed development libraries INFO: Checking network and other services WARNING: No tftp server found - please refer to "UG1144 PetaLinux Tools Documentation Reference Guide" for its impact and solution INFO: Checking installer checksum... INFO: Extracting PetaLinux installer... LICENSE AGREEMENTS PetaLinux SDK contains software from a number of sources. Please review the following licenses and indicate your acceptance of each to continue. You do not have to accept the licenses, however if you do not then you may not use PetaLinux SDK. Use PgUp/PgDn to navigate the license viewer, and press 'q' to close Press Enter to display the license agreements Do you accept Xilinx End User License Agreement? [y/N] > y Do you accept Third Party End User License Agreement? [y/N] > y INFO: Installing PetaLinux... INFO: Checking PetaLinux installer integrity... INFO: Installing PetaLinux SDK to "/home/kim/petalinux/petalinux-v2022.1-04191534/." INFO: Installing buildtools in /home/kim/petalinux/petalinux-v2022.1-04191534/./components/yocto/buildtools INFO: Installing buildtools-extended in /home/kim/petalinux/petalinux-v2022.1-04191534/./components/yocto/buildtools_extended INFO: PetaLinux SDK has been installed to /home/kim/petalinux/petalinux-v2022.1-04191534/.2. 从 BSP 版本构建的 Petalinux 启动镜像
现在已准备好运行v2022.1 Petalinux工具。
go# source <path-to-installed-PetaLinux>/settings.sh source ~/petalinux/petalinux-v2022.1-04191534/settings.sh PetaLinux environment set to '/home/kim/petalinux/petalinux-v2022.1-04191534' WARNING: /bin/sh is not bash! bash is PetaLinux recommended shell. Please set your default shell to bash. WARNING: This is not a supported OS INFO: Checking free disk space INFO: Checking installed tools INFO: Checking installed development libraries INFO: Checking network and other services WARNING: No tftp server found - please refer to "UG1144 2022.1 PetaLinux Tools Documentation Reference Guide" for its impact and solution下载 2022.1 版 Petalinux BSP:
gohttps://github.com/Digilent/Zybo-Z7/releases/tag/10%2FPetalinux%2F2022.1-1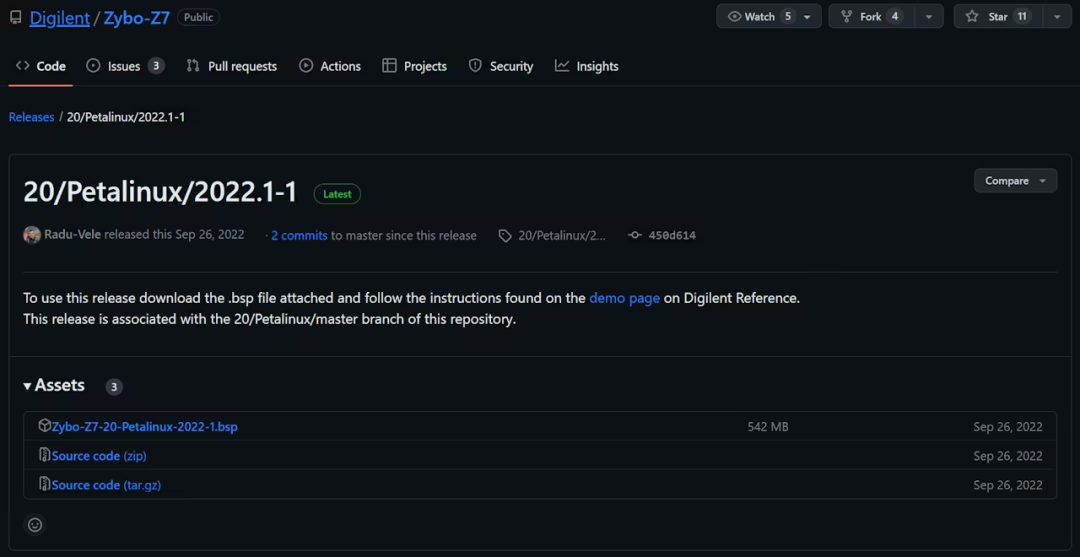
将文件下载到/mnt/d/ZYBO-Z7-20/Zybo-Z7-20-Petalinux-2022-1.bsp演示目录中。只需将软件包下载到所需位置并运行命令即可。
go# cd <path-to-project-folder> # petalinux-create -t project -s <path-to-bsp> $ mkdir -p /mnt/d/ZYBO-Z7-20/project $ cd /mnt/d/ZYBO-Z7-20/project $ petalinux-create -t project -s /mnt/d/ZYBO-Z7-20/Zybo-Z7-20-Petalinux-2022-1.bsp INFO: Create project: INFO: Projects: INFO: * os INFO: Has been successfully installed to /mnt/d/ZYBO-Z7-20/project/ INFO: New project successfully created in /mnt/d/ZYBO-Z7-20/project/该工具将生成启动所需的镜像。
go/mnt/d/ZYBO-Z7-20/project/os/pre-built/linux$ tree . ├── etc ├── images │ ├── BOOT.BIN │ ├── boot.scr │ ├── bootgen.bif │ ├── config │ ├── image.ub │ ├── pxelinux.cfg │ │ └── default │ ├── rootfs.cpio │ ├── rootfs.cpio.gz │ ├── rootfs.cpio.gz.u-boot │ ├── rootfs.ext4 │ ├── rootfs.jffs2 │ ├── rootfs.manifest │ ├── rootfs.tar.gz │ ├── system.bit │ ├── system.dtb │ ├── u-boot-dtb.bin │ ├── u-boot-dtb.elf │ ├── u-boot.bin │ ├── u-boot.elf │ ├── uImage │ ├── vmlinux │ ├── zImage │ └── zynq_fsbl.elf └── implementation └── system.bit3. 在 ZYNQ 板上启动 Petalinux
写入uEnv.txt文件以进行启动。
gokernel_load_address=0x2080000 uenvcmd=run bootkernel kernel_image=uImage devicetree_load_address=0x2000000 devicetree_image=system.dtb machine_name=zybo-zynq7 loadkernel=fatload mmc 0 ${kernel_load_address} ${kernel_image} loaddtb=fatload mmc 0 ${devicetree_load_address} ${devicetree_image} bootkernel=run loadkernel && run loaddtb && bootm ${kernel_load_address} - ${devicetree_load_address} bootargs=earlyprintk console=ttyPS0,115200 root=/dev/mmcblk0p2 rootfstype=ext4 rw rootwait将micro SD卡插入开发环境,并为micro SD卡创建启动/根分区:
go$ sudo fdisk /dev/sdb Welcome to fdisk (util-linux 2.34). Changes will remain in memory only, until you decide to write them. Be careful before using the write command. Command (m for help): d Partition number (1,2, default 2): 1 Partition 1 has been deleted. Command (m for help): d Selected partition 2 Partition 2 has been deleted. Command (m for help): n Partition type p primary (0 primary, 0 extended, 4 free) e extended (container for logical partitions) Select (default p): p Partition number (1-4, default 1): 1 First sector (2048-62521343, default 2048): Last sector, +/-sectors or +/-size{K,M,G,T,P} (2048-62521343, default 62521343): +512M Created a new partition 1 of type 'Linux' and of size 512 MiB. Command (m for help): n Partition type p primary (1 primary, 0 extended, 3 free) e extended (container for logical partitions) Select (default p): p Partition number (2-4, default 2): 2 First sector (1050624-62521343, default 1050624): Last sector, +/-sectors or +/-size{K,M,G,T,P} (1050624-62521343, default 62521343): Created a new partition 2 of type 'Linux' and of size 29.3 GiB. Command (m for help): t Partition number (1,2, default 2): 1 Hex code (type L to list all codes): c Changed type of partition 'Linux' to 'W95 FAT32 (LBA)'. Command (m for help): a Partition number (1,2, default 2): 1 The bootable flag on partition 1 is enabled now. Command (m for help): p Disk /dev/sdb: 29.83 GiB, 32010928128 bytes, 62521344 sectors Disk model: Storage Device Units: sectors of 1 * 512 = 512 bytes Sector size (logical/physical): 512 bytes / 512 bytes I/O size (minimum/optimal): 512 bytes / 512 bytes Disklabel type: dos Disk identifier: 0x9aadbd74 Device Boot Start End Sectors Size Id Type /dev/sdb1 * 2048 1050623 1048576 512M c W95 FAT32 (LBA) /dev/sdb2 1050624 62521343 61470720 29.3G 83 Linux Command (m for help): w The partition table has been altered. Syncing disks. sgdh@ubuntu:~$ sudo mkfs.vfat -n boot /dev/sdb1 mkfs.fat 4.1 (2017-01-24) mkfs.fat: warning - lowercase labels might not work properly with DOS or Windows mkfs.vfat: /dev/sdb1 contains a mounted filesystem. sgdh@ubuntu:~$ sudo mkfs.ext4 -L root /dev/sdb2 mke2fs 1.45.5 (07-Jan-2020) Creating filesystem with 7683840 4k blocks and 1921360 inodes Filesystem UUID: 07fb9490-cc27-4649-8a68-d0df05bb2a09 Superblock backups stored on blocks: 32768, 98304, 163840, 229376, 294912, 819200, 884736, 1605632, 2654208, 4096000 Allocating group tables: done Writing inode tables: done Creating journal (32768 blocks): done Writing superblocks and filesystem accounting information: done有一种方法可以使用循环设备创建便携式映像,而无需手动构建,但本文不会介绍这种方法。
goIMAGE_PATH=<path-to-build-files> cd $IMAGE_PATH MEDIA_BOOT_PATH=/media/kim/boot cp BOOT.BIN $MEDIA_BOOT_PATH cp boot.scr $MEDIA_BOOT_PATH cp image.ub $MEDIA_BOOT_PATH cp system.dtb /media/kim/boot/ cp uImage /media/kim/boot/ cp uEnv.txt /media/kim/boot/ MEDIA_ROOT_PATH=/media/kim/root sudo tar -zxvf rootfs.tar.gz -C $MEDIA_ROOT_PATH sync # $ tar zxvf rootfs.tar.gz <path_to_ext4> # unzip /usr, /bin, /lib ... # $ sudo umount /dev/sdX1 # $ sudo umount /dev/sdX2现在,把SD卡正确插入主板,并检查跳线设置。
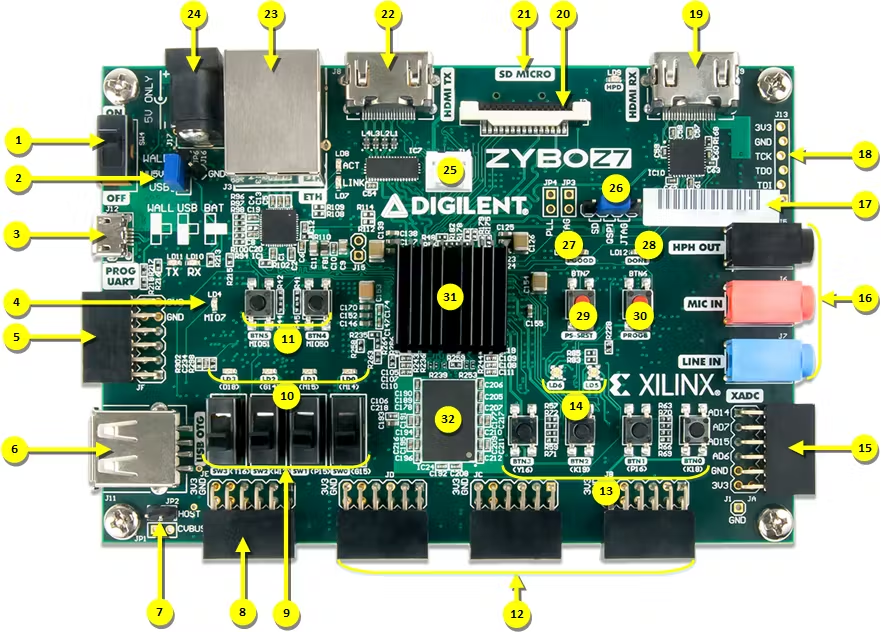
参考:
https://digilent.com/reference/programmable-logic/zybo-z7/reference-manual
要启动开发板,请将常用的串口控制台设置为监听串口,默认波特率为 115200。应该能够看到开发板从 U-Boot (SSBL) 到 Linux 登录提示符的启动过程。
注意:默认登录用户为 root:root。
4. Petalinux 上的网络摄像头服务
在这个项目中,将使用 Petalinux 中包含的 yavta 和 ffmpeg 程序作为 PoC 的原型。
go#!/bin/bash width=1920 height=1080 /usr/bin/yavta -c1 -f YUYV -s "$width"x"$height" -F /dev/video0 DIRECTORY="." LATEST_FILE=$(ls -t "$DIRECTORY"/*.bin 2>/dev/null | head -n 1) mv $LATEST_FILE "${LATESTFILE%.bin}.yuv" /usr/bin/ffmpeg -s "$width"x"$height" -pix_fmt yuyv422 -i "${LATESTFILE%.bin}.yuv" -y "${LATEST_FILE%.bin}.png" #!/bin/bash width=1920 height=1080 rate=15 media-ctl -d /dev/media0 -V '"ov5640 2-003c":0 [fmt:UYVY/'"$width"x"$height"'@1/'"$rate"' field:none]' media-ctl -d /dev/media0 -V '"43c60000.mipi_csi2_rx_subsystem":1 [fmt:UYVY/'"$width"x"$height"' field:none]' v4l2-ctl -d /dev/video0 --set-fmt-video=width="$width",height="$height",pixelformat='YUYV'参考下面链接示例创建了这个程序。Mongoose 是一个轻量级且易于使用的后端框架。
https://github.com/cesanta/mongoose/tree/master/tutorials/webui/webui-rest
已添加以下 REST API 服务。
go... else if (mg_match(hm->uri, mg_str("/api/sum"), NULL)) { // Attempt to fetch a JSON array from the body, hm->body struct mg_str json = hm->body; double num1, num2; if (mg_json_get_num(json, "$[0]", &num1) && mg_json_get_num(json, "$[1]", &num2)) { // Success! create a JSON response mg_http_reply(c, 200, "Content-Type: application/json\r\n", "{%m:%g}\n", MG_ESC("result"), num1 + num2); } ...添加一个按钮,用于使用摄像头拍摄照片。
go... <button id="btn3">Shutter button</button> <div id="image-container"> <img width=640 height=480 id="dynamic-image" alt="Dynamic Image" src=""> </div> ...按下快门按钮时,将通过 REST API 发送请求,并检索 PNG 图像。
以下是添加的用于渲染 PNG 文件的客户端 JavaScript 处理代码。
go... const getpng = ev => fetch('/api/png') .then(r => r.blob()) .catch(err => console.log(err)); btn3.onclick = ev => getpng(ev) .then(imageBlob => { const imageURL = URL.createObjectURL(imageBlob); const imgElement = document.getElementById('dynamic-image'); imgElement.src = imageURL; if (imgElement.dataset.previousUrl) { URL.revokeObjectURL(imgElement.dataset.previousUrl); } imgElement.dataset.previousUrl = imageURL; log('/api/png'); }) .catch(err => console.log(err)); ...终于,历经漫长的旅程,我们成功了!可以在 Petalinux 上观看ZYNQ板载网络摄像头的嵌入式 Linux 演示视频。
链接
https://www.hackster.io/p4ranlee/zybo-z7-20-webcam-on-the-petalinux-c28709
总结
这个项目本质是:
👉 一个最小可用的视频系统模板
把这些打通了:
-
Linux 采集
-
DDR 数据流
-
VDMA
-
FPGA 视频输出
虽然简单,但是可参考性还是很大的~