一、实验概述
1. 实验目的
- 掌握Postfix 邮件发送服务、Dovecot邮件接收服务的安装与配置方法。
- 实现POP3+SSL/TLS加密传输,保障邮件接收过程的通信安全。
- 完成客户端与服务端的邮件收发、加密接收全流程验证,理解SSL在邮件协议中的应用。
2. 实验环境
- 操作系统:openEuler 22.03
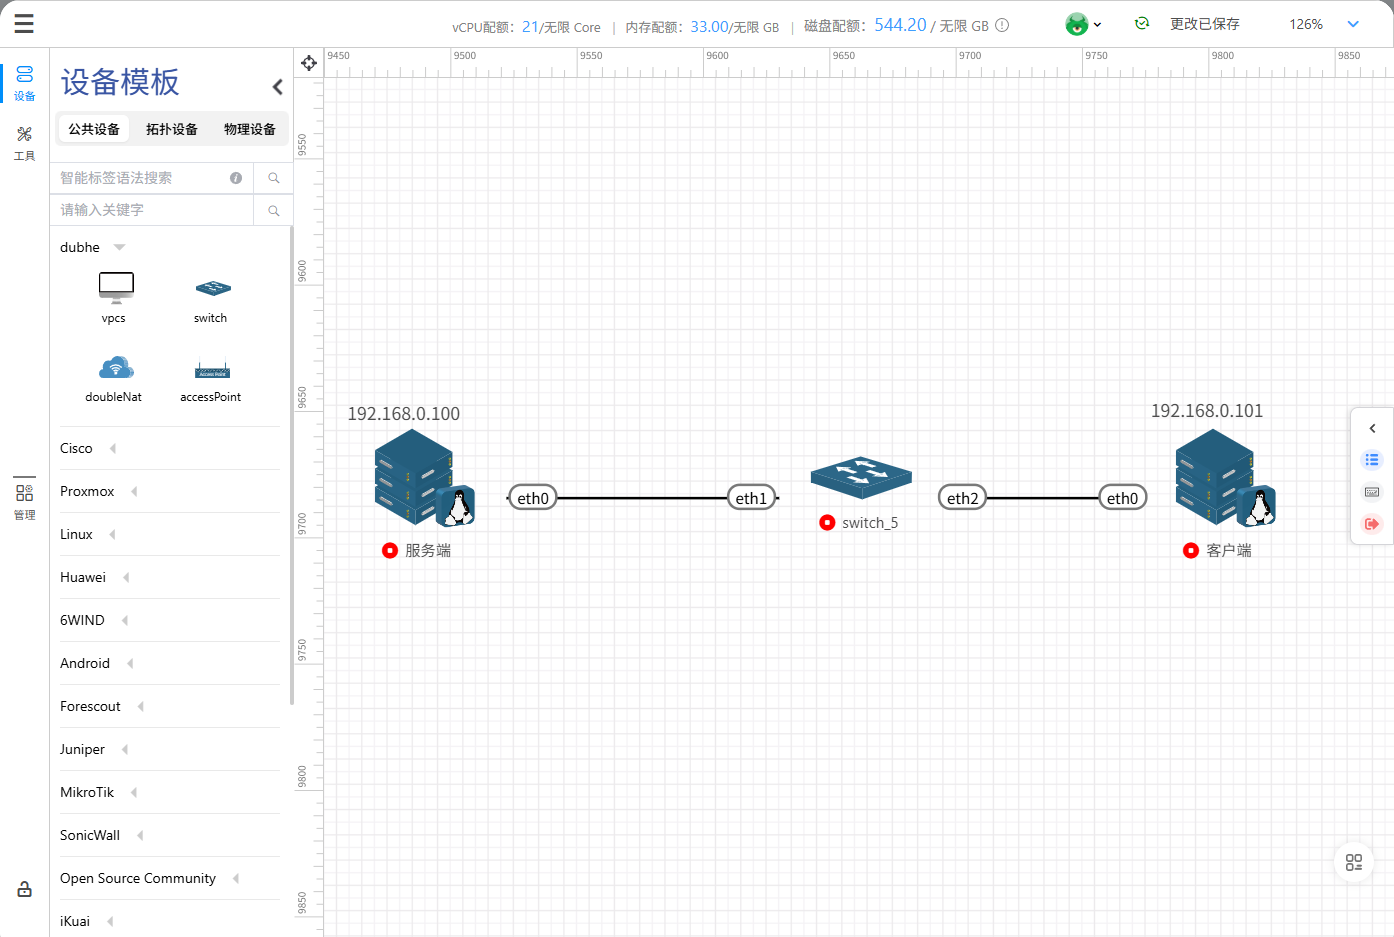
- 服务端IP:192.168.0.100,主机名:mail.b.com
- 客户端IP:192.168.0.101,主机名:mail.a.com
- 实验平台:天枢一体化虚拟仿真平台
3. 实验拓扑
二、实验前置准备(服务端+客户端通用)
为避免防火墙、SELinux拦截邮件通信,服务端与客户端均执行以下操作:
|-----------------------------------------------------------------------------------------------------------------------------------------------------|
| # 关闭防火墙 systemctl stop firewalld # 查看防火墙状态(确认inactive) systemctl status firewalld # 临时关闭SELinux setenforce 0 # 查看SELinux状态(确认Permissive) getenforce |
三、服务端配置
1. 安装邮件服务依赖包
进入软件包存放目录,执行批量安装:
|-------------------------------------------------------------------------------------------------------------------------------------------------------------------------------------------------------------------------------------------------------------------------------------------------------------------------------------------------------------------------------------------------------------------------------------------------------------------------------------------------------------------------------------------------------------------------------------------------------------------------------------------------------------------------------------------------------------------------------------------------------------------------------------------------------------------------------------------------------------------------------------------------------------------------------------------------------------------------------------------------------------------------------------------------------------------------------------------------------------------------------------------------------------------------------------------------------------------------------------------------------------------------------------------------------------------------------------------------------------------------------------------------------------------------------------------------------------------|
| root@localhost \~# cd pop/ root@localhost pop# ls clucene-core-2.3.3.4-35.oe2203sp3.x86_64.rpm libstemmer-0-12.oe2203sp3.x86_64.rpm postfix-3.3.1-21.oe2203sp3.x86_64.rpm dovecot-2.3.15-6.oe2203sp3.x86_64.rpm mariadb-connector-c-3.1.13-4.oe2203sp3.x86_64.rpm postfix-help-3.3.1-21.oe2203sp3.noarch.rpm libpq-13.21-1.oe2203sp3.x86_64.rpm pcre-8.45-5.oe2203sp3.x86_64.rpm tar-1.34-5.oe2203sp3.x86_64.rpm root@localhost pop# rpm -Uvh *.rpm 警告:clucene-core-2.3.3.4-35.oe2203sp3.x86_64.rpm: 头V4 RSA/SHA256 Signature, 密钥 ID fb37bc6f: NOKEY 警告:dovecot-2.3.15-6.oe2203sp3.x86_64.rpm: 头V4 RSA/SHA256 Signature, 密钥 ID b675600b: NOKEY Verifying... ################################# 100% 准备中... ################################# 100% 正在升级/安装... 1:mariadb-connector-c-3.1.13-4.oe22################################# 11% 2:tar-2:1.34-5.oe2203sp3 ################################# 22% 3:postfix-help-2:3.3.1-21.oe2203sp3################################# 33% 4:pcre-8.45-5.oe2203sp3 ################################# 44% 5:libstemmer-0-12.oe2203sp3 ################################# 56% 6:libpq-13.21-1.oe2203sp3 ################################# 67% 7:clucene-core-2.3.3.4-35.oe2203sp3################################# 78% 8:dovecot-1:2.3.15-6.oe2203sp3 ################################# 89% 9:postfix-2:3.3.1-21.oe2203sp3 ################################# 100% |
安装包清单:postfix、dovecot、mariadb-connector-c、pcre、clucene-core等。
2. 配置Postfix
进入配置文件目录:
|------------------|
| cd /etc/postfix/ |
编辑main.cf,核心配置项如下:
|-----------------------------------------------------------------------------------------------------------------------------------------------------------------------------------------------------------------------------------------------------------------------------------------------------------------------------------------------------------------------------------------------------------------------------------------------------------------------------------------------------------------------------------------------------------|
| # 基础配置 compatibility_level = 2 inet_interfaces = all inet_protocols = all mydestination = myhostname, localhost.mydomain, localhost mynetworks = 168.100.189.0/28, 127.0.0.0/8 home_mailbox = Maildir/ # 域名与主机名 myhostname = mail.b.com mydomain = b.com myorigin = $mydomain # TLS加密配置 smtpd_tls_cert_file = /etc/pki/tls/certs/postfix.pem smtpd_tls_key_file = /etc/pki/tls/private/postfix.key smtpd_tls_security_level = may smtp_tls_CApath = /etc/pki/tls/certs smtp_tls_CAfile = /etc/pki/tls/certs/ca-bundle.crt smtp_tls_security_level = may |
重启并验证Postfix服务:
|----------------------------------------------------|
| systemctl restart postfix systemctl status postfix |
3. 配置Dovecot
(1)生成SSL自签名证书
|------------------------------------------------------------------------------------------------------------------------------------------------------------------------------------------------------------------------------------------------------------------------------------------------------------------|
| cd /etc/dovecot/ # 创建证书存放目录 mkdir ssl cd ssl/ # 生成RSA密钥与证书(有效期365天) openssl req -new -x509 -days 365 -nodes -out /etc/dovecot/ssl/dovecot.pem -keyout /etc/dovecot/ssl/dovecot.key -subj "/C=CN/ST=Beijing/L=Beijing/O=Example Corp/OU=Mail Server/CN=mail.example.com/emailAddress=postmaster@mail.example.com" |
生成后目录下会出现dovecot.pem(证书)、dovecot.key(私钥)。
(2)核心配置修改
启用POP3协议(编辑/etc/dovecot/dovecot.conf):
|-----------------------------------------------------------------------------------------|
| dict { } !include conf.d/*.conf !include_try local.conf # 新增:启用POP3协议 protocols = pop3 |
SSL加密配置(编辑/etc/dovecot/conf.d/10-ssl.conf):
|-------------------------------------------------------------------------------------------------------------------------------------------------------------------------------------------------|
| ssl = required ssl_cert = </etc/dovecot/ssl/dovecot.pem ssl_key = </etc/dovecot/ssl/dovecot.key ssl_cipher_list = HIGH:!aNULL:!MD5 ssl_min_protocol = TLSv1.2 ssl_prefer_server_ciphers = yes |
开放POP3S加密端口(编辑/etc/dovecot/conf.d/10-master.conf):
|--------------------------------------------------------------------------------------------------------------------|
| service pop3-login { inet_listener pop3 { } # 开启995端口(POP3+SSL默认端口) inet_listener pop3s { port = 995 ssl = yes } } |
配置邮件存储路径(编辑/etc/dovecot/conf.d/10-mail.conf):
|---------------------------------------------------------------------------------------------|
| mail_location = maildir:~/Maildir namespace inbox { inbox = yes } mbox_write_locks = fcntl |
(3)启动Dovecot服务
|--------------------------------------------------|
| systemctl start dovecot systemctl status dovecot |
✅ 启动成功显示如下:
|---------------------------------------------------------------------------------------------------------------------------------------------------------------------------------------------------------------------------------------------------------------------------------------------------------------------------------------------------------------------------------------------------------------------------------------------------------------------------------------------------------------------------------------------------------------------------------------------------------------------------------------------------------------------------------------------------------------------------------------------------------------------------------------------------------------------------------------------------------------------------------------------------------------------------------------------------------------------------------------------------------------------------------------------------------------------------------------------------------------------------------------------------------------------------------------------------------------------------|
| dovecot.service - Dovecot IMAP/POP3 email server Loaded: loaded (/usr/lib/systemd/system/dovecot.service; disabled; vendor preset: disabled) Active: active (running) since Fri 2025-08-29 12:01:12 CST; 17s ago Docs: man:dovecot(1) https://doc.dovecot.org/ Process: 2599 ExecStartPre=/usr/libexec/dovecot/prestartscript (code=exited, status=0/SUCCESS) Main PID: 2607 (dovecot) Status: "v2.3.15 (0503334ab1) running" Tasks: 5 (limit: 20421) Memory: 4.1M CGroup: /system.slice/dovecot.service ├─ 2607 /usr/sbin/dovecot -F ├─ 2611 dovecot/anvil ├─ 2612 dovecot/log ├─ 2613 dovecot/config └─ 2617 dovecot/stats 8月 29 12:01:12 localhost.localdomain systemd1: Starting Dovecot IMAP/POP3 email server... 8月 29 12:01:12 localhost.localdomain dovecot2607: Warning: Corrected permissions for login directory /var/run/dovecot/token-login 8月 29 12:01:12 localhost.localdomain dovecot2607: master: Warning: Corrected permissions for login directory /var/run/dovecot/token-login 8月 29 12:01:12 localhost.localdomain dovecot2607: master: Dovecot v2.3.15 (0503334ab1) starting up for pop3 8月 29 12:01:12 localhost.localdomain systemd1: Started Dovecot IMAP/POP3 email server. |
4. 创建邮件测试用户
|-------------------------------------------------|
| # 创建用户userb useradd userb # 设置用户密码 passwd userb |
四、客户端配置
1. 安装邮件客户端工具
|-----------------------------------------------------------------------------------------------------------------------------------------------------------------------------------------------------------------------------------------------------------------------------------------------------------------------------------------------------------------------------------------------------------------------------------------------------------------------------------------------------------------------------------------------------------------------------------------------------------------------------------------------------------------------------------------------------------------------------------------------------------------------------------------------------------------------------------------------------------------|
| root@localhost \~# cd pop/ root@localhost pop# ls mariadb-connector-c-3.1.13-4.oe2203sp3.x86_64.rpm postfix-3.3.1-21.oe2203sp3.x86_64.rpm pcre-8.45-5.oe2203sp3.x86_64.rpm postfix-help-3.3.1-21.oe2203sp3.noarch.rpm root@localhost pop# rpm -Uvh *.rpm 警告:mailx-12.5-32.oe2203sp3.x86_64.rpm: 头V4 RSA/SHA256 Signature, 密钥 ID fb37bc6f: NOKEY Verifying... ################################# 100% 准备中... ################################# 100% 正在升级/安装... 1:postfix-help-2:3.3.1-21.oe2203sp3################################# 20% 2:pcre-8.45-5.oe2203sp3 ################################# 40% 3:mariadb-connector-c-3.1.13-4.oe22################################# 60% 4:postfix-2:3.3.1-21.oe2203sp3 ################################# 80% 5:mailx-12.5-32.oe2203sp3 ################################# 100% |
安装包:postfix、mailx(命令行邮件发送工具)。
2. 配置Postfix(客户端邮件发送)
进入配置目录:
|------------------|
| cd /etc/postfix/ |
编辑main.cf核心配置:
|----------------------------------------------------------------------------------------------------------------------------------------------------------------------------------------------------------------------------------------------------------------------------------------------------------------------------------------------------------|
| # 基础配置 compatibility_level = 2 inet_interfaces = all inet_protocols = all mydestination = myhostname, localhost.mydomain, localhost mynetworks = 192.168.0.0/24, 127.0.0.0/8 home_mailbox = Maildir/ # 域名与主机名 myhostname = mail.a.com mydomain = a.com myorigin = $mydomain # 转发与解析 relayhost = smtp_host_lookup = native ignore_mx_lookup_error = yes |
启动Postfix服务:
|--------------------------------------------------|
| systemctl start postfix systemctl status postfix |
3. 配置本地hosts解析
将服务端域名与IP绑定,避免DNS解析失败:
|--------------------------------------------------------------------------------------------------------------------------------------------------------------------------------------------------------------------|
| root@localhost \~# cat /etc/hosts 127.0.0.1 localhost localhost.localdomain localhost4 localhost4.localdomain4 ::1 localhost localhost.localdomain localhost6 localhost6.localdomain6 192.168.0.102 mail.b.com |
五、实验测试(收发+加密接收)
1. 客户端发送邮件到服务端
|----------------------------------------------------------------------------------------------------|
| # 发送测试邮件(主题:Test Mail,内容:Hello from A) echo "Hello from A" | mail -s "Test Mail" userb@mail.b.com |
查看Postfix日志,显示removed表示邮件已成功投递。
|------------------------------------------------------------------------------------------------------------------------------------------------------------------------------------------------------------------------------------------------------------------------------------------------------------------------------------------------------------------------------------------------------------------------------------------------------------------------------------------------------------------------------------------------------------------------------------------------------------------------------------------------------------------------------------------------------------------------------------------------------------------------------------------------------------------------------------------------------------------------------------------------------------------------------------------------------------------------------------------------------------------------------------------------------------------------------------------------------------------------------------------------------------------------------------------------------------------------------------------------------------------------------------------------------------------------------------------------------------------------------------------------------------------------------------------------------------------------------------------------------------------------------|
| root@localhost \~# systemctl status postfix postfix.service - Postfix Mail Transport Agent Loaded: loaded (/usr/lib/systemd/system/postfix.service; disabled; vendor preset: disabled) Active: active (running) since Fri 2025-08-29 14:57:59 CST; 6min ago Process: 2908 ExecStartPre=/usr/libexec/postfix/aliasesdb (code=exited, status=0/SUCCESS) Process: 2913 ExecStartPre=/usr/libexec/postfix/chroot-update (code=exited, status=0/SUCCESS) Process: 2916 ExecStart=/usr/sbin/postfix start (code=exited, status=0/SUCCESS) Main PID: 2983 (master) Tasks: 8 (limit: 20421) Memory: 10.1M CGroup: /system.slice/postfix.service ├─ 2983 /usr/libexec/postfix/master -w ├─ 2984 pickup -l -t unix -u ├─ 2985 qmgr -l -t unix -u ├─ 2989 tlsmgr -l -t unix -u ├─ 3016 cleanup -z -t unix -u ├─ 3017 trivial-rewrite -n rewrite -t unix -u ├─ 3018 smtp -t unix -u └─ 3056 smtp -t unix -u 8月 29 15:04:43 localhost.localdomain postfix/pickup2984: 114A254013E: uid=0 from=<root> 8月 29 15:04:43 localhost.localdomain postfix/cleanup3016: 114A254013E: message-id=<20250829070443.114A254013E@mail.a.com> 8月 29 15:04:43 localhost.localdomain postfix/qmgr2985: 114A254013E: from=<root@a.com>, size=418, nrcpt=1 (queue active) 8月 29 15:04:52 localhost.localdomain postfix/smtp3056: 114A254013E: to=<userb@mail.b.com>, relay=mail.b.com192.168.0.100:25, delay=0.5, delays=0.01/0/0.5/0, dsn> 8月 29 15:04:52 localhost.localdomain postfix/qmgr2985: 114A254013E: removed |
2. 服务端验证邮件接收
|---------------------------------------------------------------------------------------------------------------------------------------------------------------------------------------------------------------------------------------------------------------------------------------------------------------------------------------------------------------------------------------------------------------------------------------------------------------------------------------------------------------------------------------------------------------------------------------------------------------------------------------------------------------------------------------------------------------------------------------------------------------------------------------------------------------------------------------------------------------------------------------------------------------------|
| # 进入用户邮件目录 cd /home/userb/Maildir/new # 查看邮件文件 root@localhost new# ls 1756451092.Vfd02I10000aM610453.localhost.localdomain # 读取邮件内容 root@localhost new# cat 1756451092.Vfd02I10000aM610453.localhost.localdomain Return-Path: <root@a.com> X-Original-To: userb@mail.b.com Delivered-To: userb@mail.b.com Received: from mail.a.com (unknown 192.168.0.101) by mail.b.com (Postfix) with ESMTPS id 940DD54014D for <userb@mail.b.com>; Fri, 29 Aug 2025 15:04:52 +0800 (CST) Received: by mail.a.com (Postfix, from userid 0) id 114A254013E; Fri, 29 Aug 2025 15:04:43 +0800 (CST) Date: Fri, 29 Aug 2025 15:04:43 +0800 To: userb@mail.b.com Subject: Test Mail User-Agent: Heirloom mailx 12.5 6/20/10 MIME-Version: 1.0 Content-Type: text/plain; charset=us-ascii Content-Transfer-Encoding: 7bit Message-Id: <20250829070443.114A254013E@mail.a.com> From: root <root@a.com> Hello from A |
可看到完整邮件头、发件人、主题、正文,证明发送成功。
3. 客户端POP3+SSL加密下载邮件
通过openssl s_client建立SSL加密连接,模拟POP3客户端接收邮件:
|-------------------------------------------------------------------------------------------------------------------------------------------------------|
| (echo "USER userb"; echo 'PASS Test123'; echo "LIST"; echo "RETR 1"; echo "QUIT"; sleep 1) | openssl s_client -connect mail.b.com:995 -tls1_2 -quiet |
关键返回结果:
- +OK Dovecot ready.:服务端就绪
- +OK Logged in.:用户登录成功
- LIST:列出邮件列表
- RETR 1:读取第一封邮件(含完整加密传输内容)
- +OK Logging out.:安全退出
✅ 全程基于TLS1.2加密传输,无明文泄露,完成POP3+SSL仿真目标。
|--------------------------------------------------------------------------------------------------------------------------------------------------------------------------------------------------------------------------------------------------------------------------------------------------------------------------------------------------------------------------------------------------------------------------------------------------------------------------------------------------------------------------------------------------------------------------------------------------------------------------------------------------------------------------------------------------------------------------------------------------------------------------------------------------------------------------------------------------------------------------------------------------------------------------------------------------------------------------------------------------------------------------------------------------------------------------------------------------------------------------------------------------------------------------------------------------------------------------------------|
| mail.b.com:995 -tls1_2 -quiet depth=0 C = CN, ST = Beijing, L = Beijing, O = Example Corp, OU = Mail Server, CN = mail.example.com, emailAddress = postmaster@mail.example.com verify error:num=18:self signed certificate verify return:1 depth=0 C = CN, ST = Beijing, L = Beijing, O = Example Corp, OU = Mail Server, CN = mail.example.com, emailAddress = postmaster@mail.example.com verify return:1 +OK Dovecot ready. +OK +OK Logged in. +OK 6 messages: 1 680 2 680 3 680 4 680 5 680 6 680 . +OK 680 octets Return-Path: <root@a.com> X-Original-To: userb@mail.b.com Delivered-To: userb@mail.b.com Received: from mail.a.com (unknown 192.168.0.101) by mail.b.com (Postfix) with ESMTPS id 940DD54014D for <userb@mail.b.com>; Fri, 29 Aug 2025 15:04:52 +0800 (CST) Received: by mail.a.com (Postfix, from userid 0) id 114A254013E; Fri, 29 Aug 2025 15:04:43 +0800 (CST) Date: Fri, 29 Aug 2025 15:04:43 +0800 To: userb@mail.b.com Subject: Test Mail User-Agent: Heirloom mailx 12.5 6/20/10 MIME-Version: 1.0 Content-Type: text/plain; charset=us-ascii Content-Transfer-Encoding: 7bit Message-Id: <20250829070443.114A254013E@mail.a.com> From: root <root@a.com> Hello from A . +OK Logging out. |