嵌入式Linux开发中,可能会遇到程序崩溃问题需要定位,本篇来介绍如何使用google的breakpad工具来排查崩溃问题
1 breakpad的安装
linux编译 breakpad
sh
git clone https://github.com/google/breakpad.git
cd breakpad
./configure
make -j8
sudo make install
最新版需要C++20支持

如果不想升级ubuntu的c++版本,可以下载一个旧版本的breakpad源码,比如2021年的版本。
make之后可能还报错,提示一个三方库没有:
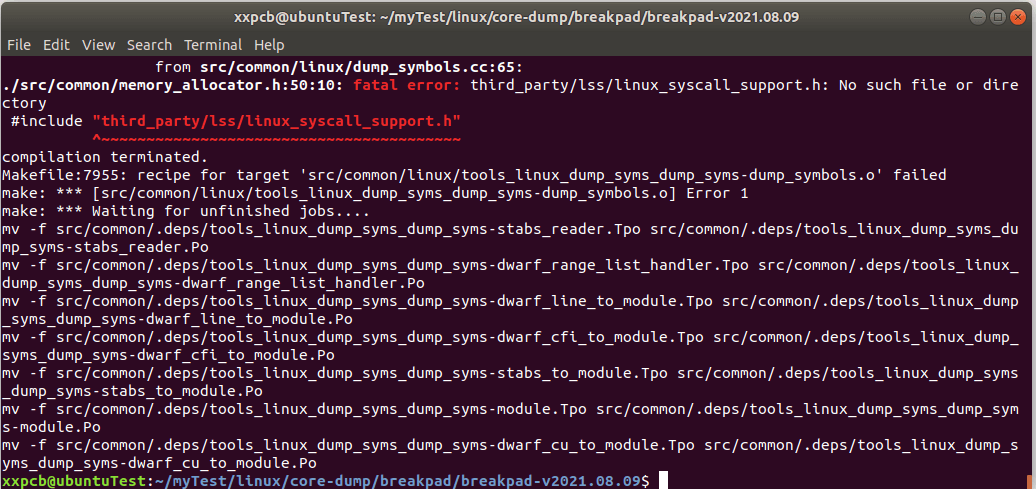
下载这个linux_syscall_support的源码,放到/src/third_part目录,可以直接在这里目录下载,然后改下文件夹的名字
sh
git clone https://github.com/cpp-pm/linux-syscall-support.git然后再make编译就不报错了:
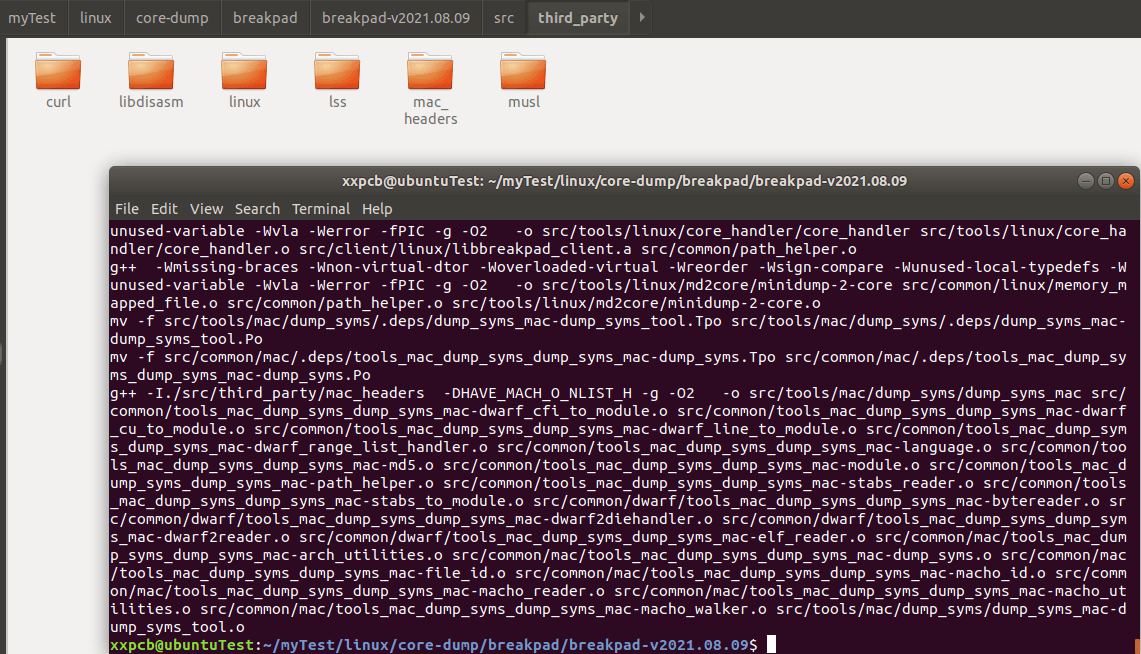
生成关键文件:
- src/client/linux/libbreakpad_client.a (链接到自己的程序)
- src/tools/linux/dump_syms/dump_syms (提取符号)
- src/processor/minidump_stackwalk(栈回溯)
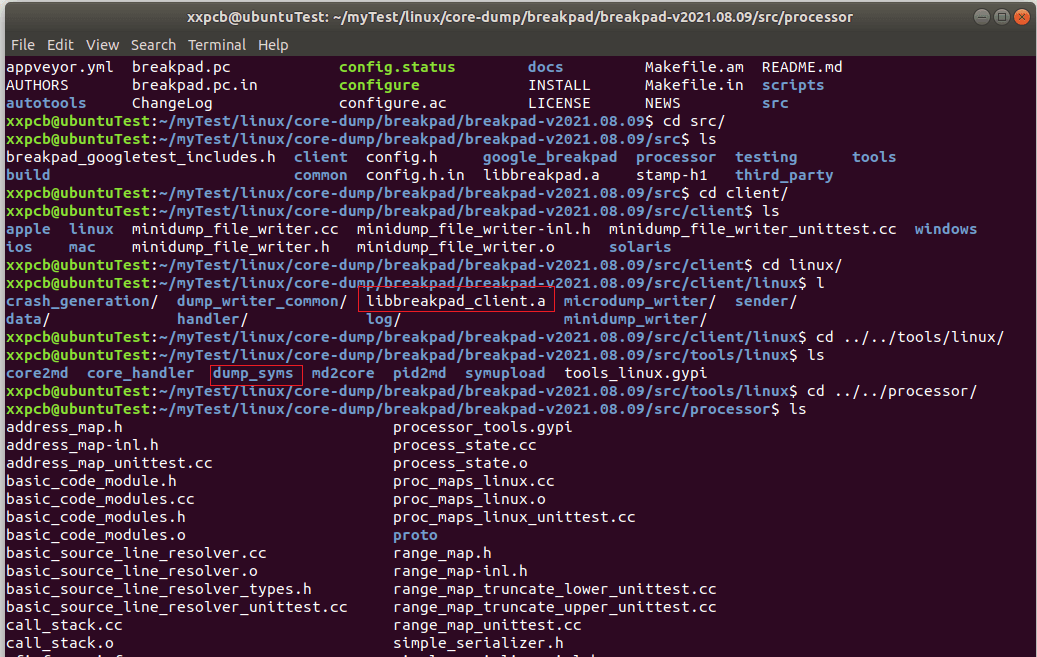
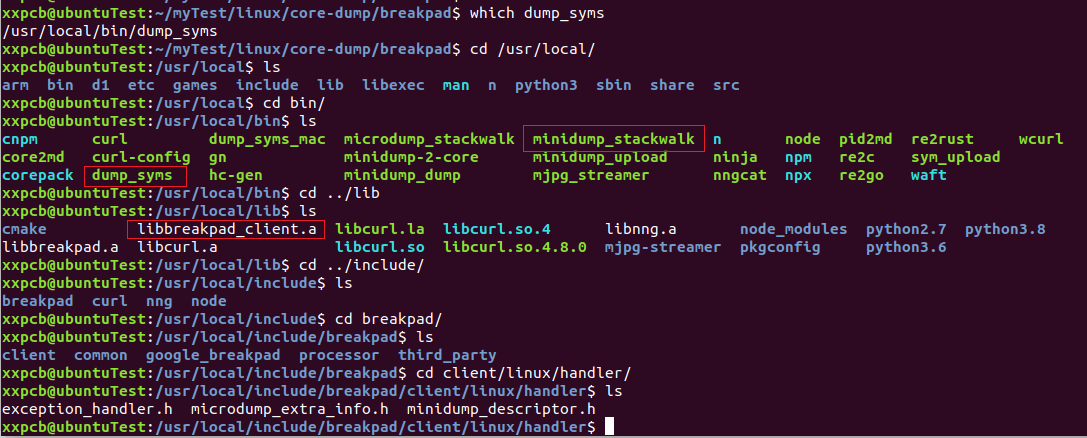
make install后,可以在用户目录找到这些文件
2 breakpad相关API介绍
2.1 MinidumpDescriptor
接口定义
c++
namespace google_breakpad {
    class MinidumpDescriptor {
        public:
        // 构造1:传入目录路径
        explicit MinidumpDescriptor(const char* directory);
        explicit MinidumpDescriptor(const std::string& directory);

        // 构造2:传入已打开的文件fd
        explicit MinidumpDescriptor(int fd);

        // 启用 microdump 极简崩溃日志
        void set_microdump(bool microdump);

        // 获取接口
        std::string path() const;
        int fd() const;
        bool IsFD() const;
        bool microdump() const;
    };
}  // namespace google_breakpad
简记:
c++
google_breakpad::MinidumpDescriptor(const char* dir);
google_breakpad::MinidumpDescriptor(const std::string& dir);
google_breakpad::MinidumpDescriptor(int fd);- path (string):minidump 文件写入的目录路径
- fd (int):直接写入到一个已打开的文件描述符(如 socket、管道、文件)
2.2 ExceptionHandler
接口定义:
c++
namespace google_breakpad {
    class ExceptionHandler {
     public:
      // 完整标准构造函数【你日常用的这个】
      ExceptionHandler(const MinidumpDescriptor& descriptor,
                       FilterCallback filter,
                       MinidumpCallback callback,
                       void* callback_context,
                       bool install_handlers,
                       int handler_types);
      // 析构
      ~ExceptionHandler();

      // 省略成员方法,只看你关心的构造
    };
}  // namespace google_breakpad
简记:
c++
google_breakpad::ExceptionHandler(
	const MinidumpDescriptor& descriptor,
    FilterCallback filter,
    MinidumpCallback callback,
    void* callback_context,
    bool install_handlers,
    int handler_types
);-
const MinidumpDescriptor& descriptor:迷你转储描述符,统一管理 dump 输出配置,也就是前面介绍的MinidumpDescriptor -
FilterCallback filter:崩溃前置过滤回调 ,拦截崩溃,判断要不要生成 minidump- 返回
true:允许生成 dump - 返回
false:忽略本次崩溃,不抓栈 - 如果该参数传nullptr,则过滤器永远放行,默认允许生成minidump
- 返回
-
MinidumpCallback callback:dump 生成完成后置回调- 崩溃、dump 写入完成后触发
- 可拿到 dump 文件路径、生成结果状态
- 用于上报、日志、自定义收尾逻辑,不需要则传
nullptr
-
void* callback_context:自定义上下文指针- 会原封不动透传给 filter、callback 两个回调,用于绑定外部类 / 全局参数
-
bool install_handlers:是否立即安装全局异常捕获处理器true:构造对象后直接接管信号、崩溃异常false:手动调用接口再安装,延迟启用崩溃捕获
-
int handler_types:需要捕获的异常类型枚举cenum HandlerType { // 不安装任何信号处理器 HANDLER_NONE = 0, // 基础崩溃信号:SIGSEGV / SIGABRT / SIGFPE / SIGILL / SIGBUS HANDLER_CRASH_EXCEPTIONS = 1 << 0, // 捕获 SIGTERM HANDLER_TERMINATE = 1 << 1, // 捕获 SIGPIPE HANDLER_PIPE = 1 << 2, // 全部信号集合 = 所有 bit 位全部启用 HANDLER_ALL = -1 };
3 示例
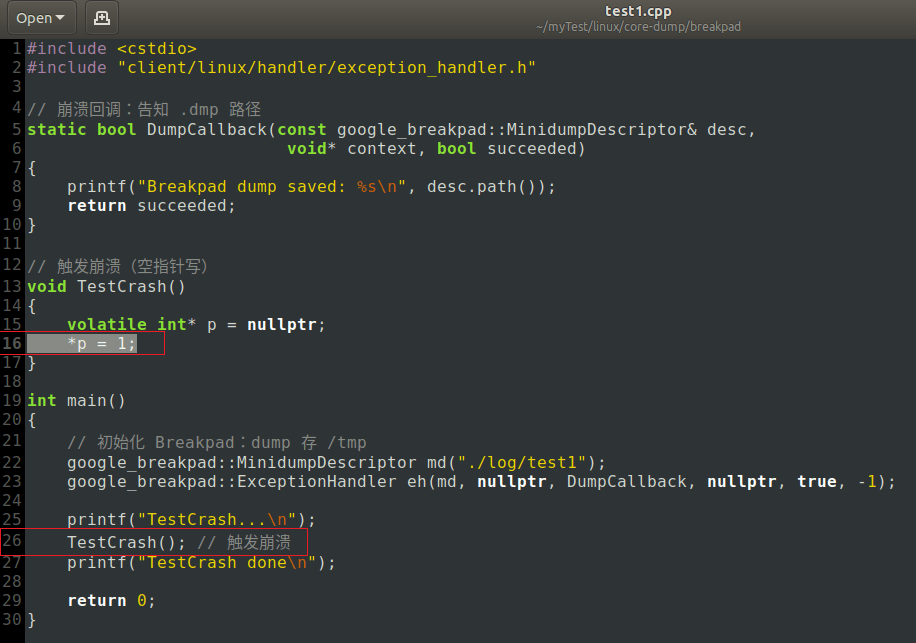
3.1 示例代码-DumpCallback演示
test1.cpp
c++
#include <cstdio>
#include "client/linux/handler/exception_handler.h"

// 崩溃回调:告知 .dmp 路径
static bool DumpCallback(const google_breakpad::MinidumpDescriptor& desc,
                          void* context, bool succeeded)
{
    printf("Breakpad dump saved: %s\n", desc.path());
    return succeeded;
}

// 触发崩溃(空指针写)
void TestCrash()
{
    volatile int* p = nullptr;
    *p = 1;
}

int main()
{
    // 初始化 Breakpad:dump 存 /tmp
    google_breakpad::MinidumpDescriptor md("./log/test1");
    google_breakpad::ExceptionHandler eh(md, nullptr, DumpCallback, nullptr, true, -1);

    printf("TestCrash...\n");
    TestCrash(); // 触发崩溃
    printf("TestCrash done\n");

    return 0;
}
3.2 编译、运行,崩溃后生成.dmp文件
sh
g++ -g test1.cpp -o test1 -I/usr/local/include/breakpad -lbreakpad_client -lpthread运行生成.dmp

3.3 解析.dmp文件
3.3.1 使用dump_syms生成符号表
sh
dump_syms test1 > log/test1/test1.sym
sh
# 查看符号文件开头的内容
head test1.sym

# 根据符号文件开头的内容,创建symbols目录及其特定名称的子目录,然后将符号文件移入
mkdir -p symbols/test1/BAED630B5595363664CC4251DE58FAFA0
mv test1.sym symbols/test1/BAED630B5595363664CC4251DE58FAFA0/
3.3.2 使用minidump_stackwalk解析.dmp文件
sh
minidump_stackwalk fd49a534-53da-4c18-6479f988-5acc949e.dmp symbols/3.3.3 解析结果分析
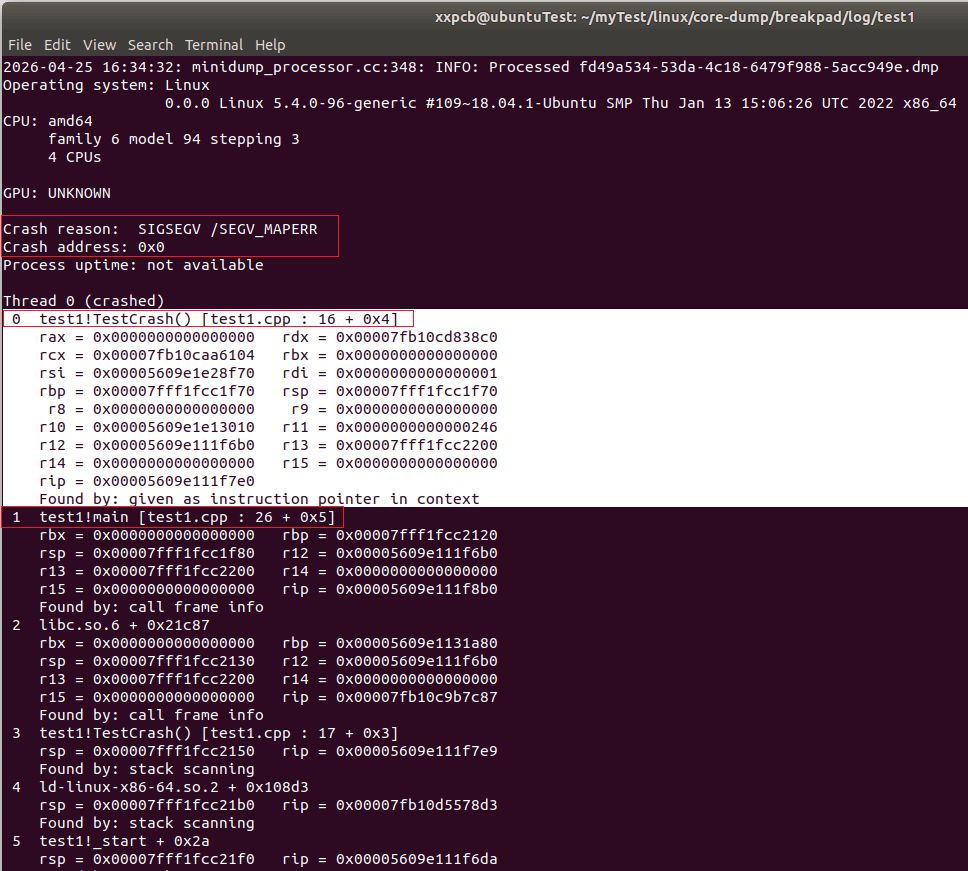
崩溃原因
sh
Crash reason:  SIGSEGV /SEGV_MAPERR
Crash address: 0x0
Process uptime: not available
解释
- SIGSEGV:段错误(最常见的崩溃)
- SEGV_MAPERR:访问了非法内存地址
- Crash address: 0x0:访问了地址 0x0 → 空指针!
崩溃栈
sh
Thread 0 (crashed)
 0  test1!TestCrash() [test1.cpp : 16 + 0x4]
    rax = 0x0000000000000000   rdx = 0x00007fb10cd838c0
    rcx = 0x00007fb10caa6104   rbx = 0x0000000000000000
    rsi = 0x00005609e1e28f70   rdi = 0x0000000000000001
    rbp = 0x00007fff1fcc1f70   rsp = 0x00007fff1fcc1f70
     r8 = 0x0000000000000000    r9 = 0x0000000000000000
    r10 = 0x00005609e1e13010   r11 = 0x0000000000000246
    r12 = 0x00005609e111f6b0   r13 = 0x00007fff1fcc2200
    r14 = 0x0000000000000000   r15 = 0x0000000000000000
    rip = 0x00005609e111f7e0
    Found by: given as instruction pointer in context
 1  test1!main [test1.cpp : 26 + 0x5]
    rbx = 0x0000000000000000   rbp = 0x00007fff1fcc2120
    rsp = 0x00007fff1fcc1f80   r12 = 0x00005609e111f6b0
    r13 = 0x00007fff1fcc2200   r14 = 0x0000000000000000
    r15 = 0x0000000000000000   rip = 0x00005609e111f8b0
    Found by: call frame info
解释:
第一行:崩溃的地方
sh
test1!TestCrash() [test1.cpp : 16]- 程序:
test1 - 函数:
TestCrash() - 文件:
test1.cpp - 行号:第 16 行
- 原因:这一行解引用了空指针
第二行:调用者
sh
test1!main [test1.cpp : 26]- main函数第 26 行调用了
TestCrash() - 然后
TestCrash()内部崩溃
对应代码再看下:
3.4 使用minidump-2-core将dmp文件转为core文件
上面通过dmp文件已经能分析到崩溃的位置了。
如果还想用gdb来分析崩溃,可以使用minidump-2-core将dmp文件转为core文件:
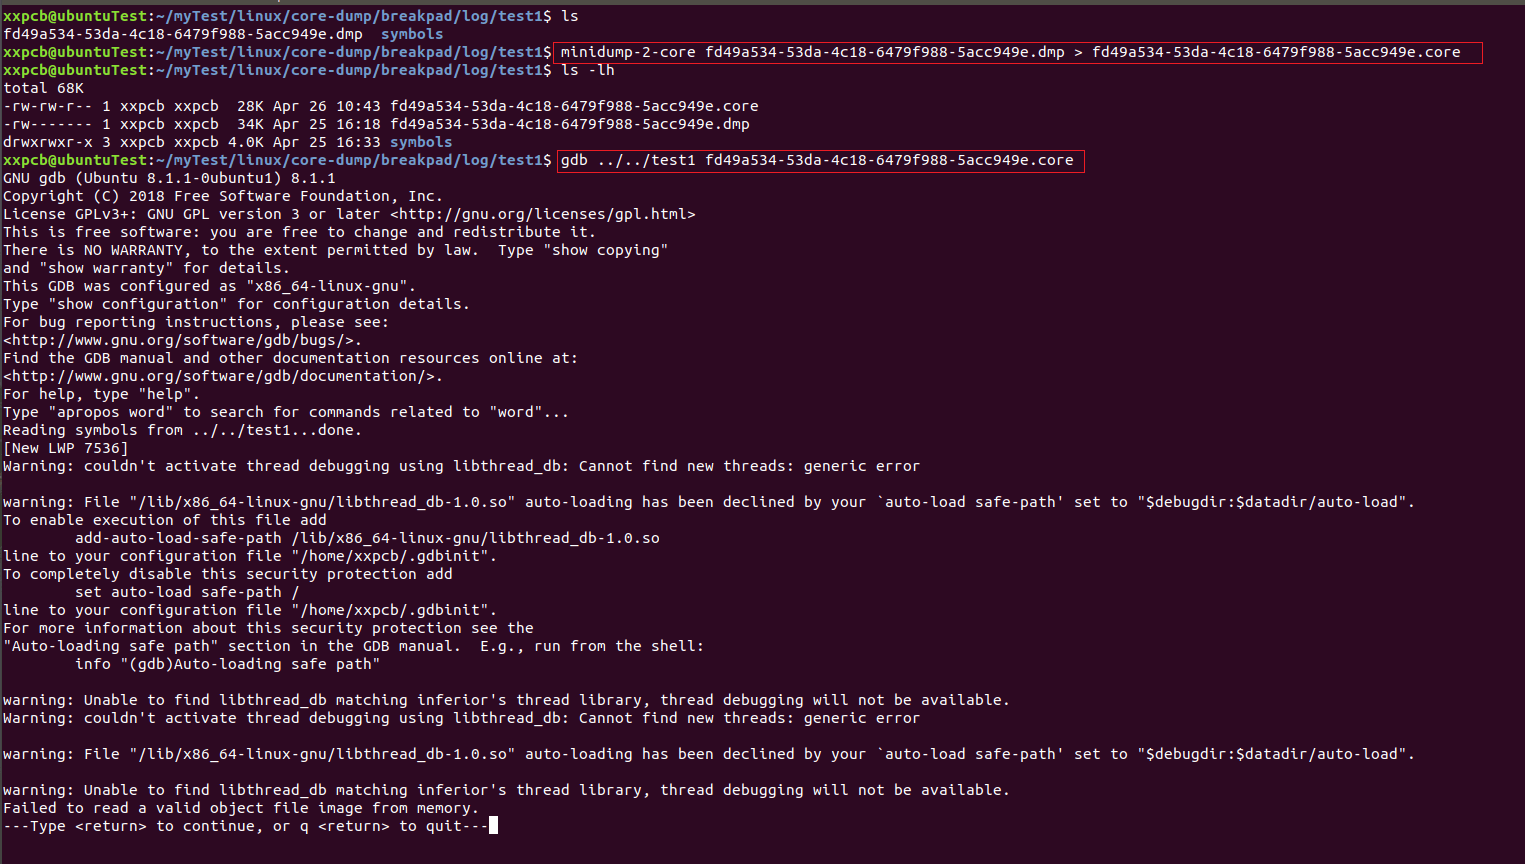
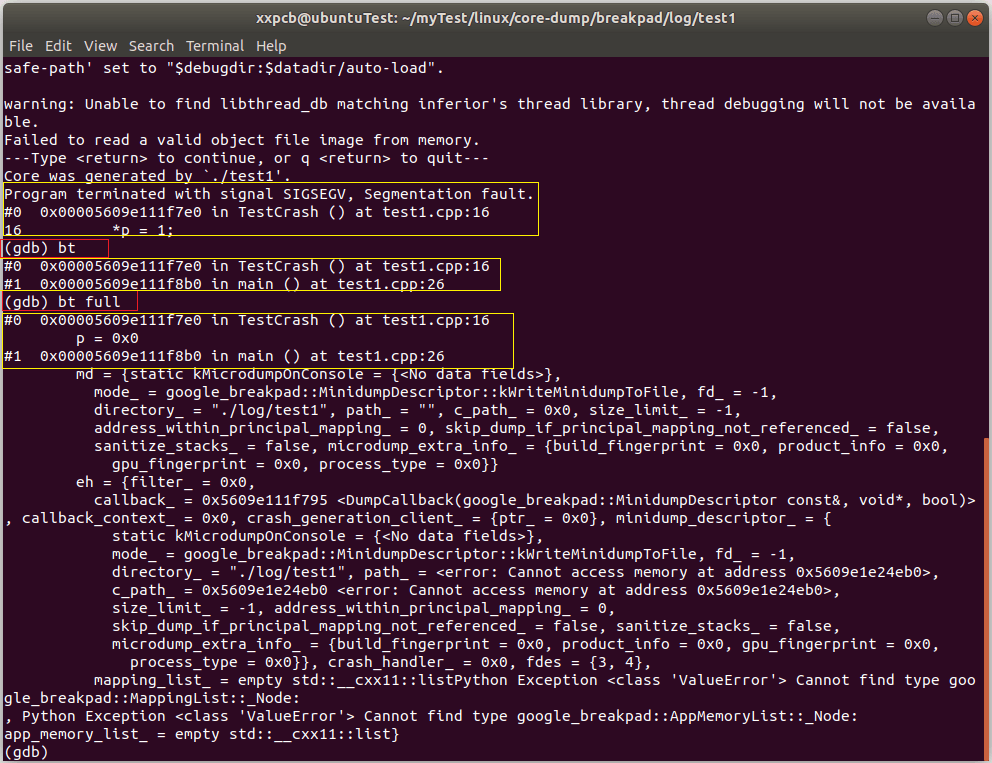
回车,开始gdb调试,输入常用的指令
- bt:查看崩溃调用栈
- bt full:完整堆栈+局部变量
如果想在代码中直接进行dmp文件转为core文件,也可以在DumpCallback中实现,例如:
c
static bool DumpCallback(const google_breakpad::MinidumpDescriptor& desc,
                          void* context, bool succeeded)
{
    printf("Breakpad dump saved: %s\n", desc.path());

    std::string corePath =  std::string(desc.path(), strlen(desc.path()) - 4) + ".core";
    std::string cmd = "minidump-2-core " + desc.path() + " > " + corePath;
    printf("do cmd: %s\n", cmd.c_str());
    system(cmd.c_str());

    return succeeded;
}
4 总结
本篇介绍了google的breakpad的使用,包括breakpad的安装、API介绍、示例代码、生成dmp文件并解析崩溃位置,转为core文件并使用gdb调试。