如果你的 Flutter 应用在 iOS 上提供任何第三方登录------Google、Facebook 或者其他------苹果的 App Review 准则 4.8 会强制你也必须提供 Sign in with Apple。跳过这一步,App Store 审核一定会拒绝。
这是没得商量的。痛苦的部分是配置流程:Apple Developer Console、Services ID、.p8 密钥、capabilities、entitlements、deep links------而且大部分内容分散在三四个不同的 Apple 和 Supabase 页面上,这些页面之间还互相不太一致。
这是我第一次做时希望拥有的指南。完整的 Flutter + Supabase Apple Sign-In 流程,每一步按顺序来,把真正会坑到你的地方标出来。
最终你会得到什么
- 在 iOS、macOS 和 Android 上都能工作的 Apple Sign-In
- 一个干净的 Flutter 辅助函数,包装原生流程并返回 Supabase 的
AuthResponse - 清楚理解什么时候需要 Services ID(什么时候不需要)
- 正确处理 "Apple 只发送一次姓名和邮箱" 这个坑
第一步 --- Apple Developer Console
打开 Apple Developer portal,进入 Certificates, Identifiers & Profiles → Identifiers。
在你的 App ID 上启用 Sign In with Apple
- 选择你现有的 App ID(匹配你 Flutter 应用 bundle identifier 的那个)。
- 往下滚动,勾选 Sign In with Apple,然后保存。
这是 原生 iOS / macOS 流程 的最低要求。如果你只针对这两个平台,可以直接跳到 Supabase 配置。
创建 Services ID(仅用于 web + Android)
如果你还需要支持 Android 或 web,就必须添加 Services ID。这是 Supabase 在没有 Apple 原生 SDK 的平台上使用的 OAuth 重定向流程。
- 在 Identifiers 中,点击 + 并选择 Services IDs。
- 设置一个 identifier ------ 惯例是在 bundle ID 后面加
.service后缀(例如com.example.app.service)。 - 启用 Sign In with Apple → Configure。
- 把你的 Supabase 域名添加到允许的域名:
<PROJECT_REF>.supabase.co。 - 添加 return URL:
https://<PROJECT_REF>.supabase.co/auth/v1/callback。
创建 Sign In with Apple 密钥
还在 Apple Developer portal 中,进入 Keys → + 并勾选 Sign In with Apple 。下载生成的 .p8 文件------这是唯一一次可以下载的机会,所以立即备份。
在第二步生成 Secret Key JWT 时,你需要三样东西:
- Key ID(创建密钥后可见)
- Team ID(Apple Developer portal 右上角)
.p8文件的内容(用文本编辑器打开)
第二步 --- Supabase Dashboard
生成 Secret Key JWT
目前的 Supabase dashboard 需要 JWT 本身------你在本地签名,然后粘贴结果。你需要 .p8 文件、Team ID、Key ID 和 Services ID。
用以下 payload 签名一个 ES256 JWT(一个小的 Node、Python 或 Ruby 脚本就行------搜 "apple sign in client_secret generator" 找一次性脚本):
json
{
  "iss": "<TEAM_ID>",
  "iat": <now>,
  "exp": <now + 15777000>,
  "aud": "https://appleid.apple.com",
  "sub": "<SERVICES_ID>"
}
设置 JWT header kid 为你的 Key ID,alg 为 ES256。把生成的 token 粘贴到 Secret Key 字段。
Apple JWT 6 个月后过期。 设置日历提醒,因为 token 过期时不会有任何警告------你的 web 和 Android 登录会默默地开始失败。原生 iOS/macOS 流程不受影响,因为它不使用 JWT。
纯 iOS 应用:跳过这一半。 原生流程直接把idToken发给 Supabase,Supabase 用 Apple 的公钥验证。你不需要 Services ID、.p8或 Secret Key------只需启用 Apple 作为 provider,并把 bundle ID 添加到 Client IDs。
或者直接用 Supabase JWT Generator 帮你生成 JWT。只是记得设置提醒每 6 个月重新生成一次。
在 Supabase 中配置 provider
在你的 Supabase 项目中,进入 Authentication → Providers → Apple 并开启 Enable Sign in with Apple。
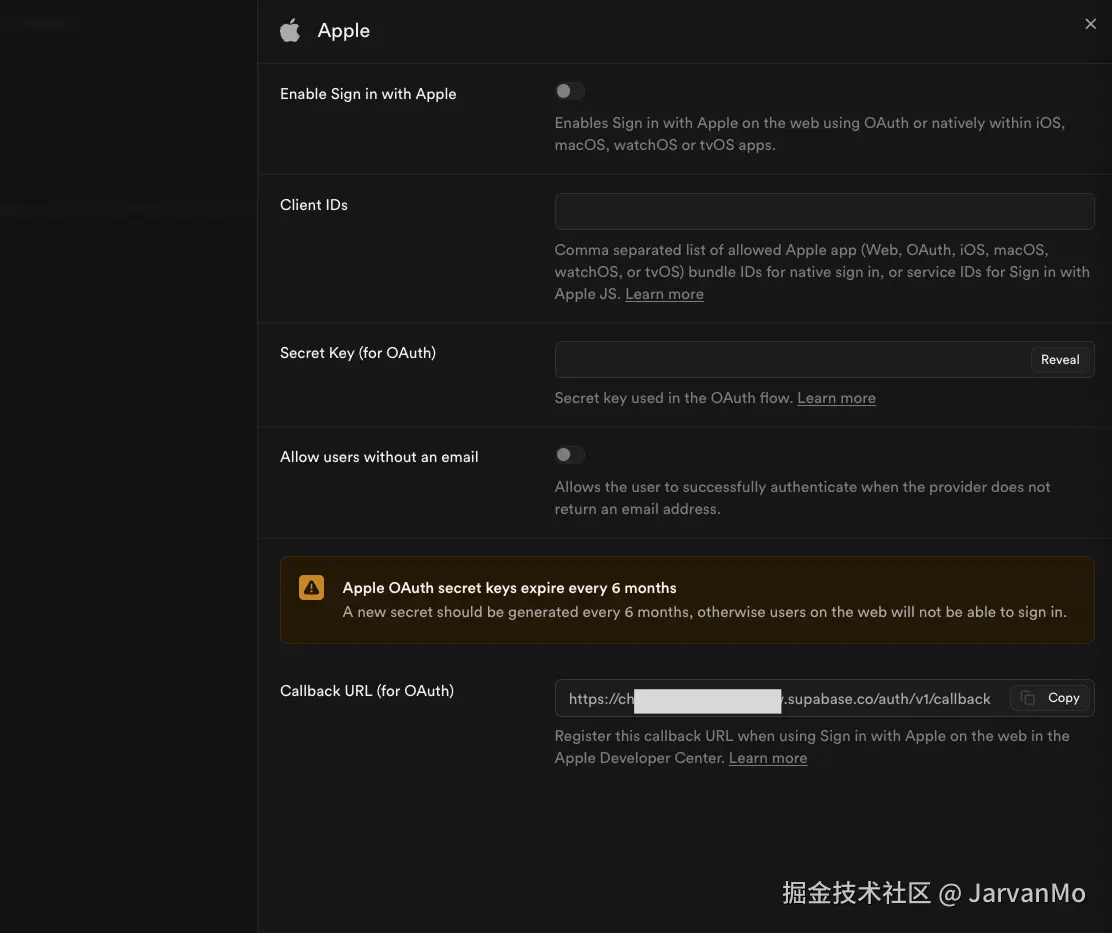
Dashboard 暴露了四个字段加一个 callback URL:
- Client IDs ------ 允许的 bundle ID(用于原生流程)和 Services ID(用于 web 流程)的逗号分隔列表。对于纯 iOS 应用,这就是你的 bundle ID(例如
com.example.app)。如果你也针对 web 或 Android,追加你的 Services ID:com.example.app, com.example.app.service。 - Secret Key (for OAuth) ------ 你上面生成的 JWT。仅用于 web/Android 重定向流程,原生 iOS/macOS 会忽略。
- Allow users without an email ------ 如果你想接受通过 Apple 邮件中继隐藏邮箱地址的用户,开启这个。否则这些用户的登录会静默失败,你会花一个下午想不明白为什么。
- Callback URL (for OAuth) ------ Supabase 自动生成,格式为
https://<PROJECT_REF>.supabase.co/auth/v1/callback。这是你在第一步 Services ID 中注册的 URL。如果你跳过了那一步,从这里复制 URL 并添加到你的 Services ID 配置中。
保存。
第三步 --- iOS 配置
在 Xcode 中,打开 Runner target → Signing & Capabilities → + Capability → Sign In with Apple。
这就是整个 iOS 设置。不需要修改 Info.plist,不需要手动编辑 entitlements------Xcode 添加 capability 时会自动处理 entitlement 文件。
第四步 --- macOS 配置
同样的路径:target Runner → Signing & Capabilities → + Capability → Sign In with Apple。
然后双击检查 entitlements 文件(macos/Runner/DebugProfile.entitlements 和 Release.entitlements)包含:
xml
<key>com.apple.developer.applesignin</key>
<array>
  <string>Default</string>
</array>
顺便确认 Outgoing Connections (Client) 已启用------你需要它来连接 Supabase。
第五步 --- Android 配置
Apple 在 Android 上没有原生 SDK,所以你要退回到 Supabase 处理的 OAuth 重定向流程:
dart
await Supabase.instance.client.auth.signInWithOAuth(
  OAuthProvider.apple,
  redirectTo: 'your-scheme://callback',
);
为了让重定向能回到你的应用,在 android/app/src/main/AndroidManifest.xml 中注册 deep link scheme:
xml
<intent-filter>
    <action android:name="android.intent.action.VIEW" />
    <category android:name="android.intent.category.DEFAULT" />
    <category android:name="android.intent.category.BROWSABLE" />
    <data android:scheme="your-scheme" android:host="callback" />
</intent-filter>
用户会得到一个基于 webview 的登录,而不是系统弹窗。不如 iOS 精致,但这是 Apple 在 Android 上给我们的唯一选择。
💡 注意:我个人不建议在 Android 上提供 Apple Sign-In,因为用户体验比原生 iOS 弹窗差太多。如果你一定要提供,确保同时提供 Google Sign-In 作为替代------Android 用户更熟悉 Google,可能根本不知道他们有 Apple ID 可以登录。
第六步 --- Flutter 依赖
三个包搞定所有工作:
yaml
dependencies:
  sign_in_with_apple: ^6.x.x
  supabase_flutter: ^2.x.x
sign_in_with_apple 在 iOS/macOS 上触发原生 Apple 弹窗。supabase_flutter 处理 token 交换。crypto 让我们能 hash nonce------接下来会讲到。
第七步 --- Flutter 代码(原生 iOS / macOS 流程)
这是我每个项目都会用的函数。它生成 nonce,触发 Apple 凭证请求,然后把得到的 idToken 转发给 Supabase:
dart
Future<AuthResponse> signInWithApple() async {
  // 1. 生成 nonce
  final rawNonce = client.auth.generateRawNonce();
  final hashedNonce = sha256.convert(utf8.encode(rawNonce)).toString();

  // 2. 触发原生 Apple 弹窗
  final credential = await SignInWithApple.getAppleIDCredential(
    scopes: [
      AppleIDAuthorizationScopes.email,
      AppleIDAuthorizationScopes.fullName,
    ],
    nonce: hashedNonce,
  );

  final idToken = credential.identityToken;
  if (idToken == null) {
    throw Exception('Apple Sign-In returned no idToken');
  }

  // 3. 用 idToken 与 Supabase 交换
  return Supabase.instance.client.auth.signInWithIdToken(
    provider: OAuthProvider.apple,
    idToken: idToken,
    nonce: rawNonce,
  );
}
这里按顺序做了三件事:
- 我们生成一个随机的
rawNonce,并把它的 SHA-256 hash 传给 Apple。 - Apple 把这个 hash 烘焙进返回的签名
idToken中。 - 我们把 原始 nonce(未 hash)发给 Supabase,Supabase 重新 hash 并确认与 Apple 签名的一致。
这个往返过程保护你免受重放攻击。
第八步 - 关联匿名账户(可选)
如果你支持匿名登录,可以把 Apple 凭证关联到现有的匿名用户,而不是创建新账户:
dart
@override
Future<void> signupFromAnonymousWithApple() async {
  final credential = await SignInWithApple.getAppleIDCredential(
    scopes: [ AppleIDAuthorizationScopes.email],
  );
  final response = await client.auth.linkIdentityWithIdToken(
    provider: OAuthProvider.apple,
    idToken: credential.identityToken!,
  );
}
用户从匿名会话触发 Apple Sign-In。2 - 我们像之前一样获取 Apple 凭证。3 - 不是调用 signInWithIdToken,而是调用 linkIdentityWithIdToken 把 Apple provider 关联到现有的匿名用户。
会坑到你的坑
Apple 只发送姓名和邮箱 仅在第一次登录时
这是每个团队在生产环境都会遇到的 bug。用户第一次授权你的应用时,AppleIDCredential 包含 givenName、familyName 和 email。之后每次用同一个 Apple ID 登录,这些字段都是 null。
解决办法:第一次收到姓名和邮箱时,立即持久化到你自己的数据库。之后从你的数据库读取,而不是从 Apple 的 payload。
dart
final user = response.user;
if (credential.givenName != null) {
  // 第一次登录------把姓名保存到 profile
  await Supabase.instance.client.from('profiles').upsert({
    'id': user!.id,
    'first_name': credential.givenName,
    'last_name': credential.familyName,
    'email': credential.email,
  });
}
Nonce 是强制的,不是可选的
有些教程跳过 nonce。别这样。没有它,Supabase 无法验证 idToken 是为你的特定请求签发的,signInWithIdToken 会拒绝。crypto 包给你的应用增加 12 KB------这是你做过的最便宜的安全交易。
Services ID 和 .p8 原生 iOS 不需要
值得重复,因为很多人会困惑:如果你的应用是纯 iOS,可以完全忽略 Services ID 和 key。原生流程把 idToken 直接发给 Supabase,Supabase 用 Apple 的公钥验证。.p8 只用于 Android 和 web 上的 OAuth 重定向流程。
authorizationCode vs idToken
AppleIDCredential 同时暴露 identityToken 和 authorizationCode。authorizationCode 用于服务端交换(当你有自己的后端需要与 Apple 通信时)。对于 Supabase,你需要 identityToken------signInWithIdToken 会处理剩下的。
总结
Apple Sign-In 的配置是移动开发中最吃力不讨好的任务之一------配置分散在三个平台上,文档碎片化,而且 Apple 主动把某些部分做得比必要的更难(说的就是你,name-and-email-only-once)。
但一旦配置正确,它就能工作。原生弹窗很快,用户信任它,而且 Apple 审核员不会再拒绝你的构建。