1、安装
npm i -g @nestjs/cli 全局安装cli
nest new pro-name 创建项目
2、指令
nest new pro-name 全局命令:创建项目
nest -h 代码指令集列表
nest g mo login --no-spec 快速创建login module 不创建测试文件 --no-spec
nest g s login 快速创建login service
nest g co login 快速创建login controller
nest g res user 快速创建user crud模板
3、控制器 Controller
@Controller 后接请求路由名称 不写即为根路由
@Post post请求 后接请求路由名称 不写即为controller默认路由
@Get / @Patch /@Delete 同理
@Get(':id') get请求 @Param形式接动态值
@Body 表示为body形式接参 @Param 表示为param形式接参 @query表示为query形式接参

4、模块 Module 使用
1、单个模块使用
引入自身Controller组件和Service业务组件

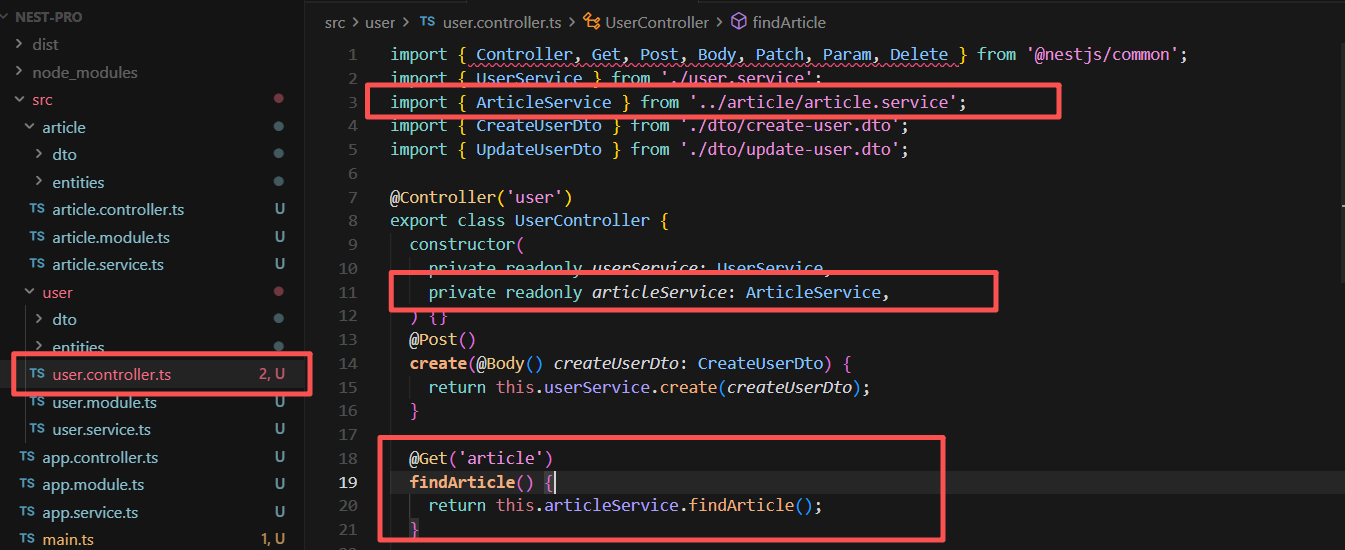
2、多模块依赖引入
在自身模块组件引入其它模块组件即可使用其它依赖模块功能
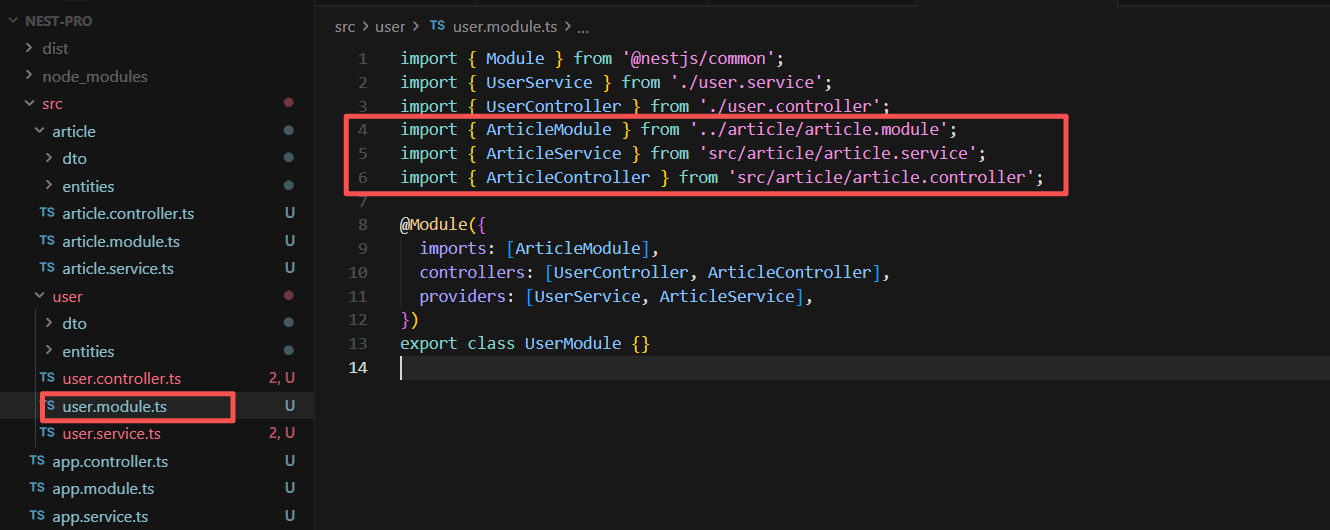
2、其它模块业务引用
5、动态模块
NestJS 社区遵循以下命名规范:
register:每次使用时配置,多次导入会创建多个实例
forRoot:全局配置一次(通常用于整个应用)
forFeature:特性配置,通常配合 forRoot() 使用
js
// config.module.ts
import { DynamicModule, Module } from '@nestjs/common';
import { ConfigService } from './config.service';

@Module({})
export class ConfigModule {
  static register(options: { folder: string }): DynamicModule {
    return {
      module: ConfigModule,
      providers: [
        {
          provide: 'CONFIG_OPTIONS',
          useValue: options,
        },
        ConfigService,
      ],
      exports: [ConfigService],
    };
  }
}

// config.service.ts
import { Inject, Injectable } from '@nestjs/common';

@Injectable()
export class ConfigService {
  constructor(@Inject('CONFIG_OPTIONS') private options: { folder: string }) {}

  getFolder(): string {
    return this.options.folder;
  }
}

// app.module.ts
@Module({
  imports: [
    ConfigModule.register({ folder: './config' })
  ],
})
export class AppModule {}
6、服务提供者
1、简化版本
js
// user.service.ts
import { Injectable } from '@nestjs/common';

@Injectable()
export class UserService {
  private users = [
    { id: 1, name: 'Alice' },
    { id: 2, name: 'Bob' },
  ];

  findAll() {
    return this.users;
  }

  findOne(id: number) {
    return this.users.find(user => user.id === id);
  }
}

// user.controller.ts
import { Controller, Get } from '@nestjs/common';
import { UserService } from './user.service';

@Controller('users')
export class UserController {
  constructor(private userService: UserService) {}

  @Get()
  getUsers() {
    return this.userService.findAll();
  }
}
2、使用 useClass
js
// app.module.ts
@Module({
  providers: [
    UserService,  // 简写形式,等同于 { provide: UserService, useClass: UserService }
  ],
})
3、使用自定义 Token
js
// 使用字符串作为 Token
@Module({
  providers: [
    {
      provide: 'USER_SERVICE',
      useClass: UserService,
    },
  ],
})
export class AppModule {}

// 在控制器中使用
@Controller('users')
export class UserController {
  constructor(@Inject('USER_SERVICE') private userService: UserService) {}
}
4、使用 useValue(常量值)
js
@Module({
  providers: [
    {
      provide: 'APP_NAME',
      useValue: 'My NestJS App',
    },
    {
      provide: 'CONFIG',
      useValue: {
        apiUrl: 'https://api.example.com',
        timeout: 5000,
      },
    },
  ],
})
7、守卫
守卫是一个使用 @Injectable() 装饰器的类,实现了 CanActivate 接口。它负责决定请求是否被处理,在请求到达路由处理器之前执行;守卫是实现授权和权限控制的核心功能
创建守卫
js
// auth.guard.ts
import { Injectable, CanActivate, ExecutionContext } from '@nestjs/common';
import { Observable } from 'rxjs';

@Injectable()
export class AuthGuard implements CanActivate {
  canActivate(
    context: ExecutionContext,
  ): boolean | Promise<boolean> | Observable<boolean> {
    const request = context.switchToHttp().getRequest();
    const token = request.headers.authorization;

    // 简单的 token 验证逻辑
    if (token === 'valid-token') {
      return true;
    }
    return false;
  }
}
使用守卫
js
// 控制器级别
@Controller('users')
@UseGuards(AuthGuard)
export class UsersController {
  @Get()
  findAll() {
    return '所有用户需要认证';
  }
}

// 方法级别
@Controller('users')
export class UsersController {
  @Get()
  @UseGuards(AuthGuard)
  findAll() {
    return '这个接口需要认证';
  }

  @Get('public')
  getPublic() {
    return '这个接口不需要认证';
  }
}
// 全局级别
// main.ts 或 app.module.ts
app.useGlobalGuards(new AuthGuard());
8、异常过滤器
异常过滤器负责捕获应用程序中抛出的异常,并将它们转换为统一的、友好的 HTTP 响应。它们可以控制响应的结构和内容
特点:
捕获全局或特定路由的异常
自定义异常响应格式
添加日志记录
统一错误处理逻辑
1、内置异常
js
import {
  BadRequestException,
  UnauthorizedException,
  ForbiddenException,
  NotFoundException,
  ConflictException,
  InternalServerErrorException,
  ServiceUnavailableException,
  HttpException,
  HttpStatus
} from '@nestjs/common';

// 使用示例
throw new BadRequestException('无效的用户数据');
throw new UnauthorizedException('请先登录');
throw new NotFoundException('用户不存在');
throw new ForbiddenException('权限不足');
throw new HttpException('自定义错误', HttpStatus.I_AM_A_TEAPOT);
2、创建自定义异常
js
// http-exception.filter.ts
import {
  ExceptionFilter,
  Catch,
  ArgumentsHost,
  HttpException
} from '@nestjs/common';
import { Request, Response } from 'express';

@Catch(HttpException)
export class HttpExceptionFilter implements ExceptionFilter {
  catch(exception: HttpException, host: ArgumentsHost) {
    const ctx = host.switchToHttp();
    const response = ctx.getResponse<Response>();
    const request = ctx.getRequest<Request>();
    const status = exception.getStatus();
    const exceptionResponse = exception.getResponse();

    response
      .status(status)
      .json({
        statusCode: status,
        timestamp: new Date().toISOString(),
        path: request.url,
        method: request.method,
        message: typeof exceptionResponse === 'string'
          ? exceptionResponse
          : exceptionResponse['message'],
        error: typeof exceptionResponse === 'string'
          ? exception.message
          : exceptionResponse['error'],
      });
  }
}
3、使用自定义异常
js
// 方法级别
@Controller('users')
export class UsersController {
  @Get(':id')
  @UseFilters(HttpExceptionFilter)
  async findOne(@Param('id') id: string) {
    const user = await this.userService.findOne(id);
    if (!user) {
      throw new NotFoundException('用户不存在');
    }
    return user;
  }
}

// 控制器级别
@Controller('users')
@UseFilters(HttpExceptionFilter)
export class UsersController {
  // 所有方法都会使用这个过滤器
}
// 全局级别
// main.ts
async function bootstrap() {
  const app = await NestFactory.create(AppModule);
  app.useGlobalFilters(new HttpExceptionFilter());
  await app.listen(3000);
}
9、管道
管道(Pipes),它是用于数据转换和验证的核心功能(执行时机:在中间件之后、守卫之前、路由处理器之前执行)
功能:
转换(Transformation):将输入数据转换为所需的格式(如字符串转数字)
验证(Validation):评估输入数据的有效性,如果无效抛出异常
1、简单自定义管道应用
js
// uppercase.pipe.ts
import { PipeTransform, Injectable, ArgumentMetadata } from '@nestjs/common';

@Injectable()
export class UpperCasePipe implements PipeTransform {
  transform(value: any, metadata: ArgumentMetadata) {
    if (typeof value === 'string') {
      return value.toUpperCase();
    }
    return value;
  }
}

// 使用
@Controller('users')
export class UsersController {
  @Post()
  create(@Body('name', UpperCasePipe) name: string) {
    // name 自动转换为大写
    return { name };
  }
}
2、内置管道及应用
js
// NestJS 提供了多个内置管道
import {
  ValidationPipe,
  ParseIntPipe,
  ParseFloatPipe,
  ParseBoolPipe,
  ParseArrayPipe,
  ParseUUIDPipe,
  ParseEnumPipe,
  DefaultValuePipe,
  ParseFilePipe,
  FileTypeValidator,
  MaxFileSizeValidator,
} from '@nestjs/common';

@Controller('users')
export class UsersController {
  // 解析整数
  @Get(':id')
  findOne(@Param('id', ParseIntPipe) id: number) {
    // id 现在是 number 类型
    return this.userService.findOne(id);
  }

  // 解析 UUID
  @Get('uuid/:uuid')
  findByUuid(@Param('uuid', ParseUUIDPipe) uuid: string) {
    return this.userService.findByUuid(uuid);
  }

  // 解析布尔值
  @Get()
  findAll(@Query('active', ParseBoolPipe) active: boolean) {
    return this.userService.findAll(active);
  }

  // 解析数组
  @Get('filter')
  filter(@Query('ids', ParseArrayPipe) ids: number[]) {
    // GET /users/filter?ids=1,2,3 → ids = [1,2,3]
    return this.userService.filter(ids);
  }

  // 枚举验证
  @Post()
  create(@Body('role', new ParseEnumPipe(RoleEnum)) role: RoleEnum) {
    return this.userService.create(role);
  }

  // 默认值
  @Get()
  getUsers(
    @Query('page', new DefaultValuePipe(1), ParseIntPipe) page: number,
    @Query('limit', new DefaultValuePipe(10), ParseIntPipe) limit: number,
  ) {
    return this.userService.getUsers(page, limit);
  }
}
3、ValidationPipe管道(数据验证)
js
// main.ts
import { ValidationPipe } from '@nestjs/common';

async function bootstrap() {
  const app = await NestFactory.create(AppModule);

  app.useGlobalPipes(new ValidationPipe({
    whitelist: true,              // 自动删除非白名单属性
    forbidNonWhitelisted: true,   // 存在非白名单属性时抛出错误
    transform: true,              // 自动转换类型
    transformOptions: {
      enableImplicitConversion: true, // 隐式类型转换
    },
    disableErrorMessages: false,   // 是否禁用详细错误消息
    skipMissingProperties: false,  // 是否跳过缺失属性
    validationError: {
      target: false,               // 是否在错误中包含目标对象
      value: false,                // 是否在错误中包含值
    },
  }));

  await app.listen(3000);
}

// DTO 定义
// create-user.dto.ts
import {
  IsString,
  IsEmail,
  IsInt,
  Min,
  Max,
  IsOptional,
  IsPhoneNumber,
  IsUrl,
  IsDate,
  IsEnum,
  IsArray,
  IsBoolean,
  MinLength,
  MaxLength,
  Matches,
  ValidateNested,
  ArrayMinSize,
  ArrayMaxSize,
  IsPositive,
  IsNegative,
  IsNotEmpty,
  IsDefined,
} from 'class-validator';
import { Type } from 'class-transformer';
import { ApiProperty } from '@nestjs/swagger';

export enum UserRole {
  ADMIN = 'admin',
  USER = 'user',
  GUEST = 'guest',
}

export class ProfileDto {
  @IsString()
  @MinLength(2)
  nickname: string;

  @IsUrl()
  avatar: string;

  @IsOptional()
  @IsString()
  bio?: string;
}

export class CreateUserDto {
  @ApiProperty({ description: '用户名', example: 'john_doe' })
  @IsString()
  @MinLength(3, { message: '用户名至少3个字符' })
  @MaxLength(20, { message: '用户名最多20个字符' })
  @Matches(/^[a-zA-Z0-9_]+$/, { message: '用户名只能包含字母、数字和下划线' })
  username: string;

  @ApiProperty({ description: '邮箱', example: 'john@example.com' })
  @IsEmail({}, { message: '请提供有效的邮箱地址' })
  email: string;

  @ApiProperty({ description: '密码', example: 'StrongP@ss123' })
  @IsString()
  @MinLength(8)
  @MaxLength(32)
  @Matches(/^(?=.*[a-z])(?=.*[A-Z])(?=.*\d)(?=.*[@$!%*?&])/, {
    message: '密码必须包含大小写字母、数字和特殊字符',
  })
  password: string;

  @ApiProperty({ description: '年龄', example: 25, required: false })
  @IsOptional()
  @IsInt()
  @Min(18)
  @Max(120)
  @IsPositive()
  age?: number;

  @ApiProperty({ description: '手机号', example: '+8613800000000' })
  @IsPhoneNumber('CN', { message: '请提供有效的中国手机号' })
  phone: string;

  @ApiProperty({ description: '角色', enum: UserRole })
  @IsEnum(UserRole)
  role: UserRole;

  @ApiProperty({ description: '兴趣', type: [String] })
  @IsArray()
  @ArrayMinSize(1)
  @ArrayMaxSize(10)
  @IsString({ each: true })
  hobbies: string[];

  @ApiProperty({ description: '是否激活' })
  @IsBoolean()
  isActive: boolean;

  @ApiProperty({ description: '生日' })
  @IsDate()
  @Type(() => Date)
  birthday: Date;

  @ApiProperty({ description: '个人资料' })
  @ValidateNested()
  @Type(() => ProfileDto)
  profile: ProfileDto;

  @ApiProperty({ description: '注册时间' })
  @IsDate()
  @Type(() => Date)
  @IsOptional()
  createdAt?: Date;
}
10、中间件
1、创建模块中间件
js
// logger.middleware.ts
import { Injectable, NestMiddleware } from '@nestjs/common';
import { Request, Response, NextFunction } from 'express';

@Injectable()
export class LoggerMiddleware implements NestMiddleware {
  use(req: Request, res: Response, next: NextFunction) {
    console.log(`[${new Date().toISOString()}] ${req.method} ${req.url}`);
    next();
  }
}
2、应用模块中间件(全路由)
js
// app.module.ts
import { Module, NestModule, MiddlewareConsumer } from '@nestjs/common';
import { LoggerMiddleware } from './logger.middleware';

@Module({
  imports: [],
  controllers: [AppController],
  providers: [],
})
export class AppModule implements NestModule {
  configure(consumer: MiddlewareConsumer) {
    consumer
      .apply(LoggerMiddleware)
      .forRoutes('*'); // 所有路由
  }
}
3、应用模块中间件(指定路由)
js
// app.module.ts
export class AppModule implements NestModule {
  configure(consumer: MiddlewareConsumer) {
    consumer
      .apply(LoggerMiddleware)
      .forRoutes(
        { path: 'users', method: RequestMethod.GET },  // 特定路径和方法
        { path: 'posts', method: RequestMethod.ALL },   // 所有方法
        'products',                                      // 字符串路径
      );
  }
}
4、应用模块中间(指定控制器)
js
// app.module.ts
import { UsersController } from './users/users.controller';

export class AppModule implements NestModule {
  configure(consumer: MiddlewareConsumer) {
    consumer
      .apply(LoggerMiddleware)
      .forRoutes(UsersController); // 整个控制器
  }
}