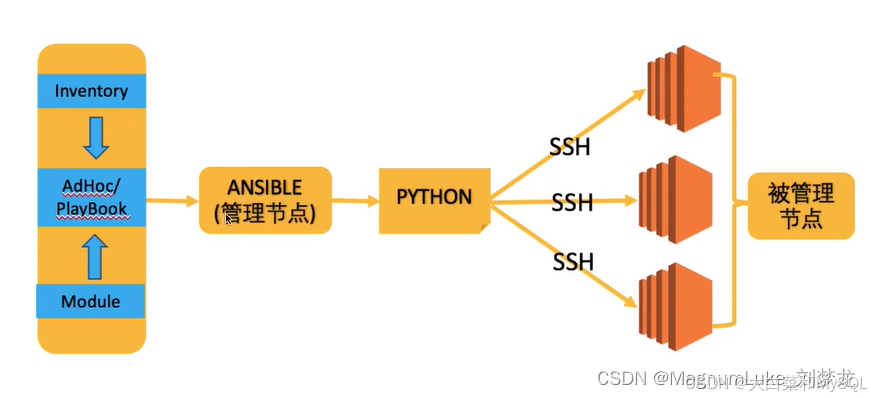
在 Ansible 管理体系中 , 存在 管理节点 和 被管理节点 两种角色
被管理节点通常被成为资产
在管理节点上 , Ansible 将 AdHoc 或 PlayBook 转换为 python脚本 , 并通过 SSH 传输到被管理节点上
在被管理节点上依次执行
安装ansible
配置域名和主机名解析 (只需ansible服务器上配置)
yum install epel-release -y
yum install ansible -y
管理节点 (ansible) 中创建密钥对
ssh-keygen
# 将本地的公钥传输到被管理节点
ssh-copy-id root@192.168.200.135
定义主机清单
# 添加host1-3主机
vim /etc/ansible/hosts
host1
host2
host3
# 将host1-3设置为webserver组
# 主机组 webservers 包含3个主机 , 调用时可以通过组名匹配主机
[webserver]
host1
host2
host3
# 有规律的主机可以使用这总方法显示 , 这代表 www001.example.com , www002.example.com , ...
www[001:006].example.com
# 子组设置
[web_servers]
192.168.1.2
192.168.1.3
192.168.1.5
[db_servers]
192.168.2.2
192.168.2.3
192.168.2.5
192.168.1.5
# 创建 all_server组 , 并将 db_servers 和 web_servers 添加为自己的子组
# 选择 all_server组时 , 则代表选中了 web_servers 和 db_servers 组下的所有主机
[all_servers]
[all_servers:children]
db_servers
web_servers测试连通性
ansible localhost -m ping  # 本机测试本机
ansible host1 -m ping      # 本机与host1主机是否通信
简洁输出模式
ansible host1 -m ping -o #在一行中输出,默认是以段落的格式输出。例:
ansible all -i 192.168.19.135,192.168.19.136 -m copy -a "src=/tmp/a.conf dest=/tmp/a.conf"all : 在 Ansible 中 , 叫做 pattern , 即匹配 , 用来在 -i 参数的资产中匹配一部分 , all 代表匹配所有
-i : 指定Ansible的资产 , 即被管理主机 (也可以是文件名),可以指定其他主机清单文件,通常也被叫做资产文件。
如 : ansible all -i inventory //伪命令 , 不可执行
-m : 指定要运行的模板 , 比如这里的 ping模块 和 copy模块
-a : 指定模块的参数 , 这里ping模块没有指定参数 , copy模块指定了 src 和 dest 参数
查看操作手册 查看所有模块
ansible-doc -l查看模块使用
ansible-doc -s yum
ansible-doc -s copy
注意: 没有配置免密的主机的会失败
没有免密的主机需要使用 -k参数
ansible host2 -m ping -u root -k
# 按照提示输入密码
也可以,在配置文件中指定密码
vim /etc/ansible/hosts
# 主机组配置
[webserver]
# 指定用户名和密码
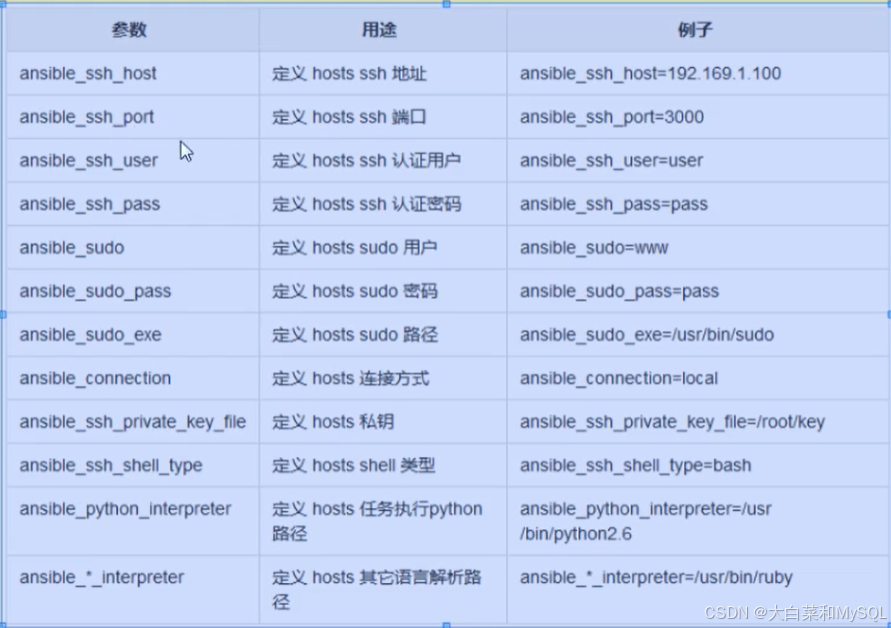
host1 ansible_ssh_user='root' ansible_ssh_pass='123456'
host2
host3
# 批量指定用户名和密码
[webserver]
# 指定用户名和密码 host1 host2 host3 host4 都设置
host[1:4] ansible_ssh_user='root' ansible_ssh_pass='123456'
# 指定ssh端口
host5 ansible_ssh_user='root' ansible_ssh_pass='123456' ansible_ssh_port='23'
# 指定所有的用户名和密码
[webserver:vars]
ansible_ssh_user='root'
ansible_ssh_pass='123456'常用变量
Ad-Hoc 点对点模式
临时的,在ansible中是指需要快速执行的单条命令,并且不需要保存的命令。对于复杂的命令则为playbook。
-
shell模块
-
复制模块
-
用户模块
-
软件包管理
-
服务模块
-
文件模块
-
收集模块
script 模块
将管理节点上的脚本传到被管理节点(远程服务器)上进行执行 , 理论上此模块的执行完全不需要被管理服务器上有Python
[root@localhost ansible]# echo "touch /tmp/testfile" > /root/a.sh
[root@localhost ansible]# ansible webserver -i hosts -m script -a "/root/a.sh"
192.168.200.134 | CHANGED => {
    "changed": true,
    "rc": 0,
    "stderr": "Shared connection to 192.168.200.134 closed.\r\n",
    "stderr_lines": [
        "Shared connection to 192.168.200.134 closed."
    ],
    "stdout": "",
    "stdout_lines": []
}
shell模块
[root@localhost ansible]# ansible webserver -m shell -a "ls -l /tmp"
192.168.200.134 | CHANGED | rc=0 >>
-rw-r--r--  1 root root      0 Dec 18 21:23 testfile
copy 模块
copy 模块主要用于管理节点和被管理节点之间的文件拷贝 , 经常用到如下参数 :
-
src 指定拷贝文件的源地址
-
dest 指定考本文件的目标地址
-
backup 拷贝文件前 , 若目标的原始文件发生变化 , 则对目标文件进行备份
-
woner 指定新拷贝文件的所有者
-
group 指定新拷贝文件的所有组
-
mode 指定新拷贝文件的权限
ansible-doc copy
- name: Copy file with owner and permissions
ansible.builtin.copy:
src: /srv/myfiles/foo.conf
dest: /etc/foo.conf
owner: foo
group: foo
mode: '0644'复制本机/etc/hosts文件到被管理机的opt文件下
ansible webserver -m copy -a "src=/etc/hosts dest=/opt"复制本机/etc/hosts文件到被管理机的opt文件下 并根据情况备份文件(文件名+日期)
echo "hello" >> /root/hosts # 如果文件没有改变再次拷备时,ansible不会拷备,ansible拷备文件时会校验文件是否改变
ansible webserver -m copy -a "src=/etc/hosts dest=/opt/hosts backup=yes"
[root@zyj87 opt]# ls
hosts hosts.3317.2024-10-06@09:14:51~复制本机/etc/hosts文件到被管理机的opt文件下 同时修改文件的用户及用户组)
[root@localhost ansible]# ansible all -i hosts -m copy -a "src=/etc/hosts dest=/opt owner=nobody group=nobody"
[root@localhost ansible]# ansible all -i hosts -m shell -a "ls -l /opt"
192.168.200.133 | CHANGED | rc=0 >>
total 4
-rw-r--r-- 1 nobody nobody 158 Dec 18 23:53 hosts
drwxr-xr-x. 2 root root 6 Oct 30 2018 rh
192.168.200.134 | CHANGED | rc=0 >>
total 8
-rw-r--r-- 1 nobody nobody 158 Dec 18 23:53 hosts
-rw-r--r-- 1 root root 158 Dec 18 21:39 hosts.4037.2023-12-18@21:46:21~
drwxr-xr-x. 2 root root 6 Oct 30 2018 rh复制本机/etc/hosts文件到被管理机的opt文件下 同时对文件的权限进行设置
[root@localhost ansible]# ansible webservers -i hosts -m copy -a "src=/etc/hosts dest=/opt/hosts mode=0755"
[root@localhost ansible]# ansible webservers -i hosts -m shell -a "ls -l /opt"
192.168.200.134 | CHANGED | rc=0 >>
total 8
-rwxr-xr-x 1 nobody nobody 158 Dec 18 23:53 hosts
-rw-r--r-- 1 root root 158 Dec 18 21:39 hosts.4037.2023-12-18@21:46:21~
drwxr-xr-x. 2 root root 6 Oct 30 2018 rh
yum_repsitory 模块
Ansible 添加 YUM 仓库 , 常用参数如下 :
-
name 仓库名称 , 就是仓库文件中第一行中括号中名称 , 必须的参数
-
description 仓库描述信息 , 添加时必须的参数
-
baseurl yum 存储库 "repodata"目录所在目录的 RUL , 添加时必须的参数 , (它可以是多个URL的列表)
-
file 仓库文件保存到本地的文件名 , (不包含.repo) , 默认是 name 的值
-
state preset 确认添加仓库文件 , absent 确认删除仓库文件
-
gpgcheck 是否检查 GPG yes|no , 没有默认值 , 使用 /etc/yum.conf 中的配置
注意 : repo 必须是通过 Ansible 创建的才能进行管理
给 dbservers 添加 epel 源
[root@localhost ansible]# ansible dbservers -i hosts -m yum_repository -a "name=epel baseurl='http://download.fedoraproject.org/pub/epel/7/$basearch' description='EPEL YUM repo'"
[root@localhost ansible]# ansible dbservers -i hosts -m shell -a "cat /etc/yum.repos.d/epel.repo"
192.168.200.133 | CHANGED | rc=0 >>
[epel]
baseurl = http://download.fedoraproject.org/pub/epel/7/
name = EPEL YUM repo给 dbservers 删除 epel 源
[root@localhost ansible]# ansible dbservers -i hosts -m yum_repository -a "name=epel state=absent"
[root@localhost ansible]# ansible dbservers -i hosts -m shell -a "cat /etc/yum.repos.d/epel.repo"
192.168.200.133 | FAILED | rc=1 >>
cat: /etc/yum.repos.d/epel.repo: No such file or directorynon-zero return codeyum 模块
等同于 Linux 上的 yum 命令 , 对远程服务器上 RPM 包进行管理 , 常用参数如下
-
name 要安装的软件包名 , 多个软件包以 ( , ) 隔开
-
state 对当前指定的软件安装 , 移除操作 (present installed latest absent removed)
-
present 确认已经安装 , 但不升级
-
installed 确认已经安装
-
latest 确保安装 , 且升级为最新
-
absent 和 removed 确认已删除
-
安装一个软件包
[root@localhost ansible]# ansible webservers -i hosts -m yum -a "name=nginx state=present"
[root@localhost ansible]# ansible webservers -i hosts -m yum -a "name=nginx state=installed"
[root@localhost ansible]# ansible webservers -i hosts -m yum -a "name=nginx state=latest"
# 检查是否安装
[root@manager ~]# ansible webservers -i /etc/ansible/hosts -m shell -a "nginx -version"
192.168.200.134 | CHANGED | rc=0 >>
nginx version: nginx/1.20.1移除一个软件包
[root@manager ~]# ansible webservers -i /etc/ansible/hosts -m yum -a "name=nginx state=absent"
[root@manager ~]# ansible webservers -i /etc/ansible/hosts -m yum -a "name=nginx state=removed"
[root@manager ~]# ansible webservers -i /etc/ansible/hosts -m shell -a "nginx -version"
192.168.200.134 | FAILED | rc=127 >>
/bin/sh: nginx: command not foundnon-zero return codesystemd模块
管理远程节点上的 systemd 服务 , 就是由 systemd 所管理的服务 , 常用参数如下
-
daemon_reload 重新载入 systemd , 扫描新的或有变动的单元 , 值为yes
-
enabled 是否开机自启动 yes | no
-
name 必选项 , 服务名称 , 比如 httpd , vsftpd 等
-
state 对当前服务执行启动 , 停止 , 重新加载等操作 (started , stopped , restarted , reloaded)
重新加载 systemd
[root@zyj86 ~]# ansible webserver -i /etc/ansible/hosts -m systemd -a "daemon_reload=yes"启动 nginx
[root@localhost ~]# ansible webserver -i /etc/ansible/hosts -m systemd -a "name=nginx state=started"关闭 nginx
[root@localhost ~]# ansible webserver -i /etc/ansible/hosts -m systemd -a "name=nginx state=stopped"启动并设置开机自启动
ansible webserver -i /etc/ansible/hosts -m systemd -a "name=nginx state=started enabled=yes"group模块
对被管理节点的组进行管理 , 常用参数如下
-
name 组名称 , 必须的
-
system 是否为系统组 , yes | no
创建普通组 db_admin
[root@localhost ~]# ansible all -i /etc/ansible/hosts -m group -a "name=db_admin"user用户模块
用于对被管理节点上的用户进行管理 , 常用参数如下 :
-
name 必须的参数 , 指定用户名
-
password 设置用户的密码 , 这里接受的是一个加密的值 , 因为会直接存到 shadow , 默认不设置密码
-
update_password 加入设置的密码不同于原密码 , 则会更新密码 , 在1.3版本中被加入
-
home 指定用户的家目录
-
shell 设置用户的shell
-
comment 用户的描述信息
-
create_home 在创建用户时 , 是否创建其家目录 , 默认创建 , 加入不创建 , 设置为 no , 在2.5版本之前使用 createhome参数
-
group 设置用户的主组
-
groups 将用户加入到多个其他组中 , 多个用逗号隔开 ,
默认会把用户从其他已经加入的组中删除 -
append 值为 yes | no , 和 groups 配合使用 , 值为yes时 , 不会把用户从其他已经加入的组中删除
-
system 值为 yes 时 , 会创建一个系统账户
-
expires 设置用户的过期时间 , 值为时间戳 , 会转为天数后 , 放在 shadow 的第8个字段里
-
generate_ssh_key 设置为yes时 , 会为用户生成密钥 , 这不会覆盖原来的密钥
-
ssh_key_type 指定用户的密钥类型 , 默认rsa , 具体的类型取决于被管理节点
-
state 删除或添加用户 , yes 为添加 , absent 为删除 , 默认值为 yes
-
remove 当与 state=absent 一起使用时 , 删除一个用户及关联的目录 , 比如家目录 , 邮箱目录 , 可选的值为 yes/no
ansible-doc user创建用户
ansible webserver -m user -a 'name=qianfeng state=present'创建账号,设置密码
先生成加密密码
[root@localhost ~]# pass=$(echo "LML123456" | openssl passwd -1 -stdin)
[root@localhost ~]# echo $pass
$1$/OmPv1Mb$Zzh1VtMFjYBjA/MiZOrX4.[root@localhost ~]# ansible all -i /etc/ansible/hosts -m user -a "name=foo password=${pass}"创建账号,设置密码,改密钥类型
[root@localhost ~]# ansible all -i /etc/ansible/hosts -m user -a "name=Dragon password=${pass} ssh_key_type=ecdsa"创建账号,设置密码,有效期,加组
[root@localhost ~]# ansible all -i /etc/ansible/hosts -m user -a "name=Cai password=${pass} group=db_admin append=yes"指定不可登录的shell
ansible zyj87 -m user -a 'name=aaa shell=/sbin/nologin'创建用户不创建家目录
ansible zyj87 -m user -a 'name=bbb shell=/sbin/nologin create_home=false'删除用户(不会删除家目录)
ansible zyj87 -m user -a 'name=aaa state=absent'删除用户(删除家目录)
ansible zyj87 -m user -a 'name=aaa state=absent remove=yes'清空变量
pass=$()file 模块
file模块主要用于远程主机上的文件操作 , 常用参数
-
group 定义文件/目录的属组
-
mode 定义文件/目录的而权限
-
owner 定义文件/目录属组
-
path 必选项 , 操作文件/目录 的路径
-
recurse 递归的设置文件的属性 , 只对目录有效
-
src 要被链接(软/硬)的源文件的路径 , 值用于 state=link 的情况
-
dest 被链接到的路径 , 只应用于 state=link 的情况
-
state 对文件执行什么操作 ?
-
directory 如果目录不存在则创建目录
-
file 文件不存在则不不会被创建 , 存在则返回文件的信息 , 常用于检查文件是否存在
-
link 创建软连接
-
hard 创建硬链接
-
touch 如果文件不存在 , 则会创建一个新的文件 , 如果文件或目录存在 , 则更新其最后修改时间
-
absent 删除目录 , 文件或者取消链接
-
文件操作
# 创建一个文件
[root@localhost ~]# ansible all -i /etc/ansible/hosts -m file -a "path=/tmp/foo.conf state=touch"
# 创建一个目录
[root@localhost ~]# ansible all -i /etc/ansible/hosts -m file -a "path=/tmp/foo.conf state=directory"
# 改变文件所有者及权限
[root@localhost ~]# ansible all -i /etc/ansible/hosts -m file -a "path=/tmp/foo.conf owner=nobody group=nobody mode=0644"
# 创建一个软连接
[root@localhost ~]# ansible all -i /etc/ansible/hosts -m file -a "src=/tmp/foo.conf dest=/tmp/link.conf state=link"
# 创建一个目录
[root@localhost ~]# ansible all -i /etc/ansible/hosts -m file -a "path=/tmp/test_dir state=directory"
# 取消一个链接
[root@localhost ~]# ansible all -i /etc/ansible/hosts -m file -a "path=/tmp/link.conf state=absent"
# 删除一个文件
[root@localhost ~]# ansible all -i /etc/ansible/hosts -m file -a "path=/tmp/foo.conf state=absent"
# 修改文件夹的所属用户
ansible zyj87 -m file -a "path=/root/a owner=nobody group=nobody mode=0755 state=directory"
# 修改文件夹的所属用户 递归修改所有
ansible zyj87 -m file -a "path=/root/a owner=nobody group=nobody mode=0755 state=directory recurse=true"cron模块
管理远程节点的 CRON 服务 , 等同于 Linux 中的计划任务 , 常用参数如下
注意 : 使用 Ansible 创建的计划任务 , 是不能使用本地 crontab -e 去编辑 , 否则 Ansible 无法再次操作此计划任务
-
name 指定一个 cron job 的名字 , 一定要指定 , 便于日后删除
-
minute 指定分钟 , 可以设置成(0-59 , * , /2 等)格式 , 默认是 * , 也就是每分钟
-
hour 指定小时 , 可以设置达成(0-23 , * , */2等)格式 , 默认是 * , 也就是每小时
-
day 指定天 , 可以设置成(1-31 , * , */2 等)格式 , 默认是 * , 也就是每天
-
month 指定月份 , 可以设置成(1-12 , * , */2 等)格式 , 默认是 * , 也就是每周
-
weekday 指定星期 , 可以设置成(0-6 for Sunday-Saturday , * 等)格式 , 默认是* , 也就是每天
-
job 要执行的内容 , 通常可以写个脚本 , 或者一段内容
-
state 指定这个 job 的状态 , 可以是新增(present) , 或者是删除(absent) , 默认为(present)
创建一个 cron job 任务
[root@manager ~]# ansible all -i /etc/ansible/hosts -m cron -a "name=newJob minute='0' job='ls -alh > /dev/null'"验证
[root@host1 ~]# crontab -l
#Ansible: newJob
0 * * * * ls -alh > /dev/null
删除一个 cron job 任务
[root@manager ~]# ansible all -i /etc/ansible/hosts -m cron -a "name=newJob state=absent"lineinfile 模块
在被管理节点上 , 使用正则匹配的方式对目标文件的一行内容修改删除等操作
如果是一个文件中把所有匹配到的多行进行统一处理 , 参考 replace模块
如果相对一个文件进行一次性 添加/更新/删除等多行内容操作 , 参考 blockinfile模块
常用参数如下
-
path 目标文件路径 , 必须的
-
state 可选值 present替换(默认 | absent删除
-
regexp 在文件的每一行中查找的正则表达式 , 对于 state=present , 找到的最后一行将被替代
-
line 要在文件中插入/替换的行 , 需要 state=present
-
create 文件不存在时 , 是否要创建文件并添加内容 , yes/no
删除被控节点文件里的某一条内容
[root@manager ~]# ansible all -i /etc/ansible/hosts -m lineinfile -a "path=/etc/sudoers regexp='^%wheel' state=absent"关闭远程主机的selinux
[root@manager ~]# ansible all -i /etc/ansible/hosts -m lineinfile -a "path=/etc/selinux/config regexp='^SELINUX=' line='SELINUX=disabled' state=present"收集模块
ansible zyj87 -m setup
zyj87 | SUCCESS => {
    "ansible_facts": {
        "ansible_all_ipv4_addresses": [
            "192.168.3.87"
        ],
        "ansible_all_ipv6_addresses": [
            "fe80::20c:29ff:fe25:7029"
......
过滤信息 ansible_all_ipv4_addresses
[root@zyj86 ~]# ansible zyj87 -m setup -a 'filter=ansible_all_ipv4_addresses'
zyj87 | SUCCESS => {
    "ansible_facts": {
        "ansible_all_ipv4_addresses": [
            "192.168.3.87"
        ],
        "discovered_interpreter_python": "/usr/libexec/platform-python"
    },
    "changed": false
}
shell模块
ansible zyj87 -m shell -a 'hostname' -o
ansible zyj87 -m shell -a 'yum -y install httpd' -o
ansible zyj87 -m shell -a 'uptime' -o
ansible zyj87 -m shell -a 'useradd xuelei' -o
ansible zyj87 -m shell -a 'touch  /tmp/777.txt' -o
ansible zyj87 -m shell -a "yum remove nginx -y"
yaml语言语法
1、列表
animals:
  - Cat
  - Dog
  - Goldfish
2、字典
city:
  haidian: beijinghaidian
  jinan: shandongjinan
  hefei: anhuihefei
检查语法
ansible-playbook apache.yaml --syntax-check
ansible-playbook apache.yaml --list-tasks
ansible-playbook apache.yaml --list-hosts
使用playbook剧本
ansible-playbook apache.yamlvim apache.yaml
- hosts: zyj87
tasks:
- name: connection test
ping:
- name: disable firewalld
service: name=firewalld state=stopped enabled=false
- name: install apache packages
yum: name=httpd state=present
- name: copy apache.conf to remote server
copy: src=./httpd.conf dest=/etc/httpd/conf/httpd.conf
notify: restart apache service
- name: start apache service
systemd: name=httpd state=started enabled=yes
handlers:
- name: restart apache service
systemd: name=httpd state=restartedRole-角色扮演
roles是在ansible中,palybooks的目录组织结构。
将代码或文件进行模块化,成为roles的文件目录组织结构,易读,代码可重用,层次清晰。
准备目录结构
mkdir roles/nginx/{files,handlers,tasks,templates,vars} -p
touch roles/site.yaml roles/nginx/{handlers,tasks,vars}/main.yaml
echo isindex.html > roles/nginx/files/index.html
yum install -y nginx && cp /etc/nginx/nginx.conf roles/nginx/templates/nginx.conf.j2
[root@zyj86 ~]# tree roles/
roles/
├── nginx
│ ├── files
│ │ └── index.html
│ ├── handlers
│ │ └── main.yaml
│ ├── tasks
│ │ └── main.yaml
│ ├── templates
│ │ └── nginx.conf.j2
│ └── vars
│ └── main.yaml
└── site.yaml
6 directories, 6 files编写配置文件
vim roles/nginx/tasks/main.yaml
---
- name: install epel-release packge
yum: name=epel-release state=latest
- name: install nginx packge
yum: name=nginx state=latest
- name: copy index.html
copy: src=index.html dest=/usr/share/nginx/html/index.html
- name: copy nginx.conf template
template: src=nginx.conf.j2 dest=/etc/nginx/nginx.conf
notify: restart nginx
- name: make sure nginx service running
service: name=nginx state=started enabled=yes金甲模版设置
# 使用收集模块查看cpu数量
[root@zyj86 ~]# ansible all -m setup -a 'filter=ansible_processor_cores'
zyj87 | SUCCESS => {
    "ansible_facts": {
        "ansible_processor_cores": 8,
        "discovered_interpreter_python": "/usr/libexec/platform-python"
    },
    "changed": false
}
# 查看主机名
[root@zyj86 ~]# ansible all -m setup -a 'filter=ansible_hostname'
zyj87 | SUCCESS => {
    "ansible_facts": {
        "ansible_hostname": "zyj87",
        "discovered_interpreter_python": "/usr/libexec/platform-python"
    },
    "changed": false
}
编辑金甲模版文件,设置根据主机cpu个数设置nginx进程数量,设置连接数
vim roles/nginx/templates/nginx.conf.j2
5 user nginx;
6 #worker_processes auto;
# 使用内置变量ansible_processor_cores设置cpu进程数
7 worker_processes {{ ansible_processor_cores }};
8 error_log /var/log/nginx/error.log;
9 pid /run/nginx.pid;
12 include /usr/share/nginx/modules/*.conf;
13
14 events {
# 使用自定义变量worker_connections设置连接数
15 worker_connections {{ worker_connections }};
16 }编写自定义变量
vim roles/nginx/vars/main.yaml
worker_connections: 10240
myvar: helloworld
language: zhongwenyuyan
path: /helloworld/data编写处理程序
vim roles/nginx/handlers/main.yaml
---
- name: restart nginx
service: name=nginx state=restarted编写剧本
vim roles/site.yaml
- hosts: zyj87
roles:
- nginx检测语法是否正确
[root@zyj86 ~]# ansible-playbook roles/site.yaml --syntax-check
playbook: roles/site.yaml执行
ansible-playbook roles/site.yaml