【鸿蒙实战】从零开发「随机决策器」------选择困难症终结者
API版本:HarmonyOS NEXT API 23
开发工具:DevEco Studio
项目类型:Entry模板应用
一、项目背景:为什么做这个?
作为一个典型的选择困难症患者,每天中午的终极哲学问题永远是:"今天吃什么?"面对火锅、烧烤、日料、西餐......每个选项都想去,但就是做不了决定。
既然如此,何不用鸿蒙原生开发一个随机决策器?既解决了生活痛点,又能深入学习 ArkUI 状态管理和动画效果,一举两得!
本文将从零开始,完整记录开发过程中的技术选型、UI设计、状态管理、动画实现以及遇到的坑点,适合鸿蒙开发初学者学习参考。
二、功能设计
2.1 核心功能
- 选项输入:用户通过多行文本框输入待选项(每行一个)
- 随机抽签:点击按钮后,选项快速滚动后逐渐减速,最终停在某个选项上
- 历史记录:保存最近的抽签结果(最多20条)
- 快捷操作:提供示例填充和一键清空功能
2.2 UI设计思路
采用经典的三段式布局:
- 顶部:标题区域,简洁明了
- 中部:结果展示区 + 选项输入区,核心交互区
- 底部:抽签按钮 + 历史记录,固定位置便于操作
配色采用暖橙色调(#FF6B35),传递活力与决断感。
三、项目结构解析
3.1 目录结构
MyApplication/
├── AppScope/
│   ├── app.json5                 # 应用全局配置
│   └── resources/
│       └── base/
│           ├── element/string.json    # 应用名称等字符串资源
│           └── media/                  # 应用图标
├── entry/
│   ├── src/main/
│   │   ├── ets/
│   │   │   ├── entryability/
│   │   │   │   └── EntryAbility.ets   # 应用入口能力
│   │   │   └── pages/
│   │   │       └── Index.ets          # 主页面(核心代码)
│   │   ├── module.json5               # 模块配置
│   │   └── resources/
│   │       ├── base/
│   │       │   ├── element/           # 颜色、字符串资源
│   │       │   ├── media/             # 图片资源
│   │       │   └── profile/           # 页面路由配置
│   │       └── dark/                  # 深色模式资源
│   └── build-profile.json5           # 模块构建配置
└── build-profile.json5               # 应用构建配置
3.2 关键配置文件
app.json5(应用级配置):
json
{
  "app": {
    "bundleName": "com.example.myapplication",
    "vendor": "example",
    "versionCode": 1000000,
    "versionName": "1.0.0",
    "icon": "$media:layered_image",
    "label": "$string:app_name"
  }
}module.json5(模块配置):
json
{
  "module": {
    "name": "entry",
    "type": "entry",
    "deviceTypes": ["phone"],
    "pages": "$profile:main_pages"
  }
}
四、核心代码实现
4.1 状态变量设计
状态管理是 ArkUI 的核心,本项目使用了以下状态变量:
typescript
@State optionsText: string = '';        // 文本框内容
@State result: string = '';             // 最终结果
@State isSpinning: boolean = false;     // 是否正在滚动
@State displayText: string = '?';        // 滚动时显示的临时文本
@State drawHistory: string[] = [];      // 历史记录数组
@State showResult: boolean = false;     // 是否显示结果
@State showHistory: boolean = false;    // 是否显示历史
为什么这样设计?
@State装饰器会让变量与UI双向绑定,任何变化都会触发UI刷新isSpinning控制按钮的禁用状态和结果显示逻辑drawHistory使用数组存储历史,配合unshift()实现最新在上
4.2 生命周期钩子
typescript
aboutToAppear(): void {
  // 页面加载时填充示例数据,方便用户快速体验
  this.optionsText = '吃火锅\n吃烧烤\n吃日料\n吃西餐\n吃面';
}
aboutToAppear() 在页面构建前调用,适合做数据初始化。
4.3 UI布局实现
顶部标题区
typescript
Column() {
  Text('随机决策器')
    .fontSize(26)
    .fontWeight(FontWeight.Bold)
    .fontColor('#FFFF6B35')

  Text('选择困难症终结者')
    .fontSize(14)
    .fontColor('#99000000')
    .margin({ top: 4 })
}
.width('100%')
.padding({ top: 20, bottom: 12 })
.alignItems(HorizontalAlign.Center)
.backgroundColor(Color.White)
结果展示区(核心交互区)
这里根据状态显示不同内容:
typescript
Column() {
  if (this.showResult) {
    // 显示最终结果
    Text('🎯 结果是')
      .fontSize(14)
      .fontColor('#66000000')
    Text(this.result)
      .fontSize(32)
      .fontWeight(FontWeight.Bold)
      .fontColor('#FFFF6B35')
  } else if (this.isSpinning) {
    // 滚动中显示临时文本
    Text(this.displayText)
      .fontSize(36)
      .fontWeight(FontWeight.Bold)
      .fontColor('#FFFF6B35')
  } else {
    // 空状态提示
    Text('?')
      .fontSize(64)
      .fontWeight(FontWeight.Bold)
      .fontColor('#20000000')
    Text('在下方输入选项,开始抽签')
      .fontSize(14)
      .fontColor('#66000000')
  }
}
.width('100%')
.height(140)
.justifyContent(FlexAlign.Center)
.backgroundColor('#FFFFF8F0')条件渲染三态切换:
showResult = true→ 显示最终结果isSpinning = true→ 显示滚动的临时文本- 默认状态 → 显示问号和提示文字
选项输入区
typescript
Column() {
  Row() {
    Text('选项列表')
      .fontSize(16)
      .fontWeight(FontWeight.Medium)

    Blank()  // 自动填充空白,实现左右布局

    Button('示例')
      .fontSize(12)
      .fontColor('#FFFF6B35')
      .backgroundColor('#FFFFF0E6')
      .onClick(() => {
        this.optionsText = '吃火锅\n吃烧烤\n吃日料\n吃西餐\n吃面';
      })

    Button('清空')
      .fontSize(12)
      .fontColor('#66000000')
      .backgroundColor('#FFF0F0F0')
      .onClick(() => {
        this.optionsText = '';
        this.result = '';
        this.showResult = false;
        this.drawHistory = [];
      })
  }

  TextArea({ text: this.optionsText, placeholder: '输入你的选项...' })
    .width('100%')
    .layoutWeight(1)
    .backgroundColor('#FFF8F8F8')
    .onChange((value: string) => {
      this.optionsText = value;
    })
}
.layoutWeight(1)技术要点:
Blank()组件用于实现两端对齐布局TextArea使用onChange监听输入变化layoutWeight(1)让输入区自动占满剩余空间
抽签按钮
typescript
Button({ type: ButtonType.Capsule, stateEffect: true }) {
  Row() {
    Text('🎲')
      .fontSize(20)
    Text(this.isSpinning ? ' 抽取中...' : ' 开始抽签')
      .fontSize(18)
      .fontColor(Color.White)
      .fontWeight(FontWeight.Bold)
  }
  .alignItems(VerticalAlign.Center)
}
.width(200)
.height(52)
.backgroundColor('#FFFF6B35')
.enabled(!this.isSpinning)  // 滚动时禁用按钮
.onClick(() => {
  this.startDraw();
})按钮状态管理:
enabled(!this.isSpinning)防止重复点击- 文字随状态切换显示"开始抽签"或"抽取中..."
历史记录区
typescript
Column() {
  Row() {
    Text('抽签记录')
      .fontSize(14)
      .fontWeight(FontWeight.Medium)
    Blank()
    Text(`${this.drawHistory.length} 次`)
      .fontSize(12)
      .fontColor('#66000000')
  }

  if (this.drawHistory.length > 0) {
    Scroll() {
      Column() {
        ForEach(this.drawHistory, (item: string, index: number) => {
          Row() {
            Text(`#${this.drawHistory.length - index}  `)
              .fontSize(12)
              .fontColor('#99000000')
            Text(item)
              .fontSize(14)
              .fontColor('#FF333333')
          }
          .width('100%')
          .padding({ left: 16, right: 16, top: 4, bottom: 4 })
          .backgroundColor(index % 2 === 0 ? '#FFF8F8F8' : Color.White)
          .borderRadius(6)
        })
      }
    }
    .width('100%')
    .layoutWeight(1)
  }
}
.height(120)
.backgroundColor(Color.White)
ForEach 渲染列表:
- 第一个参数是数据源数组
- 第二个参数是渲染函数
- 使用
index实现斑马纹背景
4.4 核心逻辑:抽签动画实现
startDraw():启动抽签
typescript
startDraw(): void {
  // 解析选项:按换行符分割,去除空白,过滤空行
  let lines = this.optionsText.split('\n')
    .map(s => s.trim())
    .filter(s => s.length > 0);

  if (lines.length < 2) {
    this.result = '至少需要 2 个选项';
    this.showResult = true;
    return;
  }

  this.optionsList = lines;
  this.isSpinning = true;
  this.showResult = false;
  this.spinCount = 0;

  // 清除可能存在的旧定时器
  if (this.spinInterval > 0) {
    clearInterval(this.spinInterval);
  }

  // 启动定时器
  this.spinInterval = setInterval(() => {
    let idx = Math.floor(Math.random() * this.optionsList.length);
    this.displayText = this.optionsList[idx];
    this.spinCount++;

    // 达到最大循环次数时停止
    if (this.spinCount >= this.MAX_SPIN_CYCLES) {
      clearInterval(this.spinInterval);
      this.spinInterval = -1;
      this.finishDraw();
    }
  }, Math.max(50, 200 - this.spinCount * 8));
}关键技术点:
-
字符串解析:
typescriptthis.optionsText.split('\n') // 按换行分割 .map(s => s.trim()) // 去除首尾空格 .filter(s => s.length > 0); // 过滤空行 -
减速动画效果:
typescriptMath.max(50, 200 - this.spinCount * 8)- 初始间隔 200ms
- 每次递减 8ms
- 最小间隔 50ms
- 实现由快到慢的视觉效果
-
随机算法:
typescriptMath.floor(Math.random() * this.optionsList.length)生成 0, length-1 范围的随机索引
finishDraw():完成抽签
typescript
finishDraw(): void {
  // 最终随机结果
  let finalIdx = Math.floor(Math.random() * this.optionsList.length);
  this.result = this.optionsList[finalIdx];
  this.displayText = this.result;
  this.isSpinning = false;
  this.showResult = true;

  // 加入历史记录(最新的在最前面)
  this.drawHistory.unshift(this.result);
  if (this.drawHistory.length > 20) {
    this.drawHistory.pop();  // 保持最多20条
  }
}数组操作:
unshift()在数组头部插入元素pop()移除最后一个元素(超出限制时)
五、遇到的坑与解决方案
5.1 坑点一:定时器清除时机
问题:用户快速连续点击抽签按钮,可能导致多个定时器同时运行,结果混乱。
解决方案:
typescript
// 在启动新定时器前,清除旧定时器
if (this.spinInterval > 0) {
  clearInterval(this.spinInterval);
}
同时配合按钮禁用:
typescript
.enabled(!this.isSpinning)5.2 坑点二:TextArea 双向绑定
问题 :TextArea 的 text 属性只设置初始值,后续输入需要通过 onChange 监听。
错误写法:
typescript
TextArea({ placeholder: '输入选项' })
.text(this.optionsText) // ❌ 这样写不会自动更新正确写法:
typescript
TextArea({ text: this.optionsText, placeholder: '输入选项...' })
  .onChange((value: string) => {
    this.optionsText = value;  // ✅ 手动同步状态
  })
5.3 坑点三:ForEach 渲染性能
问题:历史记录过多时,ForEach 每次都重新渲染所有元素,可能造成卡顿。
解决方案:
typescript
if (this.drawHistory.length > 20) {
  this.drawHistory.pop();  // 限制最多20条
}
同时建议在正式项目中使用 LazyForEach:
typescript
LazyForEach(this.dataSource, (item: string) => {
  // 渲染逻辑
}, (item: string) => item)  // 唯一键生成器
5.4 坑点四:字符串解析兼容性
问题 :Windows 换行符 \r\n 和 Unix 换行符 \n 不一致。
当前实现(简化版):
typescript
this.optionsText.split('\n')更健壮的实现:
typescript
this.optionsText.split(/\r?\n/) // 兼容两种换行符六、项目扩展方向
6.1 功能增强
- 权重模式:给不同选项设置不同权重(如"吃火锅"权重×2,被抽中概率翻倍)
- 排除模式:勾选"今天不吃XXX",从备选池中排除
- 数据持久化:使用 Preferences 保存历史记录和常用选项模板
- 语音播报:集成 TTS,抽中结果后语音播报"今天吃XX!"
6.2 UI优化
-
动效增强:
- 结果揭晓时添加缩放+渐显动画
- 使用
animateTo()包裹状态变化
-
主题切换:
- 利用
dark资源目录适配深色模式 - 支持自定义主题色
- 利用
-
响应式布局:
- 使用栅格布局适配不同屏幕尺寸
- 平板横屏时左右分栏显示
6.3 架构优化
-
MVVM 模式:
- 抽取
DecisionViewModel管理业务逻辑 - 使用
@Observed和@ObjectLink管理复杂状态
- 抽取
-
组件拆分:
- 提取
ResultDisplay组件 - 提取
HistoryList组件 - 提取
OptionInput组件
- 提取
七、总结
本项目虽然功能简单,但涵盖了鸿蒙原生开发的多个核心技术点:
| 技术点 | 实践应用 |
|---|---|
| 状态管理 | @State 装饰器的正确使用 |
| 条件渲染 | if-else 控制多状态UI切换 |
| 列表渲染 | ForEach 渲染动态数据 |
| 定时器 | setInterval 实现动画效果 |
| 组件布局 | Column、Row、Blank 组合布局 |
| 事件处理 | onClick、onChange 事件监听 |
| 字符串处理 | split、map、filter 链式调用 |
八、附录:完整代码结构
Index.ets 完整代码框架
typescript
@Entry
@Component
struct Index {
  // 状态变量定义
  @State optionsText: string = '';
  @State result: string = '';
  @State isSpinning: boolean = false;
  @State displayText: string = '?';
  @State drawHistory: string[] = [];
  @State showResult: boolean = false;

  private optionsList: string[] = [];
  private spinInterval: number = -1;
  private spinCount: number = 0;
  private readonly MAX_SPIN_CYCLES: number = 15;

  aboutToAppear(): void {
    this.optionsText = '吃火锅\n吃烧烤\n吃日料\n吃西餐\n吃面';
  }

  build() {
    Column() {
      // 标题区
      // 结果展示区
      // 选项输入区
      // 抽签按钮
      // 历史记录区
    }
    .width('100%')
    .height('100%')
    .backgroundColor('#FFF5F5F5')
  }

  startDraw(): void {
    // 抽签启动逻辑
  }

  finishDraw(): void {
    // 抽签完成逻辑
  }
}
九、写在最后
这个「随机决策器」是我学习鸿蒙原生开发的第一个实战项目,从构思到完成大约花了3小时。过程中查阅了大量官方文档和示例代码,也踩了不少坑。
最大的收获:
- 深刻理解了
@State状态管理的核心作用 - 掌握了 ArkUI 声明式UI的编写范式
- 学会了使用定时器实现简单的动画效果
下一步计划:
- 尝试将历史记录持久化到本地存储
- 学习使用
@Watch装饰器监听状态变化 - 探索
animateTo显式动画API
如果你也是鸿蒙开发初学者,希望这篇实战记录对你有所帮助。有任何问题欢迎在评论区留言交流!
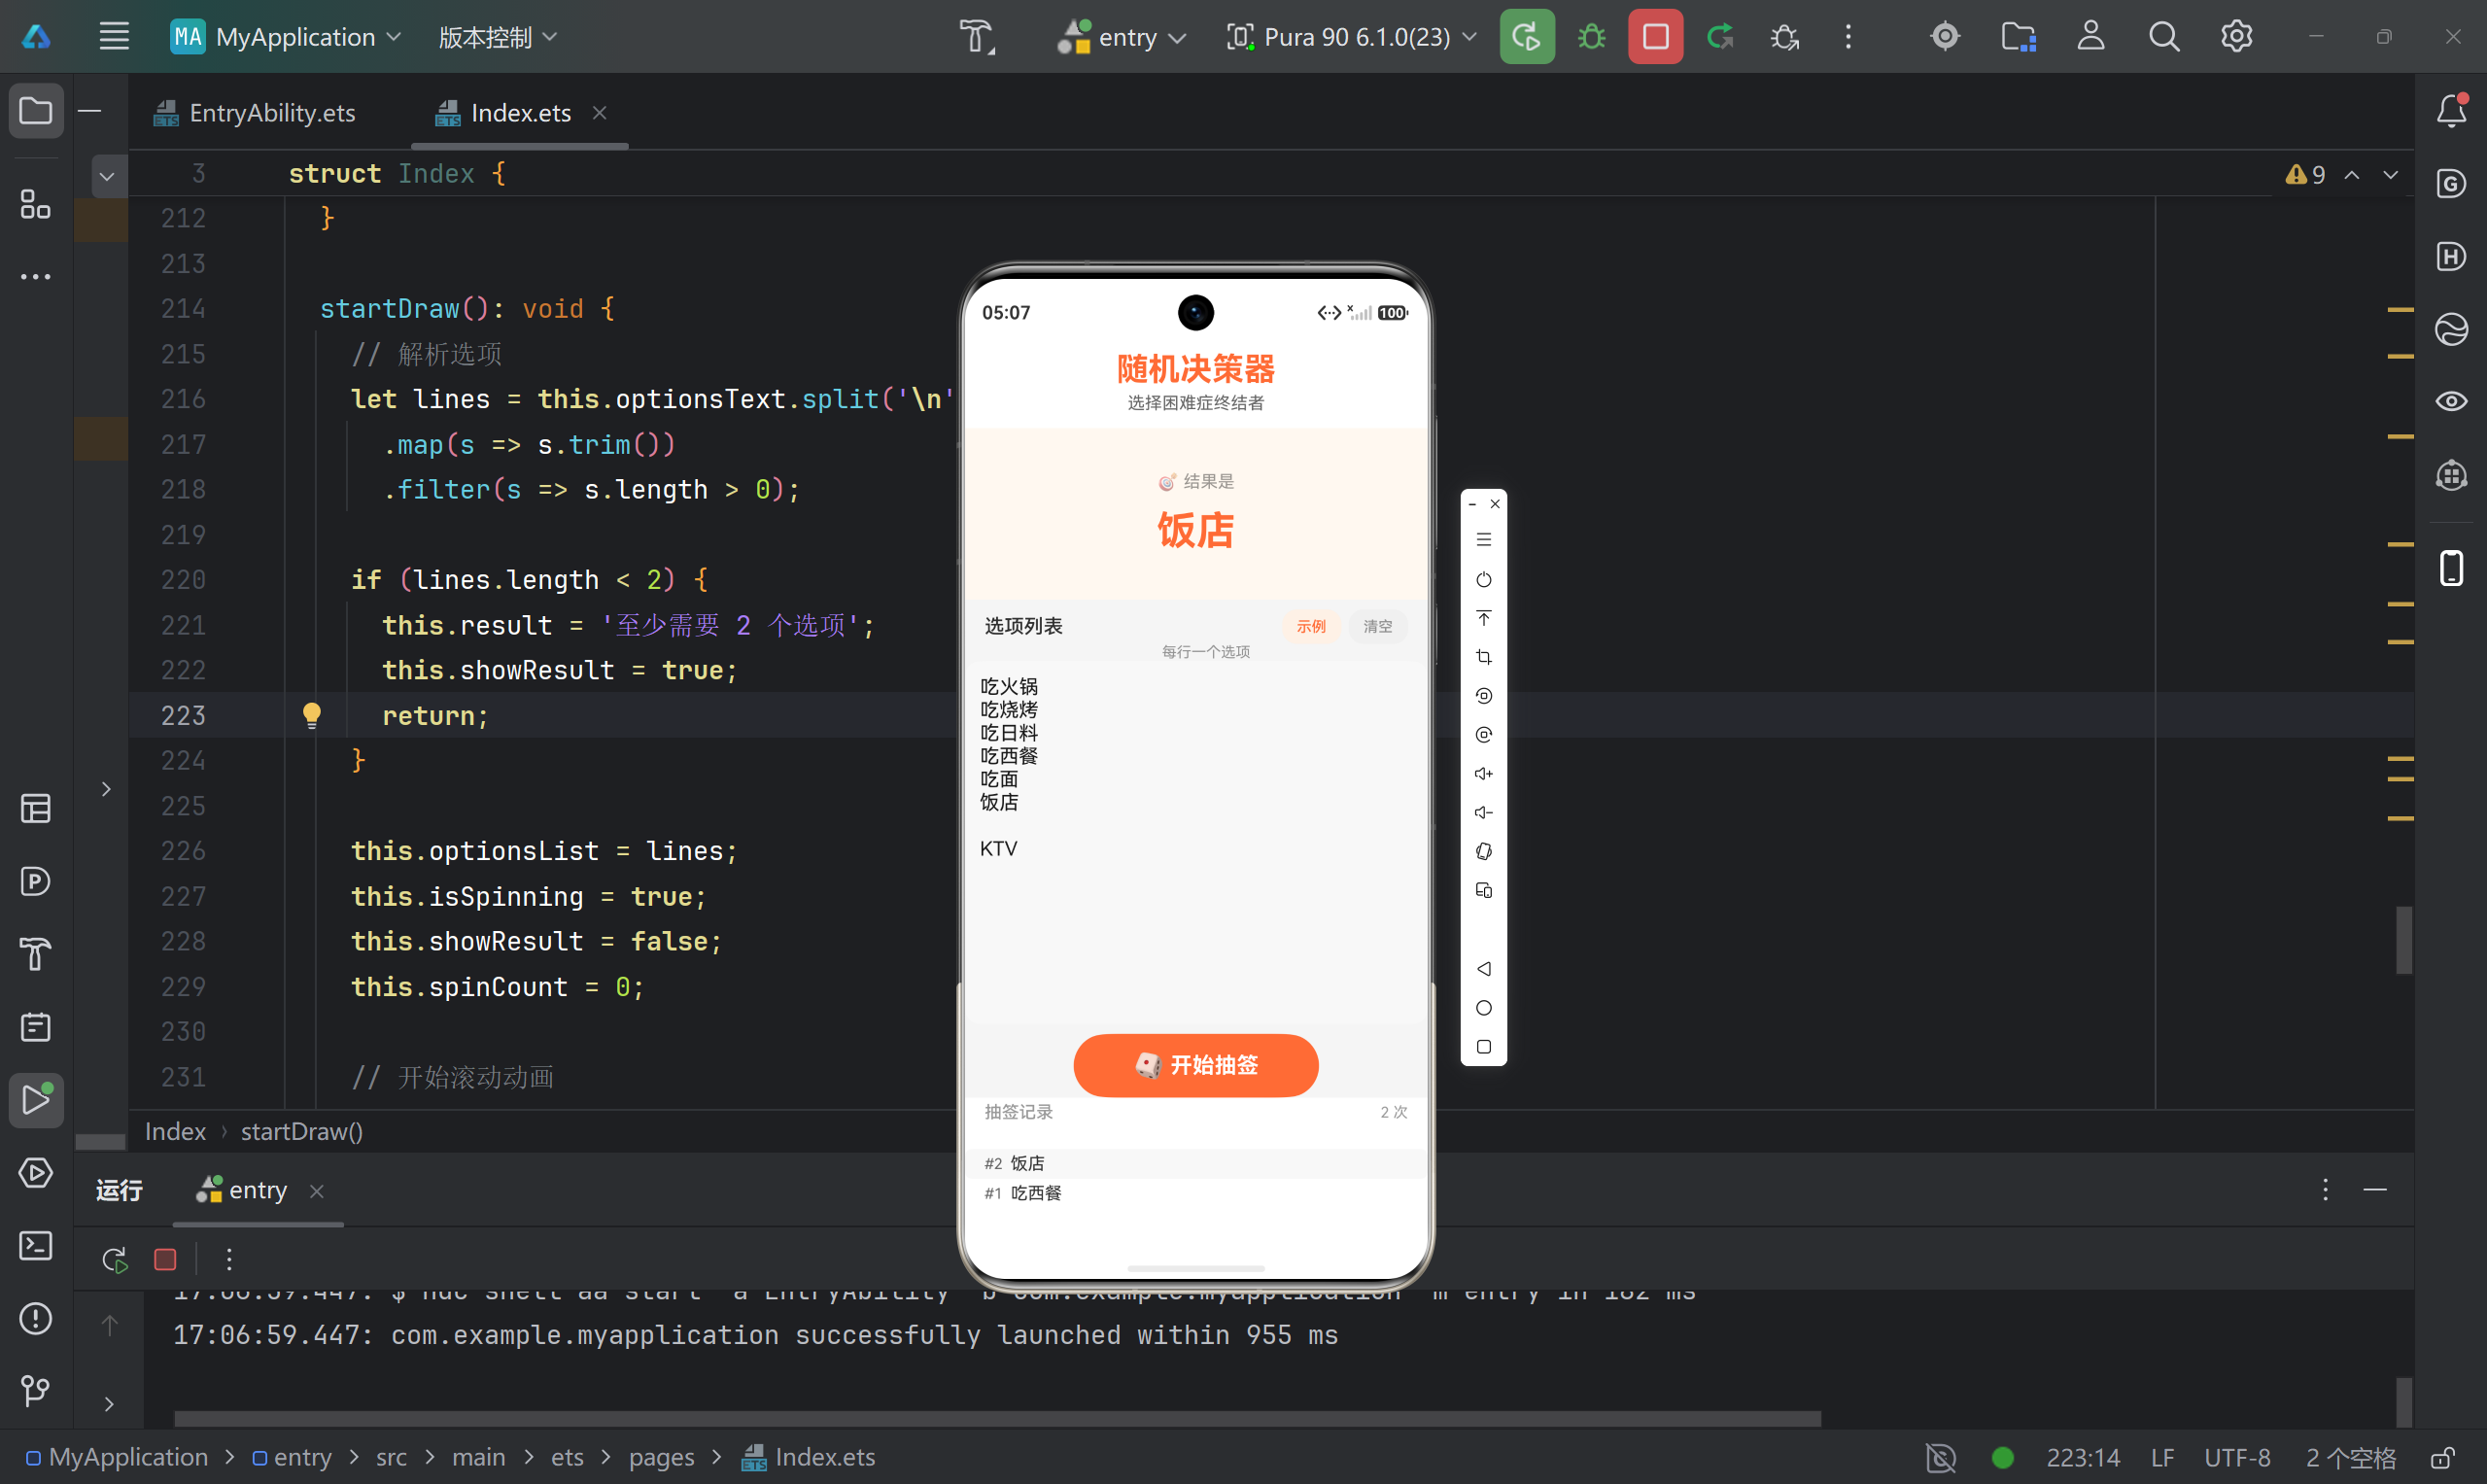
运行截图 :