测试学习记录,仅供参考!
如何去使用到已经封装好的方法
1、查看项目根目录 testcases 软件包 login 目录文件路径下"test_login.py"文件内容;
# 导包--引入pytest模块框架
import pytest
# 导入 读取 yaml 文件数据模块--读取文件模块
from unit_tools.handle_data.yaml_handler import read_yaml, write_yaml
# 导入读取配置文件模块--解析配置文件
from unit_tools.handle_data.configParse import ConfigParser
# 引入 发起接口请求 模块
from unit_tools.sendrequests import SendRequests
# 在最外层先 实例化一个对象--读取配置文件
conf = ConfigParser()
# 创建一个测试类
class TestLogin:
"""登录模块"""
# 参数化--通过参数化去读取到接口信息
@pytest.mark.parametrize('api_info', read_yaml('./datas/login.yaml'))
# 创建一个测试用例
def test_login_module(self, api_info):
# 从yaml文件获取接口信息
# conf.get_host('host') 拿到服务器地址--再返回赋值给conf_url
conf_url = conf.get_host('host')
url = conf_url + api_info['baseInfo']['url']
method = api_info['baseInfo']['method']
# 这里登录接口做特殊处理了--目前不需要请求头,所以暂时传空
header = None
# 入参
req_param = api_info['testCase'][0]['data']
# 调用接口SendRequests类去执行接口请求
# 先实例化这个类--然后给它返回一个对象
send = SendRequests()
# 再通过这个对象去调用 执行接口请求 方法--里面开始传参
response = send.execute_api_request(api_name=None, url=url, method=method, header=header, case_name=None,
cookie=None, file=None, data=req_param)
# 将接口返回值转换为json格式
result_json = response.json()
print(f'接口实际返回信息:{result_json}')
# 把登录接口的返回值token写入到extract.yaml文件中
login_token = {}
login_token['token'] = result_json['token']
write_yaml(login_token)
# 结果断言
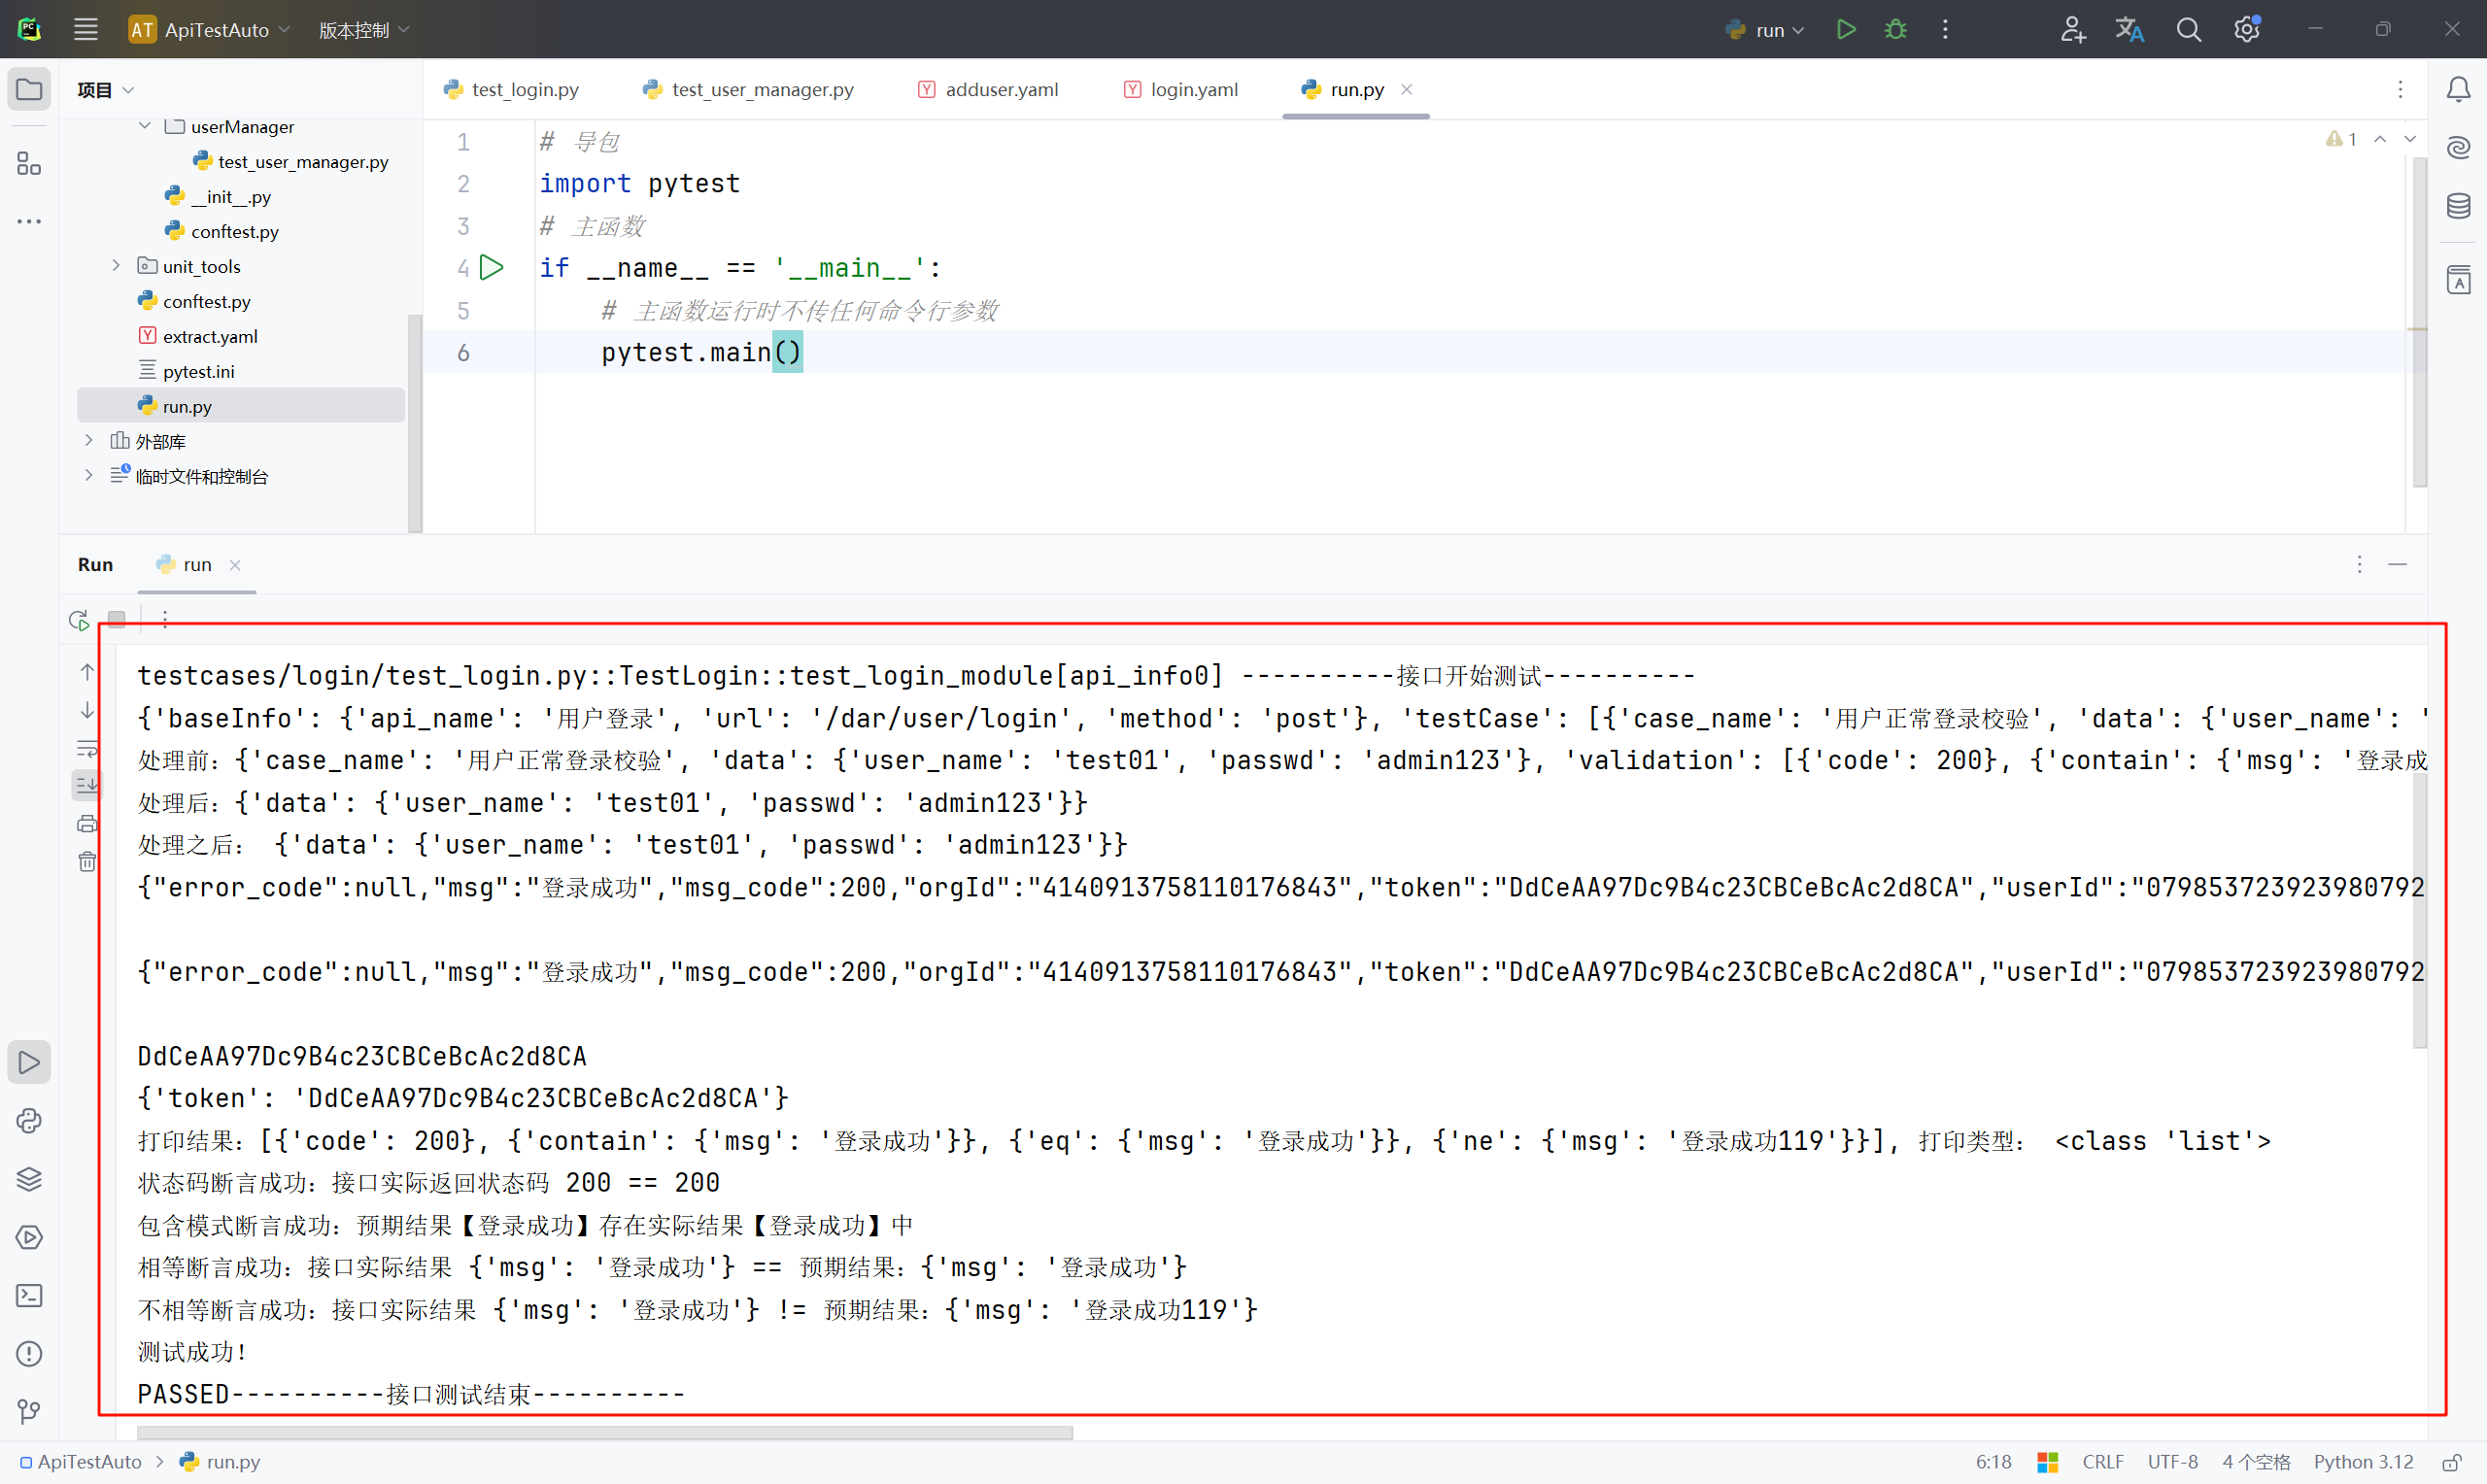
assert result_json['msg'] == '登录成功', '登录接口测试失败!'2、修改"test_login.py"文件,直接调用已经封装好的方法,简化"test_login.py"文件代码;
# 导包--引入pytest模块框架
import pytest
from unit_tools.handle_data.yaml_handler import read_yaml
from unit_tools.apiutils import RequestsBase

# 创建一个测试类
class TestLogin:
    """登录模块"""

    # 参数化--通过参数化去读取到接口信息
    @pytest.mark.parametrize('api_info', read_yaml('./datas/login.yaml'))
    # 创建一个测试用例
    def test_login_module(self, api_info):
        # 通过实例化类RequestsBase()去引用已经封装好的方法--传一个接口信息api_info
        RequestsBase().execute_test_cases(api_info)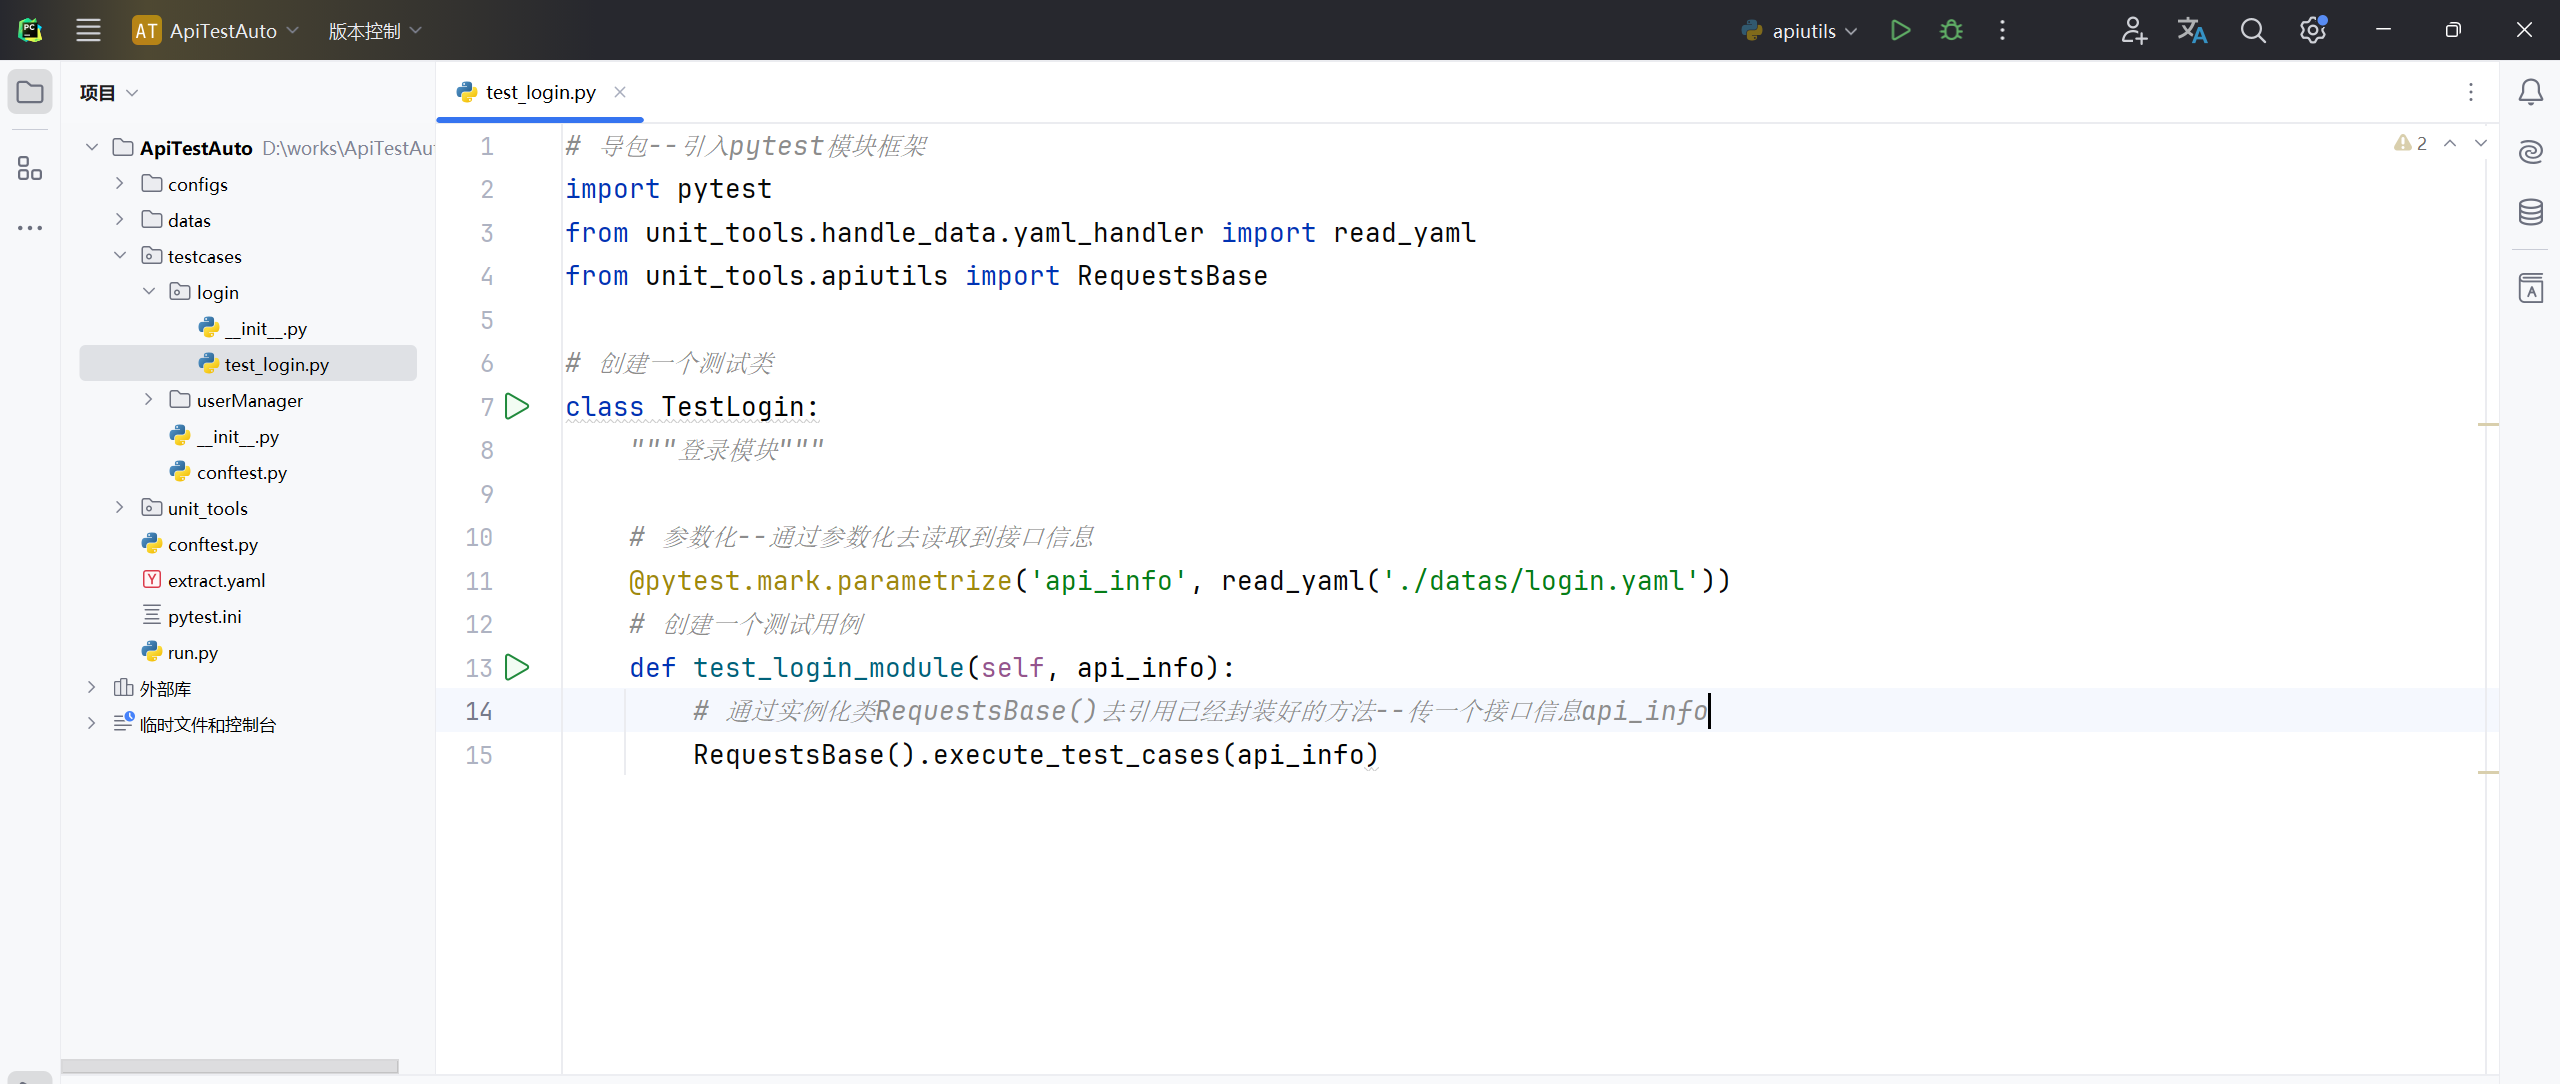
3、查看项目根目录 testcases 软件包 userManager 目录文件路径下"test_user_manager.py"文件内容;
# 导包
import pytest
from unit_tools.handle_data.yaml_handler import read_yaml
from unit_tools.handle_data.configParse import ConfigParser
from unit_tools.sendrequests import SendRequests
# 引入 动态解析 模块
from unit_tools.apiutils import RequestsBase

conf = ConfigParser()
# 也做个实例化
parse = RequestsBase()

class TestUserManager:
    """用户管理模块"""

    @pytest.mark.parametrize('api_info', read_yaml('./datas/adduser.yaml'))
    def test_user_add(self, api_info):

        # 解析yaml文件里面的${......},得到一个调用后的接口信息
        api_info = parse.parse_and_replace_variables(api_info)

        # 从解析后的接口信息中获取接口信息
        conf_url = conf.get_host('host')
        url = conf_url + api_info['baseInfo']['url']
        method = api_info['baseInfo']['method']
        # header = eval(api_info['baseInfo']['header'])
        header = None
        req_param = api_info['testCase'][0]['data']

        # 调用接口SendRequests类去执行接口请求
        send = SendRequests()
        # 再通过这个对象去调用 执行接口请求 方法--里面开始传参
        response = send.execute_api_request(api_name=None, url=url, method=method, header=header, case_name=None, cookie=None, file=None, data=req_param)
        # 将接口返回值转换为json格式
        result_json = response.json()
        print(f'接口实际返回信息:{result_json}')

        # 结果断言
        assert result_json['msg'] == '新增成功', '新增接口测试失败!'
4、修改"test_user_manager.py"文件内容,调用已经封装好的方法,简化"test_user_manager.py"文件代码;
# 导包
import pytest
from unit_tools.handle_data.yaml_handler import read_yaml
from unit_tools.apiutils import RequestsBase

class TestUserManager:
    """用户管理模块"""

    @pytest.mark.parametrize('api_info', read_yaml('./datas/adduser.yaml'))
    def test_user_add(self, api_info):
        # 引入模块之后通过这个类RequestsBase()去调用里面的方法execute_test_cases()执行所有测试用例--把读取到的数据api_info传递给它
        RequestsBase().execute_test_cases(api_info)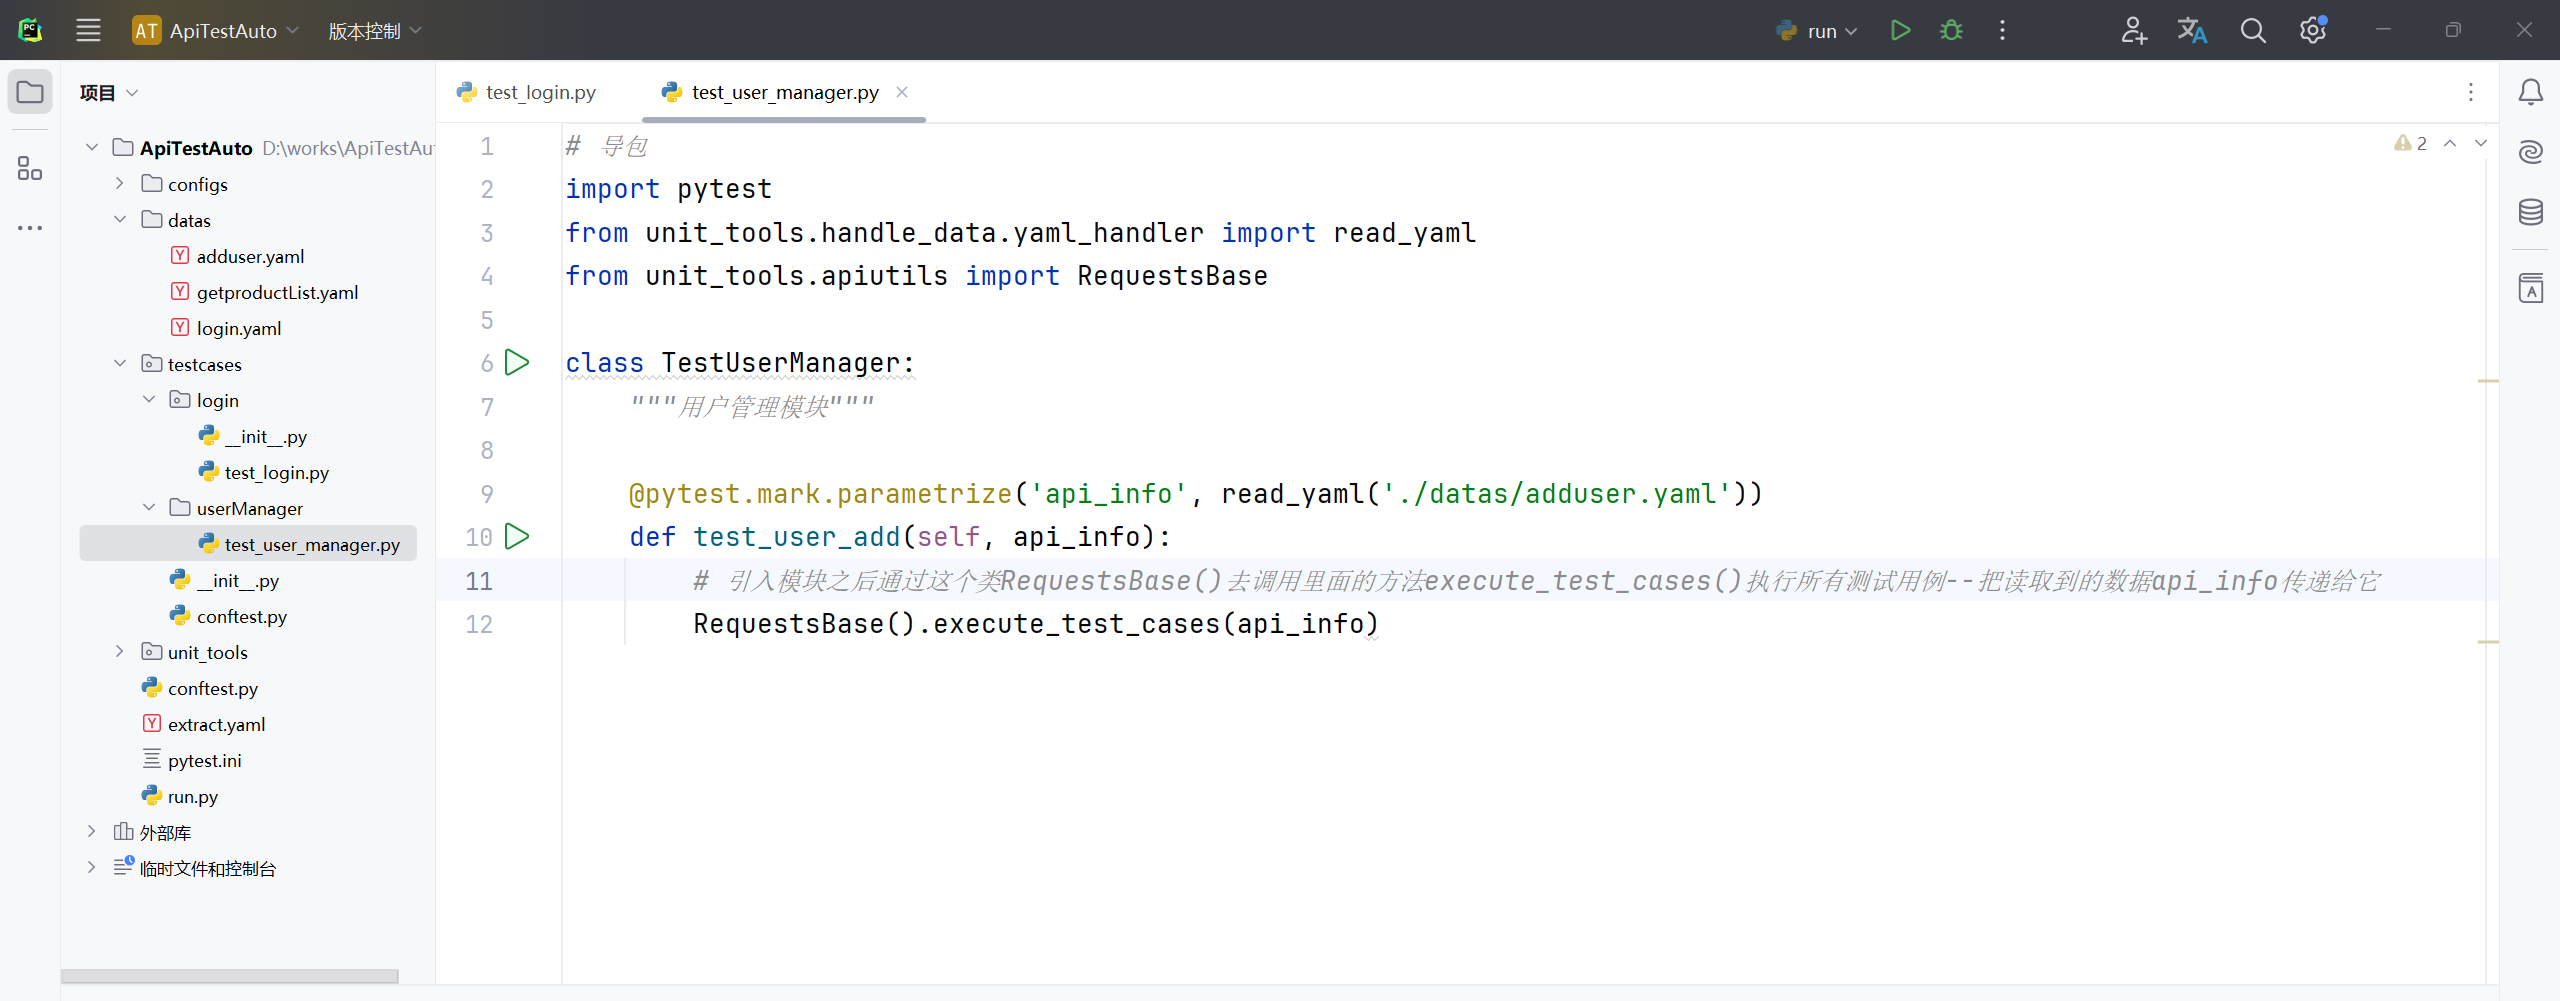
5、修改 adduser.yaml 文件内容;
- baseInfo:
    api_name: 用户新增
    url: /dar/user/addUser
    method: post
#    headers: ${get_headers(data)}
  testCase:
     - case_name: 用户新增正常校验
       data:
         username: testadduser
         password: tset6789890
         role_id: 123456789
         dates: '2000-12-31'
         phone: 13800000000
         token: ${get_extract_data(token)}
       validation:
         - code: 200
         - eq: {'msg':'新增成功'}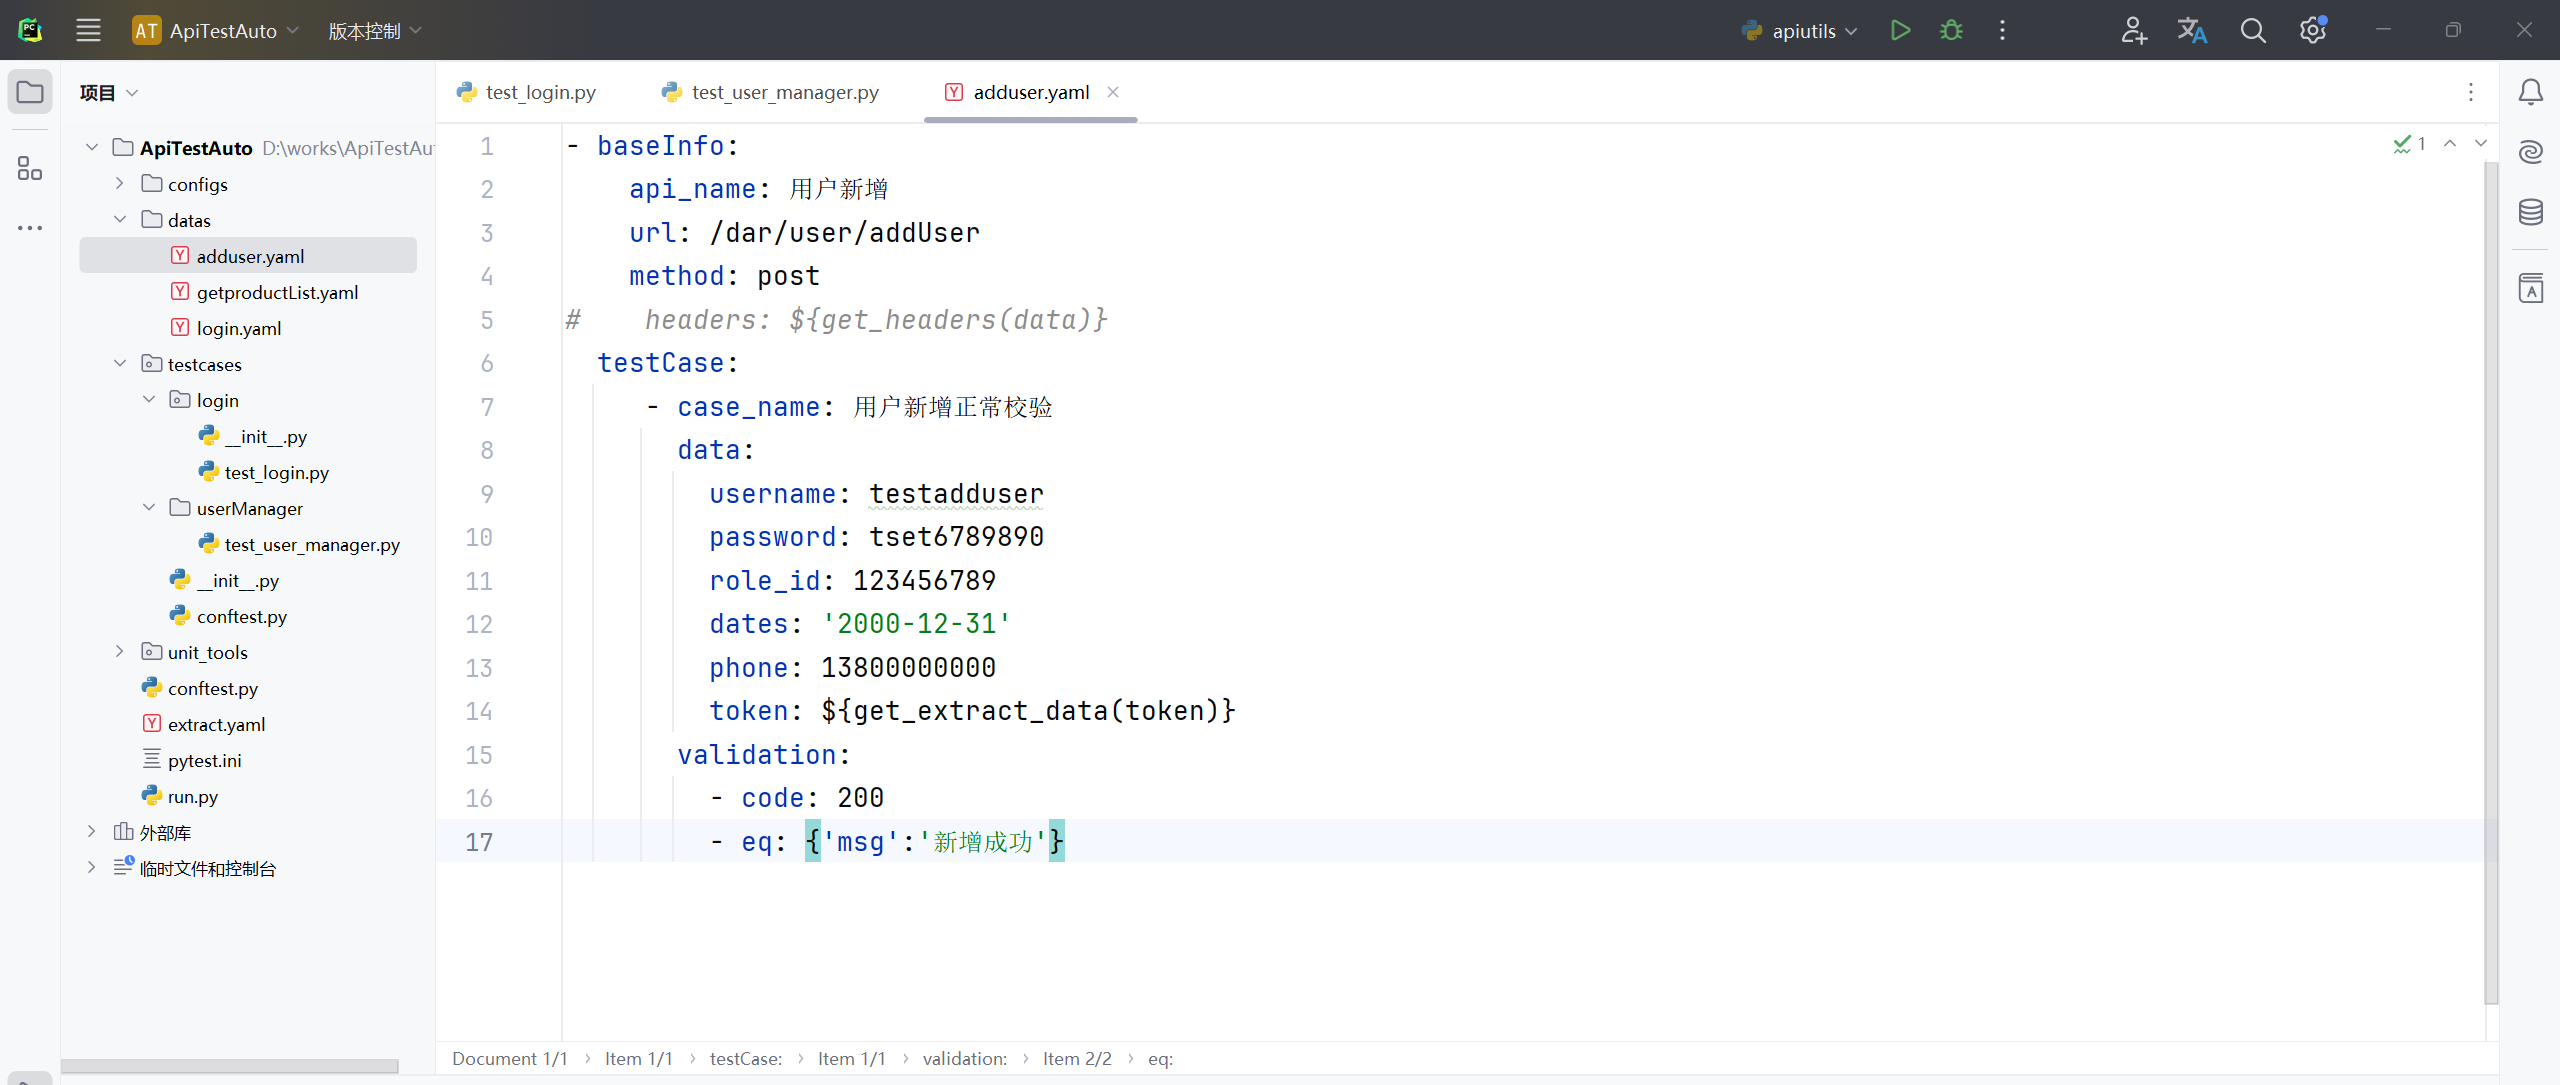
6、修改 login.yaml 文件内容;
- baseInfo:
    api_name: 用户登录
    url: /dar/user/login
    method: post
  testCase:
     - case_name: 用户正常登录校验
       data:
         user_name: test01
         passwd: admin123
       validation:
         - code: 200
         - contain: {'msg':'登录成功'}
         - eq: {'msg':'登录成功'}
         - ne: {'msg':'登录成功119'}
       extract:
         token: $.token
#       extract_list:
#         goodid: $.goodis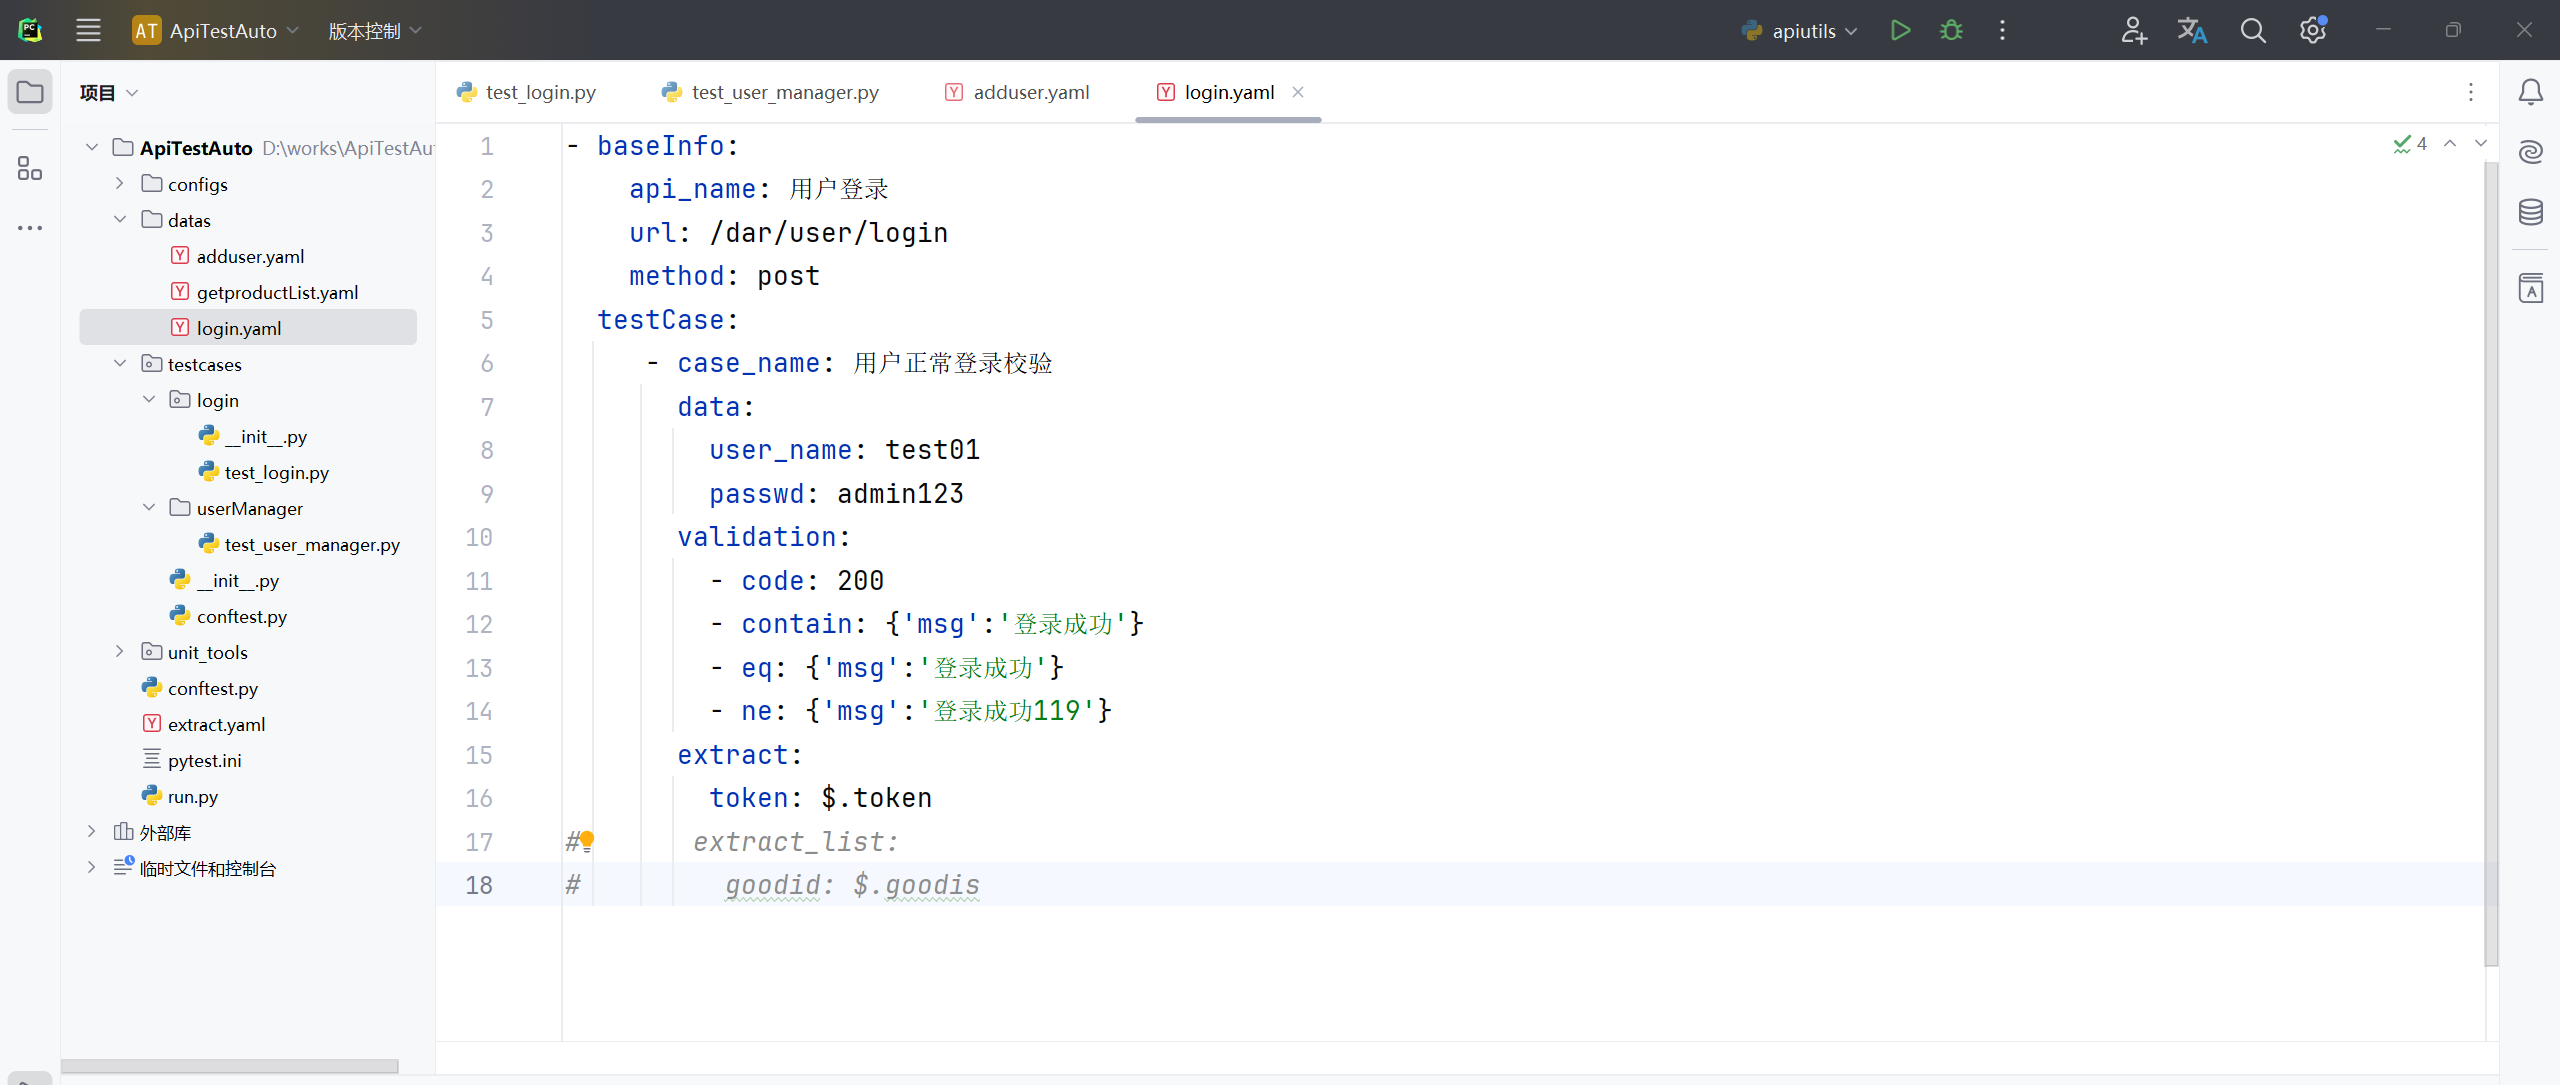
7、测试运行主函数 run.py 文件;
统一管理文件
把对应的yaml文件放到testcase软件包下对应的目录(模块)中去;一个模块下面可以写多个yaml文件,每一个yaml文件管理一个接口信息,执行文件可以写一个,也可以写多个;若想每一个yaml文件对应一个pytest执行文件也行,按需选择;需要注意的是,要运行的程序入口是主函数 run.py 文件,所以说路径要根据主函数 run.py 文件路径去写"相对路径";如果是在当前文件中运行,就要根据当前文件的相对路径。
8、把 datas 目录下的 adduser.yaml 文件 剪切移动(建议直接拖拽)到 testcase 软件包 userManager 目录下;
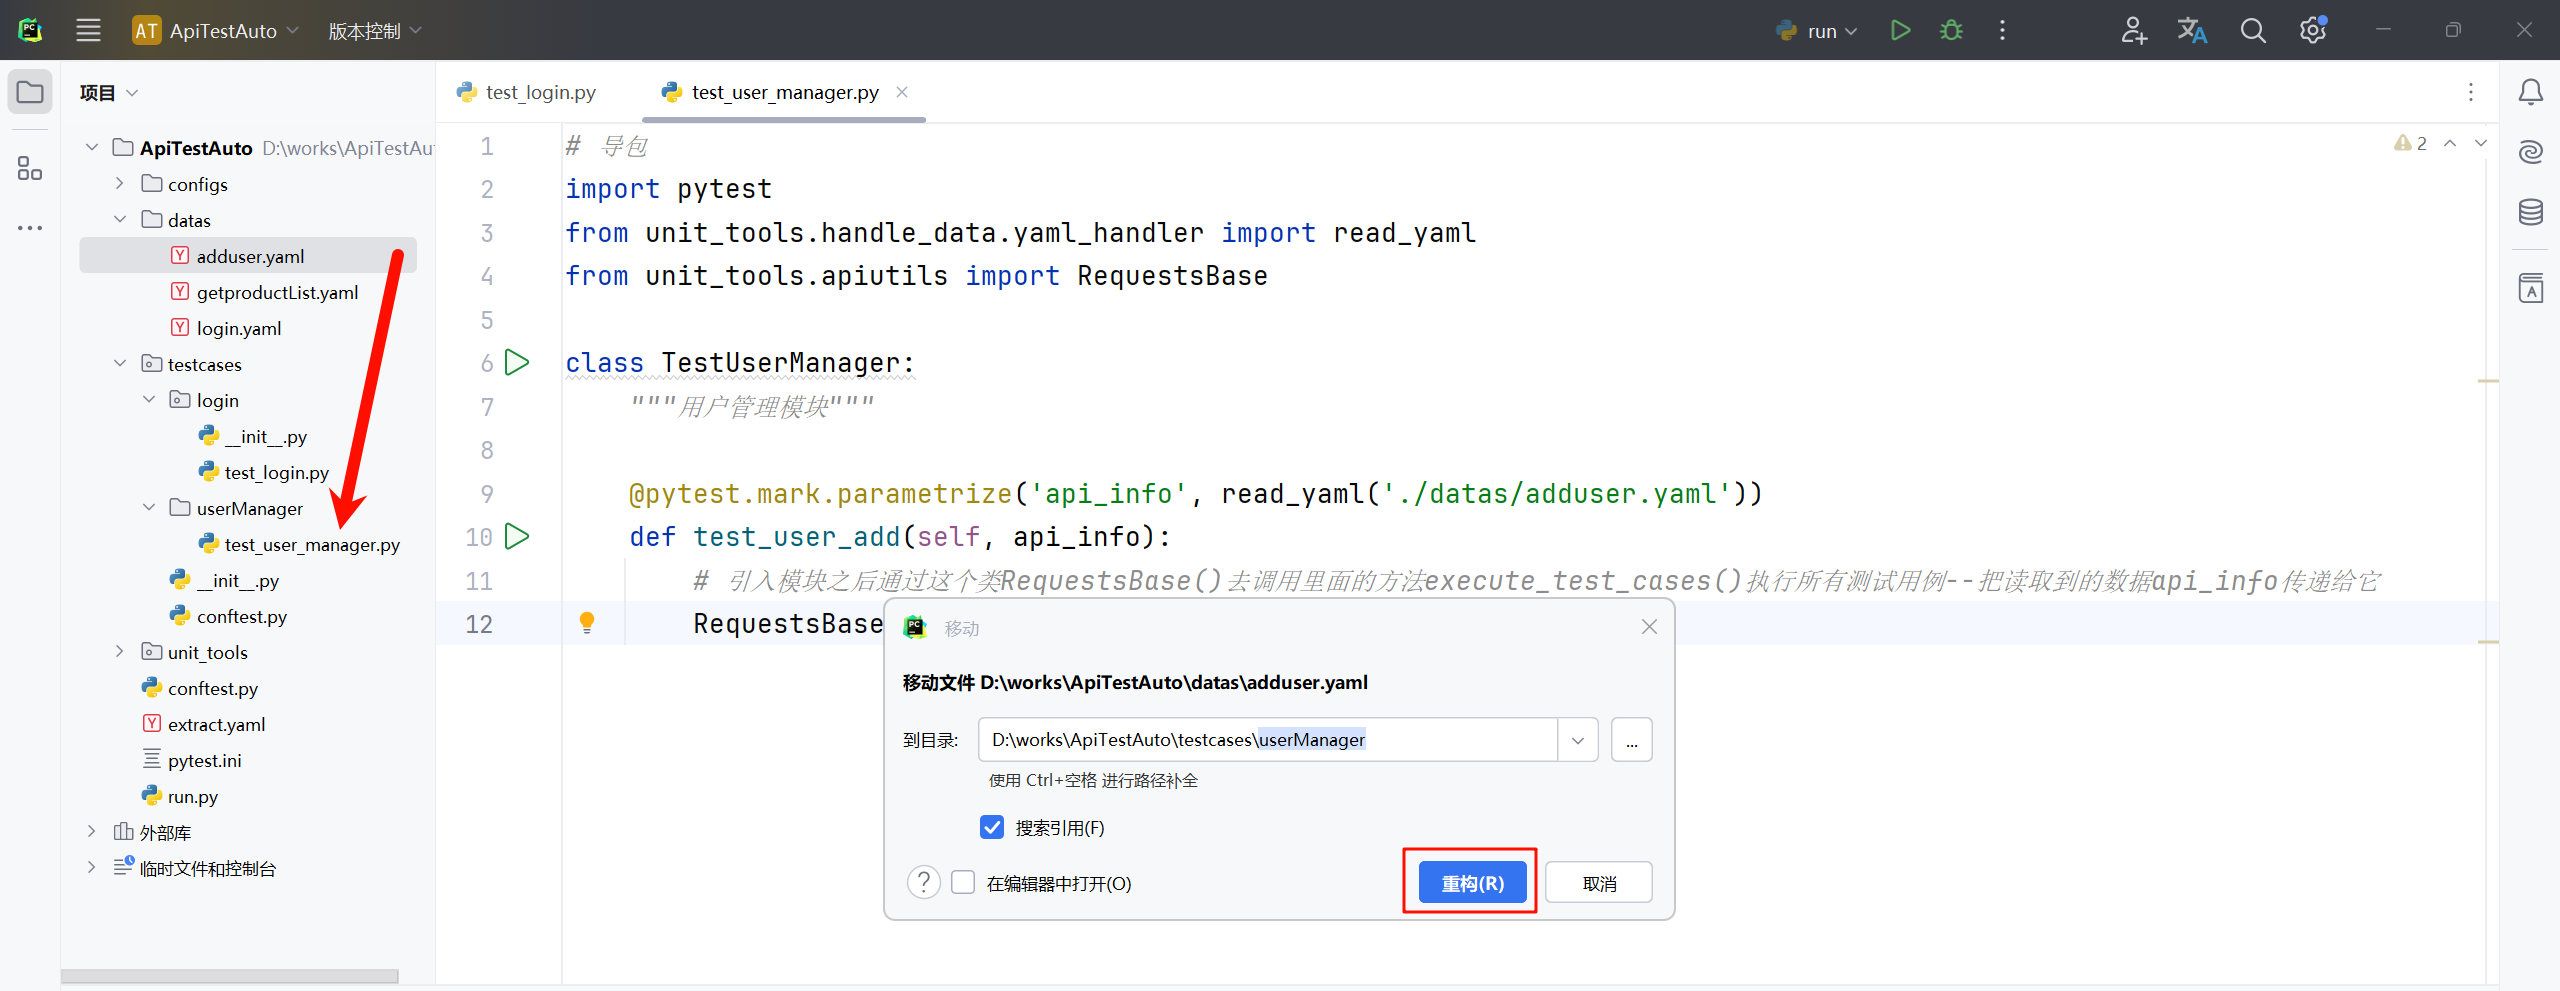
9、修改 test_user_manager.py 文件,更新yaml文件路径;
# 导包
import pytest
from unit_tools.handle_data.yaml_handler import read_yaml
from unit_tools.apiutils import RequestsBase

class TestUserManager:
    """用户管理模块"""

    @pytest.mark.parametrize('api_info', read_yaml('./testcases/userManager/adduser.yaml'))
    def test_user_add(self, api_info):
        # 引入模块之后通过这个类RequestsBase()去调用里面的方法execute_test_cases()执行所有测试用例--把读取到的数据api_info传递给它
        RequestsBase().execute_test_cases(api_info)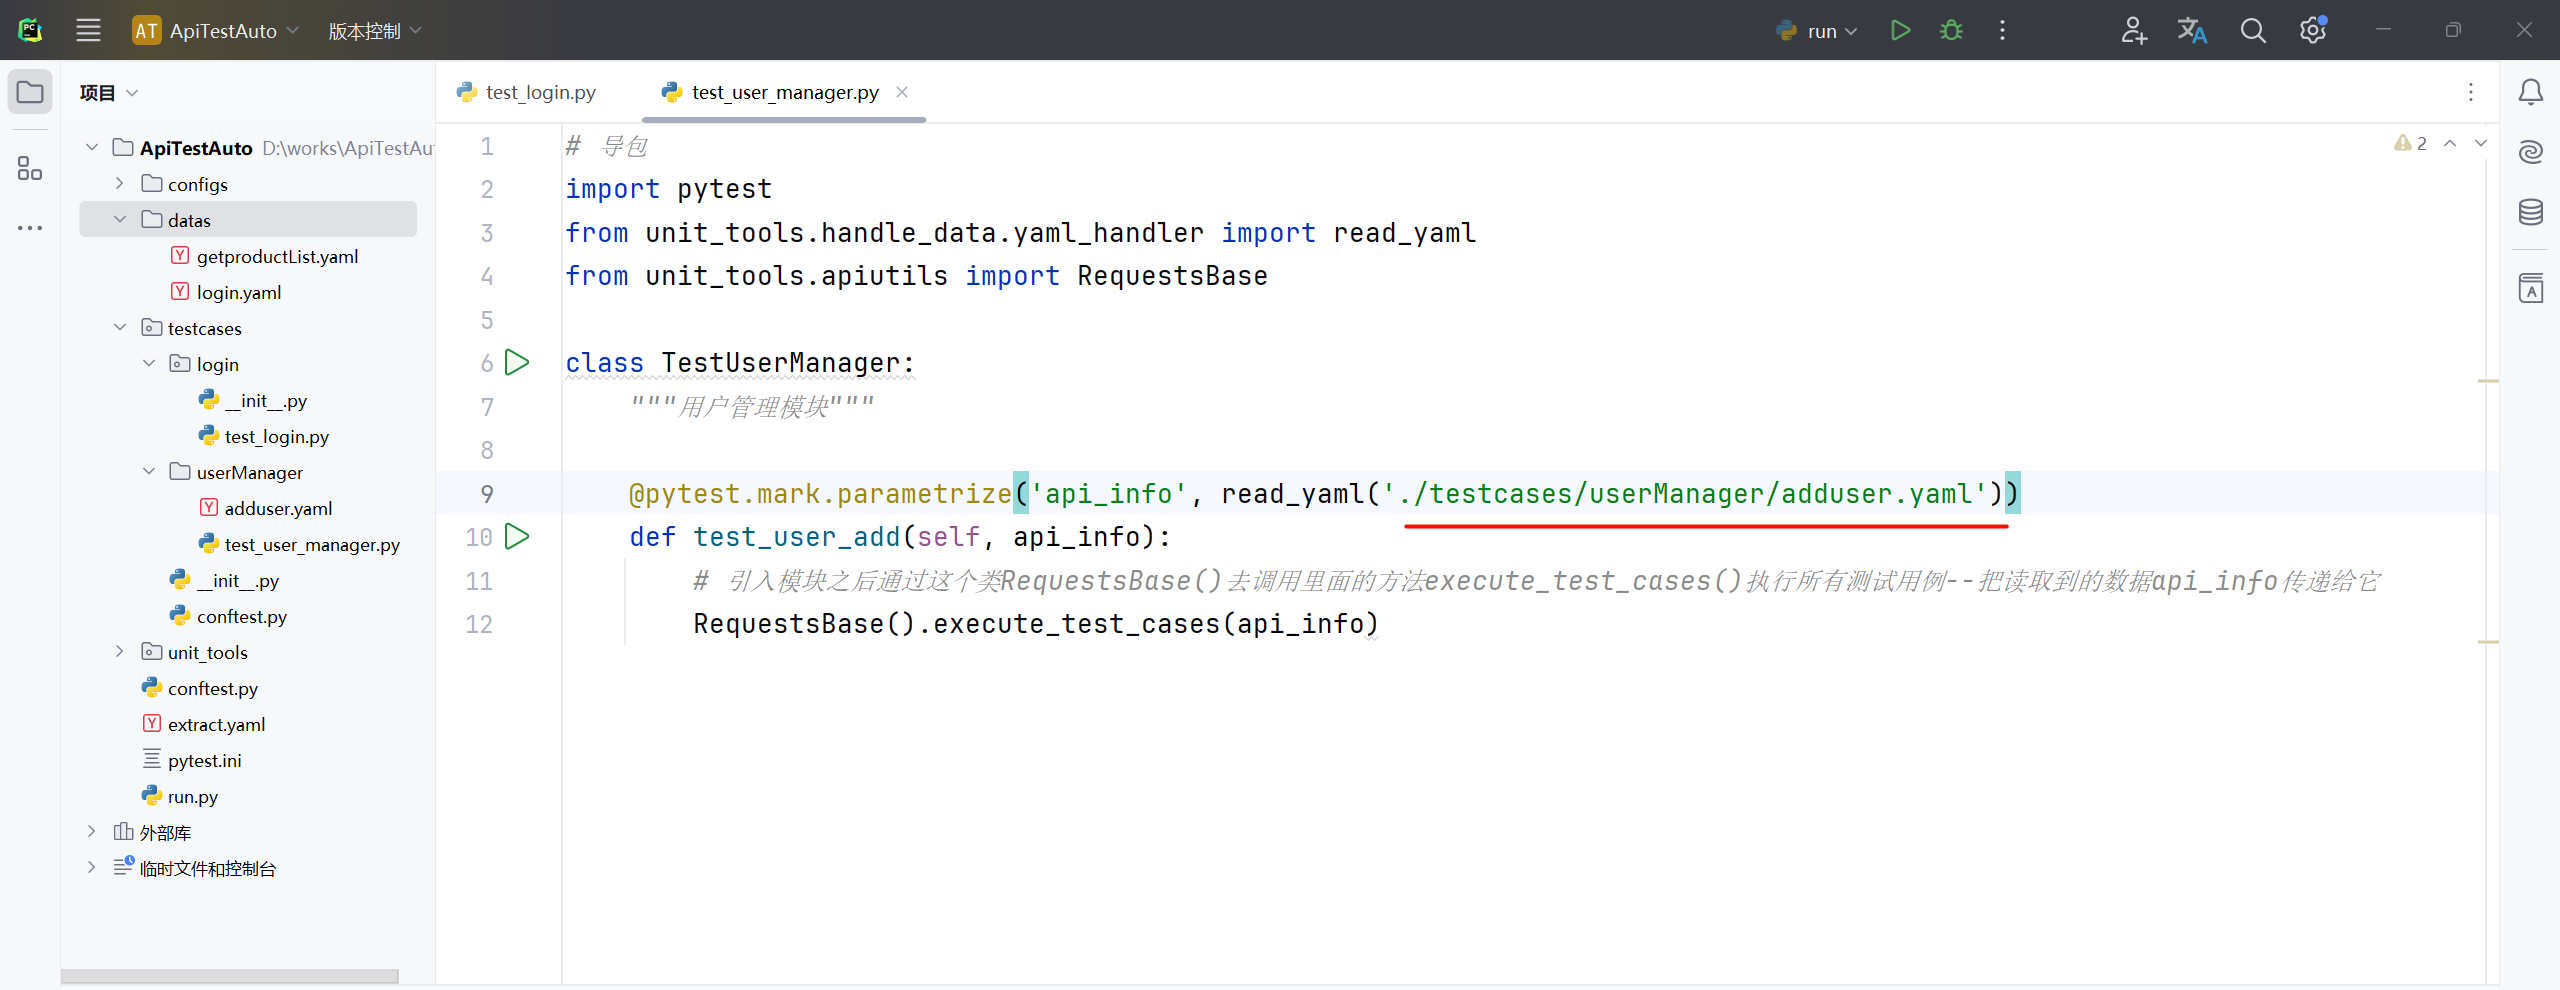
10、在 userManager 目录下新建名称为"deleteUser.yaml"的文件并输入以下内容(用户删除文件);
- baseInfo:
    api_name: 用户删除
    url: /dar/user/deleteUser
    method: post
#    headers: ${get_headers(data)}
  testCase:
     - case_name: 用户有效删除
       data:
         user_id: 123839387391912
       validation:
         - code: 200
         - eq: {'msg':'删除成功'}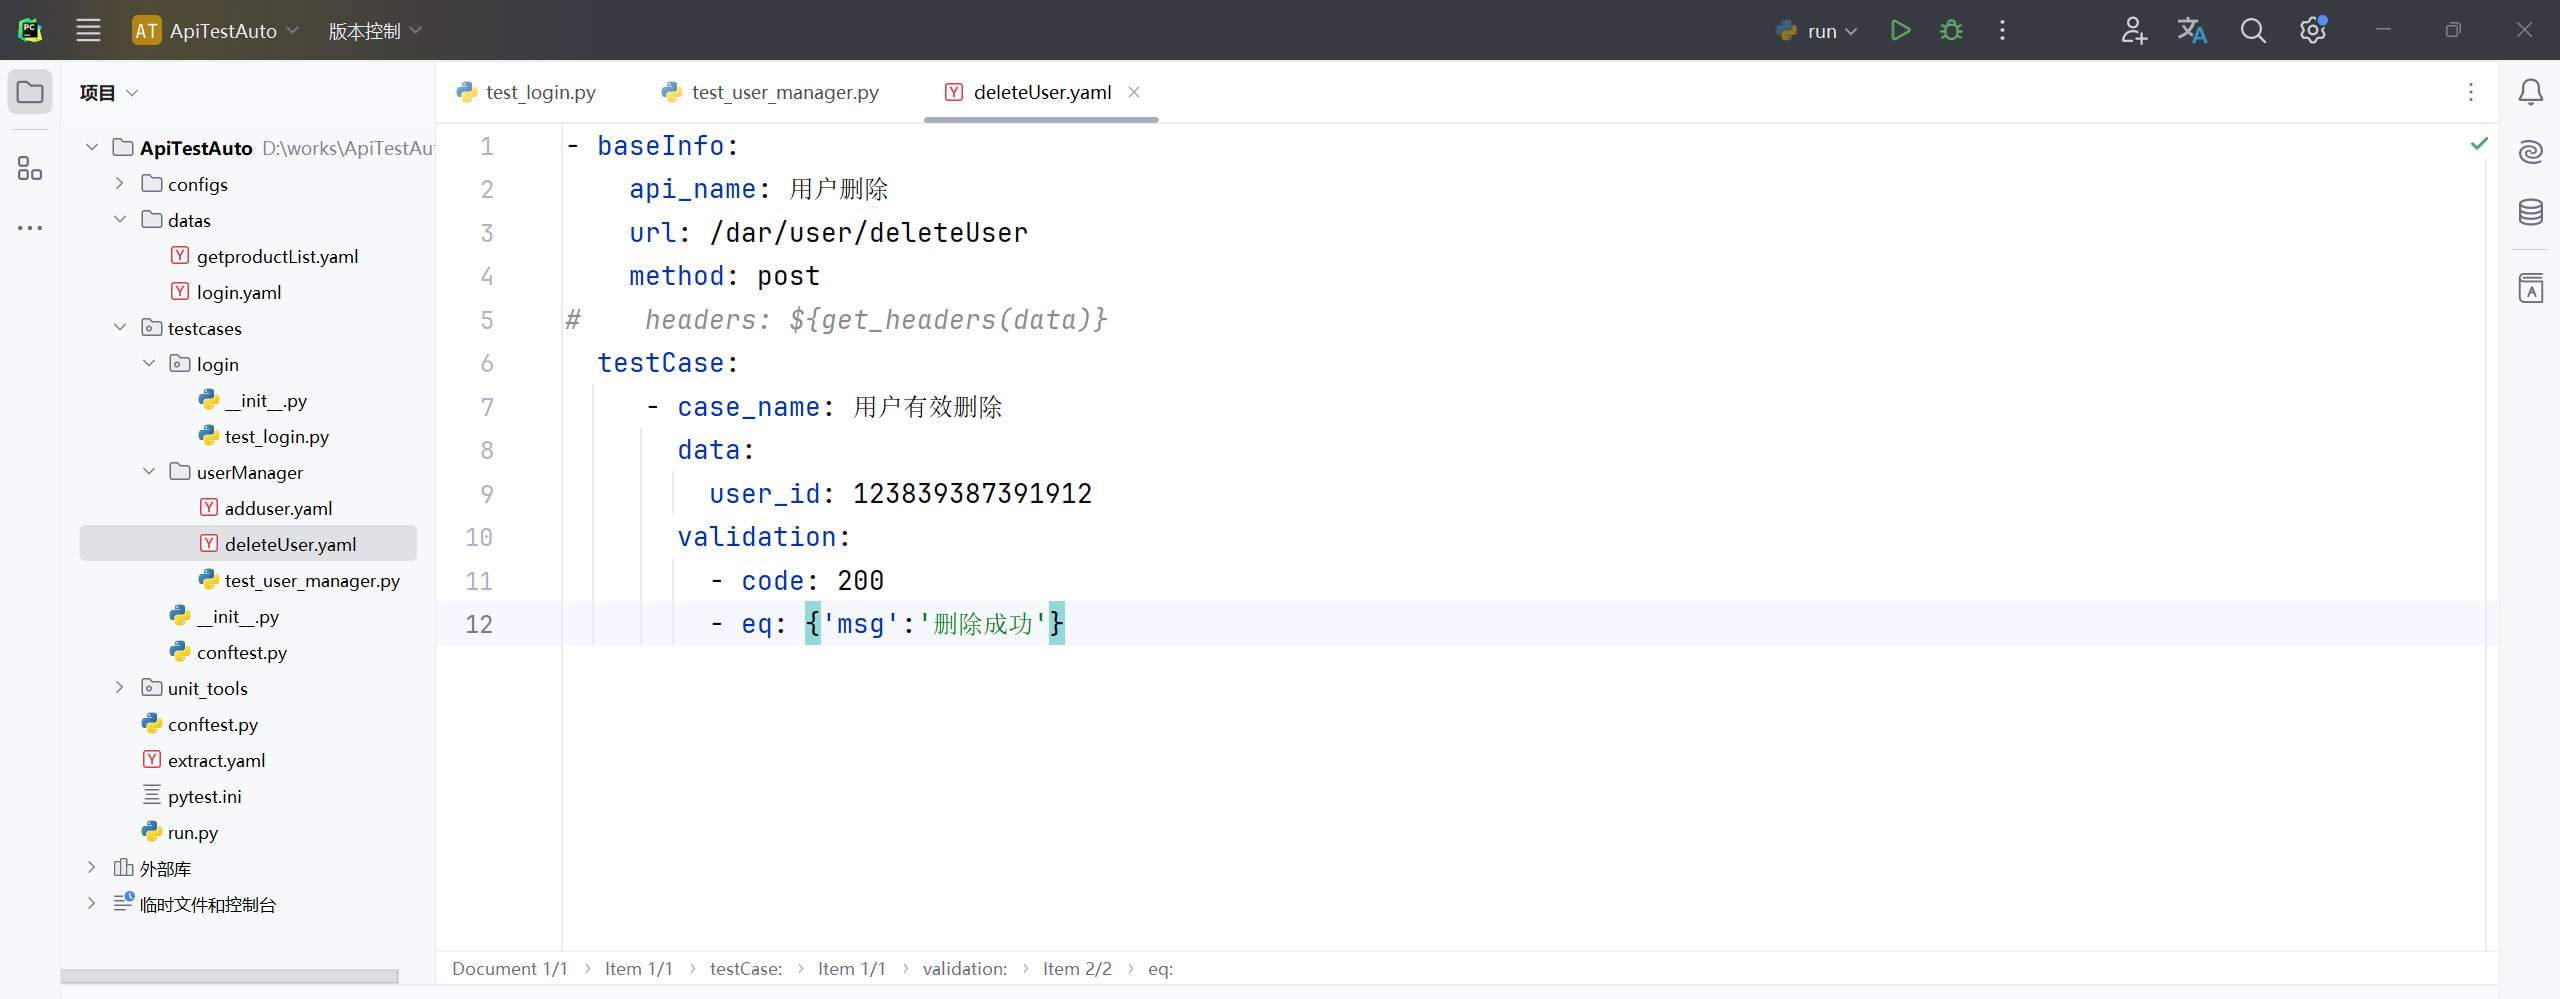
11、在 userManager 目录下新建名称为"queryUser.yaml"的文件并输入以下内容(用户查询文件);
- baseInfo:
    api_name: 用户查询
    url: /dar/user/queryUser
    method: post
#    headers: ${get_headers(data)}
  testCase:
     - case_name: 用户有效查询
       data:
         user_id: 123839387391912
       validation:
         - code: 200
         - eq: {'msg':'查询成功!'}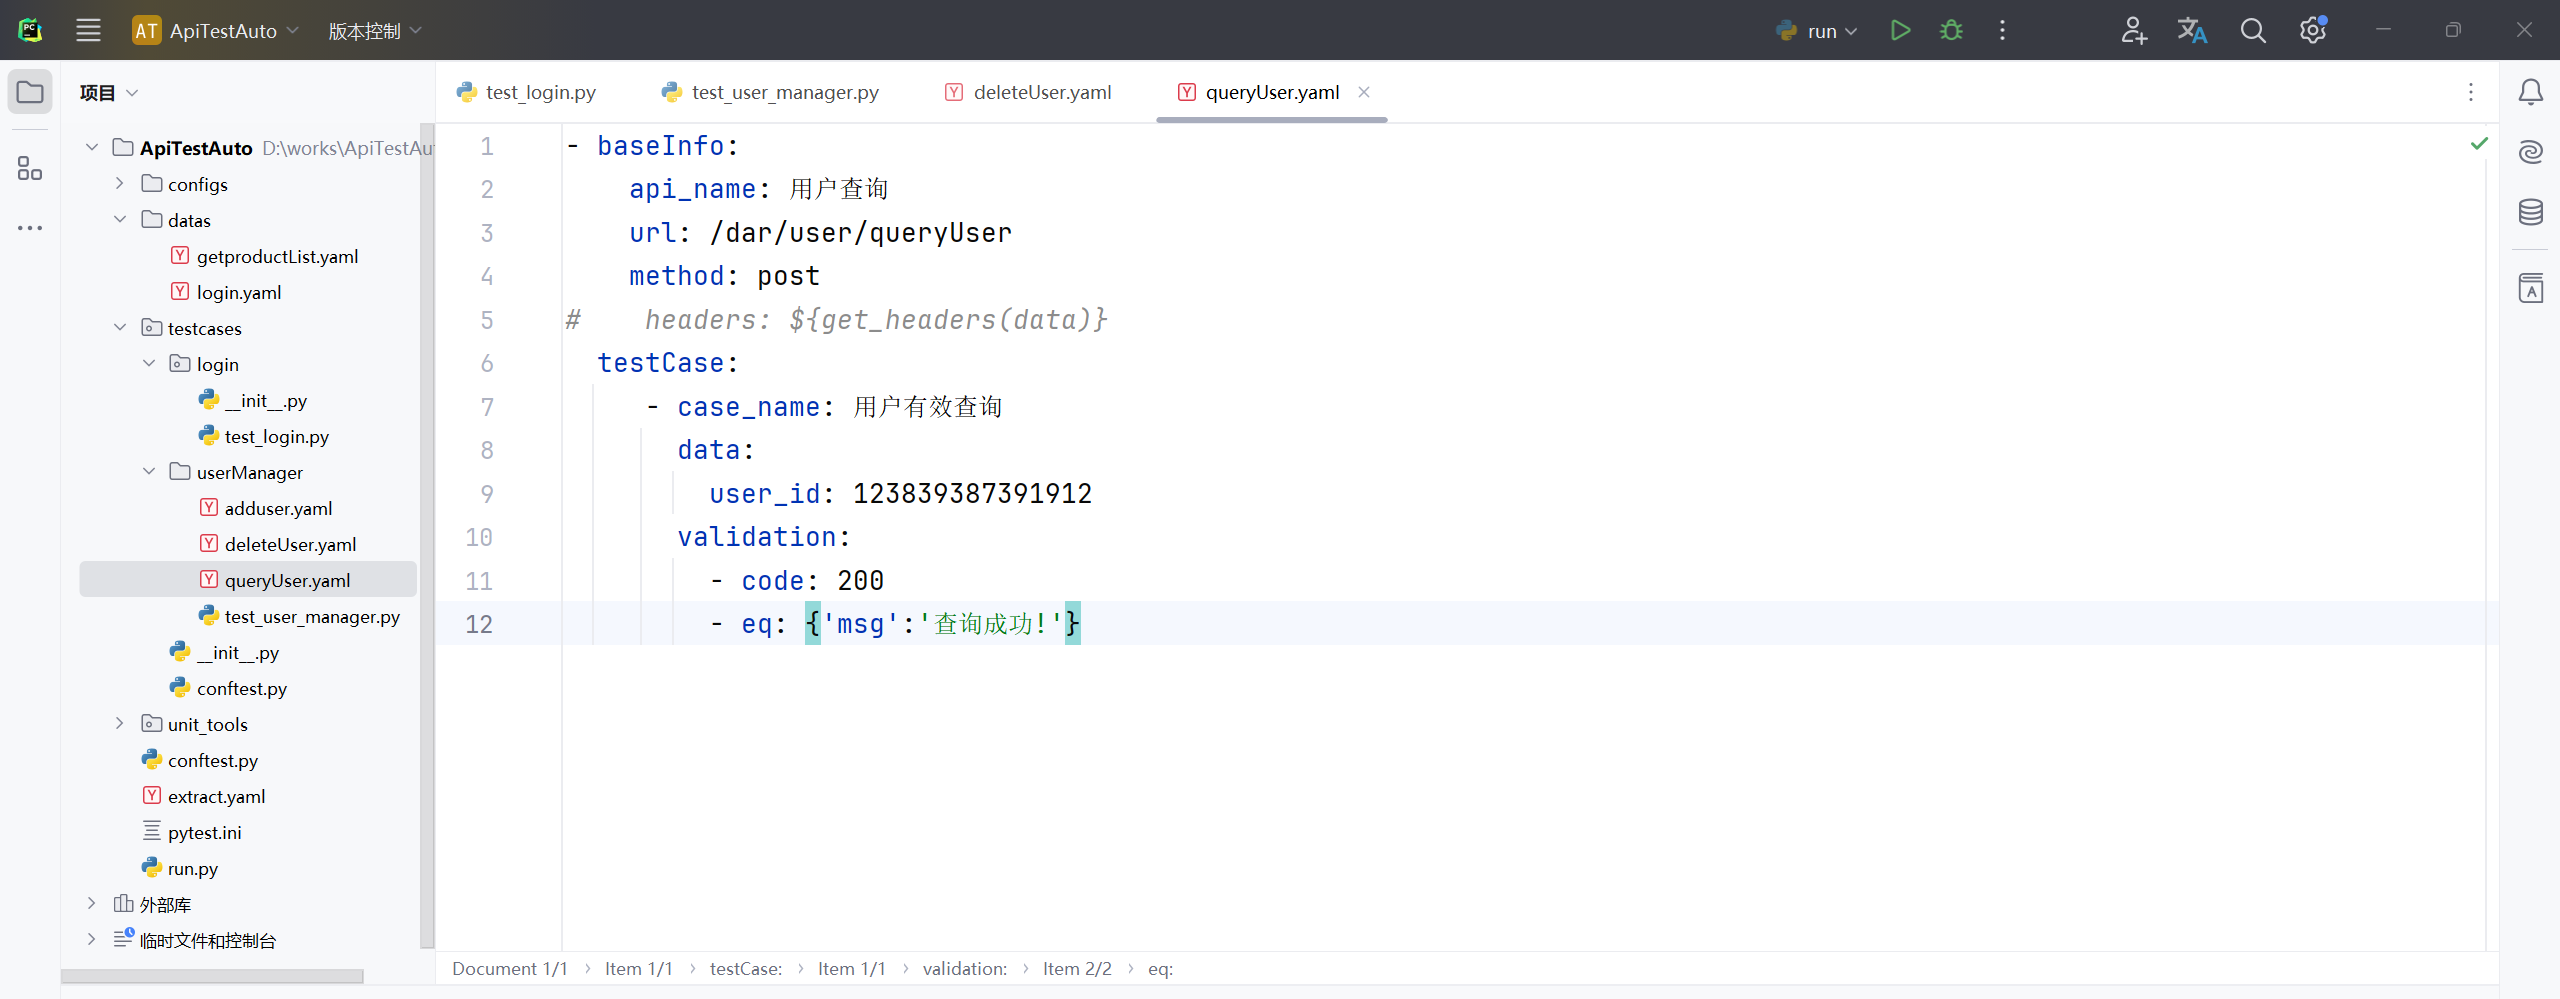
12、在 userManager 目录下新建名称为"updataUser.yaml"的文件并输入以下内容(用户更新文件);
- baseInfo:
    api_name: 用户修改
    url: /dar/user/updateUser
    method: post
#    headers: ${get_headers(data)}
  testCase:
     - case_name: 用户修改
       data:
         username: testadduser
         password: "tset6789#$123"
         role_id: 89588181111112343
         dates: '2023-12-31'
         phone: 13800000000
#         token: ${get_extract_data(token)}
       validation:
         - code: 200
         - eq: {'msg':'更新成功'}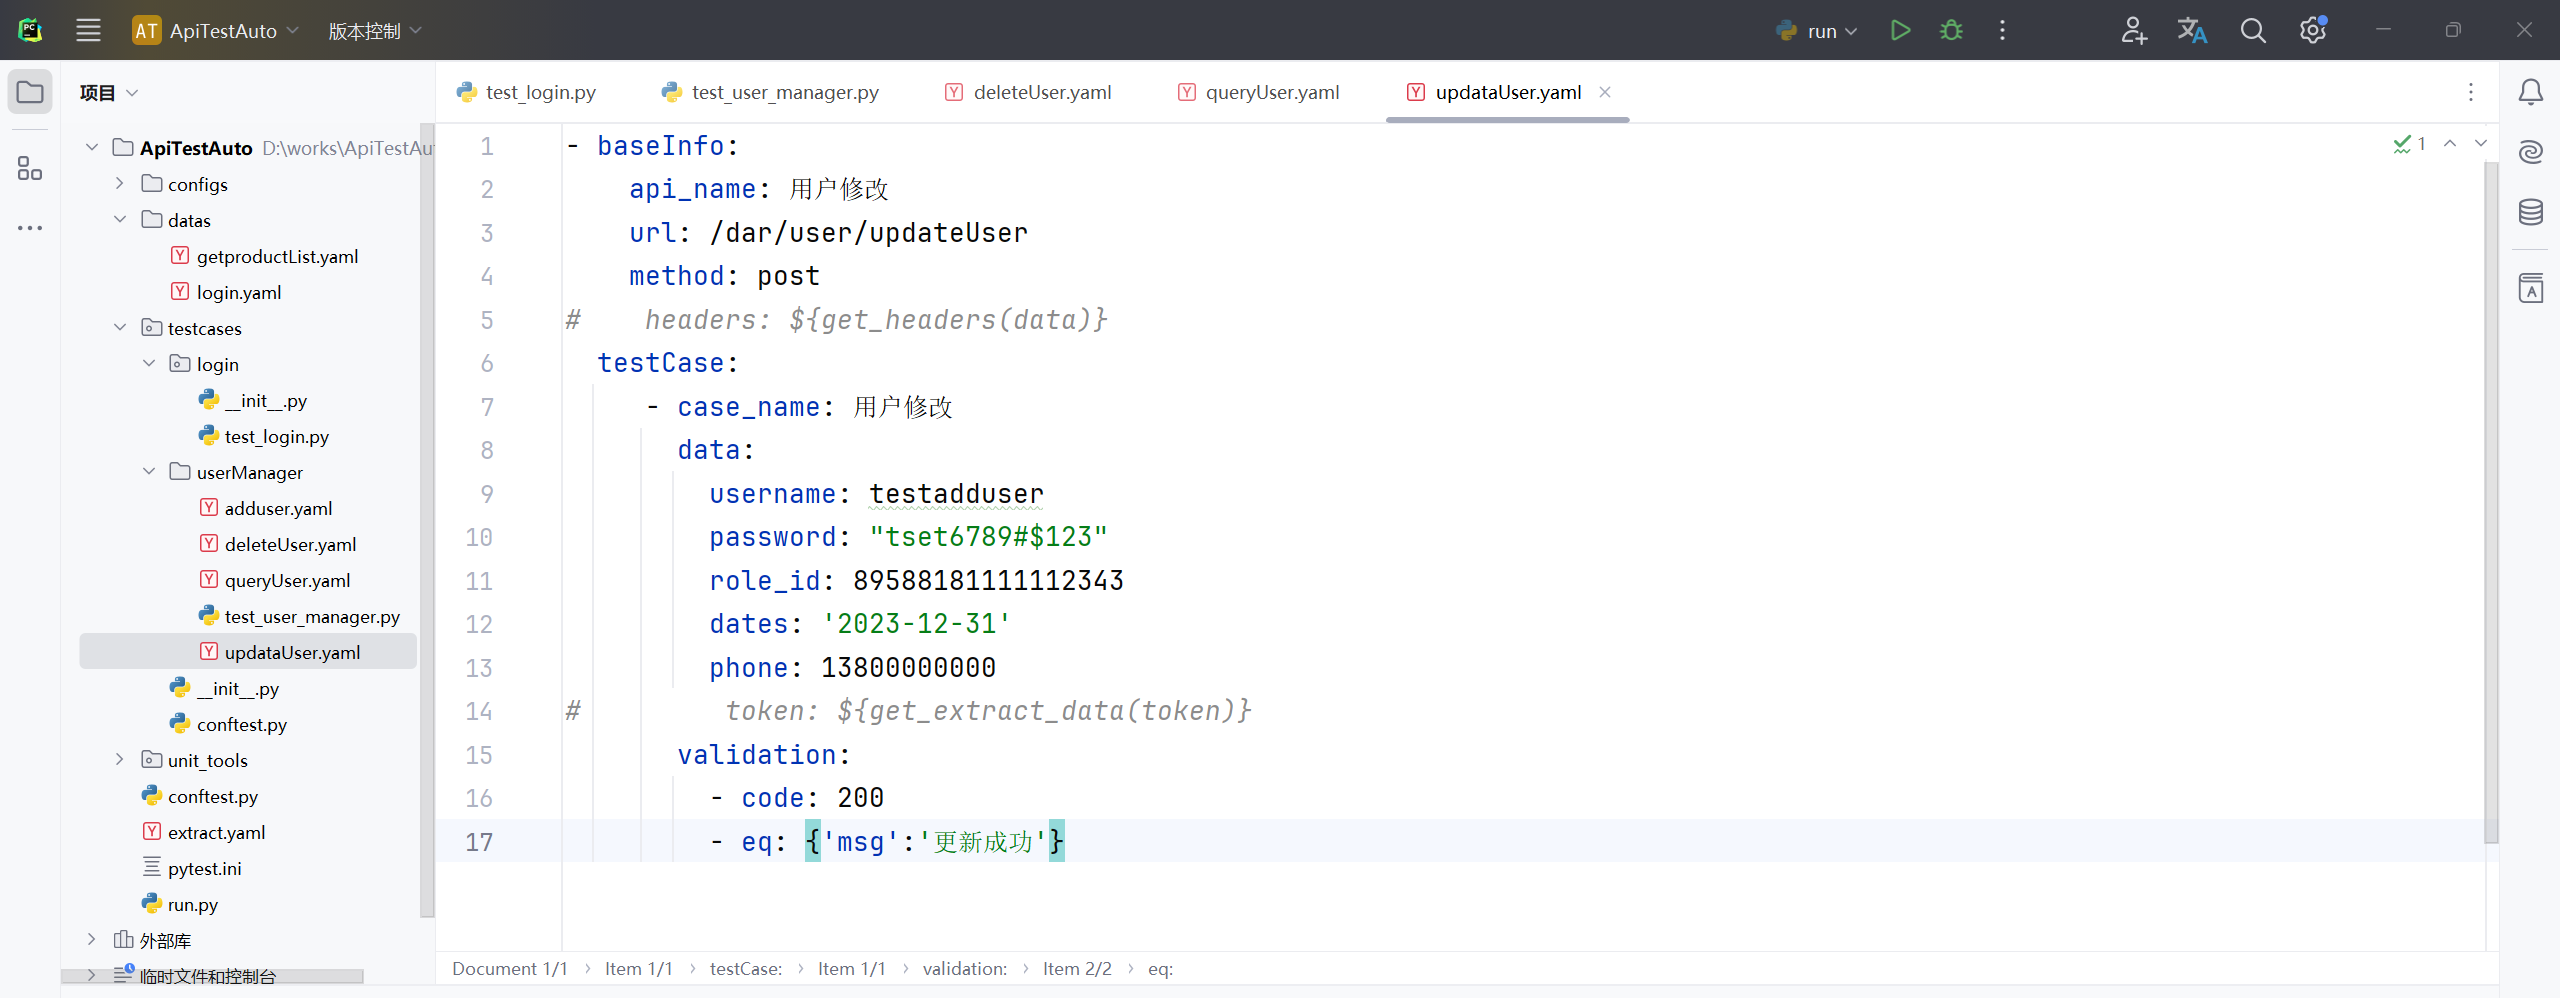
13、修改"test_user_manager.py"文件内容;
# 导包
import pytest
from unit_tools.handle_data.yaml_handler import read_yaml
from unit_tools.apiutils import RequestsBase

class TestUserManager:
    """用户管理模块"""

    @pytest.mark.parametrize('api_info', read_yaml('./testcases/userManager/adduser.yaml'))
    def test_user_add(self, api_info):
        # 引入模块之后通过这个类RequestsBase()去调用里面的方法execute_test_cases()执行所有测试用例--把读取到的数据api_info传递给它
        RequestsBase().execute_test_cases(api_info)

    @pytest.mark.parametrize('api_info', read_yaml('./testcases/userManager/deleteUser.yaml'))
    def test_user_delete(self, api_info):
        RequestsBase().execute_test_cases(api_info)

    @pytest.mark.parametrize('api_info', read_yaml('./testcases/userManager/queryUser.yaml'))
    def test_user_query(self, api_info):
        RequestsBase().execute_test_cases(api_info)

    @pytest.mark.parametrize('api_info', read_yaml('./testcases/userManager/updateUser.yaml'))
    def test_user_update(self, api_info):
        RequestsBase().execute_test_cases(api_info)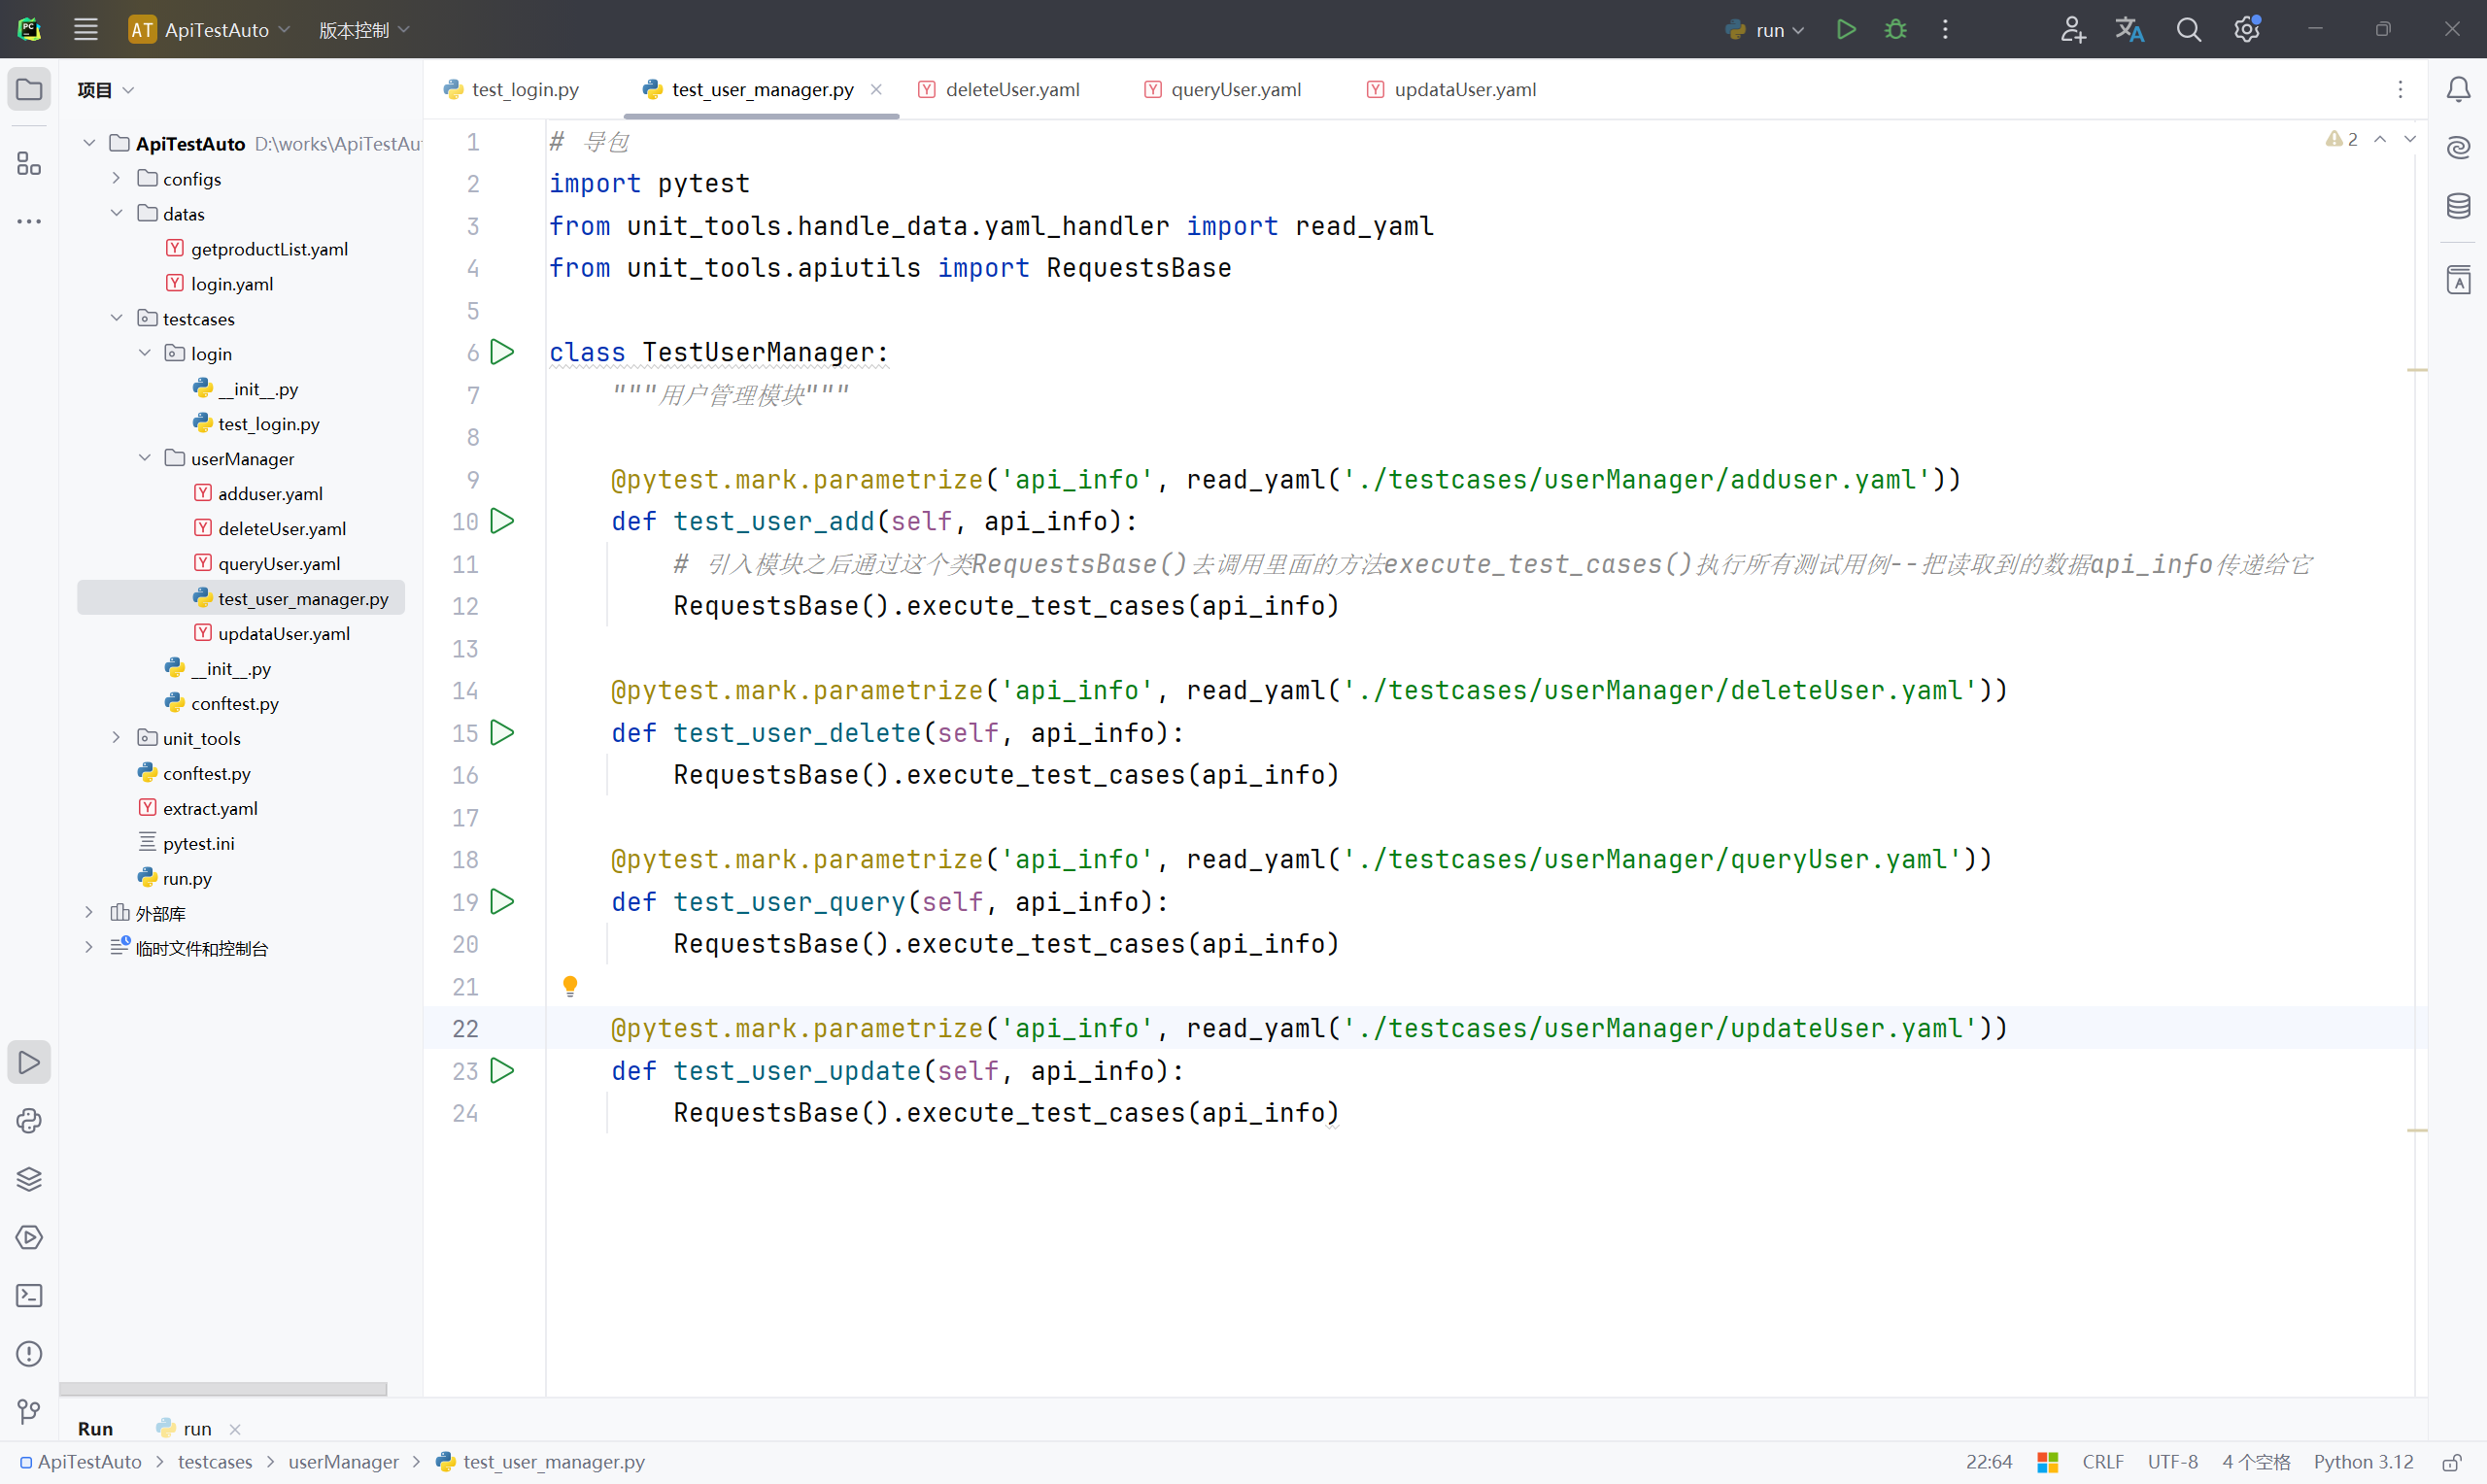
开始撰写其他模块
14、在 testcases 软件包下新建名称"productManager"的目录文件,在 productManager 目录文件路径下新建名称为"getProducList.yaml"的文件,并输入以下内容;
- baseInfo:
    api_name: 获取商品列表
    url: /coupApply/cms/goodsList
    method: get
#    headers:
#      ${get_headers(data)}
  testCase:
     - case_name: 获取商品列表
       params:
         msgType: getHandsetListOfCust
         page: 1
         size: 20
       validation:
         - code: 200
         - eq: {'error_code':'0000'}
       extract_list:
         goodIds: '"goodsId":\s*"(\d+)"'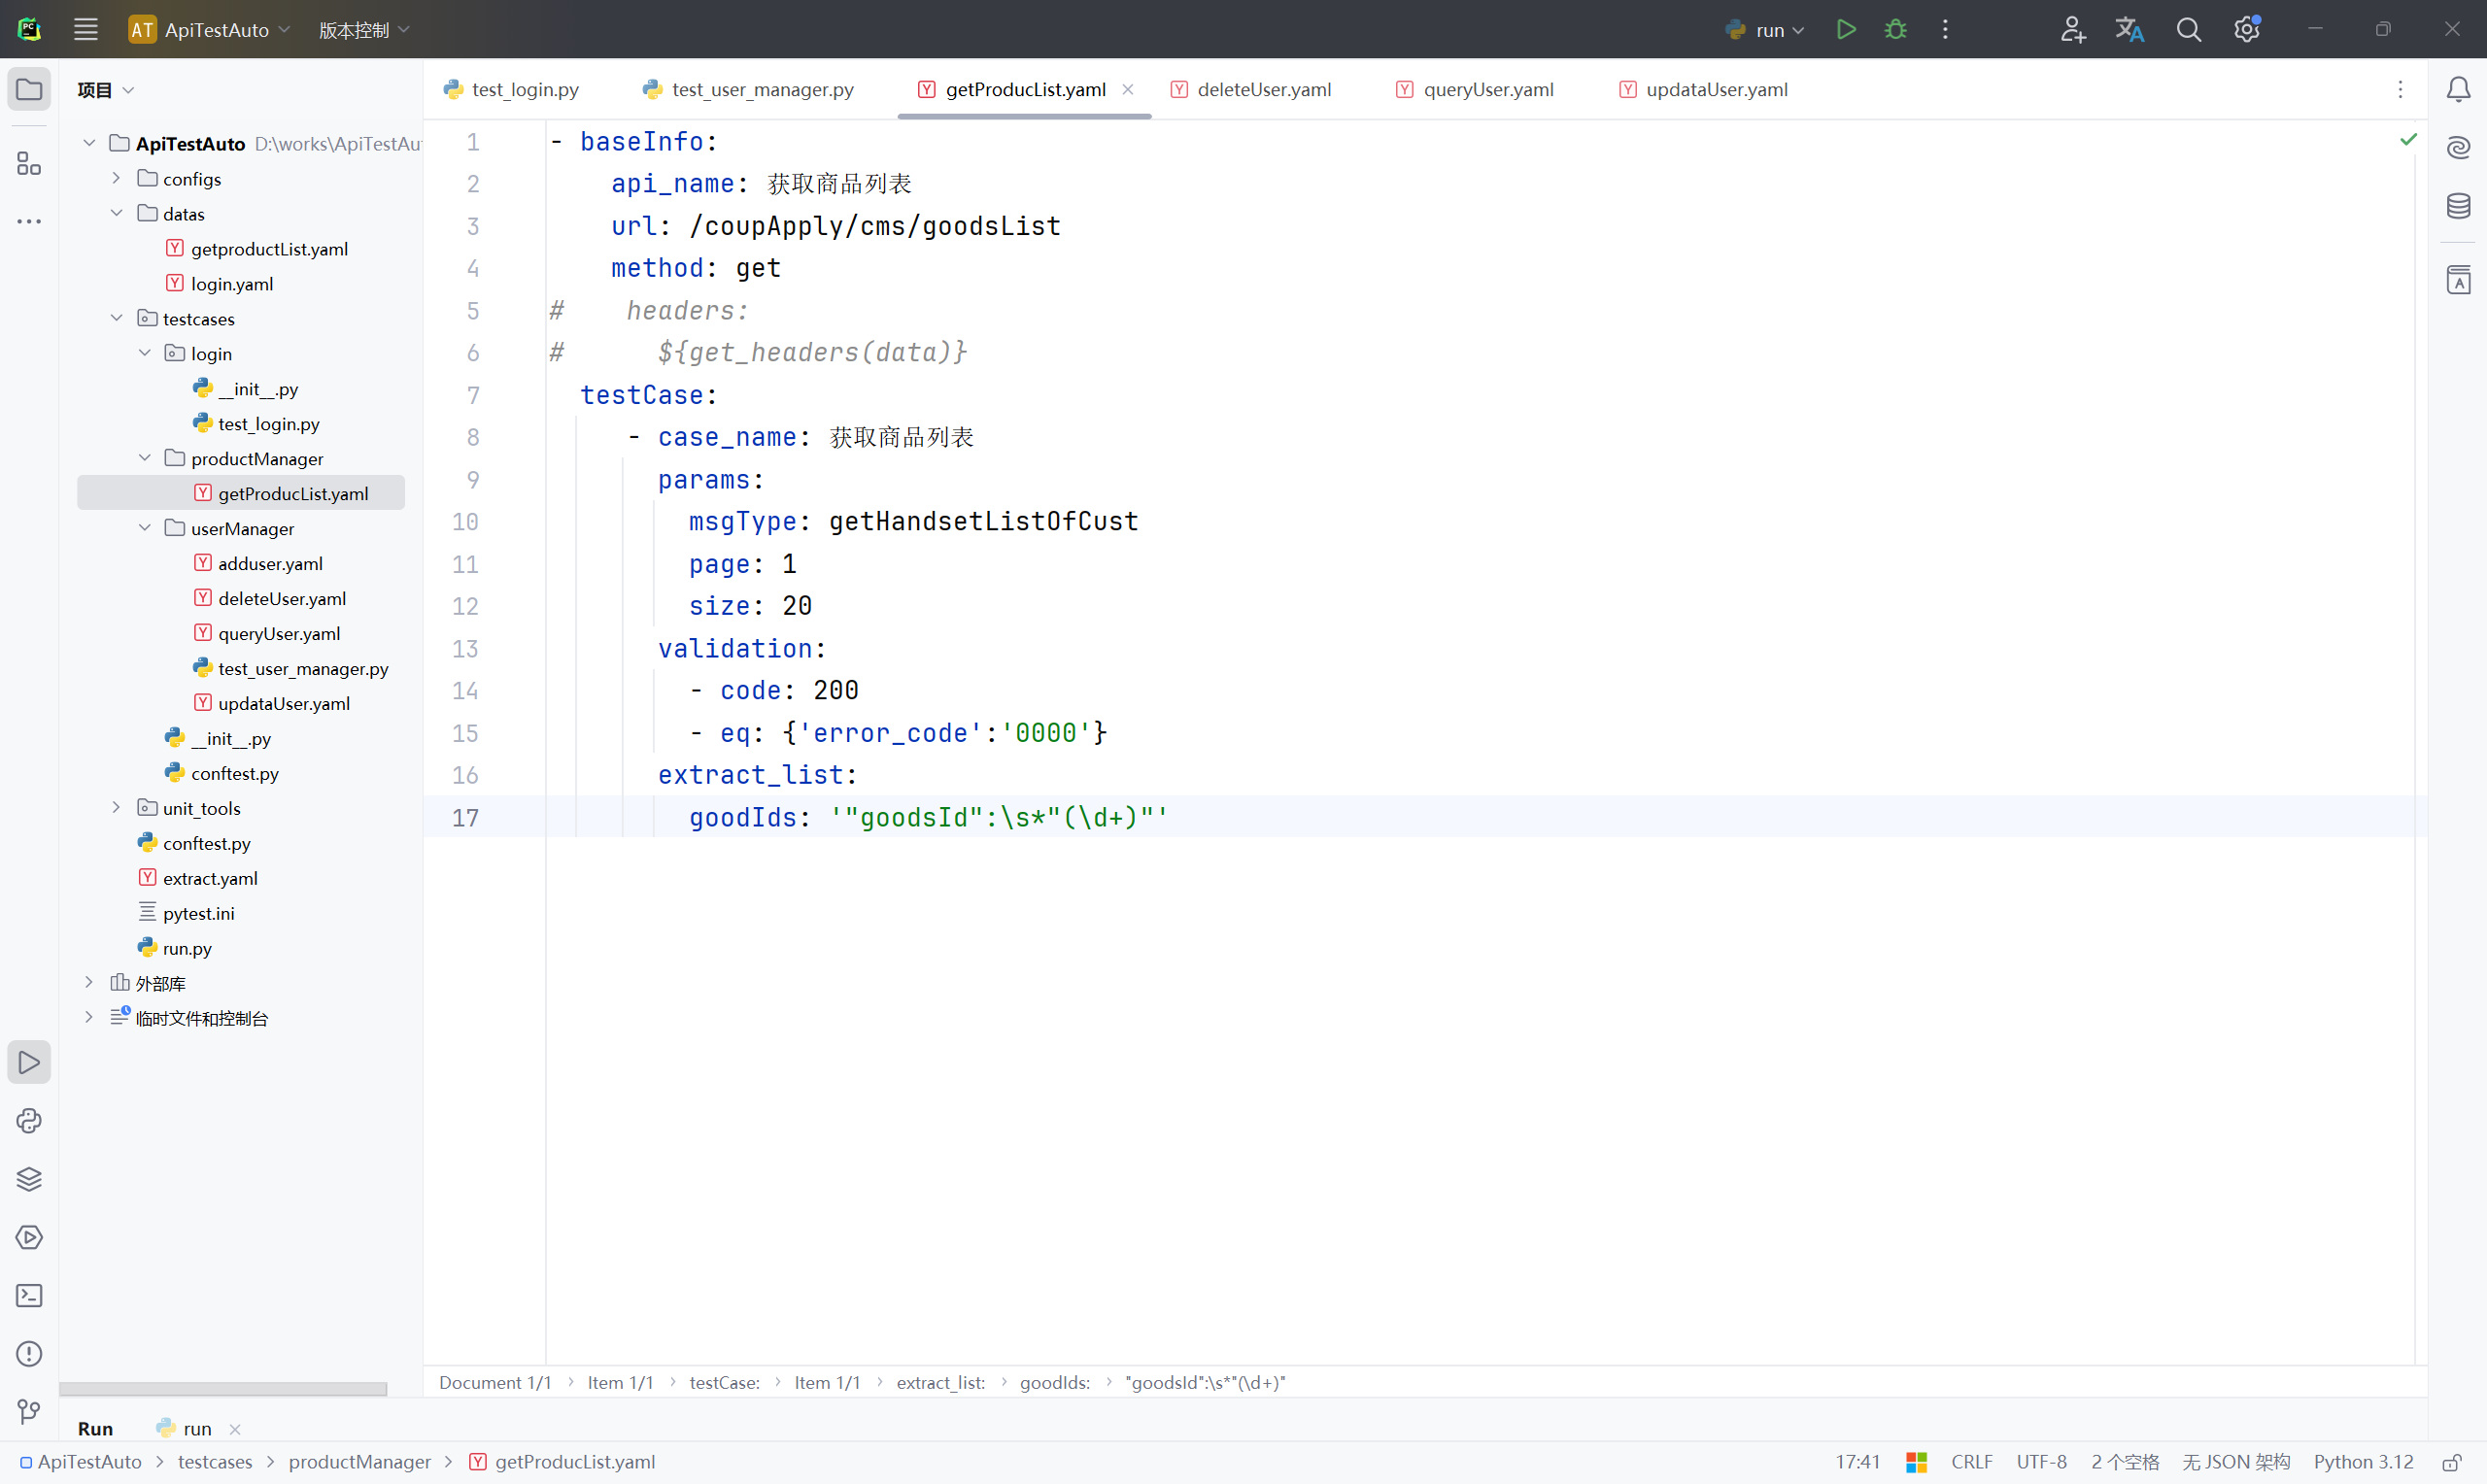
15、创建一个执行文件,在 productManager 目录下下新建名称为"test_product_manager.py"的 Python 文件,并输入以下内容;
# 引入封装的统一操作方法
from unit_tools.apiutils import RequestsBase
# 导入yaml文件读取方法
from unit_tools.handle_data.yaml_handler import read_yaml
import pytest

class TestProductManager:
    @pytest.mark.parametrize('api_info', read_yaml('./testcases/productManager/getPorductList.yaml'))
    def test_get_product_list(self, api_info):
        RequestsBase().execute_test_cases(api_info)
16、在 productManager 目录下新建名称为"getProductDetails.yaml"的文件并输入以下内容;
- baseInfo:
    api_name: 获取商品详情
    url: /coupApply/cms/productDetail
    method: post
    headers:
      ${get_headers(json)}
  testCase:
     - case_name: 获取商品详情
       json:
         pro_id: ${get_extract_data(goodIds,0)}
         page: 1
         size: 20
       validation:
         - code: 200
         - eq: {'error_code':'0000'}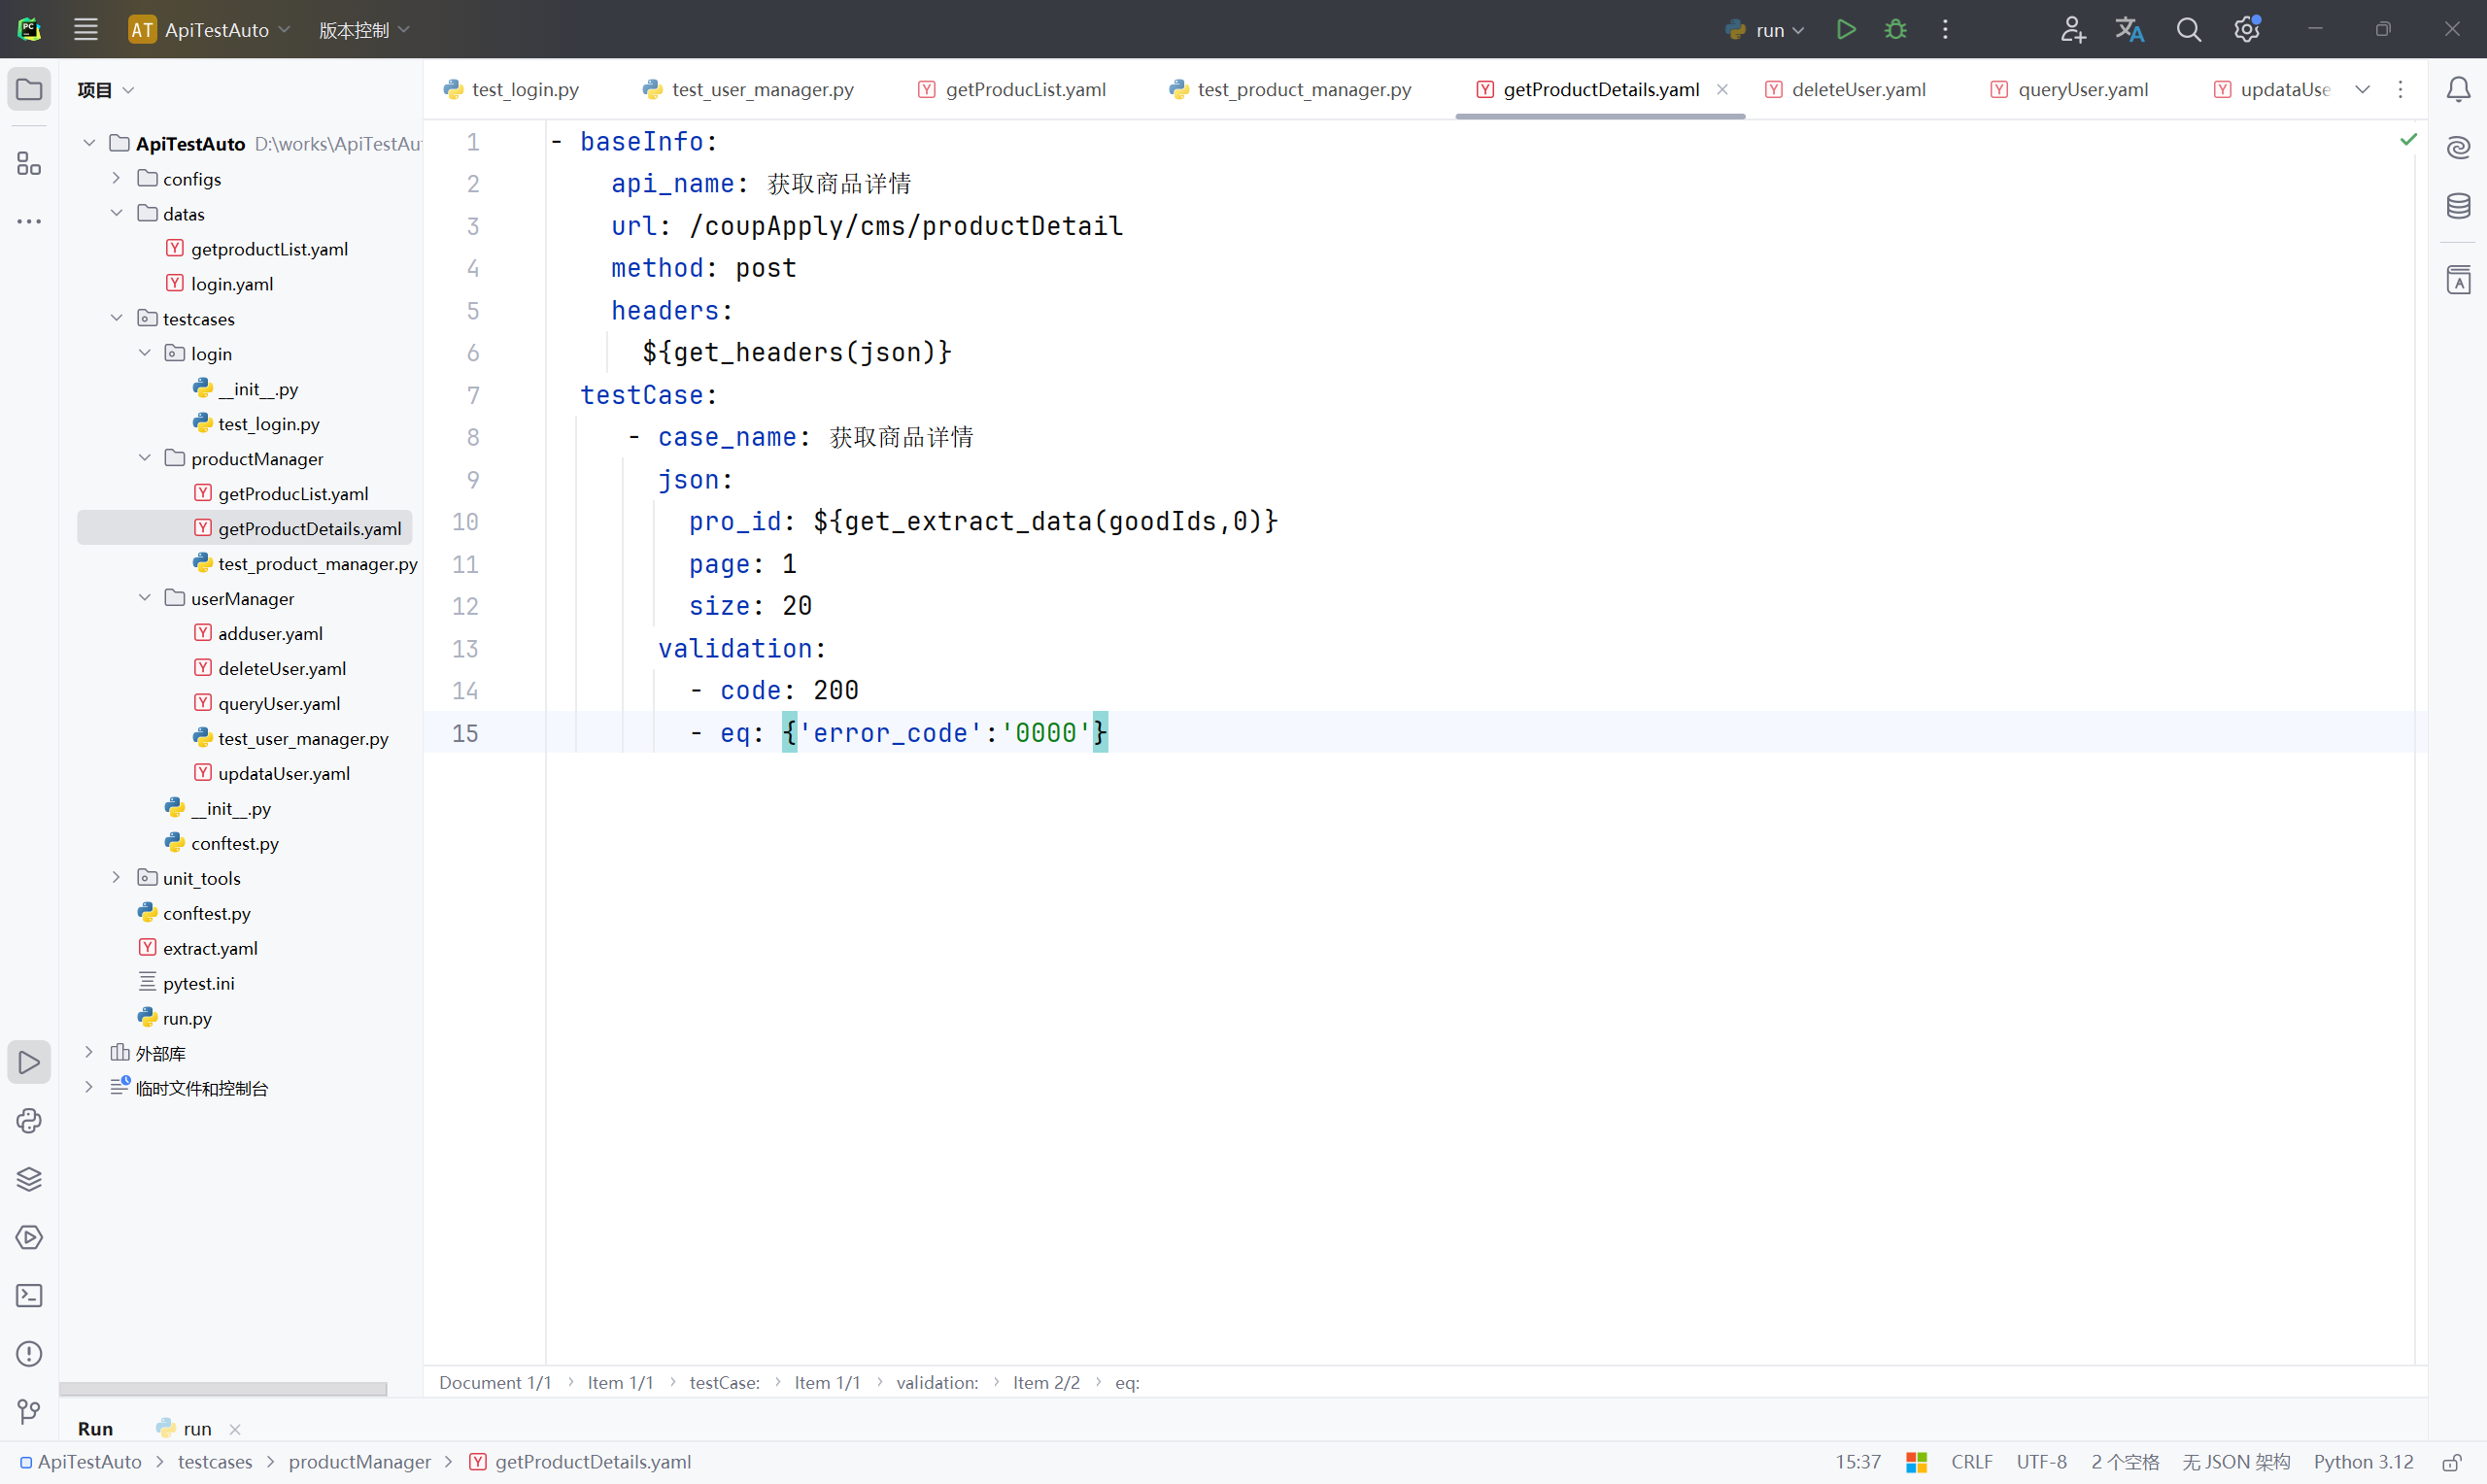
17、修改 productManager 目录文件路径下"test_product_manager.py"的文件内容;
# 引入封装的统一操作方法
from unit_tools.apiutils import RequestsBase
# 导入yaml文件读取方法
from unit_tools.handle_data.yaml_handler import read_yaml
import pytest

class TestProductManager:
    @pytest.mark.parametrize('api_info', read_yaml('./testcases/productManager/getProductList.yaml'))
    def test_get_product_list(self, api_info):
        RequestsBase().execute_test_cases(api_info)

    @pytest.mark.parametrize('api_info', read_yaml('./testcases/productManager/getProductDetails.yaml'))
    def test_get_product_details(self, api_info):
        RequestsBase().execute_test_cases(api_info)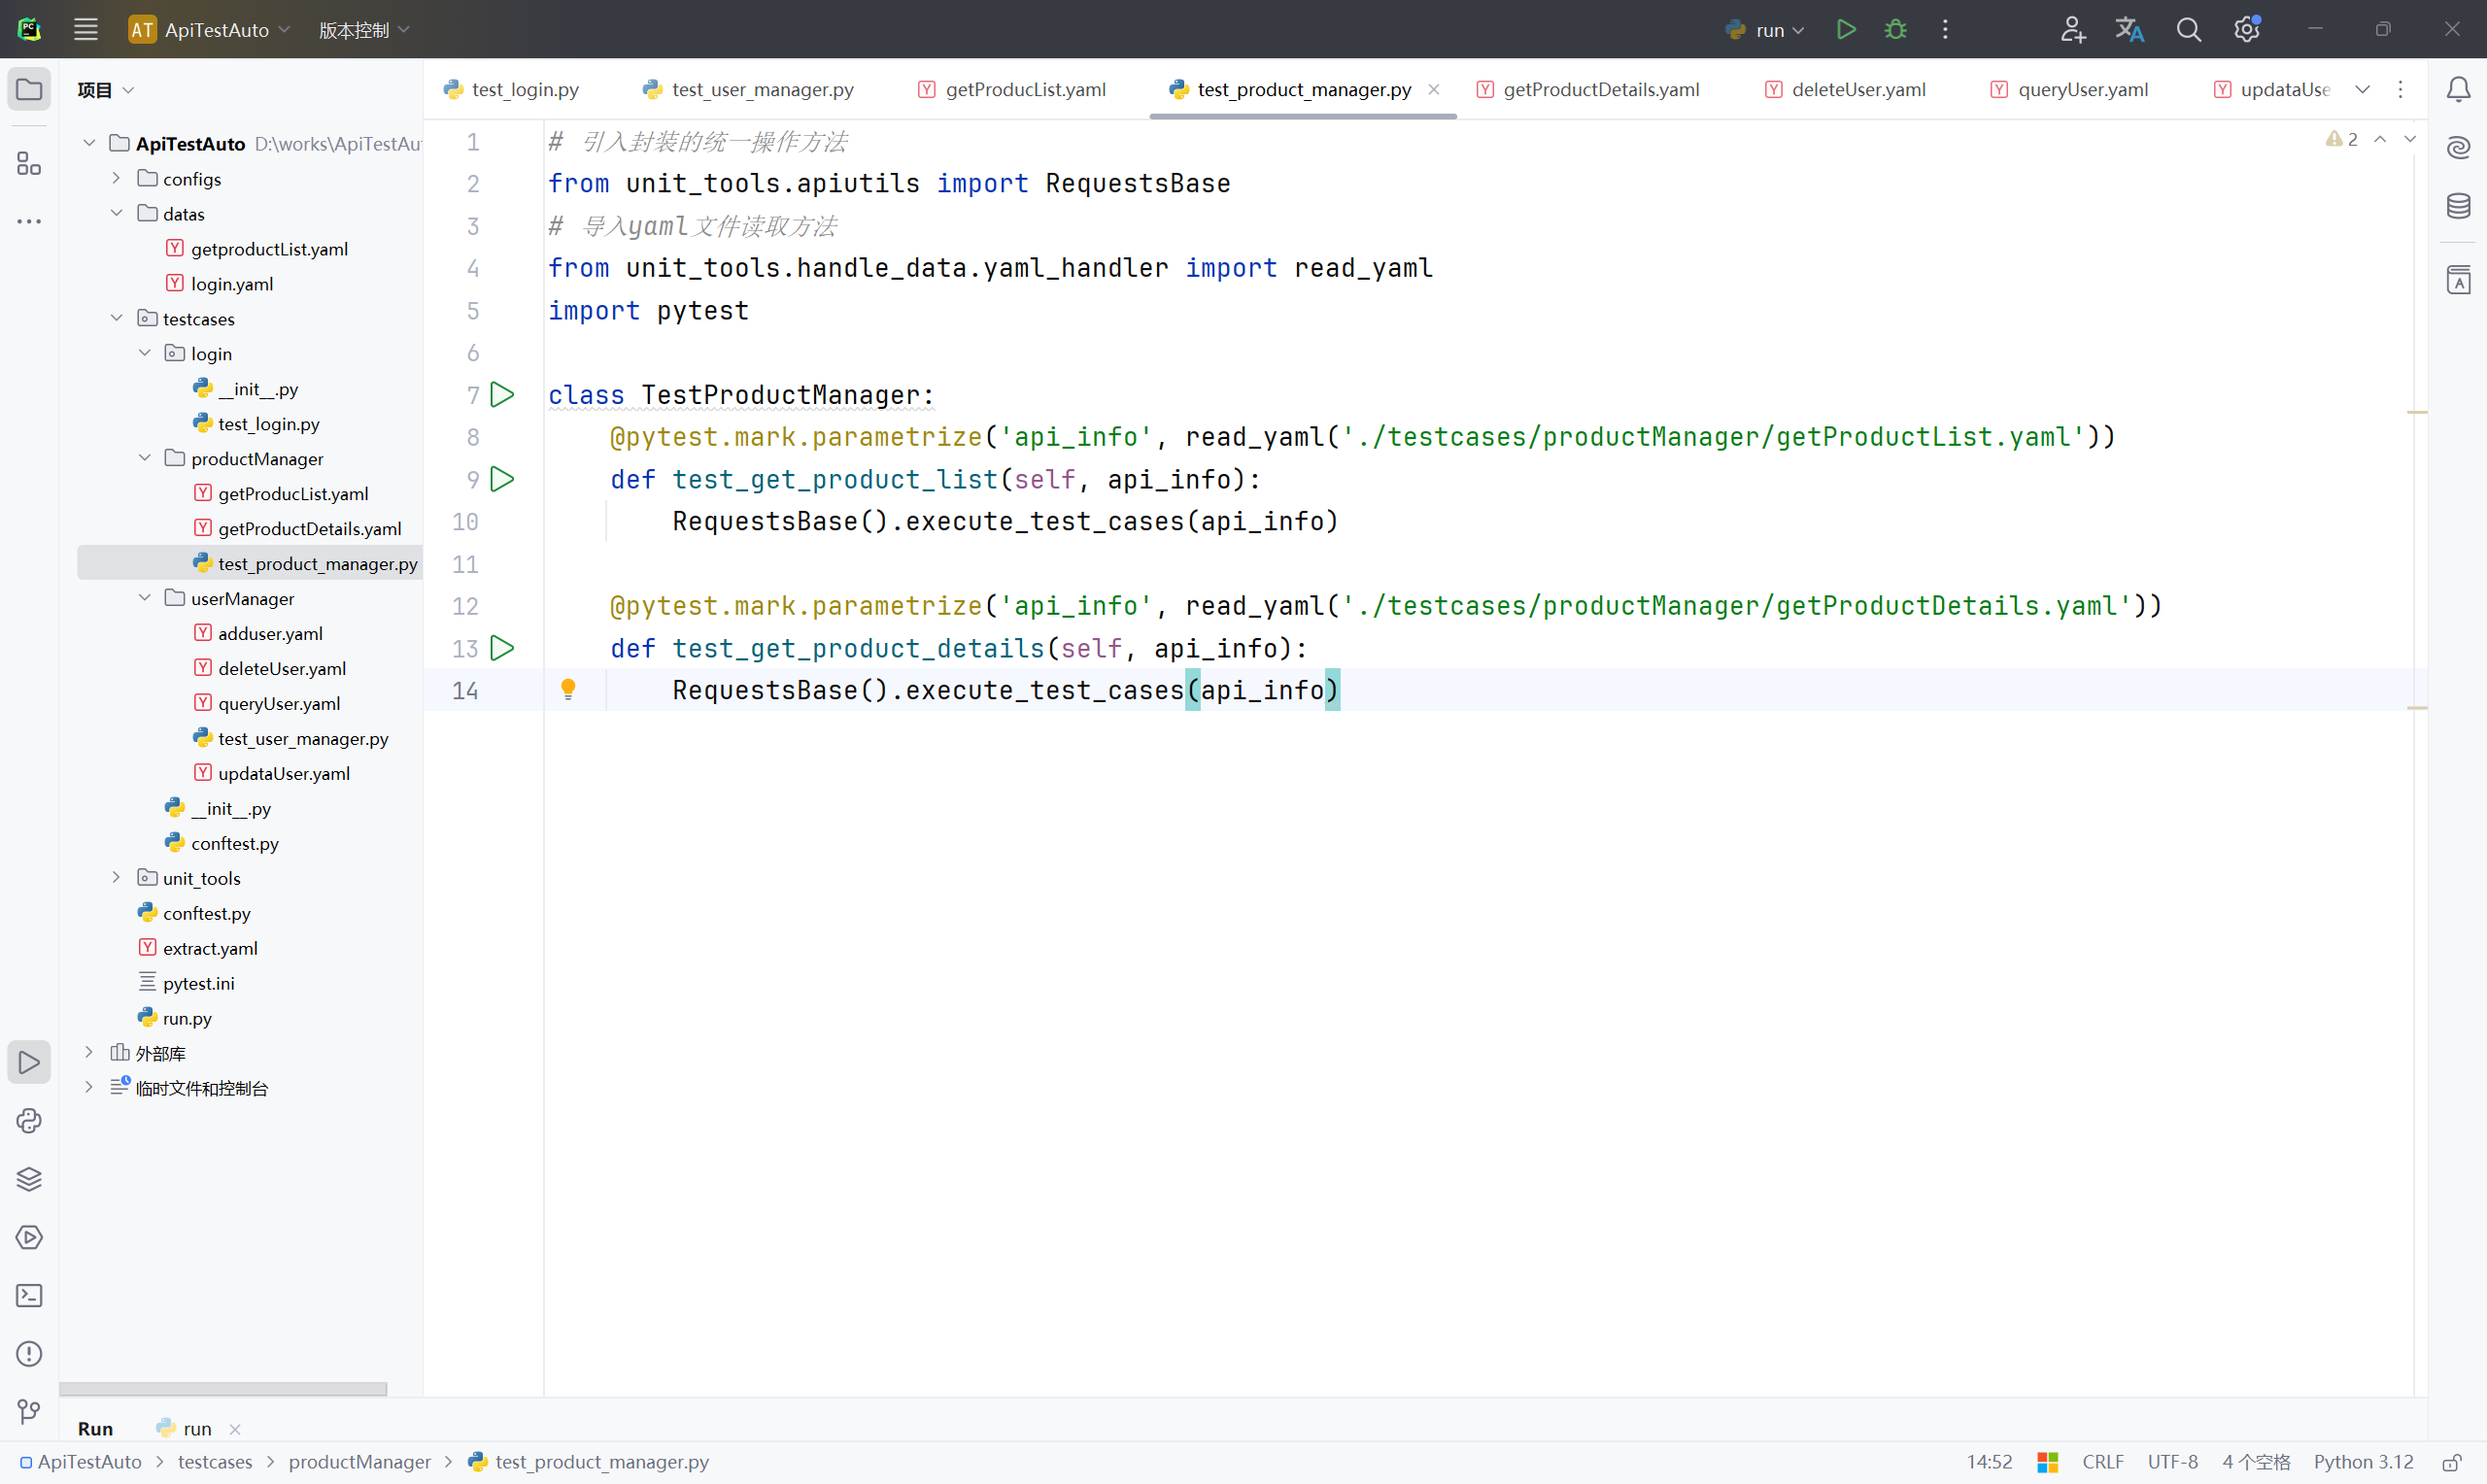
18、修改项目根目录 unit_tools 软件包下"assertion_utils.py"文件内容,优化处理 相等、不相等断言代码;
# -*- coding:utf-8 -*-
# 引入内置模块--类型检测工具--指定类型
from typing import Callable,Any
# 引入自定义异常
# from exception_utils.exception import AssertTypeError
from unit_tools.exception_utils.exception import AssertTypeError
import jsonpath
import operator

# 创建一个断言类 Assertions--里面有多种断言模式
class Assertions:
    """
    接口断言模式封装
    1、状态码断言
    2、包含模式断言
    3、相等断言
    4、不相等断言
    5、数据库断言
    """
    # 封装成一个类方法 @classmethod--说明这个方法不需要访问实例属性
    @classmethod
    # 定义一个方法status_code_assert--跟上两个参数
    def status_code_assert(cls, expected_result, status_code):
        """
        接口的响应状态码断言
        :param expected_result: yaml文件code模式中的预期状态码
        :param status_code: 接口实际返回的状态码
        :return:
        """
        # 断言状态码标识,0 表示成功,其他表示失败
        failure_count = 0
        # 直接判断 预期结果 等于 接口的实际返回状态码
        if expected_result == status_code:
            print(f'状态码断言成功:接口实际返回状态码 {status_code} == {expected_result}')
        else:
            print(f'状态码断言失败:接口实际返回状态码 {status_code} == {expected_result}')
            # 标识加1--加1之后就不等于0了,表示失败
            failure_count += 1
        # 最后把失败统计的标识返回出去
        return failure_count

    @classmethod
    # 包含模式断言
    def contain_assert(cls, expected_result, response):
        """
        字符串包含模式,断言预期结果字符串是否包含在接口的实际响应返回信息中
        :param expected_result: yaml文件中的预期结果
        :param response: 接口的实际返回值
        :return:
        """
        failure_count = 0
        # 调用字典中的items()分别拿到key值、value值
        for assert_key, assert_value in expected_result.items():
            # print(f'key值:{assert_key} -- value值:{assert_value}')
            # 通过调用jsonpath.jsonpath()方法去接口的实际响应结果response中 根据表达式 $.. 去提取
            response_list = jsonpath.jsonpath(response, f'$..{assert_key}')
            # print(response_list)
            # 判断提取到的结果存不存在--并且是不是字符串类型
            if response_list and isinstance(response_list[0], str):
                # 如果是字符串类型的话,则重新组成一个字符串--把list数据转成字符串
                response_str = ''.join(response_list)
                # print(response_str)
                success_message = f'包含模式断言成功:预期结果【{assert_value}】存在实际结果【{response_str}】中'
                failure_message = f'包含模式断言失败:预期结果【{assert_value}】未存在,没有在实际结果【{response_str}】中找到'
                # 判断assert_value是不是包含在response_str里面
                if assert_value in response_str:
                    print(success_message)
                else:
                    failure_count += 1
                    print(failure_message)
        return failure_count

    @classmethod
    def equal_assert(cls, expected_result, response):
        """
        相等断言,根据yaml里面的validation关键词下面的eq模式数据去跟接口实际响应信息对比
        :param expected_result: (dict)yaml里面的eq值
        :param response: (dict)接口实际响应结果
        :return:
        """
        failure_count = 0
        if isinstance(response, dict) and isinstance(expected_result, dict):
            # print(f'yaml的预期结果:{expected_result}')
            # print(f'接口的实际结果:{response}')
            # 找出实际结果与预期结果共同的key值
            common_key = list(expected_result.keys() & response.keys())
            if common_key:
                common_key = common_key[0]
                # print(common_key)
                # 根据相同的key值去实际结果中获取,并重新生成一个实际结果的字典
                new_actual_result = {common_key: response[common_key]}
                # print(new_actual_result)
                # 调用operator.eq()方法
                eq_assert = operator.eq(new_actual_result, expected_result)
                if eq_assert:
                    print(f'相等断言成功:接口实际结果 {new_actual_result} == 预期结果:{expected_result}')
                else:
                    failure_count += 1
                    print(f'相等断言失败:接口实际结果 {new_actual_result} != 预期结果:{expected_result}')
            else:
                failure_count += 1
                print('相等断言失败:请检查yaml文件eq模式的预期结果或接口返回值是否正确!')

        return failure_count

    @classmethod
    def not_equal_assert(cls, expected_result, response):
        """
        不相等断言,根据yaml里面的validation关键词下面的ne模式数据去跟接口实际响应信息对比
        :param expected_result: (dict)yaml里面的ne值
        :param response: (dict)接口实际响应结果
        :return:
        """
        failure_count = 0
        if isinstance(response, dict) and isinstance(expected_result, dict):
            # print(f'yaml的预期结果:{expected_result}')
            # print(f'接口的实际结果:{response}')
            # 找出实际结果与预期结果共同的key值
            common_key = list(expected_result.keys() & response.keys())
            if common_key:
                common_key = common_key[0]
                # print(common_key)
                # 根据相同的key值去实际结果中获取,并重新生成一个实际结果的字典
                new_actual_result = {common_key: response[common_key]}
                # print(new_actual_result)
                # 调用operator.ne()方法
                eq_assert = operator.ne(new_actual_result, expected_result)
                if eq_assert:
                    print(f'不相等断言成功:接口实际结果 {new_actual_result} != 预期结果:{expected_result}')
                else:
                    failure_count += 1
                    print(f'不相等断言失败:接口实际结果 {new_actual_result} == 预期结果:{expected_result}')
            else:
                failure_count += 1
                print('不相等断言失败:请检查yaml文件ne模式的预期结果或接口返回值是否正确!')

        return failure_count

    @classmethod
    # 定义一个方法assert_result 用于管理多种断言模式
    def assert_result(cls, expected_result, response, status_code):
        """
        断言主函数,通过all_flag标记,如all_flag == 0 表示测试成功,否则为失败
        :param expected_result: (list)yaml文件validation关键词下面的预期结果
        :param response: (dict)接口的实际响应信息
        :param status_code: 接口的实际响应状态码
        :return:
        """
        all_flag = 0
        # 通过字典映射的关系去管理方法
        assert_methods = {
            'code': cls.status_code_assert,
            'contain': cls.contain_assert,
            'eq': cls.equal_assert,
            'ne': cls.not_equal_assert
        }
        try:
            # 先打印查看一下预期结果是什么类型
            # print(f'打印结果:{expected_result}', '打印类型:', type(expected_result))
            print(f'打印结果:{expected_result}, 打印类型:', type(expected_result))
            # 通过for循环 拿到断言模式
            for yq in expected_result:
                # print(yq)
                # 先拿到 断言模式assert_mode,预期结果值assert_value--通过字典items()函数获取到每一个值
                for assert_mode, assert_value in yq.items():
                    # print(f'断言模式:{assert_mode}--预期值:{assert_value}')
                    # 通过assert_methods.get(assert_mode)它的字典去读取对应的断言方法
                    # 表示assert_method是一个接收两个参数,类型为Any表示可以是任意类型,并返回整数的可调用对象
                    assert_method:Callable[[Any, Any], int] = assert_methods.get(assert_mode)
                    # 判断获取到的值存在
                    if assert_method:
                        # 调用对应的断言方法,传递适当的参数
                        if assert_mode == 'code':
                            # 返回一下标识 flag
                            flag = assert_method(assert_value, status_code)
                        else:
                            flag = assert_method(assert_value, response)
                        all_flag += flag
                    else:
                        print(f'不支持{assert_mode}该断言模式')
                        # 手动抛出异常
                        raise AssertTypeError(f'不支持{assert_mode}该断言模式')
        except Exception as exceptions:
            # print(exceptions)
            # 抛出异常
            raise exceptions

        # 通过assert关键词去断言 标识all_flag 等于0即测试成功,不等于0测试失败
        assert all_flag == 0, '测试失败!'
        print('测试成功!')
19、继续修改 testcases 软件包下"conftest.py"文件内容,如果里面会话级别是 session 的话则改为函数级别 function(默认的,也可以不用写);
# 导包
import pytest
# 前后置操作
@pytest.fixture(scope='function', autouse=True)
def print_info():
    print('----------接口测试开始----------')
    yield
    print('----------接口测试结束----------')
处理带 cookie 的数据
建议写在其他模块,可以新建一个模块;
20、在 testcases 软件包下新建名称"logisticsMode"的目录文件,在 logisticsMode 目录文件路径下新建名称为"getgetMaterial.yaml"的文件,并输入以下内容;
- baseInfo:
    api_name: 获取物料信息
    url: /api/order/customer/orderPlan/getMaterial
    method: get
    headers:
      ${get_headers(data)}
    cookies:
      ${get_extract_data(Cookie)}
  testCase:
     - case_name: 获取物料信息
       validation:
         - code: 200
         - eq: {'message':'操作成功'}
       extract_list:
         materIds: $.material[*]
21、创建一个执行文件,在 logisticsMode 目录下下新建名称为"test_logistics_mode.py"的 Python 文件,并输入以下内容;
import pytest
from unit_tools.handle_data.yaml_handler import read_yaml
from unit_tools.apiutils import RequestsBase

class TestLogisticsMode:

    @pytest.mark.parametrize('api_info', read_yaml('./testcases/logisticsMode/getgetMaterial.yaml'))
    def test_get_material_info(self, api_info):
        RequestsBase().execute_test_cases(api_info)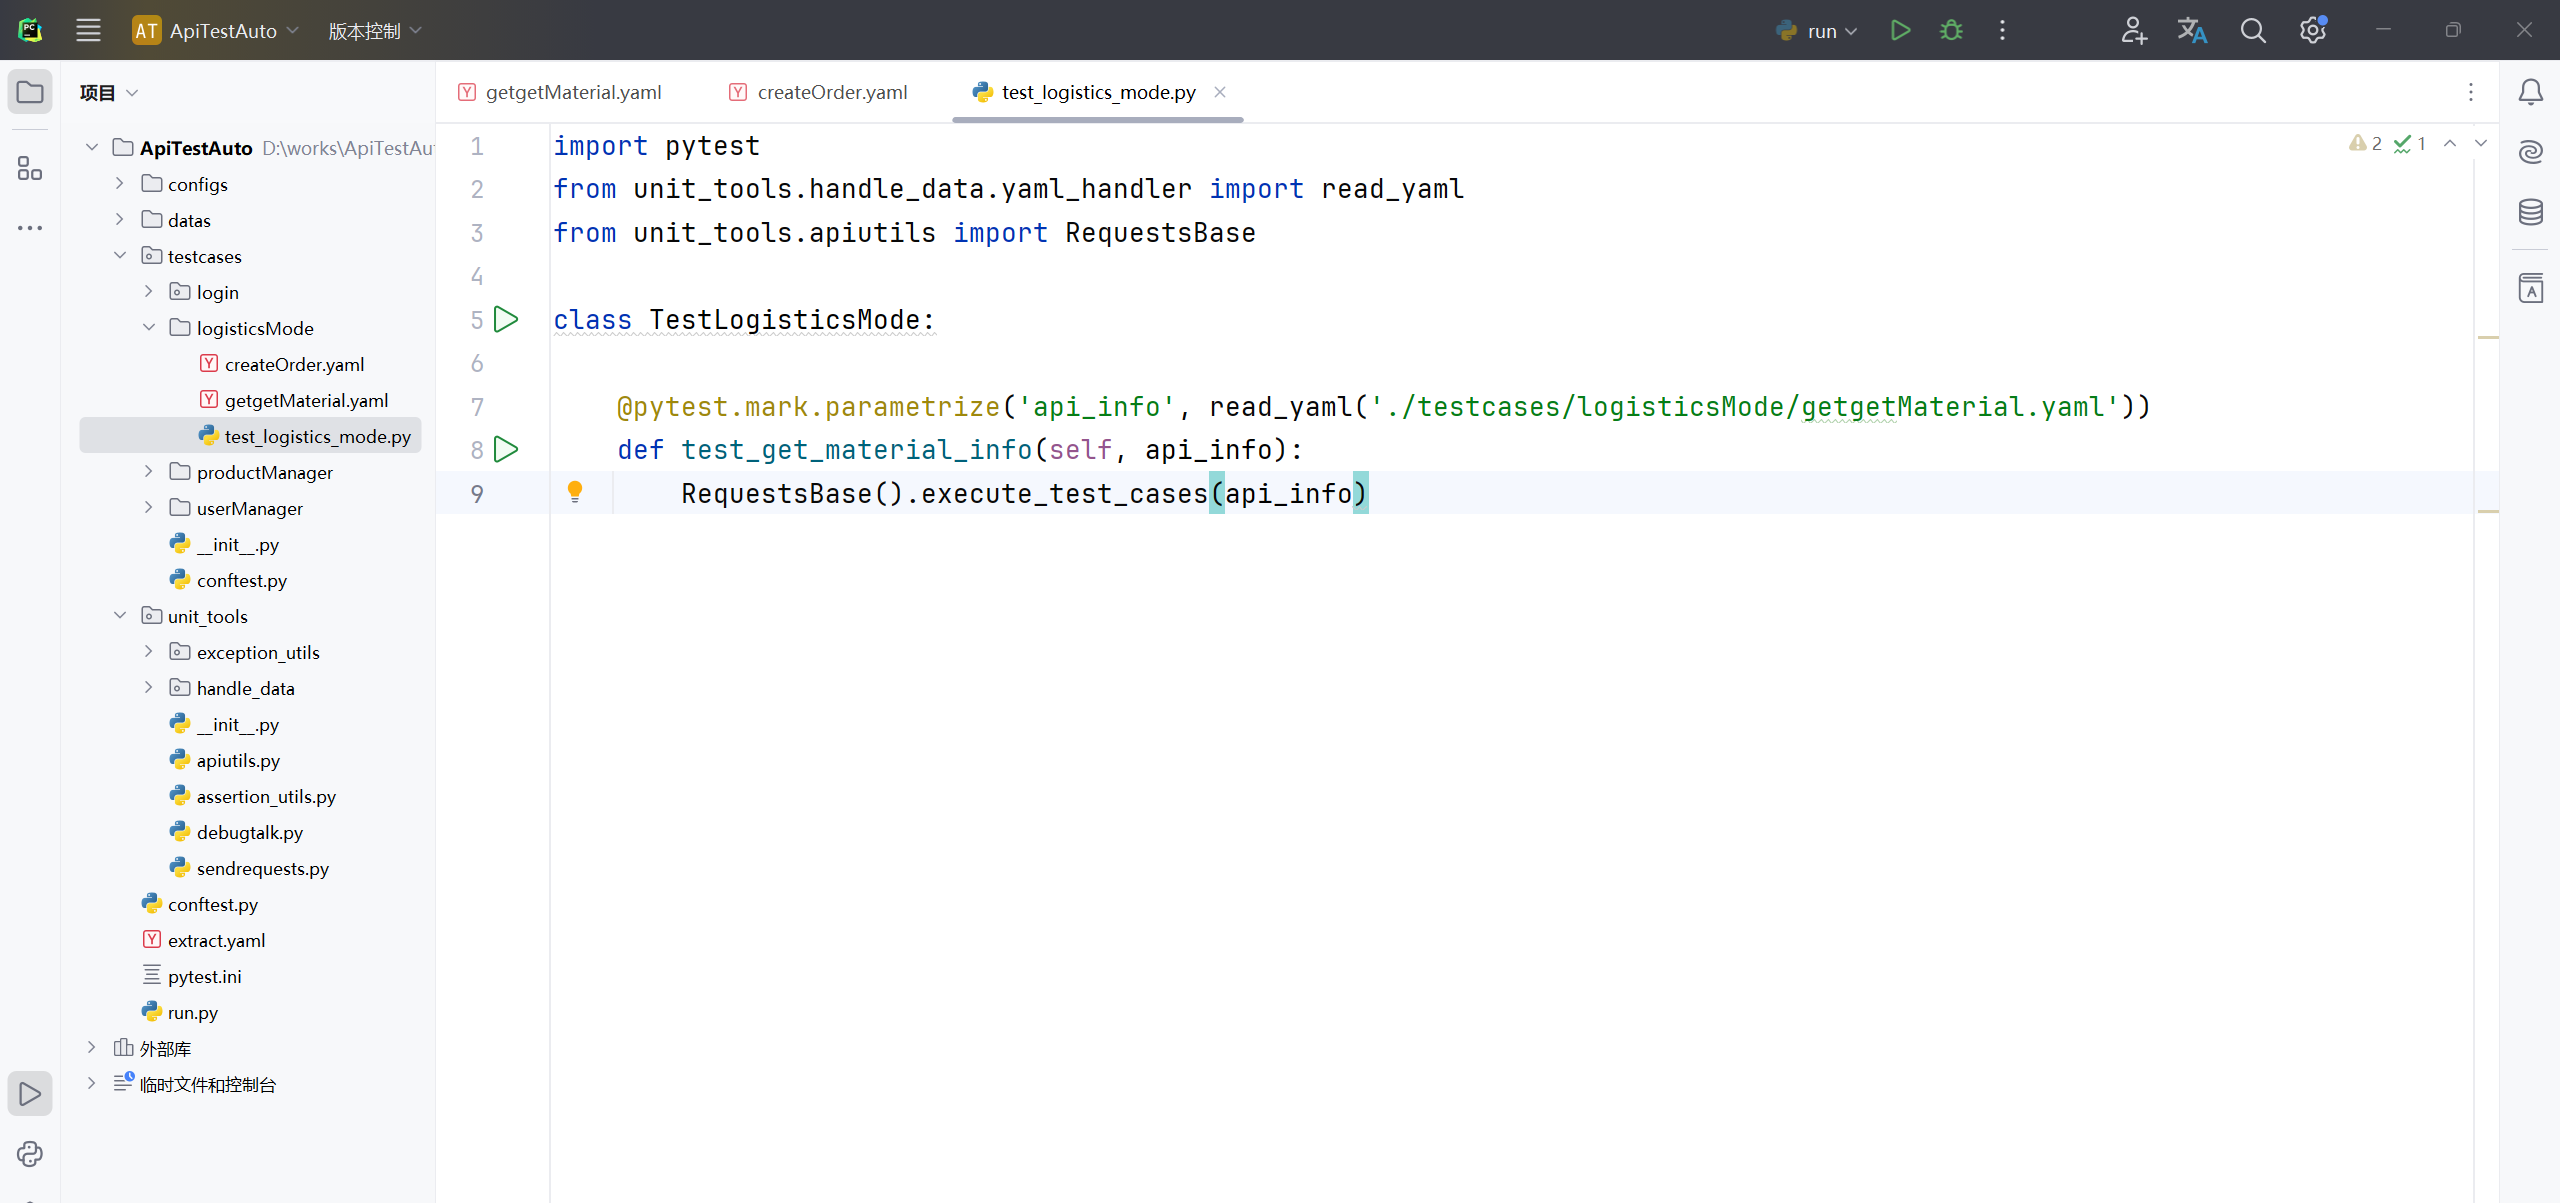
22、在 logisticsMode 目录文件路径下新建名称为"createOrder.yaml"的文件,并输入以下内容,烦请自行查看测试项目服务接口文档;
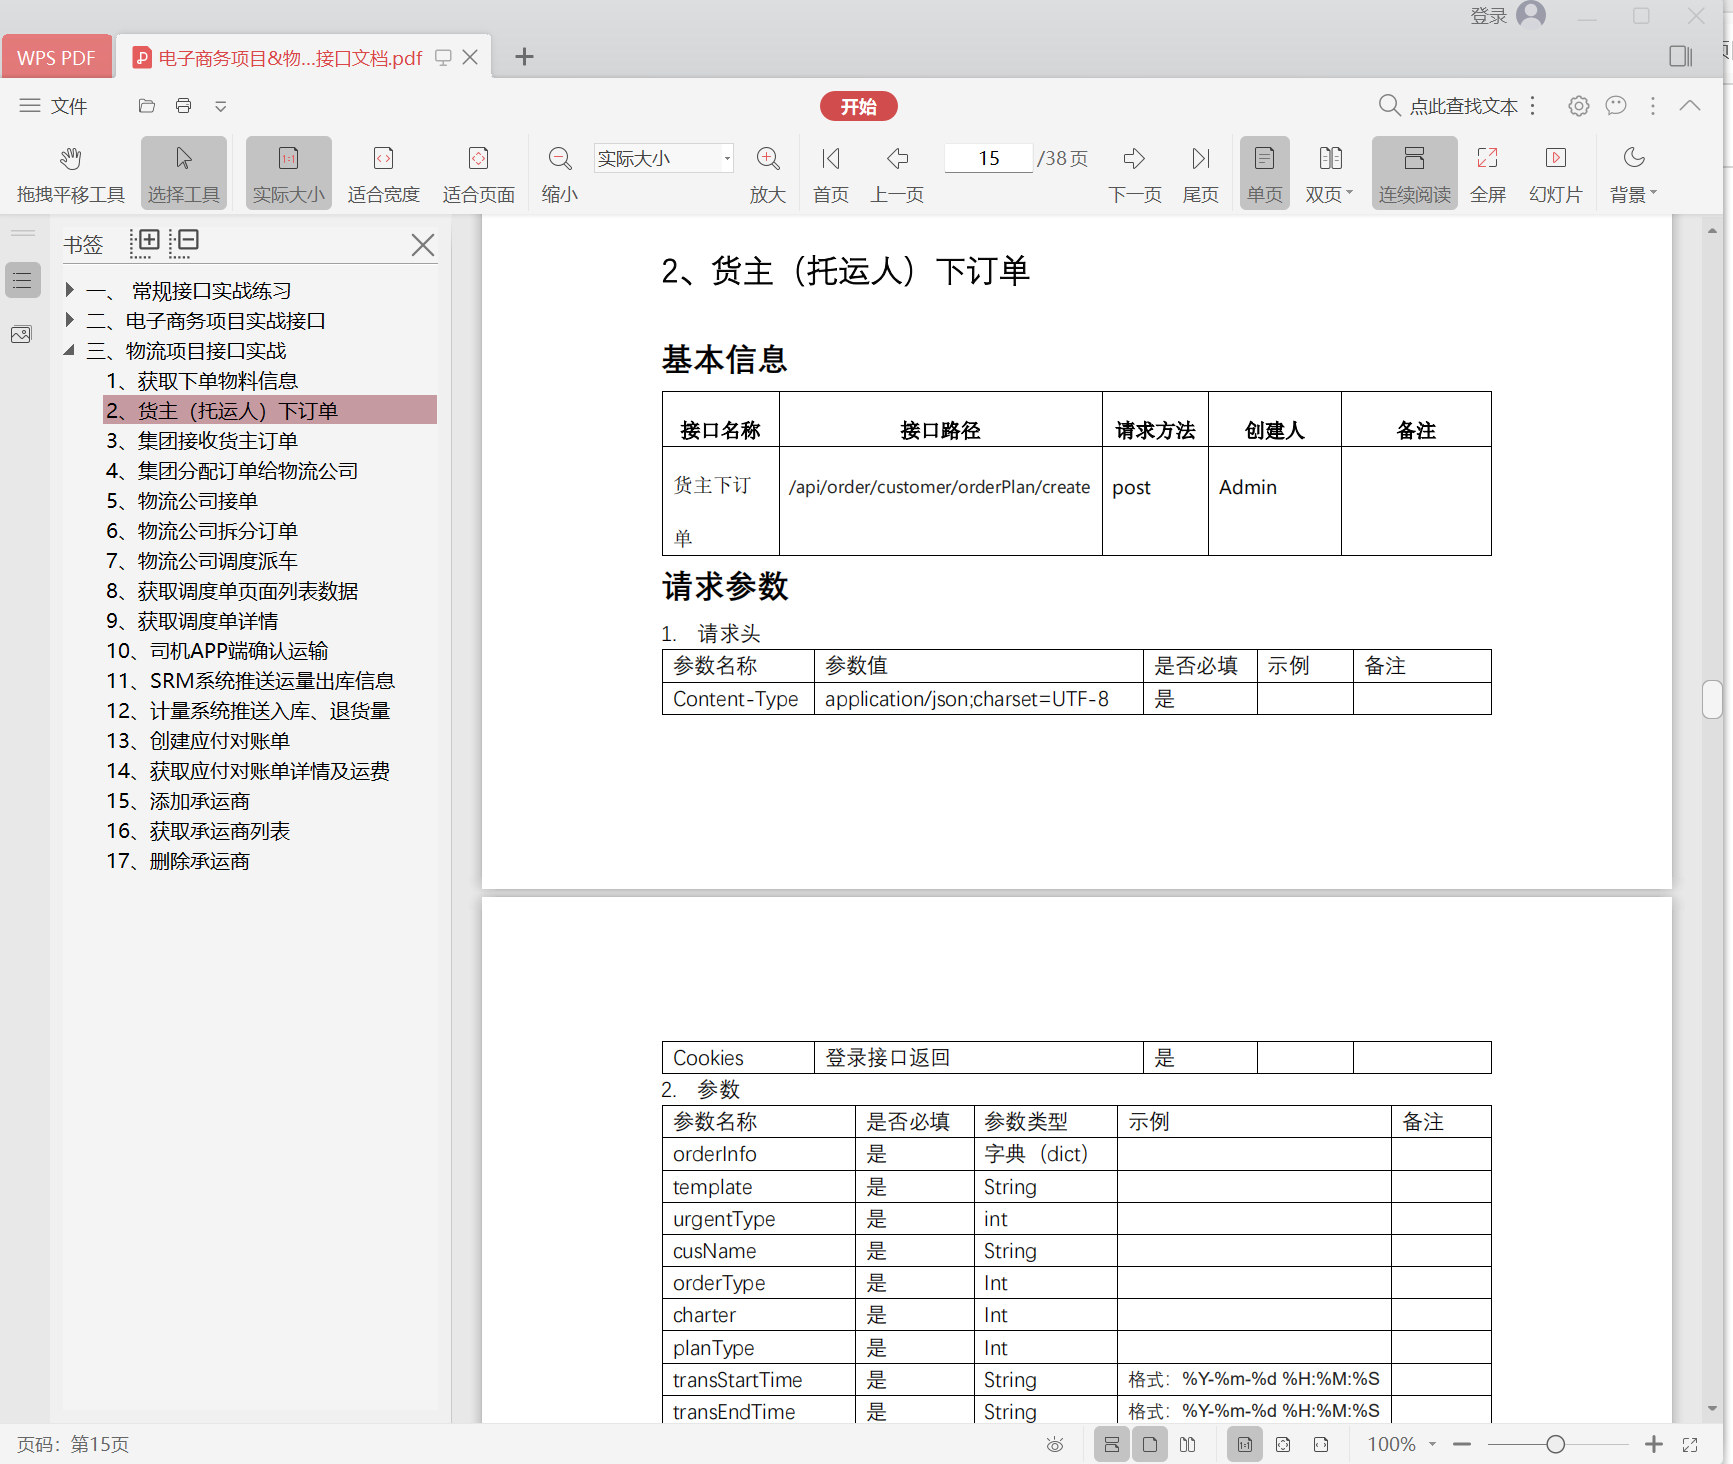
- baseInfo:
    api_name: 货主下单
    url: /api/order/customer/orderPlan/create
    method: post
    headers:
      ${get_headers(json)}
    cookies:
      ${get_extract_data(Cookie)}
  testCase:
    - case_name: 货主下订单成功
      json:
        orderInfo:
          template: define
          urgentType: 2
          cusName: 总仓
          orderType: 1
          charter: 2
          planType: 1
          transStartTime: '2023-07-14 10:37:02'
          transEndTime: '2023-07-16 10:38:58'
          orderMark: 货主下单
          cusId: '1661242770195464193'
        orderCapacityList:
          - materialCategoryId: '1676511586856882178'
            materialCategory: 粮食
            materialName: 小麦
            materialUnit: KG
            materialUnitId: '1660891402561581058'
            settlementUnit: KG
            syncMaterialId: '4'
            billingWeightCoe: null
            billingVolumeCoe: null
            sendWeightCoe: null
            sendVolumeCoe: null
            materialSpecList: null
            materialId: '1661349087048306690'
            sendCusId: '1661663745663741954'
            sendCusName: 码头尖庄仓
            receiveCusId: '1661624733406285825'
            receiveCusName: 502 车间
            sendAdrId: '1674617286107828226'
            sendAdrName: 长宁县五谷粮食购销有限责任公司
            sendPoiId: '1674615819826425857'
            sendAdrDetail: null
            receiveAdrId: '1674208708683337730'
            receiveAdrName: 五区一区
            receivePoiId: '1674208399908237313'
            receiveAdrDetail: 五区一区
            materialSpecId: '1661349088147214337'
            specName: '1'
            materialNum: 100
            materialSpecUnit: KG
            remark: 原粮
        orderVehicleList: [ ]
        orderBoxList: [ ]
      validation:
        - code: 200
        - eq: { 'message': '操作成功' }
      extract:
        orderNumber: $.orderNo
23、修改"test_logistics_mode.py"文件内容;
import pytest
from unit_tools.handle_data.yaml_handler import read_yaml
from unit_tools.apiutils import RequestsBase

class TestLogisticsMode:

    @pytest.mark.parametrize('api_info', read_yaml('./testcases/logisticsMode/getgetMaterial.yaml'))
    def test_get_material_info(self, api_info):
        RequestsBase().execute_test_cases(api_info)

    @pytest.mark.parametrize('api_info', read_yaml('./testcases/logisticsMode/createOrder.yaml'))
    def test_create_order(self, api_info):
        RequestsBase().execute_test_cases(api_info)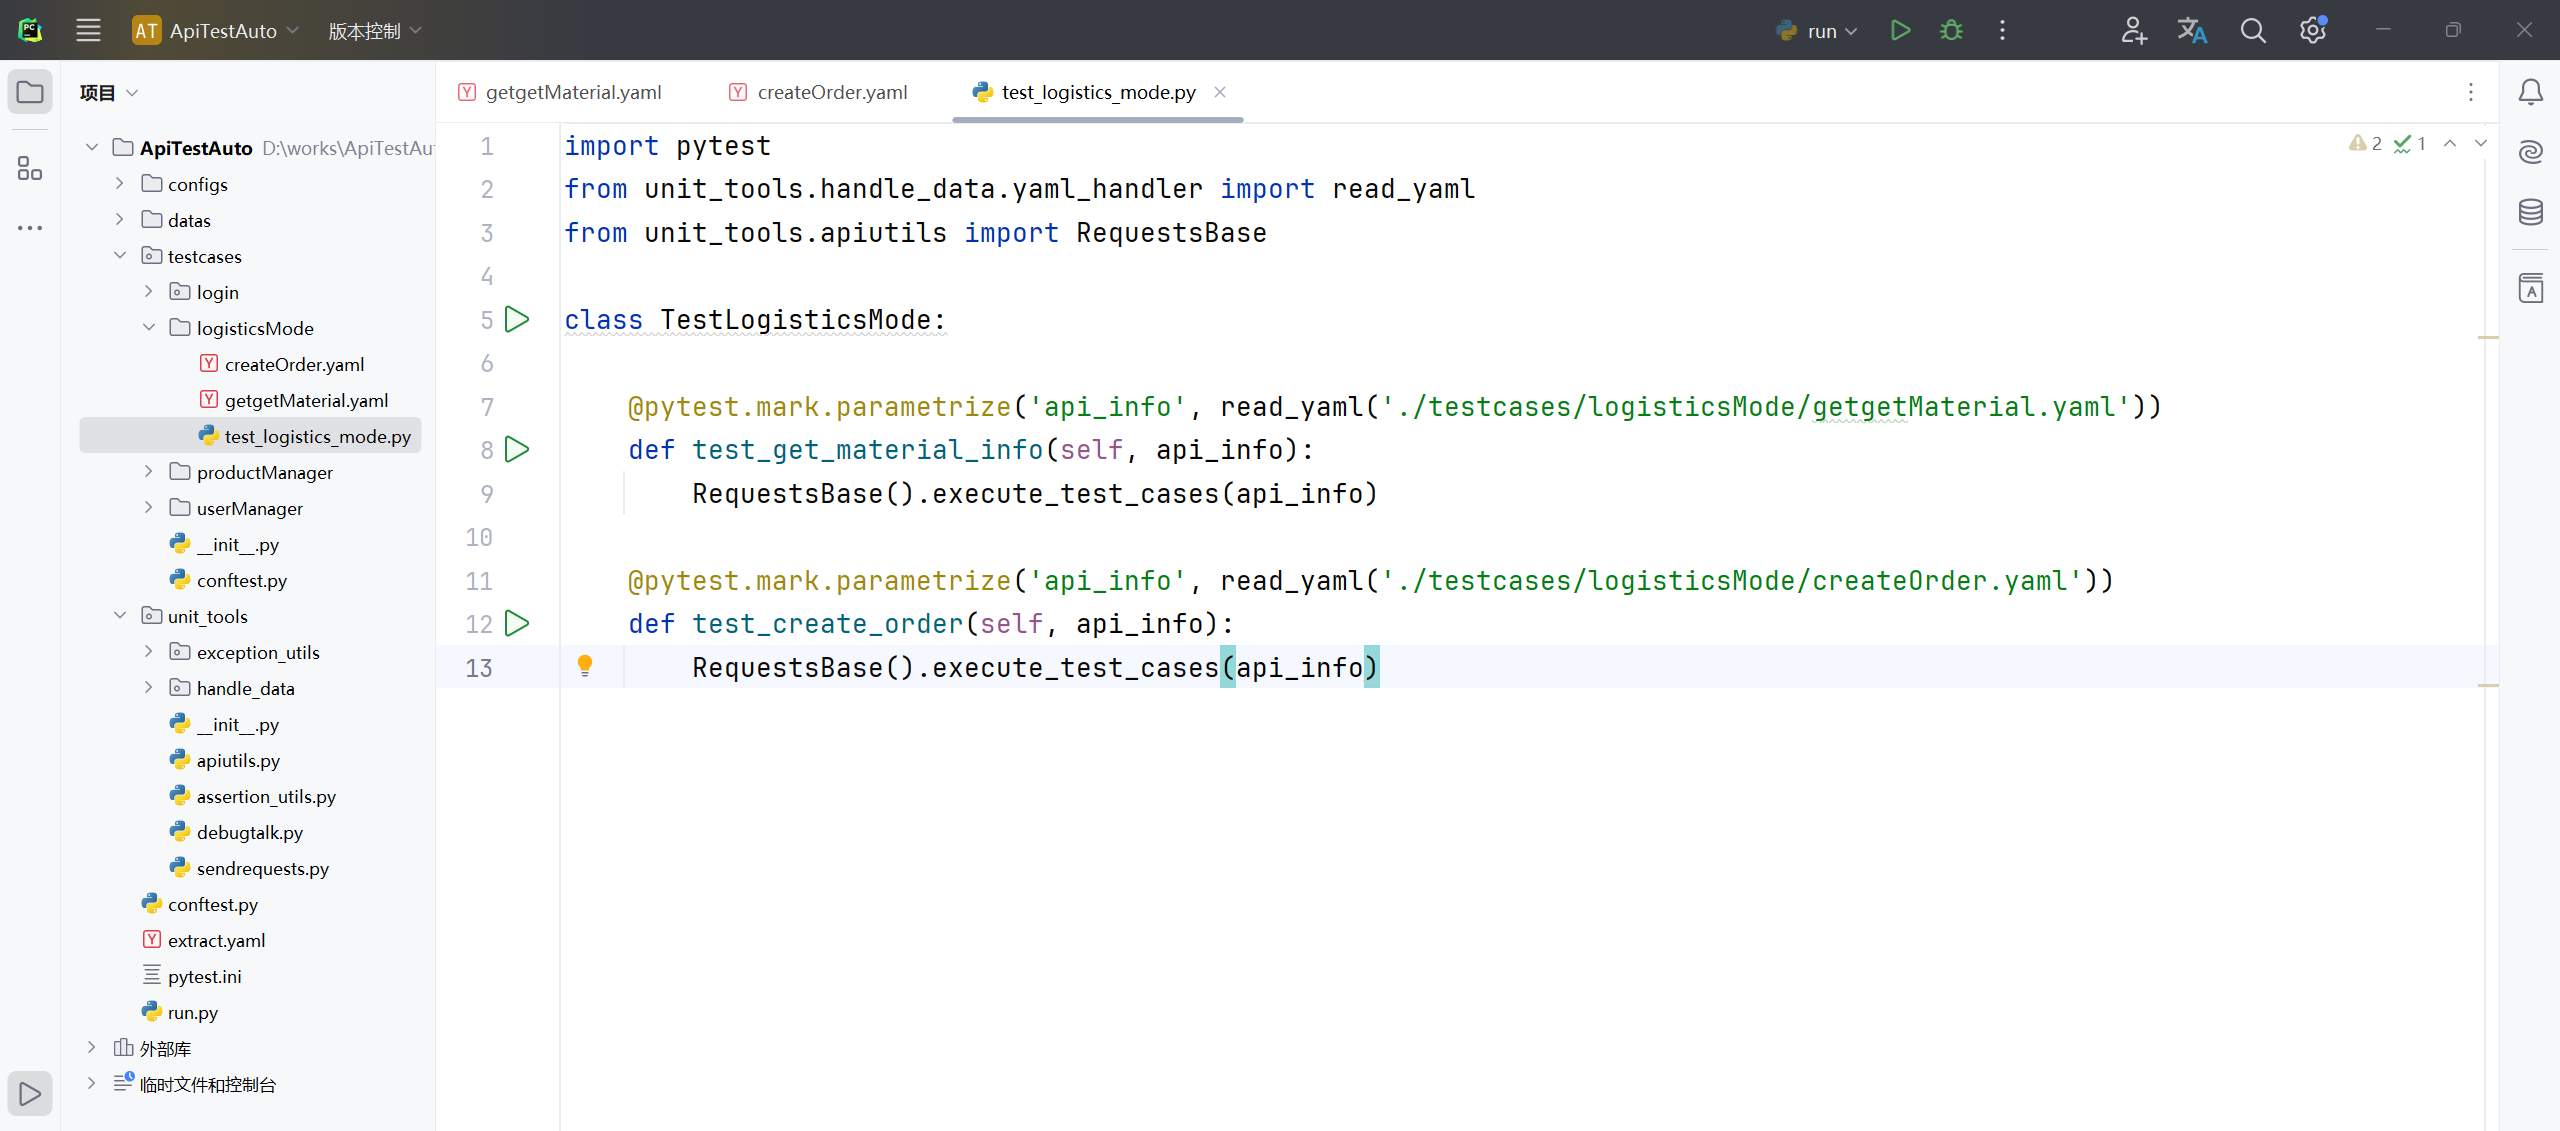
24、修改项目根目录 unit_tools 软件包下"apiutils.py"文件内容,优化总结果输出信息;
# 导包
import json
import jsonpath
from unit_tools.handle_data.yaml_handler import read_yaml, write_yaml
import re
from unit_tools.debugtalk import DebugTalk
# 引入 配置文件模块
from unit_tools.handle_data.configParse import ConfigParser
# 引入 发起请求模块
from unit_tools.sendrequests import SendRequests
# 引入 断言类
from unit_tools.assertion_utils import Assertions
# 导入模块
import traceback

# 创建一个类 RequestsBase
class RequestsBase:

    # 在RequestsBase类的里面写一个初始化构造函数
    def __init__(self):
        # 实例化一下,实例化之后就可以通过这个对象去获取 host
        self.conf = ConfigParser()
        # 实例化
        self.send_request = SendRequests()
        # 实例化断言类
        self.asserts = Assertions()

    # 创建一个方法 parse_and_replace_variables(解析并且替换变量)--传一个参数 yml_data--要解析的yaml文件的数组
    def parse_and_replace_variables(self, yml_data):
        """
        解析并替换YAML文件数据中的变量引用,如:${get_extract_data(goodsId,1)}
        :param yml_data: 解析的YAML数据
        :return: 最终要返回的是dict类型--才能给后续的一些方法调用时使用
        """
        # if isinstance(yml_data, str)--判断传进来的数据是什么类型?--后续需要字符串才能做操作的,所以这里先判断是不是字符串格式
        # yml_data若是字符串则执行 if 语句左边的代码 直接返回yml_data
        # yml_data不是字符串--调用json.dumps(yml_data)模块转成字符串--ensure_ascii=False 参数是可以处理中文
        # if else 语句写在一行是 三元运算--通过这一系列之后最终返回一个 新的变量yaml_data_str --它是一个字符串
        yml_data_str = yml_data if isinstance(yml_data, str) else json.dumps(yml_data, ensure_ascii=False)
        # 打印查看 yaml_data_str
        # print(f'解析前:{yml_data_str}')
        # 用for循环去判断 字符串yml_data_str里面这种标识 "${" 格式出现的次数--加一个'_'下划线表示不需要用到这个变量,是一个占位符的意思
        for _ in range(yml_data_str.count("${")):
            # if判断这个标识'${' 它包含在字符串yml_data_str里面--并且另一半它 '}' 也包含在字符串yml_data_str里面
            if '${' in yml_data_str and '}' in yml_data_str:
                # 通过获取到 "${" 标识的起始位置--通过字符串 yml_data_str 的索引 index--获取它的索引的起始位置
                strat_index = yml_data_str.index("${")
                # 获取结束位置 标识 "}"--再加一个参数 它的开头 strat_index
                end_index = yml_data_str.index("}", strat_index)
                # 拿到开始、结束位置后--通过字符串切片--起始位置、结束位置+1--为什么+1?--因为python中索引切片是左闭右开的一个规则
                # 什么是左闭右开?--开始位置是包含在切片里面的,但是结束元素不包含在切片中,所以得+1
                variable_data = yml_data_str[strat_index:end_index+1]

                # 使用正则表达式提取函数名和参数
                # 导入re模块--调用re模块中的match方法--里面跟两个参数,第一个参数是正则表达式,第二个参数是要提取正则表达式的字符串
                match = re.match(r'\$\{(\w+)\((.*?)\)\}', variable_data)
                # 判断一下有没有匹配到--匹配的对象是不是成功了--成功
                if match:
                    # 通过match.groups()去拿到函数名还有参数--定义两个变量去接收,第一个函数名func_name、第二个函数值func_params
                    func_name, func_params = match.groups()

                    # 先判断它存在--走if左边的代码--给它做一个切片;若参数值不存在,则返回一个空列表即可
                    # 参数值有一个或多个--所以需要做一个处理--参数值func_params通过逗号去做一个切片
                    # 最后再把值重新赋值给它自己
                    func_params = func_params.split(',') if func_params else []

                    # 使用面向对象反射getattr调用函数
                    # 引如类后直接 实例化类--第二个参数传的是一个函数名 func_name--函数调用 (*func_params)--通过星号把参数值func_params去解包传递给参数func_name
                    extract_data = getattr(DebugTalk(), func_name)(*func_params)
                    # print(f'提取到的结果:{extract_data}')
                    # 使用正则表达式替换原始字符串中的变量引用为调用后的结果
                    # 使用正则表达式替换函数re.sub--第一个参数就是需要替换的哪个参数值,第二个参数是解析后得到的数据extract_data,第三个参数是原始解析前的yml_data_str
                    yml_data_str = re.sub(re.escape(variable_data), str(extract_data), yml_data_str)
        # 还原数据,将其转换为字典类型
        # 添加异常处理--像这种转换的最好是加一个异常处理
        try:
            # 直接调用 son.loads(yml_data_str)--把字符串转换成字典
            data = json.loads(yml_data_str)
        # json转码异常
        except json.JSONDecodeError:
            # 返回原始数据yml_data_str--赋值给新变量 data
            data = yml_data_str
        return data

    # 写个方法 execute_test_cases--传一个参数 接口的信息--即写yaml文件信息
    def execute_test_cases(self, api_info):
        """
        规范yaml接口信息,执行接口、提取结果以及断言操作
        :param api_info:
        :return:
        """
        # 先打印查看api_info信息
        print(api_info)
        # 添加异常
        try:
            # 处理baseInfo里面的数据
            # 获取到接口的服务器地址--通过读取配置文件去获取--通过这个对象去调用
            conf_host = self.conf.get_host('host')
            # 获取url--完整的url是通过 服务器地址    加上  接口信息api_info
            url = conf_host + api_info['baseInfo']['url']
            # 接口名称
            api_name = api_info['baseInfo']['api_name']
            # 请求方式
            method = api_info['baseInfo']['method']
            # 请求头--通过get方法获取看里面有没有请求头--如果有的话就返回给变量headers,若没有,则传个默认空值None就行
            # 判断请求头是否可选,使用get的话,当headers有的话就返回,没有时就返回None,不至于报错
            headers = api_info['baseInfo'].get('headers', None)
            # 再进行一步处理--判断 headers 不为空
            if headers is not None:
                # if isinstance(headers, str)    判断headers是什么类型?--如果是一个字符串str类型的话 就需要给它做一个解析
                # self.parse_and_replace_variables(headers)  调用parse_and_replace_variables方法,把headers给传进来
                # else headers   若不是字符串,直接给他返回headers
                # headers =    最后再把结果传回给它自己就行了
                # eval()    调用一个函数 把解析后的数据 self.parse_and_replace_variables(headers) 转换为 字典类型
                headers = eval(self.parse_and_replace_variables(headers)) if isinstance(headers, str) else headers
                # print(headers)

            # cookies 与 请求头一样
            cookies = api_info['baseInfo'].get('cookies', None)
            if cookies is not None:
                cookies = eval(self.parse_and_replace_variables(cookies)) if isinstance(cookies, str) else cookies
                # print(cookies)

            # 处理testCase里面的数据
            # 通过for循环--循环testcase--通过读取api_info--拿到最外层的数据testCase
            for testcase in api_info['testCase']:
                print(f'处理前:{testcase}')
                # 拿到之后,进行更近一步的处理--通过testcase.pop()去处理--先获取它第一组数据 case_name
                case_name = testcase.pop('case_name')
                # 通过变量引用处理断言结果
                # 通过self.parse_and_replace_variables去断言解析的函数--通过for循环中testcase.get获取断言的关键词validation
                # 然后拿到validation后面的这组数据--再把断言的结果值给返回出去并赋值给变量val_result
                val_result = self.parse_and_replace_variables(testcase.get('validation'))
                # print(val_result)
                # 拿到断言结果,继续往下写--把testcase['validation']这个值更新成处理后的数据val_result
                testcase['validation'] = val_result
                # 同样是调用pop--然后去获取这个数据variables--最后把结果返回出去给variables
                validation = testcase.pop('validation')
                # print(validation, type(validation))
                # print(testcase, type(testcase))

                # 处理接口返回值提取部分
                # 通过testcase.pop去删除,删除之前再把结果返回,即返回再删除--获取extract关键词结果
                # --可以在跟一个参数,设置默认值,当login.yaml文件中有extract这个值的时候就返回,没有返回一个None,它就不会报错了
                # extract = testcase.pop('extract', None)
                # print(extract)
                # 处理为 列表的情况 extract_list--要把每一种情况都考虑进去
                # extract_list = testcase.pop('extract_list', None)
                # print(extract_list)
                # 把extract、extract_list 写在一行--看个人习惯,分开写或者一起都行
                extract, extract_list = testcase.pop('extract', None), testcase.pop('extract_list', None)
                print(f'处理后:{testcase}')

                # 处理参数类型和请求参数
                # 使用for循环--参数类型param_type、参数值param_value--它是一个字典直接通过testcase.items() 字典函数
                for param_type, param_value in testcase.items():
                    # 拿到之后开始进一步操作
                    # print(f'类型:{param_type}, 参数值:{param_value}')
                    # 先判断类型 param_type 在不在这三种其中之一--也就是说参数类型只能写这三种里面的一个
                    if param_type in ['params', 'data', 'json']:
                        # 若是在的话则可以解析了--直接去调用解析的方法--把参数值param_value传递给它--最后再把结果返回出去赋值给变量request_params
                        request_params = self.parse_and_replace_variables(param_value)
                        # print(request_params)
                        # 把testcase字典key值 参数类型更新为 通过解析之后的数据 request_params
                        testcase[param_type] = request_params
                print('处理之后:', testcase)
                # 文件上传现在还没有,暂时定义个控制传给参数
                files =None
                # 通过刚刚创建的实例化对象self.send_request去调用执行接口请求的方法execute_api_request()--里面的参数需要一一对应
                # **kwargs 未知数量传参------------直接把 **testcase 传给它
                response = self.send_request.execute_api_request(api_name=api_name, url=url, method=method, header=headers, case_name=case_name, cookie=cookies, file=files, **testcase)
                # 获取状态码和接口返回结果的text文本格式
                status_code, response_text = response.status_code, response.text
                print(response_text)

                # 处理接口返回值提取
                # 判断这个值extract不等于None的话
                if extract is not None:
                    # 就调用封装的方法extract_data--传递--第一个参数extract------------第二个参数response
                    self.extract_data(extract, response_text)
                # 判断这个值extract_list不等于None的话
                if extract_list is not None:
                    # 调用封装的方法extract_data_list--传递--第一个参数extract_list------------第二个参数response
                    self.extract_data_list(extract_list, response_text)

                # 处理接口断言
                self.asserts.assert_result(validation, response.json(), status_code)

        except Exception as e:
            # 因暂时未写日志模块,所以这里先打印出来
            # {str(traceback.format_exc())}--当出现异常时,会打印出比较详细的信息
            print(f'出现未知异常:--{str(traceback.format_exc())}')
            # 这里出现异常时,需手动抛出异常--在生成报告时,这里若没有抛出这个异常的话,在测试出现失败时,还是会统计为成功的
            raise e

    # 创建一个方法 extract_data 提取接口的返回值--接收两个参数,testcase_extract就是yaml文件中的token: $.token------------response_text 接口返回信息,文本格式
    @classmethod
    def extract_data(cls, testcase_extract, response_text):
        """
        提取单个参数,提取接口的返回参数,支持正则表达式提取和json提取器
        :param testcase_extract:    (dict)yaml文件中的extract值,例如:{'token':'$.token'}
        :param response_text:   (str)接口的实际返回值
        :return:
        """
        # 先打印一下表达式 {'token':'$.token'}
        # print(testcase_extract)
        extract_data = None
        try:
            # 使用for循环------------因为这个值token: $.token是一个字典类型,要分别去拿到要提取变量的名称token,还有后面拿到表达式$.token
            for key, value in testcase_extract.items():
                # any() 函数是 当里面的元素都为真True的情况下,就返回True------------则if通过,才会执行下面的语句------------这里其实是一个生成器表达式
                # 使用for循环里面的列表------------正则表达式(贪婪匹配、非贪婪匹配)
                # '(.*?)':只是匹配0次或多次; '(.+?)':只是匹配1次或多次;
                # r'(\d+)'、r'(\d*)':加 r 是防止被转义;\d 是获取数字;+ 加号是获取至少1次或多次;* 星号是至少0次
                if any(pat in value for pat in ['(.*?)', '(.+?)', r'(\d+)', r'(\d*)']):
                    # 使用正则表达式的模块调用search函数去全局的搜索--第一个参数是它的正则表达式value,第二个是从接口的返回信息中去提取response_text
                    ext_list = re.search(value, response_text)
                    # 把数据存储下来,存到字典中--对值value进行一个判断--判断提取到的数据是字符串还是整数类型
                    # 先去判断 if r'(\d+)' in value 有没有这个值,有的话把它转成整数类型的 int(ext_list.group(1))
                    # 若不是 (\d+) 则直接执行 else 后面的语句 ext_list.group(1)
                    extract_data = {key: int(ext_list.group(1)) if r'(\d+)' in value else ext_list.group(1)}
                    # print(f'提取到的结果:{extract_data}')
                # 判断有没有 $ 符号
                elif '$' in value:
                    # 引入模块 import jsonpath --调用jsonpath()去提取--因为json提取需要json格式,而response_text是字符串类型的
                    # 使用json.loads(response_text)转换成字典类型,它才能提取--第二个值value--它最外层是列表,所以需要索引[0]取值
                    extract_json = jsonpath.jsonpath(json.loads(response_text), value)[0]
                    # 拿到接口返回值token
                    print(extract_json)
                    # 先判断提取的结果是否存在--若存在,则定义一个字典存储起来;若不存在,则直接提示打印一句话
                    extract_data = {key: extract_json} if extract_json else {key: "未提取到数据,请检查接口返回信息或表达式!"}
                    # 提取到的结果
                    print(extract_data)
                # 判断extract_data是否存在
                if extract_data:
                    # 引入写入方法 write_yaml()--若存在,则调用方法--把结果字典类型的extract_data给存进去
                    write_yaml(extract_data)

        except re.error:
            print('正则表达式解析错误,请检查yaml文件extract表达式是否正确!')
        except json.JSONDecodeError:
            print('JSON解析错误,请检查yaml文件extract表达式是否正确!')

    @classmethod
    def extract_data_list(cls, testcase_extract_list, response_text):
        """
        提取多个参数,提取接口的返回参数,支持正则表达式提取和json提取器
        :param testcase_extract_list:    (dict)yaml文件中的extract_list值,例如:{'token':'$.token'}
        :param response_text:   (str)接口的实际返回值
        :return:
        """
        extract_data = None
        try:
            # 跟上面的方法一样,先去循环拿到key值、value值
            for key, value in testcase_extract_list.items():
                if any(pat in value for pat in ['(.*?)', '(.+?)', r'(\d+)', r'(\d*)']):
                    # 使用正则表达式的模块调用findall函数--传参还是一样的-- re.S --re模块的一个选项,表示在模式中匹配任何字符,包括换行符
                    ext_list = re.findall(value, response_text, re.S)
                    print(ext_list)
                    # 判断提取的结果对不对
                    if ext_list:
                        # 存储起来
                        extract_data = {key: ext_list}
                        print(extract_data)
                # json提取器
                elif "$" in value:
                    # 这里是提取多个,是一个列表,所以不需要通过索引[0]去取值
                    extract_json = jsonpath.jsonpath(json.loads(response_text), value)
                    print(extract_json)
                    # 判断提取的这个值是否存在
                    if extract_json:
                        extract_data = {key: extract_json}
                    else:
                        extract_data= {key: '未提取到数据,请检查接口返回信息或表达式!'}
                # 判断extract_data是否存在
                if extract_data:
                    # 写入方法
                    write_yaml(extract_data)

        except re.error:
            print('正则表达式解析错误,请检查yaml文件extract表达式是否正确!')
        except json.JSONDecodeError:
            print('JSON解析错误,请检查yaml文件extract表达式是否正确!')

# 测试调试查看
if __name__ == '__main__':
    # 先引进读取方法 read_yaml--传如一个它的相对路径--赋值给新变量data--[0]通过索引去列表值第一个
    api_info = read_yaml('.././datas/login.yaml')[0]
    # 实例化类 RequestsBase()--并赋值给一个变量对象 req
    req = RequestsBase()
    # 通过类对象去调用parse_and_replace_variables(data) 这个解析的方法--把读取到的 data 这个yaml数据传给它
    # res = req.parse_and_replace_variables(data)
    # print(f'解析后:{res}')
    # 通过这个对象req去调用刚刚封装的方法execute_test_cases--把读取到yaml文件的数据api_info传给它
    req.execute_test_cases(api_info)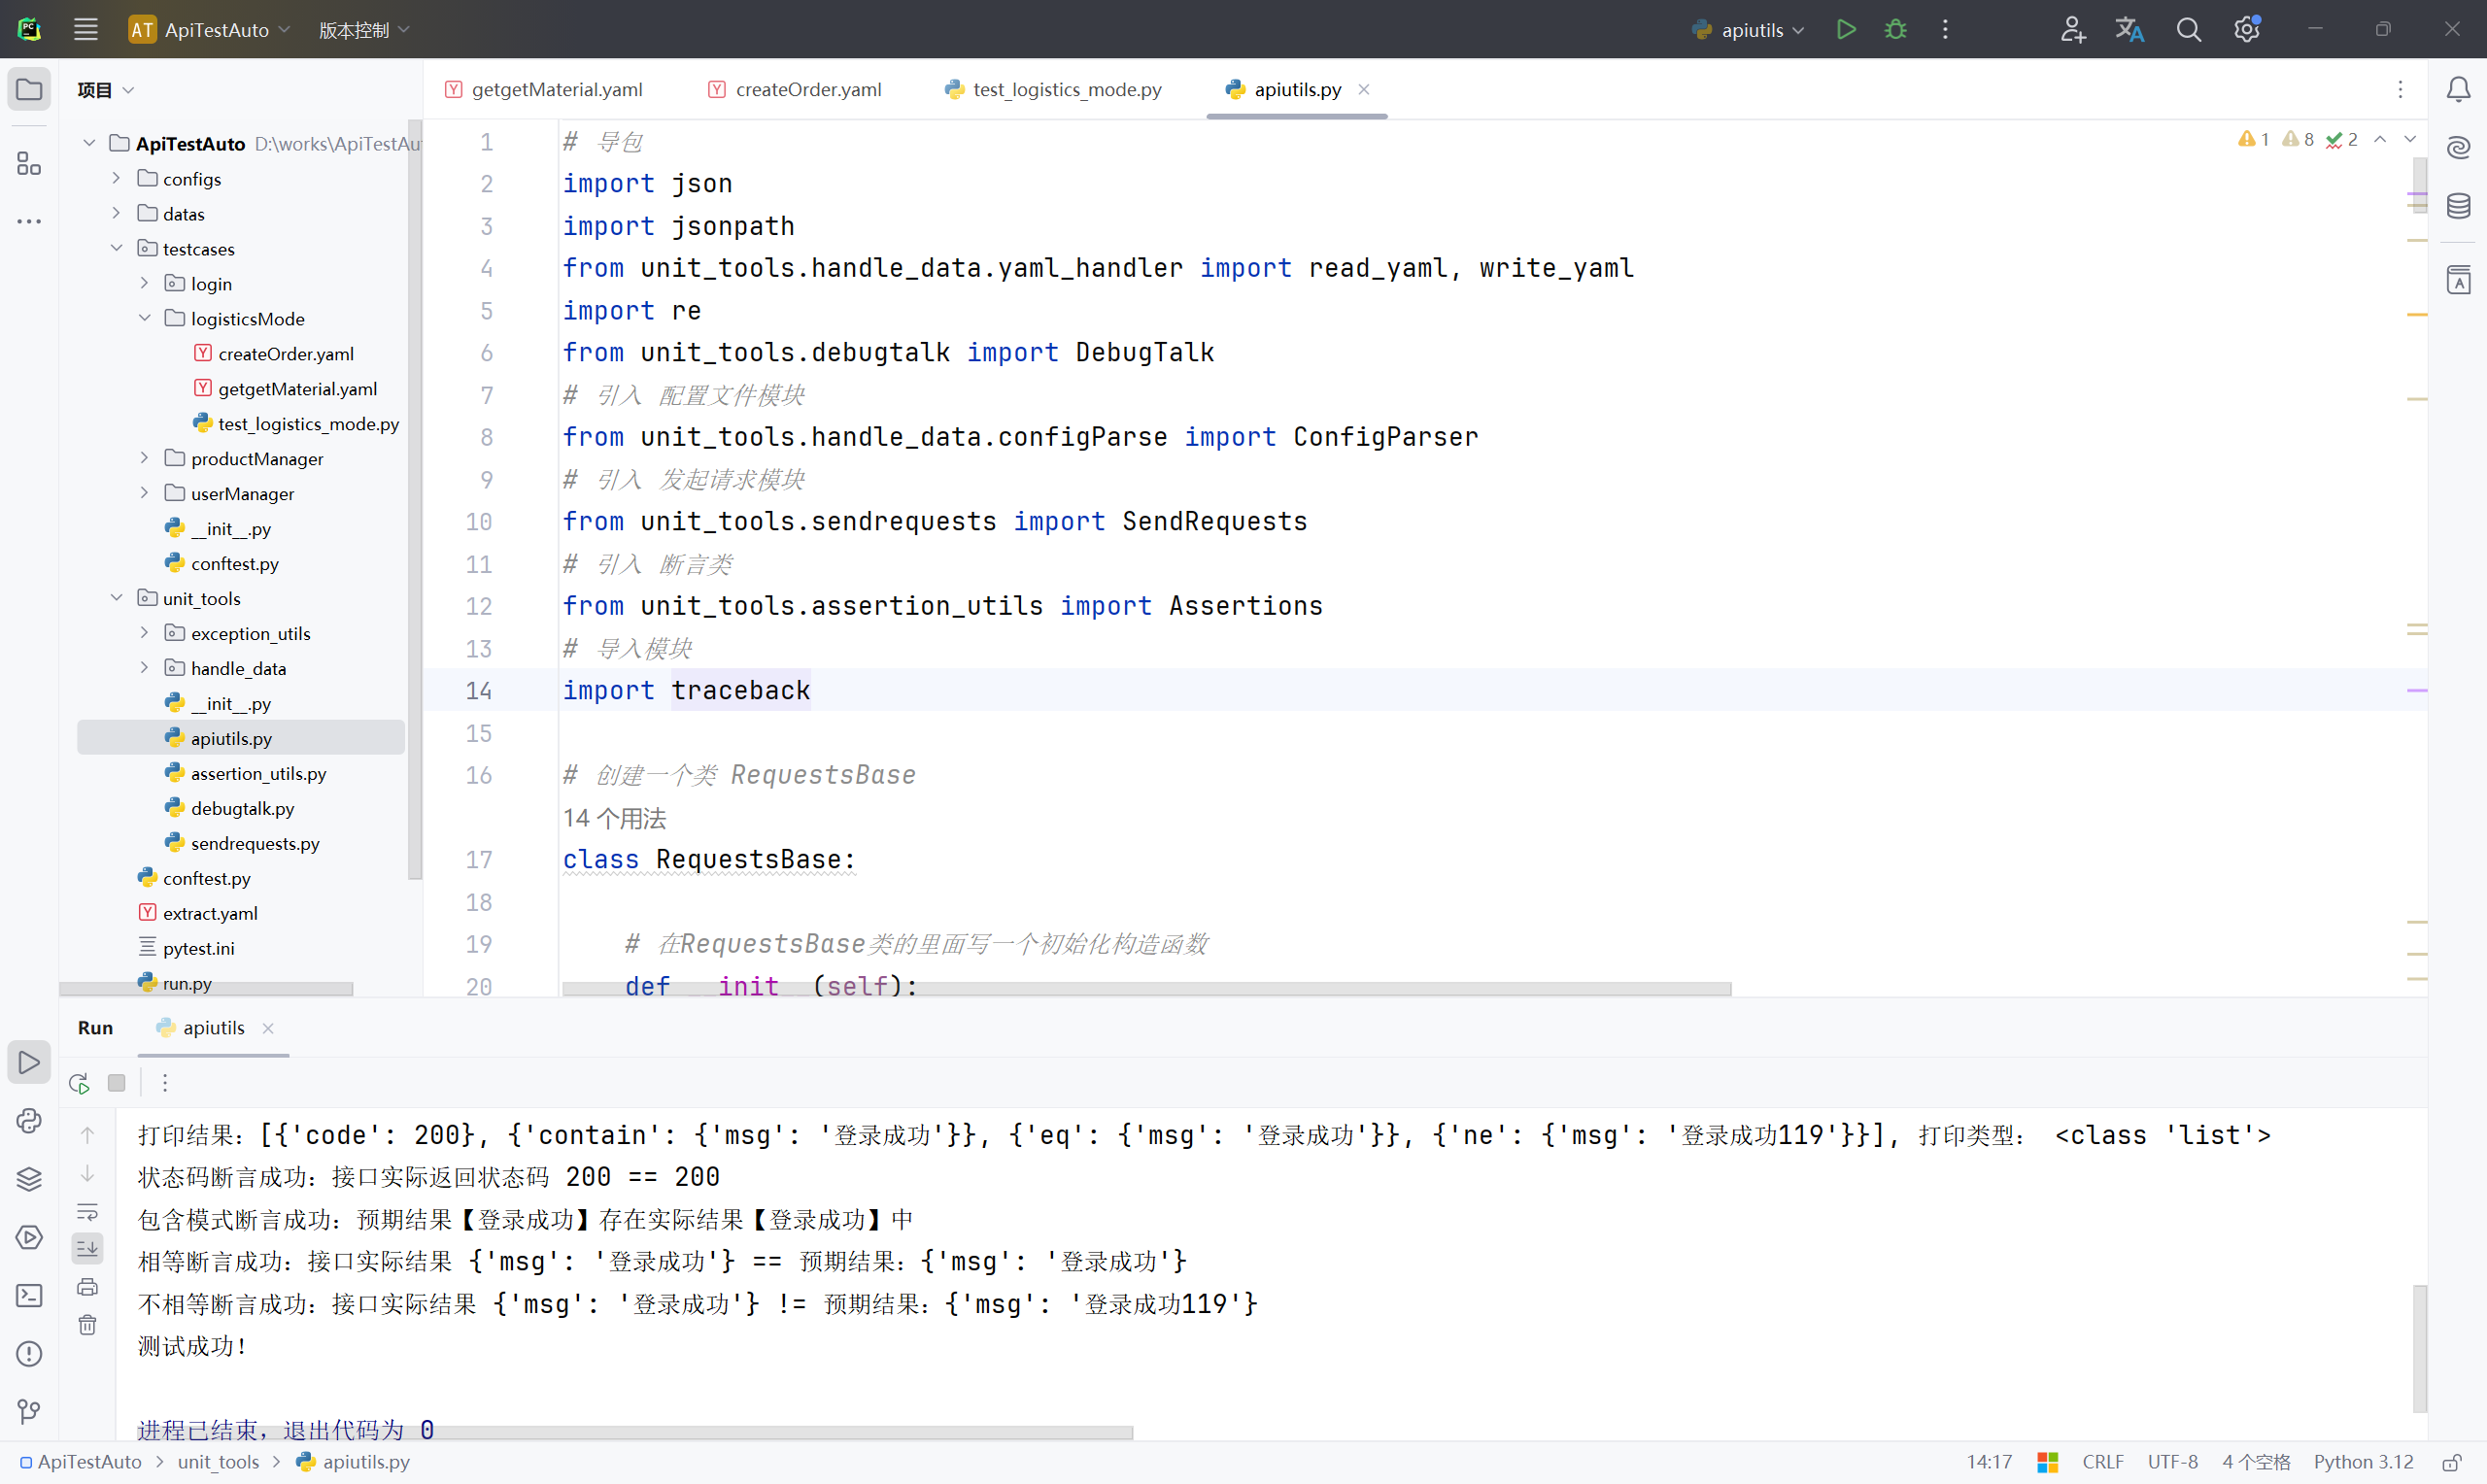
未完待续。。。