目录
[1. 快速入门](#1. 快速入门)
[1.1. 环境准备](#1.1. 环境准备)
[1.2. 快速开始](#1.2. 快速开始)
[1.2.1 引入依赖](#1.2.1 引入依赖)
[1.2.2 定义 Mapper](#1.2.2 定义 Mapper)
[1.2.3 测试](#1.2.3 测试)
[1.3. 常见注解](#1.3. 常见注解)
[1.3.1 @TableName](#1.3.1 @TableName)
[1.3.2 @TableId](#1.3.2 @TableId)
[1.3.3 @TableField](#1.3.3 @TableField)
[1.4. 常见配置](#1.4. 常见配置)
[2. 核心功能](#2. 核心功能)
[2.1. 条件构造器](#2.1. 条件构造器)
[2.1.1 QueryWrapper](#2.1.1 QueryWrapper)
[2.1.2 UpdateWrapper](#2.1.2 UpdateWrapper)
[2.1.3 LambdaQueryWrapper](#2.1.3 LambdaQueryWrapper)
[2.2. 自定义 SQL](#2.2. 自定义 SQL)
[2.2.1 基本用法](#2.2.1 基本用法)
[2.2.2 多表关联](#2.2.2 多表关联)
[2.3. Service 接口](#2.3. Service 接口)
[2.3.1 基本用法](#2.3.1 基本用法)
[2.3.2 快速实现 CRUD 接口](#2.3.2 快速实现 CRUD 接口)
[2.3.3 自定义业务逻辑](#2.3.3 自定义业务逻辑)
[2.3.4 Lambda 查询](#2.3.4 Lambda 查询)
[2.3.5 批量新增](#2.3.5 批量新增)
本文介绍了MyBatisPlus的快速入门与核心功能。内容涵盖:
-
基础配置(JDK11环境准备、数据库连接配置);
-
快速实现CRUD(通过继承BaseMapper简化操作);
-
常用注解(@TableName、@TableId、@TableField的用法);
-
条件构造器的使用(QueryWrapper/LambdaQueryWrapper实现复杂查询);
-
自定义SQL与多表关联方案;
-
Service层封装(IService接口的CRUD与批处理优化)。
文章通过完整代码示例演示了从基础配置到复杂查询的实现过程,特别强调了通过Wrapper构建动态条件和Lambda表达式避免魔法值的技巧。
1. 快速入门
1.1. 环境准备
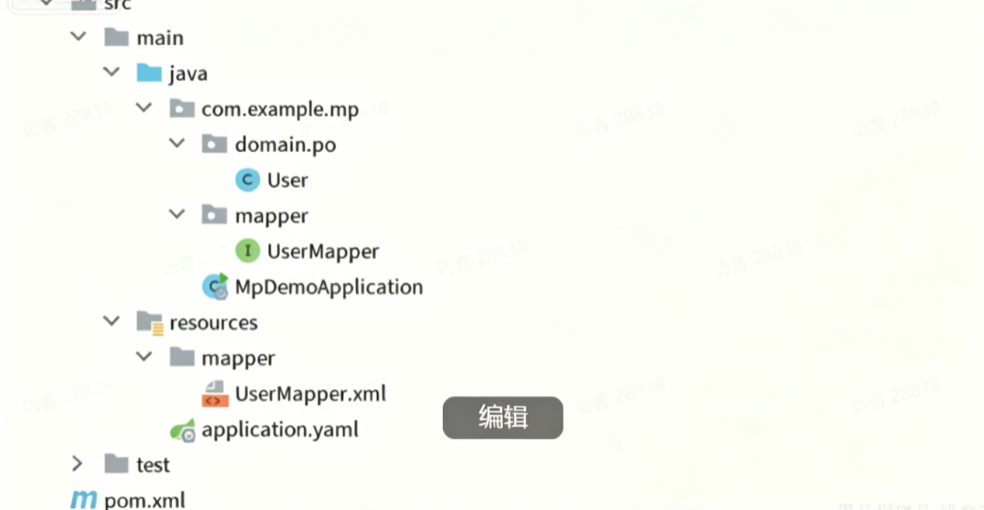
创建一个新的项目,配置项目的 JDK 版本为 JDK 11。项目结构如下:
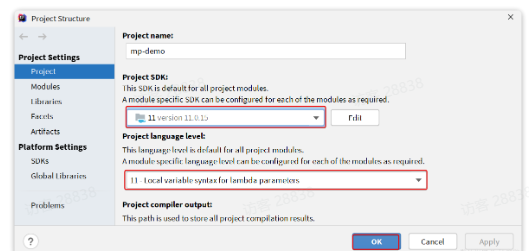
点击项目结构设置:

在弹窗中配置 JDK:
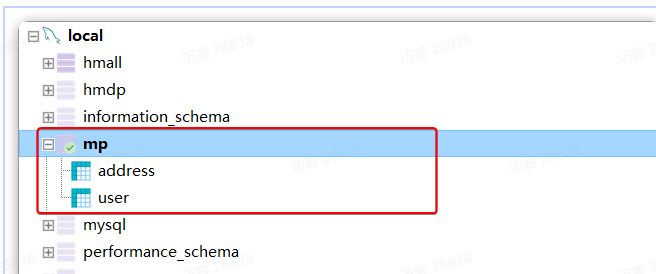
准备数据库表,对应的数据库表结构如下:
在 application.yaml 中配置数据库连接参数:
java
spring:
  datasource:
    url: jdbc:mysql://127.0.0.1:3306/mp?useUnicode=true&characterEncoding=UTF-8&autoReconnect=true&serverTimezone=Asia/Shanghai
    driver-class-name: com.mysql.cj.jdbc.Driver
    username: root
    password: MySQL123
logging:
  level:
    com.example: debug
  pattern:
    dateformat: HH:mm:ss
1.2. 快速开始
实现 User 表的 CRUD,只需要下面几步:
1.2.1 引入依赖
MyBatis Plus 提供了 starter,实现了自动装配功能:
java
<dependency>
    <groupId>com.baomidou</groupId>
    <artifactId>mybatis-plus-boot-starter</artifactId>
    <version>3.5.3.1</version>
</dependency>
最终项目依赖如下:
java
<dependencies>
    <dependency>
        <groupId>com.baomidou</groupId>
        <artifactId>mybatis-plus-boot-starter</artifactId>
        <version>3.5.3.1</version>
    </dependency>
    <dependency>
        <groupId>com.mysql</groupId>
        <artifactId>mysql-connector-j</artifactId>
        <scope>runtime</scope>
    </dependency>
    <dependency>
        <groupId>org.projectlombok</groupId>
        <artifactId>lombok</artifactId>
        <optional>true</optional>
    </dependency>
    <dependency>
        <groupId>org.springframework.boot</groupId>
        <artifactId>spring-boot-starter-test</artifactId>
        <scope>test</scope>
    </dependency>
</dependencies>
1.2.2 定义 Mapper
MyBatis Plus 提供了 BaseMapper 接口,已实现单表 CRUD:
java
package com.example.mp.mapper;
import com.baomidou.mybatisplus.core.mapper.BaseMapper;
import com.example.mp.domain.po.User;
public interface UserMapper extends BaseMapper<User> {
}1.2.3 测试
编写单元测试:
java
package com.example.mp.mapper;
import com.example.mp.domain.po.User;
import org.junit.jupiter.api.Test;
import org.springframework.beans.factory.annotation.Autowired;
import org.springframework.boot.test.context.SpringBootTest;
import java.time.LocalDateTime;
import java.util.List;
@SpringBootTest
class UserMapperTest {
@Autowired
private UserMapper userMapper;
@Test
void testInsert() {
User user = new User();
user.setId(5L);
user.setUsername("Lucy");
user.setPassword("123");
user.setPhone("18688990011");
user.setBalance(200);
user.setInfo("{\"age\": 24, \"intro\": \"英文老师\", \"gender\": \"female\"}");
user.setCreateTime(LocalDateTime.now());
user.setUpdateTime(LocalDateTime.now());
userMapper.insert(user);
}
@Test
void testSelectById() {
User user = userMapper.selectById(5L);
System.out.println("user = " + user);
}
@Test
void testSelectByIds() {
List<User> users = userMapper.selectBatchIds(List.of(1L, 2L, 3L, 4L, 5L));
users.forEach(System.out::println);
}
@Test
void testUpdateById() {
User user = new User();
user.setId(5L);
user.setBalance(20000);
userMapper.updateById(user);
}
@Test
void testDelete() {
userMapper.deleteById(5L);
}
}运行日志显示生成的 SQL 非常标准:
java
DEBUG 15524 --- [main] c.i.mp.mapper.UserMapper.selectById     : ==> Preparing: SELECT id,username,password,phone,info,status,balance,create_time,update_time FROM user WHERE id=?
DEBUG 15524 --- [main] c.i.mp.mapper.UserMapper.selectById     : ==> Parameters: 5(Long)
DEBUG 15524 --- [main] c.i.mp.mapper.UserMapper.selectById     : <== Total: 1
只需要继承 BaseMapper 就能省去所有单表 CRUD,非常简单!
1.3. 常见注解
MyBatis Plus 根据 PO 实体的信息推断表信息,从而生成 SQL。默认规则:
-
表名 = 类名(小写)
-
字段名 = 属性名(驼峰转下划线)
-
主键字段 = id
但很多情况下,默认规则与实际场景不符,因此 MyBatis Plus 提供了注解声明表信息。
1.3.1 @TableName
指定实体类对应的表名:
java
@TableName("user")
public class User {
    private Long id;
    private String name;
}
支持的属性:
| 属性 | 类型 | 默认值 | 描述 |
|---|---|---|---|
| value | String | "" | 表名 |
| schema | String | "" | schema |
| keepGlobalPrefix | boolean | false | 是否保持使用全局 tablePrefix |
| resultMap | String | "" | xml 中 resultMap 的 id |
| autoResultMap | boolean | false | 是否自动构建 resultMap |
| excludeProperty | String\[\] | {} | 需要排除的属性名 |
1.3.2 @TableId
指定主键字段:
java
@TableName("user")
public class User {
    @TableId
    private Long id;
    private String name;
}
支持的属性:
| 属性 | 类型 | 默认值 | 描述 |
|---|---|---|---|
| value | String | "" | 主键字段名 |
| type | Enum | IdType.NONE | 指定主键类型 |
IdType 支持的类型:
| 值 | 描述 |
|---|---|
| AUTO | 数据库 ID 自增 |
| NONE | 未设置主键类型 |
| INPUT | insert 前自行 set 主键值 |
| ASSIGN_ID | 分配 ID(雪花算法) |
| ASSIGN_UUID | 分配 UUID |
常见的三种主键策略:自增、雪花算法、手动输入。
1.3.3 @TableField
指定非主键字段:
java
@TableName("user")
public class User {
    @TableId
    private Long id;
    private String name;
    private Integer age;
    @TableField("is_married")
    private Boolean isMarried;
    @TableField("`concat`")
    private String concat;
}
一般情况下不需要添加此注解,特殊情况除外:
-
字段名与属性名不一致
-
字段是数据库关键字(需用反引号包裹)
-
字段不是数据库表字段(
exist = false)
支持的其他属性:
| 属性 | 类型 | 默认值 | 描述 |
|---|---|---|---|
| value | String | "" | 数据库字段名 |
| exist | boolean | true | 是否为数据库表字段 |
| condition | String | "" | 查询条件 |
| update | String | "" | 更新 set 注入 |
| insertStrategy | Enum | DEFAULT | 插入策略 |
| updateStrategy | Enum | DEFAULT | 更新策略 |
| fill | Enum | DEFAULT | 字段自动填充策略 |
| select | boolean | true | 是否进行 select 查询 |
1.4. 常见配置
MyBatis Plus 支持基于 yaml 文件的自定义配置:
java
mybatis-plus:
  type-aliases-package: com.example.mp.domain.po
  global-config:
    db-config:
      id-type: auto  # 全局 id 类型为自增长
Mapper XML 文件的读取地址配置:
java
mybatis-plus:
  mapper-locations: "classpath*:/mapper/**/*.xml"  # 默认值
示例:新建 UserMapper.xml 文件:
java
<?xml version="1.0" encoding="UTF-8"?>
<!DOCTYPE mapper PUBLIC "-//mybatis.org//DTD Mapper 3.0//EN" "http://mybatis.org/dtd/mybatis-3-mapper.dtd">
<mapper namespace="com.example.mp.mapper.UserMapper">
    <select id="queryById" resultType="User">
        SELECT * FROM user WHERE id = #{id}
    </select>
</mapper>
测试自定义方法:
java
@Test
void testQuery() {
    User user = userMapper.queryById(1L);
    System.out.println("user = " + user);
}
2. 核心功能
复杂条件的 SQL 需要用到更高级的功能。
2.1. 条件构造器
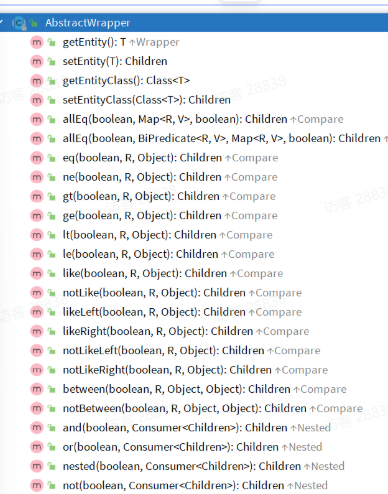
BaseMapper 中提供的修改、删除、查询方法除了支持 id 条件外,还支持更复杂的 where 条件。参数中的 Wrapper 就是条件构造的抽象类,其子类关系如图:
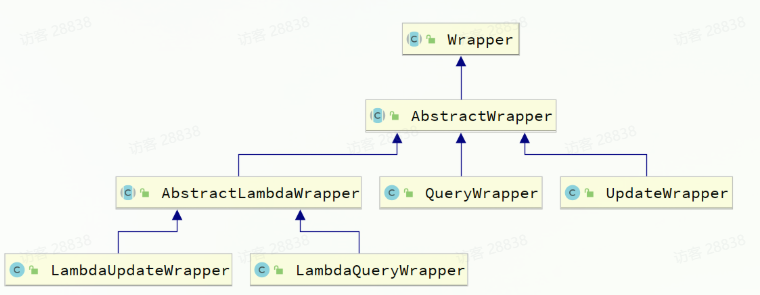
Wrapper 的子类 AbstractWrapper 提供了 where 中包含的所有条件构造方法:
而 QueryWrapper 在 AbstractWrapper 的基础上拓展了一个 select 方法,允许指定查询字段:

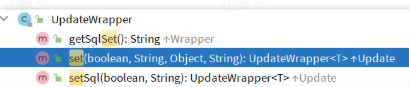
而 UpdateWrapper 在 AbstractWrapper 的基础上拓展了一个 set 方法,允许指定 SQL 中的 SET 部分:
2.1.1 QueryWrapper
无论是修改、删除、查询,都可以使用 QueryWrapper 构建查询条件。
查询示例:查询名字中带 "o",存款大于等于 1000 元的人
java
@Test
void testQueryWrapper() {
    QueryWrapper<User> wrapper = new QueryWrapper<User>()
            .select("id", "username", "info", "balance")
            .like("username", "o")
            .ge("balance", 1000);
    List<User> users = userMapper.selectList(wrapper);
    users.forEach(System.out::println);
}更新示例:更新用户名为 jack 的用户余额为 2000
java
@Test
void testUpdateByQueryWrapper() {
    QueryWrapper<User> wrapper = new QueryWrapper<User>().eq("username", "Jack");
    User user = new User();
    user.setBalance(2000);
    userMapper.update(user, wrapper);
}
2.1.2 UpdateWrapper
BaseMapper 的 update 方法只能直接赋值,对于复杂需求(如 balance = balance - 200)需要使用 UpdateWrapper 的 setSql 功能:
java
@Test
void testUpdateWrapper() {
    List<Long> ids = List.of(1L, 2L, 4L);
    UpdateWrapper<User> wrapper = new UpdateWrapper<User>()
            .setSql("balance = balance - 200")
            .in("id", ids);
    userMapper.update(null, wrapper);
}
对应的 SQL:UPDATE user SET balance = balance - 200 WHERE id IN (1, 2, 4)
2.1.3 LambdaQueryWrapper
QueryWrapper 和 UpdateWrapper 在构造条件时需要写死字段名称,会出现字符串魔法值。MyBatis Plus 提供了基于 Lambda 的 Wrapper:
java
@Test
void testLambdaQueryWrapper() {
    QueryWrapper<User> wrapper = new QueryWrapper<>();
    wrapper.lambda()
            .select(User::getId, User::getUsername, User::getInfo, User::getBalance)
            .like(User::getUsername, "o")
            .ge(User::getBalance, 1000);
    List<User> users = userMapper.selectList(wrapper);
    users.forEach(System.out::println);
}
2.2. 自定义 SQL
在某些场景下,SQL 语句最好维护在持久层。MyBatis Plus 提供了自定义 SQL 功能,可以利用 Wrapper 生成查询条件,再结合 Mapper XML 编写 SQL。
2.2.1 基本用法
java
@Test
void testCustomWrapper() {
    List<Long> ids = List.of(1L, 2L, 4L);
    QueryWrapper<User> wrapper = new QueryWrapper<User>().in("id", ids);
    userMapper.deductBalanceByIds(200, wrapper);
}
在 UserMapper 中自定义 SQL:
java
@Update("UPDATE user SET balance = balance - #{money} ${ew.customSqlSegment}")
void deductBalanceByIds(@Param("money") int money, @Param("ew") QueryWrapper<User> wrapper);
2.2.2 多表关联
理论上 MyBatis Plus 不支持多表查询,但可以利用 Wrapper 结合自定义 SQL 实现:
java
@Test
void testCustomJoinWrapper() {
    QueryWrapper<User> wrapper = new QueryWrapper<User>()
            .in("u.id", List.of(1L, 2L, 4L))
            .eq("a.city", "北京");
    List<User> users = userMapper.queryUserByWrapper(wrapper);
    users.forEach(System.out::println);
}
在 UserMapper 中定义方法:
java
@Select("SELECT u.* FROM user u INNER JOIN address a ON u.id = a.user_id ${ew.customSqlSegment}")
List<User> queryUserByWrapper(@Param("ew") QueryWrapper<User> wrapper);
或者在 XML 中写 SQL:
java
<select id="queryUserByIdAndAddr" resultType="com.example.mp.domain.po.User">
    SELECT * FROM user u INNER JOIN address a ON u.id = a.user_id ${ew.customSqlSegment}
</select>
2.3. Service 接口
MyBatis Plus 提供了通用的 Service 接口及默认实现,封装了常用的 service 模板方法。
2.3.1 基本用法
定义 IUserService 接口,继承 IService:
java
package com.example.mp.service;
import com.baomidou.mybatisplus.extension.service.IService;
import com.example.mp.domain.po.User;
public interface IUserService extends IService<User> {
}编写 UserServiceImpl 类,继承 ServiceImpl:
java
package com.example.mp.service.impl;
import com.baomidou.mybatisplus.extension.service.impl.ServiceImpl;
import com.example.mp.domain.po.User;
import com.example.mp.mapper.UserMapper;
import com.example.mp.service.IUserService;
import org.springframework.stereotype.Service;
@Service
public class UserServiceImpl extends ServiceImpl<UserMapper, User> implements IUserService {
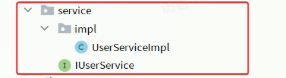
}项目结构如下:
2.3.2 快速实现 CRUD 接口
引入依赖:
java
<!--swagger-->
<dependency>
    <groupId>com.github.xiaoymin</groupId>
    <artifactId>knife4j-openapi2-spring-boot-starter</artifactId>
    <version>4.1.0</version>
</dependency>
<!--web-->
<dependency>
    <groupId>org.springframework.boot</groupId>
    <artifactId>spring-boot-starter-web</artifactId>
</dependency>
配置 Swagger:
java
knife4j:
  enable: true
  openapi:
    title: 用户管理接口文档
    description: "用户管理接口文档"
    email: dev@example.com
    concat: 开发者
    url: https://www.example.com
    version: v1.0.0
    group:
      default:
        group-name: default
        api-rule: package
        api-rule-resources:
          - com.example.mp.controller
定义 DTO 和 VO:
java
// UserFormDTO
@Data
@ApiModel(description = "用户表单实体")
public class UserFormDTO {
@ApiModelProperty("id") private Long id;
@ApiModelProperty("用户名") private String username;
@ApiModelProperty("密码") private String password;
@ApiModelProperty("注册手机号") private String phone;
@ApiModelProperty("详细信息") private String info;
@ApiModelProperty("账户余额") private Integer balance;
}
// UserVO
@Data
@ApiModel(description = "用户VO实体")
public class UserVO {
@ApiModelProperty("用户id") private Long id;
@ApiModelProperty("用户名") private String username;
@ApiModelProperty("详细信息") private String info;
@ApiModelProperty("使用状态") private Integer status;
@ApiModelProperty("账户余额") private Integer balance;
}编写 Controller:
java
@Api(tags = "用户管理接口")
@RequiredArgsConstructor
@RestController
@RequestMapping("users")
public class UserController {
private final IUserService userService;
@PostMapping
@ApiOperation("新增用户")
public void saveUser(@RequestBody UserFormDTO userFormDTO) {
User user = BeanUtil.copyProperties(userFormDTO, User.class);
userService.save(user);
}
@DeleteMapping("/{id}")
@ApiOperation("删除用户")
public void removeUserById(@PathVariable("id") Long userId) {
userService.removeById(userId);
}
@GetMapping("/{id}")
@ApiOperation("根据id查询用户")
public UserVO queryUserById(@PathVariable("id") Long userId) {
User user = userService.getById(userId);
return BeanUtil.copyProperties(user, UserVO.class);
}
@GetMapping
@ApiOperation("根据id集合查询用户")
public List<UserVO> queryUserByIds(@RequestParam("ids") List<Long> ids) {
List<User> users = userService.listByIds(ids);
return BeanUtil.copyToList(users, UserVO.class);
}
}2.3.3 自定义业务逻辑
实现扣减用户余额的业务,包含业务逻辑处理:
java
// Controller
@PutMapping("{id}/deduction/{money}")
@ApiOperation("扣减用户余额")
public void deductBalance(@PathVariable("id") Long id, @PathVariable("money") Integer money) {
userService.deductBalance(id, money);
}
// Service 接口
public interface IUserService extends IService<User> {
void deductBalance(Long id, Integer money);
}
// Service 实现
@Override
public void deductBalance(Long id, Integer money) {
User user = getById(id);
if (user == null || user.getStatus() == 2) {
throw new RuntimeException("用户状态异常");
}
if (user.getBalance() < money) {
throw new RuntimeException("用户余额不足");
}
baseMapper.deductMoneyById(id, money);
}
// Mapper
@Update("UPDATE user SET balance = balance - #{money} WHERE id = #{id}")
void deductMoneyById(@Param("id") Long id, @Param("money") Integer money);2.3.4 Lambda 查询
定义查询条件实体:
java
@Data
@ApiModel(description = "用户查询条件实体")
public class UserQuery {
    @ApiModelProperty("用户名关键字") private String name;
    @ApiModelProperty("用户状态") private Integer status;
    @ApiModelProperty("余额最小值") private Integer minBalance;
    @ApiModelProperty("余额最大值") private Integer maxBalance;
}
使用 Lambda 查询:
java
@GetMapping("/list")
@ApiOperation("根据条件查询用户")
public List<UserVO> queryUsers(UserQuery query) {
    List<User> users = userService.lambdaQuery()
            .like(query.getName() != null, User::getUsername, query.getName())
            .eq(query.getStatus() != null, User::getStatus, query.getStatus())
            .ge(query.getMinBalance() != null, User::getBalance, query.getMinBalance())
            .le(query.getMaxBalance() != null, User::getBalance, query.getMaxBalance())
            .list();
    return BeanUtil.copyToList(users, UserVO.class);
}
2.3.5 批量新增
逐条插入数据:
java
@Test
void testSaveOneByOne() {
    long b = System.currentTimeMillis();
    for (int i = 1; i <= 100000; i++) {
        userService.save(buildUser(i));
    }
    long e = System.currentTimeMillis();
    System.out.println("耗时:" + (e - b));
}
使用批处理:
java
@Test
void testSaveBatch() {
    List<User> list = new ArrayList<>(1000);
    long b = System.currentTimeMillis();
    for (int i = 1; i <= 100000; i++) {
        list.add(buildUser(i));
        if (i % 1000 == 0) {
            userService.saveBatch(list);
            list.clear();
        }
    }
    long e = System.currentTimeMillis();
    System.out.println("耗时:" + (e - b));
}
优化批处理性能,修改 JDBC URL 添加 rewriteBatchedStatements=true:
java
spring:
  datasource:
url: jdbc:mysql://127.0.0.1:3306/mp?useUnicode=true&characterEncoding=UTF-8&autoReconnect=true&serverTimezone=Asia/Shanghai&rewriteBatchedStatements=true总结:
MyBatis Plus 通过 BaseMapper 简化了单表 CRUD 操作,通过条件构造器实现了复杂查询。掌握这些核心技能,可以大幅提高开发效率。