代码地址:https://gitee.com/CodeMao01/agentscope-learn
一、快速开始
1.1、studio启动
官网地址:https://java.agentscope.io/v1/zh/docs/task/observability.html
AgentScope Java 提供了多种机制来观测和调试智能体的执行过程:
- Studio(可视化调试):Studio 提供 Web 界面实时可视化 Agent 执行过程,支持交互式调试和消息追踪。
- OpenTelemetry 链路追踪:通过 OTLP 协议将 Trace 数据导出到外部可观测性平台(如 Langfuse、Jaeger)
核心特性:
- 实时可视化:Web 界面展示 Agent 推理和执行过程
- 交互式输入:通过 Web UI 与 Agent 对话
- 消息追踪:查看完整的消息流和Trace
- 多 Run 管理:支持多个实验运行的组织和比较
- 拉项目、安装依赖并启动
json
git clone https://github.com/agentscope-ai/agentscope-studio
cd agentscope-studio
npm install
npm run dev- 打开可视化界面:http://localhost:5173/overview
1.2、项目创建
- 项目整体目录

- 父子项目pom依赖
xml
<?xml version="1.0" encoding="UTF-8"?>
<project xmlns="http://maven.apache.org/POM/4.0.0" xmlns:xsi="http://www.w3.org/2001/XMLSchema-instance"
         xsi:schemaLocation="http://maven.apache.org/POM/4.0.0 https://maven.apache.org/xsd/maven-4.0.0.xsd">
    <modelVersion>4.0.0</modelVersion>
    <parent>
        <groupId>org.springframework.boot</groupId>
        <artifactId>spring-boot-starter-parent</artifactId>
        <version>3.5.15</version>
        <relativePath/> <!-- lookup parent from repository -->
    </parent>


    <groupId>com.example</groupId>
    <artifactId>agentscope-learn</artifactId>
    <version>0.0.1-SNAPSHOT</version>
    <packaging>pom</packaging>
    <name>agentscope-lern</name>
    <description>agentscope-learn</description>

    <modules>
        <module>quickstart</module>
    </modules>
    <url/>
    <licenses>
        <license/>
    </licenses>
    <developers>
        <developer/>
    </developers>
    <scm>
        <connection/>
        <developerConnection/>
        <tag/>
        <url/>
    </scm>
    <properties>
        <java.version>17</java.version>
        <agentscope.version>1.0.10</agentscope.version>
        <project.build.sourceEncoding>UTF-8</project.build.sourceEncoding>
    </properties>

    <dependencyManagement>
        <dependencies>
            <dependency>
                <groupId>io.agentscope</groupId>
                <artifactId>agentscope-spring-boot-starter</artifactId>
                <version>${agentscope.version}</version>
            </dependency>
            <dependency>
                <groupId>io.agentscope</groupId>
                <artifactId>agentscope-extensions-studio</artifactId>
                <version>${agentscope.version}</version>
            </dependency>
            <dependency>
                <groupId>io.agentscope</groupId>
                <artifactId>agentscope-agui-spring-boot-starter</artifactId>
                <version>${agentscope.version}</version>
            </dependency>
            <dependency>
                <groupId>com.squareup.okhttp3</groupId>
                <artifactId>okhttp</artifactId>
                <version>5.3.2</version>
            </dependency>
            <dependency>
                <groupId>io.socket</groupId>
                <artifactId>socket.io-client</artifactId>
                <version>2.1.2</version>
            </dependency>
            <dependency>
                <groupId>io.opentelemetry</groupId>
                <artifactId>opentelemetry-api</artifactId>
                <version>1.49.0</version>
            </dependency>
            <dependency>
                <groupId>io.opentelemetry</groupId>
                <artifactId>opentelemetry-exporter-otlp</artifactId>
                <version>1.49.0</version>
            </dependency>
            <dependency>
                <groupId>io.opentelemetry.instrumentation</groupId>
                <artifactId>opentelemetry-reactor-3.1</artifactId>
                <version>2.25.0-alpha</version>
            </dependency>
        </dependencies>
    </dependencyManagement>

    <dependencies>
        <dependency>
            <groupId>org.springframework.boot</groupId>
            <artifactId>spring-boot-starter-web</artifactId>
        </dependency>
        <dependency>
            <groupId>org.springframework.boot</groupId>
            <artifactId>spring-boot-starter-webflux</artifactId>
        </dependency>
        <dependency>
            <groupId>io.agentscope</groupId>
            <artifactId>agentscope-spring-boot-starter</artifactId>
        </dependency>
        <dependency>
            <groupId>org.projectlombok</groupId>
            <artifactId>lombok</artifactId>
            <version>1.18.42</version>
        </dependency>
    </dependencies>

    <build>
        <plugins>
            <plugin>
                <groupId>org.springframework.boot</groupId>
                <artifactId>spring-boot-maven-plugin</artifactId>
            </plugin>
        </plugins>
    </build>

</project>
xml
<?xml version="1.0" encoding="UTF-8"?>
<project xmlns="http://maven.apache.org/POM/4.0.0" xmlns:xsi="http://www.w3.org/2001/XMLSchema-instance"
         xsi:schemaLocation="http://maven.apache.org/POM/4.0.0 https://maven.apache.org/xsd/maven-4.0.0.xsd">
    <modelVersion>4.0.0</modelVersion>
    <parent>
        <groupId>com.example</groupId>
        <artifactId>agentscope-learn</artifactId>
        <version>0.0.1-SNAPSHOT</version>
    </parent>
    <artifactId>quickstart</artifactId>
    <name>quickstart</name>
    <description>quickstart</description>

    <url/>
    <licenses>
        <license/>
    </licenses>
    <developers>
        <developer/>
    </developers>
    <scm>
        <connection/>
        <developerConnection/>
        <tag/>
        <url/>
    </scm>
    <properties>
        <java.version>17</java.version>
    </properties>
    <dependencies>
        <dependency>
            <groupId>io.agentscope</groupId>
            <artifactId>agentscope-extensions-studio</artifactId>
        </dependency>
        <dependency>
            <groupId>com.squareup.okhttp3</groupId>
            <artifactId>okhttp</artifactId>
        </dependency>
        <dependency>
            <groupId>io.socket</groupId>
            <artifactId>socket.io-client</artifactId>
        </dependency>
        <dependency>
            <groupId>io.opentelemetry</groupId>
            <artifactId>opentelemetry-api</artifactId>
        </dependency>
        <dependency>
            <groupId>io.opentelemetry</groupId>
            <artifactId>opentelemetry-exporter-otlp</artifactId>
        </dependency>
        <dependency>
            <groupId>io.opentelemetry.instrumentation</groupId>
            <artifactId>opentelemetry-reactor-3.1</artifactId>
        </dependency>
    </dependencies>

    <build>
        <plugins>
            <plugin>
                <groupId>org.springframework.boot</groupId>
                <artifactId>spring-boot-maven-plugin</artifactId>
            </plugin>
        </plugins>
    </build>

</project>- 启动类连接studio
java
package com.example.quickstart;

import io.agentscope.core.studio.StudioManager;
import jakarta.annotation.PreDestroy;
import org.springframework.boot.SpringApplication;
import org.springframework.boot.autoconfigure.SpringBootApplication;

@SpringBootApplication
public class QuickstartApplication {

    public static void main(String[] args) {
        // 初始化 Studio 连接
        StudioManager.init()
                .studioUrl("http://localhost:3000")
                .project("MyProject")
                .runName("demo_" + System.currentTimeMillis())
                .initialize()
                .block();

        SpringApplication.run(QuickstartApplication.class, args);
    }

    @PreDestroy
    public void destroy() {
        // 停止 Studio 运行
        StudioManager.shutdown();
    }

}- 配置文件编写
yaml
spring:
  application:
    name: quickstart
server:
  port: 8801
  servlet:
    encoding:
      enabled: true
      charset: UTF-8
force: true- ReActAgent配置
java
package com.example.quickstart.config;

import io.agentscope.core.ReActAgent;
import io.agentscope.core.agent.Agent;
import io.agentscope.core.model.OllamaChatModel;
import io.agentscope.core.model.ollama.OllamaOptions;
import io.agentscope.core.model.ollama.ThinkOption;
import io.agentscope.core.studio.StudioManager;
import io.agentscope.core.studio.StudioMessageHook;
import org.springframework.context.annotation.Bean;
import org.springframework.context.annotation.Configuration;

@Configuration
public class AIConfig {
    @Bean
    public OllamaChatModel ollamaChatModel() {
        return OllamaChatModel.builder()
                .modelName("qwen3.5:0.8b")
                .defaultOptions(OllamaOptions.builder()
                        .thinkOption(ThinkOption.ThinkBoolean.DISABLED).build())
                .build();
    }

    @Bean
    public Agent reactAgent() {
        return ReActAgent.builder()
                .name("Hello Agent")
                // studio 可观测这个agent
                .hook(new StudioMessageHook(StudioManager.getClient()))
                .model(ollamaChatModel())
                .build();
    }
}- 测试接口
java
package com.example.quickstart.controller;

import io.agentscope.core.agent.Agent;
import io.agentscope.core.agent.Event;
import io.agentscope.core.message.Msg;
import org.springframework.beans.factory.annotation.Autowired;
import org.springframework.web.bind.annotation.GetMapping;
import org.springframework.web.bind.annotation.RestController;
import reactor.core.publisher.Flux;

@RestController
public class HelloController {
    @Autowired
    private Agent agent;

    @GetMapping("/chat")
    public String chat(String question) {
        Msg block = agent.call(Msg.builder().textContent(question).build()).block();
        return block.getTextContent();
    }

    @GetMapping("/stream")
    public Flux<String> stream(String question) {
        Flux<Event> stream = agent.stream(Msg.builder().textContent(question).build());
        return stream.map(event -> event.getMessage().getTextContent());
    }
}- 允许studio页面发送消息
java
package com.example.quickstart.init;

import io.agentscope.core.agent.Agent;
import io.agentscope.core.message.Msg;
import io.agentscope.core.studio.StudioManager;
import io.agentscope.core.studio.StudioUserAgent;
import org.springframework.beans.factory.annotation.Autowired;
import org.springframework.boot.ApplicationArguments;
import org.springframework.boot.ApplicationRunner;
import org.springframework.stereotype.Component;

@Component
public class StudioAgentRunner implements ApplicationRunner {

    @Autowired
    private Agent agent;

    @Override
    public void run(ApplicationArguments args) throws Exception {
        // 创建用户 Agent
        StudioUserAgent user = StudioUserAgent.builder()
                .name("User")
                .studioClient(StudioManager.getClient())
                .webSocketClient(StudioManager.getWebSocketClient())
                .build();

        // 对话循环
        System.out.println("Starting conversation (type 'exit' to quit)");
        System.out.println("Open http://localhost:3000 to interact\n");

        Msg msg = null;
        int turn = 1;
        while (true) {
            System.out.println("[Turn " + turn + "] Waiting for user input...");
            msg = user.call(msg).block();

            if (msg == null || "exit".equalsIgnoreCase(msg.getTextContent())) {
                System.out.println("\nConversation ended");
                break;
            }

            System.out.println("[Turn " + turn + "] User: " + msg.getTextContent());
            msg = agent.call(msg).block();

            if (msg != null) {
                System.out.println("[Turn " + turn + "] Agent: "
                        + msg.getTextContent() + "\n");
            }
            turn++;
        }
    }
}
二、AgentScope
2.1、工具tool
2.1.1、快速使用
- 获取时间工具
java
package com.example.quickstart.tool;

import io.agentscope.core.tool.Tool;
import io.agentscope.core.tool.ToolParam;

import java.time.LocalDateTime;

public class DateTools {
    @Tool(description = "获取当前时间")
    public String getCurrentDate(@ToolParam(name = "timeZone", description = "时区, 例如:北京") String timeZone) {
        return LocalDateTime.now().toString();
    }

}- AgentScope接入工具
java
@Bean
public Agent reactAgent() {
    Toolkit toolkit = new Toolkit();
    toolkit.registerTool(new DateTools());
    return ReActAgent.builder()
            .name("Hello Agent")
            // studio 可观测这个agent
            .hook(new StudioMessageHook(StudioManager.getClient()))
            .model(ollamaChatModel())
            .toolkit(toolkit)
            .build();
}
2.1.2、工具配置
模型的工具配置和工具自定义配置,优先级是模型的工具配置
java
@Bean
public Agent reactAgent() {
    Toolkit toolkit = new Toolkit(ToolkitConfig.builder()
            .executionConfig(ExecutionConfig.builder()
                    .maxAttempts(2)
                    .timeout(Duration.ofSeconds(1))
                    .build())
            .build());
    toolkit.registerTool(new DateTools());
    ExecutionConfig executionConfig = ExecutionConfig.builder()
            .timeout(Duration.ofSeconds(2))
//                .maxAttempts(3)
            .build();
    return ReActAgent.builder()
            .name("Hello Agent")
            // studio 可观测这个agent
            .hook(new StudioMessageHook(StudioManager.getClient()))
            .model(ollamaChatModel())
            .toolkit(toolkit)
//                .maxIters(2)
            // 优先模型配置
            .toolExecutionConfig(executionConfig)
            .build();
}
2.1.3、参数传递
源码支持的参数:io.agentscope.core.tool.ToolMethodInvoker#convertParameters
java
@Tool(description = "获取当前时间")
public String getCurrentDate(@ToolParam(name = "timeZone", description = "时区, 例如:北京") String timeZone,
                             AIConfig.UserContext userContext,
                             Agent agent,
                             ToolExecutionContext toolExecutionContext,
                             ToolEmitter toolEmitter
) throws InterruptedException {
    System.out.println("userContext: " + userContext.name());
    System.out.println("agent: " + agent);
    System.out.println("toolExecutionContext: " + toolExecutionContext.getStores().get(0));
    System.out.println("toolEmitter: " + toolEmitter);
    return LocalDateTime.now().toString();
}
java
public record UserContext(String name){}

    @Bean
    public Agent reactAgent() {
        Toolkit toolkit = new Toolkit(
//                ToolkitConfig.builder()
//                .executionConfig(ExecutionConfig.builder()
//                        .maxAttempts(2)
//                        .timeout(Duration.ofSeconds(1))
//                        .build())
//                .build()
        );
        toolkit.registerTool(new DateTools());
//        ExecutionConfig executionConfig = ExecutionConfig.builder()
//                .timeout(Duration.ofSeconds(2))
////                .maxAttempts(3)
//                .build();
        ToolExecutionContext toolExecutionContext = ToolExecutionContext.builder()
                .register(new UserContext("赵六"))
                .register("name", String.class, "张三")
                .build();
        return ReActAgent.builder()
                .name("Hello Agent")
                // studio 可观测这个agent
                .hook(new StudioMessageHook(StudioManager.getClient()))
                .model(ollamaChatModel())
                .toolkit(toolkit)
//                .maxIters(2)
                // 优先模型配置
//                .toolExecutionConfig(executionConfig)
                .toolExecutionContext(toolExecutionContext)
                .build();
    }
2.1.4、预设参数
不需要大模型传递参数,而是可以手动传递参数
java
public class WeatherTools {
    @Tool(name = "getWeather", description = "获取天气信息")
    public String getWeather(@ToolParam(name = "city", description = "城市") String city,
                             @ToolParam(name = "apiKey", description = "API Key") String apiKey) {
        return "晴空万里, city:" + city;
    }
}
java
@Bean
public Agent reactAgent() {
    Toolkit toolkit = new Toolkit(
//                ToolkitConfig.builder()
//                .executionConfig(ExecutionConfig.builder()
//                        .maxAttempts(2)
//                        .timeout(Duration.ofSeconds(1))
//                        .build())
//                .build()
    );
    toolkit.registerTool(new DateTools());
    toolkit.registration()
            .tool(new WeatherTools())
            .presetParameters(Map.of("getWeather", Map.of("apiKey", "123456789")))
            .apply();

//        ExecutionConfig executionConfig = ExecutionConfig.builder()
//                .timeout(Duration.ofSeconds(2))
////                .maxAttempts(3)
//                .build();
    ToolExecutionContext toolExecutionContext = ToolExecutionContext.builder()
            .register(new UserContext("赵六"))
            .register("name", String.class, "张三")
            .build();
    return ReActAgent.builder()
            .name("Hello Agent")
            // studio 可观测这个agent
            .hook(new StudioMessageHook(StudioManager.getClient()))
            .model(ollamaChatModel())
            .toolkit(toolkit)
//                .maxIters(2)
            // 优先模型配置
//                .toolExecutionConfig(executionConfig)
            .toolExecutionContext(toolExecutionContext)
            .build();
}
2.1.5、工具组
不需要给大模型全部的工具,而是自己注册一个工具组给大模型,让大模型按需激活然后调用
java
@Bean
public DashScopeChatModel dashScopeChatModel() {
    return DashScopeChatModel.builder()
            .apiKey(System.getenv("DASHSCOPE_KEY"))
            .modelName("qwen-plus-2025-12-01")
//                .baseUrl("https://dashscope.aliyuncs.com/api/v1")
            .build();
}
@Bean
public Agent reactAgent() {
    Toolkit toolkit = new Toolkit();
    toolkit.registration()
            .tool(new DateTools())
            .apply();
    toolkit.registration()
            .tool(new WeatherTools())
            .presetParameters(Map.of("getWeather", Map.of("apiKey", "123456789")))
            .apply();

    toolkit.createToolGroup("date", "日期工具", false);
    toolkit.createToolGroup("weather", "天气工具", false);
    // 这种方式有问题, 不会自动激活, 建议使用.enableMetaTool(true)
//        toolkit.registerMetaTool();
    ToolExecutionContext toolExecutionContext = ToolExecutionContext.builder()
            .register(new UserContext("赵六"))
            .register("name", String.class, "张三")
            .build();
    return ReActAgent.builder()
            .name("Hello Agent")
            .hook(new StudioMessageHook(StudioManager.getClient()))
            .model(dashScopeChatModel())
            .toolkit(toolkit)
            .enableMetaTool(true)
            .toolExecutionContext(toolExecutionContext)
            .build();
}
2.1.6、内置工具
java
@Bean
    public Agent reactAgent() {
        Toolkit toolkit = new Toolkit();
        toolkit.registration()
                .tool(new DateTools())
                .apply();
        toolkit.registration()
                .tool(new WeatherTools())
                .presetParameters(Map.of("getWeather", Map.of("apiKey", "123456789")))
                .apply();

        toolkit.createToolGroup("date", "日期工具", false);
        toolkit.createToolGroup("weather", "天气工具", false);
        ToolExecutionContext toolExecutionContext = ToolExecutionContext.builder()
                .register(new UserContext("赵六"))
                .register("name", String.class, "张三")
                .build();

        toolkit.registerTool(new ReadFileTool("D:\\Desktop\\tmp"));
        toolkit.registerTool(new WriteFileTool("D:\\Desktop\\tmp"));
        // 默认允许执行所有的shell脚本
//        toolkit.registerTool(new ShellCommandTool());
        // 只允许执行ls、或者命令中包含python
        toolkit.registerTool(new ShellCommandTool(Set.of("ls"), cmd -> {
            if (cmd.contains("python")) {
                return true;
            }
            return false;
        }));

        return ReActAgent.builder()
                .name("Hello Agent")
                // studio 可观测这个agent
                .hook(new StudioMessageHook(StudioManager.getClient()))
//                .model(dashScopeChatModel())
                .model(ollamaChatModel())
                .toolkit(toolkit)
                .enableMetaTool(true)
                .toolExecutionContext(toolExecutionContext)
                .build();
    }
2.1.6、工具挂起
工具挂起,比如说需要调用外部系统的时候可以挂起,然后调用外部服务然后拿结果再给LLM
- 工具挂起
java
package com.example.quickstart.tool;

import io.agentscope.core.tool.Tool;
import io.agentscope.core.tool.ToolSuspendException;

public class UserTools {
    @Tool(name = "getUserInfo", description = "获取用户信息")
    public String getUserInfo() {
        throw new ToolSuspendException("需要调用外部信息");
    }
}- 注册工具
java
@Bean
public Agent reactAgent() {
    Toolkit toolkit = new Toolkit(
    );

    toolkit.createToolGroup("date", "日期工具", false);
    toolkit.createToolGroup("weather", "天气工具", false);
    ToolExecutionContext toolExecutionContext = ToolExecutionContext.builder()
            .register(new UserContext("赵六"))
            .register("name", String.class, "张三")
            .build();


    toolkit.registerTool(new UserTools());
    return ReActAgent.builder()
            .name("Hello Agent")
            // studio 可观测这个agent
            .hook(new StudioMessageHook(StudioManager.getClient()))
            .model(ollamaChatModel())
            .toolkit(toolkit)
            .enableMetaTool(true)
            .toolExecutionContext(toolExecutionContext)
            .build();
}- 获取外部接口(测试)
java
package com.example.quickstart.controller;

import io.agentscope.core.agent.Agent;
import io.agentscope.core.agent.Event;
import io.agentscope.core.message.*;
import org.springframework.beans.factory.annotation.Autowired;
import org.springframework.web.bind.annotation.GetMapping;
import org.springframework.web.bind.annotation.RestController;
import reactor.core.publisher.Flux;

@RestController
public class HelloController {
    @Autowired
    private Agent agent;

    @GetMapping("/chat")
    public String chat(String question) {
        Msg block = agent.call(Msg.builder().textContent(question).build()).block();

        if (block.getGenerateReason() == GenerateReason.TOOL_SUSPENDED) {
            // 获取被挂起的工具调用信息
            ToolUseBlock toolUseBlock = block.getContentBlocks(ToolUseBlock.class).get(0);
            // 获取挂起的原因/提示信息
            ToolResultBlock toolResultBlock = block.getContentBlocks(ToolResultBlock.class).get(0);
            TextBlock contentBlock = (TextBlock) toolResultBlock.getOutput().get(0);
            String text = contentBlock.getText();
            if (text != null) {
                // 根据返回信息调用外部信息
                String userName = "张三, " + text;
                // 组装信息给大模型重新回复
                Msg result = Msg.builder()
                        .role(MsgRole.TOOL)
                        .content(ToolResultBlock.builder()
                                .id(toolUseBlock.getId())
                                .name(toolUseBlock.getName())
                                .output(TextBlock.builder().text(userName).build())
                                .build())
                        .build();
                block = agent.call(result).block();
            }
        }

        return block.getTextContent();
    }

}
2.2、循环次数
一次对话循环的次数
java
@Bean
public Agent reactAgent() {
    Toolkit toolkit = new Toolkit();
    toolkit.registerTool(new DateTools());
    return ReActAgent.builder()
            .name("Hello Agent")
            // studio 可观测这个agent
            .hook(new StudioMessageHook(StudioManager.getClient()))
            .model(ollamaChatModel())
            .toolkit(toolkit)
//                .maxIters(2)
            .build();
}
2.3、记忆
2.3.1、短期记忆
2.3.1.1、InMemoryMemory
内存记忆,默认就是内存记忆
java
 @Bean
public Agent reactAgent() {
    Toolkit toolkit = new Toolkit(
//                ToolkitConfig.builder()
//                .executionConfig(ExecutionConfig.builder()
//                        .maxAttempts(2)
//                        .timeout(Duration.ofSeconds(1))
//                        .build())
//                .build()
    );
//        toolkit.registerTool(new DateTools());
    toolkit.registration()
            .tool(new DateTools())
            .apply();
    toolkit.registration()
            .tool(new WeatherTools())
            .presetParameters(Map.of("getWeather", Map.of("apiKey", "123456789")))
            .apply();

//        ExecutionConfig executionConfig = ExecutionConfig.builder()
//                .timeout(Duration.ofSeconds(2))
////                .maxAttempts(3)
//                .build();
    toolkit.createToolGroup("date", "日期工具", false);
    toolkit.createToolGroup("weather", "天气工具", false);
    // 这种方式有问题, 不会自动激活, 建议使用.enableMetaTool(true)
//        toolkit.registerMetaTool();
    ToolExecutionContext toolExecutionContext = ToolExecutionContext.builder()
            .register(new UserContext("赵六"))
            .register("name", String.class, "张三")
            .build();

//        toolkit.registerTool(new ReadFileTool("D:\\Desktop\\tmp"));
//        toolkit.registerTool(new WriteFileTool("D:\\Desktop\\tmp"));
    // 默认允许执行所有的shell脚本
//        toolkit.registerTool(new ShellCommandTool());
    // 只允许执行ls、或者命令中包含python
//        toolkit.registerTool(new ShellCommandTool(Set.of("ls"), cmd -> {
//            if (cmd.contains("python")) {
//                return true;
//            }
//            return false;
//        }));

    toolkit.registerTool(new UserTools());
    return ReActAgent.builder()
            .name("Hello Agent")
            // studio 可观测这个agent
            .hook(new StudioMessageHook(StudioManager.getClient()))
            .model(dashScopeChatModel())
//                .model(ollamaChatModel())
            .toolkit(toolkit)
            .enableMetaTool(true)
//                .maxIters(2)
            // 优先模型配置
//                .toolExecutionConfig(executionConfig)
            .toolExecutionContext(toolExecutionContext)
            // 默认也是开始内存短期记忆
            .memory(new InMemoryMemory())
            .build();
}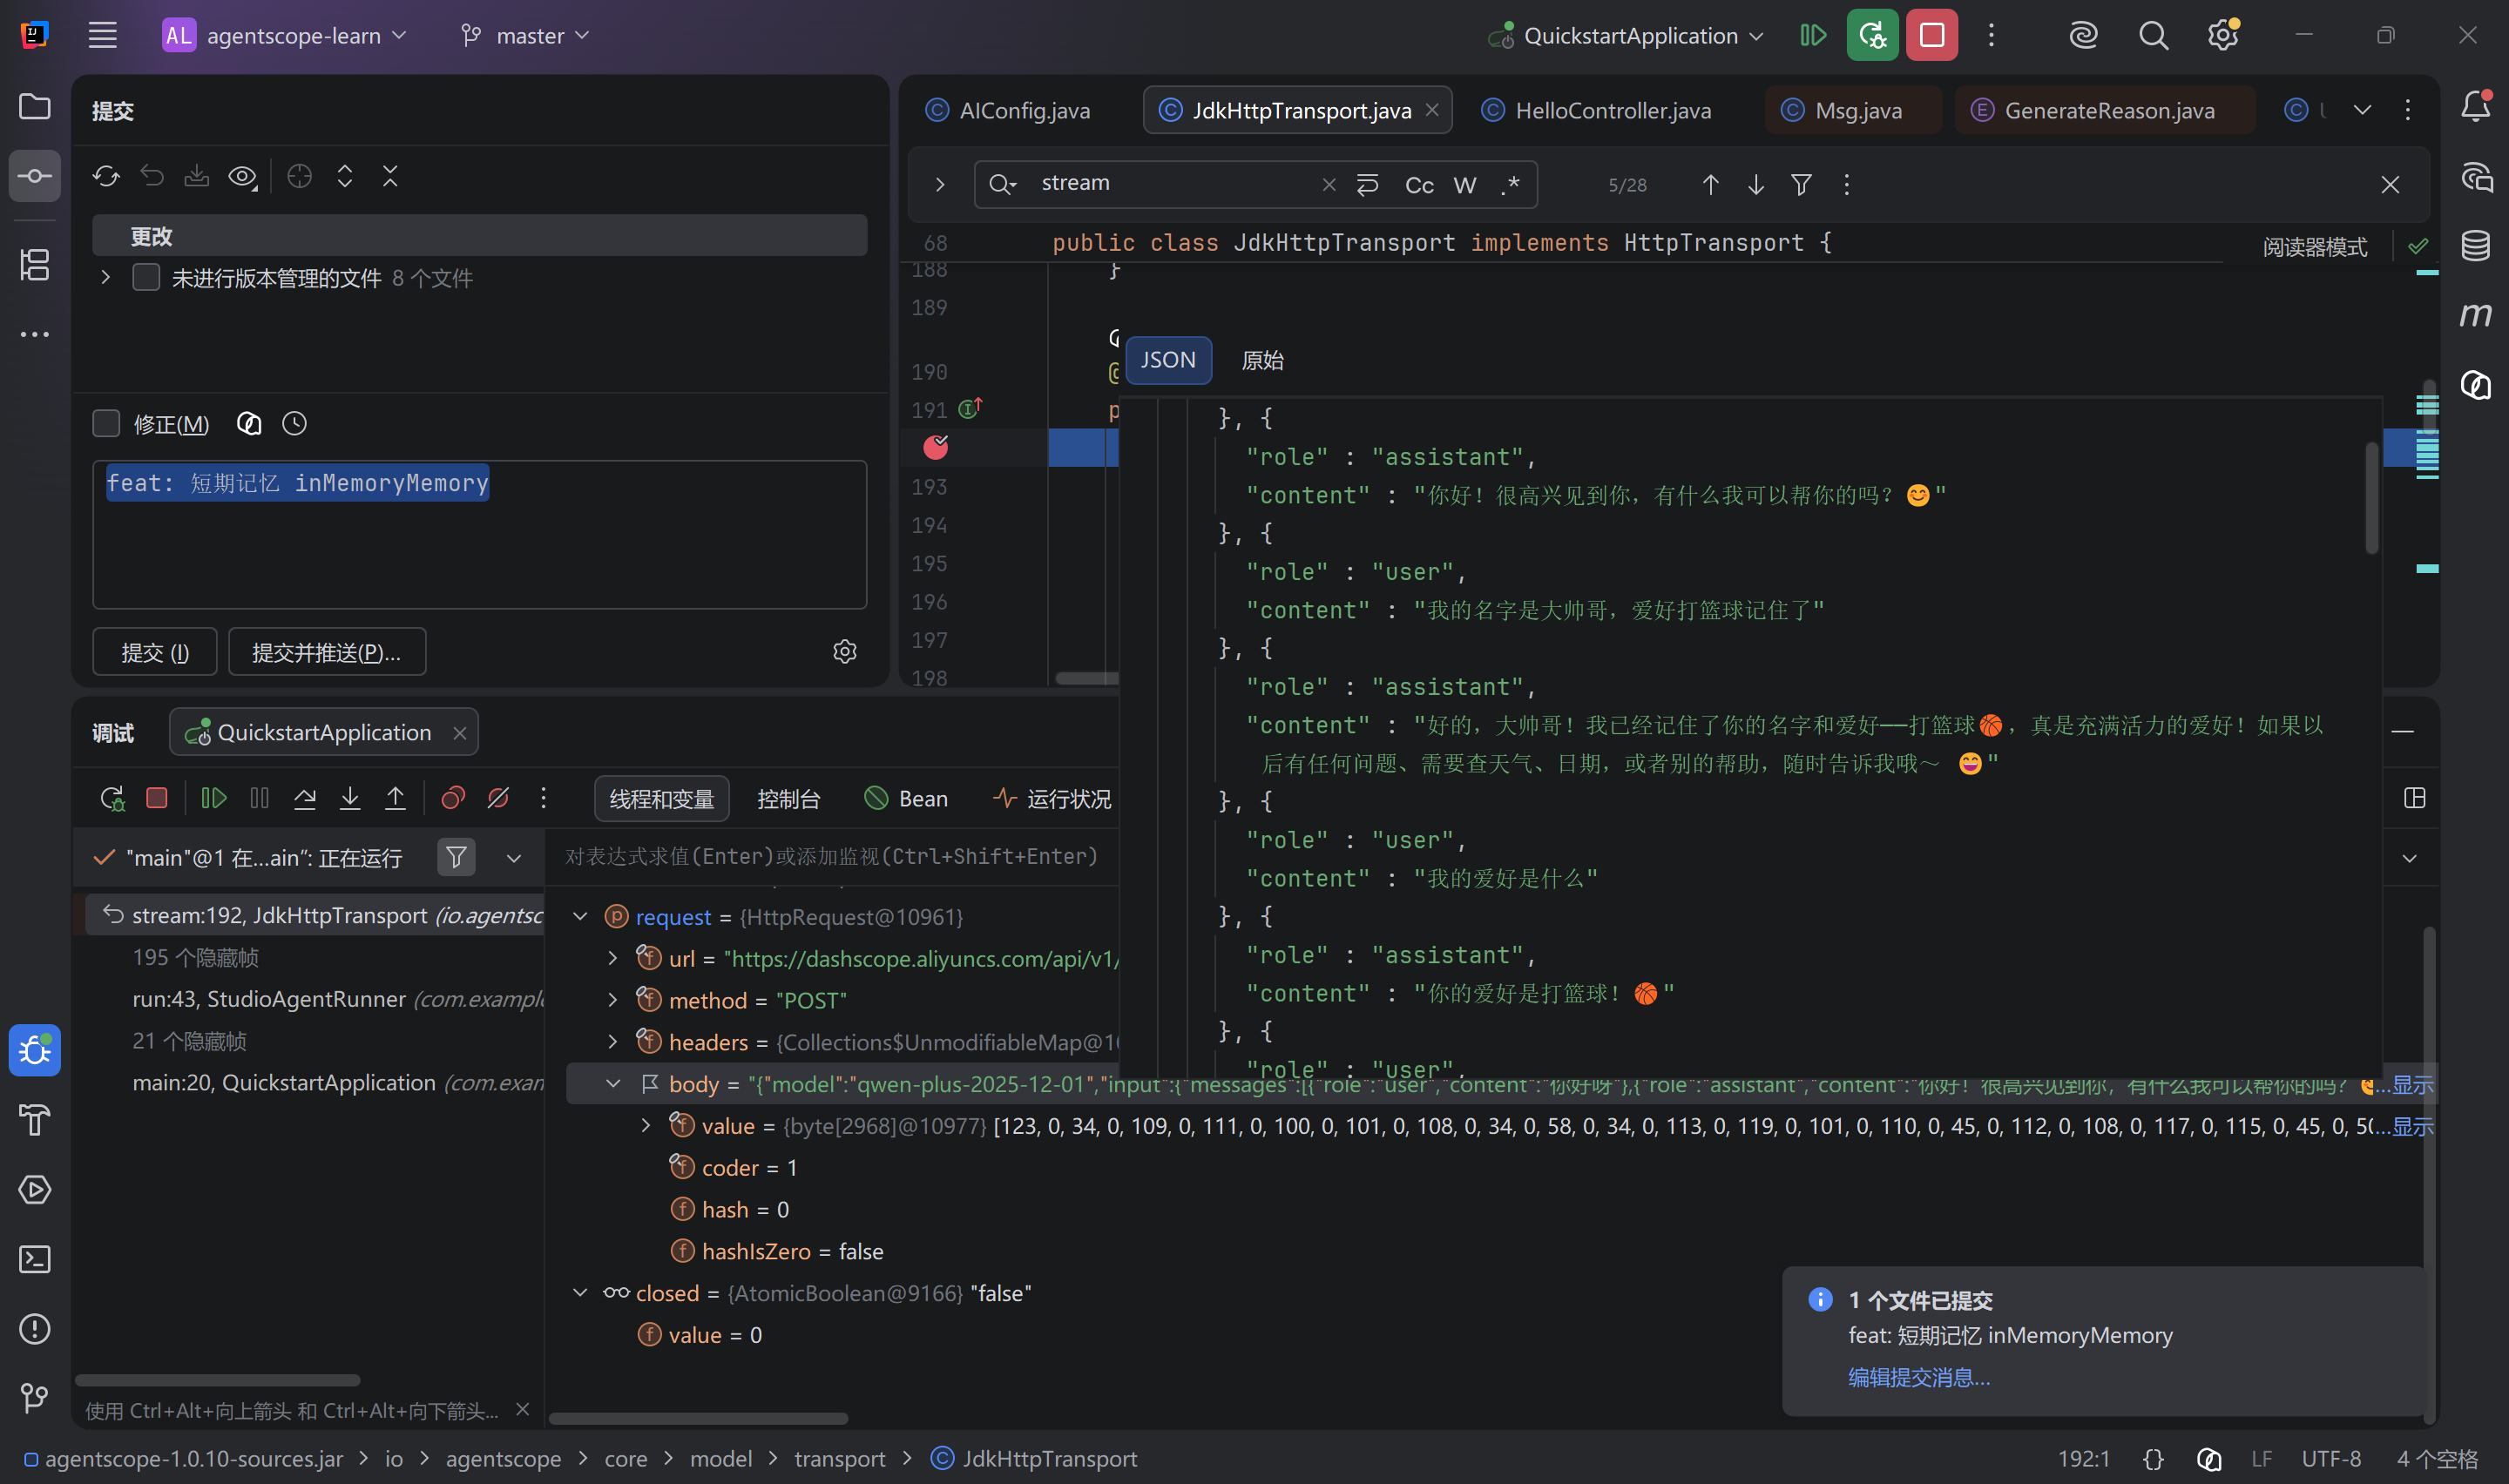
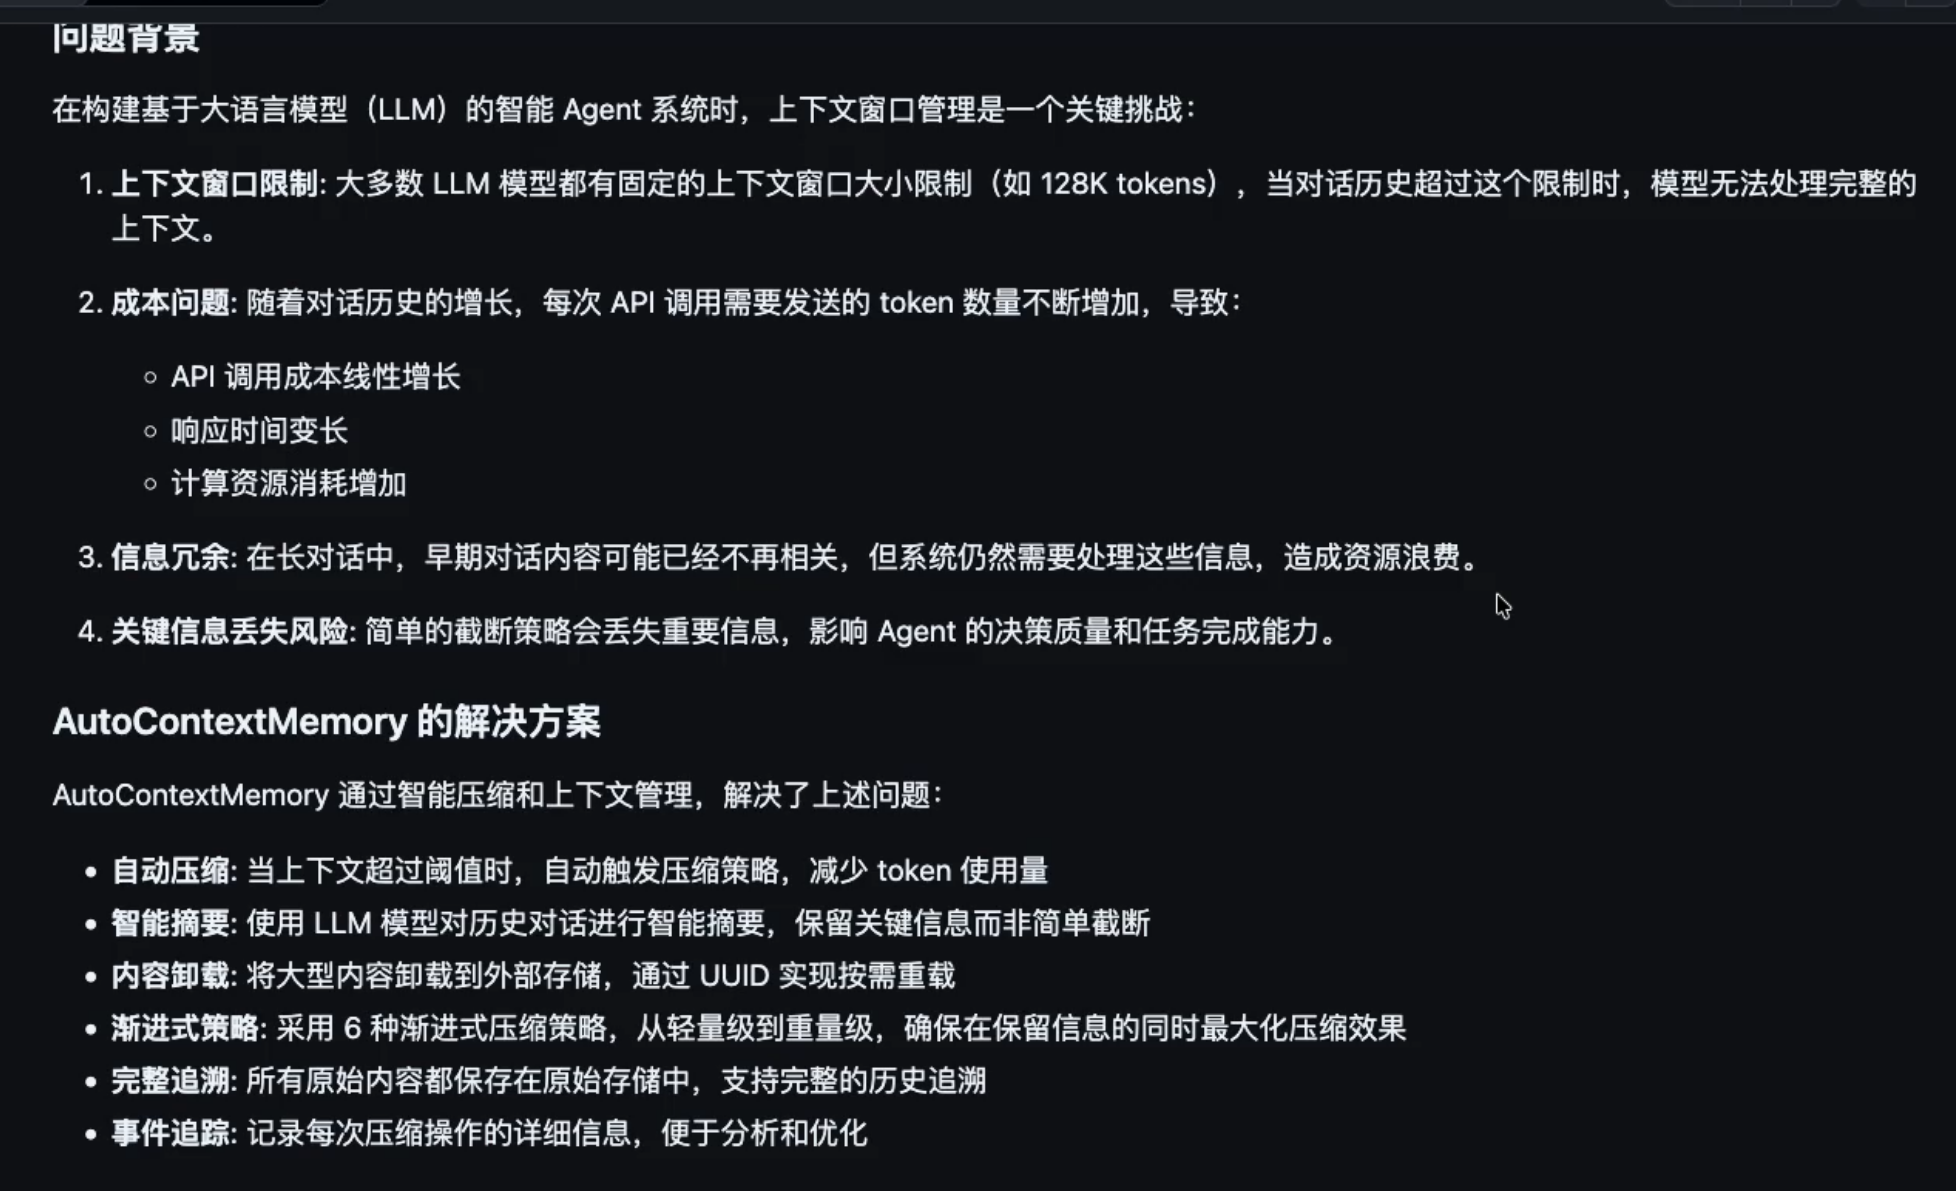
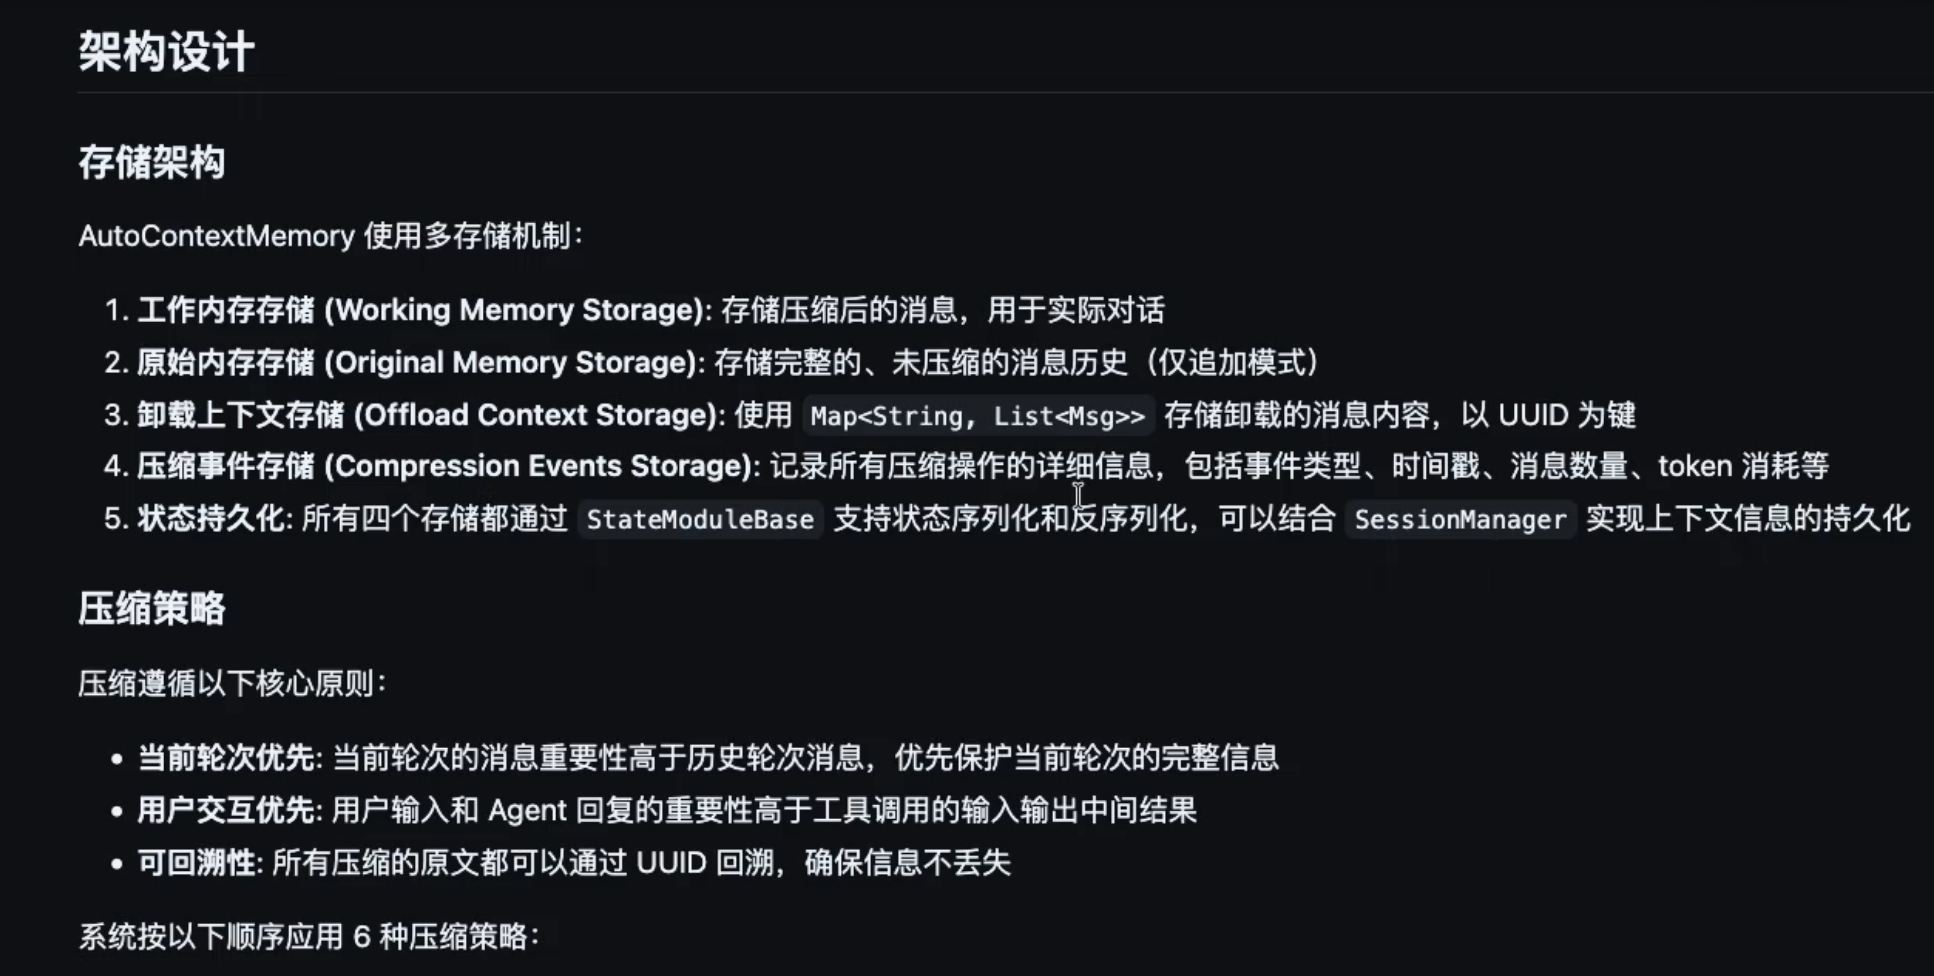
2.3.1.2、AutoContextMemroy
- 基本介绍


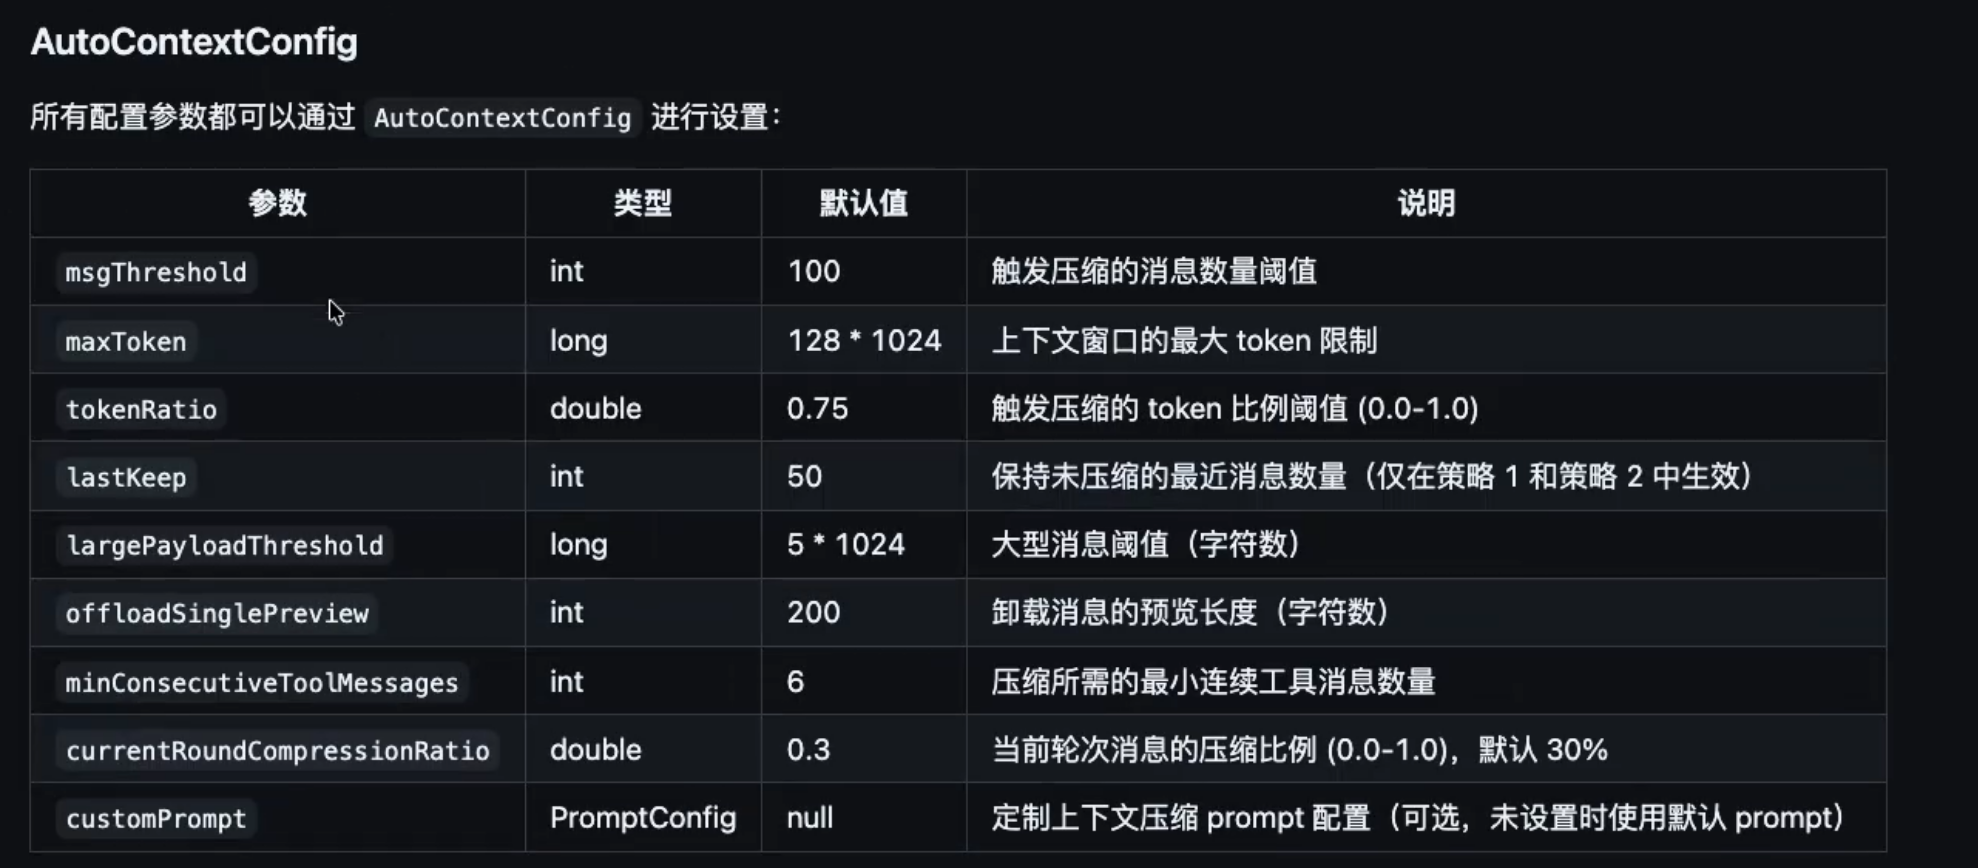
- 代码配置
java
@Bean
public Agent reactAgent() {
    Toolkit toolkit = new Toolkit(
    );
    // toolkit.registerTool(new UserTools());
    AutoContextConfig autoContextConfig = AutoContextConfig.builder()
            .msgThreshold(50)
            .maxToken(64 * 1024)
            .tokenRatio(0.7)
            .lastKeep(20)
            .largePayloadThreshold(10 * 1024)
            .offloadSinglePreview(300)
            .minConsecutiveToolMessages(4)
            .currentRoundCompressionRatio(0.3)
            .build();
    AutoContextMemory autoContextMemory = new AutoContextMemory(autoContextConfig, dashScopeChatModel());

    return ReActAgent.builder()
            .name("Hello Agent")
            // studio 可观测这个agent
            .hook(new StudioMessageHook(StudioManager.getClient()))
            .model(dashScopeChatModel())
            .toolkit(toolkit)
            .enableMetaTool(true)
            .toolExecutionContext(toolExecutionContext)
            // memroy、enablePlan、hook都要配置
            .memory(autoContextMemory)
            .enablePlan()
            .hook(new AutoContextHook())
            .build();
}
2.3.2、长期记忆
2.3.2.1、JsonSession
持久化到指定目录文件
java
JsonSession session = new JsonSession(Path.of("D:\\Desktop\\tmp"));
agent.loadIfExists(session, "session_id_1");
// 执行agent调用
agent.saveTo(session, "session_id_1");
2.3.2.2、MysqlSession
- pom依赖(引入mysql及druid)
xml
<dependency>
    <groupId>com.mysql</groupId>
    <artifactId>mysql-connector-j</artifactId>
</dependency>
<dependency>
    <groupId>com.alibaba</groupId>
    <artifactId>druid-spring-boot-3-starter</artifactId>
    <version>1.2.28</version>
</dependency>- yaml配置(连接mysql和druid配置)
yaml
spring:
  datasource:
    type: com.alibaba.druid.pool.DruidDataSource
    driver-class-name: com.mysql.cj.jdbc.Driver
    url: jdbc:mysql://localhost:3306/agentscope?useSSL=false&serverTimezone=Asia/Shanghai&characterEncoding=utf-8&allowPublicKeyRetrieval=true
    username: root
    password: 123456
    druid:
      name: druid-db1
      # 初始化连接数
      initial-size: 5
      # 最小空闲连接数
      min-idle: 5
      # 最大活跃连接数
      max-active: 20
      # 获取连接最大等待时间(毫秒)
      max-wait: 60000
      # 检测间隔时间(毫秒),检测需要关闭的空闲连接
      time-between-eviction-runs-millis: 60000
      # 一个连接在池中最小生存的时间(毫秒)
      min-evictable-idle-time-millis: 300000
      # 一个连接在池中最大生存的时间(毫秒)
      max-evictable-idle-time-millis: 900000
      # 用来检测连接是否有效的 SQL
      validation-query: SELECT 1
      # 申请连接时执行 validationQuery 检测连接是否有效(默认 false,建议开启)
      test-while-idle: true
      # 申请连接时执行 validationQuery 检测连接是否有效(默认 true)
      test-on-borrow: false
      # 归还连接时执行 validationQuery 检测连接是否有效(默认 false)
      test-on-return: false
      # 打开 PSCache,并且指定每个连接上 PSCache 的大小
      pool-prepared-statements: true
      max-pool-prepared-statement-per-connection-size: 20
      # 连接池中的 minIdle 数量以内的连接,空闲时间超过 minEvictableIdleTimeMillis,则会执行 keepAlive 操作
      keep-alive: true
      # 最大打开的预编译语句数
      max-open-prepared-statements: 20
      # 是否使用全局数据源统计,默认 false
      use-global-data-source-stat: true
      # 通过 connectProperties 属性来打开 mergeSql 功能;慢 SQL 记录
      connection-properties: druid.stat.mergeSql=true;druid.stat.slowSqlMillis=5000

      # StatViewServlet 配置(监控页面)
      stat-view-servlet:
        enabled: true
        # 访问路径,默认是 /druid/*
        url-pattern: /druid/*
        # 允许访问的 IP 地址,空或 * 表示所有 IP
        allow: 127.0.0.1
        # 禁止访问的 IP 地址
        deny:
        # 登录用户名
        login-username: admin
        # 登录密码
        login-password: admin123
        # 是否可以重置数据源
        reset-enable: false

      # WebStatFilter 配置(Web 应用监控)
      web-stat-filter:
        enabled: true
        # 过滤 URL 规则
        url-pattern: /*
        # 排除一些静态资源
        exclusions: "*.js,*.gif,*.jpg,*.png,*.css,*.ico,/druid/*"
        # 监控 session 信息
        session-stat-enable: true
        # 设置单个 session 的最大并发数
        session-stat-max-count: 1000
        # 监控 principal 信息
        principal-session-name: user
        principal-cookie-name: user
        # 监控 profile 信息
        profile-enable: true

      # 内置 Filter 配置
      filter:
        # 状态监控过滤器
        stat:
          enabled: true
          # 数据库类型
          db-type: mysql
          # 开启慢 SQL 监控,超过指定时间则认为是慢 SQL,记录到日志中
          log-slow-sql: true
          # 慢 SQL 时间阈值(毫秒)
          slow-sql-millis: 5000

        # 日志监控过滤器,使用 logback 进行日志输出
        logback:
          enabled: true
          statement-log-error-enabled: true
          statement-create-after-log-enabled: false
          statement-close-after-log-enabled: false
          result-set-open-after-log-enabled: false
          result-set-close-after-log-enabled: false

        # 防火墙过滤器
        wall:
          enabled: true
          config:
            delete-allow: true        # 允许删除数据
            drop-table-allow: false    # 允许删除表
            alter-table-allow: true   # 允许修改表结构
            create-table-allow: true  # 允许创建表
            truncate-allow: true      # 允许清空表
            comment-allow: true       # 允许注释
            multi-statement-allow: true # 允许一次执行多条语句
            none-base-statement-allow: true # 允许非基础语句

          # 白名单配置(可选)
          white-list:
            - SELECT 1
- SHOW VARIABLES LIKE 'version%'- 测试写法
java
@Autowired
private DataSource dataSource;

@GetMapping("/chat")
public String chat(String question) {
//        JsonSession session = new JsonSession(Path.of("D:\\Desktop\\tmp"));
    MysqlSession session = new MysqlSession(dataSource, true);
    agent.loadIfExists(session, "session_id_1");


    Msg block = agent.call(Msg.builder().textContent(question).build()).block();

    if (block.getGenerateReason() == GenerateReason.TOOL_SUSPENDED) {
        // 获取被挂起的工具调用信息
        ToolUseBlock toolUseBlock = block.getContentBlocks(ToolUseBlock.class).get(0);
        // 获取挂起的原因/提示信息
        ToolResultBlock toolResultBlock = block.getContentBlocks(ToolResultBlock.class).get(0);
        TextBlock contentBlock = (TextBlock) toolResultBlock.getOutput().get(0);
        String text = contentBlock.getText();
        if (text != null) {
            // 根据返回信息调用外部信息
            String userName = "张三, " + text;
            // 组装信息给大模型重新回复
            Msg result = Msg.builder()
                    .role(MsgRole.TOOL)
                    .content(ToolResultBlock.builder()
                            .id(toolUseBlock.getId())
                            .name(toolUseBlock.getName())
                            .output(TextBlock.builder().text(userName).build())
                            .build())
                    .build();
            block = agent.call(result).block();
        }
    }

    agent.saveTo(session, "session_id_1");

    return block.getTextContent();
}
2.4、结构化输出
- Agent配置
java
// 两种模式,默认是Tool,还有Prompt
.structuredOutputReminder(StructuredOutputReminder.TOOL_CHOICE)- 测试代码(重点关注call 和 return)
java
 @GetMapping("/chat")
public String chat(String question) {
//        JsonSession session = new JsonSession(Path.of("D:\\Desktop\\tmp"));
    MysqlSession session = new MysqlSession(dataSource, true);
    agent.loadIfExists(session, "session_id_1");


    Msg block = agent.call(Msg.builder().textContent(question).build(), Movie.class).block();

    if (block.getGenerateReason() == GenerateReason.TOOL_SUSPENDED) {
        // 获取被挂起的工具调用信息
        ToolUseBlock toolUseBlock = block.getContentBlocks(ToolUseBlock.class).get(0);
        // 获取挂起的原因/提示信息
        ToolResultBlock toolResultBlock = block.getContentBlocks(ToolResultBlock.class).get(0);
        TextBlock contentBlock = (TextBlock) toolResultBlock.getOutput().get(0);
        String text = contentBlock.getText();
        if (text != null) {
            // 根据返回信息调用外部信息
            String userName = "张三, " + text;
            // 组装信息给大模型重新回复
            Msg result = Msg.builder()
                    .role(MsgRole.TOOL)
                    .content(ToolResultBlock.builder()
                            .id(toolUseBlock.getId())
                            .name(toolUseBlock.getName())
                            .output(TextBlock.builder().text(userName).build())
                            .build())
                    .build();
            block = agent.call(result).block();
        }
    }

    agent.saveTo(session, "session_id_1");

    return block.getStructuredData(Movie.class).toString();
}
2.5、Plan
https://java.agentscope.io/v1/zh/docs/task/plan.html
帮助智能体将复杂任务分解为结构化的子任务并逐步执行
2.5.1、使用默认配置(推荐)
plain
ReActAgent agent = ReActAgent.builder()
        .name("Assistant")
        .model(model)
        .toolkit(toolkit)
        .enablePlan()  // 启用计划功能
        .build();
2.5.2、自定义配置
plain
PlanNotebook planNotebook = PlanNotebook.builder()
        .maxSubtasks(10)  // 限制子任务数量
        .build();

ReActAgent agent = ReActAgent.builder()
        .name("Assistant")
        .model(model)
        .toolkit(toolkit)
        .planNotebook(planNotebook)
        .build();
java
@Bean
    public ReActAgent reactAgent() {
        return ReActAgent.builder()
                .name("Hello Agent")
                // 默认配置
                .enablePlan()
                // 自定义配置
//                .planNotebook(PlanNotebook.builder()
//                        .maxSubtasks(10)
//                        .storage(new InMemoryPlanStorage())
//                        .planToHint(new DefaultPlanToHint())
//                        .build())
                .build();
    }
2.7、MCP
AgentScope Java 提供对 MCP (Model Context Protocol) 的完整支持,使智能体能够连接到外部工具服务器并使用 MCP 生态系统中的工具。
什么是 MCP?
MCP 是用于将 AI 应用程序连接到外部数据源和工具的标准协议。它支持:
- 统一的工具接口:通过单个协议访问各种工具
- 外部工具服务器:连接到专门的服务(文件系统、git、数据库等)
- 生态系统集成:使用不断增长的 MCP 生态系统中的工具
- 灵活的传输:支持 StdIO、SSE 和 HTTP 传输
传输类型
AgentScope 支持三种 MCP 传输机制:
| 传输 | 使用场景 | 连接方式 | 状态 |
|---|---|---|---|
| StdIO | 本地进程通信,比如操作文件、git、自定义命令 | 启动子进程 | 有状态 |
| SSE | HTTP Server-Sent Events | HTTP 流式 | 有状态 |
| HTTP | 可流式 HTTP,比如调用外部的MCP工具 | 请求/响应 | 无状态 |
2.7.1、StdIO方式
- 连接到 MCP 服务器
plain
import io.agentscope.core.tool.mcp.McpClientBuilder;
import io.agentscope.core.tool.mcp.McpClientWrapper;

// StdIO 传输 - 连接到本地 MCP 服务器
McpClientWrapper mcpClient = McpClientBuilder.create("filesystem-mcp")
        .stdioTransport("npx", "-y", "@modelcontextprotocol/server-filesystem", "/tmp")
        .buildAsync()
.block();- 注册 MCP 工具
plain
import io.agentscope.core.tool.Toolkit;

Toolkit toolkit = new Toolkit();

// 注册 MCP 服务器的所有工具
toolkit.registerMcpClient(mcpClient).block();- 在智能体中配置 MCP
plain
import io.agentscope.core.ReActAgent;
import io.agentscope.core.memory.InMemoryMemory;

ReActAgent agent = ReActAgent.builder()
        .name("Assistant")
        .model(model)
        .toolkit(toolkit)  // MCP 工具现已可用
        .memory(new InMemoryMemory())
        .build();
StdIO 传输用于本地进程通信:
plain
// 文件系统服务器
McpClientWrapper fsClient = McpClientBuilder.create("fs-mcp")
        .stdioTransport("npx", "-y", "@modelcontextprotocol/server-filesystem", "/path/to/dir")
        .buildAsync()
        .block();

// Git 服务器
McpClientWrapper gitClient = McpClientBuilder.create("git-mcp")
        .stdioTransport("python", "-m", "mcp_server_git")
        .buildAsync()
        .block();

// 自定义命令
McpClientWrapper customClient = McpClientBuilder.create("custom-mcp")
        .stdioTransport("/path/to/executable", "arg1", "arg2")
        .buildAsync()
        .block();
2.7.2、HTTP方式
java
McpClientWrapper httpClient = McpClientBuilder.create("http-mcp")
.streamableHttpTransport("https://mcp.example.com/http")
.header("X-API-Key", apiKey)
.queryParam("queryKey", "queryValue")
.buildAsync()
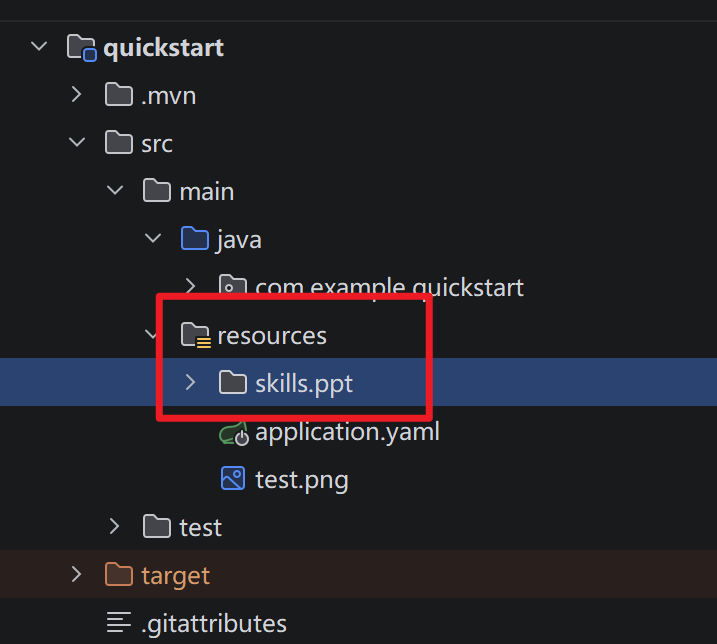
.block();2.8、Skill
- 可以去魔塔广场下载个skill放到resourse中
- 接入ReactAgent
java
SkillBox skillBox = new SkillBox(toolkit);
skillBox.codeExecution()
        .workDir("D:\\Desktop\\tmp")
        .withShell(new ShellCommandTool())
        .withRead()
        .withWrite()
        .enable();

try (ClasspathSkillRepository repository = new ClasspathSkillRepository("skills")) {
    List<AgentSkill> allSkills = repository.getAllSkills();
    for (AgentSkill skill : allSkills) {
        skillBox.registerSkill(skill);
    }
} catch (IOException e) {
    throw new RuntimeException(e);
}

.skillBox(skillBox)
2.9、Hook
Hook 是一系列的扩展点,用于在特定执行阶段监控和修改智能体行为。
AgentScope Java 使用统一事件模型 ,所有 Hook 都需要实现 <font style="color:rgb(0, 0, 0);">onEvent(HookEvent)</font> 方法:
- 基于事件:所有智能体活动生成事件
- 类型安全:对事件类型进行模式匹配
- 优先级排序:钩子按优先级执行(值越小优先级越高)
- 可修改:某些事件允许修改执行上下文
支持的事件
| 事件类型 | 时机 | 可修改 | 描述 |
|---|---|---|---|
| PreCallEvent | 智能体调用前 | ✅ | 智能体开始处理之前(可修改输入消息) |
| PostCallEvent | 智能体调用后 | ✅ | 智能体完成响应之后(可修改最终消息) |
| PreReasoningEvent | 推理前 | ✅ | LLM 推理之前(可修改输入消息) |
| PostReasoningEvent | 推理后 | ✅ | LLM 推理完成之后(可修改推理结果) |
| ReasoningChunkEvent | 推理流式期间 | ❌ | 流式推理的每个块(仅通知) |
| PreActingEvent | 工具执行前 | ✅ | 工具执行之前(可修改工具参数) |
| PostActingEvent | 工具执行后 | ✅ | 工具执行之后(可修改工具结果) |
| ActingChunkEvent | 工具流式期间 | ❌ | 工具执行进度块(仅通知) |
| PreSummaryEvent | 摘要生成前 | ✅ | 达到最大迭代次数时,摘要生成之前 |
| PostSummaryEvent | 摘要生成后 | ✅ | 摘要生成完成之后(可修改摘要结果) |
| SummaryChunkEvent | 摘要流式期间 | ❌ | 摘要流式生成的每个块(仅通知) |
| ErrorEvent | 发生错误时 | ❌ | 发生错误时(仅通知) |
- hook定义
java
package com.example.quickstart.hook;

import com.alibaba.fastjson2.JSON;
import io.agentscope.core.hook.*;
import io.agentscope.core.message.Msg;
import reactor.core.publisher.Mono;

import java.util.List;
import java.util.Map;

public class LoggingHook implements Hook {
    @Override
    public <T extends HookEvent> Mono<T> onEvent(T event) {
        if (event instanceof PreCallEvent e) {
            // 参数传递
            List<Msg> inputMessages = e.getInputMessages();
            Msg msg = inputMessages.get(0);
            Map<String, Object> metadata = msg.getMetadata();
            System.out.println("元数据:" + metadata);

            System.out.println("智能体开始执行:" + e.getAgent().getName());
            System.out.println("PreCallEvent: "  + JSON.toJSONString(inputMessages));
        }

        if(event instanceof PostCallEvent e) {
            System.out.println("PostActingEvent: " + JSON.toJSONString(e.getFinalMessage()));
            System.out.println("智能体执行完毕:" + e.getAgent().getName());
        }

        return Mono.just(event);
    }
}- 整合ReactAgent
java
.hook(new LoggingHook())- 测试代码(参数传递)
java
Msg block = agent.call(Msg.builder().textContent(question)
        .metadata(Map.of("userId", "1"))
                .build(), Movie.class)
        .block();
2.10、RAG
可以理解为外链一个知识库
AgentScope 提供内置 RAG 支持,使 Agent 能够访问外部知识库。
2.10.1、核心组件
AgentScope 中的 RAG 模块由两个核心组件组成:
- Reader(读取器):负责读取和分块输入文档,将其转换为可处理的单元
- Knowledge(知识库):负责存储文档、生成嵌入向量以及检索相关信息
2.10.2、支持范围
AgentScope 支持多种类型的知识库实现:
| 类型 | 实现 | 支持功能 | 文档管理 | 适用场景 |
|---|---|---|---|---|
| 本地知识库 | <font style="color:rgb(0, 0, 0);">SimpleKnowledge</font> |
完整的文档管理和检索 | 通过代码管理(使用 Reader) | 开发、测试、完全控制数据 |
| 云托管知识库 | <font style="color:rgb(0, 0, 0);">BailianKnowledge</font> |
仅检索 | 百炼控制台 | 企业级、多轮对话、查询重写 |
| Dify 知识库 | <font style="color:rgb(0, 0, 0);">DifyKnowledge</font> |
仅检索 | Dify 控制台 | 多种检索模式、Reranking |
| RAGFlow 知识库 | <font style="color:rgb(0, 0, 0);">RAGFlowKnowledge</font> |
仅检索 | RAGFlow 控制台 | 强大OCR、知识图谱、多数据集 |
2.10.3、集成模式
AgentScope 支持两种 RAG 集成模式:
| 模式 | 描述 | 优点 | 缺点 |
|---|---|---|---|
| Generic 模式 | 在每个推理步骤之前自动检索和注入知识 | 简单,适用于任何 LLM | 即使不需要也会检索 |
| Agentic 模式 | Agent 使用工具决定何时检索 | 灵活,只在需要时检索 | 需要强大的推理能力 |
Generic 模式
在 Generic 模式下,知识会自动检索并注入到用户的消息中:
plain
ReActAgent agent = ReActAgent.builder()
    .name("助手")
    .sysPrompt("你是一个可以访问知识库的有用助手。")
    .model(chatModel)
    .toolkit(new Toolkit())
    // 启用 Generic RAG 模式
    .knowledge(knowledge)
    .ragMode(RAGMode.GENERIC)
    .retrieveConfig(
        RetrieveConfig.builder()
            .limit(3)
            .scoreThreshold(0.3)
            .build())
    .build();
工作原理:
- 用户发送查询
- 知识库自动检索相关文档
- 检索到的文档被添加到用户消息之前
- Agent 处理增强后的消息并响应
Agentic 模式
在 Agentic 模式下,Agent 拥有 <font style="color:rgb(0, 0, 0);">retrieve_knowledge</font> 工具并决定何时使用它:
plain
ReActAgent agent = ReActAgent.builder()
    .name("智能体")
    .sysPrompt("你是一个拥有知识检索工具的有用助手。" +
               "需要信息时使用 retrieve_knowledge 工具。")
    .model(chatModel)
    .toolkit(new Toolkit())
    // 启用 Agentic RAG 模式
    .knowledge(knowledge)
    .ragMode(RAGMode.AGENTIC)
    .retrieveConfig(
        RetrieveConfig.builder()
            .limit(3)
            .scoreThreshold(0.5)
            .build())
    .build();
工作原理:
- 用户发送查询
- Agent 推理并决定是否检索知识
- 如果需要,Agent 调用
<font style="color:rgb(0, 0, 0);">retrieve_knowledge(query="...")</font> - 检索到的文档作为工具结果返回
- Agent 使用检索到的信息再次推理
本地知识库:
java
@Bean
public ReActAgent reactAgent() {

    OllamaTextEmbedding embedding = OllamaTextEmbedding.builder()
            .modelName("bge-m3:567m")
            .dimensions(1024)
            .build();

    SimpleKnowledge knowledge = SimpleKnowledge.builder()
            .embeddingModel(embedding)
            .embeddingStore(InMemoryStore.builder().dimensions(1024).build())
            .build();
    TextReader textReader = new TextReader(512, SplitStrategy.PARAGRAPH, 50);
    List<Document> documents = textReader.read(ReaderInput.fromString("我的名字是田爷, 爱好看书, 打篮球")).block();
    knowledge.addDocuments(documents).block();


    return ReActAgent.builder()
            .name("Hello Agent")
            // studio 可观测这个agent
            .hook(new StudioMessageHook(StudioManager.getClient()))
            .model(dashScopeChatModel())
            .enableMetaTool(true)
            .enablePlan()
            .knowledge(knowledge)
//                .ragMode(RAGMode.GENERIC)
            // 如果使用 AGENTIC 模式则需要加系统提示词
            .sysPrompt("需要查询用户信息的时候使用 retrieve_knowledge 工具")
            .ragMode(RAGMode.AGENTIC)
            .retrieveConfig(RetrieveConfig.builder()
                    .limit(5)
                    .scoreThreshold(0.6)
                    .build())
            .build();
}
2.11、Human-in-the-Loop
Human-in-the-Loop 让你可以在智能体执行过程中插入人工审核环节。当智能体准备调用工具时,你可以先暂停让用户确认,再决定是否继续。
两个暂停时机
智能体的执行分为"推理"和"行动"两个阶段,你可以选择在不同时机暂停:
推理后暂停:模型决定要调用哪些工具后,在实际执行前暂停。此时你可以看到工具名称和参数,让用户决定是否允许执行。
行动后暂停:工具执行完毕后,在进入下一轮推理前暂停。此时你可以看到执行结果,让用户决定是否继续。
- 敏感词hook
java
package com.example.quickstart.hook;

import io.agentscope.core.hook.Hook;
import io.agentscope.core.hook.HookEvent;
import io.agentscope.core.hook.PostReasoningEvent;
import io.agentscope.core.message.Msg;
import io.agentscope.core.message.TextBlock;
import reactor.core.publisher.Mono;

public class SensitiveWordHook implements Hook {
    @Override
    public <T extends HookEvent> Mono<T> onEvent(T event) {
        // 拦截推理结束 事件
        if (event instanceof PostReasoningEvent e) {
            // 获取推理结果
            Msg reasoningMessage = e.getReasoningMessage();
            // 如果推理结果为空或不包含文本
            if (reasoningMessage == null || !reasoningMessage.hasContentBlocks(TextBlock.class)) {
                return Mono.just(event);
            }
            String text = reasoningMessage.getTextContent();
            if (text != null && text.contains("大帅哥")) {
                e.stopAgent();
            }
        }

        return Mono.just(event);
    }
}- ReactAgent添加hook
java
.hook(new SensitiveWordHook())- 测试代码拦截推理原因中断
java
 else if (block.getGenerateReason() == GenerateReason.REASONING_STOP_REQUESTED) {
            block = agent.call(Msg.builder().textContent("内容包含敏感词了! ").build()).block();
        }