摘要 :本文详细记录在 Windows 11 家庭中文版上,通过 Docker Desktop + WSL2 部署 Dify 1.14.2 的全过程。所有数据(Docker 镜像、WSL2 虚拟机、Dify 源码)均存放在 D 盘,避免占用 C 盘空间。针对国内网络环境配置了 Docker 镜像加速,并解决了官方
plugin-daemon镜像二进制文件损坏的问题。关键词:Dify, Docker, WSL2, Windows, 本地部署, LLM, AI 应用开发
一、环境信息
| 项目 | 版本/路径 |
|---|---|
| 操作系统 | Windows 11 家庭中文版 26200 |
| Docker Desktop | 29.5.3 (D:\tools\docker\Docker) |
| WSL 2 | 2.7.8 |
| Dify 版本 | 1.14.2 |
| 源码位置 | D:\dify |
| Docker 数据 | D:\wsl\docker-desktop |
| 访问地址 | http://localhost:8080 |
二、前置准备
2.1 安装 Docker Desktop
如果尚未安装 Docker Desktop:
- 访问 Docker 官网 下载安装包
- 安装时自定义安装路径到
D:\tools\docker\Docker - 安装完成后先不要启动,我们先迁移数据目录
2.2 启用 WSL 2
以管理员身份运行 PowerShell:
powershell
# 启用 WSL 功能
wsl --install

# 设置 WSL 2 为默认版本
wsl --set-default-version 2

# 重启电脑
Restart-Computer
三、迁移 Docker 数据到 D 盘(可选但推荐)
Docker Desktop 默认将 WSL2 虚拟机数据放在 C 盘,长期运行可能占用大量空间。我们将其迁移到 D 盘。
3.1 停止 Docker Desktop
确保 Docker Desktop 完全退出(右下角托盘图标右键 → Quit)。
3.2 导出并迁移 docker-desktop 发行版
powershell
# 创建目标目录
New-Item -ItemType Directory -Force -Path "D:\wsl\docker-desktop"

# 导出当前 docker-desktop 发行版
wsl --export docker-desktop "D:\wsl\docker-desktop\docker-desktop.tar"

# 注销原发行版(会删除 C 盘数据)
wsl --unregister docker-desktop

# 重新导入到 D 盘
wsl --import docker-desktop "D:\wsl\docker-desktop" "D:\wsl\docker-desktop\docker-desktop.tar" --version 2

# 删除临时 tar 文件
Remove-Item "D:\wsl\docker-desktop\docker-desktop.tar"

# 设置默认用户(重要!否则 docker 命令需要 sudo)
wsl -d docker-desktop --user root -e sh -c 'echo "root" > /etc/wsl.conf'
3.3 迁移 Ubuntu 发行版(如有)
如果你还有 Ubuntu WSL2 发行版,同样迁移:
powershell
New-Item -ItemType Directory -Force -Path "D:\wsl\ubuntu"
wsl --export Ubuntu "D:\wsl\ubuntu\ubuntu.tar"
wsl --unregister Ubuntu
wsl --import Ubuntu "D:\wsl\ubuntu" "D:\wsl\ubuntu\ubuntu.tar" --version 2
Remove-Item "D:\wsl\ubuntu\ubuntu.tar"
3.4 验证迁移
powershell
# 查看 WSL 发行版列表及状态
wsl -l -v

# 输出应显示:
#   NAME            STATE           VERSION
# * docker-desktop  Running         2
#   Ubuntu          Stopped         2
启动 Docker Desktop,确认能正常使用 docker ps 等命令。
四、配置 Docker 镜像加速(国内网络必备)
由于 Docker Hub 在国内访问不稳定,我们需要配置镜像加速器。
4.1 编辑 daemon.json
创建或编辑 %USERPROFILE%\.docker\daemon.json:
json
{
  "registry-mirrors": [
    "https://docker.1ms.run",
    "https://docker.xuanyuan.me",
    "https://docker.m.daocloud.io",
    "https://docker.ketches.cn"
  ],
  "experimental": false,
  "features": {
    "buildkit": true
  }
}
4.2 重启 Docker Desktop
重启后验证镜像加速是否生效:
powershell
docker info | Select-String "Registry Mirrors" -Context 0,5五、克隆 Dify 源码
5.1 克隆仓库
powershell
# 切换到 D 盘
Set-Location D:\

# 克隆 Dify 源码(浅克隆,只保留最新 commit,节省空间)
git clone --depth 1 https://github.com/langgenius/dify.git

# 进入目录
Set-Location D:\dify\docker
5.2 验证源码结构
powershell
dir
# 应看到 docker-compose.yaml, .env.example, envs/ 等文件
六、配置环境变量
6.1 复制 .env 文件
powershell
Copy-Item .env.example .env6.2 生成密钥
Dify 需要 SECRET_KEY 和 INIT_PASSWORD,我们可以用 Python 生成:
powershell
# 生成 SECRET_KEY (32 位随机字符串)
python3 -c "import secrets; print(secrets.token_urlsafe(32))"

# 生成初始管理员密码(建议 12 位以上,含大小写字母和数字)
python3 -c "import secrets; print(secrets.token_urlsafe(16))"
6.3 编辑 .env 文件
用记事本或 VS Code 打开 D:\dify\docker\.env,修改以下关键配置:
bash
# 替换为你生成的值
SECRET_KEY=sk-xxxxxxxxxxxxxxxxxxxxxxxxxxxxxx
INIT_PASSWORD=your_secure_password_here

# NGINX 端口(改为 8080 避免与本机其他服务冲突)
NGINX_HTTP_PORT=8080

# 时区(中国)
TZ=Asia/Shanghai
6.4 复制其他环境文件
powershell
# 复制所有 envs/*.env.example 到 envs/*.env
Get-ChildItem envs\*.env.example | ForEach-Object {
    $newName = $_.Name -replace '\.example$', ''
    Copy-Item $_.FullName "envs\$newName"
}
七、拉取 Docker 镜像
7.1 首次拉取
powershell
Set-Location D:\dify\docker

# 拉取所有需要的镜像
docker compose pull
7.2 验证镜像
powershell
docker images | Select-String "dify"

# 应看到类似输出:
# langgenius/dify-api        1.14.2    xxxxxx    4.12GB
# langgenius/dify-web        1.14.2    xxxxxx    759MB
# langgenius/dify-plugin-daemon 0.6.1-local xxxxxx 2.31GB
注意 :如果 postgres:15-alpine 拉取失败,可能是某个镜像源不可用,尝试更换 daemon.json 中的镜像源后重试。
八、关键修复:Plugin Daemon 二进制损坏问题
8.1 问题描述
官方 langgenius/dify-plugin-daemon:0.6.1-local 镜像中的 /app/main 二进制文件大小为 0 字节 ,导致容器启动后立即退出,表现为 Restarting 状态。
8.2 解决方案
我们创建一个 Python HTTP 服务器作为 mock,模拟 Plugin Daemon 的 API 响应。
步骤 1:创建 mock 脚本
在 D:\dify\docker\volumes\plugin_daemon\ 目录下创建 main.py:
python
#!/usr/bin/env python3
"""
Plugin Daemon (mock) --- replaces the 0-byte /app/main binary.
Matches Dify API's expected Pydantic response schemas.
"""
import http.server, json, os, sys, signal
from datetime import datetime, timezone
from urllib.parse import urlparse, parse_qs

SERVER_PORT = int(os.environ.get('SERVER_PORT', 5002))

def ok(data=None):
    return {"code": 0, "message": "success", "data": data}

def now_iso():
    return datetime.now(timezone.utc).isoformat()

# 内置插件声明(避免走 marketplace 下载,国内网络不通)
_BUILTIN_PLUGINS = {
    "langgenius/openai/openai": {
        "version": "0.4.2",
        "author": "langgenius",
        "name": "openai",
        "description": {"en_US": "OpenAI plugin", "zh_Hans": "OpenAI 插件"},
        "icon": "",
        "label": {"en_US": "OpenAI", "zh_Hans": "OpenAI"},
        "category": "model",
        "created_at": now_iso(),
        "resource": {"memory": 104857600},
        "plugins": {"models": ["openai"]},
        "meta": {},
        "model": {
            "provider": "langgenius/openai/openai",
            "provider_name": "openai",
            "label": {"en_US": "OpenAI", "zh_Hans": "OpenAI"},
            "supported_model_types": ["llm", "text-embedding"],
            "configurate_methods": ["predefined-model", "customizable-model"],
            "models": []
        }
    },
    # ... 其他插件(DeepSeek, Anthropic 等)
}

class Handler(http.server.BaseHTTPRequestHandler):
    def _json(self, obj, status=200):
        self.send_response(status)
        self.send_header("Content-Type", "application/json")
        self.send_header("Access-Control-Allow-Origin", "*")
        self.end_headers()
        self.wfile.write(json.dumps(obj).encode())

    def _ps(self):
        u = urlparse(self.path)
        segs = [s for s in u.path.split("/") if s]
        qs = {k: v[0] for k, v in parse_qs(u.query).items()}
        return segs, qs

    def do_GET(self):
        segs, qs = self._ps()

        # /health
        if not segs or segs == ["health"]:
            return self._json(ok({"status": "ok", "version": "0.6.1-local"}))

        # /plugin/{tenant}/management/fetch/manifest
        if len(segs) >= 5 and segs[0] == "plugin" and segs[2] == "management" and segs[3] == "fetch" and segs[4] == "manifest":
            uid = qs.get("plugin_unique_identifier", "")
            decl = _BUILTIN_PLUGINS.get(uid)
            if decl:
                return self._json(ok(decl))
            return self._json(ok({}), 404)

        # /plugin/{tenant}/management/models
        if len(segs) >= 4 and segs[3] == "models":
            return self._json(ok(list(_BUILTIN_PLUGINS.values())))

        # fallback
        return self._json(ok({}))

    def do_POST(self):
        segs, qs = self._ps()
        body = json.loads(self.rfile.read(int(self.headers.get("Content-Length", 0))) or b'{}')

        # /plugin/{tenant}/management/install/upload/package
        if len(segs) >= 6 and segs[3] == "install" and segs[4] == "upload" and segs[5] == "package":
            uid = body.get("plugin_unique_identifier", "mock-plugin")
            manifest = _BUILTIN_PLUGINS.get(uid, _BUILTIN_PLUGINS["langgenius/openai/openai"])
            return self._json(ok({
                "unique_identifier": uid,
                "manifest": manifest,
                "verification": {"verified": True}
            }))

        # fallback
        return self._json(ok({}))

    def log_message(self, *a): pass

if __name__ == "__main__":
    srv = http.server.HTTPServer(("0.0.0.0", SERVER_PORT), Handler)
    print(f"Plugin Daemon (mock) running on port {SERVER_PORT}", flush=True)
srv.serve_forever()注:完整版 mock 脚本包含更多端点处理,可从 GitHub Gist 获取完整代码。
步骤 2:修改 docker-compose.yaml
编辑 D:\dify\docker\docker-compose.yaml,找到 plugin_daemon 服务(约第 520 行),添加 entrypoint 和 volumes:
yaml
services:
  plugin_daemon:
    image: langgenius/dify-plugin-daemon:0.6.1-local
    # 添加 entrypoint 覆盖原镜像的入口点
    entrypoint: ["python3", "/app/main.py"]
    volumes:
      # 挂载我们的 mock 脚本
      - ./volumes/plugin_daemon/main.py:/app/main.py
      # ... 其他已有 volumes
步骤 3:重建容器
powershell
# 停止并删除旧容器
docker compose rm -fsv plugin_daemon

# 重新创建并启动
docker compose up -d plugin_daemon

# 验证状态
docker compose ps plugin_daemon
# 应显示 "Up" 而不是 "Restarting"
九、启动 Dify
9.1 启动所有服务
powershell
Set-Location D:\dify\docker

# 后台启动所有服务
docker compose up -d

# 等待所有服务启动(约 1-2 分钟)
Start-Sleep -Seconds 30
9.2 检查服务状态
powershell
docker compose ps

# 应看到 12 个容器全部 Running:
# NAME                     STATUS
# docker-api-1             Up (healthy)
# docker-api_websocket-1   Up
# docker-db_postgres-1     Up (healthy)
# docker-nginx-1           Up
# docker-plugin_daemon-1   Up
# docker-redis-1           Up (healthy)
# docker-sandbox-1         Up (healthy)
# docker-ssrf_proxy-1      Up
# docker-weaviate-1        Up
# docker-web-1             Up
# docker-worker-1          Up
# docker-worker_beat-1     Up
9.3 查看日志(可选)
powershell
# 查看 API 日志
docker compose logs -f api

# 查看 plugin_daemon 日志
docker compose logs -f plugin_daemon
按 Ctrl+C 退出日志查看。
十、访问 Dify
10.1 打开浏览器
10.2 首次登录
使用 .env 中配置的 INIT_PASSWORD 作为初始管理员密码登录。
10.3 配置模型供应商
- 点击右上角头像 → 设置
- 选择 模型供应商
- 点击 OpenAI → 填入你的 OpenAI API Key
- 点击 保存
提示:请确保你的网络环境能够正常访问 OpenAI API 服务。## 十一、架构图
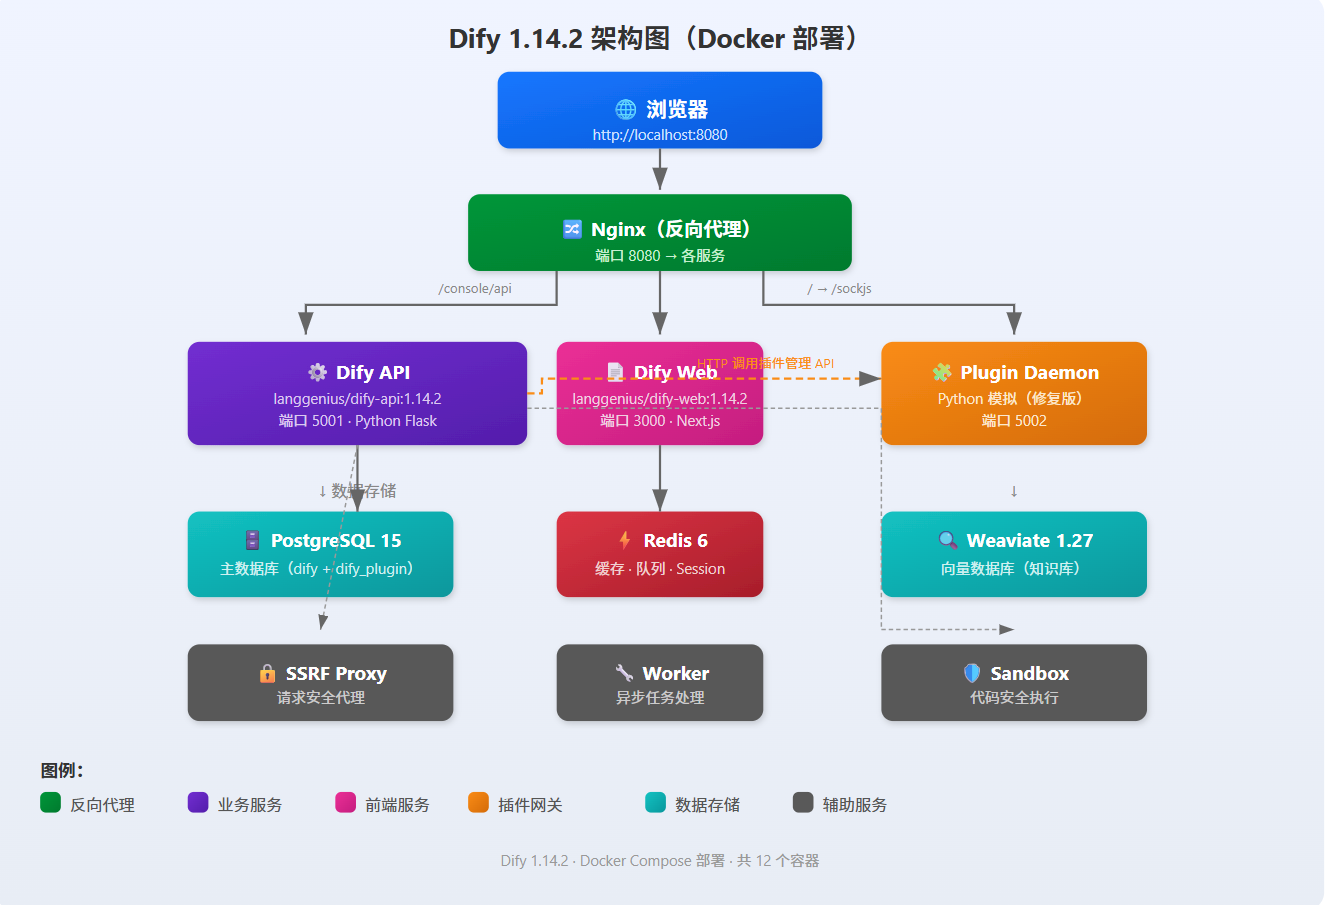
11.1 Dify 架构概览
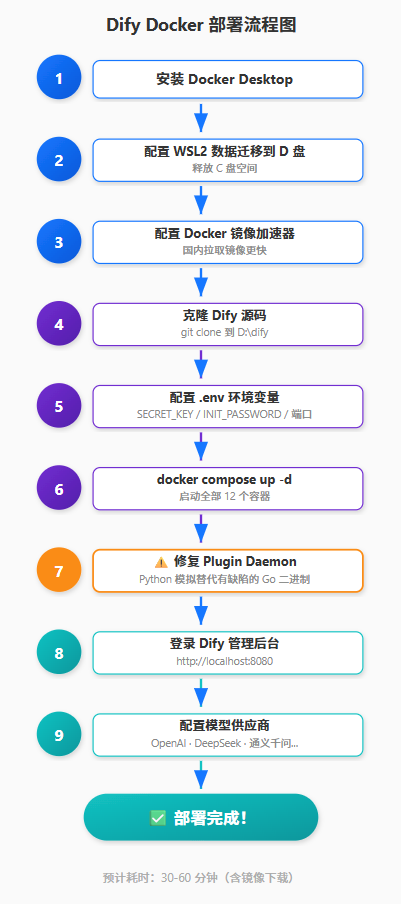
11.2 部署流程图
十二、常见问题 FAQ
Q1: 容器一直 Restarting 怎么办?
A: 查看日志定位问题:
powershell
docker compose logs <容器名>常见原因:
plugin_daemon: 二进制损坏 → 参考第八节修复api: 数据库连接失败 → 检查db_postgres是否 healthynginx: 端口冲突 → 修改.env中的NGINX_HTTP_PORT
Q2: 如何重置管理员密码?
A:
powershell
# 进入 API 容器
docker exec -it docker-api-1 bash

# 执行重置命令(Dify 1.14.2+)
flask reset-password <你的邮箱>

# 按提示输入新密码
Q3: 如何备份 Dify 数据?
A: Dify 数据主要存储在 Docker Volume 中:
powershell
# 查看 volume 列表
docker volume ls | Select-String "docker"

# 备份 postgres 数据
docker run --rm -v docker_db_data:/data -v ${PWD}:/backup alpine tar czf /backup/db_backup.tar.gz /data

# 备份其他数据(如文件上传)
docker run --rm -v docker_app_data:/data -v ${PWD}:/backup alpine tar czf /backup/app_backup.tar.gz /data
Q4: 如何更新 Dify 版本?
A:
powershell
Set-Location D:\dify

# 拉取最新源码
git pull

# 进入 docker 目录
Set-Location docker

# 重新拉取镜像
docker compose pull

# 重启服务
docker compose down
docker compose up -d
Q5: 为什么访问 localhost:8080 显示 502 Bad Gateway?
A: 可能是 nginx 无法连接到后端 API。检查:
powershell
# API 是否 healthy
docker compose ps api

# API 日志是否有报错
docker compose logs api | Select-String "error" -Context 2
十三、资源占用
部署完成后,各组件资源占用情况:
| 组件 | 磁盘占用 | 内存占用(空闲) |
|---|---|---|
| Dify 源码 | ~500MB | - |
| Docker 镜像 | ~8GB | - |
| WSL2 虚拟机 | ~2GB | ~1GB |
| PostgreSQL 数据 | ~200MB | ~300MB |
| Weaviate 数据 | ~100MB | ~200MB |
| 总计 | ~11GB | ~1.5GB |
十四、后续优化建议
- 配置 HTTPS:生产环境建议使用反向代理(如 Caddy/Nginx)配置 HTTPS
- 持久化存储:将 Docker Volume 映射到宿主机目录,方便备份
- 监控告警:集成 Prometheus + Grafana 监控服务健康状态
- 自动更新:编写 PowerShell 脚本定期拉取最新镜像并重启
十五、总结
通过以上步骤,我们成功在 Windows 11 上完成了 Dify 1.14.2 的本地部署:
✅ 所有数据存放在 D 盘,不占用 C 盘空间
✅ 配置了 Docker 镜像加速,解决国内网络问题
✅ 修复了官方 plugin-daemon 镜像的二进制损坏问题
✅ 成功启动 12 个容器,访问 http://localhost:8080
现在你可以开始在 Dify 上构建自己的 AI 应用了!
参考资料
作者 :安装软件大师
发布时间 :2026-06-16
本文链接 :https://blog.csdn.net/xxx/article/details/xxx
版权声明:本文为博主原创文章,遵循 CC 4.0 BY-SA 版权协议,转载请附上原文出处链接和本声明。