1 项目创建
1.1 项目创建
(1) IDEA快速创建(需要联网)
(2) Spring官网创建(需要联网)
(3) Maven创建(需手动添加配置文件)
1.2 启动类结构
java
@SpringBootApplication						启动类组合注解
	@SpringBootConfiguration					Springboot配置类
	@EnableAutoConfiguration					自动配置
		@AutoConfigurationPackage				自动配置的路径
			@Import(Registrar.class)
		@Import(AutoConfigurationImportSelector.class)
	@ComponentScan		包扫描,自动装配Bean			扫描启动类以下的包
1.3 自动配置
1.3.1 Condition自动配置
注释:@Condition选择性创建Bean(Spring4.0加入)
java
@Configuration
public class XxxConfig {
    @Bean
    @Condition(Condition子类.class)   //根据子类matches方法返回值(true创建,false不创建)
    public 实例 xxx() {
        return new 实例();
    }
}
Condition子类
java
matches方法参数(
    ConditionContext,   // 上下文参数: 可用来获取配置文件,IOC容器
    AnnotatedTypeMetaData) { // 用来获取注解信息
   ...
}
1.3.2 自动配置原理
注释:springboot不能直接获取其它工程的bean ( @ComponentScan只扫描当前工程 ),可通过(1)ComponentSacn(包), (2) Import(类.class), (3) 定义注解类(封装Import) 来获取其它工程Bean
(1) 启动类的@SpringbootApplication注解中的 @EnableAutoConfiguration 会扫描项目里的依赖,读取 classpath 下 META-INF/spring.factories 文件,自动配置好对应的组件。
(2) @Import使用:
方式1( 类注解@Import(Bean类.class) 通过类型获取, bean一般为全类名)
方式2(类注解 @Import(Config类.class), Config类 Import(Bean.class) 或 return @Bean实例)
注释:Import导入的Config或bean可以不加 (@Configuration @Component) 注解
2 配置文件
2.1 核心配置文件
注释:springboot项目会默认读取application.properties文件。基于约定大于配置,没有application.properties文件项目也能执行。
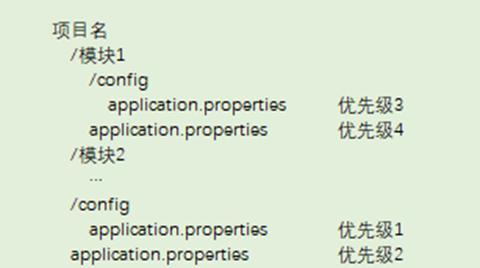
2.1.1 加载顺序优先级
(1) 开发环境(内部文件)
注释:项目根目录config > 项目根目录 > 模块config > 模块根目录
注释:模块根目录是src/main/resources/下文件,最常见的配置路径,也是最低优先级
(2) 运行环境(外部文件)
注释:将模块打成jar包后,项目根目录下的配置并不会打到jar包里。只有模块config和根目录有效。
运行方式是执行jar文件(命令:java -jar 项目名.jar)
方式1 命令参数:java -jar 项目名.jar --配置文件属性=值 // 多个属性用空格分隔
方式2 指定文件:java -jar 项目名.jar --spring.config.location=d:\\xx.properties
方式3 默认读取:java -jar 项目名.jar // 默认加载:jar包同级 application.properties 或者jar包同级/config目录下application.properties
2.1.2 配置文件分类
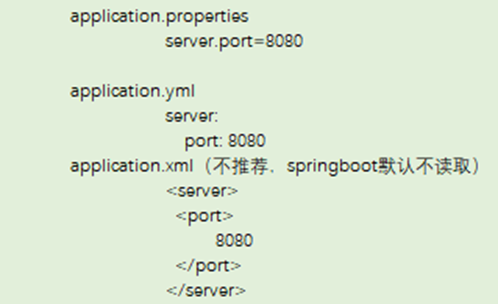
(1) 文件类型:1 properties, 2 yml(yaml), 3 xml
(2) 读取类型:springboot只加载(properties 和 yml | yaml)// 不会加载xml文件,需要通过@ImportResource读取xml文件内容
(3) 类型优先级:同级目录下,application.properties > application.yml > application.yaml
(4) 文件格式
2.1.3 常用配置
application.properties
java
server.servlet.context-path=/v1	    修改项目访问路径(例如:localhost: 8080/v1/xxx)
server.port=8080				    服务器端口号(注释:打war包依赖外部Tomcat时无效)
server.tomcat.uri-encoding=UTF-8	服务器编码格式
2.2 自定义属性
2.2.1 properties自定义
java
name=lisi			      键值对
person.name=zhangsan      对象
person.age=18		      对象
address=beijing,shanghai  数组
2.2.2 yml自定义
(1) yml文法规则
java
大小写敏刚				  Son不等与son
冒号与值之间必须加空格	  port: 8080
缩进不能用tab必须空格
同级别左对齐               空格数量不重要
#注释				      #注释内容
(2) 属性类型
java
name: lisi				            键值对
mag1: 'aaa /n bbb' 				    常量
msg2: "aaa /n bbb"				    常量

persion: {name: zhangsan, age: 20}  对象|map(方式1)

persion:				            对象|map(方式2:)
    name: zhangsan
    age: 20

address: [ beijing, shanghai ]	    数组|集合(方式1)

address:				            数组|集合(方式2)
    - beijing
    - shanghai

address: beijing, shanghai			数组|集合(方式3)

address:				            数组|集合(方式4)
    beijing,
    shanghai

People:
    name: ${name}                   属性引用
2.2.3 读配置方式1@Value
注释:@Value内的属性与配置文件一致,
注释:@Value只能注入字面量,字面量以外需要加#{'...'}的SqEL表达式,无法注入对象类型
注释:@Value所在对象类必须是Component, Configuration等
注释:Map,数组,List不支持配置文件多行属性
(1) properties读取
配置application.properties
java
projectname=pname
projectversion=3
person1.name=zhangsan
person1.age=18
person1.hobby=play,read,sleep
person1.brother=zhangsi,zhangwu
person1.map={'k1':'v1', 'k2':'v2'}
person1.father.name=zhangda
person1.father.age=50

注释:@Value的数组List,Map不识别多行配置,@Environment的Map不识别单行配置。
读取配置
java
@Component
public class Person1 {
    @Value("${person1.name}")
    private String name;
    @Value("${person1.age}")
    private int age;
    @Value("#{'${person1.hobby}'}")
    private String[] hobby;
    @Value("#{'${person1.brother}'}")
    private List<String> brother;
    @Value("#{${person1.map}}")
    private Map<String, String> map;
    @Autowired
    private Father1 father1;
}
@Component
public class Father1 {
    @Value("${person1.father.name}")
    private String name;
    @Value("${person1.father.age}")
    private int age;
}
(2) yml读取
配置application.yml
XML
projectname: pname
projectversion: 3
person2:
  name: lisan
  age: 20
  hobby: play,read,sleep
  brother: lisi,liwu
  map: "{'k1': 'v11', 'k2': 'v22'}"
  father: {name: lida, age: 60}
读取配置(同properties一样)
java
@Component
public class Person2 {
    @Value("${person2.name}")
    private String name;
    @Value("${person2.age}")
    private int age;
    @Value("#{'${person2.hobby}'}")
    private String[] hobby;
    @Value("#{'${person2.brother}'}")
    private List<String> brother;
    @Value("#{${person2.map}}")
    private Map<String, String> map;
    @Autowired
    private Father2 father2;
}
@Component
public class Father2{
    @Value("${person2.father.name}")
    private String name;
    @Value("${person2.father.age}")
    private int age;
}
2.2.4 读配置方式2Environment
注释:Environment对象会将配置文件属性自动注入到对象中
java
@Autowired
private Environment environment;

public void xx() {
    environment.getProperty("person1.name")
    environment.getProperty("person1.age")
    environment.getProperty("person1.hobby")
    environment.getProperty("person1.brother")
    environment.getProperty("person1.map")
    environment.getProperty("person1.father.name")
    environment.getProperty("person1.father.age")
}
2.2.5 读配置方式3ConfigurationProperties
注释:ConfigurationProperties支持数据校验(具体方式略)
配置文件application.properties
java
person3.name=zhangsan
person3.age=18
person3.hobby=play,read,sleep
person3.brother=zhangsi,zhangwu
person3.map.k1=v1
person3.map.k2=v2
person3.father.name=zhangda
person3.father.age=50
读取配置
注释:ConfigurationProperties注入的Bean对象必须有set方法才能注入
java
@Component
@ConfigurationProperties(prefix="person3")
public class ConfigurationTestPerson {
    private String name;
    private int age;
    private String[] hobby;
    private List<String> brother;
    private Map<String, String> map;
    private ConfigurationTestFather father;
    ...set方法略
}
public class ConfigurationTestFather {
    private String name;
    private int age;
    ...
}
注释:配置对象Bean在IDEA中出现提示信息(不影响运行,可添加依赖)
作用是配置文件输入自动提示类中属性名(不提示需执行 mvn clean compile)
XML
        <dependency>
            <groupId>org.springframework.boot</groupId>
            <artifactId>spring-boot-configuration-processor</artifactId>
            <optional>true</optional>
        </dependency>
2.3 自定义配置文件
(1) 自定义文件
testval.properties
XML
    testval.version=18
    person.name=tname
(2) 读取自定义文件
方式1: Component + PropertySource
注释:@Component注解默认开启依赖注入,可省略@EnableConfigurationProperties
java
@Component
@PropertySource("classpath:testval.properties")
@ConfigurationProperties(prefix = "test")
public class TestProperties {
    private int version;
    private String name;
    ...set方法略
}
方式2:Configuration
java
@Configuration
@EnableConfigurationProperties(TestProperties.class)
@PropertySource("classpath:test.properties")
@ConfigurationProperties(prefix = "test")
public class TestProperties {
    private int version;
    private String name;
    ...set方法略
}
2.4 多环境配置
2.4.1 多环境配置文件
(1) properteis
java
application.properties
    spting.profiles.active=dev
application-dev.properties
    server.port=8081
application-pro.properties
    server.port=8082
application-test.properties
    server.port=8083
(2) yml
java
---
server:
    port: 8081
spring:
    config:
        activate:
            on-profile: dev
---
server:
    port: 8083
spring:
    config:
        activate:
            on-profile: test
---
spring:
    profiles:
        active: dev
2.4.2 多环境配置类
(1) 调用者类(注释:注入多环境接口类型)
java
@Autowired
private Dbconnector dbconnector;
(2) 实现者类
java
@Configuration
@Profile("dev")
public class DevDBConnector implements DBConnector{ ...}
java
@Configuration
@Profile("test")
public class TestDBConnector implements DBConnector{ ...}
2.4.3 多环境激活方式
(1) 配置文件
properties文件:spring.profiles.active=dev
yml文件:spring: profiles: active: dev
(2) 开发环境
虚拟机参数:IDEA工具栏 > Run > EditConfiguration > VM options: -Dspring.profiles.active=xx
命令行参数:IDEA工具栏 > Run > EditConfiguration > Active profiles: pro
注释:命令行参数优先级大于虚拟机参数
(3) 运行环境
注释:参照核心配置文件的运行环境配置
方式1jar文件执行指定参数:java -jar .\xx.jar --spring.profiles.active=xx
方式2指定外部文件加载:略
方式3加载默认配置文件:略
3 服务器开发
3.1 视图控制器
注释:前后端分离项目无需配置
java
@Configuration
public class MvcConfig implements WebMvcConfigurer {
    @Override
    public void addViewControllers(ViewControllerRegistry registry) {
        registry.addViewController("/toLoginPage").setViewName("login");
        registry.addViewController("/login.html").setViewName("login");
    }
}
3.2 拦截器
3.2.1 自定义拦截器
java
@Component
public class TestInterceptor implements HandlerInterceptor {
    @Override
    public boolean preHandle(HttpServletRequest req, HttpServletResponse res, Object handler) throws Exception {
        String uri = req.getRequestURI();
        return true;
    }
    @Override
    public void postHandle(HttpServletRequest req, HttpServletResponse res
        , Object handler, @Nullable ModelAndView modelAndView) throws Exception {
        req.setAttribute("msg", "...");
    }
    @Override
    public void afterCompletion(HttpServletRequest req, HttpServletResponse res
        , Object handler, @Nullable Exception e) throws Exception {
    }
}
3.2.2 注册拦截器
MvcConfig.java
java
@Autowired
private TestInterceptor myInterceptor;
@Override
public void addInterceptors(InterceptorRegistry registry){
    registry.addInterceptor(myInterceptor)
        .addPathPatterns("/**")
        .excludePathPatterns("/login.html");
}
3.3 过滤监听处理器
3.3.1 处理Servlet
java
@Component
public class TestServlet extends HttpServlet
    @Override
    protected void doGet(HttpServletRequest req, HttpServletResponse res) throws ServletException, IOException {
        this.doPost(req, res);
    }
    @Override
    protected void doPost(HttpServletRequest req, HttpServletResponse res) throws ServletException, IOException {
        res.getWriter().write("hello"):
    }
}
3.3.2 过滤器Filter
java
@Component
public class TestFilter implements Filter {
    @Override
    public void init(FilterConfig filterConfig) throws ServletException{ }
    @Override
    public void doFilter(ServletRequest req, ServletResponse res, FilterChain filterChain) throws IOEXception, ServletException {
        filterChain.doFilter(req, res);
    }
    @Override
    public void destroy() {}
}
3.3.3 监听器Listener
java
@Component
public class TestListener implements ServletContextListener {
    @Override
    public void contextInitialized(ServletContextEvent servletContextEvent) {
        ...
    }
    @Override
    public void contextDestroyed(ServletContextEvent servletContextEvent) {
        ...
    }
}
3.3.4 整合三大件
(1) 方式1:创建Bean对象
java
@Configuration
public class ServletConfig {
    @Bean
    public ServletRegistrationBean getServlet(TestServlet servlet) {
        ServletRegistrationBean regis = new ServletRegistrationBean(servlet, "/servlet");
        return regis;
    }
    @Bean
    public FilterRegistrationBean getFilter(TestFilter filter) {
        FilterRegistrationBean regis = new FilterRegistrationBean();
        regis.setUrlPatterns(Arrays.asList("/toLoginPage", "/testFilter"));
        return regis;
    }
    @Bean
    public ServletListenerRegistrationBean getServletListener(TestListener listener) {
        ServletListenerRegistrationBean regis = new ServletListenerRegistrationBean();
        return regis;
    }
}
(2) 方式2:注解扫描
启动类(@ServletComponentScan)
java
@SpringBootApplication
@ServletComponentScan
public class XxApplication {
    ...
}
Servlet
java
@WebServlet("/xxxServlet")
public class TestServlet extends HttpServlet {
   ...
}
Filter
java
@WebFilter(value = { "/xxx", "/xxxFilter" })
public class TestFilter implements Filter {
   ...
}
Listener
java
@WebListener
public class TestListener implements ServletContextListener {
   ...
}
3.4 异常处理
3.4.1 单项目页面异常处理
(1) 自定义页面
方式1:Thymeleaf(classpath:/templates/error.html)
注释:错误时,自动表示该画面
html
<!DOTYPE html>
<html xmlns:th="http://www.thymeleaf.org">
<head><meta charset="UTF-8"></head>
<body>错误页面<span th:text="${msg}"></span></body>
方式2:JSP(src/main/webapp/WEB-INF/jsp/error.jsp)
html
<%@ page language="java" contentType="text/html; charset=UTF-8"
         pageEncoding="UTF-8"%>
<head>...</head>
<body>
Spring boot Error Page<br/>
<% if(request.getAttribute("msg") != null){ %>
${msg}
<% } %>
</body>
(2) Controller处理局部异常
java
@Controller
public class TestController {
    ...
    @ExceptionHandler(value={NullPointerException.class})
    public String exceptionHandle(HttpServletRequest req, Exception e) {
        req.setAttribute("msg", e.getMessage());					  // 指定Msg信息
        return "error";							                      // 返回error画面
    }
}
(3) ControllerAdvice处理全局异常
java
@ControllerAdvice							// 标记为全局异常
public class GlobalException {
    ...
    @ExceptionHandler(value={Exception.class})	// 所有Controller发生指定异常都会执行该处理
    public String exceptionHandle(HttpServletRequest req, Exception e) {
        req.setAttribute("msg", e.getMessage());
        return "error";
    }
}
3.4.2 前后端分离异常处理
略
4 前端开发
4.1 前端JSP
注释:springboot默认不支持jsp,默认是内置tomcat等服务器,并且是打成jar包的形式。可以通过配置,使其可以使用JSP,适用于快速旧项目迁移,这么做有限制,无法使用springboot自带的错误处理器/error
4.1.1 添加依赖
XML
<!-- Apache Tomcat的JSP引擎 -->
<dependency>
    <groupId>org.apache.tomcat.embed</groupId>
    <artifactId>tomcat-embed-jasper</artifactId>
    <scope>provided</scope>
</dependency>

<!-- JSTL标签库 -->
<dependency>
    <groupId>javax.servlet</groupId>
    <artifactId>jstl</artifactId>
</dependency>
4.1.2 添加插件
XML
<build>
        <!-- 指定最终生成的 JAR 包名称(项目名) -->
        <finalName>boot2jsp</finalName>

        <plugins>
            <plugin>
                <groupId>org.springframework.boot</groupId>
                <artifactId>spring-boot-maven-plugin</artifactId>
            </plugin>
        </plugins>

        <resources>
            <!-- 1. 处理 src/main/resources 下的常规配置文件 -->
            <resource>
                <directory>src/main/resources</directory>
                <includes>
                    <include>**/*.*</include>
                </includes>
            </resource>

            <!-- 2. 关键配置:将 webapp 目录下的资源复制到 META-INF/resources -->
            <resource>
                <directory>src/main/webapp</directory>
                <targetPath>META-INF/resources</targetPath>
                <includes>
                    <include>**/*.*</include>
                </includes>
            </resource>
        </resources>
    </build>
4.1.3 配置视图解析器
application.properties
XML
spring.mvc.view.prefix=/WEB-INF/jsp/
spring.mvc.view.suffix=.jsp
4.1.4 创建JSP
src/main/webApp/WEB-INF/jsp/hello.jsp
4.1.5 创建控制器
java
@Controller
public class HelloController {
    @GetMapping("/")
    public String hello() {
        return "hello";
    }
}
4.2 前端Thymeleaf
4.2.1 添加依赖
XML
<dependency>
    <groupId>org.springframework.boot</groupId>
    <artifactId>spring-boot-starter-thymeleaf</artifactId>
</dependency>
4.2.2 更改配置
application.properties
XML
spring.thymeleaf.cache = true
spring.thymeleaf.encoding = UTF-8
spring.thymeleaf.mode = HTML5
spring.thymeleaf.prefix = classpath:/resources/templates
spring.thymeleaf.suffix = .html
4.2.3 创建页面
login.html
html
<!DOCTYPE html>
<html lang="en" xmlns:th="http://www.thymeleaf.org">
<head>...</head>
<body>
    <div th:text="${dataval}"></div>
</body>
4.2.4 创建控制器
java
@Controller
public class HelloController {
    @GetMapping("/")
    public String hello(Model model) {
        model.addAttribute("dataval", "hello thymeleaf");
        return "login";
    }
}
4.3 前后端分离Vue
4.3.1 服务器端
(1) 添加依赖
XML
<dependencies>
    <dependency>
        <groupId>org.springframework.boot</groupId>
        <artifactId>spring-boot-starter-web</artifactId>
    </dependency>
    <!-- 用于JSON处理,web依赖默认有jackson依赖 -->
    <dependency>
        <groupId>com.fasterxml.jackson.core</groupId>
        <artifactId>jackson-databind</artifactId>
    </dependency>
</dependencies>
(2) 创建控制器
java
import org.springframework.web.bind.annotation.*;

@RestController
@RequestMapping("/api")
public class DataController {

    @GetMapping("/datalist")
    public List<DataItem> getData() {
        List<DataItem> dataList = new ArrayList<>();
        dataList.add(new DataItem("Item1", "Description1"));
        dataList.add(new DataItem("Item2", "Description2"));
        return dataList;
    }

    @GetMapping("/data")
    public MyData getData() {
        return new MyData("Hello", "World");
    }

    @PostMapping("/data")
    public MyData createData(@RequestBody MyData data) {
        // 处理数据,例如保存到数据库等
        return data;
    }
}
(3) 封装Json
注释:配置将json的null转成空字符串
java
@Configuration
public class JacksonConfig {
    @Bean
    @Primary
    @ConditionalOnMissingBean(ObjectMapper.class)
    public ObjectMapper jacksonObjectMapper(Jackson2ObjectMapperBuilder builder) {
        ObjectMapper objMapper = builder.createXmlMapper(false).build();
        objMapper.getSerializerProvider().setNullValueSerializer(new JsonSerializer<Object>() {
            @Override
            public void serialize(Object o, JsonGenerator jsonGenerator, SerializerProvider provider) throws IOException {
                jsonGenerator.writeString("");
            }
         });
         return objMapper;
    }
}
(4) 统一返回数据结构
封装
java
public class JsonResult<T> {
    private T data;
    private String code;
    private String msg;

    public JsonResult() {			// 没有返回数据时,默认成功
        this.code = "0";
        this.msg = "操作成功";
    }

    public JsonResult(String code, String msg) { // 人为指定,状态码与返回信息
        this.code = code;
        this.msg = msg;
    }

    public JsonResult(T data) {					// 有数据返回,默认成功
        this.code = "0";
        this.msg = "操作成功";
        this.data = data;
    }
}
使用例
java
@RequestMapping("/xxx")
public JsonResult<List<User>> getUserList() {
    return new JsonResult<>(xxList);		// 可返回,list, map, obj, str
}
4.3.2 创建Vue页面
list请求访问
html
<template>
    <div>
        <button @click="fetchData">获取数据</button>
        <ul>
            <li v-for="item in items" :key="item.id"> {{item.name}} </li>
        </ul>
    </div>
</template>
<script>
import axios from 'axios'
export default {
    data() {
        return {
            items: []
        };
    },
    methods: {
        fetchData() {
            axios.get('api/data')
                .then(res => {
                    this.items=res.data;
                })
                .catch(error => {
                    console.log("error", error);
                })
        }
    }
}
</script>
restful发送数据测试页面
html
<template>
    <div>
        <button @click="fetchData">获取数据</button>
        <button @click="postData">发送数据</button>
    </div>
</template>
<script>
import axios from 'axios'
export default {
    methods: {
        fetchData() {
            axios.get('http://localhost:8080/api/data')
                .then(res => {
                    console.log(res.data);
                })
                .catch(error => {
                    console.log("error", error);
                })
        },
        postData() {
            const data = { message: 'Hello', detail: 'World' };
            axios.post('api/data')
                .then(res => {
                    console.log(res.data);
                })
                .catch(error => {
                    console.log("error", error);
                })
        }
    }
}
</script>
4.3.3 跨域解决
(1) 方案1:后端设置允许跨域IP
java
import org.springframework.context.annotation.Bean;
import org.springframework.context.annotation.Configuration;
import org.springframework.web.servlet.config.annotation.CorsRegistry;
import org.springframework.web.servlet.config.annotation.WebMvcConfigurer;

@Configuration
public class WebConfig implements WebMvcConfigurer {
    @Override
    public void addCorsMappings(CorsRegistry registry) {
        registry.addMapping("/‌**") // 对所有路径生效,也可以指定路径如"/api/**‌"等。
                .allowedOrigins("http://localhost:8080") // 前端访问的地址,可以根据实际情况修改。如果是生产环境,这里应该是前端部署的域名。
                .allowedMethods("GET", "POST", "PUT", "DELETE") // 设置允许的HTTP方法。可以根据需要添加或删除。
                .allowedHeaders("*");
                .allowCredentials(true) // 允许发送Cookie。默认是false。根据需要配置。
                .maxAge(3600); // 预检请求的有效期(秒)。可以根据需要调整。
    }
}
(2) 方案2:解除Ajax请求安全限制
注释:这有3中方式
(1 Jsonp 最早解决案,利用Script标签可跨域原理)
(2 Nginx 反向代理,将跨域请求转为不跨域)
(3 CORS 规范化开宇请求方案)
CORS方式配置类
java
@Configuration
public class GlobalCorsConfig {
    @Bean
    public CorsFilter corsFiler() {
        CorsConfiguration config = new CorsConfiguration();
        config.addAllowedOrigin("http://localhost:8081");						设置允许接收请求的地址
        config.setAllowCredentials(true);						是否发送cookie
        config.addAllowedMethod("OPTIONS");						允许的请求方式
        config.addAllowedMethod("HEAD");
        config.addAllowedMethod("GET");
        config.addAllowedMethod("PUT");
        config.addAllowedMethod("POST");
        config.addAllowedMethod("DELETE");
        config.addAllowedMethod("PATCH");
        config.addAllowedHeader("*");						允许的头信息

        UrlBasedCorsConfigurationSource configSource = new UrlBasedCorsConfigurationSource();
        configSource.registerCorsConfiguration("/**", config);						设置拦截的请求
        return new CorsFilter(configSource);
    }
}
ajax请求(jquery方式)
java
$.ajax({
    type: 'post'
    url: 'htttp://localhost:8080/users',
    data: JSON.stringify({
        "username":"zhangsan",
        "password":"123456"
    }),
    dataType: "json",
    contentType: "application/json;charset=UTF-8",
    success: function(msg) {
        ...
    }
})
方案3:修改Vue项目的 Vite.config.js
java
import { defineConfig } from 'vite'
import vue from '@vitejs/plugin-vue'

// https://vite.dev/config/
export default defineConfig({
  plugins: [vue()],
  server: {
    port: 8081, // 将此处修改为你想要的端口号,例如 3000, 8080 等
    proxy:{
      '/api':{
        target:'http://localhost:8080',
        changeOrigin:true,
        rewrite:(path)=>path.replace(/^\/api/,'')
      }
    }
  }
})
5 数据库
5.1 数据库
5.1.1 MySQL
(1) 添加依赖
XML
<dependency>						mysql驱动
    <groupId>mysql</groupId>
    <artifactId>mysql-connector-java</artifactId>
</dependency>
<dependency>
    <groupId>org.springframework.boot</groupId>						JDBC连接
    <artifactId>spring-boot-starter-jdbc</artifactId>
</dependency>
(2) 配置文件
application.yml
XML
spring:
    datasource:
        url: jdbc:mysql://localhost:3306/test?serverTimezone=GMT%2B8
        username: root
        password: root
        driver-class-name: com.mysql.jdbc.Driver
      #driver-class-name: con.mysql.cj.jdbc.Driver
application.properties
XML
# 数据库连接信息
spring.datasource.url=jdbc:mysql://localhost:3306/springboottest?serverTimezone=UTC
spring.datasource.username=root
spring.datasource.password=root
5.1.2 Redis
5.1.2.1 简介
redis支持5种数据类型
(1) 字符串:String
(2) 列表:list
(3) 集合:set
(4) 哈希类型:hash
(5) 有序集合:Sorted Set
5.1.2.2 下载安装运行
(1) 下载:https://GitHub.com/MicrosoftAtchive/redis/releases // 选择latest Release版 redis-x64-3.0.504.zip
(2) 解压缩,运行(双击:redis-server.exe)
注释:默认支持16个数据库(不可改名)默认操作0号数据,可通过databases修改默认数据库数量,默认密码为空
5.1.2.3 操作
(1) 字符串操作:
XML
set name zhangsan			添加
set name lisi			修改
get name			查看
keys *			查看所有key
del name			删除
(2) 列表操作:
XML
lpush mylist 'c++' 'java' 'web'			先头添加
rpush mylist 'python'			末尾添加
lset mylist 0 'php'			更新下标0的值
lrange mylist 0 -1			查询集合
lrem mylist 0 'php'			删除下标0的值
(3) 集合操作:
XML
sadd myset java c++ python			添加(自动去重)
srem myset c++			删除
smembers myset			查询全部
(4) 哈希操作:
XML
hset myhash name zhangsan			添加
hset myhash name lisi			修改
hkeys myhash			查询所有key
hvals myhash			查询所有值
hgetall myhash			查询所有键值
(5) 有序集合:
XML
zadd myzset 1 'baidu.com'			添加
zrange myzset 0 -1			查询全部(由小到大)
5.1.2.4 Spring整合
(1) 添加依赖
(2) 连接池:常用连接池 Lettuce 和 Jedis(Jedis在多线程用同一个连接时,线程不安全,需要为每个线程分配一个连接。Lettuce多线程用同一个连接,线程安全。Redis默认使用Lettuce连接池)
(3) 配置文件application.properties
XML
spring.redis.database = 0				默认库
spring.redis.host=localhost				地址
spring.redis.port=6379				服务器端口
spring.redis.password=				服务器密码,默认为空
spring.redis.lettuce.pool.max-active=8				连接池,最大连接数(负数无限制)
spring.redis.lettuce.pool.max-wait=-1ms				连接池,最大阻塞等待时间(负数无限制)
spring.redis.lettuce.pool.max-idle=8				连接池,最大空闲数
spring.redis.pool.min-idle=0				连接池,最小空闲数
(4) 代码操作
注释:也可写在service层。有则从redis获取,无则从DB获取
java
@Autowired
private RedisTemplate redisTemplate;
@Autowired
private StringRedisTemplate stringRedisTemplate;
@GetMapping("/")
public void testRedis() {
    ValueOperations<String, String> ops = stringRedisTemplate.opsForValue();
    ops.set("name", "zhangsan");	// 添加,更新,字符串对象
    String name = ops.get("name");	// 获取,字符串对象

    ValueOperations opsForValue =redisTemplate.opsForValue();
    City city = new City(1, "北京", "中国");
    opsForValue.set("city", city);			// 添加,对象

    Boolean exists = redisTemplate.hasKey("city");	// 判断对象存在
    redisTemplate.delete("city");					// 删除对象
    redisTemplate.opsForValue().set("city", new City(2, "山西", "中国")); // 更新对象

    City c2 = (City)redisTemplate.opsForValue().get("city"); // 获取对象
}
5.1.3 MongoDB
5.1.3.1 下载安装
下载:https://www.mongodb.com/download-center/community
安装:双击执行 > 一直下一步(取消勾选 Install MongoDB Compass)
配置环境变量PATH:D:\\xxxMongoDB\bin
启动:命令行 > mongod --dbpath D:\xxx\MongoDB\data\db
可视化工具下载:https://www.mongodbmanager.com/download
5.1.3.2 常用命令
java
show dbs					显示所有数据库
show tables					显示所有表
db.user.find()					查询user表
db.user.findOne()					查询user表第一行
db.user.finde({"age":{$gt:10}})					查询年龄大于10的user表数据
show collections					显示所有集合
use test					切换数据库
db.createCollection("test")					创建集合
db.user.insert({"id":"1", "name":"zhangsan"})					创建表及插入数据
db.user.update({"id":"1"}, {$set:{"name":"zhangsan"}})					更新数据
db.dropDatabase()					删除当前数据库
db.user.drop()					删除user表
5.1.3.3 spring整合
(1) 添加依赖
XML
<dependency>
    <groupId>org.springframework.boot</groupId>
    <artifactId>spring-boot-starter-data-mongodb</artifactId>
</dependency>
(2) 配置application.properties
XML
spring.data.mongodb.uri=mongodb://localhost:27017/test(3) 代码操作
java
@Component
public class MongoTest {
    @Autowired
    private MongoTemplate mongoTemplate;

    public String saveObj(Book book) { // 追加
        book.setUpdateTime(new Date());
        mongoTemplate.save(book);
        return "添加成功";
    }

    public List<book> findAll() { // 查询所有
        return mongoTemplate.findAll(Book.class);
    }

    public Book getBookByName(String name) {
        Query query = new Query(Criteria.where("name").is(name)); // 条件查询
        return mongoTemplate.findOne(query, Book.class);
    }

    public String updateBook(Book book) {
        Query query = new Query(Criteria.where("_id").is(book.getId())); // 设置更新条件
        Update update = new Update().set("name", book.getName()).set("updateTime", new Date()); // 变更名称,更新时间
        template.updateFirst(query, update, Book.class); // 更新查询结果第一条
        template.updateMulti(query, update, Book.class); // 更新查询结果全部
        template.upsert(query, update, Book.class);	     // 对象不存在则插入
        return "成功";
    }

    public String deleteBook(int id) { // 删除
        Query query = new Query(Criteria.where("id").is(id));
        mongoTemplate.remove(query, Book.class);
        return "成功";
    }
}
5.2 配置数据源
5.2.1 Druid
(1) 添加依赖
XML
        <dependency>
            <groupId>com.alibaba</groupId>
            <artifactId>druid-spring-boot-starter</artifactId>
            <version>1.2.16</version>
        </dependency>
(2) 配置application.properties
XML
# 数据源
spring.datasource.type=com.alibaba.druid.pool.DruidDataSource
# 初始化大小
spring.datasource.druid.initial-size=5
#最小空闲数
spring.datasource.druid.min-idle=5
#最大连接数
spring.datasource.druid.max-active=20
注释:其它配置信息
XML
没有可用连接时(最大等待时长)
空闲连接回收的(检测间隔)用于清理无效连接
总空闲大于最小空闲数,超过这个时间的连接被回收
用于检测连接是否有效
空闲连接使用前,测试
从连接池获取连接时进行有效测试(会增加性能开销)
为连接池返还连接时进行有效测试(会增加性能开销)
是否开启对preparedStatement缓存(可提升重复执行效率)
开启SQL执行监控(记录SQL执行次数,耗时等)
开启SQL防火墙,拦截恶意SQL,防止SQL注入等风险。
(3) 配置类
java
@Configuration
public class JdbcConfig {
    @Bean
    @ConfigurationProperties(prefix="spring.datasource")
    public DataSource getDruid() {
        return new DruidDataSource();
    }
}
5.3 持久层框架
5.3.1 JdbcTemplate
注释:几乎不常用的访问方式
java
@Autowired
private JdbcTemplate jdbcTemplate;

public List test() {
    String sql = "select * from t_user";
    List<User> users = jdbcTemplate.query(sql, new RowMapper<User>() {
        @Override
        public User mapRor(ResultSet res, int i) throws SQLException {
            User user = new User();
            user.setId(res.getInt("id"));
            return user;
        }
    })
    return users;
}
5.3.2 JPA(Spring Data JPA)
(1) 添加依赖
XML
<dependency>
    <groupId>org.springframework.boot</groupId>
    <artifactId>spring-boot-starter-data-jpa</artifactId>
</dependency>
(2) 配置文件application.yml
java
spring:
    jpa:
        database: MySQL
        database-platform: org.hibernate.dialect.MySQL5InnoDBDialect
        show-sql: true
        hibernate:
            ddl-auto: update				自动更新
注释:ddl-auto属性
java
create		每次运行程序,重新建表(会清空数据)
create-drop		每次运行程序,创建表结构,程序结束时情况表
update		每次运行程序,无表则建表,有变更则更新表结构(不改变数据)
validate		每次运行程序,校验数据与数据库自动类型,不同则报错
none		禁用DDL
(3) 创建Entity
注释:复合主键需要创建主键类
java
@Entity(name="表名")
public class Xxx{
    @Id		// 主键项目
    @GeneratedValue(strategy=GenerationType.IDENTITY)	// 自增
    private Integer id;

    @Column(name = "DB字段名")
    private String name;

    ... get  set 略
}
(4) 创建接口类
java
public interface XxxRepository extends JpaRepository<Entity类, Integer> { //指定模型与主键类型
    public List<对象> findBy字段名NotNull(); // 根据方法名 拼成SQL查询,详细规则略

    @Query(" SELECT * FROM ... WHER a_id= ?1")
    public List<对象> get对象Paged(Integer aid, Pageable pageable);

    @Transactional
    @Modifying					// 添加,更新,删除,的注解
    @Query("UPDATE ... SET ... = ?1 WHERE ... = ?2")
    public int updatexxx(String name, Integer id);
}
(5) 测试
java
@RunWith(SpringRunner.class)
@SpringBootTest
public class JpaTest{
    @Autowired
    private XxxRepository repository;
    @Test
    public void select() {
        List<对象> list = repository.findBy字段名NotNull();
    }
    @Test
    public void select() {
        Pageable pageable = PageRequest.of(0, 3);
        List<对象> list = repository.get对象Paged(1, pageable);
    }
}
5.3.3 Mybatis
(1) 添加依赖
XML
        <dependency>
            <groupId>org.mybatis.spring.boot</groupId>
            <artifactId>mybatis-spring-boot-starter</artifactId>
            <version>2.3.1</version>
        </dependency>
(2) 配置
application.properties
XML
# Mybatis配置信息
mybatis.mapper-locations=classpath:com/example/mapper/*Mapper.xml	xml文件目录
mybatis.type-aliases-package=com.example.pojo		                实体目录
mybatis.configuration.map-underscore-to-camel-case=true		        开启驼峰命名
application.yml
XML
mybatis:
    mapper-locations: classpath:mapper/*Mapper.xml	 xml文件目录
    type-aliases-package: 实体类包.包				 实体目录
    configuration:
        map-underscore-to-camel-case: true			 开启驼峰命名
(3) 配置映射文件查询
接口
java
@Mapper
public interface UserMapper {
    public User selectUserById(String username);
}
映射文件
XML
<?xml version="1.0" encoding="UTF-8"?>
<!DOCTYPE mapper PUBLIC "-//mybatis.org//DTD Mapper 3.0//EN"
        "http://mybatis.org/dtd/mybatis-3-mapper.dtd">
<mapper namespace="com.example.mapper.UserMapper">
    <select id="selectUserById" resultType="com.example.pojo.User">
        SELECT username, password
        FROM user
        WHERE username = #{username}
    </select>
</mapper>
(4) 纯注解查询
java
@Mapper
public interface XxMapper {
    @Select(" SELECT * FROM ... WHERE id = #{id} ")
    public Xxx findxxx(Integer id);
}
6 认证授权
6.1 认证
添加依赖
XML
<dependency>
    <groupId>org.springframework.boot</groupId>
    <artifactId>spring-boot-starter-security</artifactId>
</dependency>
6.1.1 内存认证
配置类
注释:密码编码器,有很多(例:PbkdfPasswordEncoder, SCryptPasswordEncoder)
注释:角色 roles("common", "vip"); 与权限 authorities("ROLE_common" , "ROLE_vip")等效
java
@EnableWebSecurity
public class SecurityConfig extends WebSecurityConfigureAdapter {
    @Override
    protected void configure(AuthenticationManagerBuilder auth) throws Exception {
        BCryptPasswordEncoder encoder = new BCryptPasswordEncoder();
        auth.inMemoryAuthentication().passwordEncoder(encoder)
            .withUser("zhangsan").password(encoder.encode("123456")).roles("common")
            .and()
            .withUser("lisi").password(encoder.encode("123456")).roles("vip");
    }
}
6.1.2 JDBC认证
(1) 添加依赖
XML
<dependency>
    <groupId>org.springramework.boot</groupId>
    <atrifactId>spring-boot-starter-jdbc</artifactId>
</dependency>
<dependency>
    <groupId>mysql</groupId>
    <artifactId>mysql-connector-java</artifactId>
    <scope>runtime</scope>
</dependency>
(2) 配置文件
application.properties
XML
spring.datasource.url=jdbc:mysql://localhost:3306/springbootdata?serverTimezone=UTC
spring.datasource.username=root
spring.datasource.password=root
(3) 配置类
注释:用户表username, password, valid,权限表username, authority是必须查询项目
java
@EnableWebSecurity
public class SecurityConfig extends WebSecurityConfigureAdapter {
    @Autowired
    private DataSource dataSource;
    @Override
    protected void configure(AuthenticationManagerBuilder auth) throws Exception {
        BCryptPasswordEncoder encoder = new BCryptPasswordEncoder();

        String userSQL = "select username, password, valid from t_user where username= ?";
        String authSQL = "select u.username, a.authority ";
            + " from t_user u "
            + " left join user_auth ua "
            + "     on u.username = ua.username "
            + " left join auth a "
            + "     on ua.authority = a.username "
            + "  where u.username = ? ";

        auth.jdbcAuthentication().passwordEncoder(encoder)
            .dataSource(dataSource)
            .userByUsernameQuery(userSQL)
            .authoritiesByUsernameQuery(authSQL);
    }
6.1.3 UserDetilsService认证
(1) 自定义Service
java
@Service
public class UserService {
    User getUser(String username);
    List<Customer> getAuthority(String username);
}
(2) 自定义UserDetailsService实现类
java
@Service
public class UserDetailsServiceImpl implements UserDetailsService {
    @Autowired
    private LoginService service;

    @Override
    public UserDetails loadUserByUsername(String username) throws UsernameNotFoundException {
        com.example.pojo.User user = service. getUser(username);	 // 获取用户
        List<Customer> authorities = service.getAuthority(username); // 获取权限
        List<SimpleGrantedAuthority> list = authorities.stream()	 // 封装权限
                .map(authority -> new SimpleGrantedAuthority(authority.getAuthname()))
                .collect(Collectors.toList());
        if ( user != null ) {
            return new User(user.getUsername(), user.getPassword(), list); // 封装用户信息
        } else {
            throw new UsernameNotFoundException("当前用户不存在");
        }
    }
}
(3) 配置类
java
@EnableWebSecurity
public class SecurityConfig extends WebSecurityConfigureAdapter {
    @Autowired
    private UserDetailsServiceImpl service;
    @Override
    protected void configure(AuthenticationManagerBuilder auth) throws Exception {
        BCryptPasswordEncoder encoder = new BCryptPasswordEncoder();
        auth.userDetailsService(service).passwordEncoder(encoder);
    }
}
6. 2 授权
(1) 配置类
java
@EnableWebSecurity
public class SecurityConfig extends WebSecurityConfigureAdapter {
    ...
    @Override
    protected void configure(HttpSecurity http) throws Exception {
        http.authorizeRequests()
            .antMatchers("/").permitAll()		// 允许 所有人(permitAll)  访问 /
            .antMatchers("/static/**").permitAll()	// 允许所有人访问静态资源
            .antMatchers("/detail/common/**").hasRole("common")	// 允许 有common权限的用户, 访问 /detail/common/**
            .antMatchers("/detail/vip/**").hasRole("vip")	// 允许 有vip权限的用户, 访问 /detail/vip/**
            .anyRequest().authenticated()	// 允许 已经登录用户,访问 其它任何请求
            .and()
            .formLogin();					// 基于表单的用户登录
    }
}
(2) http方法
java
authorizeRequests()		开启认证请求
formLogin()		开启表单登录认证
logout()		开启退出登录
rememberMe()		开启记住我功能
csrf()		开启CSRF跨站请求伪造防护
(3) 认证请求authorizeRequests()方法
java
antMatchers(...)		路径匹配(ant风格)
mvcMatchers(...)		路径匹配(mvc风格)
regexMatchers(...)		路径匹配(正则风格)
anyRequest()		其它任何请求

hasRole(String)		有角色
hasAnyRole(...)		有任意角色		"ROLE_" + db取得的权限名
hasAuthority(string)		有权限		db取得的权限名
hasAnyAuthority(...)		有任意权限
authenticated()		已经登录的用户

permitAll()		无条件对请求放行

and()		连接符
6.3 登录
(1) 表单
html
<form th:action="@{/userLogin}" th:method="post" >
    <input type="text" name="name" placeholder="用户名" required="" autofocus=""/>
    <input type="password" name="pwd" placeholder="密码" required="" />
</form>
(2) 配置类
java
@EnableWebSecurity
public class SecurityConfig extends WebSecurityConfigureAdapter {
    ...
    @Override
    protected void configure(HttpSecurity http) throws Exception {
        http.authorizeRequests()
            ...
            .anyRequest().authenticated();
        http.formLogin()
            .loginPage("/userLogin").permitAll()
            .usernameParameter("name").passwordParameter("pwd")	// 指定表单name属性名,如果是username,password则可省略
            .defaultSuccessUrl("/")
            .failureUrl("/userLogin?error");
(3) formLogin()方法
java
loginPage(string)			 登录页面路径(默认:get请求,/login)

successForwardUrl(string)	 登录成功后重定向地址
defaultSuccessUrl(string)	 登录成功后请求转发地址
successHandler(AuthenticationSuccesshandler) 登录成功后处理

failureForwardURL(stirng)	 登录失败后重定向地址
failureUrl(string)			 登录失败后请求转发地址(默认: /login?error)
failureHandler(AuthenticationFailureHandler) 登录失败后处理

usernameParameter(string)	 登录用户的表单控件名,默认username
passwordParameter(string)	 登录密码的表单控件名,默认password

loginProcessingUrl(string)	 登录表单提交路径(默认: post请求, /login)

permitAll()					 无条件对请求放行
6.4 登出
(1) 表单 Thymeleaf
html
<form th:action="@{/mylogout}" method="post">
    <input th:type="submit" th:value="退出" />
</form>
(2) 配置类
java
@EnableWebSecurity
public class SecurityConfig extends WebSecurityConfigureAdapter {
    ...
    http.logout()
        .logoutUrl("/testLogout")
        .logoutSuccessUrl("/");
}
(3) logout()方法
java
logoutUrl(string)		       退出处理URL(默认:post请求, /logout)
logoutSuccessUrl(string)       退出成功后重定向URL
logoutSuccesshandler(LogoutSuccessHandler) 退出成功后处理
deleteCookies(String)          退出后删除指定cookie
invalidatehttpSession(boolean)  退出成功后是否立即清除session(默认:true)
clearAuthentication(boolean)    退出成功后是否立即清除用户认证信息(默认:true)
6.5 登录信息
6.5.1 方式1session获取
Controller
java
@Controller
public class UserController {
    @GetMapping("/testSession")
    @ResponseBody
    public void getUser(HttpSession session) {
        Object obj = session.getAttribute("SPRING_SECURITY_CONTEXT");
        if (obj != null) {
            SecurityContextImpl attribute = (SecurityContextImpl) obj;
            Authentication authentication = attribute.getAuthentication();
            UserDetails principal = (UserDetails)authentication.getPrincipal();
            String username = principal.getUsername();
        }
    }
}
6.5.2 方式2SecurityContextHolder获取
Controller
java
@Controller
public class UserController {
    @GetMapping("/testSession")
    @ResponseBody
    public void getUser() {
        SecurityContext context = SecurityContextHolder.getContext();
        Authentication authentication = context.getAuthentication();
        UserDetails principal = (UserDetails)authentication.getPrincipal();
        String username = principal.getUsername();
    }
}
6.6 记住我
注释:安全性要求高的应用,不推荐使用记住功能
6.6.1 方式1简单加密Token
注释:Cookie失效前任何人都可以通过该Token登录
(1) 前端
html
<input type="checkbox" name="rememberme" />记住我(2) 后端(SecurityConfig)
java
@Override
protected void configure(HttpSecurity http) throws Exception {
    http.authorizeRequests()...
    http.formLogin()...
    http.logout()...
    http.rememberMe()
        .rememberMeParameter("rememberme")
        .tokenValiditySeconds(200);
(3) rememberMe()方法
java
rememberMeParameter(string)					指定表单控件名(默认:rememberme)
key(string)					                记住我Token令牌标识
tokenValiditySeconds(int)					记住我Token令牌有效期(单位/秒)
tokenRepository(PersistentTokenRepository)  配置持久化Token令牌
alwaysRemember(boolean)					    是否始终创建记住我Cookie(默认:false)
clearAuthentication(boolean)			    是否设置安全Cookie(true: 必须HTTPS请求)
6.6.2 持久化Token
注释:每次访问生成username+随机数的token发给浏览器(防止别人盗用客户token)。没有cookie则返回登录页面。
SecurityConfig.java
java
@Override
protected void configure(HttpSecurity http) throws Exception {
    http.authorizeRequests()...
    http.formLogin()...
    http.logout()...
    http.rememberMe()
        .rememberMeParameter("rememberme")
        .tokenValiditySeconds(200)
        .tokenRepository(tokenRepository());
}

@Bean
public JdbcTokenRepositoryImpl tokenRepository() {
    JdbcTokenRepositoryImpl jr= new JdbcTokenRepositoryImpl();
    jr.setDataSource(dataSource);
    return js;
}
6.7 CSRF跨站请求伪造
6.7.1 默认开启CSRF防御
可通过http.csrf().disable();关闭 // 不推荐关闭
6.7.2 表单配置CSRF TOKEN
(1) Thymeleaf 显示声明
html
<form method="post" action="/xxx">
    <input type="hidden" th:name="${_csrf.parameterName}" th:value="${_csrf.token}" />
</form>
(2) Thymeleaf 隐式声明
html
<form method="post" th:action="@{/xxx}">	th:action默认包含csrf数据
    ....
</form>
6.7.3 ajax请求CSRF TOKEN
(1) Thymeleaf头信息
html
<head>
    <meta name="_csrf" th:content="${_csrf.token}"/>
    <meta name="_csrf_header" th:content="${_csrf.headerName}"/>
</head>
(2) ajax
html
$(function() {
    var token=${"meta[name='_csrf']").attr("content");
    var header=$("meta[name='_carf_header']").attr("content");
    $(document).ajaxSend(function(e, xhr, options) {
        xhr.setRequestHeader(header, token);
    });
});
6.7.4 csrf()方法
html
disable()					                 关闭CSRF防御
csrfTokenRepository(CsrfTokenRepository)	 指定Token持久化Repository,默认还是HttpSessionCsrfTokenRepository
requireCsrfProtectionMatcher(RequestMatcher) 指定防护请求类型(默认:忽略GET, HEAD, TRACE, OPTIONS,处理PATCH, POST, PUT, DELETE)
6.8 加密
java
@EnableWebSecurity
public class WebSecurityConfig extends WebSecurityConfigurerAdapter {
    @Bean
    public PasswordEncoder passwordEncoder() {
        return new BCryptPasswordEncoder();
    }
}

@Service
public class UserInfoService {
    @Autowired
    PasswordEncoder passwordEncoder;
    public int insertUser(UserInfo userInfo) {
       userInfo.setPassword(passwordEncoder.encode(userInfo.getPassword()));
        return mapper.insertUserInfo(userInfo);
    }
}
7 系统优化
7.1 缓存
7.1.1 默认缓存
(1) 开启缓存(@EnableCaching)
XxApplication.java
java
@EnableCaching
@SpringBootApplication
public class XxApplication {
    ...
}
(2) 添加缓存(@Cacheable)
XxService.java
java
@Cacheable(cacheNames="comment")
public 对象 findById(int id) {
    return repository.findById(id);
}
(3) Cacheable属性
java
value | cacheNames		存储空间名(必须)
key		缓存数据的唯一标识(可使用SpEL表达式)
keyGenerator		指定缓存key生成器(与key二选一)
cacheManager		缓存管理器
cacheResolver		缓存解析器(与缓存管理器二选一)
condition		指定条件(满足条件则缓存数据)	例:@Cacheable(condition="#result==null")
uniess		指定条件(满足条件则不缓存数据)
sync		指定异步缓存(默认false不开启)
(4) SpEL表达式
java
#root	位置对象(可理解为当前方法)
#root.methodName	方法名
#root.method.name	方法名
#root.target	方法所在的对象实例
#root.targetClass	方法所在的类
#root.args	方法参数列表		例如:#root.args[0],获取第一个参数,也可用(#a0, #p0)获取第一个参数
#root.caches[0]	方法缓存列表	例如:#root.caches[0].name,获取第一个缓存名
#result	方法返回结果
(5) 更新缓存(@CachePut)
XxService.java
java
@CachePut(cacheNames="xxx", key="#result.id")
public 对象 update(对象 obj) {
    repository.update(obj...);
    return obj;
}
(6) 删除缓存(@CacheEvict)
XxService.java
java
@CacheEvict(cacheNames="xxx")
public void delete(int id) {
    repository.deleteById(id);
}
注释:CacheEvict属性(1 allEntries:是否清除空间内全部缓存(默认false,只清楚指定key))(2 beforeInvocation:是否方法执行前清除(默认false))
(7) 变更操作缓存(@Caching)
注释:相当于添加更新删除@Cacheable, @CachePut, @CacheEvict三个注解
XxService.java
java
@Caching(
    cacheable={@Cacheable(cachenames="comment", key="#id")},
    put={#CachePut(cacheNames="comment", key="#result.id")}
)
public 对象 getComment(int id) {
    return repository.findById(id).get();
}
7.1.2 Redis缓存
(1) 添加依赖
XML
<dependency>
    <groupId>org.springframework.boot</groupId>
    <artifactId>spring-boot-starter-data-redis</artifactId>
</dependency>
(2) 配置
XML
spring.redis.host=127.0.0.1			服务器地址
spring.redis.port=6379			服务器端口
spring.redis.password=xxx			服务器密码,默认为空
(3) 基于注解缓存
注释:同默认缓存一样(略)
(4) 基于API缓存
注释:更新缓存 redisTemplate.opsForValue().set("空间名"+id, obj);
注释:删除缓存 redisTemplate.delete("空间名"+id);
注释:单独设置有效期限, redisTemplate.expire("空间名"+id, 1, TimeUnit.DAYS);
java
@Service
public class XxxService {
    @Autowired
     private RedisTemplate redisTemplate;
    public 对象 findById(int id) {
        Object obj = redisTemplate.opsForValue().get("缓存空间名"+id);
        if (obj != null) {
            return (对象)obj;
        }
        Optional<对象> optional = repository.fincById(id);
        if (optional.isPresent()){
            对象 obj = optional.get();
            redisTemplate.opsForValue().set("空间名"+id,
                obj, 1, TimeUnit.DAYS); // 添加缓存,设置缓存有效期1天
            return obj;
        } else {
            return null;
        }
}
(5) 序列化
默认序列化
注释:redis默认无法缓存对象类型,需要为对象配置序列化接口
java
public class User implements Serizlizable {
    ...
}
自定义序列化API的缓存管理器
java
@Configuration
public class RedisConfig {
    @Bean
    public RedisTemplate<Object, Object> redisTemplate(RedisConnectionFactory redisConnectionFactory) {
        RedisTemplate<Object, Object> template = new RedisTemplate();
        template.setConnectionFactory(redisConnectionFactory);

          Jackson2JsonRedisSerizlizer jacksonSeial = new Jackson2JsonRedisSerizlizer(Object.class); 使用json格式化对象

            ObjectMapper om = new ObjectMapper(); 转换异常解决方案
            om.setVisibility(PropertyAccessor.ALL, JsonAutoDetect.Visibility.ANY);
            om.setenableDefaultTyping(ObjectMapper.DefaultTyping.NON_FINAL);

          jacksonSeial.setObjectMapper(om);

        template.setDefaultSerizlizer(jacksonSeial); 设置模版序列号方式
        return template;
    }
}
自定义序列化注解的缓存管理器
java
@Configuration
public class RedisConfig {
    @Bean
    public RedisCacheManager cacheManager(RedisConnectionFactory redisConnectionFactory) {
        RedisSerizlizer<String> strSerizlizer = new StringRedisSerializer();
        Jackson2JsonRedisSerializer jacksonSeial = new Jackson2JsonRedisSerializer(Object.class);
            ObjectMapper om = new ObjectMapper(); // 转换异常解决方案
            om.setVisibility(PropertyAccessor.ALL, JsonAutoDetect.Visibility.ANY);
            om.setenableDefaultTyping(ObjectMapper.DefaultTyping.NON_FINAL);
        jacksonSeial.setObjectMapper(om);
        RedisCacheConfiguration config = RedisCacheConfiguration.defaultCacheConfig()
            .entryTtl(Duration.ofDays(1)) // 缓存时效
            .serizlizeKeysWith(RedisSerializationContext.SerializationPair
                .fromSerializer(strSerializer))	// Key为字符串形式
            .serializeValuesWith(RedisSerializationContext.SerializationPair
                .fromSerializer(jacksonSeial)) // Value为Json格式
            .disableCachingNullValues();
        RedisCacheManager cacheManager = RedisCacheManager
            .builder(redisConnectionFactory)
            .cacheDefaults(config).build();
        return cacheManager;
    }
}
7.2 消息服务
常用消息中间件:
ActiveMQ(性能较弱,不适用高并发大数据处理)
RabbitMQ(数据一致性,稳定性,可靠性高),
Kafka(高吞吐量,适用于大量数据收集业务)
7.2.1 RabbitMQ
(1) 消息服务作用
java
1 异步处理
2 应用解耦
3 流量削峰
4 分布式事务管理
(2) RabbitMQ工作模式
java
1 工作队列模式(一个队列,多个消费者,轮询处理)
2 发布订阅模式(一个交换器,多个相同消息队列)例如:适用于短信,邮件通知
3 路由模式(一个交换器,多个不同消息队列)例如:对不同日志进行不同处理。
4 通配符模式(一个交换器,多个(通配符键)的不同消息队列)例如:动态路由匹配,不同客户匹配一个或多个队列
5 RPC模式(回环消息队列)例如:客户端->消息->服务器->消息->客户端
6 Headers模式,使用较少
(3) 下载安装
下载:官网下载(rabbitmq-server-3.7.9.exe)
安装:双击exe(先安装Erlang语言包,再安装RabbitMQ)
可视化:服务器端口号:5672,浏览器可视化工具:http://localhost:15672,用户名: guest, 密码:guest
(4) Spring整合
添加依赖:创建工程> 选择依赖 > Integration > RabbitMQ (或者手动添加)
配置application.properties
java
spring.rabbitmq.host=localhost
spring.rabbitmq.port=5672
spring.rabbitmq.username=guest
spring.rabbitmq.password=guest
spring.rabbitmq.virtual-host=/				rabbitmq的虚拟主机路径
(5) 代码实现
7.2.1.1 发布订阅模式
A 定制消息发送组件
方式1:图形化界面定制
Tab(Exchanges)> 添加("fanout_exchange")
Tab(Queues)>添加("fanout_queue_email", "fanout_queue_ems")
Tab(Exchanges)> 点击("fanout_exchange"),绑定("fanout_queue_email", "fanout_queue_ems")
方式2:API实现
执行下列代码,定制消息发送组件
java
@Autowired
private AmqpAdmin amqpAdmin; // 消息组件
public void test() {
    amqpAdmin.declareExchange(new FanoutExchange("fanout_exchange")); // 定义,交换器
    amqpAdmin.declareQueue(new Queue("fanout_queue_email")); // 定义,队列
    amqpAdmin.declareQueue(new Queue("fanout_queue_ems")); // 定义,队列
    amqpAdmin.declareBinding(new Binding("fanout_queue_email"
        , Binding.DestinationType.QUEUE
        , "fanout_exchange", "", null)); // 队列与交换器绑定
    amqpAdmin.declareBinding(new Binding("fanout_queue_ems"
        , Binding.DestinationType.QUEUE
        , "fanout_exchange", "", null)); // 队列与交换器绑定
}
定义类型转换器
java
@Configuration
public class RabbitMQConfig {
    @Bean
    public MessageConverter messageConverter() {
        return new Jackson2JsonMessageConverter(); // 定义json类型转换器
    }
}
方式3:配置类
java
@Configuration
public class RabbitMQConfig {
    @Bean
    public MessageConverter messageConverter() {
        return new Jackson2JsonMessageConverter(); // 定义json类型转换器
    }
    @Bean
    public Exchange fanout_exchange() {
        return ExchangeBuilder.fanoutExchange("fanout_exchange")
            .build(); // 定义,交换器
    }
    @Bean
    public Queue fanout_queue_email() {
       return new Queue("fanout_queue_email"); // 定义,队列
    }
    @Bean
    public Queue fanout_queue_ems() {
       return new Queue("fanout_queue_ems"); // 定义,队列
    }
    @Bean
    public Binding bindingEmail() {
        return BindingBuilder.bind(fanout_queue_email())
            .to(fanout_exchange()).with("").noargs(); // 队列与交换器绑定
    }
    @Bean
    public Binding bindingEms() {
        return BindingBuilder.bind(fanout_queue_ems())
            .to(fanout_exchange()).with("").noargs(); // 队列与交换器绑定
    }
B 发送消息
注释:将消息,发送给,名字叫fanout_exchange的消息队列。发布订阅模式没有路由key
java
@Autowired
private RabbitTemplate rabbitTemplate;

public void test() {
    User user = new User();
    user.setId(1);
    user.setAge(18)
    rabbitTemplate.converAndSend("fanout_exchange", "", user);
}
C 接收消息(fanout)
java
	@Service
	public class RabbitMQService {
        // 监听工作模式消息,获取消息体
	    @RabbitListener(queues="fanout_queue_email")
	    public void psubConsumerEmail(Message message) {
	        byte[] body = message.getBody();
	        String  str = new String(body);
	    }

        // 监听工作模式消息体
	    @RabbitListener(
	        @Queuebinding(
	            value=@Queue("fanout_queue_email)
	            , exchange=@Exchange(
	                value="fanout_exchange" , type="fanout"
	            )
	        )
	    )
	    public void test(User user) {
	        ...
	    }
	}
7.2.1.2 路由模式
A 定制消息发送组件
略
B 发送消息
注释:将消息,发送给,名字叫routing_exchange,路由key为"routing_key的消息队列
java
@Autowired
private RabbitTemplate rabbitTemplate;

public void test() {
    String msg = "msg";
    rabbitTemplate.converAndSend("routing_exchange", "routing_key", msg);
}
C 接收消息(direct)
java
    @RabbitListener(
        bindings=@Queuebinding(
            value=@Queue("routing_queue_email)
            , exchange=@Exchange(
                value="routing_exchange" , type="direct"
            )
            , key = "routing_key"
        )
    )
    // 可指定多个:key={"error_routing_key", "info_routing_key"}
    public void test(User user) {
        ...
    }
7.2.1.3 通配符模式
A 定制消息发送组件
略
B 发送消息
java
@Autowired
private RabbitTemplate rabbitTemplate;

public void test1() {
    String msg = "msg";
    // 将消息,发送给,名字叫topic_exchange,路由key为"info.email"的消息队列
    rabbitTemplate.converAndSend("topic_exchange", "info.email", msg);
}
public void test2() {
    String msg = "msg";
    // 将消息,发送给,名字叫topic_exchange,路由key为"info.ems"的消息队列
    rabbitTemplate.converAndSend("topic_exchange", "info.ems", msg);
}
public void test3() {
    String msg = "msg";
    // 将消息,发送给,名字叫topic_exchange,路由key为"info.email.ems"的消息队列
    rabbitTemplate.converAndSend("topic_exchange", "info.email.ems", msg);
}
C 接收消息(topic)
注释:#匹配多个字符,*匹配一个字符。与其他字符用.连接
java
    @RabbitListener(
        bindings=@Queuebinding(
            value=@Queue("topic_queue_email)
            , exchange=@Exchange(
                value="topic_exchange" , type="topic"
            )
            , key = "info.#.email.#"
        )
    )
    // 接收 key满足前面表达式的消息服务
    public void test(User user) {
        ...
    }
7.3 异步任务
(1) 开启异步任务
Application.java(@EnableAsync)
java
@EnableAsync
@SpringBootApplicaiton
public class XxxApplication {... }
(2) 无返回值异步任务
定义
java
@Service
public class TestAsyncService {
    @Async
    public void test() {
        ...
    }
}
调用
java
@RestController
public class TestAsyncController {
    @Autowired
    private TestAsyncService service;
    @GetMapping("/test")
    public String test() {
        service.test();
        ...	// 与异步方法同时执行
    }
}
(3) 有返回值异步任务
定义
java
@Service
public class TestAsyncService {
    @Async
    public Future<Integer> test1() {
        return new AsyncResult<Integer>(1);
    }
    @Async
    public Future<Integer> test2() {
        return new AsyncResult<Integer>(2);
    }
}
调用
java
@RestController
public class TestAsyncController {
    @Autowired
    private TestAsyncService service;
    @GetMapping("/test")
    public String test() {
        Future<Integer> res1 = service.test1();
        Future<Integer> res2 = service.test2();
        int res = res1.get() + res2.get();				等待计算结果
        ...
    }
}
8 功能实现
8.1 文件上传下载
配置application.properties
java
spring.servlet.multipart.enabled=true			 开启文件上传功能
spring.servlet.multipart.max-file-size=10MB		 单个文件最大10MB(默认1Mb)
spring.servlet.multipart.max-request-size=50MB	 多个文件最大50MB(默认10MB)
8.1.1 JSP文件上传下载
(1) 单文件上传
JSP页面
html
<form name="form1" action="/fileUpload" method="post" enctype="multipart/form-data">
    <input type="file" name="file" /><br/>
    <button>文件上传</button>
</form>
后台
java
    @RequestMapping("/fileUpload")
    public String fileUpload(@RequestParam("file") MultipartFile file
        , HttpServletRequest req) {
        String fileName = file.getOriginalFilename();

        File destFile = new File("D://fileUpload/upload/"+fileName);
        if (!destFile.getParentFile().exists()) {
            destFile.getParentFile().mkdirs();
        }
        try {
            file.transferTo(destFile);
            req.setAttribute("msg", "上传成功");
        } catch (Exception e) {
            req.setAttribute("msg", "上传失败");
        }
        return "upload";
    }
(2) 多文件上传
JSP页面
html
<form name="form1" action="/fileUploads" method="post" enctype="multipart/form-data">
    <input type="file" name="file" /><br/>
    <input type="file" name="file" /><br/>
    <button>文件上传</button>
</form>
后台
java
   @PostMapping("/fileUploads")
    public String upload(HttpServletRequest req) {
        List<MultipartFile> files = ((MultipartHttpServletRequest) req).getFiles("file");
        String msg = "";
        for (MultipartFile file: files) {
            String fileName = file.getOriginalFilename();
            File destFile = new File("D://fileUpload/uploads/"+fileName);
            if (!destFile.getParentFile().exists()) {
                destFile.getParentFile().mkdirs();
            }
            try {
                file.transferTo(destFile);
                msg = msg + fileName + ":上传成功 ";
            } catch (Exception e) {
                msg = msg + fileName + ":上传失败 ";
            }
        }
        req.setAttribute("msg", msg);
        return "uploads";
    }
(3) 文件下载
JPS页面
html
<form name="form1" action="/fileDownload" method="get" >
    <button>文件下载</button>
</form>
后台
java
    @GetMapping("fileDownload")
    public void fileDownload(HttpServletResponse res) throws IOException {
        String filename = "test1.txt";
        File file = new File("D://fileUpload/upload/" + filename);
        FileInputStream fis = new FileInputStream(file);
        res.setContentType("application/force-download");
        res.setHeader("Content-Disposition", "attachment;fileName="+filename);
        OutputStream os = res.getOutputStream();
        byte[] buf = new byte[1024];
        int len=0;
        while((len=fis.read(buf))!=-1) {
            os.write(buf, 0, len);
        }
        fis.close();
        os.close();
    }
8.1.2 Thymeleaf文件上传下载
(1) 文件上传
Thymeleaf
html
<!DOCTYPE html>
<html lang="en" xmlns:th="http://www.thymeleaf.org">
...
<form th:action="@{uploadFile}" method="post" enctyp="multipart/form-data">
    <input type="file" name="fileUpload1" />
    <input type="file" name="fileUpload2" />
    <input type="submit" value="上传" />
</form>
后端
java
@Controller
public class FileController {
    @PostMapping("/uploadFile")
    public String uploadFile(MultipartFilet[] fileUpload, Model model) {
        model.addAttribute("msg", "上传成功");
        for (MultipartFile file : fileUpload) {
            String fileName = file.getOriginalFilename();
            fileName = UUID.randomUUID() + "_" + fileName;
            File filePath = new File("D:/files/");
            if(!filePath.exists()) {
                filePath.mkdirs();
            }
            try {
                file.transferTo(new File("D:/files/" + fileName));
            } catch (Exception e) {
                model.addAttribute("msg", "上传失败");
            }
        }
        return "画面名";
    }
}
(2) 文件下载
Thymeleaf
html
<!DOCTYPE html>
<html lang="en" xmlns:th="http://www.thymeleaf.org">
...
<div>
    <a th:href="@{/download(filename='xxx.jpg')}">下载文件</a>
</div>
后端
XML
<dependency>
    <groupId>commons-io</groupId>
    <artifactId>commons-io</artifactId>
    <version>2.6</version>
</dependency>
java
@Controller
public class FileController {
    @GetMapping("/download")
    public ResponseEntity<byte[]> fileDownloac(Stirng filename) {
        File file = new File("D:/files/" + filename);
        HttpHeaders headers = new HttpHeaders();
        headers.setContentDispositionFormData("attachment", filename); //附件形式下载
        headers.setContentType(MediaType.APPLICATION_OCTET_STREAM);
        try {
            return new ResponseEntity<>(FileUtils.readFileToByteArray(file)
                , headers, HttpStatus.OK);
        } catch (Exception e) {
            return new ResponseEntity<byte[]>(e.getMessage().getBytes()
                , HttpStatus.EXPECTATION_FAILED);
        }
    }
}
8.2 数据校验
略
8.3 邮件发送
8.3.1 默认邮件系统
(1) 添加依赖
XML
<dependency>
    <groupId>org.springframework.boot</groupId>
    <artifactId>spring-boot-starter-mail</artifactId>
</dependency>
(2) 配置application.properties
XML
spring.mail.host=smtp.qq.com
spring.mail.port=587
spring.mail.username=12345678@qq.com
spring.mail.password=abcd1234
spring.mai.default-encoding=UTF-8
spring.mai.properties.mail.smtp.connectiontimeout=5000	 连接超时时间,默认无限(会阻塞线程)
spring.mai.properties.mail.smtp.timeout=5000			 超时时间,默认无限(会阻塞线程)
spring.mai.properties.mail.smtp.writetimeout=5000		 写超时时间,默认无限(会阻塞线程)
(3) 发送纯文本邮件
java
@Service
public class SendEmailService {
    @Autowired
    private JavaMailSenderImpl mailSender;
    @Value("${spring.mail.username}")
    private String from;
    public void send(String to, String subject, String text) {
        SimpleMailMessage msg = new SimpleMailMessage();
        msg.setFrom(from);
        msg.setTo(to);
        msg.setSubject(subject);
        msg.setText(text);
        try {
            mailSender.send(msg);
        } catch (MailException e) {
            ...
        }
    }
}
(4) 发生附件邮件
java
    public void send(String to, String subject, String text, String filePath, String rscId, String rscPath) {	// to=123456@qq.com
        MimeMessage msg = mailSender.createMaimeMessage(); // subject="标题"
        try {	// text=<html>...<body><h1>xxx</h1></body></html>
            MimeMessageHelper helper = new MimeMessageHelper(message, true);
            helper.setFrom(from);
            helper.setTo(to);	// filePath="D:\\xxx.txt"
            helper.setSubject(subject);	// rscId= "xxx"
            helper.setText(text, true); // rscPath="D:\\xxx.jpg"

            FileSystemResource res = new FileSystemResource(new File(rscPath));
            helper.addInline(rscId, res); // 设置静态资源

            FileSystemResource file = new FileSystemResource(new File(filePath));
            String fileName = filePath.substring(filePath.lastIndexOf(File.separator));
            helper.addAttachment(fileName, file); // 设置附件

            mailSender.send(msg);	// 发送邮件
        } catch (MessagingException e) {
            ...
        }
8.4 定时任务
8.4.1 开启定时任务功能
启动类注解(@EnableScheduling)开启定时任务功能
java
@EnableScheduling
@SpringBootApplication
public class XxxApplication {...}
8.4.2 实现定时任务功能
标记定时执行方法**@Scheduled**
java
@Service
public class TestService {
    @Scheduled(fixedRate=60000)
    public void test() {... }

    @Scheduled(cron = "0 * * * * *")
    public void test() {... }
}
8.4.3 Scheduled属性
cron:定制定时任务触发时间(依次为,秒,分,时,日,月,周。注释( 0 * * * * * )代表每到0秒也就是每分钟执行一次
zone:时区,默认是空:本地时区
fixedDelay:程序启动立即执行,上一次任务结束后的指定时间间隔执行。单位毫秒,@Scheduled(fixedDelay=5000)
fixedDelayString:程序启动立即执行,上一次任务结束后的指定时间间隔执行。单位毫秒,@Scheduled(fixedDelayString="5000")
fixedRate:程序启动立即执行,上一次任务开始后的指定时间间隔执行。单位毫秒,@Scheduled(fixedRate=5000)
fixedRateString:程序启动立即执行,上一次任务开始后的指定时间间隔执行。单位毫秒,@Scheduled(fixedRateString="5000")
initialDelay:程序启动延时执行,@Scheduled(initialDelay=1000, fixedRate=5000),延时1秒后执行一次,之后每隔5秒执行。与fixedDelay或fixedRate配合使用
initialDelayString:程序启动延时执行,@Scheduled(initialDelayString="1000", fixedRateString="5000"),延时1秒后执行一次,之后每隔5秒执行
8.4.4 cron属性
java
秒:0-59
分:0-59
时:1-23
日:1-31
月:1-12 或 英文前3字母(不分大小写)
周:0-7(0和7表示周日)或 英文前3字母(不分大小写)
年:可选属性
特殊符号
java
枚举 逗号:	1,3,5	表示1,3,5都可以
区间 减号	1-5	表示1到5
任意 星号	*	表示任意。例如(0 0 12 * * ?)表示每天12点执行
步长 除号	/	表示间隔。例如(0/5 * * * * *) 表示每整秒执行,间隔5秒执行一次
日期冲突	?	指定日时,周标记为?。
最后	L	最后一个单位。例如(0 0 * L * ?)表示每月最后一天,每一小时执行一次
9 工具与部署
9.1 整合junit
9.1.1 添加依赖
XML
spring4.x的依赖
        <dependency>
            <groupId>org.springframework.boot</groupId>
            <artifactId>spring-boot-starter-webmvc-test</artifactId>
            <scope>test</scope>
        </dependency>
spring2.x, 3.x的依赖
        <dependency>
            <groupId>org.springframework.boot</groupId>
            <artifactId>spring-boot-starter-test</artifactId>
            <scope>test</scope>
        </dependency>
9.1.2 测试类
注释:类注解@Runwith(SpringRunner.class)在Springboot2.2后被弃用
注释:旧IDEA引入新项目,或新IDEA引入旧项目都可能导致Junit无法执行
java
@SpringBootTest(classes= Project4Application.class)
public class TestJunit {
    @Autowired
    private Person1 person1;
    @Test
    public void test(){
        System.out.println(person1.toString());
    }
}
9.2 打包发布
9.2.1 打包
(1) 打包jar
IDEA > maven > package // jar文件生成在target目录下,可以通过控制台查看
(2) 打包war
pom.xml 依赖
XML
方式1:
	<packaging>war</packaging>
	<dependency>
	    <groupId>org.springframework.boot</groupId>
	    <artifactId>spring-boot-starter-tomcat</artifactId>
	    <scope>provided</scope>
	</dependency>

方式2
	排除内置tomcat
		<dependency>
		    <groupId>org.springframework.boot</groupId>
		    <artifactId>spring-boot-starter-web</artifactId>
		    <exclusions>
		        <exclusion>
		            <groupId>org.springframework.boot</groupId>
		            <artifactId>spring-boot-starter-tomcat</artifactId>
		        </exclusion>
		    </exclusions>
		</dependency>

	添加servlet-api依赖
		<dependency>
		    <groupId>javax.servlet</groupId>
		    <artifactId>javax.servlet-api</artifactId>
		    <version>3.1.0</version>
		    <scope>provided</scope>
		</dependency>
修改启动类
java
@ServletComponentScan
@SpringBootApplication
public class XxAppplication extends SpringBootServletInitializer {
    @Override
    protected SpringApplicationBuilder configure(SpringApplicationBuilder builder ) {
        return builder.sources(XxApplication.class);
    }
    public static void main(String[] args) {
        SpringApplication.run(XxApplication.class, args);
    }
}
IDEA > maven > package // war文件生成在target目录下,可以通过控制台查看
9.2.2 发布
(1) jar发布:执行命令启动:java -jar 项目名.jar
(2) war发布:将war包放到tomcat的webapps中,启动tomcat
9.3 热部署
(1) 添加依赖
注释:不设置optional属性时只页面变更时重启,添加true后java变更也会重启,但是会清空session
XML
<dependency>
    <groupId>org.springframework.boot</groupId>
    <artifactId>spring-boot-devtools</artifactId>
    <optional>true</optional>
</dependency>
(2) IDEA热部署设置
File > Settings > Build,Execution, Deployment > Compiler > 选【Build project automatically】。
快捷键【Ctrl+Shift+Alt+/】> Registry > 选【compiler.automake.allow.when.app.running】。
9.4 PostMan
下载地址:Download Postman | Get Started for Free
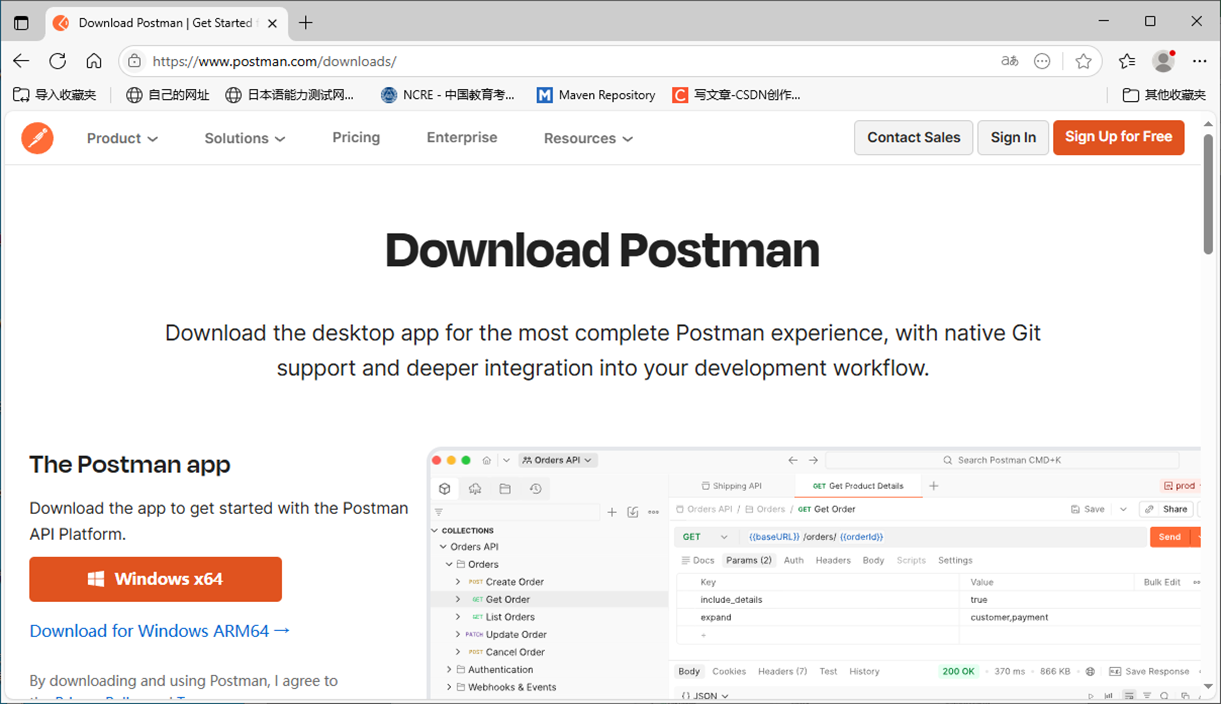
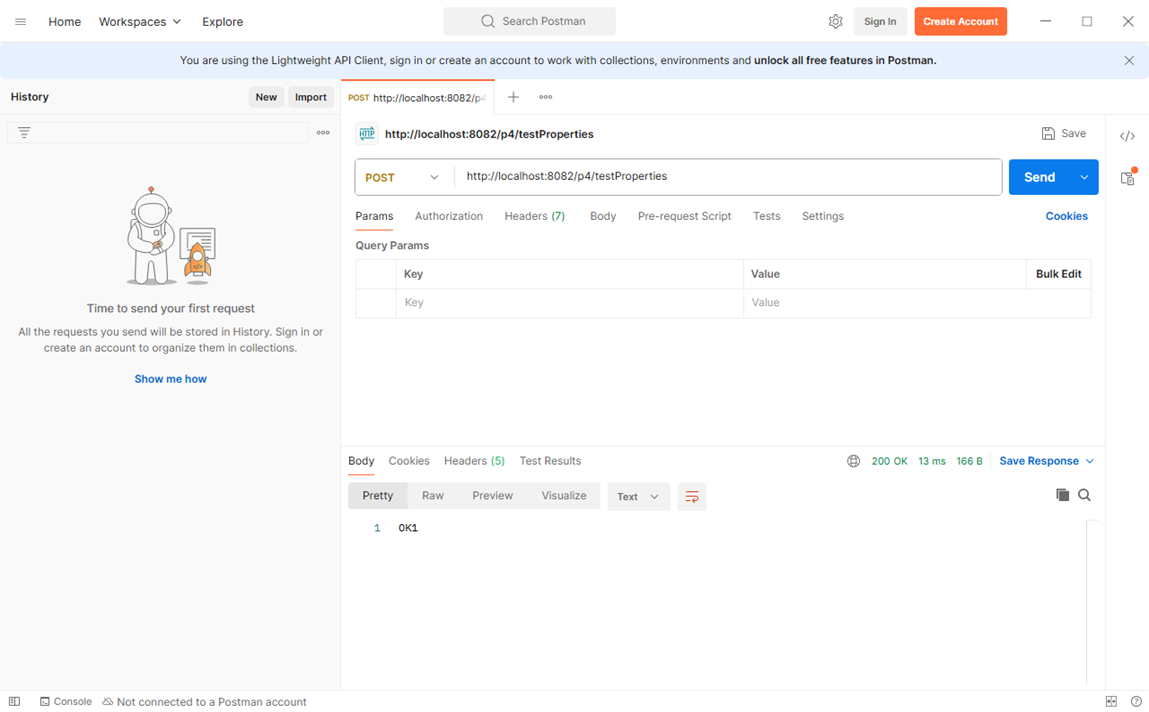
安装:双击执行(自动安装成功并打开)
点击"Continue without signing in"或"跳过登录"
输入URL测试