一、主要内容
在上篇树莓派上传温湿度模拟数据到腾讯云物联网平台的基础上,树莓派接通DHT22传感器,使用真实传感器(温湿度 )数据,上报到腾讯云。
二、实现步骤
(一)树莓派端连接
1.DHT22 引脚定义和接法
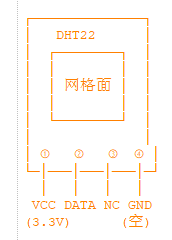
引脚 1(最左):VCC → 接 3.3V 电源
引脚 2(左二):DATA → 接 GPIO 数据引脚(同时上拉到 3.3V)
引脚 3(右二):NC → 悬空,不接任何线
引脚 4(最右):GND → 接 GND 地线
2.树莓派 4B GPIO 40 针脚参考图和接法
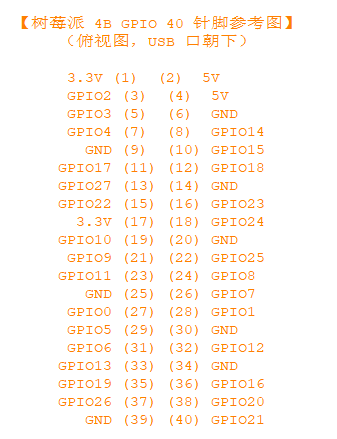
【推荐接线方案(使用 GPIO4 = 物理引脚 7)】
DHT22 引脚 1 (VCC)  ────  树莓派 引脚 1  (3.3V)    红色线
DHT22 引脚 2 (DATA) ────  树莓派 引脚 7  (GPIO4)   黄色线
DHT22 引脚 4 (GND)  ────  树莓派 引脚 9  (GND)     黑色线
DHT22 引脚 3 (NC)   ────  不接(悬空)
【接线要点总结】
1. 供电电压必须是 3.3V,不能接 5V(DHT22 会烧!)
2. 线长建议不超过 20 米(长了信号衰减)
3. 接线完成后,先用 `pinout` 命令确认引脚编号
(二)腾讯物联网平台 --- MQTT 公共模块
文件名称iot_mqtt.py,供 iot_sender.py / iot_dht22_sender.py 等其它文件复用。
功能说明:
- 从 config.json 读取 MQTT 连接参数(支持 JSONC // 注释)
- 创建并配置 MQTT 客户端(paho-mqtt v2.x + HMAC-SHA256 认证)
- 按腾讯云物联网数据模板格式,通过 MQTT 协议上报传感器数据
- 提供优雅退出的信号处理逻辑
- 提供带缓冲的 Timer 类,避免上报间隔内连读传感器
使用方式:
在需要 MQTT 功能的脚本中 import 本模块:
from iot_mqtt import MqttUploader
然后调用:
uploader = MqttUploader() # 自动读取同目录 config.json
uploader.connect() # 连接腾讯云
uploader.report({"temperature": 25.6, "humidity": 62.3}) # 上报数据
uploader.disconnect() # 断开连接
导入依赖库
python
import json          # 解析配置文件、构造上报消息
import time          # 时间相关操作
import signal        # 捕获 Ctrl+C 信号,实现优雅退出
import sys           # sys.exit() 退出程序
import os            # 获取脚本目录路径
import threading     # 用于线程安全的运行标志和保护

# 导入 paho-mqtt 库(MQTT 客户端,需提前 pip install paho-mqtt)
import paho.mqtt.client as mqtt
配置读取函数
读取 JSONC 格式的配置文件,标准 JSON 不支持注释,这里通过逐行过滤掉 // 开头的注释行,再将剩余内容用 json.loads() 解析,实现 JSONC 兼容。
python
def load_config(config_path: str) -> dict:

    with open(config_path, "r", encoding="utf-8") as f:
        lines = f.readlines()

    # 过滤注释行(以 // 开头)和纯空行
    filtered = []
    for line in lines:
        stripped = line.strip()
        if stripped.startswith("//") or stripped == "":
            continue
        filtered.append(line)

    json_str = "".join(filtered)
    return json.loads(json_str)
MQTT 回调函数
MQTT 连接成功/失败的回调(内部函数)
python
def _on_connect(client, userdata, flags, reason_code, properties):
    """
    参数说明:
        client:      MQTT 客户端实例
        userdata:    自定义数据(这里传入 MqttUploader 实例,
                     用于在回调中访问 uploader 的方法/属性)
        flags:       连接标志(paho-mqtt v2.x)
        reason_code: 连接结果码,0 = 成功,非 0 = 失败
        properties:  MQTT 5.0 属性字典
    """
    if reason_code == 0:
        print(f"✅ [连接成功] 已成功连接到腾讯物联网平台!")
    else:
        print(f"❌ [连接失败] 返回码: {reason_code}")
        print(f"   请检查 config.json 中的凭证是否正确")
MQTT 断开连接的回调(内部函数)
python
def _on_disconnect(client, userdata, flags, reason_code, properties):
    """
    参数说明:
        reason_code 为 0 表示主动调用 disconnect() 正常断开,
        非 0 表示网络中断、服务器拒绝等异常断开。
    """
    if reason_code == 0:
        print(f"👋 [正常断开] 已主动断开与腾讯物联网平台的连接")
    else:
        # 连接意外断开时只打印简短提示,不打印误导性错误
        # 重连逻辑由 MqttUploader.report() 中的 _reconnect() 处理
        print(f"⚠️  [连接断开] 返回码: {reason_code},将在下次上报时重连...")
消息发布确认的回调(内部函数)
python
def _on_publish(client, userdata, mid, reason_code, properties):
    """
    参数说明:
        mid:         消息 ID,每条 MQTT 消息的唯一编号
        reason_code: 0 = 服务器确认接收成功
    """
    if reason_code == 0:
        # 成功确认时打印消息 ID,方便追踪
        print(f"   📬 [服务器已确认] 消息ID: {mid}")
MQTT 上传数据类
封装与腾讯物联网平台的连接和数据上报,用法示例:
>>> uploader = MqttUploader()
>>> uploader.connect()
>>> uploader.report({"temperature": 25.6, "humidity": 62.3})
>>> uploader.disconnect()
python
class MqttUploader:
    def __init__(self, config_path: str = None):
        """
        初始化类,加载配置
        参数:
            config_path: config.json 的路径。若为 None,则自动查找
                        脚本所在目录下的 config.json
        """
        # ---- 确定配置文件路径 ----
        if config_path is None:
            # 自动定位:取本模块文件所在目录 + config.json
            script_dir = os.path.dirname(os.path.abspath(__file__))
            config_path = os.path.join(script_dir, "config.json")

        print(f"📂 [配置文件] {config_path}")

        if not os.path.exists(config_path):
            print(f"❌ [错误] 配置文件不存在: {config_path}")
            sys.exit(1)

        # ---- 读取并解析配置 ----
        cfg = load_config(config_path)

        # MQTT 连接参数
        self.broker     = cfg["broker"]             # MQTT 服务器地址
        self.port       = cfg["port"]               # MQTT 端口号 (1883/8883)
        self.client_id  = cfg["client_id"]          # 客户端 ID (产品ID+设备名)
        self.username   = cfg["username"]           # 用户名 (含时间戳)
        self.password   = cfg["password"]           # 密码 (HMAC-SHA256 签名)
        self.product_id = cfg["product_id"]         # 产品 ID
        self.device_name= cfg["device_name"]        # 设备名称
        self.report_interval = cfg["report_interval"]  # 上报间隔(秒)

        # ---- 内部状态 ----
        self.client = None          # paho-mqtt 客户端实例(connect 后赋值)
        self.running = True         # 运行标志,主循环用;Ctrl+C 时设为 False
        self._lock = threading.Lock()  # 线程锁,保护 running 标志的读写

    # ---------- 连接 ----------

    def _create_client(self):
        """
        创建并配置 MQTT 客户端实例(内部方法)

        说明:
            - reconnect_on_failure=False:禁用 paho-mqtt 的自动重连
              腾讯云 IoT 断开连接后需要几秒清理会话,立即重连会被拒绝
              改为在 report() 中检测连接状态,断开了等几秒再手动重连
        """
        self.client = mqtt.Client(
            callback_api_version=mqtt.CallbackAPIVersion.VERSION2,
            client_id=self.client_id,
            reconnect_on_failure=False    # 禁用自动重连,改由 report() 手动控制
        )

        # 设置用户名和密码(腾讯云 HMAC-SHA256 认证方式)
        # 用户名格式:产品ID+设备名称;SDK版本;连接ID;时间戳
        # 密码格式:  HMAC签名;hmacsha256
        self.client.username_pw_set(
            username=self.username,
            password=self.password
        )

        # 注册 MQTT 回调函数
        self.client.on_connect    = _on_connect     # 连接成功/失败时触发
        self.client.on_disconnect = _on_disconnect  # 断开连接时触发
        self.client.on_publish    = _on_publish     # 消息被服务器确认时触发

    def connect(self) -> bool:
        """
        创建 MQTT 客户端并连接到腾讯云物联网平台

        返回:
            bool: True = 连接成功,False = 连接失败

        说明:
            - 使用 paho-mqtt v2.x 的 CallbackAPIVersion.VERSION2
            - 采用 HMAC-SHA256 认证方式(用户名 + 密码)
            - keepalive=60:每 60 秒发送一次心跳 PING 包
            - 连接成功后自动启动后台 network loop 线程
            - 禁用自动重连,改由 report() 检测连接状态并手动重连
        """
        # 创建并配置 MQTT 客户端
        self._create_client()

        # 建立 TCP 连接到 MQTT Broker
        print(f"\n🔗 [连接中] 正在连接 {self.broker}:{self.port} ...")
        try:
            self.client.connect(self.broker, self.port, keepalive=60)
        except Exception as e:
            print(f"❌ [连接错误] {e}")
            print(f"   请检查网络连接和配置参数")
            return False

        # 启动后台 MQTT 网络循环(在独立线程中运行)
        # 主线程负责读取传感器 / 上报数据,后台线程处理 MQTT 协议收发
        self.client.loop_start()

        # 等待一小段时间确保连接建立
        time.sleep(2)
        return True

    # 重连配置
    RECONNECT_MAX_RETRIES = 3     # 最大重试次数
    RECONNECT_RETRY_DELAY = 5     # 重试间隔(秒)

    def _ensure_connected(self) -> bool:
        """
        确保连接可用(每次上报前调用),带重试机制

        返回:
            bool: True = 连接就绪,False = 连接失败

        说明:
            上报间隔较长(如 10 分钟)时,连接必然已超时断开。
            直接建立新连接,失败后重试,保证上报成功。
        """
        for attempt in range(1, self.RECONNECT_MAX_RETRIES + 1):
            # 清理旧客户端(如果存在)
            if self.client is not None:
                try:
                    self.client.loop_stop()
                except Exception:
                    pass
                try:
                    self.client.disconnect()
                except Exception:
                    pass
                self.client = None

            if self.connect():
                return True

            if attempt < self.RECONNECT_MAX_RETRIES:
                print(f"⚠️  [重试] 第 {attempt} 次连接失败,{self.RECONNECT_RETRY_DELAY} 秒后重试...")
                time.sleep(self.RECONNECT_RETRY_DELAY)

        print(f"❌ [连接失败] 已重试 {self.RECONNECT_MAX_RETRIES} 次")
        return False

    # ---------- 断开 ----------

    def disconnect(self):
        """
        断开 MQTT 连接并释放资源

        说明:
            先停止后台网络循环线程,再主动断开与 Broker 的连接。
            确保所有已发送的消息被处理完毕。
        """
        if self.client is None:
            return     # 尚未连接,无需操作

        print(f"🧹 [清理] 正在断开 MQTT 连接...")
        self.client.loop_stop()    # 停止后台网络线程
        self.client.disconnect()   # 主动断开 TCP 连接
        self.client = None

    # ---------- 数据上报 ----------

    def report(self, sensor_data: dict) -> int:
        """
        将传感器数据上报到腾讯物联网平台

        参数:
            sensor_data: 传感器数据字典,例如:
                         {"temperature": 25.63, "humidity": 62.18}

        返回:
            int: MQTT 消息 ID(mid),用于追踪消息是否成功投递

        说明:
            每次上报前直接建立新连接(上报间隔长,连接必然已断开)。

            上报 Topic 格式(腾讯云 IoT Explorer 属性上报):
                $thing/up/property/{product_id}/{device_name}

            消息体格式(腾讯云物联网数据模板标准格式):
                {
                    "method": "report",
                    "params": {
                        "temperature": 25.63,
                        "humidity": 62.18
                    }
                }

            qos=1 表示"至少一次送达",服务器会返回 PUBACK 确认。
            retain=False 表示不保留消息(每次都是最新瞬时值)。
        """
        # ---- 建立连接(每次上报都新建连接) ----
        if not self._ensure_connected():
            print("❌ [上报失败] 无法连接腾讯云,跳过本次上报")
            return -1

        # ---- 构造上报 Topic ----
        topic = f"$thing/up/property/{self.product_id}/{self.device_name}"

        # ---- 构造消息体 ----
        payload = {
            "method": "report",       # 固定字段:上报方法
            "params": sensor_data     # 传感器数据(温度 + 湿度)
        }
        payload_str = json.dumps(payload, ensure_ascii=False)

        # ---- 发布 MQTT 消息 ----
        result = self.client.publish(topic, payload_str, qos=1, retain=False)

        print(f"   📤 [已发送] Topic: {topic}")
        print(f"   📦 [数据内容] {payload_str}")

        return result.mid

    # ---------- 运行控制 ----------

    def set_running(self, value: bool):
        """线程安全地设置运行标志"""
        with self._lock:
            self.running = value

    def is_running(self) -> bool:
        """线程安全地读取运行标志"""
        with self._lock:
            return self.running

    # ---------- 信号处理 ----------

    @staticmethod
    def register_signal_handler(handler_func):
        """
        注册 SIGINT (Ctrl+C) 信号处理器

        参数:
            handler_func: 收到 SIGINT 信号时调用的函数(无参数)
        """
        signal.signal(signal.SIGINT, handler_func)

    # ---------- 打印启动信息 ----------

    def print_startup_info(self, title: str = "温湿度数据上报",
                           extra_lines: list = None):
        """
        打印格式化的启动信息横幅

        参数:
            title:       横幅标题
            extra_lines: 额外的信息行列表,每项为 (标签, 值) 元组
        """
        print(f"{'='*55}")
        print(f" {title}")
        print(f"{'='*55}")
        print(f"  服务器: {self.broker}:{self.port}")
        print(f"  客户端: {self.client_id}")
        print(f"  产品ID: {self.product_id}")
        print(f"  设备名: {self.device_name}")
        print(f"  上报间隔: {self.report_interval} 秒")
        if extra_lines:
            for label, value in extra_lines:
                print(f"  {label}: {value}")
        print(f"{'='*55}")
(三)真实数据上报脚本
文件名称iot_dht22_sender.py,功能说明:
功能说明:
- 通过 GPIO 针脚读取 DHT22(AM2302)传感器真实的温度 & 湿度数据
- 复用 iot_mqtt.py 模块,连接腾讯云物联网平台并上报数据
- 与 iot_sender.py 共用同一份 config.json 配置文件
- 使用 adafruit-circuitpython-dht 库(内核级脉冲计数,精度高)
- 自带容错:单次读取失败自动重试,连续失败后跳过本次上报
- 打印详细的传感器读数日志和上报状态
运行方式:
cd /home/zgp/.openclaw/workspace/tencent_iot
source venv/bin/activate
python iot_dht22_sender.py
退出方式:
按 Ctrl+C 优雅退出
刚开始我通过 GPIO 位拆裂(bit-banging)方式与 DHT22 通信,无需任何额外的 C 扩展库,仅依赖 RPi.GPIO,纯 Python做DHT22 协议解析(无需额外 C 扩展库),但实际测试失败,openclaw检查称脉冲控制的精度不够导致无法正确读取数据,所以还得使用 adafruit-circuitpython-dht 库。
python
# ==================== 导入依赖库 ====================
import time # 延时、计时
import sys # 退出程序
import os # 路径操作
# ---- 导入本项目的 MQTT 公共模块 ----
# iot_mqtt.py 封装了配置读取、MQTT 连接、数据上报等全部逻辑
from iot_mqtt import MqttUploader
# ---- 导入 Adafruit DHT 库 ----
# adafruit-circuitpython-dht 使用内核级脉冲计数(pulseio),精度高,稳定可靠
try:
import board
import adafruit_dht
DHT_LIB_AVAILABLE = True
except ImportError:
DHT_LIB_AVAILABLE = False
print("⚠️ [警告] adafruit-circuitpython-dht 未安装,将无法读取传感器数据")
print(" 安装方法: pip install adafruit-circuitpython-dht")
# ==================== DHT22 传感器读取类 ====================
class DHT22Reader:
"""
DHT22(AM2302)温湿度传感器驱动 --- 使用 Adafruit CircuitPython 库
底层通过内核级脉冲计数(pulseio)与 DHT22 通信,
精度远高于纯 Python bit-banging,在树莓派 Linux 上稳定可靠。
使用示例:
>>> reader = DHT22Reader(pin=4) # GPIO4 (BCM 编号)
>>> data = reader.read() # 读取一次
>>> print(data) # {"temperature": 25.6, "humidity": 62.3}
"""
# BCM 编号 → adafruit.board 属性名映射
BCM_TO_BOARD_PIN = {
2: board.D2, 3: board.D3, 4: board.D4,
14: board.D14, 15: board.D15,
17: board.D17, 18: board.D18, 27: board.D27,
22: board.D22, 23: board.D23, 24: board.D24,
10: board.D10, 9: board.D9, 25: board.D25,
11: board.D11, 8: board.D8, 7: board.D7,
0: board.D0, 1: board.D1, 5: board.D5,
6: board.D6, 12: board.D12, 13: board.D13,
19: board.D19, 16: board.D16, 26: board.D26,
20: board.D20, 21: board.D21,
}
# 读取配置
MAX_RETRIES = 3 # 单次读取失败时的最大重试次数
RETRY_DELAY = 2.0 # 两次重试之间的等待时间(秒)
def __init__(self, pin: int):
"""
初始化 DHT22 传感器读取器
参数:
pin: 数据线连接的 GPIO 引脚编号(BCM 编号)
例如:pin=4 表示 GPIO4,对应物理引脚 7
"""
if not DHT_LIB_AVAILABLE:
raise RuntimeError(
"adafruit-circuitpython-dht 不可用,无法初始化 DHT22 传感器"
)
self.pin = pin # GPIO BCM 引脚编号
self._last_read = None # 缓存最近一次成功读取的数据
self._consecutive_failures = 0 # 连续失败计数(用于日志)
# 将 BCM 编号映射为 board 属性
board_pin = self.BCM_TO_BOARD_PIN.get(pin)
if board_pin is None:
raise ValueError(f"不支持的 BCM 引脚 {pin},可选: {sorted(self.BCM_TO_BOARD_PIN.keys())}")
# 创建 DHT22 传感器实例(use_pulseio=True = 内核级高精度脉冲计数)
self._sensor = adafruit_dht.DHT22(board_pin, use_pulseio=True)
def read(self) -> dict:
"""
从 DHT22 传感器读取一次温湿度数据
返回:
dict: 成功时返回 {"temperature": 25.6, "humidity": 62.3}
失败时返回 None
"""
if not DHT_LIB_AVAILABLE:
return None
try:
temperature = self._sensor.temperature
humidity = self._sensor.humidity
# Adafruit 库可能返回 None
if temperature is None or humidity is None:
return None
# 合理性检查:温度 -40~80℃,湿度 0~100%
if not (-40.0 <= temperature <= 80.0):
print(f" ⚠️ [异常] 温度值不合理: {temperature}℃")
return None
if not (0.0 <= humidity <= 100.0):
print(f" ⚠️ [异常] 湿度值不合理: {humidity}%")
return None
result = {
"temperature": round(temperature, 2),
"humidity": round(humidity, 2)
}
self._last_read = result
self._consecutive_failures = 0
return result
except RuntimeError as e:
# Adafruit 库读取失败时抛出 RuntimeError
# 常见原因:DHT22 未响应、校验失败、数据不完整
print(f" ⚠️ [传感器异常] {e}")
return None
except Exception as e:
print(f" ⚠️ [传感器异常] {e}")
return None
def read_with_retry(self) -> dict:
"""
带重试机制的传感器读取
返回:
dict: 成功时返回温湿度数据,全部重试失败返回 None
说明:
最多重试 MAX_RETRIES 次(默认 3 次),
每次失败后等待 RETRY_DELAY 秒(默认 2 秒)再重试。
所有重试失败后,连续失败计数 +1。
"""
for attempt in range(1, self.MAX_RETRIES + 1):
result = self.read()
if result is not None:
return result
if attempt < self.MAX_RETRIES:
print(f" 🔄 [重试] 第 {attempt} 次失败,{self.RETRY_DELAY} 秒后重试...")
time.sleep(self.RETRY_DELAY)
self._consecutive_failures += 1
print(f" ❌ [读取失败] 已连续失败 {self._consecutive_failures} 次")
return None
def cleanup(self):
"""
清理传感器资源
说明:
程序退出时必须调用此方法,释放底层 pulseio 资源。
否则下次运行时可能因资源被占用而报错。
"""
try:
self._sensor.exit()
except Exception:
pass
# ==================== 主函数 ====================
def main():
"""
程序主入口
执行流程:
1. 初始化 DHT22 传感器读取器
2. 加载 MQTT 配置(复用 iot_mqtt.py)
3. 连接腾讯云物联网平台
4. 主循环:定时读取传感器 → 上报数据
5. 退出时清理 GPIO 和 MQTT 资源
"""
# ==================== 1. 初始化 DHT22 传感器 ====================
# ---- 传感器配置 ----
# DHT22_PIN: 数据线连接的 GPIO BCM 编号
# 默认 GPIO4 → 物理引脚 7
# 如需使用其他引脚,修改此处的数字即可
# 常用可选引脚:GPIO4(7), GPIO17(11), GPIO27(13), GPIO22(15)
DHT22_PIN = 4
print(f"\n{'='*55}")
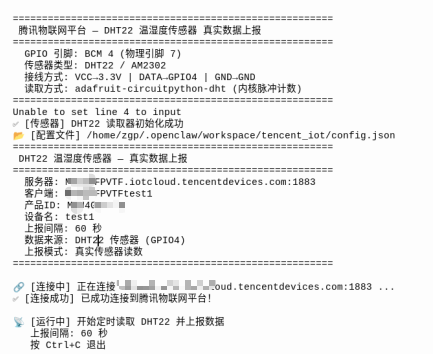
print(f" 腾讯物联网平台 --- DHT22 温湿度传感器 真实数据上报")
print(f"{'='*55}")
print(f" GPIO 引脚: BCM {DHT22_PIN} (物理引脚 {_bcm_to_physical(DHT22_PIN)})")
print(f" 传感器类型: DHT22 / AM2302")
print(f" 接线方式: VCC→3.3V | DATA→GPIO{DHT22_PIN} | GND→GND")
print(f" 读取方式: adafruit-circuitpython-dht (内核脉冲计数)")
print(f"{'='*55}")
# 创建传感器读取器实例
try:
dht22 = DHT22Reader(pin=DHT22_PIN)
print(f"✅ [传感器] DHT22 读取器初始化成功")
except RuntimeError as e:
print(f"❌ [传感器] 初始化失败: {e}")
print(f" 请确认:")
print(f" 1. 在树莓派上运行本脚本")
print(f" 2. DHT22 接线正确")
print(f" 3. 必要时运行: sudo python iot_dht22_sender.py")
sys.exit(1)
# ==================== 2. 加载 MQTT 配置 & 连接 ====================
# 创建 MQTT 上传器(自动读取同目录下的 config.json)
uploader = MqttUploader()
# 打印启动信息
uploader.print_startup_info(
title="DHT22 温湿度传感器 --- 真实数据上报",
extra_lines=[
("数据来源", "DHT22 传感器 (GPIO{})".format(DHT22_PIN)),
("上报模式", "真实传感器读数"),
]
)
# 连接腾讯云物联网平台
if not uploader.connect():
print(f"❌ [错误] 无法连接腾讯云,请检查网络和配置")
dht22.cleanup()
sys.exit(1)
# ==================== 3. 注册信号处理 ====================
def signal_handler(sig, frame):
"""
Ctrl+C 信号处理函数
不直接退出,而是将 running 标志设为 False,
让主循环自然结束,确保资源清理代码被执行。
"""
print(f"\n🛑 [退出信号] 检测到 Ctrl+C,正在优雅退出...")
uploader.set_running(False)
MqttUploader.register_signal_handler(signal_handler)
# ==================== 4. 主循环 ====================
print(f"\n📡 [运行中] 开始定时读取 DHT22 并上报数据")
print(f" 上报间隔: {uploader.report_interval} 秒")
print(f" 按 Ctrl+C 退出\n")
report_count = 0 # 成功上报次数
skip_count = 0 # 因传感器读取失败而跳过的次数
last_successful_read = None # 最近一次成功读取的数据
while uploader.is_running():
# ---- 读取 DHT22 传感器数据 ----
print(f"--- 第 {report_count + 1} 次读取 ---")
sensor_data = dht22.read_with_retry()
if sensor_data is None:
# 传感器读取失败:跳过本次上报,等待下一轮
skip_count += 1
print(f" ⏭️ [跳过] 本次读数失败,跳过上报(累计跳过 {skip_count} 次)")
else:
# 读取成功:保存数据,上报到腾讯云
last_successful_read = sensor_data
temp = sensor_data["temperature"]
humi = sensor_data["humidity"]
print(f" 🌡️ [传感器读数] 温度: {temp}℃ | 湿度: {humi}%")
# 上报到腾讯云物联网平台
report_count += 1
uploader.report(sensor_data)
# ---- 等待下一次上报 ----
# 使用小步 sleep(每次 0.5 秒),及时响应 Ctrl+C
waited = 0
while uploader.is_running() and waited < uploader.report_interval:
time.sleep(0.5)
waited += 0.5
# ==================== 5. 清理退出 ====================
print(f"\n{'='*55}")
print(f" 📊 运行统计")
print(f"{'='*55}")
print(f" 成功上报: {report_count} 次")
print(f" 读取失败跳过: {skip_count} 次")
if last_successful_read:
print(f" 最后读数: {last_successful_read['temperature']}℃ / "
f"{last_successful_read['humidity']}%")
print(f"{'='*55}")
# 清理传感器
dht22.cleanup()
print(f"🧹 [传感器] 已释放 DHT22 资源 (BCM {DHT22_PIN})")
# 断开 MQTT
uploader.disconnect()
print(f"✨ [完成] 程序已安全退出,再见!\n")
# ==================== 辅助函数 ====================
def _bcm_to_physical(bcm_pin: int) -> str:
"""
将 BCM GPIO 编号转换为物理引脚编号(用于显示,方便接线)
参数:
bcm_pin: GPIO BCM 编号(如 4、17、27)
返回:
str: 物理引脚编号字符串,如 "7";查不到则返回 "?"+BCM编号
说明:
树莓派 40 针 GPIO 引脚映射表。
只包含常用的 GPIO 引脚,不包含电源和 GND。
"""
# 树莓派 4B 40 针 GPIO 映射表:{BCM编号: 物理引脚编号}
BCM_TO_PHYSICAL = {
2: 3, 3: 5, 4: 7, 14: 8, 15: 10,
17: 11, 18: 12, 27: 13, 22: 15, 23: 16,
24: 18, 10: 19, 9: 21, 25: 22, 11: 23,
8: 24, 7: 26, 0: 27, 1: 28, 5: 29,
6: 31, 12: 32, 13: 33, 19: 35, 16: 36,
26: 37, 20: 38, 21: 40,
}
phys = BCM_TO_PHYSICAL.get(bcm_pin)
if phys is not None:
return str(phys)
return f"?{bcm_pin}"
# ==================== 程序入口 ====================
if __name__ == "__main__":
main()