一 概述
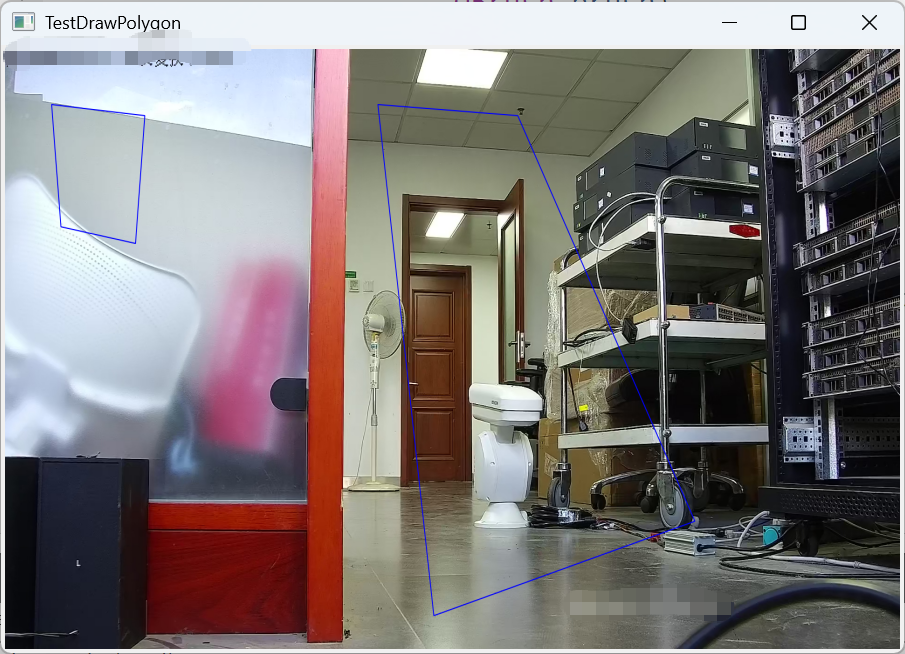
本文章实现了如何在jpeg图片上画多边形。现实中的应用场景有:1.在安防监控中,IPC摄像头可以设置多个防区,用于监测指定区域的状况,防区一般都是一个闭合的多边形;2.在物体监测时,识别到指定物体时,会使用矩形将物体框起来。
二 代码实现
cpp
#include "widget.h"
#define WIDTH 1920
#define HEIGHT 1080

void DrawPolygonOnImage(QImage &img,
                        const QRect rect,
                        const QPolygon &polygon,
                        QPen pen,
                        QBrush brush)
{
    // 空图/空多边形直接返回
    if (img.isNull() || polygon.isEmpty())
        return;

    QPainter painter(&img);
    // 抗锯齿优化
    painter.setRenderHint(QPainter::Antialiasing, true);

    // 设置画笔与填充
    painter.setPen(pen);
    painter.setBrush(brush);

    // 可选:限制绘制范围在rect内(坐标裁剪)
    painter.setClipRect(rect);

    // 绘制闭合多边形
    painter.drawPolygon(polygon);

    painter.end();
}
Widget::Widget(QWidget *parent)
    : QWidget(parent)
{
    setMinimumSize(800,600);
#if 0
    m_pImage = new QImage(WIDTH,HEIGHT,QImage::Format_RGB888);
    m_pImage->fill(Qt::lightGray);
#else
    m_pImage = new QImage("D:/Test/TestDrawPolygon/1.jpeg");
#endif
    QRect rect = QRect(0,0,WIDTH,HEIGHT);
    QPolygon poly;
    poly << QPoint(100, 100)
         << QPoint(300, 120)
         << QPoint(280, 350)
         << QPoint(120, 320);
    DrawPolygonOnImage(*m_pImage,
                       rect,
                       poly,
                       QPen(Qt::blue, 2),
                       QBrush(QColor(255,255,255, 0)));
    poly.clear();
    poly << QPoint(800, 100)
         << QPoint(1100, 120)
         << QPoint(1480, 850)
         << QPoint(920, 1020);
    DrawPolygonOnImage(*m_pImage,
                       rect,
                       poly,
                       QPen(Qt::blue, 2),
                       QBrush(QColor(255,255,255, 0)));
}

Widget::~Widget()
{

}

void Widget::drawImg(QPainter *painter, QImage &img)
{
    painter->save();
    int offset = borderWidth * 1 + 0;
    if (fillImage) {

        QRect rect(4,4,width()-8,height()-8);
        painter->drawImage(rect,img);
    } else {
        //按照比例自动居中绘制
        m_scaleImage = img.scaled(width() - 8, height() - 8, Qt::IgnoreAspectRatio,Qt::SmoothTransformation);
#if 0
        int pixX = rect().center().x() - img.width() / 2;
        int pixY = rect().center().y() - img.height() / 2;
        QPoint point(pixX, pixY);
#endif
        QRect rect(4,4,width() - 8, height() - 8);
        painter->drawImage(rect, m_scaleImage);
    }
    painter->restore();
}

void Widget::paintEvent(QPaintEvent *event)
{
    QPainterPath path;
    path.setFillRule(Qt::OddEvenFill);
    path.addRect(0, 0, this->width(), this->height());

    //使用全局的 painter brush
    painter.begin(this);
    painter.setRenderHints(QPainter::Antialiasing);

    painter.fillPath(path,brush);
    if(m_pImage){
        drawImg(&painter,*m_pImage);
    }
    painter.end();
}
三 关键函数
cpp
void DrawPolygonOnImage(QImage &img,
                        const QRect rect,
                        const QPolygon &polygon,
                        QPen pen,
                        QBrush brush)
{
    // 空图/空多边形直接返回
    if (img.isNull() || polygon.isEmpty())
        return;

    QPainter painter(&img);
    // 抗锯齿优化
    painter.setRenderHint(QPainter::Antialiasing, true);

    // 设置画笔与填充
    painter.setPen(pen);
    painter.setBrush(brush);

    // 可选:限制绘制范围在rect内(坐标裁剪)
    painter.setClipRect(rect);

    // 绘制闭合多边形
    painter.drawPolygon(polygon);

    painter.end();
}
四 运行效果