一. launch简介
回忆下之前博客中所构造的文件
ROS工作空间、功能包、节点创建_创建自己的功能包与节点-CSDN博客
ROS2自定义接口消息、参数服务案例_ros2自定义通信借口-CSDN博客
ROS2质量服务策略Qos & 时间相关API-CSDN博客
编译后,想要启动包里的含有节点的可执行程序,则要命令行一条条执行,比如执行如下几个:
ros2 run pythonpackagedemo1 topic_demo1_publisher_side
ros2 run pythonpackagedemo1 topic_demo1_subscriber_side
ros2 run pythonpackagedemo1 pythonexecute_onenode 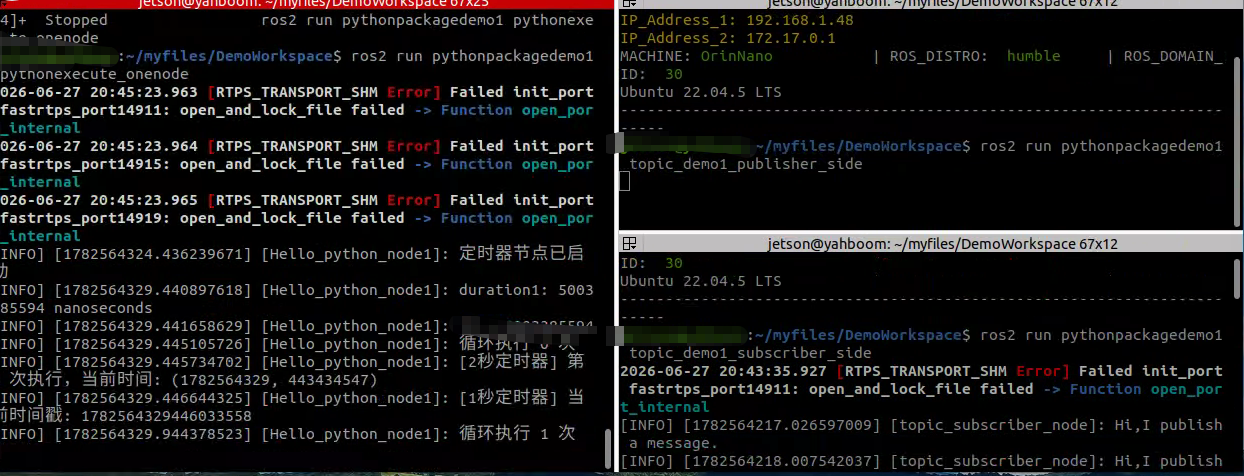
但这样太麻烦了,我们需要寻找一种批量打开各程序的方法,那就是Launch启动文件,它是ROS系统中多节点启动与配置的一种脚本。
ROS2 Launch 用于批量启动节点、设置参数、配置命名空间、加载硬件驱动,替代多条独立ros2 run命令,支持多种文件格式:
Python launch 文件(最灵活,可写逻辑判断)
XML launch 文件(简洁,适合简单启动流程)
YAML launch 文件(轻量化,仅基础启动)
二. launch文件编写(py文件)
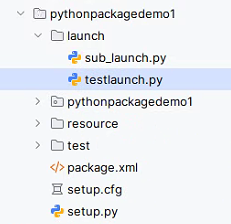
拿pythonpackagedemo1包做实验,在该包下新建一个文件夹launch, 然后在launch文件夹内新建两个py文件testlaunch.py和sub_launch.py。testlaunch.py文件里会嵌套启用另一个sub_launch.py。
testlaunch.py文件中代码如下:
python
from launch import LaunchDescription
from launch_ros.actions import Node
import os
from launch.actions import IncludeLaunchDescription
from launch.launch_description_sources import PythonLaunchDescriptionSource
from ament_index_python.packages import get_package_share_directory
from launch.actions import DeclareLaunchArgument
from launch.substitutions import LaunchConfiguration

def generate_launch_description():
###################################   本launch文件运行程序所用参数       ##############################################################################################

    # 1. 先声明本launch参数
    arg_name = DeclareLaunchArgument("arg_name", default_value="to_onenode")
    # 2. 创建本launch参数占位对象
    name = LaunchConfiguration("arg_name")

##################################    子launch文件运行程序所用参数         ##################################################################################################

    # 先声明子launch参数
    arg_publish_name = DeclareLaunchArgument("arg_publish_name", default_value="to_publish_node", description="")
    arg_subscribe_name = DeclareLaunchArgument("arg_subscribe_name", default_value="to_subscribe_node",  description="")

    # 创建子launch参数占位对象
    publish_name = LaunchConfiguration("arg_publish_name")      #由于后面调子节点时要用,这边要加载
    subscribe_name = LaunchConfiguration("arg_subscribe_name")


   #嵌套子launch,并把参数传递给子launch ==========
    child_launch = IncludeLaunchDescription(PythonLaunchDescriptionSource(
        [os.path.join(get_package_share_directory('pythonpackagedemo1'), 'launch'),
         '/sub_launch.py']),
        # 将当前launch的参数转发给子launch
        launch_arguments={
            "arg_publish_name": publish_name,     #使用时用占位符名字
            "arg_subscribe_name": subscribe_name  #使用时用占位符名字
        }.items()
    )
######################################################################################################################################################################

    #当前launch加载的可执行程序
    node1 = Node(
        package='pythonpackagedemo1',   # 包名
        executable='pythonexecute_onenode',  # 可执行程序文件名
        name = "tmpnodename",  # 节点重命名
        output='screen',   # 日志打印到终端
        # 把参数作为ROS参数传入节点内部
        parameters=[
            {"arg_name": name},
        ],
    )

    return LaunchDescription([
                              arg_name,                         #调用程序时要传参
                              arg_publish_name,
                              arg_subscribe_name,
                              node1,
                              child_launch
                              ])
sub_launch.py中代码如下:
python
from launch import LaunchDescription
from launch_ros.actions import Node
from launch.actions import DeclareLaunchArgument
from launch.substitutions import LaunchConfiguration

#子launch文件

def generate_launch_description():
    # 接收父launch传递的两个参数
    # 1. 先声明参数
    arg_publish_name = DeclareLaunchArgument("arg_publish_name", default_value="to_publish_node", description="")
    arg_subscribe_name = DeclareLaunchArgument("arg_subscribe_name", default_value="to_subscribe_node",  description="")

    # 2. 创建参数占位对象
    publish_name = LaunchConfiguration("arg_publish_name")
    subscribe_name = LaunchConfiguration("arg_subscribe_name")

    #接下来使用,第1可以赋值给节点名称、命名空间
    # Node(
    #     name=publish_name,
    #     namespace=subscribe_name
    # )

    #接下来使用,第2拼接动态话题名(不能用 f-string,必须列表拼接)
    # remappings = [
    #     ["/topic_demo1", "/robot_", topic_suffix]

    # 接下来使用,第3作为 ROS 参数传入节点内部
    # parameters = [
    #     {"robot_name": robot_name},
    #     {"suffix": topic_suffix}
    # ]
    #

    # 接下来使用,第4传递给子 launch 文件
    # IncludeLaunchDescription(
    #     PythonLaunchDescriptionSource(sub_launch_path),
    #     launch_arguments={
    #         "robot_name": robot_name
    #     }.items()
    # )

    nod_pub = Node(
        package='pythonpackagedemo1',   # 包名
        executable='topic_demo1_publisher_side',  # 可执行程序文件名
        output='screen',   # 日志打印到终端
        parameters=[{"arg_publish_name": publish_name}], #使用时用占位符名字
        remappings=[("/topic_demo1", "/topic_changed")]
    )

    nod_sub = Node(
        package='pythonpackagedemo1',  # 包名
        executable='topic_demo1_subscriber_side',  # 可执行程序文件名
        output='screen',  # 日志打印到终端
        parameters=[{"arg_subscribe_name": subscribe_name}], #使用时用占位符名字
        remappings=[("/topic_demo1", "/topic_changed")]
    )

    return LaunchDescription([
                              arg_publish_name,     #调用应用程序,传参
                              arg_subscribe_name,
                              nod_pub,
                              nod_sub
                              ])
launch文件中的一些格式等要求,在上面的代码中都有注释说明
我们再去修改下启动的py文件中的代码
第1个是pythonexecute1.py, 增加了打印launch方式传进来的参数:
python
import rclpy                                     # ROS2 Python接口库
from rclpy.node import Node                      # ROS2 节点类
import time
import threading
from rclpy.time import Time
from rclpy.duration import Duration

"""
创建一个py_hello节点
"""
class pyHelloNode1(Node):
    def __init__(self, name):
        super().__init__(name)

        # 声明需要读取的参数(必须声明,否则读不到)
        # 参数名 和 launch 里的 key 保持一致,第二个是默认值
        self.declare_parameter("arg_name", "hi,pub")
        # 读取参数值
        # 字符串参数 .string_value
        show = self.get_parameter("arg_name").value

        #show = self.get_parameter("arg_name").get_parameter_value().string_value
        # # 整数
        # int_val = self.get_parameter("num").get_parameter_value().integer_value
        # # 浮点数
        # float_val = self.get_parameter("rate").get_parameter_value().double_value
        # # 布尔
        # bool_val = self.get_parameter("enable").get_parameter_value().bool_value

        # 打印验证
        self.get_logger().info(f"读取到launch传入参数arg_name: {show}")

        # 计数器,用于演示定时器执行次数
        self.counter = 0

        # 创建定时器:每1秒执行一次callback函数
        self.timer = self.create_timer(2.0, self.timer_callback)

        # 创建一个更快的定时器:每2秒执行一次
        self.fast_timer = self.create_timer(1.0, self.fast_timer_callback)

        self.get_logger().info("定时器节点已启动")

    def get_time(self):
       return self.get_clock().now()

    def timer_callback(self):
        """2秒定时器回调函数"""
        self.counter += 1
        current_time = self.get_clock().now()

        # 打印当前时间和计数器值
        self.get_logger().info(
            f"[2秒定时器] 第 {self.counter} 次执行,当前时间: {current_time.seconds_nanoseconds()}")

    def fast_timer_callback(self):
        """1秒定时器回调函数"""
        # 打印当前时间戳(纳秒)
        self.get_logger().info(
            f"[1秒定时器] 当前时间戳: {self.get_clock().now().nanoseconds}")

        # ROS2节点父类初始化
        # while rclpy.ok():                          # ROS2系统是否正常运行
        #     self.get_logger().info("Hello python node1")  # ROS2日志输出
        #     time.sleep(0.5)                        # 休眠控制循环时间

    def run_loop(self):
        # 使用节点的create_rate()创建2Hz的Rate
        rate = self.create_rate(2)

        count = 0
        try:
            while rclpy.ok():
                self.get_logger().info(f"循环执行 {count} 次")
                count += 1
                rate.sleep()  # 休眠到下一个周期(0.5秒)
        except KeyboardInterrupt:
            self.get_logger().info("循环被中断")

def main(args=None):
    # ROS2节点主入口main函数
    rclpy.init(args=args)                          # ROS2 Python接口初始化
    node = pyHelloNode1("Hello_python_node1")            # 创建ROS2节点对象并进行初始化

    # time类的使用方法,创建'时间点、时刻'
    time1_demo = Time(seconds=1)
    current_time = node.get_time()
    time.sleep(5)
    duration1 =  node.get_time() - current_time
    t2 = time1_demo  + duration1

    node.get_logger().info(f'duration1: {duration1}')
    node.get_logger().info("t2 = %d" % t2.nanoseconds)

    # 创建线程运行循环(避免阻塞主线程)
    loop_thread = threading.Thread(target=node.run_loop)
    loop_thread.start()

    # 主线程执行spin,维持ROS 2节点运行
    try:
        rclpy.spin(node)
    except KeyboardInterrupt:
        pass
    finally:
        loop_thread.join()  # 等待线程结束
        node.destroy_node()
        rclpy.shutdown()
第2个是topic_demo1_publisher_side.py,里面的代码如下:
python
# 导入rclpy库
import rclpy
from rclpy.node import Node
# 导入String字符串消息
from std_msgs.msg import String
# 导入QoS相关类
from rclpy.qos import QoSProfile, QoSReliabilityPolicy, QoSHistoryPolicy

# 创建一个继承于Node基类的子类
class Topic_Pub(Node):
    def __init__(self, name):
        super().__init__(name)
        # 声明需要读取的参数(必须声明,否则读不到)
        # 参数名 和 launch 里的 key 保持一致,第二个是默认值
        self.declare_parameter("arg_publish_name", "hi,pub")
        # 读取参数值
        # 字符串参数 .string_value
        show = self.get_parameter("arg_publish_name").value
        # 打印验证
        self.get_logger().info(f"读取到launch传入参数 rg_publish_name: {show}")


        # 1. 配置QoS策略:可靠传输,保留最后1条历史数据
        self.qos_profile = QoSProfile(
            reliability=QoSReliabilityPolicy.BEST_EFFORT,  # 可靠传输(重传丢失数据)
            history=QoSHistoryPolicy.KEEP_LAST,  # 保留最后N条数据
            depth=1  # 保留1条历史数据
        )
        # 参数含义: 消息类型, "话题名", 消息队列长度
        self.pub = self.create_publisher(String, "/topic_demo1", self.qos_profile)

        #self.create_timer(1.0, self.timer_callback)
        #意思:每隔1秒执行一次timer_callback
        self.timer = self.create_timer(1, self.pub_msg)

    def pub_msg(self):
        msg = String()  # 创建一个String类型的变量msg
        msg.data = "Hi,I publish a message."  # 给msg里边的data赋值
        self.pub.publish(msg)  # 发布话题数据


# 主函数
def main(args=None):
    rclpy.init()  # 初始化
    pub_demo = Topic_Pub("topic_publisher_node")
    rclpy.spin(pub_demo)
    pub_demo.destroy_node()  # 销毁节点对象
    rclpy.shutdown()  # 关闭ROS2 Python接口
第3个是topic_demo1_subscriber_side.py文件
python
#导入相关的库
import rclpy
from rclpy.node import Node
from std_msgs.msg import String
from rclpy.qos import QoSProfile, QoSReliabilityPolicy, QoSHistoryPolicy

class Topic_Sub(Node):
    def __init__(self,name):
        super().__init__(name)
        #self.create_subscription(
        #    msg_type,  # 1. 消息类型(必须)
        #    topic,  # 2. 话题名称(必须)
        #    callback,  # 3. 收到消息后的回调函数(必须)
        #    qos_profile,  # 4. 队列长度(必须)
        #    callback_group=None,  # 5. 回调组(可选)
        #)

        # 4个必须参数(你写代码必写)
        # msg_type 消息类型,如String、Image、LaserScan
        # topic 话题名字字符串,如"my_topic"
        # callback 收到消息后自动调用的函数
        # qos_profile队列长度,一般写10

        # 声明需要读取的参数(必须声明,否则读不到)
        # 参数名 和 launch 里的 key 保持一致,第二个是默认值
        self.declare_parameter("arg_subscribe_name", "hi,sub")
        # 绑定参数变更回调函数
        self.add_on_set_parameters_callback(self.param_callback)

        # 读取参数值
        # 字符串参数 .string_value
        show = self.get_parameter("arg_subscribe_name").value
        # 打印验证
        self.get_logger().info(f"读取到launch传入参数 rg_publish_name: {show}")

        # 1. 配置与发布者兼容的QoS策略
        self.qos_profile = QoSProfile(
            reliability=QoSReliabilityPolicy.BEST_EFFORT,
            history=QoSHistoryPolicy.KEEP_LAST,
            depth=1
        )
        self.sub = self.create_subscription(String,"/topic_demo1",self.sub_callback,self.qos_profile)

    def param_callback(self, params):
        for param in params:
            if param.name == "arg_subscribe_name":
                self.get_logger().info(f"参数更新:{param.string_value}")
        return rclpy.parameter.ParameterSetResult.SUCCESS

    def sub_callback(self,msg):
        # print(msg.data,flush=True)
        self.get_logger().info(msg.data)

def main(args=None):
    rclpy.init()
    sub_demo = Topic_Sub("topic_subscriber_node") # 创建对象并进行初始化
    rclpy.spin(sub_demo)
    sub_demo.destroy_node()  #销毁节点对象
    rclpy.shutdown()         #关闭ROS2 Python接口
三. 2种运行方式
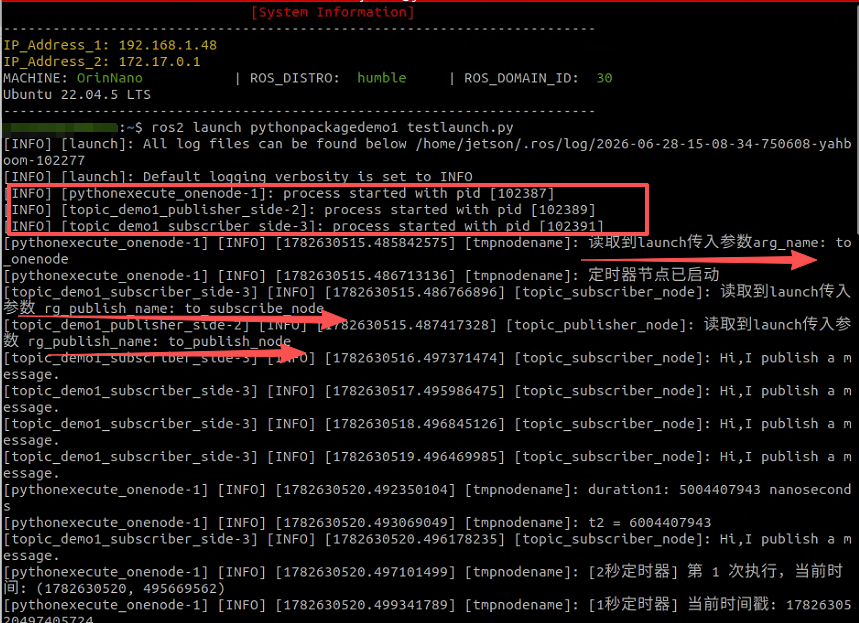
1. 使用默认参数启动
由于launch.py文件中,都有写默认参数,故可直接运行
python
ros2 launch pythonpackagedemo1 testlaunch.py可看到三个可执行程序运行起来了,同时如下默认参数传进来了
2. 命令行自定义传参
python
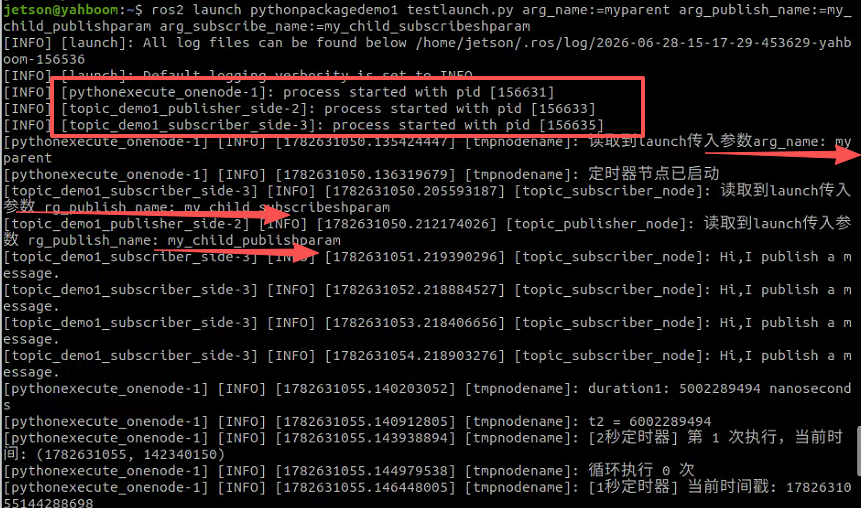
ros2 launch pythonpackagedemo1 testlaunch.py arg_name:=myparent arg_publish_name:=my_child_publishparam arg_subscribe_name:=my_child_subscribeshparam可看到三个可执行程序运行起来了,同时命令行设置的参数传进来了
**注1:**查看所有可传入参数说明,可使用如下语句
python
ros2 launch pythonpackagedemo1 testlaunch.py --show-args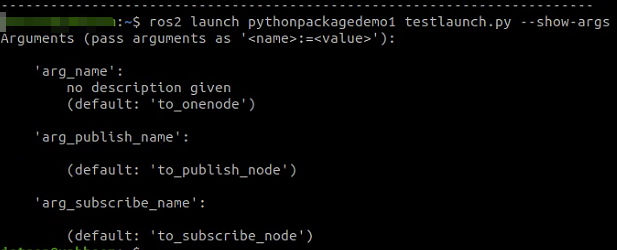
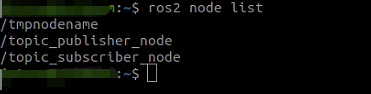
注2: 确认节点是否重命名了**(** 在testlaunch.py中对节点名字进行了修改,见代码注释,本来是Hello_python_node1**)**
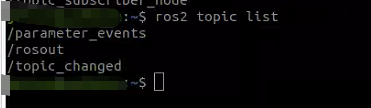
注3: 确认话题名字是否重映射了**(** 在子sub_launch.py中对话题做了名字映射**)**
至于使用xml文件和yaml文件方式实现批量运行可执行程序的方式,博主这边就不再介绍了。