本章将 CI/CD 系列的所有知识点串联起来,构建一个从代码提交到生产部署的完整 DevOps 流水线。以 Spring Boot 应用为例,涵盖代码检查、单元测试、镜像构建与扫描、Helm 部署、多环境管理、健康检查与回滚等全部环节。这是一个可以直接复制到实际项目中的生产级模板。
一、项目全景
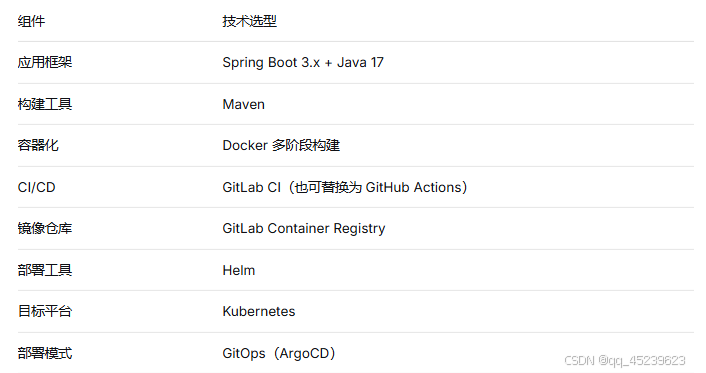
1.1 技术栈
1.2 流水线 Stages
text
lint → test → build → scan → package → deploy-staging → deploy-production
二、项目结构
text
spring-boot-app/
├── .gitlab-ci.yml # CI/CD 流水线定义
├── Dockerfile # 多阶段构建
├── pom.xml # Maven 配置
├── src/ # 应用源码
│ └── main/
│ └── java/
├── chart/ # Helm Chart
│ ├── Chart.yaml
│ ├── values.yaml
│ ├── values/
│ │ ├── staging.yaml
│ │ └── production.yaml
│ └── templates/
│ ├── deployment.yaml
│ ├── service.yaml
│ ├── ingress.yaml
│ └── _helpers.tpl
└── k8s/ # GitOps 部署清单(可选)
└── overlays/
├── staging/
└── production/
三、Dockerfile:多阶段构建
dockerfile
阶段1:构建(使用完整 JDK)
FROM maven:3.8.4-openjdk-17 AS builder
WORKDIR /app
COPY pom.xml .
RUN mvn dependency:go-offline
COPY src ./src
RUN mvn clean package -DskipTests
阶段2:运行(使用精简 JRE)
FROM openjdk:17-jre-slim
WORKDIR /app
COPY --from=builder /app/target/*.jar app.jar
EXPOSE 8080
ENTRYPOINT "java", "-jar", "/app/app.jar"
四、Helm Chart 模板
chart/values.yaml:
yaml
# 默认配置
replicaCount: 2
image:
  repository: ${CI_REGISTRY_IMAGE}
  tag: latest
  pullPolicy: IfNotPresent

service:
  type: ClusterIP
  port: 8080

ingress:
  enabled: false
  host: ""

resources:
  limits:
    cpu: 500m
    memory: 512Mi
  requests:
    cpu: 250m
    memory: 256Mi

livenessProbe:
  httpGet:
    path: /actuator/health
    port: 8080
  initialDelaySeconds: 30
  periodSeconds: 10

readinessProbe:
  httpGet:
    path: /actuator/health
    port: 8080
  initialDelaySeconds: 10
  periodSeconds: 5
chart/templates/deployment.yaml:
yaml
apiVersion: apps/v1
kind: Deployment
metadata:
  name: {{ include "myapp.fullname" . }}
  labels:
    app.kubernetes.io/name: {{ include "myapp.name" . }}
    app.kubernetes.io/instance: {{ .Release.Name }}
spec:
  replicas: {{ .Values.replicaCount }}
  selector:
    matchLabels:
      app.kubernetes.io/name: {{ include "myapp.name" . }}
      app.kubernetes.io/instance: {{ .Release.Name }}
  template:
    metadata:
      labels:
        app.kubernetes.io/name: {{ include "myapp.name" . }}
        app.kubernetes.io/instance: {{ .Release.Name }}
    spec:
      containers:
      - name: {{ .Chart.Name }}
        image: "{{ .Values.image.repository }}:{{ .Values.image.tag }}"
        imagePullPolicy: {{ .Values.image.pullPolicy }}
        ports:
        - containerPort: {{ .Values.service.port }}
        livenessProbe:
          {{- toYaml .Values.livenessProbe | nindent 10 }}
        readinessProbe:
          {{- toYaml .Values.readinessProbe | nindent 10 }}
        resources:
          {{- toYaml .Values.resources | nindent 10 }}
五、GitLab CI 完整流水线
.gitlab-ci.yml:
yaml
stages:
  - lint
  - test
  - build
  - scan
  - package
  - deploy-staging
  - deploy-production

variables:
  MAVEN_OPTS: "-Dmaven.repo.local=.m2/repository"
  IMAGE_TAG: $CI_COMMIT_SHORT_SHA
  CHART_PATH: ./chart

cache:
  paths:
    - .m2/repository/

# ========== Stage 1: 代码检查 ==========
lint:
  stage: lint
  image: maven:3.8.4-openjdk-17
  script:
    - mvn checkstyle:check
  allow_failure: true
  only:
    - merge_requests
    - main

# ========== Stage 2: 单元测试 ==========
test:unit:
  stage: test
  image: maven:3.8.4-openjdk-17
  script:
    - mvn test
  artifacts:
    reports:
      junit: target/surefire-reports/*.xml
    paths:
      - target/surefire-reports/
  coverage: '/Coverage: \d+\.\d+%/'

# ========== Stage 3: 构建镜像 ==========
build-image:
  stage: build
  image: docker:latest
  services:
    - docker:dind
  variables:
    DOCKER_TLS_CERTDIR: "/certs"
    DOCKER_BUILDKIT: 1
  script:
    - docker login -u $CI_REGISTRY_USER -p $CI_REGISTRY_PASSWORD $CI_REGISTRY
    - docker build --cache-from $CI_REGISTRY_IMAGE:latest -t $CI_REGISTRY_IMAGE:$IMAGE_TAG .
    - docker push $CI_REGISTRY_IMAGE:$IMAGE_TAG
  only:
    - main
    - develop

# ========== Stage 4: 镜像安全扫描 ==========
scan-image:
  stage: scan
  image: aquasec/trivy:latest
  script:
    - trivy image --severity HIGH,CRITICAL --exit-code 1 $CI_REGISTRY_IMAGE:$IMAGE_TAG
  only:
    - main

# ========== Stage 5: 打包 Helm Chart ==========
package-chart:
  stage: package
  image: alpine/helm:3.14
  script:
    - cd $CHART_PATH
    - helm dependency build
    - helm lint .
    - helm package .
  artifacts:
    paths:
      - $CHART_PATH/*.tgz
  only:
    - main

# ========== Stage 6: 部署到预发布环境 ==========
deploy-staging:
  stage: deploy-staging
  image: alpine/helm:3.14
  before_script:
    - mkdir -p $HOME/.kube
    - echo "$KUBECONFIG_STAGING" | base64 -d > $HOME/.kube/config
  script:
    - cd $CHART_PATH
    - helm upgrade --install myapp ./ \
        -f values/staging.yaml \
        --set image.tag=$IMAGE_TAG \
        --namespace staging \
        --atomic \
        --timeout 5m
    - kubectl rollout status deployment/myapp -n staging
  environment:
    name: staging
    url: https://staging.myapp.example.com
  only:
    - develop
    - main

# ========== Stage 7: 部署到生产环境(手动触发) ==========
deploy-production:
  stage: deploy-production
  image: alpine/helm:3.14
  before_script:
    - mkdir -p $HOME/.kube
    - echo "$KUBECONFIG_PRODUCTION" | base64 -d > $HOME/.kube/config
  script:
    - cd $CHART_PATH
    - helm upgrade --install myapp ./ \
        -f values/production.yaml \
        --set image.tag=$IMAGE_TAG \
        --namespace production \
        --atomic \
        --timeout 5m
    - kubectl rollout status deployment/myapp -n production
  environment:
    name: production
    url: https://myapp.example.com
  only:
    - main
  when: manual
六、多环境 Values 文件
chart/values/staging.yaml:
yaml
replicaCount: 1
resources:
  limits:
    cpu: 200m
    memory: 256Mi
  requests:
    cpu: 100m
    memory: 128Mi
ingress:
  enabled: true
  host: "staging.myapp.example.com"
chart/values/production.yaml:
yaml
replicaCount: 3
resources:
  limits:
    cpu: 500m
    memory: 512Mi
  requests:
    cpu: 250m
    memory: 256Mi
ingress:
  enabled: true
  host: "myapp.example.com"
七、GitOps 版本:使用 ArgoCD 替代直接部署
如果采用 GitOps 模式,将 deploy-staging 和 deploy-production 替换为更新 Git 仓库的 Job:
yaml
update-gitops-staging:
  stage: deploy-staging
  image: alpine/git:latest
  script:
    - git clone https://gitlab.com/team/gitops-repo.git
    - cd gitops-repo
    - sed -i "s|tag: .*|tag: $IMAGE_TAG|g" overlays/staging/kustomization.yaml
    - git config user.email "ci@gitlab.com"
    - git config user.name "GitLab CI"
    - git add .
    - git commit -m "deploy staging: $IMAGE_TAG"
    - git push https://$GITLAB_USER:$GITLAB_TOKEN@gitlab.com/team/gitops-repo.git main
  environment:
    name: staging
  only:
    - main
ArgoCD 会自动检测 Git 仓库变更并将新镜像部署到集群。
八、流水线执行流程
text
- 开发人员提交代码到 develop 分支
↓ - lint:代码风格检查
↓ - test:单元测试 + 覆盖率报告
↓ - build:构建 Docker 镜像并推送到仓库
↓ - scan:Trivy 漏洞扫描(仅 main 分支)
↓ - package:打包 Helm Chart
↓ - deploy-staging:自动部署到预发布环境
↓ - (人工审批)
↓ - deploy-production:部署到生产环境
九、故障处理与回滚
9.1 自动回滚
Helm 的 --atomic 参数会在升级失败时自动回滚到上一个版本。
9.2 手动回滚
bash
# 查看发布历史
helm history myapp -n production

# 回滚到指定版本
helm rollback myapp 2 -n production
9.3 在 CI 中集成回滚
yaml
rollback-production:
  stage: deploy-production
  image: alpine/helm:3.14
  script:
    - helm rollback myapp $ROLLBACK_REVISION -n production
  only:
    - main
  when: manual
十、监控与告警集成(可选)
在流水线最后,可集成监控告警:
yaml
notify-deployment:
  stage: deploy-production
  image: curlimages/curl:latest
  script:
    - curl -X POST -H "Content-type: application/json" \
        --data '{"text":"✅ 部署成功: myapp 版本 $IMAGE_TAG 已上线"}' \
        $SLACK_WEBHOOK
  only:
    - main
十一、小结
本章构建了一条完整的 DevOps 流水线,覆盖了从代码提交到生产部署的全流程。核心要点:
多阶段构建:Dockerfile 分离编译和运行环境,减小镜像体积
镜像安全扫描:Trivy 在部署前阻断高危漏洞
Helm 管理配置:通过 values 文件区分环境,保持部署一致性
多环境隔离:staging 自动部署,production 手动触发
原子部署:--atomic 确保失败时自动回滚
将这套流水线应用到实际项目中,即可实现从代码提交到生产的全自动化、可追溯、可回滚的交付体系。