第十一章
目录
[例 11.1 顶层模块](#例 11.1 顶层模块)
[例 11.2 测试平台的程序](#例 11.2 测试平台的程序)
[例 11.3 CPU 管理接口](#例 11.3 CPU 管理接口)
[例 11.4 Utopia 接口](#例 11.4 Utopia 接口)
[例 11.5 Environment 类的首部](#例 11.5 Environment 类的首部)
[例 11.6 Environment 类的方法](#例 11.6 Environment 类的方法)
[例 11.7 回调类连接了驱动器和记分板](#例 11.7 回调类连接了驱动器和记分板)
[例 11.8 回调类连接了监视器和记分板](#例 11.8 回调类连接了监视器和记分板)
[例 11.9 回调类连接了监视器和覆盖率类](#例 11.9 回调类连接了监视器和覆盖率类)
[例 11.10 配置类](#例 11.10 配置类)
[例 11.11 信元配置类型](#例 11.11 信元配置类型)
[例 11.13 UNI 信元格式](#例 11.13 UNI 信元格式)
[例 11.14 NNI 信元格式](#例 11.14 NNI 信元格式)
[例 11.15 ATM 信元类型](#例 11.15 ATM 信元类型)
[例 11.16 UNI_cell 定义](#例 11.16 UNI_cell 定义)
[例 11.17 UNI_cell 的方法](#例 11.17 UNI_cell 的方法)
[例 11.18 UNI_generator 类](#例 11.18 UNI_generator 类)
[例 11.19 Driver 类](#例 11.19 Driver 类)
[例 11.20 Driver 回调类](#例 11.20 Driver 回调类)
[例 11.21 Monitor 回调类](#例 11.21 Monitor 回调类)
[例 11.22 Monitor 类](#例 11.22 Monitor 类)
[例 11.23 Scoreboard 类](#例 11.23 Scoreboard 类)
[例 11.24 功能覆盖类](#例 11.24 功能覆盖类)
[CPU 驱动器类](#CPU 驱动器类)
[例 11.25 CPU_driver 类](#例 11.25 CPU_driver 类)
[例 11.26 只有一个信元的测试](#例 11.26 只有一个信元的测试)
[例 11.27 通过 driver 回调测试信元的丢失](#例 11.27 通过 driver 回调测试信元的丢失)
测试平台产生受约束的随机激励,并收集功能覆盖数据
测试平台是按第 8 章的规则建立的结构化的测试平台,可以在不改变底层模块的情况下增加新的功能
待测设计是 Sutherland(2006) 书中的 ATM 交换机,这个例子来源于 Janick Bergeron 的验证协会。Sutherland 用 SystemVerilog 修改了原始的 Verilog 代码,使其可以配置成从 4×4 到 16×16 的 ATM 交换机。最初的测试平台使用 $urandom 产生 ATM 信元,修改其中的 ID 域后发送给待测设计,然后检查相应的结果
设计单元
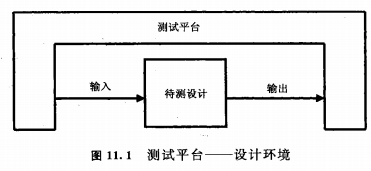
待测设计和测试平台之间的连接关系如图 11.1 所示,和第 4 章描述的相同
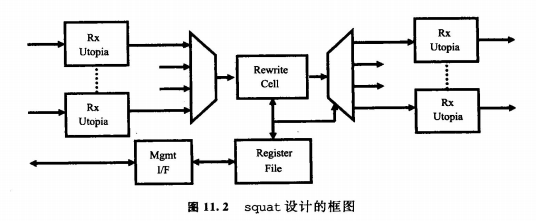
顶层设计称为 squat,它有 N 个发送 UNI 格式信元的 Utopia Rx 接口。在 DUT 内部,信元先保存下来,转换成 NNI 格式,然后转发到 Tx 接口。根据输入信元的 VPI 域,通过对查找表的寻址完成转发。查找表通过管理接口编程
例 11.1 顶层模块
`timescale 1ns/1ns

`define TxPorts 4    // 发送端口的个数
`define RxPorts 4    // 接收端口的个数

module top;
    parameter int NumRx = `RxPorts;
    parameter int NumTx = `TxPorts;

    logic rst, clk;
    // 系统时钟和复位
    initial begin
        rst = 0; clk = 0;
        #5ns rst = 1;
        #5ns clk = 1;
        #5ns rst = 0; clk = 0;
        forever #5ns clk = ~clk;
    end

    Utopia Rx[0:NumRx-1]();    // NumRx 个 Level 1 Utopia Rx 接口
    Utopia Tx[0:NumTx-1]();    // NumTx 个 Level 1 Utopia Tx 接口
    cpu_ifc mif();             // Utopia management interface

    squat #(NumRx, NumTx) squat(Rx, Tx, mif, rst, clk);    // DUT
    test #(NumRx, NumTx) t1(Rx, Tx, mif, rst, clk);        // Test
endmodule : top
例 11.2 测试平台的程序
program automatic test
    #(parameter int NumRx = 4, parameter int NumTx = 4)
    (Utopia.TB_Rx Rx[0:NumRx-1],
     Utopia.TB_Tx Tx[0:NumTx-1],
     cpu_ifc.Test mif,
     input logic rst, clk);

    `include "environment.sv"
    Environment env;

    initial begin
        env = new(Rx, Tx, NumRx, NumTx, mif);
        env.gen_cfg();
        env.build();
        env.run();
        env.wrap_up();
    end
endprogram // test
测试平台执行流程
1. env = new(Rx, Tx, NumRx, NumTx, mif)
   └── 创建环境对象,传入接口和参数
2. env.gen_cfg()
    └── 生成随机配置(端口数、查找表等)
3. env.build()
    └── 构建测试平台组件(发生器、驱动器、监视器等)
 4. env.run()
    └── 并发运行所有事务处理器
5. env.wrap_up()
    └── 收尾清理,生成报告
例 11.3 CPU 管理接口
测试平台通过管理接口(也称为 CPU 接口)来装载控制信息。在本章的例子里,CPU 接口仅仅用来装载将 VPI 映射到转发模板的查找表
interface cpu_ifc;
    logic BusMode, Sel, Rd_DS, Wr_RW, Rdy_Dtack;
    logic [11:0] Addr;
    CellCfgType DataIn, DataOut;    // 在例 11.11 中定义

    modport Peripheral
        (input BusMode, Addr, Sel, DataIn, Rd_DS, Wr_RW,
         output DataOut, Rdy_Dtack);

    modport Test
        (output BusMode, Addr, Sel, DataIn, Rd_DS, Wr_RW,
         input DataOut, Rdy_Dtack);
endinterface : cpu_ifc

typedef virtual cpu_ifc.Test vCPU_T;
例 11.4 Utopia 接口
测试平台使用 Utopia 接口与待测设计 squat 进行通信,发送和接收 ATM 信元。接口具有控制发送和接收路径的时钟块,连接待测设计和测试平台的 modport
interface Utopia;
    parameter int IfWidth = 8;

    logic [IfWidth-1:0] data;
    bit clk_in, clk_out;
    bit soc, en, clav, valid, ready, reset, selected;
    ATMCellType ATMCell;    // ATM 信元结构的联合

    // 接收方向 modport(TopReceive / CoreReceive)
    modport TopReceive {
        input data, soc, clav,
        output clk_in, reset, ready, clk_out, en, ATMCell, valid
    }

    modport CoreReceive {
        input clk_in, data, soc, clav, ready, reset,
        output clk_out, en, ATMCell, valid
    }

    // 发送方向 modport(TopTransmit / CoreTransmit)
    modport TopTransmit {
        input clav,
        inout selected,
        output clk_in, clk_out, ATMCell, data, soc, en, valid,
               reset, ready
    }

    modport CoreTransmit {
        input clk_in, clav, ATMCell, valid, reset,
        output clk_out, data, soc, en, ready
    }

    // Rx 时钟块(用于测试平台接收)
    clocking cbr @(negedge clk_out);
        input clk_in, clk_out, ATMCell, valid, reset, en, ready;
        output data, soc, clav;
    endclocking : cbr
    modport TB_Rx (clocking cbr);

    // Tx 时钟块(用于测试平台发送)
    clocking cbt @(negedge clk_out);
        input clk_out, clk_in, ATMCell, soc, en, valid,
              reset, data, ready;
        output clav;
    endclocking : cbt
    modport TB_Tx (clocking cbt);
endinterface

// 虚接口类型定义
typedef virtual Utopia vUtopia;
typedef virtual Utopia.TB_Rx vUtopiaRx;
typedef virtual Utopia.TB_Tx vUtopiaTx;
设计单元关键组件
| 组件 | 说明 |
|---|---|
| squat | 顶层 DUT,4×4 可配置到 16×16 ATM 交换机 |
| Utopia Rx | 接收 UNI 格式信元的接口(N 个) |
| Utopia Tx | 发送 NNI 格式信元的接口(N 个) |
| cpu_ifc | 管理接口,用于编程 VPI 查找表 |
| 测试平台 | 产生受约束随机激励,收集功能覆盖率 |
| 类型 | 说明 |
|---|---|
vUtopia |
Utopia 接口的虚接口句柄 |
vUtopiaRx |
Utopia.TB_Rx modport 的虚接口 |
vUtopiaTx |
Utopia.TB_Tx modport 的虚接口 |
vCPU_T |
cpu_ifc.Test modport 的虚接口 |
测试平台的模块
Environment 类是测试平台的核心,如 8.2.1 节所示。在这个类里包含了分层测试平台的各个模块,例如发生器、驱动器、监视器和记分板。它还控制了测试的四个步骤:产生随机配置、建立测试平台环境、运行并等待测试结束以及关闭系统和产生报告的收尾阶段
例 11.5 Environment 类的首部
class Environment;
    UNI_generator gen[];
    mailbox gen2drv[];
    event drv2gen[];
    Driver drv[];
    Monitor mon[];
    Config cfg;
    Scoreboard scb;
    Coverage cov;
    virtual Utopia.TB_Rx Rx[];
    virtual Utopia.TB_Tx Tx[];
    int numRx, numTx;
    vCPU_T mif;
    CPU_driver cpu;

    extern function new( input vUtopiaRx Rx[],
                         input vUtopiaTx Tx[],
                         input int numRx, numTx,
                         input vCPU_T mif);
    extern virtual function void gen_cfg();
    extern virtual function void build();
    extern virtual task run();
    extern virtual function void wrap_up();
endclass : Environment
例 11.6 Environment 类的方法
// ---
// 构造 environment 实例
function Environment::new( input vUtopiaRx Rx[],
                           input vUtopiaTx Tx[],
                           input int numRx, numTx,
                           input vCPU_T mif);
    this.Rx = new[Rx.size()];
    foreach (Rx[i]) this.Rx[i] = Rx[i];
    this.Tx = new[Tx.size()];
    foreach (Tx[i]) this.Tx[i] = Tx[i];
    this.numRx = numRx;
    this.numTx = numTx;
    this.mif = mif;
    cfg = new(numRx, numTx);

    // 获取随机数种子(VCS 仿真参数)
    if ($test$plusargs("ntb_random_seed")) begin
        int seed;
        $value$plusargs("ntb_random_seed=%d", seed);
        $display("Simulation run with random seed=%d", seed);
    end
    else
        $display("Simulation run with default random seed");
endfunction : new

// ---
// 随机化配置描述符
function void Environment::gen_cfg();
    assert(cfg.randomize());
    cfg.display();
endfunction : gen_cfg

// ---
// 为本次测试建立 environment 对象
// 注意需要为每个通道建立对象,即使通道不使用也要建立对象,
// 这样可以避免空句柄错误。
function void Environment::build();
    cpu = new(mif, cfg);
    gen = new[numRx];
    drv = new[numRx];
    gen2drv = new[numRx];
    drv2gen = new[numRx];
    scb = new(cfg);
    cov = new();

    // 建立发生器
    foreach (gen[i]) begin
        gen2drv[i] = new();
        gen[i] = new(gen2drv[i], drv2gen[i],
                     cfg.cells_per_chan[i], i);
        drv[i] = new(gen2drv[i], drv2gen[i], Rx[i], i);
    end

    // 建立监视器
    mon = new[numTx];
    foreach (mon[i])
        mon[i] = new(Tx[i], i);

    // 通过回调函数连接记分板到驱动器和监视器
    begin
        Scb_Driver_cbs sdc = new(scb);
        Scb_Monitor_cbs smc = new(scb);
        foreach (drv[i]) drv[i].cbsq.push_back(sdc);
        foreach (mon[i]) mon[i].cbsq.push_back(smc);
    end

    // 通过回调函数连接覆盖率程序到监视器
    begin
        Cov_Monitor_cbs smc = new(cov);
        foreach (mon[i])
            mon[i].cbsq.push_back(smc);
    end
endfunction : build

// ---
// 启动事务:发生器、驱动器、监视器
// 不会启动没有使用的通道
task Environment::run();
    int num_gen_running;

    // CPU 接口必须先初始化
    cpu.run();

    num_gen_running = numRx;

    // 为每个 RX 接收通道启动发生器和驱动器
    foreach (gen[i]) begin
        int j = i;    // 在交换出的线程里,自动变量保持了索引值
        fork
            begin
                if (cfg.in_use_Rx[j])
                    gen[j].run();    // 等待发生器结束
                num_gen_running--;    // 减少驱动器的个数
            end
            if (cfg.in_use_Rx[j]) drv[j].run();
        join_none
    end

    // 为每个 Tx 输出通道启动监视器
    foreach (mon[i]) begin
        int j = i;
        fork
            mon[j].run();
        join_none
    end

    // 等待所有的发生器结束或超时
    fork : timeout_block
        wait (num_gen_running == 0);
        begin
            repeat (1_000_000) @(Rx[0].cbr);
            $display("@%0t: %m ERROR: Generator timeout ", $time);
            cfg.nErrors++;
        end
    join_any
    disable timeout_block;

    // 等待数据送到监视器和记分板
    repeat (1_000) @(Rx[0].cbr);
endtask : run

// ---
// 运行结束后的清除/报告工作
function void Environment::wrap_up();
    $display("@%0t: End of sim, %0d errors, %0d warnings",
             $time, cfg.nErrors, cfg.nWarnings);
    scb.wrap_up();
endfunction : wrap_up
回调类连接
例 11.7 回调类连接了驱动器和记分板
class Scb_Driver_cbs extends Driver_cbs;
    Scoreboard scb;

    function new(input Scoreboard scb);
        this.scb = scb;
    endfunction : new

    // 把收到的信元发送到记分板
    virtual task post_tx(input Driver drv,
                         input UNI_cell cell);
        scb.save_expected(cell);
    endtask : post_tx
endclass : Scb_Driver_cbs
例 11.8 回调类连接了监视器和记分板
class Scb_Monitor_cbs extends Monitor_cbs;
    Scoreboard scb;

    function new(input Scoreboard scb);
        this.scb = scb;
    endfunction : new

    // 把收到的信元发送到记分板
    virtual task post_rx(input Monitor mon,
                         input NNI_cell cell);
        scb.check_actual(cell, mon.PortID);
    endtask : post_rx
endclass : Scb_Monitor_cbs
例 11.9 回调类连接了监视器和覆盖率类
class Cov_Monitor_cbs extends Monitor_cbs;
    Coverage cov;

    function new(input Coverage cov);
        this.cov = cov;
    endfunction : new

    // 把收到的信元发送到覆盖率类
    virtual task post_rx(input Monitor mon,
                         input NNI_cell cell);
        CellCfgType CellCfg = top.squat.lut.read(cell.VPI);
        cov.sample(mon.PortID, CellCfg.FWD);
    endtask : post_rx
endclass : Cov_Monitor_cbs
配置类
例 11.10 配置类
class Config;
    int nErrors, nWarnings;              // 错误和警告的个数
    bit [31:0] numRx, numTx;             // 把参数复制一份

    rand bit [31:0] nCells;              // 信元的总数
    constraint c_nCells_valid     { nCells > 0; }
    constraint c_nCells_reasonable { nCells < 1000; }

    rand bit in_use_Rx[];                // 允许使用的输入/输出通道
    constraint c_in_use_valid { in_use_Rx.sum() > 0; }    // 至少需要一个 RX 通道

    rand bit [31:0] cells_per_chan[];
    constraint c_sum_ncells_sum { cells_per_chan.sum() == nCells; }

    // 把未使用的通道的信元个数设为 0
    constraint zero_unused_channels {
        foreach (cells_per_chan[i]) {
            solve in_use_Rx[i] before cells_per_chan[i];
            if (in_use_Rx[i])
                cells_per_chan[i] inside {[1:nCells]};
            else
                cells_per_chan[i] == 0;
        }
    }

    extern function new(input bit [31:0] numRx, numTx);
    extern virtual function void display(input string prefix = "");
endclass : Config
信元格式定义
例 11.11 信元配置类型
typedef struct packed {
    bit [`TxPorts-1:0] FWD;
    bit [11:0] VPI;
} CellCfgType;
例 11.13 UNI 信元格式
typedef struct packed {
    bit [3:0] GFC;
    bit [7:0] VPI;
    bit [15:0] VCI;
    bit CLP;
    bit [2:0] PT;
    bit [7:0] HEC;
    bit [0:47] [7:0] Payload;
} uniType;
例 11.14 NNI 信元格式
typedef struct packed {
    bit [11:0] VPI;
    bit [15:0] VCI;
    bit CLP;
    bit [2:0] PT;
    bit [7:0] HEC;
    bit [0:47] [7:0] Payload;
} nniType;
例 11.15 ATM 信元类型
typedef union packed {
    uniType uni;
    nniType nni;
    bit [0:52] [7:0] Mem;
} ATMCellType;
信元类和发生器
例 11.16 UNI_cell 定义
class UNI_cell extends BaseTr;
    // 物理域
    rand bit [3:0] GFC;
    rand bit [7:0] VPI;
    rand bit [15:0] VCI;
    rand bit CLP;
    rand bit [2:0] PT;
    bit [7:0] HEC;
    rand bit [0:47] [7:0] Payload;

    // 数据域
    static bit [7:0] syndrome[0:255];
    static bit syndrome_not_generated = 1;

    extern function new();
    extern function void post_randomize();
    extern virtual function bit compare(input BaseTr to);
    extern virtual function void display(input string prefix = "");
    extern virtual function void copy_data(input UNI_cell copy);
    extern virtual function BaseTr copy(input BaseTr to = null);
    extern virtual function void pack(output ATMCellType to);
    extern virtual function void unpack(input ATMCellType from);
    extern function NNI_cell to_NNI();
    extern function void generate_syndrome();
    extern function bit [7:0] hec(bit [31:0] hdr);
endclass : UNI_cell
例 11.17 UNI_cell 的方法
function UNI_cell::new();
    if (syndrome_not_generated)
        generate_syndrome();
endfunction : new

// 在所有其他数据都确定后计算 HEC
function void UNI_cell::post_randomize();
    HEC = hec({GFC, VPI, VCI, CLP, PT});
endfunction : post_randomize

// 和其他信元比较
// 可以进一步改进,返回不匹配的域
function bit UNI_cell::compare(input BaseTr to);
    UNI_cell cell;
    $cast(cell, to);
    if (this.GFC != cell.GFC) return 0;
    if (this.VPI != cell.VPI) return 0;
    if (this.VCI != cell.VCI) return 0;
    if (this.CLP != cell.CLP) return 0;
    if (this.PT != cell.PT) return 0;
    if (this.HEC != cell.HEC) return 0;
    if (this.Payload != cell.Payload) return 0;
    return 1;
endfunction : compare

// 输出信元各个域的详细内容
function void UNI_cell::display(input string prefix);
    ATMCellType p;
    $display("%s UNI id:%0d GFC=%x, VPI=%x, VCI=%x, CLP=%b, PT=%x, HEC=%x, Payload[0]=%x",
             prefix, id, GFC, VPI, VCI, CLP, PT, HEC, Payload[0]);
    this.pack(p);
    $write("%s", prefix);
    foreach (p.Mem[i]) $write("%x", p.Mem[i]);
    $display;
endfunction : display

// 复制信元的数据域
function void UNI_cell::copy_data(input UNI_cell copy);
    copy.GFC = this.GFC;
    copy.VPI = this.VPI;
    copy.VCI = this.VCI;
    copy.CLP = this.CLP;
    copy.PT = this.PT;
    copy.HEC = this.HEC;
    copy.Payload = this.Payload;
endfunction : copy_data

// 复制对象
function BaseTr UNI_cell::copy(input BaseTr to);
    UNI_cell dst;
    if (to == null) dst = new();
    else $cast(dst, to);
    copy_data(dst);
    return dst;
endfunction : copy

// 把对象打包到一个字节数组
function void UNI_cell::pack(output ATMCellType to);
    to.uni.GFC = this.GFC;
    to.uni.VPI = this.VPI;
    to.uni.VCI = this.VCI;
    to.uni.CLP = this.CLP;
    to.uni.PT = this.PT;
    to.uni.HEC = this.HEC;
    to.uni.Payload = this.Payload;
endfunction : pack

// 把字节数组的内容按域展开到 this 对象
function void UNI_cell::unpack(input ATMCellType from);
    this.GFC = from.uni.GFC;
    this.VPI = from.uni.VPI;
    this.VCI = from.uni.VCI;
    this.CLP = from.uni.CLP;
    this.PT = from.uni.PT;
    this.HEC = from.uni.HEC;
    this.Payload = from.uni.Payload;
endfunction : unpack

// 根据 UNI 信元产生 NNI 信元
function NNI_cell UNI_cell::to_NNI();
    NNI_cell copy;
    copy = new();
    copy.VPI = this.VPI;      // NNI 信元的 VPI 更宽
    copy.VCI = this.VCI;
    copy.CLP = this.CLP;
    copy.PT = this.PT;
    copy.HEC = this.HEC;
    copy.Payload = this.Payload;
    return copy;
endfunction : to_NNI

// 产生用于计算 HEC 的 syndrome 数组
function void UNI_cell::generate_syndrome();
    bit [7:0] sndrm;
    for (int i = 0; i < 256; i = i + 1) begin
        sndrm = i;
        repeat (8) begin
            if (sndrm[7] == 1'b1)
                sndrm = (sndrm << 1) ^ 8'h07;
            else
                sndrm = sndrm << 1;
        end
        syndrome[i] = sndrm;
    end
    syndrome_not_generated = 0;
endfunction : generate_syndrome

// 计算对象的 HEC
function bit [7:0] UNI_cell::hec(bit [31:0] hdr);
    hec = 8'h00;
    repeat (4) begin
        hec = syndrome[hec ^ hdr[31:24]];
        hdr = hdr << 8;
    end
    hec = hec ^ 8'h55;
endfunction : hec
说明 :
NNI_cell类几乎和UNI_cell类一样,但NNI_cell没有GFC域,也没有转换成UNI_cell的方法
例 11.18 UNI_generator 类
class UNI_generator;
    UNI_cell blueprint;    // Blueprint 信元
    mailbox gen2drv;       // driver 的 Mailbox
    event drv2gen;         // driver 完成时的事件
    int nCells;            // 要产生的信元个数
    int PortID;            // 产生哪个 Rx 端口的信元?

    function new(input mailbox gen2drv,
                 input event drv2gen,
                 input int nCells, PortID);
        this.gen2drv = gen2drv;
        this.drv2gen = drv2gen;
        this.nCells = nCells;
        this.PortID = PortID;
        blueprint = new();
    endfunction : new

    task run();
        UNI_cell cell;
        repeat (nCells) begin
            assert(blueprint.randomize());
            $cast(cell, blueprint.copy());
            cell.display($psprintf("%0t: Gen%0d: ", $time, PortID));
            gen2drv.put(cell);
            @drv2gen;    // 等待 driver 完成
        end
    endtask : run
endclass : UNI_generator
驱动器类
例 11.19 Driver 类
typedef class Driver_cbs;

class Driver;
    mailbox gen2drv;               // 用于存储发生器发送的信元
    event drv2gen;                 // 通知发生器已经处理完毕
    vUtopiaRx Rx;                  // 发送信元的虚接口
    Driver_cbs cbsq[$];            // 回调对象的队列
    int PortID;

    extern function new(input mailbox gen2drv,
                        input event drv2gen,
                        input vUtopiaRx Rx,
                        input int PortID);
    extern task run();
    extern task send(input UNI_cell cell);
endclass : Driver
例 11.20 Driver 回调类
typedef class Driver;

class Driver_cbs;
    virtual task pre_tx(input Driver drv,
                        input UNI_cell cell,
                        inout bit drop);
    endtask : pre_tx

    virtual task post_tx(input Driver drv,
                         input UNI_cell cell);
    endtask : post_tx
endclass : Driver_cbs
监视器类
例 11.21 Monitor 回调类
typedef class Monitor;

class Monitor_cbs;
    virtual task post_rx(input Monitor drv,
                         input NNI_cell cell);
    endtask : post_rx
endclass : Monitor_cbs
例 11.22 Monitor 类
typedef class Monitor_cbs;

class Monitor;
    vUtopiaTx Tx;                  // 连接 DUT 输出的虚接口
    Monitor_cbs cbsq[$];           // 回调对象的队列
    int PortID;

    extern function new(input vUtopiaTx Tx, input int PortID);
    extern task run();
    extern task receive(output NNI_cell cell);
endclass : Monitor
记分板类
例 11.23 Scoreboard 类
class Expect_cells;
    NNI_cell q[$];
    int iexpect, iactual;
endclass : Expect_cells

class Scoreboard;
    Config cfg;
    Expect_cells expect_cells[];
    NNI_cell cellq[$];
    int iexpect, iactual;

    extern function new(Config cfg);
    extern virtual function void wrap_up();
    extern function void save_expected(UNI_cell ucell);
    extern function void check_actual(input NNI_cell cell,
                                      input int portn);
    extern function void display(string prefix = "");
endclass : Scoreboard
功能覆盖类
例 11.24 功能覆盖类
class Coverage;
    bit [1:0] src;
    bit [NumTx-1:0] fwd;

    covergroup CG_Forward;
        coverpoint src {
            bins src[] = {[0:3]};
            option.weight = 0;
        }
        coverpoint fwd {
            bins fwd[] = {[1:15]};    // 忽略 fwd==0
            option.weight = 0;
        }
        cross src, fwd;
    endgroup : CG_Forward

    function new();
        CG_Forward = new();    // 例化 covergroup
    endfunction : new

    // 采样输入数据
    function void sample(input bit [1:0] src,
                         input bit [NumTx-1:0] fwd);
        $display("@%0t: Coverage: src=%d, FWD=%b", $time, src, fwd);
        this.src = src;
        this.fwd = fwd;
        CG_Forward.sample();
    endfunction : sample
endclass : Coverage
CPU 驱动器类
例 11.25 CPU_driver 类
class CPU_driver;
    vCPU_T mif;
    CellCfgType lookup[255:0];    // 复制一份查找表
    Config cfg;
    bit [NumTx-1:0] fwd;

    extern function new(vCPU_T mif, Config cfg);
    extern task Initialize_Host();
    extern task HostWrite(int a, CellCfgType d);
    extern task HostRead(int a, output CellCfgType d);
    extern task run();
endclass : CPU_driver

┌─────────────────────────────────────────────────────────────────────┐
│                          Top 模块                                  │
│  ┌─────────────────────────────────────────────────────────────┐   │
│  │                    测试程序块 (test)                        │   │
│  │  ┌─────────────────────────────────────────────────────┐   │   │
│  │  │                  Environment                        │   │   │
│  │  │  ┌──────────┐  ┌──────────┐  ┌──────────────┐     │   │   │
│  │  │  │ UNI_gen  │  │ Driver   │  │  Scoreboard  │     │   │   │
│  │  │  │ [numRx]  │─▶│ [numRx]  │  │              │     │   │   │
│  │  │  └──────────┘  └──────────┘  └──────────────┘     │   │   │
│  │  │  ┌──────────┐  ┌──────────┐  ┌──────────────┐     │   │   │
│  │  │  │ Monitor  │  │ Coverage │  │  CPU_driver  │     │   │   │
│  │  │  │ [numTx]  │  │          │  │              │     │   │   │
│  │  │  └──────────┘  └──────────┘  └──────────────┘     │   │   │
│  │  └─────────────────────────────────────────────────────┘   │   │
│  └─────────────────────────────────────────────────────────────┘   │
│                              │                                      │
│                              ▼                                      │
│  ┌─────────────────────────────────────────────────────────────┐   │
│  │           Utopia Rx[] / Utopia Tx[] / cpu_ifc              │   │
│  └─────────────────────────────────────────────────────────────┘   │
│                              │                                      │
│                              ▼                                      │
│  ┌─────────────────────────────────────────────────────────────┐   │
│  │                    squat #(NumRx, NumTx)                   │   │
│  └─────────────────────────────────────────────────────────────┘   │
└─────────────────────────────────────────────────────────────────────┘| 类名 | 功能 | 关键特性 |
|---|---|---|
Environment |
测试平台核心 | 控制四阶段流程(cfg/build/run/wrap_up) |
Config |
随机配置 | 通道数、信元数、使用约束 |
UNI_generator |
信元发生器 | 蓝图模式,随机产生 UNI 信元 |
Driver |
信元驱动器 | 虚接口,回调队列 |
Monitor |
信元监视器 | 从 DUT 接收信元,触发回调 |
Scoreboard |
记分板 | 期望值 vs 实际值比较 |
Coverage |
功能覆盖率 | 交叉覆盖 src × fwd |
CPU_driver |
管理接口驱动 | 配置 VPI 查找表 |
修改测试
例 11.2 中的最简单的测试只使用了很少的约束。在验证期间,根据要测试的功能需要建立很多测试集。每个测试集使用不同的种子运行
第一个测试------只有一个信元的测试
你运行的第一个测试可能只有一个信元,如例 11.26 所示。可以在随机化前通过扩展 Config 类来增加新的约束和对象。如果第一个测试成功了,可以先增加到两个信元,然后取消约束,以运行更长的序列
例 11.26 只有一个信元的测试
program automatic test
    #(parameter int NumRx = 4, parameter int NumTx = 4)
    (Utopia.TB_Rx Rx[0:NumRx-1],
     Utopia.TB_Tx Tx[0:NumTx-1],
     cpu_ifc.Test mif,
     input logic rst, clk);

    `include "environment.sv"
    Environment env;

    // 扩展 Config 类:约束信元数量为 1
    class Config_1_cell extends Config;
        constraint one_cells { nCells == 1; }

        function new(input int NumRx, NumTx);
            super.new(NumRx, NumTx);
        endfunction : new
    endclass : Config_1_cell

    initial begin
        env = new(Rx, Tx, NumRx, NumTx, mif);

        begin    // 仅仿真 1 个信元
            Config_1_cell cl = new(NumRx, NumTx);
            env.cfg = cl;
        end

        env.gen_cfg();    // 配置成只有 1 个信元
        env.build();
        env.run();
        env.wrap_up();
    end
endprogram // test| 步骤 | 操作 | 说明 |
|---|---|---|
| 1 | 约束 nCells == 1 |
验证最小配置 |
| 2 | 约束 nCells == 2 |
验证多信元场景 |
| 3 | 取消 one_cells 约束 |
恢复随机长度序列 |
随机丢弃信元
下一个测试通过随机地丢弃一些信元来人为地产生错误,如例 11.27 所示。你需要建立一个用来设置丢弃标志的新的 driver 回调类,然后在测试中增加这个新功能
例 11.27 通过 driver 回调测试信元的丢失
program automatic test
    #(parameter int NumRx = 4, parameter int NumTx = 4)
    (Utopia.TB_Rx Rx[0:NumRx-1],
     Utopia.TB_Tx Tx[0:NumTx-1],
     cpu_ifc.Test mif,
     input logic rst, clk);

    `include "environment.sv"
    Environment env;

    // 扩展 Driver 回调类:随机丢弃信元
    class Driver_cbs_drop extends Driver_cbs;
        virtual task pre_tx(input ATM_cell cell, ref bit drop);
            // 在每 100 个事务中随机地丢弃 1 个
            drop = ($urandom_range(0, 99) == 0);
        endtask
    endclass

    initial begin
        env = new(Rx, Tx, NumRx, NumTx, mif);
        env.gen_cfg();
        env.build();

        begin    // 故障注入
            Driver_cbs_drop dcd = new();
            env.drv.cbs.push_back(dcd);    // 放入 driver 的队列
        end

        env.run();
        env.wrap_up();
    end
endprogram // test
测试修改策略对比
| 测试类型 | 扩展方式 | 修改范围 |
|---|---|---|
| 单信元测试 | 扩展 Config 类,增加约束 |
仅测试文件 |
| 随机丢包测试 | 扩展 Driver_cbs 类,注入故障 |
仅测试文件 |
| 配置测试 | 扩展 Config 类,修改配置 |
仅测试文件 |
关键原则
通过回调和多个环境,只需要修改一个文件就能建立新的测试,增加新的功能
构造一个分层的测试平台。通过回调和多个环境,只需要修改一个文件就能建立新的测试,增加新的功能
| 要点 | 说明 |
|---|---|
| 分层测试平台 | Environment 类包含所有组件(发生器、驱动器、监视器、记分板、覆盖率) |
| 蓝图模式 | 使用 blueprint 对象随机化并复制,产生多个信元 |
| 回调机制 | 连接驱动器→记分板、监视器→记分板、监视器→覆盖率 |
| 虚接口 | 动态连接物理接口,支持多通道配置 |
| 受约束随机 | Config 类定义随机配置,约束驱动激励生成 |
| 功能覆盖 | 交叉覆盖 src × fwd,测量验证进度 |
| 测试扩展 | 通过继承 Config 或 Driver_cbs 增加新功能 |
┌─────────────────────────────────────────────────────────────────────┐
│                      扩展机制                                       │
│                                                                     │
│  配置扩展                                  回调扩展                  │
│  ┌─────────────────┐                    ┌─────────────────────┐   │
│  │   Config         │                    │   Driver_cbs        │   │
│  │   (基类)         │                    │   (基类)             │   │
│  └────────┬────────┘                    └──────────┬──────────┘   │
│           │ 继承                                    │ 继承          │
│           ▼                                         ▼              │
│  ┌─────────────────┐                    ┌─────────────────────┐   │
│  │  Config_1_cell  │                    │  Driver_cbs_drop    │   │
│  │  (nCells == 1)  │                    │  (随机丢包)          │   │
│  └─────────────────┘                    └─────────────────────┘   │
│                                                                     │
│  测试文件只需:                                                      │
│  1. 定义扩展类                                                      │
│  2. 替换 env.cfg 或 env.drv.cbs 中的对象                           │
│  3. 无需修改 Environment 类                                        │
└─────────────────────────────────────────────────────────────────────┘| 节 | 主题 | 核心内容 |
|---|---|---|
| 11.1 | 设计单元 | top 模块、Utopia 接口、cpu_ifc、信元格式 |
| 11.2 | 测试平台的模块 | Environment、Config、UNI_generator、Driver、Monitor、Scoreboard、Coverage、CPU_driver |
| 11.3 | 修改测试 | 扩展 Config、扩展 Driver_cbs、回调注入故障 |