【QCustomPlot教程07】QCustomPlot 交互功能与用户操作
- 一、内置交互功能
- 二、自定义交互功能
-
- 1、数据追踪器:QCPItemTracer
- 2、十字坐标线(Crosshair)
- [3、QCustomPlot 鼠标事件重写的两种方式](#3、QCustomPlot 鼠标事件重写的两种方式)
- 三、信号与槽机制
原创作者:郑同学的笔记
原文链接:https://zhengjunxue.blog.csdn.net/article/details/155229882
一、内置交互功能
QCustomPlot通过QCP::Interaction枚举定义了一系列内置交互功能,我们可以通过setInteractions()方法启用它们。
交互枚举详解
QCP::iRangeDrag - 允许用户通过鼠标拖拽来平移图表
QCP::iRangeZoom - 允许用户通过鼠标滚轮或拖拽选择区域来缩放图表
QCP::iSelectPlottables - 允许用户选择图表中的曲线、散点等绘图元素
QCP::iSelectAxes - 允许用户选择坐标轴
QCP::iSelectLegend - 允许用户选择图例
QCP::iSelectItems - 允许用户选择自定义添加的项目(如文本、箭头等)
Demo
cpp
#include "mainwindow.h"
#include "ui_mainwindow.h"
#include <QTimer>
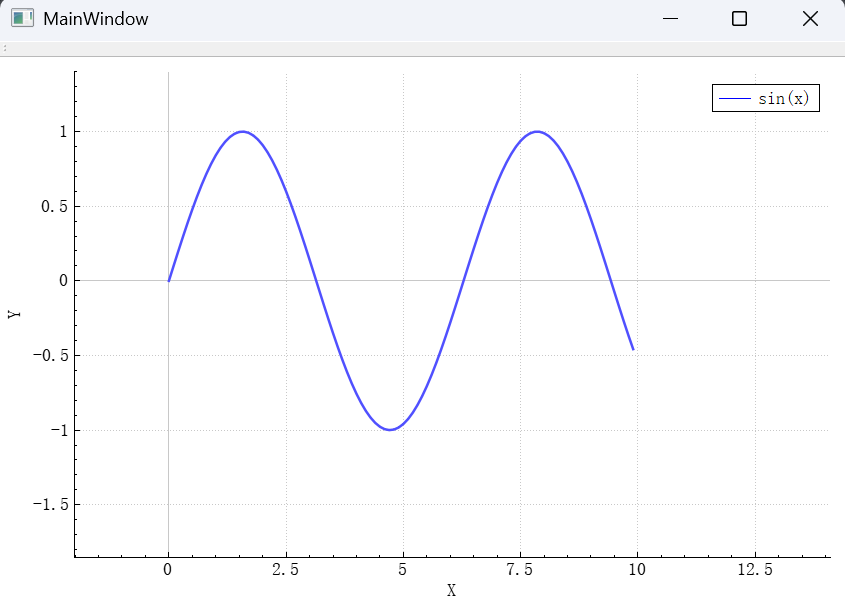
void InteractionsDemo(QCustomPlot *customPlot)
{
// 添加一条正弦曲线
QVector<double> x(100), y(100);
for (int i = 0; i < 100; ++i) {
x[i] = i / 10.0;
y[i] = qSin(x[i]);
}
customPlot->addGraph();
customPlot->graph(0)->setData(x, y);
customPlot->xAxis->setLabel("X");
customPlot->yAxis->setLabel("Y");
customPlot->legend->setVisible(true);
customPlot->graph(0)->setName("sin(x)");
// 启用交互功能
customPlot->setInteractions(
QCP::iRangeDrag | // 拖动平移
QCP::iRangeZoom | // 滚轮缩放
QCP::iSelectPlottables | // 选择图线
QCP::iSelectAxes | // 选择坐标轴
QCP::iSelectLegend // 选择图例
);
customPlot->rescaleAxes();
customPlot->replot();
}
MainWindow::MainWindow(QWidget *parent) :
QMainWindow(parent),
ui(new Ui::MainWindow)
{
ui->setupUi(this);
// 创建 QCustomPlot 实例
QCustomPlot *customPlot = new QCustomPlot(this);
setCentralWidget(customPlot);
InteractionsDemo(customPlot);
// LegendDemo *demo = new LegendDemo(this);
// setCentralWidget(demo);
}
MainWindow::~MainWindow()
{
delete ui;
}
二、自定义交互功能
除了内置交互,QCustomPlot 还支持高度自定义的交互逻辑,常见包括:
- 数据追踪器(QCPItemTracer)
十字光标(十字坐标线)
自定义鼠标事件处理
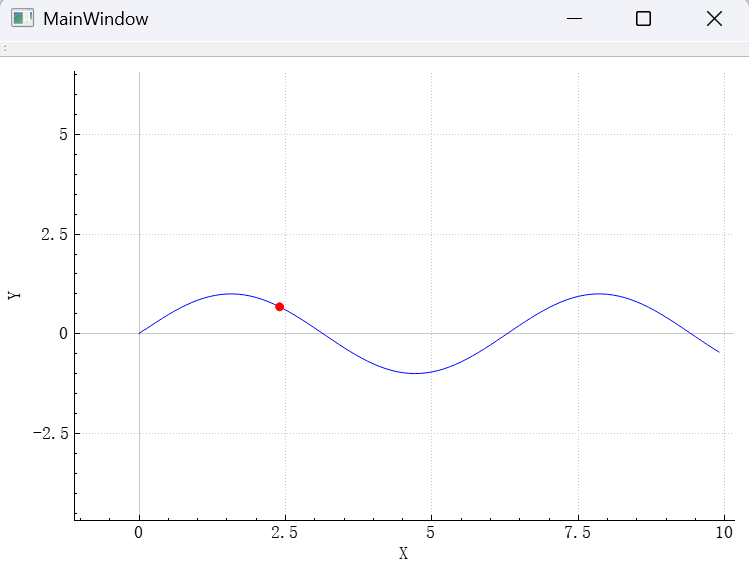
1、数据追踪器:QCPItemTracer
用于在曲线上动态显示某个数据点的位置信息。
cpp
#include "mainwindow.h"
#include "ui_mainwindow.h"
#include <QTimer>

MainWindow::MainWindow(QWidget *parent) :
    QMainWindow(parent),
    ui(new Ui::MainWindow)
{
    ui->setupUi(this);

    // 创建 QCustomPlot 实例
   QCustomPlot *customPlot = new QCustomPlot(this);
   setCentralWidget(customPlot);

   // 添加正弦曲线
       QVector<double> x(100), y(100);
       for (int i = 0; i < 100; ++i) {
           x[i] = i / 10.0;
           y[i] = std::sin(x[i]);
       }
       customPlot->addGraph();
       customPlot->graph(0)->setData(x, y);
       customPlot->xAxis->setLabel("X");
       customPlot->yAxis->setLabel("Y");
       customPlot->replot();

       // 创建追踪器(作为成员变量或局部变量,但需保证生命周期)
       QCPItemTracer *tracer = new QCPItemTracer(customPlot);
       tracer->setStyle(QCPItemTracer::tsCircle);
       tracer->setSize(8);
       tracer->setPen(QPen(Qt::red));
       tracer->setBrush(Qt::red);
       tracer->setVisible(false); // 初始隐藏

       // 关键:将追踪器关联到图形
        tracer->setGraph(customPlot->graph(0));

       // 连接鼠标移动事件:现在在 MainWindow 成员函数中,this 有效!
       connect(customPlot, &QCustomPlot::mouseMove, this, [=](QMouseEvent *event) {
           double key = customPlot->xAxis->pixelToCoord(event->pos().x());
           auto graph = customPlot->graph(0);
           double minDist = std::numeric_limits<double>::max();
           int bestIndex = -1;

           // 遍历数据点找最近的
           for (int i = 0; i < graph->data()->size(); ++i) {
               double dist = std::abs(graph->data()->at(i)->key - key);
               if (dist < minDist) {
                   minDist = dist;
                   bestIndex = i;
               }
           }

           if (bestIndex >= 0) {
               tracer->setGraphKey(graph->data()->at(bestIndex)->key);
               tracer->setVisible(true);
           } else {
               tracer->setVisible(false);
           }
           customPlot->replot();
       });

       // 启用交互(可选)
       customPlot->setInteractions(QCP::iRangeDrag | QCP::iRangeZoom);

//    Crosshair *demo = new Crosshair(customPlot);
//    setCentralWidget(demo);
}

MainWindow::~MainWindow()
{
    delete ui;
}
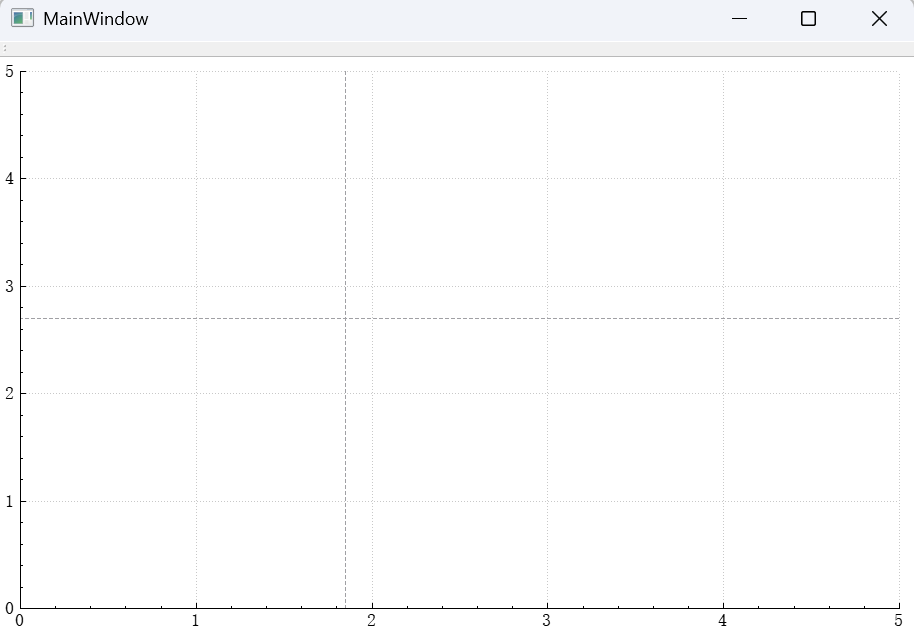
2、十字坐标线(Crosshair)
使用两条 QCPItemStraightLine 实现十字光标。
Demo:添加十字光标
cpp
#include "mainwindow.h"
#include "ui_mainwindow.h"
#include <QTimer>

MainWindow::MainWindow(QWidget *parent) :
    QMainWindow(parent),
    ui(new Ui::MainWindow)
{
    ui->setupUi(this);

    // 创建 QCustomPlot 实例
   QCustomPlot *customPlot = new QCustomPlot(this);
   setCentralWidget(customPlot);

   // 添加十字线
   QCPItemStraightLine *vLine = new QCPItemStraightLine(customPlot);
   QCPItemStraightLine *hLine = new QCPItemStraightLine(customPlot);
   vLine->setPen(QPen(Qt::gray, 1, Qt::DashLine));
   hLine->setPen(QPen(Qt::gray, 1, Qt::DashLine));

   connect(customPlot, &QCustomPlot::mouseMove, this, [=](QMouseEvent *event) {
       double x = customPlot->xAxis->pixelToCoord(event->pos().x());
       double y = customPlot->yAxis->pixelToCoord(event->pos().y());

       vLine->point1->setCoords(x, customPlot->yAxis->range().lower);
       vLine->point2->setCoords(x, customPlot->yAxis->range().upper);
       hLine->point1->setCoords(customPlot->xAxis->range().lower, y);
       hLine->point2->setCoords(customPlot->xAxis->range().upper, y);

       customPlot->replot();
   });
}

MainWindow::~MainWindow()
{
    delete ui;
}
3、QCustomPlot 鼠标事件重写的两种方式
在 QCustomPlot 中处理鼠标事件有两种主要方式:继承方式和组合方式。下面详细讲解这两种方法的具体实现。
- 方式一:继承 QCustomPlot(继承方式)
通过创建 QCustomPlot 的子类来直接重写鼠标事件。
cpp
// mycustomplot.h
#ifndef MYCUSTOMPLOT_H
#define MYCUSTOMPLOT_H

#include "qcustomplot/qcustomplot.h"

class MyCustomPlot : public QCustomPlot
{
    Q_OBJECT
public:
    explicit MyCustomPlot(QWidget *parent = nullptr);

protected:
    // 重写鼠标事件
    virtual void mousePressEvent(QMouseEvent *event) override;
    virtual void mouseMoveEvent(QMouseEvent *event) override;
    virtual void mouseReleaseEvent(QMouseEvent *event) override;
    virtual void wheelEvent(QWheelEvent *event) override;

signals:
    // 可以定义一些信号,用于与外部通信
    void mouseMoved(QMouseEvent *event);
};

#endif // MYCUSTOMPLOT_H
cpp
// mycustomplot.cpp
#include "mycustomplot.h"
#include <QMouseEvent>
#include <QWheelEvent>

MyCustomPlot::MyCustomPlot(QWidget *parent) : QCustomPlot(parent)
{
    // 初始化代码...
    this->xAxis->setRange(0,10);
    this->yAxis->setRange(0,10);
}

void MyCustomPlot::mousePressEvent(QMouseEvent *event)
{
    // 先调用基类处理,以确保QCustomPlot的内置交互功能(如拖动、缩放)仍然有效
    QCustomPlot::mousePressEvent(event);

    // 自定义处理
    if (event->button() == Qt::LeftButton) {
        // 左键按下处理
        qDebug() << "Left button pressed at" << event->pos();
    }
}

void MyCustomPlot::mouseMoveEvent(QMouseEvent *event)
{
    // 先调用基类处理
    QCustomPlot::mouseMoveEvent(event);

    // 自定义处理
    qDebug() << "Mouse moved at" << event->pos();
    emit mouseMoved(event); // 发出信号
}

void MyCustomPlot::mouseReleaseEvent(QMouseEvent *event)
{
    // 先调用基类处理
    QCustomPlot::mouseReleaseEvent(event);

    // 自定义处理
    if (event->button() == Qt::LeftButton) {
        qDebug() << "Left button released at" << event->pos();
    }
}

void MyCustomPlot::wheelEvent(QWheelEvent *event)
{
    // 先调用基类处理,以实现滚轮缩放
    QCustomPlot::wheelEvent(event);

    // 自定义处理
    qDebug() << "Wheel event";
}
使用
cpp
#include "mainwindow.h"
#include "ui_mainwindow.h"
#include <QTimer>
#include "mycustomplot.h"

MainWindow::MainWindow(QWidget *parent) :
    QMainWindow(parent),
    ui(new Ui::MainWindow)
{
    ui->setupUi(this);

    // 创建 QCustomPlot 实例
//   QCustomPlot *customPlot = new QCustomPlot(this);
//   setCentralWidget(customPlot);

//   customPlot->installEventFilter()

    MyCustomPlot *demo = new MyCustomPlot(this);
    setCentralWidget(demo);
}

MainWindow::~MainWindow()
{
    delete ui;
}- 方式二:使用 QCustomPlot 作为成员(组合方式)
通过将 QCustomPlot 作为成员变量,并使用事件过滤器来处理鼠标事件。
cpp
// mywidget.h
#ifndef MYWIDGET_H
#define MYWIDGET_H

#include <QWidget>
#include "qcustomplot/qcustomplot.h"

class MyWidget : public QWidget
{
    Q_OBJECT
public:
    explicit MyWidget(QWidget *parent = nullptr);

protected:
    // 重写事件过滤器
    virtual bool eventFilter(QObject *obj, QEvent *event) override;

private:
    QCustomPlot *m_customPlot;
};

#endif // MYWIDGET_H
cpp
// mywidget.cpp
#include "mywidget.h"
#include <QMouseEvent>
#include <QVBoxLayout>

MyWidget::MyWidget(QWidget *parent) : QWidget(parent)
{
    m_customPlot = new QCustomPlot(this);
    QVBoxLayout *layout = new QVBoxLayout(this);
    layout->addWidget(m_customPlot);

    // 安装事件过滤器
    m_customPlot->installEventFilter(this);

    // 初始化m_customPlot...
}

bool MyWidget::eventFilter(QObject *obj, QEvent *event)
{
    if (obj == m_customPlot) {
        QMouseEvent *mouseEvent;
        switch (event->type()) {
        case QEvent::MouseButtonPress:
            mouseEvent = static_cast<QMouseEvent*>(event);
            if (mouseEvent->button() == Qt::LeftButton) {
                qDebug() << "Left button pressed at" << mouseEvent->pos();
                // 处理事件,如果需要阻止进一步处理(例如QCustomPlot的内置处理),则返回true
                // 否则返回false,让事件继续传递
            }
            break;
        case QEvent::MouseMove:
            mouseEvent = static_cast<QMouseEvent*>(event);
            qDebug() << "Mouse moved at" << mouseEvent->pos();
            break;
        case QEvent::MouseButtonRelease:
            mouseEvent = static_cast<QMouseEvent*>(event);
            if (mouseEvent->button() == Qt::LeftButton) {
                qDebug() << "Left button released at" << mouseEvent->pos();
            }
            break;
        case QEvent::Wheel:
            qDebug() << "Wheel event";
            break;
        default:
            break;
        }
    }

    // 将事件传递给基类事件过滤器
    return QWidget::eventFilter(obj, event);
}
如何使用
cpp
#include "mainwindow.h"
#include "ui_mainwindow.h"
#include <QTimer>
#include "mywidget.h"

MainWindow::MainWindow(QWidget *parent) :
    QMainWindow(parent),
    ui(new Ui::MainWindow)
{
    ui->setupUi(this);

    // 创建 QCustomPlot 实例
//   QCustomPlot *customPlot = new QCustomPlot(this);
//   setCentralWidget(customPlot);

//   customPlot->installEventFilter()

    MyWidget *demo = new MyWidget(this);
    setCentralWidget(demo);
}

MainWindow::~MainWindow()
{
    delete ui;
}
三、信号与槽机制
QCustomPlot 提供丰富的信号,便于响应用户操作。
- 1 轴范围变化:rangeChanged()
当用户拖动或缩放导致坐标轴范围改变时触发。
| 交互类型 | 信号 | 说明 |
|---|---|---|
| 轴范围变化 | QCPAxis::rangeChanged(const QCPRange &newRange) | 当坐标轴范围改变时发出。 |
| 轴范围变化(含旧值) | QCPAxis::rangeChanged(const QCPRange &newRange, const QCPRange &oldRange) | 重载信号,同时提供改变前的旧范围。 |
cpp
#include "mainwindow.h"
#include "ui_mainwindow.h"
#include <QTimer>
#include "mywidget.h"

MainWindow::MainWindow(QWidget *parent) :
    QMainWindow(parent),
    ui(new Ui::MainWindow)
{
    ui->setupUi(this);

    // 创建图表
    QCustomPlot *plot = new QCustomPlot;
    setCentralWidget(plot);

    // 添加数据
    QVector<double> x(50), y(50);
    for (int i = 0; i < 50; ++i) {
        x[i] = i / 5.0 - 5;
        y[i] = x[i] * x[i] + qSin(x[i] * 2);
    }
    plot->addGraph();
    plot->graph(0)->setData(x, y);
    plot->graph(0)->setScatterStyle(QCPScatterStyle::ssDisc);

    // 设置可交互部分:允许选择数据点
//    plot->setInteractions(QCP::iSelectPlottables);
    // 启用交互(可选)
    plot->setInteractions(QCP::iRangeDrag | QCP::iRangeZoom);

    // 连接选择信号
    // 关键:监听范围变化
    connect(plot->xAxis, SIGNAL(rangeChanged(QCPRange)), this, SLOT(xAxisChanged(QCPRange)));
    connect(plot->yAxis, SIGNAL(rangeChanged(QCPRange)), this, SLOT(yAxisChanged(QCPRange)));

    // 设置坐标轴范围
    plot->xAxis->setRange(-10, 10);
    plot->yAxis->setRange(-10, 10);

    plot->xAxis->setLabel("X轴");
    plot->yAxis->setLabel("Y轴");
    // 为选择的点设置样式
}

MainWindow::~MainWindow()
{
    delete ui;
}

void MainWindow::xAxisChanged(const QCPRange &range)
{
        // 更新水平滚动条
        qDebug() << "X轴范围变化:" << range.lower << "~" << range.upper;
}

void MainWindow::yAxisChanged(const QCPRange &range)
{
        // 更新水平滚动条
        qDebug() << "y轴范围变化:" << range.lower << "~" << range.upper;
}
cpp
#ifndef MAINWINDOW_H
#define MAINWINDOW_H
#include <QMainWindow>
#include "qcustomplot/qcustomplot.h"
namespace Ui {
class MainWindow;
}

class MainWindow : public QMainWindow
{
    Q_OBJECT

public:
    explicit MainWindow(QWidget *parent = nullptr);
    ~MainWindow();

private slots:
    void xAxisChanged(const QCPRange &range);
    void yAxisChanged(const QCPRange &range);

private:
    Ui::MainWindow *ui;
};

#endif // MAINWINDOW_H- 2、主要交互信号分类
| 信号类型 | 信号名称 | 说明 |
|---|---|---|
| 鼠标事件 | mouseDoubleClick, mousePress, mouseMove, mouseRelease, mouseWheel | 基础鼠标交互 |
| 元素点击 | plottableClick, itemClick, axisClick, legendClick | 特定图表元素点击 |
| 选择变化 | selectionChangedByUser | 用户交互引起的选择变化 |
| 重绘事件 | beforeReplot, afterLayout, afterReplot | 图表重绘过程 |
cpp
#include "mainwindow.h"
#include "ui_mainwindow.h"
#include <QTimer>
#include "mywidget.h"

MainWindow::MainWindow(QWidget *parent) :
    QMainWindow(parent),
    ui(new Ui::MainWindow)
{
    ui->setupUi(this);

    QCustomPlot *customPlot = new QCustomPlot(this);
   setCentralWidget(customPlot);

   // 添加一个 Graph
   customPlot->addGraph();
   QVector<double> x(10), y(10);
   for (int i = 0; i < 10; ++i) {
       x[i] = i;
       y[i] = qSin(i);
   }
   customPlot->graph(0)->setData(x, y);
   customPlot->graph(0)->setLineStyle(QCPGraph::lsLine);

   // 启用选择功能:允许选择整个 plottable(包括数据点)
   customPlot->setInteractions(QCP::iRangeDrag | QCP::iRangeZoom | QCP::iSelectPlottables);
   customPlot->graph(0)->setSelectable(QCP::stWhole); // 或 stWhole

   // 连接信号
   connect(customPlot, &QCustomPlot::selectionChangedByUser,
           this, &MainWindow::onSelectionChangedByUser);

   customPlot->rescaleAxes();
   customPlot->replot();
}

MainWindow::~MainWindow()
{
    delete ui;
}

void MainWindow::onSelectionChangedByUser()
{
    QCustomPlot *plot = qobject_cast<QCustomPlot*>(sender());
   if (!plot) return;

   qDebug() << "Selection changed by user.";

   // 遍历所有 graph,检查是否有被选中的数据点
   for (int i = 0; i < plot->graphCount(); ++i)
   {
       QCPGraph *graph = plot->graph(i);
       if (graph->selected())
       {
           qDebug() << "Graph" << i << "is selected as a whole.";
       }
    }
}