📑 目录
- 快速部署 --- 先跑起来
- [1.1 Docker 环境](#1.1 Docker 环境)
- [1.2 ★ LiveKit 安装(3 步)](#1.2 ★ LiveKit 安装(3 步))
- [1.3 内网测试(无域名)](#1.3 内网测试(无域名))
- [1.4 配套组件](#1.4 配套组件)
- [1.5 AppServer](#1.5 AppServer) --- SDK 角色 + 核心代码
- 验证部署
- [LiveKit 配置详解](#LiveKit 配置详解) --- 每项原理
- 系统架构 --- 理解全貌
- 环境要求
- 端口与网络
- 数据库初始化
- 运维监控
- 故障排查
- 性能优化
- 安全加固
- [常见问题 FAQ](#常见问题 FAQ)
- 附录
一、快速部署
本章直接给你可执行的命令。跑通之后,后面章节逐层讲原理:[LiveKit 配置详解](#LiveKit 配置详解) → 系统架构 → 端口规划 → 故障排查。
1.1 前置准备:Docker 环境
安装 Docker
bash
# CentOS
yum install -y yum-utils
yum-config-manager --add-repo https://download.docker.com/linux/centos/docker-ce.repo
yum install -y docker-ce docker-ce-cli containerd.io docker-compose-plugin
systemctl enable docker --now

# Ubuntu
apt update && apt install -y docker.io docker-compose-v2
systemctl enable docker --now

# 验证
docker --version          # ≥ 24.0
docker compose version    # ≥ v2.20
配置镜像加速(国内拉取更快)
Docker 默认从 docker.io(Docker Hub)拉取镜像,国内直连速度慢。通过 registry-mirrors 让 Docker 先走国内镜像源:
bash
cat > /etc/docker/daemon.json << 'EOF'
{
  "registry-mirrors": [
    "https://docker.1ms.run",
    "https://hub.rat.dev"
  ]
}
EOF

systemctl restart docker
docker.1ms.run和hub.rat.dev是社区提供的 Docker Hub 镜像。你也可以换成其他镜像源,比如https://mirror.ccs.tencentyun.com。
配置后,docker pull livekit/livekit-server:latest 实际拉取链路:
docker pull livekit/livekit-server:latest
    │
    ▼
Docker Daemon 检查 registry-mirrors
    │
    ├─① 先试: docker.1ms.run/livekit/livekit-server:latest
    ├─② 再试: hub.rat.dev/livekit/livekit-server:latest
    └─③ 兜底: docker.io/livekit/livekit-server:latest (Docker Hub 直连)
1.2 ★ LiveKit 安装(2 步搞定 + 验证)
┌──────────────┐    ┌──────────────────┐    ┌──────────────────┐
│ 第 1 步       │──►│ 第 2 步            │──►│ 验证              │
│ 自动生成全部  │    │ docker compose    │    │ curl :7880       │
│ 配置文件+密钥 │    │ up -d 启动        │    │ 看到 {"ok"}      │
└──────────────┘    └──────────────────┘    └──────────────────┘
bash
# ═══════════════════════════════════════════
# 第 1 步:用 livekit/generate 自动生成全部配置文件
# ═══════════════════════════════════════════
# generate 会根据你输入的域名创建同名子目录
# 所以先进入部署的父目录,不要在提前创建子目录
mkdir -p /opt/livekit
cd /opt/livekit
# 拉取配置生成器
docker pull livekit/generate
# 拉取 LiveKit Server 镜像(后续 docker compose pull 也会自动拉取)
docker pull livekit/livekit-server:latest

# 运行生成器(交互式)
docker run --rm -it -v $PWD:/output livekit/generate完整交互过程(上下箭头选择,回车确认):
Generating config for production LiveKit deployment This deployment will utilize docker-compose and Caddy. It'll set up a secure LiveKit installation with built-in TURN/TLS SSL Certificates for HTTPS and TURN/TLS will be generated automatically via LetsEncrypt or ZeroSSL. ? What to deploy: LiveKit Server only ▸ with Egress ← 选这个(需要录音) with Ingress with both Egress and Ingress ? Primary domain name: livekit.your-domain.com ← 你的主域名 ? TURN domain name: livekit-turn.your-domain.com ← 主域名前面加 -turn (TURN 域名也要配 DNS A 记录,指向同一台服务器) ? Which SSL issuers to use?: ▸ Let's Encrypt (no account required) ← 免费,无需注册 ZeroSSL (best compatibility, requires account) ? LiveKit version: custom ▸ latest ← 最新稳定版 v1.13.2 ? Use external Redis: ▸ no - (we'll bundle Redis) ← 自带 Redis,省事 yes ? Generate a startup script?: ▸ Startup Shell Script ← 生成 init_*.sh Cloud Init for Amazon Linux Cloud Init for Ubuntu Skip ? Email: your@email.com ← 证书过期提醒用生成完毕后输出你的专属密钥(记下来,后续 AppServer 配置要用):
Server URL: wss://livekit.your-domain.com
API Key: APIxxxxxxxxxxxx
API Secret: xxxxxxxxxxxxxxxxxxxxxxxxxxxxxxxxxxxxxxxx

Here's a test token generated with your keys: eyJhbGciOi...
同时所有配置文件已自动生成到
livekit.your-domain.com/目录下,密钥已自动填入,无需手动改任何东西。
生成后的目录(由 generate 自动创建,名字 = 你的域名):
/opt/livekit/
└── livekit.your-domain.com/      ← 目录名就是你的域名
    ├── livekit.yaml            # ★ 密钥、端口、TURN、Webhook 全部配好
    ├── docker-compose.yaml     # 4 个服务:caddy + livekit + redis + egress
    ├── caddy.yaml              # 自动配好 TLS 证书 + 域名
    ├── egress.yaml             # 录音配置
    ├── redis.conf              # Redis 持久化
    └── init_*.sh               # 初始化脚本(可选)
这就是为什么目录叫
livekit.your-domain.com------ LiveKit 以域名作为部署单元,一个域名一套配置。你上来做的就是有域名的部署,所以直接用livekit/generate(不需要--local)。
如果是内网测试(无域名,纯 IP):
bash
docker run --rm -v $PWD:/output livekit/generate --local
# 不问你域名,直接生成内网配置
bash
# ═══════════════════════════════════════════
# 第 2 步:拉取镜像 + 启动
# ═══════════════════════════════════════════
# generate 已经在 /opt/livekit 下创建了以域名命名的子目录
cd /opt/livekit/livekit.your-domain.com

# 拉取 docker-compose.yaml 中定义的全部镜像
# 包含: livekit/livekit-server + livekit/caddyl4 + livekit/egress + redis:7-alpine
docker compose pull

# 启动所有服务
docker compose up -d

# 验证
curl -s http://127.0.0.1:7880
# → {"message":"ok"}

# 查看运行状态
docker compose ps
docker compose pull一步拉取全部 4 个镜像,不需要单独docker pull livekit/livekit-server,因为livekit/generate生成的docker-compose.yaml已经定义好了这些镜像,compose pull会一并处理。
至此 LiveKit 已运行。 配置文件、密钥、服务编排全部由 livekit/generate 1 自动完成。接下来 验证部署,然后深入 配置原理。
1.3 内网测试环境(无域名、无 SSL)
用 livekit/generate --local 即可,一行生成内网配置:
bash
mkdir -p /opt/livekit/livekit-intranet && cd /opt/livekit/livekit-intranet
docker run --rm -v $PWD:/output livekit/generate --local
docker compose pull
docker compose up -d

# 连接地址: ws://服务器IP:7880
1.4 看一眼生成的配置文件
livekit/generate 自动产出了 5 个文件,无需手写:
bash
cd /opt/livekit/livekit.your-domain.com
ls -la
# livekit.yaml           ← LiveKit 核心配置(密钥已自动填入)
# docker-compose.yaml    ← 4 个服务编排(caddy + livekit + redis + egress)
# caddy.yaml             ← Caddy L4 代理 + TLS
# egress.yaml            ← 录音服务
# redis.conf             ← Redis 持久化
常用运维命令
bash
cd /opt/livekit/livekit.your-domain.com

docker compose ps                          # 查看状态
docker compose restart livekit             # 重启 LiveKit
docker compose logs -f livekit             # 实时日志
docker compose up -d --force-recreate livekit  # 重建容器
docker compose pull livekit && docker compose up -d livekit  # 升级
docker exec -it $(docker compose ps -q livekit) /bin/sh        # 进容器调试
1.5 AppServer 业务后端
AppServer 是 LiveKit 与客户端之间的业务调度层。要理解它的定位,需要先看清两个 SDK 的角色(参考 LiveKit 官方 SDK 生态 2):
┌──────────────────────────────────────────────────────────────┐
│                        你的系统                               │
│                                                              │
│  Flutter App                     Python AppServer            │
│  ┌─────────────┐                 ┌──────────────┐            │
│  │ Client SDK  │  ←── WS ───→   │ Server SDK   │            │
│  │ (前端媒体)   │   信令+Token    │ (后端调度)    │            │
│  └──────┬──────┘                 └──────┬───────┘            │
│         │                               │                    │
│         │  WebRTC 媒体                   │  API / Webhook     │
│         │                               │                    │
│         └─────── LiveKit Server ────────┘                    │
│                   (SFU 中转)                                  │
└──────────────────────────────────────────────────────────────┘| SDK 类型 | 跑在哪里 | 干什么 | 本项目用的 |
|---|---|---|---|
| Client SDK | Flutter App 内 | WebRTC 采集麦克风、播放音频、房间连接 | livekit_client (Flutter) |
| Server SDK | AppServer 内 | 签发 JWT Token、调 LiveKit API、收 Webhook | livekit-api (Python) |
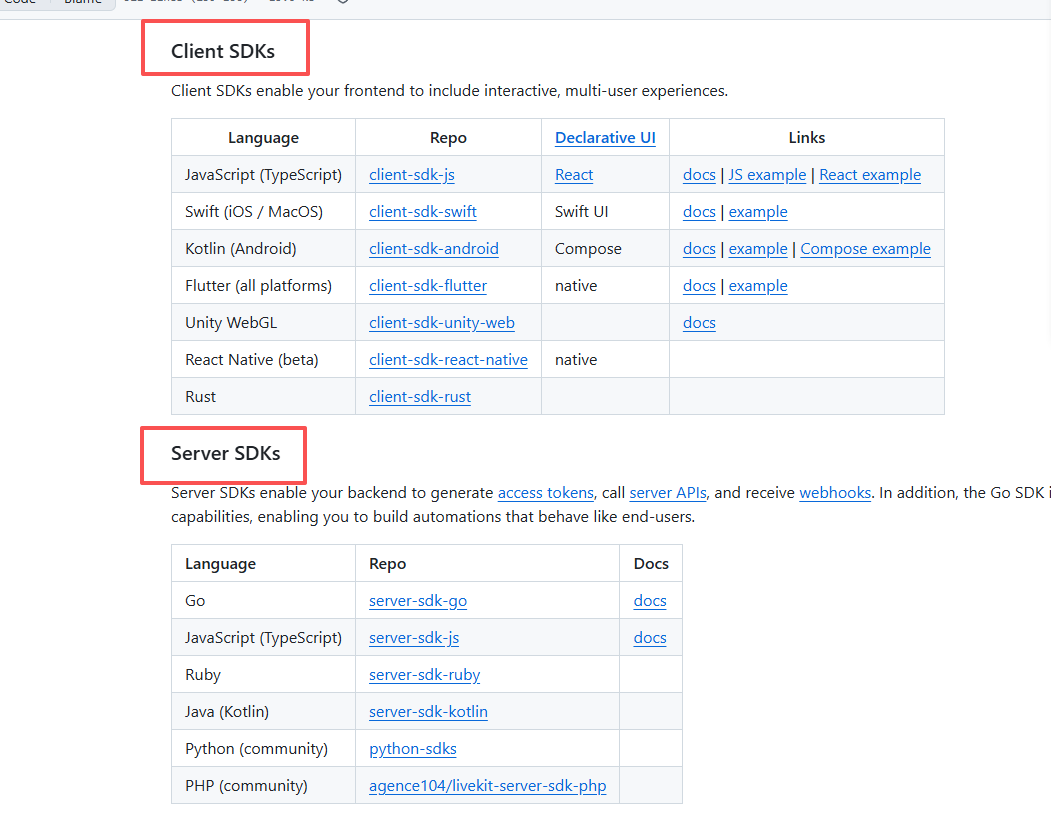
Client SDK 只管媒体 (音视频的采集与播放),Server SDK 只管调度 (谁可以进哪个房间、何时启动录音)。两者通过 LiveKit Server 对接。AppServer 就是 Server SDK 的载体,承担 Token 签发、WebSocket 信令、Webhook 录音触发。
AppServer 核心模块
三个关键模块串联起完整通话流程:
模块一:WebSocket 连接管理 --- 在线状态 + 呼叫信令
python
class ConnectionManager:
    def __init__(self):
        self.active_connections: dict[str, WebSocket] = {}   # 谁在线
        self.names: dict[str, str] = {}                     # 显示名称
        self.pending_calls: dict[str, dict] = {}            # 进行中的呼叫
        self.missed_calls: dict[str, list[dict]] = {}       # 离线未接来电积压
客户端连上 → 记入 active_connections → 广播在线列表 → 发起/接听/挂断全部走 WS。
模块二:Token 签发 --- 客户端凭此进入 LiveKit 房间
python
@app.post("/api/token")
async def generate_token(identity: str, room_name: str):
    token = lk_api.AccessToken(api_key=..., api_secret=...) \
        .with_identity(identity) \
        .with_grants(lk_api.VideoGrants(
            room_join=True, room=room_name,
            can_publish=True, can_subscribe=True,
        )) \
        .to_jwt()
    # 返回给客户端 → 客户端用 token 连接 LiveKit 房间
模块三:Webhook --- 录音自动触发
python
@app.post("/api/webhook/livekit")
async def livekit_webhook(request: Request):
    event = lk_api.WebhookReceiver(...).receive(body, auth_header)
    if event.event == "participant_joined":
        await _auto_start_recording_on_join(room_name)   # 第二人进房 → 自动录音
    elif event.event == "egress_ended":
        ...  # 录音结束 → 更新 recording_files 表
三个模块的协作关系:
WS连接 ──→ ConnectionManager(在线)
  │
  ├─ 呼叫 ──→ pending_calls(信令) ──→ 对方收到 incoming_call
  │
  └─ 接听 ──→ /api/token(模块二) ──→ 双方各拿 Token
                  │
                  └─→ 连 LiveKit 房间 ──→ participant_joined Webhook
                                               │
                                               └─→ 模块三触发 Egress 录音
环境配置
bash
mkdir -p /opt/livekit/AppServer/{logs,recordings}
cd /opt/livekit/AppServer
bash
# .env
cat > .env << 'EOF'
LIVEKIT_URL=http://127.0.0.1:7880
LIVEKIT_API_KEY=你的API_KEY
LIVEKIT_API_SECRET=你的API_SECRET
DATABASE_URL=mysql+asyncmy://user:password@your-db-host:3306/your-db-name
APP_PORT=8080
LOG_LEVEL=INFO
LOG_DIR=/opt/livekit/AppServer/logs
LOG_RETENTION_DAYS=3
EOF
安装与部署
bash
# conda 环境
conda create -n appsrv python=3.11 -y && conda activate appsrv

# 安装依赖(Server SDK: livekit-api 实现 Token + Webhook)
pip install fastapi uvicorn livekit-api pyjwt sqlalchemy asyncmy minio python-dotenv aiohttp protobuf websockets

# 核心文件 4 个
# main.py          主程序:WS 信令 + Token + 录音 + Webhook + 监控
# models.py        数据模型:call_records + recording_files
# config.py        环境变量读取
# system_monitor.py 系统资源监控

# 从本地上传
scp AppServer/*.py root@your-server-ip:/opt/livekit/AppServer/

# 启动
uvicorn main:app --host 0.0.0.0 --port 8080
systemd 守护
bash
cat > /etc/systemd/system/appsrv.service << 'EOF'
[Unit]
Description=LiveKit AppServer
After=network.target docker.service

[Service]
Type=simple
User=root
WorkingDirectory=/opt/livekit/AppServer
ExecStart=/opt/livekit/anaconda3/envs/appsrv/bin/uvicorn main:app --host 0.0.0.0 --port 8080
Restart=always
RestartSec=5

[Install]
WantedBy=multi-user.target
EOF

systemctl daemon-reload
systemctl enable appsrv --now
systemctl status appsrv
二、验证部署是否成功
2.1 启动顺序
MySQL(远程) → Redis → LiveKit → Caddy → AppServer
                                  → Egress
bash
# 从头启动
cd /opt/livekit/livekit.your-domain.com
docker compose up -d redis       # 先 Redis
sleep 3
docker compose up -d livekit     # 再 LiveKit
sleep 2
docker compose up -d caddy egress # 最后代理和录音
systemctl start appsrv            # AppServer
2.2 健康检查
bash
# AppServer
curl http://localhost:8080/api/health
# → {"status":"ok"}

# 详细状态
curl http://localhost:8080/api/health/detail
# → {"status":"ok","db_ok":true,"online_users":0,"active_calls":0,...}

# LiveKit
curl -s http://127.0.0.1:7880
# → {"message":"ok"}

# Caddy → LiveKit
curl -s -k https://localhost/
# → {"message":"ok"}

# Redis
docker exec $(docker ps -q -f name=redis) redis-cli ping
# → PONG

# WebSocket
wscat -c wss://livekit.your-domain.com
# 连接后输入 {"type":"ping"} → 收到 {"type":"pong"}
2.3 端到端测试
浏览器打开 livekit-test-production.html,两标签页加入同一房间测试音频互通。
三、LiveKit 配置详解
上面的部署让你跑起来了。下面解释每个配置项的原理。
3.1 livekit.yaml 完整参考
yaml
# ── 基础 ──
port: 7880                              # API / WebSocket 监听端口
bind_addresses: [""]                    # "" 表示监听所有网卡

# ── WebRTC ──
rtc:
    tcp_port: 7881                      # TCP fallback(UDP 不通时走 TCP)
    port_range_start: 50000             # UDP 媒体端口起始
    port_range_end: 60000               # UDP 媒体端口结束
    use_external_ip: true               # 自动探测公网 IP
    enable_loopback_candidate: false    # 禁用 127.0.0.1

# ── Redis ──
redis:
    address: localhost:6379
    username: ""
    password: ""
    db: 0
    use_tls: false

# ── TURN ──
turn:
    enabled: true
    domain: livekit-turn.your-domain.com
    tls_port: 5349
    udp_port: 3478
    external_tls: true

# ── API 认证 ──
keys:
    YOUR_KEY: YOUR_SECRET

# ── Webhook ──
webhook:
    urls:
        - http://localhost:8080/api/webhook/livekit
    api_key: YOUR_KEY
3.2 每个配置项的作用
| 配置项 | 干什么 | 配错/不配的后果 |
|---|---|---|
port: 7880 |
LiveKit 内部 API + WebSocket 端口 | AppServer 无法签发 Token |
rtc.port_range |
WebRTC 媒体 UDP 端口池 | 听不到声音,没有媒体数据 |
rtc.use_external_ip |
自动获取公网 IP 填 ICE candidate | 客户端 P2P 连接失败,强制走 TURN 中继 |
redis |
房间状态缓存,Egress 任务队列 | 房间无法创建,录音无法启动 |
turn |
NAT 穿透兜底(对称型 NAT 用户) | 部分用户无法通话 |
keys |
API 调用鉴权 | AppServer 签发 Token 时报 401 |
webhook |
房间事件回调(进房/离房/销毁) | 录音无法自动启停 |
3.3 RTC 端口池规模计算
端口范围 50000 , 60000 50000, 60000 50000,60000,总计 10001 10001 10001 个端口。
每个 WebRTC PeerConnection 消耗约 2 ∼ 4 2 \sim 4 2∼4 个端口:
C m a x = 10001 4 ≈ 2500 路并发 C_{max} = \frac{10001}{4} \approx 2500 \text{ 路并发} Cmax=410001≈2500 路并发
实际瓶颈在 CPU 和带宽,单机建议 200~500 路。
3.4 Token TTL 设计
Token 有效期由 AppServer 的 TOKEN_TTL_HOURS 环境变量控制,默认 24 小时:
T v a l i d = T T L h o u r s × 3600 秒 T_{valid} = TTL_{hours} \times 3600 \text{ 秒} Tvalid=TTLhours×3600 秒
python
# AppServer/main.py 中的 Token 签发逻辑
token = lk_api.AccessToken(api_key, api_secret) \
    .with_identity(identity) \
    .with_name(display_name) \
    .with_grants(lk_api.VideoGrants(
        room_join=True, room=room_name,
        can_publish=True, can_subscribe=True,
    )) \
    .with_ttl(datetime.timedelta(hours=TOKEN_TTL_HOURS)) \
    .to_jwt()
3.5 数据流:从呼叫到通话音頻
Flutter A (主叫)     AppServer(:8080)      Flutter B (被叫)      LiveKit(:7880)
    │                     │                     │                    │
    │─① WS call(B)──────►│                     │                    │
    │                     │─② WS incoming─────►│                    │
    │◄─③ WS ringing──────│                     │                    │
    │                     │◄─④ WS accept───────│                    │
    │                     │─⑤ 签发 A+B Token───│                    │
    │◄─⑥ WS accepted─────│─⑥ WS accepted─────►│                    │
    │                     │                     │                    │
    │──⑦ connect(token)─────────────────────────────────────────►│
    │                     │                     │──⑦ connect(token)►│
    │◄═══════════════ ⑧ WebRTC 音频 (SFU 中转) ══════════════════►│
信令走 WebSocket,媒体走 WebRTC。控制面与数据面分离。
四、系统架构
4.1 架构全景图
┌──────────────────────────────────────────────────────────────────┐
│                         Internet                                 │
│  Flutter App ◄──── wss://livekit.your-domain.com:443 ────►        │
└───────────────────────────┬──────────────────────────────────────┘
                            │
                   ┌────────▼────────┐
                   │  Caddy (L4 代理) │  TLS 终结 + SNI 路由
                   │  :443 (TLS)     │
                   │  :5349 (TURNS)  │
                   └──┬──────────┬───┘
                      │          │
         ┌────────────▼──┐  ┌───▼───────────────┐
         │ ★ LiveKit SFU │  │ TURN Server       │
         │ :7880 (API)   │  │ :3478 (STUN/UDP)  │
         │ :7881 (TCP)   │  │ :5349 (TURNS/TLS) │
         │ :50000-60000  │  └───────────────────┘
         │   (UDP 媒体)   │
         └───────┬────────┘
                 │
    ┌────────────┼────────────────┐
    │            │                │
┌───▼──┐  ┌─────▼──────┐  ┌─────▼────────┐
│Redis │  │Egress(录音) │  │AppServer:8080│
│:6379 │  │:内部        │  │FastAPI + WS  │
└──────┘  └──────┬──────┘  └──┬───────────┘
                 │             │
           ┌─────▼─────┐  ┌───▼────┐
           │ 录音文件    │  │ MySQL  │
           │ /recordings│  │ 远程DB  │
           └───────────┘  └────────┘
4.2 组件职责一览
| 组件 | 一句话职责 | 端口 | 挂掉的影响 |
|---|---|---|---|
| LiveKit | WebRTC 媒体 SFU 中转 | 7880/7881/UDP池 | 整个通话不可用 |
| Caddy | TLS 终结 + L4 反向代理 | 443 | 公网客户端无法连接 |
| AppServer | Token 签发 + 信令 + 录音触发 | 8080 | 无法发起/接听通话, 录音停摆 |
| Egress | 服务端录音 MP3 编码 | 内部 | 通话正常但无录音 |
| Redis | 房间状态 + Egress 任务队列 | 6379 | 无法创建房间, 录音失败 |
| TURN | NAT 穿透兜底 | 3478/5349 | 对称型NAT用户无法通话 |
| MySQL | 通话记录持久化 | 3306(远程) | 记录不落库, 无法查历史 |
4.3 Webhook 录音链路
房间参与者变动 → LiveKit POST webhook → AppServer
    → handle_participant_joined()
    → 判断 ≥2 个真实参与者
    → LiveKit API: start_egress(room_name)
    → Redis 通知 Egress
    → Egress 入房 → 接收音频 → MP3 编码 → 写入磁盘
停止录音四重保障(按优先级):
handle_hangup--- 挂断信令 → 主动停(最可靠)participant_left--- 房间无真实用户 → 自动停room_finished--- 房间销毁 → 清理 RecordingFile- 客户端 HTTP → REST API 手动停(兜底)
五、环境要求
| 资源 | 最低 | 推荐 | 备注 |
|---|---|---|---|
| CPU | 4 核 | 8 核+ | Egress 1 核/路录音 |
| 内存 | 8 GB | 16 GB+ | AppServer ~500MB, Redis ~100MB |
| 磁盘 | 50 GB | 200 GB+ | 录音 1MB/分钟 |
| 带宽 | 10 Mbps | 50 Mbps+ | ~100Kbps/路 |
| Docker | ≥ 24.0 | 最新 | --- |
| Python | ≥ 3.10 | 3.11 | AppServer |
Python 依赖:
txt
fastapi>=0.115.0        # Web 框架
uvicorn>=0.32.0         # ASGI 服务器
livekit-api>=1.0.0      # LiveKit 服务端 SDK
pyjwt>=2.9.0            # JWT
sqlalchemy>=2.0.0       # ORM
asyncmy>=0.2.0          # MySQL 异步驱动
minio>=7.2.0            # 对象存储
python-dotenv>=1.0.0    # .env
aiohttp>=3.10.0         # 异步 HTTP
protobuf>=5.0.0         # LiveKit Protocol
六、端口规划与防火墙
6.1 端口映射
| 端口 | 协议 | 用途 | 公网 |
|---|---|---|---|
| 443 | TCP | Caddy WSS/HTTPS (TLS) | ✅ |
| 443 | UDP | TURN/TLS 备选 | ✅ |
| 5349 | TCP/UDP | TURN TLS | ✅ |
| 3478 | UDP | TURN STUN | ✅ |
| 8080 | TCP | AppServer REST + WS | ✅ |
| 50000-60000 | UDP | WebRTC 媒体端口池 | ✅ |
| 7880 | TCP | LiveKit 内部 API | ❌ |
| 7881 | TCP | LiveKit RTC TCP | ❌ |
| 6379 | TCP | Redis | ❌ |
| 9000/9001 | TCP | MinIO | ❌ |
6.2 443 端口被占用,怎么换?
如果 443 端口已被其他程序(IIS、nginx、Skype 等)占用,换成 8443:
bash
cd ~/LMZPro/LiveKit/livekit.your-domain.com

# 一行命令换端口
sed -i 's/listen: \[":443"\]/listen: [":8443"]/' caddy.yaml

# 重启 Caddy
docker compose restart caddy
改后 Caddy 监听 :8443,需要同步更新三处:
| 位置 | 改什么 |
|---|---|
caddy.yaml |
listen: [":8443"] ✅ 上面 sed 已改 |
| 阿里云安全组 | 放行 TCP 8443 |
AppServer .env |
LIVEKIT_URL=https://livekit.your-domain.com:8443 |
| 客户端 | ws_url 换成 wss://livekit.your-domain.com:8443 |
6.3 防火墙配置
bash
# 公网端口
iptables -A INPUT -i eth0 -p tcp --dport 8080 -j ACCEPT
iptables -A INPUT -i eth0 -p tcp --dport 5349 -j ACCEPT
iptables -A INPUT -i eth0 -p udp --dport 3478 -j ACCEPT
iptables -A INPUT -i eth0 -p udp --dport 50000:60000 -j ACCEPT

# 内网端口拒绝外网访问
iptables -A INPUT -i eth0 -p tcp --dport 7880 -j DROP
iptables -A INPUT -i eth0 -p tcp --dport 6379 -j DROP
七、数据库初始化
7.1 MySQL 连接
| 项目 | 值 |
|---|---|
| 主机 | your-db-host:3306 |
| 数据库 | your-db-name |
| 用户 | your-db-name |
| 密码 | your-db-password |
7.2 建表 SQL
sql
CREATE TABLE IF NOT EXISTS call_records (
    id INT AUTO_INCREMENT PRIMARY KEY,
    room_name VARCHAR(255) NOT NULL COMMENT 'LiveKit房间名',
    caller_identity VARCHAR(255) NOT NULL COMMENT '主叫ID',
    caller_name VARCHAR(255) COMMENT '主叫名称',
    callee_identity VARCHAR(255) COMMENT '被叫ID',
    callee_name VARCHAR(255) COMMENT '被叫名称',
    status VARCHAR(32) NOT NULL DEFAULT 'pending'
        COMMENT 'pending/active/ended/failed',
    started_at DATETIME COMMENT '开始时间',
    ended_at DATETIME COMMENT '结束时间',
    duration_seconds INT COMMENT '通话时长(秒)',
    INDEX idx_room (room_name),
    INDEX idx_caller (caller_identity),
    INDEX idx_status (status)
) ENGINE=InnoDB DEFAULT CHARSET=utf8mb4;

CREATE TABLE IF NOT EXISTS recording_files (
    id INT AUTO_INCREMENT PRIMARY KEY,
    call_record_id INT NOT NULL COMMENT '关联call_records.id',
    egress_id VARCHAR(255) NOT NULL UNIQUE COMMENT 'Egress任务ID',
    file_path TEXT COMMENT '文件路径',
    file_size_bytes INT COMMENT '文件大小',
    status VARCHAR(32) NOT NULL DEFAULT 'started'
        COMMENT 'started/ended/failed',
    started_at DATETIME,
    ended_at DATETIME,
    created_at TIMESTAMP DEFAULT CURRENT_TIMESTAMP,
    INDEX idx_call_record (call_record_id),
    FOREIGN KEY (call_record_id) REFERENCES call_records(id) ON DELETE CASCADE
) ENGINE=InnoDB DEFAULT CHARSET=utf8mb4;
7.3 ER 图
┌──────────────────┐          ┌──────────────────┐
│   call_records   │          │ recording_files  │
├──────────────────┤          ├──────────────────┤
│ id (PK)          │◄────────┤ call_record_id(FK)│
│ room_name        │   1:N    │ id (PK)          │
│ caller_identity  │          │ egress_id (UK)   │
│ callee_identity  │          │ file_path        │
│ status           │          │ status           │
│ started_at       │          │ started_at       │
│ ended_at         │          │ ended_at         │
│ duration_seconds │          └──────────────────┘
└──────────────────┘
八、运维监控体系
8.1 核心指标
bash
curl http://localhost:8080/api/health/detail| 指标 | 告警阈值 | 动作 |
|---|---|---|
concurrent_recordings / limit |
> 80% | Egress CPU 即将饱和 |
recordings_last_1h_failed |
> 0 | 录音链路故障 |
active_calls / limit |
> 80% | 即将拒绝新呼叫 |
db_ok |
false | 数据库不可用 |
online_users / limit |
> 90% | 即将拒绝新连接 |
8.2 系统资源监控
AppServer 内置 _system_monitor_task,每秒采集:
- CPU > 85% 或 MEM > 90% 或 DISK > 90% → 拒绝新呼叫 ,返回
call_failed: "服务器繁忙" - 监控数据异常时降级放行,优先保证可用性
可通过环境变量调阈值:
| 参数 | 默认 |
|---|---|
MONITOR_CPU_THRESHOLD |
85% |
MONITOR_MEM_THRESHOLD |
90% |
MONITOR_DISK_THRESHOLD |
90% |
8.3 日志管理
bash
# AppServer(按天轮转,保留 3 天)
tail -f /opt/livekit/AppServer/logs/appserver.log

# systemd
journalctl -u appsrv -f

# 关键词过滤
grep "ERROR\|WARNING" /opt/livekit/AppServer/logs/appserver.log
grep "上线\|下线\|呼叫\|挂断\|录音" /opt/livekit/AppServer/logs/appserver.log

# Docker 日志
docker compose -f /opt/livekit/livekit.your-domain.com/docker-compose.yaml logs livekit --tail 50
docker compose -f /opt/livekit/livekit.your-domain.com/docker-compose.yaml logs egress --tail 30
8.4 资源消耗参考
| 组件 | 消耗 | 瓶颈 | 单路参考 |
|---|---|---|---|
| LiveKit | 网络带宽 | 带宽 | ~100 Kbps |
| Egress | CPU | CPU 核数 | 1 核/路 |
| AppServer | 内存 | 内存 | ~50 KB/连接 |
| Redis | 内存 | 内存 | < 100 MB |
| Caddy | CPU (TLS) | CPU | 极低 |
Egress 是唯一瓶颈。并发录音数超过 CPU 核数则新录音启动失败。
九、故障排查指南
遇到问题先查下表,然后按 [9.2 专项排查](#9.2 专项排查) 逐项定位。涉及配置修改后参考 三、配置详解 确认参数正确性。
9.1 速查表
| 现象 | 原因 | 排查 | 解决 |
|---|---|---|---|
| Flutter 连不上 | 端口不可达/安全组 | curl IP:8090/api/health |
放行安全组 |
| WebSocket 404 | uvicorn 缺 websockets 库 | `journalctl -u appsrv | grep WebSocket` |
| 录音无文件 | 目录挂载/权限/路径 | docker exec egress find /recordings |
补挂载卷 + chmod 777 |
| 录音未自动启动 | Webhook / LIVEKIT_URL | grep "录音自动启动" logs/ |
确认 .env URL 正确 |
| Egress 反复失败 | ws_url 指向错误地址 | grep ws_url egress.yaml |
改为 ws://localhost:7880 |
| Egress x509 证书错误 | Caddy 移除后仍连 wss | docker logs egress --tail 30 |
ws_url 用 ws 不用 wss |
| CPU 过载拒呼 | 并发录音过多 | curl /api/health/detail |
降低并发/扩容 |
| 听不到声音 | UDP 端口被封 | nc -u IP 50000-60000 |
查防火墙 |
| 通话记录不落库 | MySQL 不可达 | curl /api/health/detail |
查 DB 连接 |
9.2 录音故障专项排查(迁移常见踩坑)
以下场景特指 Caddy 移除后 LiveKit 直连 时的录音问题:
问题一:录音启动成功但文件不生成
┌─ 排查链路 ───────────────────────────────────────┐
│ 1. docker exec livekit-your-domain-egress-1 find /recordings -name "*.mp3" │
│    → 有文件 → 挂载路径不对,文件在容器内但没映射到宿主机                    │
│    → 无文件 → 进第 2 步                                                   │
│ 2. docker logs livekit-your-domain-egress-1 --tail 30                     │
│    → "x509: certificate expired" → ws_url 用了 wss,需改成 ws              │
│    → "could not dial signal connection" → egress.yaml 指向了外网域名       │
│ 3. grep recordings docker-compose.yaml                                     │
│    → 无结果 → volumes 挂载缺失,需补:                                       │
│      volumes:                                                               │
│        - ./egress.yaml:/etc/egress.yaml                                     │
│        - /opt/livekit/AppServer/recordings:/recordings        │
└──────────────────────────────────────────────────┘
问题二:Egress ws_url 导致证书/连接失败
bash
# 原因:egress.yaml 中 ws_url 指向 wss://域名(走 Caddy),
# Caddy 移除后证书失效,Egress 无法连上 LiveKit

# 修复:改为内网直连
sed -i 's|ws_url:.*|ws_url: ws://localhost:7880|' egress.yaml
docker compose restart egress
问题三:AppServer 连不上 LiveKit 导致录音 API 500
bash
# 原因:.env 中 LIVEKIT_URL 仍指向 https://域名:8443(走 Caddy)
# Caddy 移除后此地址不可达

# 修复:改为内网直连
# .env 中: LIVEKIT_URL=http://127.0.0.1:7880
systemctl restart appsrv
修复后验证:
bash
# 1. 确认 Egress 无报错
docker logs livekit-your-domain-egress-1 --tail 10 | grep -E "ERROR|error|failed"

# 2. 确认录音目录可写
ls -la /opt/livekit/AppServer/recordings/

# 3. 打一通测试电话后确认文件生成
find /opt/livekit/AppServer/recordings/ -name "*.mp3"
WebSocket 频繁断开:
journalctl -u appsrv --since "5 min ago" | grep "断开"
  → 客户端主动断 or 网络超时
  → 同一秒多次重连 → 客户端需加退避
十、性能优化建议
10.1 LiveKit
yaml
# 生产调优
rtc:
    use_external_ip: true
    enable_loopback_candidate: false
    # 纯语音场景可关闭 TCP fallback 以减少连接开销
    # tcp_port: 7881
10.2 AppServer
bash
uvicorn main:app --host 0.0.0.0 --port 8080 \
    --limit-concurrency 1000 \
    --backlog 2048 \
    --timeout-keep-alive 65
WebSocket 状态是内存维护的,不要用
--workers N多进程,否则跨 worker 在线状态不一致。
10.3 容量规划
若 CPU 为 8 核:
R m a x = min ( 8 − 2 , 10 ) = 6 路并发录音 R_{max} = \min(8 - 2, \ 10) = 6 \text{ 路并发录音} Rmax=min(8−2, 10)=6 路并发录音
留 2 核给系统。Egress 1 路 = 1 核。
十一、安全加固清单
P0 必做:
- 替换
livekit.yaml中默认 Key/Secret →docker run --rm livekit/livekit-server generate-keys - 修改数据库密码
- 防火墙仅开放必需端口(443/5349/3478/8080/50000-60000)
- SSH 密钥认证 + 改端口
P1 建议:
- Webhook 签名验证上线(当前 dev 模式跳过)
- Redis 加
requirepass - 日志脱敏(不打印完整 Token/Secret)
十二、常见问题 FAQ
Q1: 443 端口被占用怎么换?
sed -i 's/listen: \[":443"\]/listen: [":8443"]/' caddy.yaml && docker compose restart caddy。然后客户端 URL 加端口号 wss://域名:8443。
Q2: 不用域名直接用 IP 行吗?
行。用内网模式 docker compose -f docker-compose-intranet.yaml up -d,连接 ws://IP:7880。但 WebRTC 需要 TLS 才能用麦克风,生产还是要域名。
Q3: Egress 录音为什么不启动?
三个原因:① 只有 1 人在房间 ② Redis 不通 ③ 磁盘满。
Q4: 怎么看当前有多少通话?
curl http://localhost:8080/api/health/detail | jq '.active_calls'
Q5: 录音文件在哪?
/opt/livekit/AppServer/recordings/{room_name}/{主叫}_{被叫}_{时间}.mp3
Q6: AppServer 重启在线用户会丢吗?
会。当前 ConnectionManager 是内存状态。生产建议加 Redis 持久化或客户端自动重连。
Q7: 怎么升级 LiveKit?
docker compose pull livekit && docker compose up -d livekit
Q8: 支持多少并发?
8核:6路录音 + ~200路纯通话。16核:14路录音 + ~500路纯通话。瓶颈在 Egress CPU。
附录
| 文件 | 服务器路径 | 用途 |
|---|---|---|
main.py |
/opt/livekit/AppServer/ |
AppServer 主程序 |
models.py |
/opt/livekit/AppServer/ |
数据模型 |
config.py |
/opt/livekit/AppServer/ |
配置读取 |
.env |
/opt/livekit/AppServer/ |
密钥/数据库 |
docker-compose.yaml |
/opt/livekit/livekit.your-domain.com/ |
Docker 编排 |
livekit.yaml |
/opt/livekit/livekit.your-domain.com/ |
★ LiveKit 配置 |
caddy.yaml |
/opt/livekit/livekit.your-domain.com/ |
Caddy 代理 |
egress.yaml |
/opt/livekit/livekit.your-domain.com/ |
Egress 录音 |
redis.conf |
/opt/livekit/livekit.your-domain.com/ |
Redis 配置 |
B. 一键部署脚本
bash
#!/bin/bash
# deploy.sh --- LiveKit 一键部署
set -e
echo "=== LiveKit 部署开始 ==="

mkdir -p /opt/livekit/{AppServer/{logs,recordings},livekit.your-domain.com}
cd /opt/livekit

# 拉取配置生成器并生成配置
docker pull livekit/generate
docker run --rm -v $PWD:/output livekit/generate --local

# 启动所有服务
cd livekit.your-domain.com
docker compose pull
docker compose up -d

# 健康检查
sleep 3
curl -s http://127.0.0.1:7880 && echo " LiveKit ✅"
docker compose ps
echo "=== 部署完成 ==="
C. 参考资料
| 编号 | 文献 | 链接 | 说明 |
|---|---|---|---|
| 1 | LiveKit 官方文档 | https://docs.livekit.io/ | 快速开始、配置参考、API 文档 |
| 2 | LiveKit Server GitHub | https://github.com/livekit/livekit | 服务端源码、SDK 生态说明 |
| 3 | LiveKit 部署指南 | https://docs.livekit.io/transport/self-hosting/ | 自托管部署完整步骤 |
| 4 | LiveKit CLI 工具 | https://github.com/livekit/livekit-cli | 命令行 Token 签发与测试 |
| 5 | Caddy Layer4 代理 | https://caddyserver.com/docs/modules/layer4 | L4 层 TLS 终结配置 |
| 6 | WebRTC W3C 标准 | https://www.w3.org/TR/webrtc/ | 浏览器实时通信规范 |
| 7 | TURN/STUN 协议 | https://datatracker.ietf.org/doc/html/rfc8656 | NAT 穿透技术标准 |
| 8 | Let's Encrypt 证书 | https://letsencrypt.org/docs/ | 免费 TLS 证书自动签发 |
| 9 | Docker 官方文档 | https://docs.docker.com/ | 容器运行时与 Compose |
| 10 | FastAPI WebSocket | https://fastapi.tiangolo.com/advanced/websockets/ | Python 异步 WebSocket |
| 11 | LiveKit Client SDK Flutter | https://github.com/livekit/client-sdk-flutter | Flutter 端媒体 SDK |
| 12 | LiveKit Server SDK Python | https://github.com/livekit/python-sdks | Python 后端 Token/API SDK |
互动 & 推荐阅读
投票:你觉得这篇部署文档对你有帮助吗?
- 👍 非常有用,照着部署一次成功
- ✅ 有用,解决了一些卡点
- 📖 作为参考资料查阅还不错
- 💬 有疑问,评论区交流
推荐阅读(内部链接)
原创声明
本文为作者原创,基于 LiveKit v1.13.2 实际部署验证。文中所有代码均可直接执行,配置已脱敏处理。适用环境:Linux (CentOS 7+/Ubuntu 20.04+),Python 3.11+,Docker 24.0+。
📅 适用版本 : LiveKit Server v1.13.2 ~ latest | 最后验证: 2026-07-01